
Behind the Scenes: Dynamic Magic Dynamic Machines
Introduction
Hi, my name is Robert Kouts, I’m a 16-year-old from Australia, a self-taught 3D artist and programmer.
In this article, I will explain my process for creating this animation which won 1st place international in the Dynamic Machines Challenge.
First, I want to introduce you to Clinton Jones / Pwnisher. Clint is an awesome VFX artist who left his dream job at Corridor Digital to pursue his passion and help other people pursue their passions in 3D. He has hosted the biggest 3D competitions on the internet rocking thousands of participants. He also has an awesome Discord server with thousands of members where you can participate in weekly competitions and chat with many helpful people.
I started using Blender eight years ago but up until early this year I never really made anything substantial with 3D, partially because over that 8 years I mainly spent my time developing games.
On May 14th 2020, the Unreal Engine 5 reveal trailer was released. At that point, I was still using the Unity Engine and this blew me away, I had to switch to Unreal.
At the start of May this year, Epic Games came out with an Unreal Engine animation competition that I was very excited about. One day later I saw a video on YouTube from Clint announcing the Alternate Realities competition. They both ended on the same day so I had to pick one. After a day of thought, I decided to do Clint’s competition, but still use Unreal Engine. I am so glad I made this decision because even though it was a massive challenge, I loved the process so much that I quit game development and started fully pursuing 3D. The Alternate Realities challenge literally changed my life.
After that, I decided to move back to Blender, where it all started. Clint, the guy who hosted the first competition also hosts weekly competitions. I hadn’t participated in any since the last competition because I wanted a break, but then a challenge came out with the prompt “Deep”.
In 3 days I made this animation with Blender:
I was one of the 5 winners. It felt so awesome and gave me a massive confidence boost for what was to come…
Dynamic Machines
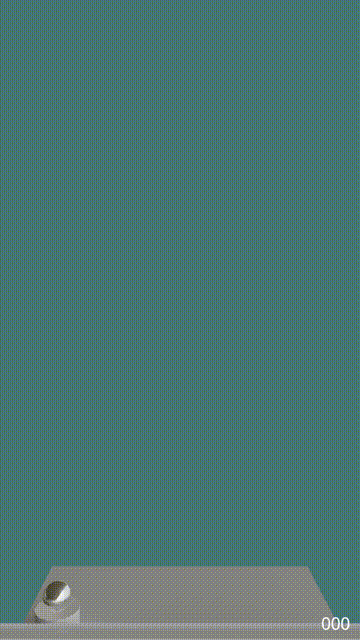
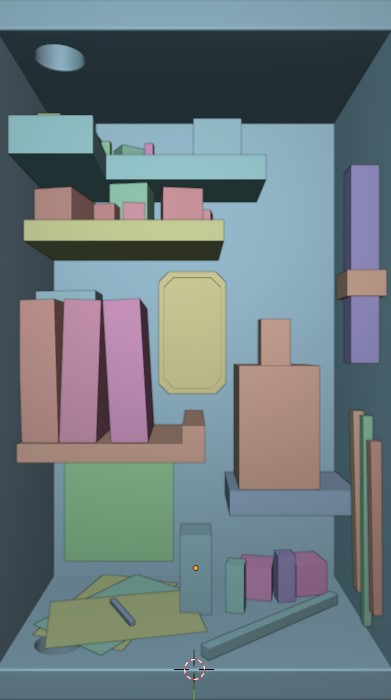
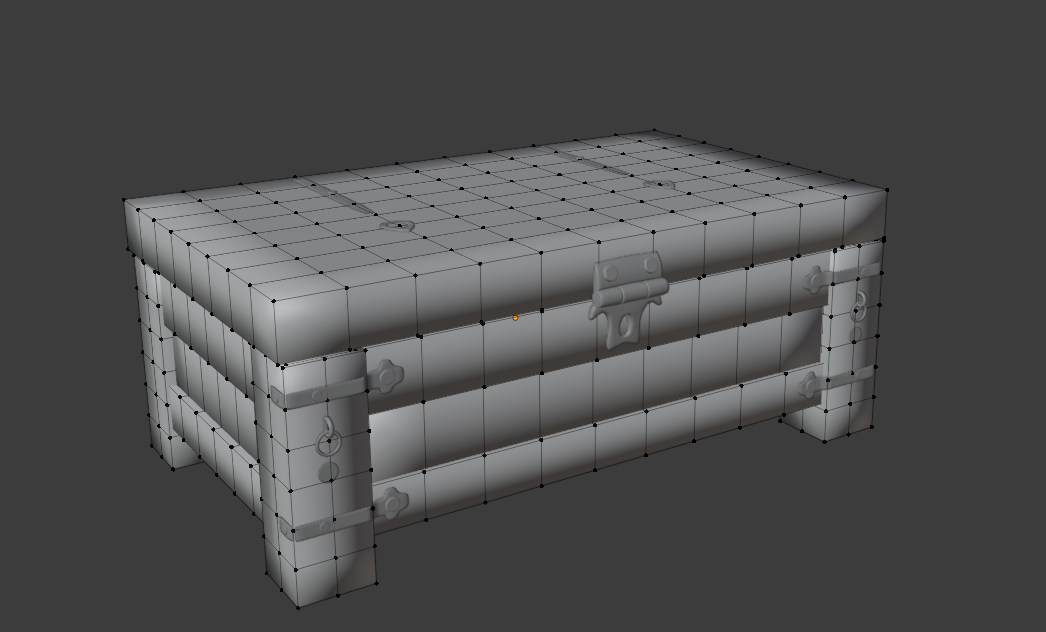
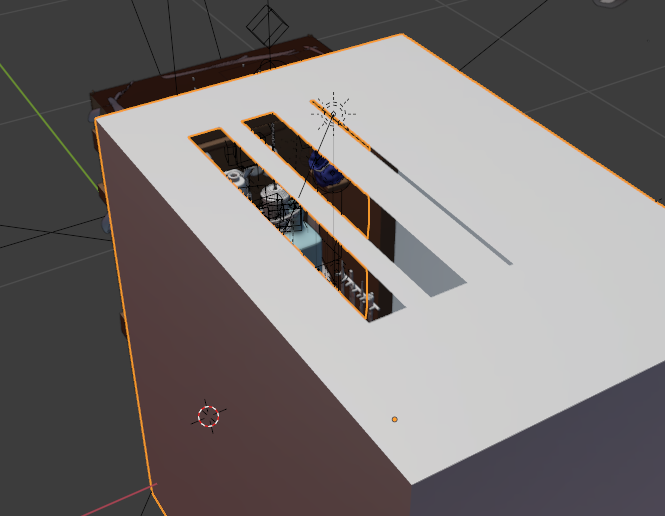
When Clint announced the winners for that weekly competition, he also announced his new big competition, Dynamic Machines. The rules were this: using the given template, create a contraption that guides the chrome ball using physics (you could hand animate some parts but it must look realistic) from the first hole to the second. The ball must enter the box on frame 113 and exit between frames 335 and 340. The ball must be affected by gravity. You can’t edit the box’s geometry but you can change materials and do whatever you want with the inside, textures, objects, lighting, etc. You also can’t edit any properties of the camera.
The template:
The idea
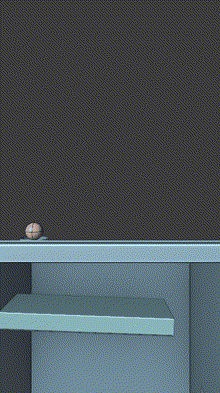
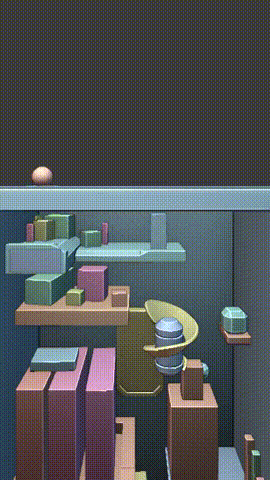
So with all of that in mind, I had to come up with an idea. This took many iterations and was a lot more work than anticipated. My method was to finalize the movement of the ball and contraption before doing any detailing or aesthetic work. So, I went straight into Blender and started prototyping the contraption. After a few hours, I prototyped a complete layout and came up with the idea of using books in some way:
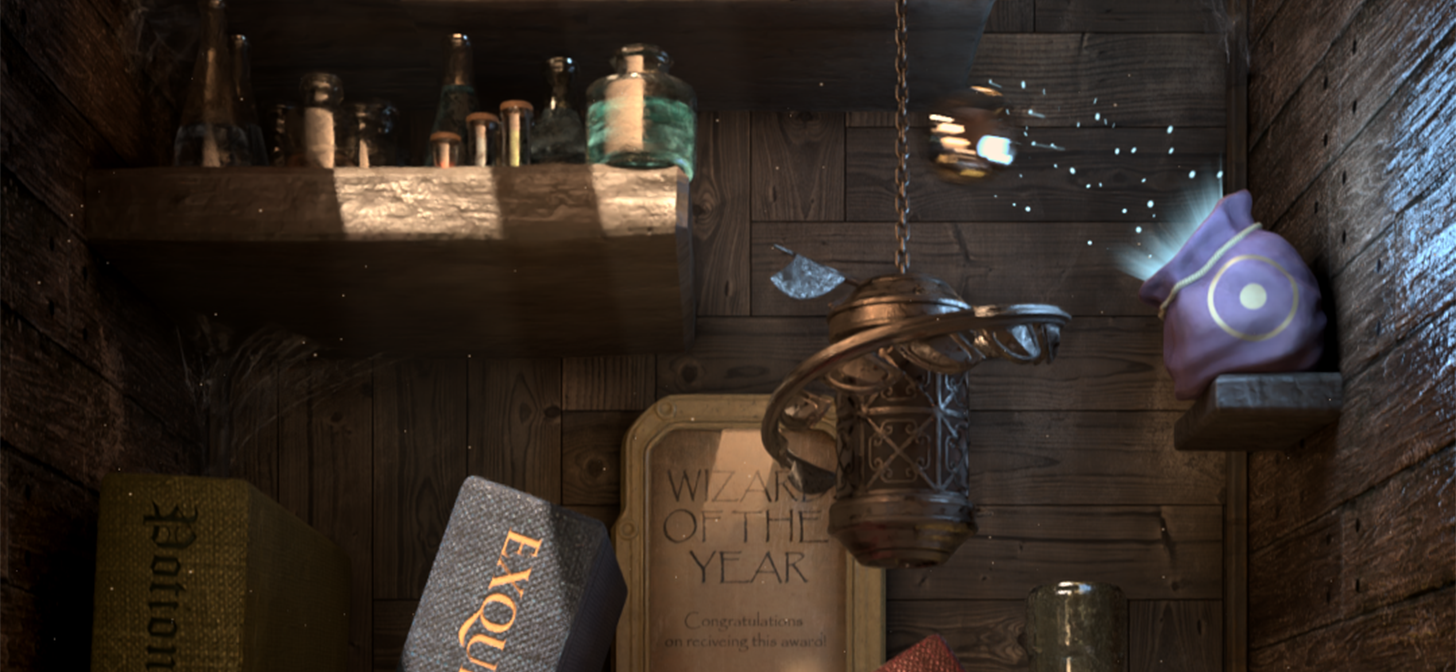
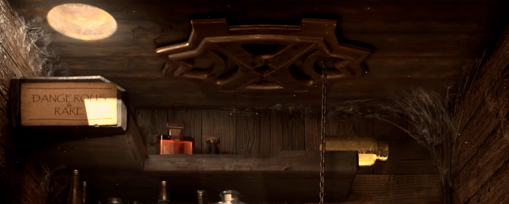
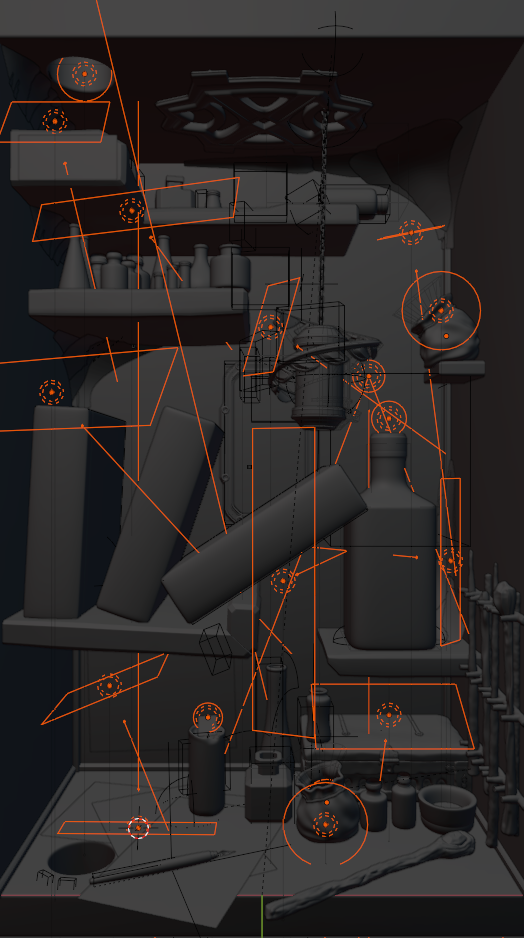
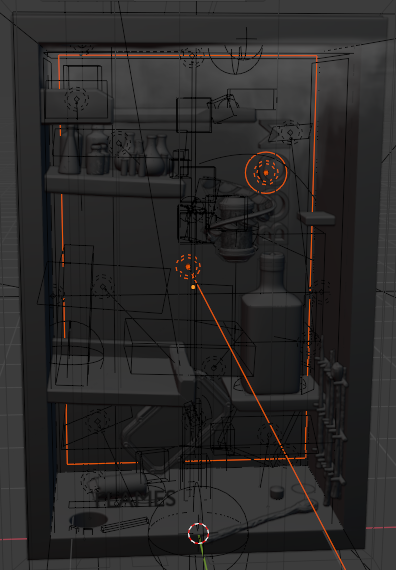
From the little book experiment and some deep thought, I came up with a vision of a dusty wizard’s cupboard, full of potions and trinkets. This rendition, in my mind, was far above what I actually achieved in the end, but it pushed me to get as close as I could. With that idea, I made the following blockout. This was mostly aesthetic as I hadn’t figured out the route of the ball yet, although I had a few ideas like the potion exploding and the candle lighting the papers on fire.
This was something, but being such a complicated task juggling the physics, the art direction, and the timing of the ball entering and exiting at the correct frames, I knew that I had to take a more structured approach.
If I wanted to win, I had to make an incredibly unique and high-quality render—it couldn’t be like all of the others. So I asked myself, “What will make my render unique?”, then I wrote down a list of everything that would make it unique:
- Depth in the scene and in the movement of the ball
- Anticipation
- Interaction with the environment
- The ball will leave a mark on the environment.
- The challenge is called Dynamic Machines, my animation will be dynamic.
- The movement of the ball will be a mini adventure with suspense, payoff, and excitement.
- The environment will tell a story about the world in which it exists.
- How the environment reacts to the ball will also tell a story about the world.
- My environment will have excellent composition.
- The environment is the contraption.
- The viewer should know the answer to a few of these questions on the first frame.
- When is this?
- Where is this?
- What is this?
I also wrote down a list of magical items or tools that I could use to create the contraption:
- Floating things, dropping them
- Disappearing things / disintegrating
- Invisibility
- Wind
- Portals
- Endless bag
- Making things bigger, smaller
- Duplication
- Antigravity
- Potions stuff
- exploding
- melting potions
- setting things on fire
- Non-magic stuff
- spiral
- catapult
- bounce off things
After a lot of trial and error this is what I came up with:
It changed slightly over the course of the competition, but this was the final blockout.
The aesthetics
With the blockout and physics figured out, it was time to make everything look like an actual wizard’s cupboard and not just some colorful blocks.
Keep in mind that the quality of the entire scene was constantly improved and iterated on over the course of the competition, but for the sake of simplicity, I’m going to break down each element at a time instead of explaining everything in the order it was performed.
Resources
All of the textures used in this render were completely free. I sourced pretty much all of the textures from 3dassets.one, which allows you to quickly and easily search many royalty-free texture websites at once. I also used this free surface imperfections pack—it is incredibly useful and nearly every object in the scene uses one or a combination of textures from this pack.
The only models I didn’t make were the candle (model and flame shader) and the pen, both are from BlenderKit (a free 3D model and texture library); everything else was created by me during the competition.
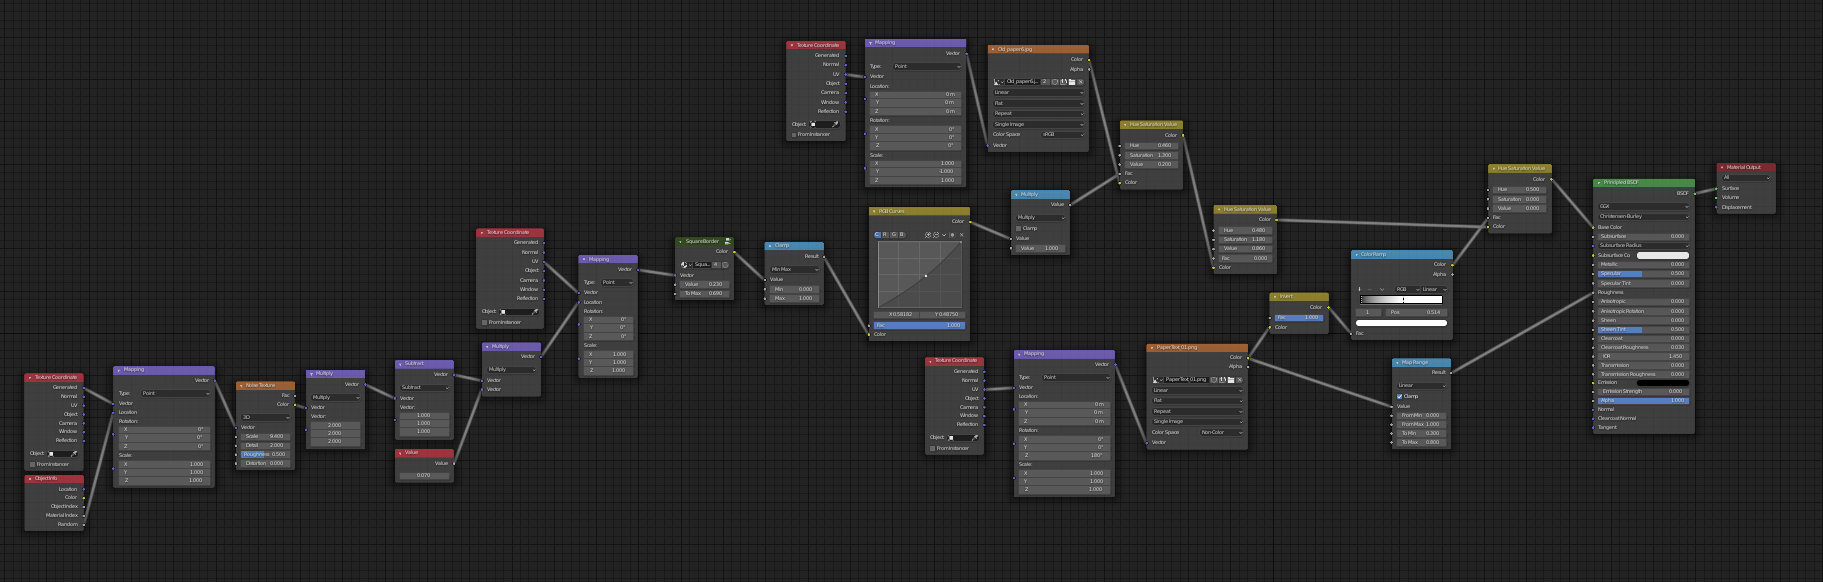
The potions
Modelling the potions was quite simple. The non-cylindrical potions are made using subdivision modelling. For all of the cylindrical potions, I needed lots of variations so I used a more procedural approach.
The following series of modifiers take a simple 2D line and turn it into the final potion vessel.
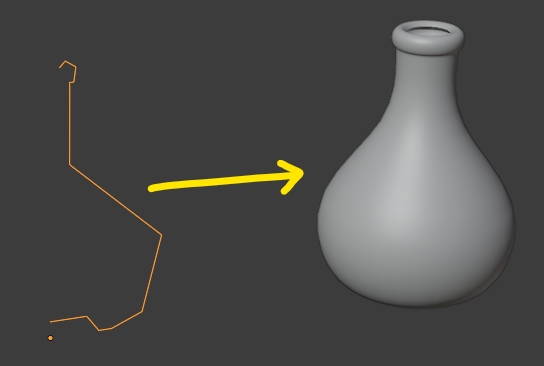
First, we use a subdivision modifier to smooth out the line.

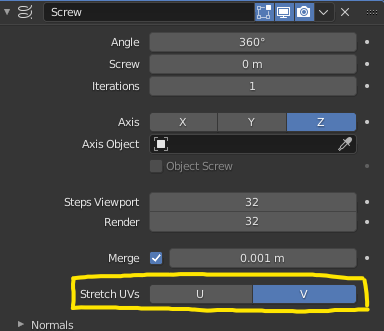
Then a screw modifier to spin that line around and create a potion from it. Make sure the origin is in the correct place, as that’s the pivot the screw modifier uses.
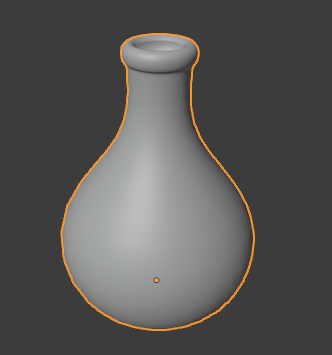
By default, the screw modifier doesn’t produce the correct UV coordinates. The trick is to enable UV stretching on one of the axes. This step allows us to keep the object procedural while having nice mapping.
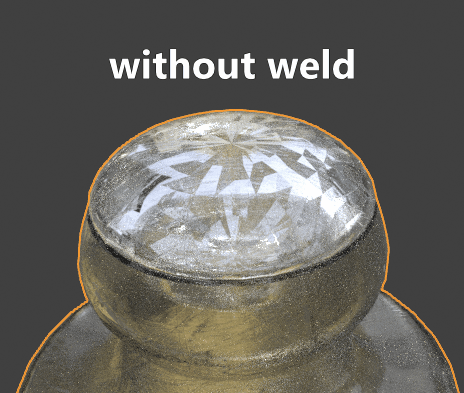
Finally, I used a solidify modifier to add some thickness.
This was causing some issues with some of the potions, so I also added a weld modifier to remove any double vertices.
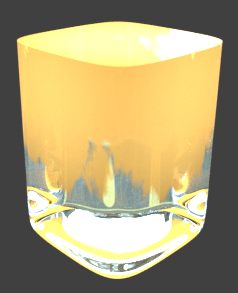
I used the same glass and liquid material for pretty much all of the potions.
The Glass material mixes two imperfection maps for the roughness and bump, thereby making the glass look very scratched and worn.
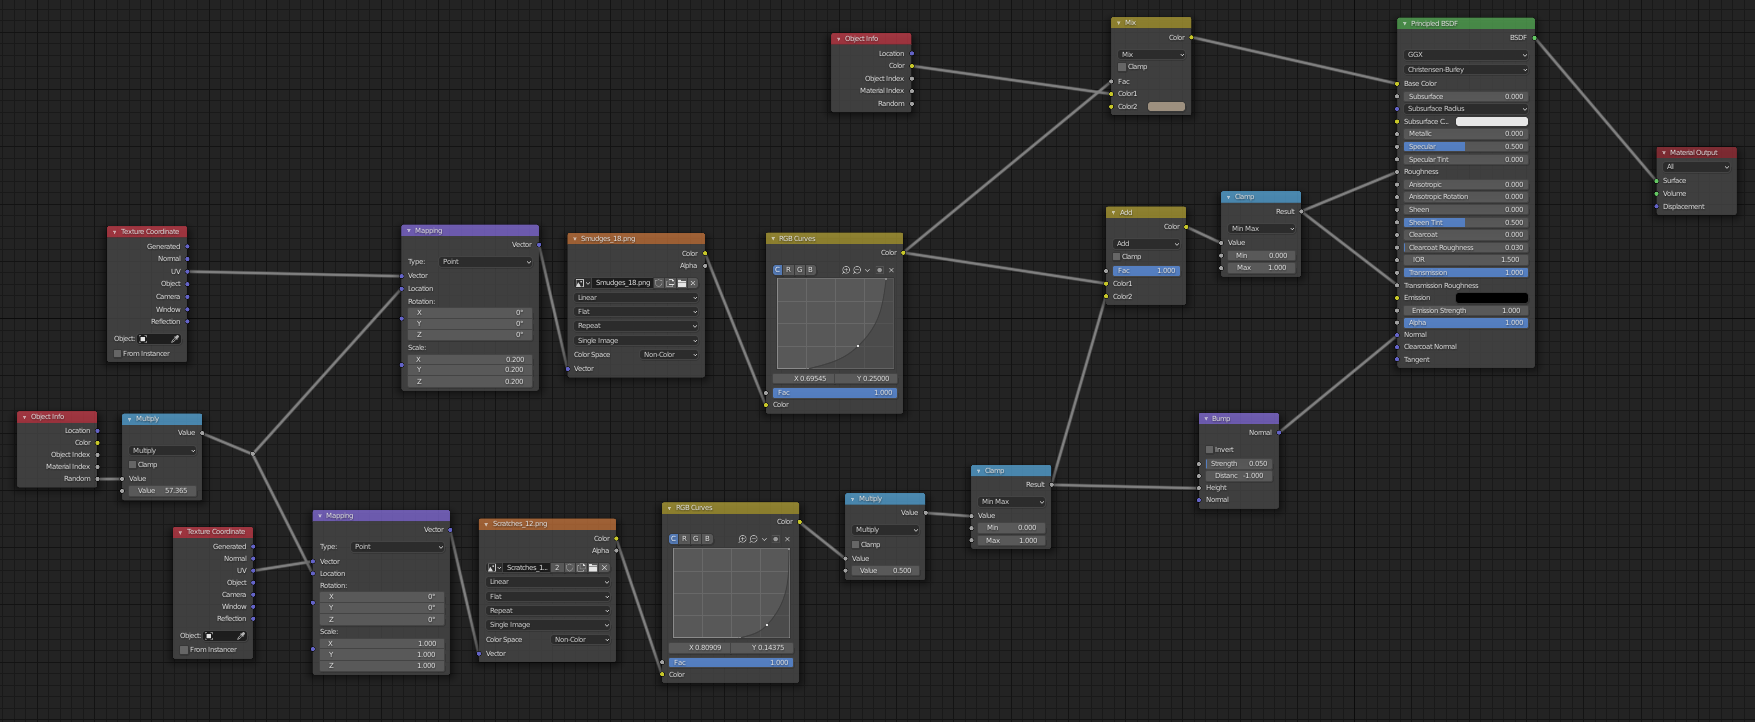
The liquid material also uses imperfection maps, but instead of driving the roughness and bump, the imperfections are multiplied by a fresnel node and plug into the emission. This technique creates a magical edge glow. It also uses a slight voronoi noise as a normal map to produce some sparkling.
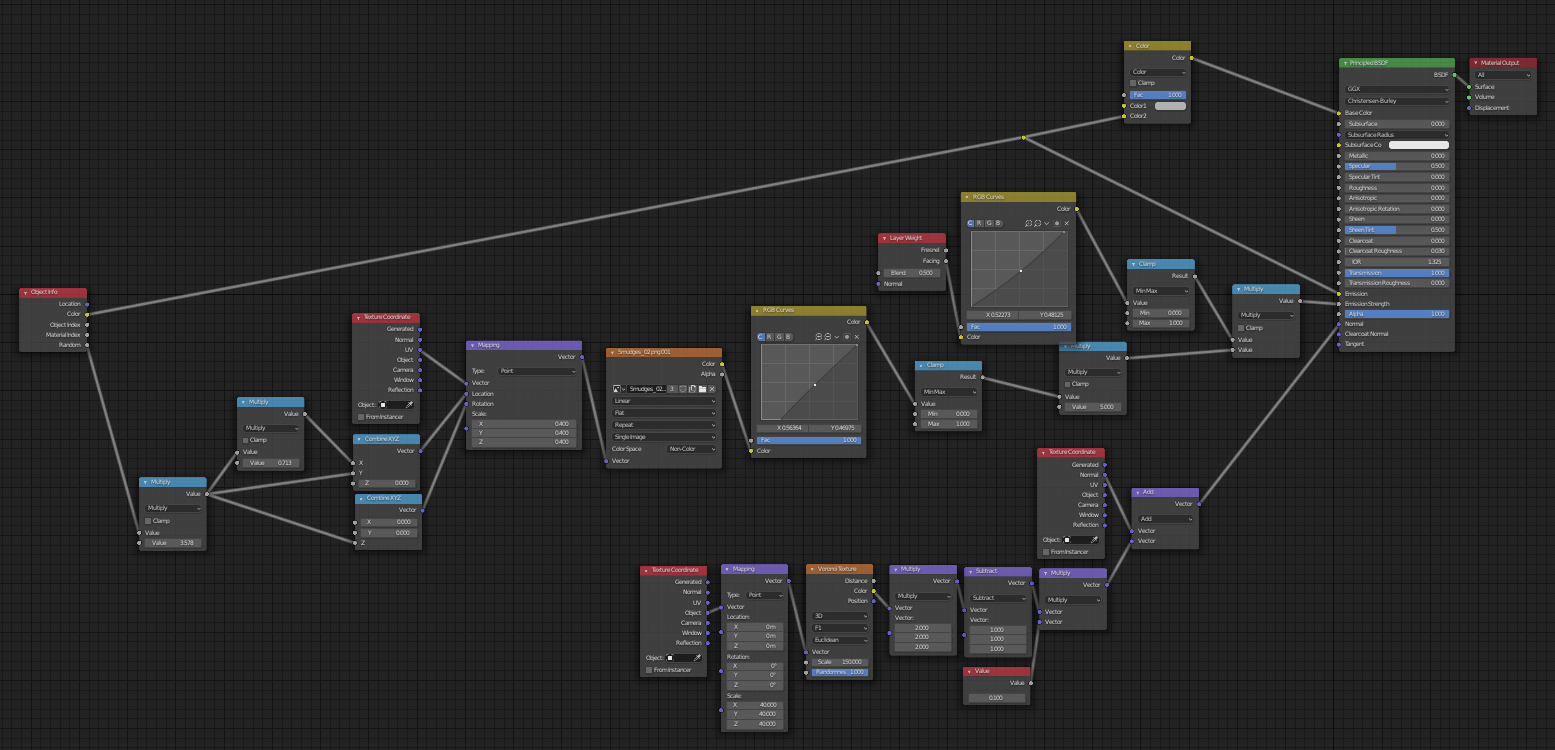
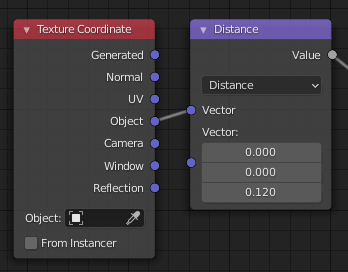
The biggest thing to point out for both of the materials is the use of the Object Info node.
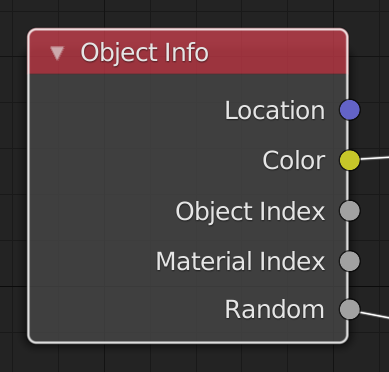
This node is very powerful because it allows you to change the settings of the material on a per-object basis. This allows you to have just a single material and many variations for different objects. While there are more flexible ways to do this with the attribute node, this is the simplest way as you don’t have to mess around with custom properties on every object.
For the liquid, I used the Color output of the Object Info node to control both the color and brightness of the potion and the Random output to offset the Texture Coordinates for additional variation.
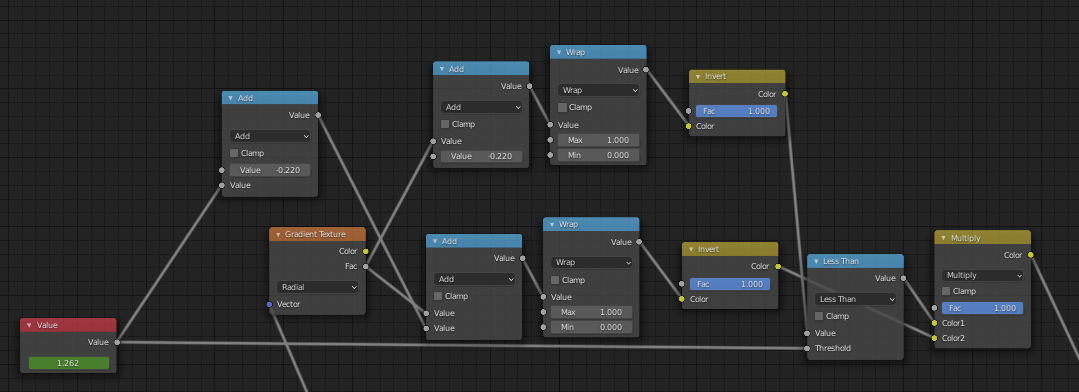
The droplet dissolve shader gets the distance between the texture coordinate position on the object and the top of the liquid.
Combining that distance with some noise creates the following texture:

We can then create a sharp color ramp.
![]()
Then we add the previous texture to an input value and put the result into the factor of the color ramp. We can animate this input value to change how much is white, and how much is black.

And finally, we use that as a mask to mix between the clear liquid and our golden one.
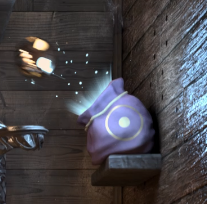
Portals
First, the mechanics of the portal. The ball that comes out of the second portal is different from the ball that goes into the first portal. This made the physics a lot simpler and easier to manage because it let me bake the physics for the first ball once it was done. That way I didn’t have to worry about messing it up when working on the physics for the second ball.
When the ball comes out of the second portal, it is hand-animated along a curve for a few frames before it goes back to physics. This was the easiest way to make it “jump” out of the portal.
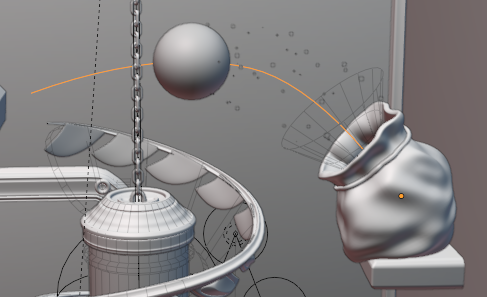
I also used this technique near the end to easily get the ball to bounce off the potions and land where I needed it to.

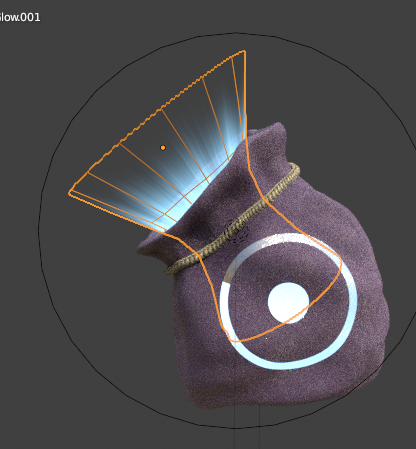
Now, on to the effects. I’m only going to explain the effects for the second portal because the first one is the same, but simpler. The portal effect uses a combination of materials, lights, and a particle system.
The shader for the portal bag is… complicated.
To be honest, if you asked me how this works, it would probably take me a while to figure it out again. But to boil it down, first, it gets the distance to a point on the bag and uses that as the factor for a gradient ramp to create a mask to mix between the velvet and gold materials, which creates the golden circle and dot.

Then it uses some mapping, a radial gradient texture, and a bit of math combined with the previous mask to create the spinning blue loading bar.
The material for the aura is a lot simpler.
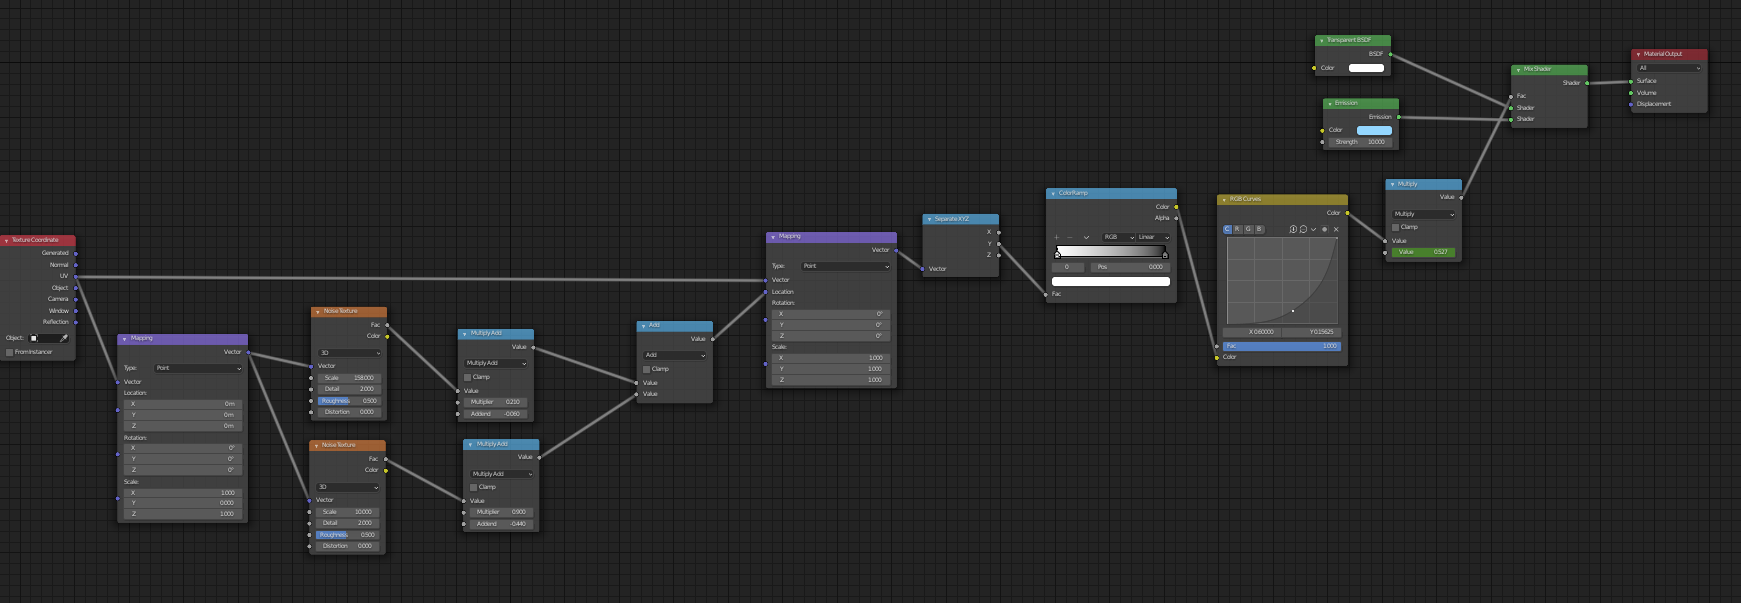
It combines two noise nodes, one large and one small, then uses them to offset the UV texture coordinates. If you then plug one of the axes of the warped texture coordinates into a color ramp, you get this effect. You just need to make sure that your object is unwrapped correctly, otherwise, it won’t work.
To guide the viewer’s eye to the portal a bit more, I added some temporary particles to the ball and some animated lights that give the portal some extra glow.
Physics & animation
As stated in the previous section, while most of the ball’s movement is done using physics, some parts are hand-animated. Other parts of the scene are also hand-animated, like these potions and the candle when the ball knocks them.
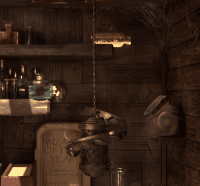
And the hanging lamp, both when the ball hits it and when the explosion pushes it.
While it may be more accurate to do these things using physics, it is usually a lot easier if you hand-animate them. If the end result still looks good, then it’s probably the better method.
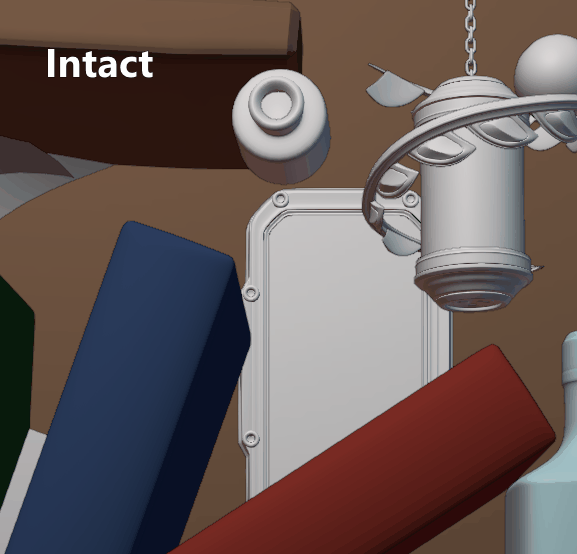
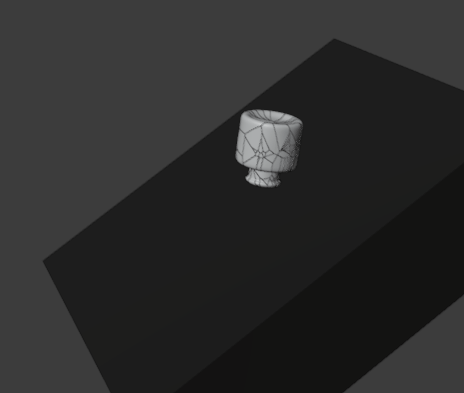
To create the potion smash, I fractured the glass and applied rigidbody to all the pieces, then replaced the intact potion with the fractured version on the frame in which it touches the book.
Since Blender doesn’t handle either fracturing or physics at small scales very well, I had to do this process in a separate file with everything scaled up, bake the physics, then import the collection from the scaled-up physics file into the main file and scale it back down.
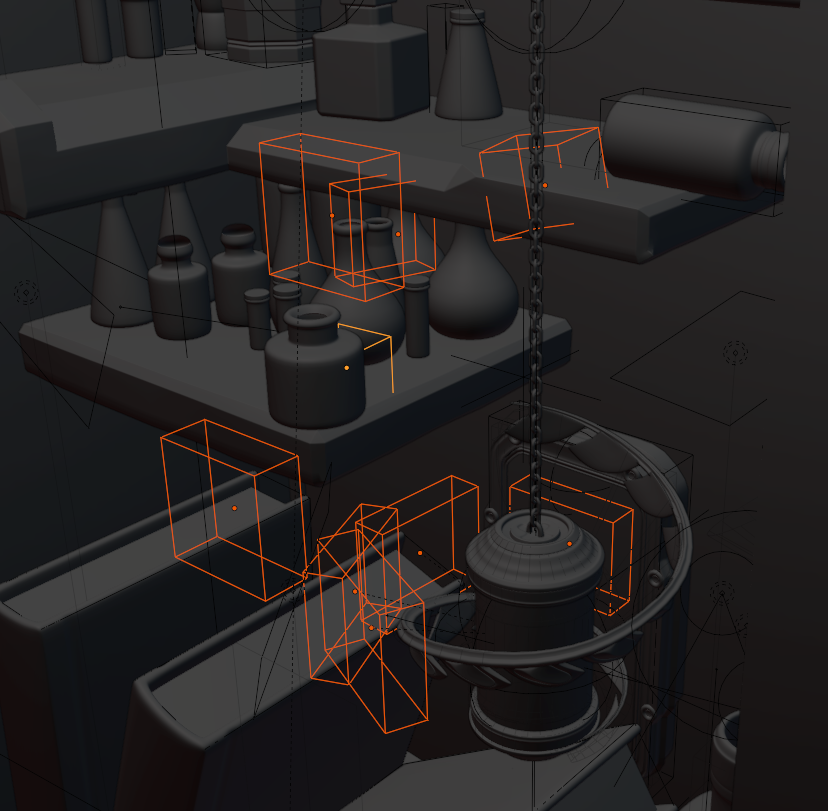
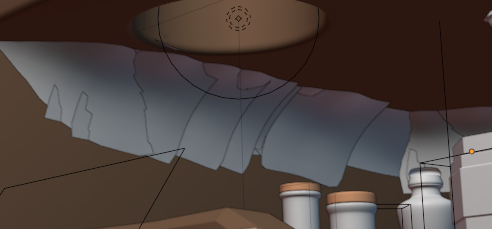
Because of the intricacies in trying to time the animation and physics correctly, both to look nice and to make the ball leave the scene at the correct frame, I used a few invisible colliders to guide the ball near the start and around the lamp:
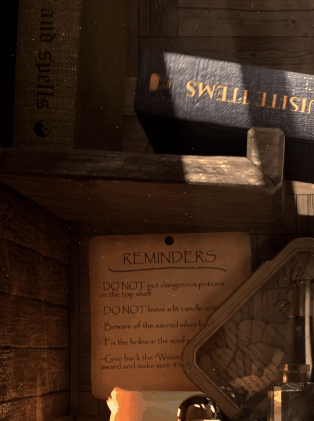
Other Objects
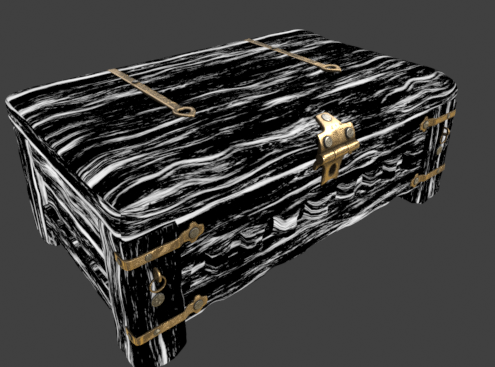
The chest was sculpted using the multiresolution modifier from a very simple mesh. This made it super easy because I didn’t have to retopologize to unwrap it.
Both the wood and metal parts use the ambient occlusion node to get some nice procedural texturing:
I also clipped the displacement map using a color ramp to get those harsher details in the wood.

For the papers, I grabbed some royalty-free images of old paper online. Then I made the following shader, which darkens the borders and uses a black and white image I made in Photoshop to darken the color where there is text:
I used the same technique for the book titles but I also put all of the graphics on a single texture for easier access.
For the cobwebs, I used Gleb Alexandrov’s awesome tutorial and a lot of trial and error. I also found that to get the sort of thickness I was looking for, I had to layer many of the webs on top of each other:
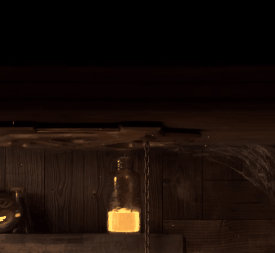
Lighting
There are 19 lights in the scene. The most obvious one is the directional light. I used an invisible box placed around the scene to create the light shafts.
That part was easy, but it took me a while to figure out the rest of the lights. I ended up having many lights spread throughout the scene, each quite small and selectively highlighting key points of interest.
This approach allowed me to “sculpt” the light how I wanted it. Instead of having a few big main lights around the scene, lighting it from different directions, I had many smaller lights, each with a specific purpose. With this way of lighting, it’s about trying to light each individual object to look the best on its own, instead of only worrying about the scene as a whole. While it may not work well for some environments, I think it did wonders on this project.
No matter the method you use, the most important thing is that every light in your scene has a specific purpose.
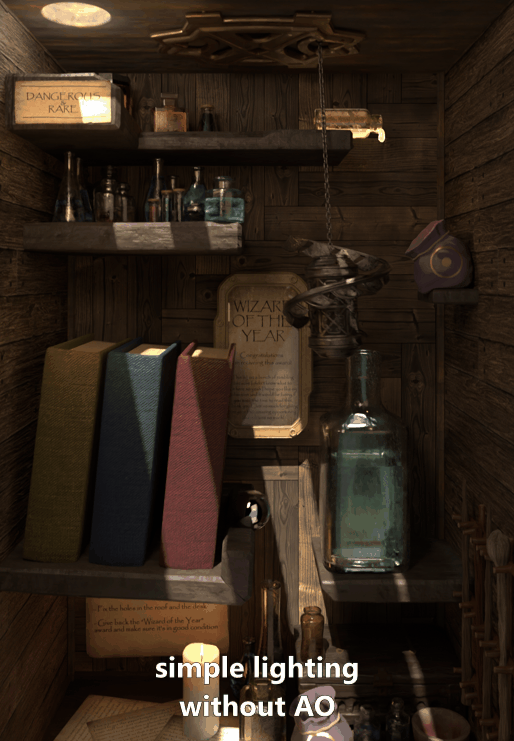
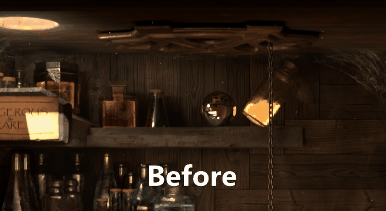
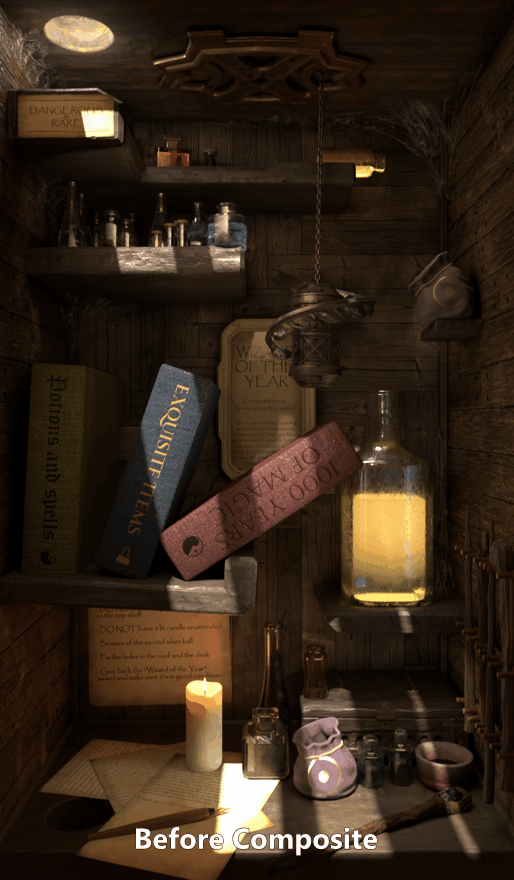
While it isn’t directly related to lighting, using ambient occlusion on the walls made a massive difference to the look of the scene, especially when combined with the lighting method mentioned above.
Here is the difference when you use both together:
The explosion
I did a few tests and came to the conclusion that due to the time constraints I had to render the volumetrics in EEVEE instead of Cycles.
I duplicated the file and removed all objects that the smoke wasn’t going to collide with. I also put a massive area lamp at the back of the scene to light all of the smoke.
To get the fast explosion, I animated the surface emission on the emitter so that it starts at 10 and quickly goes down to below 1. I don’t really have any experience with simulations so it was mainly just changing settings until it worked. Once I had achieved the desired result, it was time to bake and render.
To render the smoke, I enabled the holdout option in the outliner and made every object in the scene a holdout. This way I could render transparent frames and overlay the smoke on top of the Cycles render.
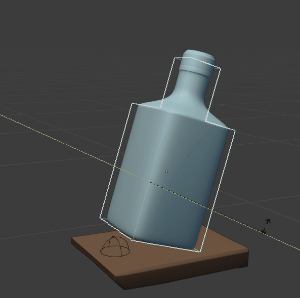
To make the potion wobble when it explodes, I used two pivot constraints targeting two empties on either edge of the bottle. The trick here was to limit the pivot constraint rotation to a certain axis:
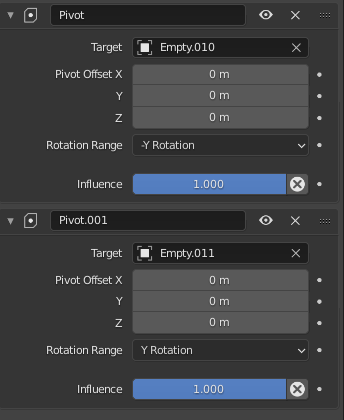
With this setup, all you have to do is animate the bottle rotating on your desired axis (in my case it is the Y-axis).
To add to this, I animated a boolean, which tilted the liquid at a slightly delayed rate compared to the bottle.

I also used an animated boolean for the small golden potion.
Rendering
Apart from the explosion, I rendered the scene in Blender 3.0. I think it took around 30 hours to render the final at 256 samples on a GTX 1060. I still created the entire scene in 2.93 because it was more stable.
FX and compositing
Now for the finishing touches!
For the fire, I tried using Simulations and then Shaders, but neither looked good so I ended up using plates with stock footage from Envato. I layered a few plates and curved the geometry to get a more realistic effect.
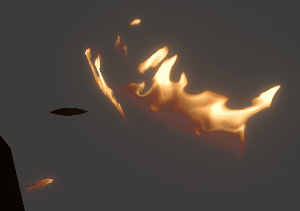
The shader for the fire is quite simple.
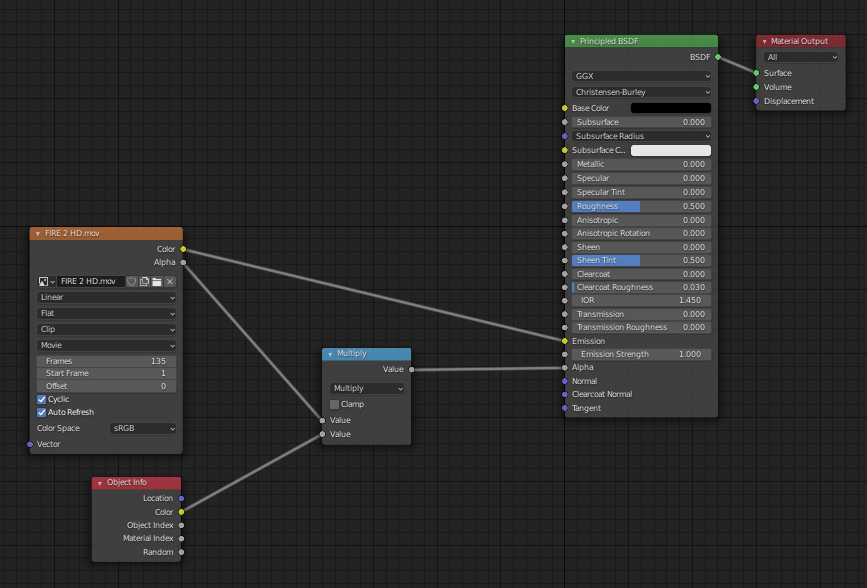
It uses the footage for the color, and multiplies it by the Color output of the Object Info node for the Alpha. This allows me to change the opacity of each fire object so they can fade in one by one, while still having the same material for all of them.
And just like the explosion, I rendered the fire in a separate file using holdouts in EEVEE.
I wanted to add a bit more punch to the feeling of the scene so I rendered some volumetrics in EEVEE to composite on top, using the same method as the fire and explosion.
There was one slight mishap, however. When rendering the volumetrics, I accidentally overwrote my EXR rendering files, which meant I couldn’t restore some of the blown-out areas.
Now to put it all together in DaVinci Resolve.
I overlaid the fire and smoke, adding a tiny bit of glow and color correction to both.
Then I did some basic color correction to the scene. This included exporting a mask of the ball from Blender so I could color correct that separately, to make it pop out of the scene a touch more.
Finally, I used DaVinci Resolve’s particle system to add some very subtle animated dust.
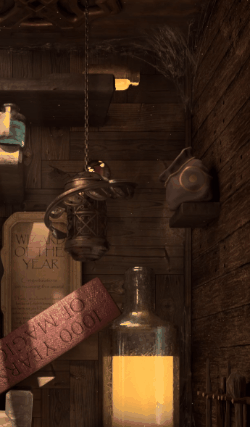
If we combine all of that together, the volumetrics, the dust and the color correction, we get the following result:
While it may seem like a subtle difference, every detail counts. Every little thing that you do to your render adds up, turning a good render into an epic one.
The result
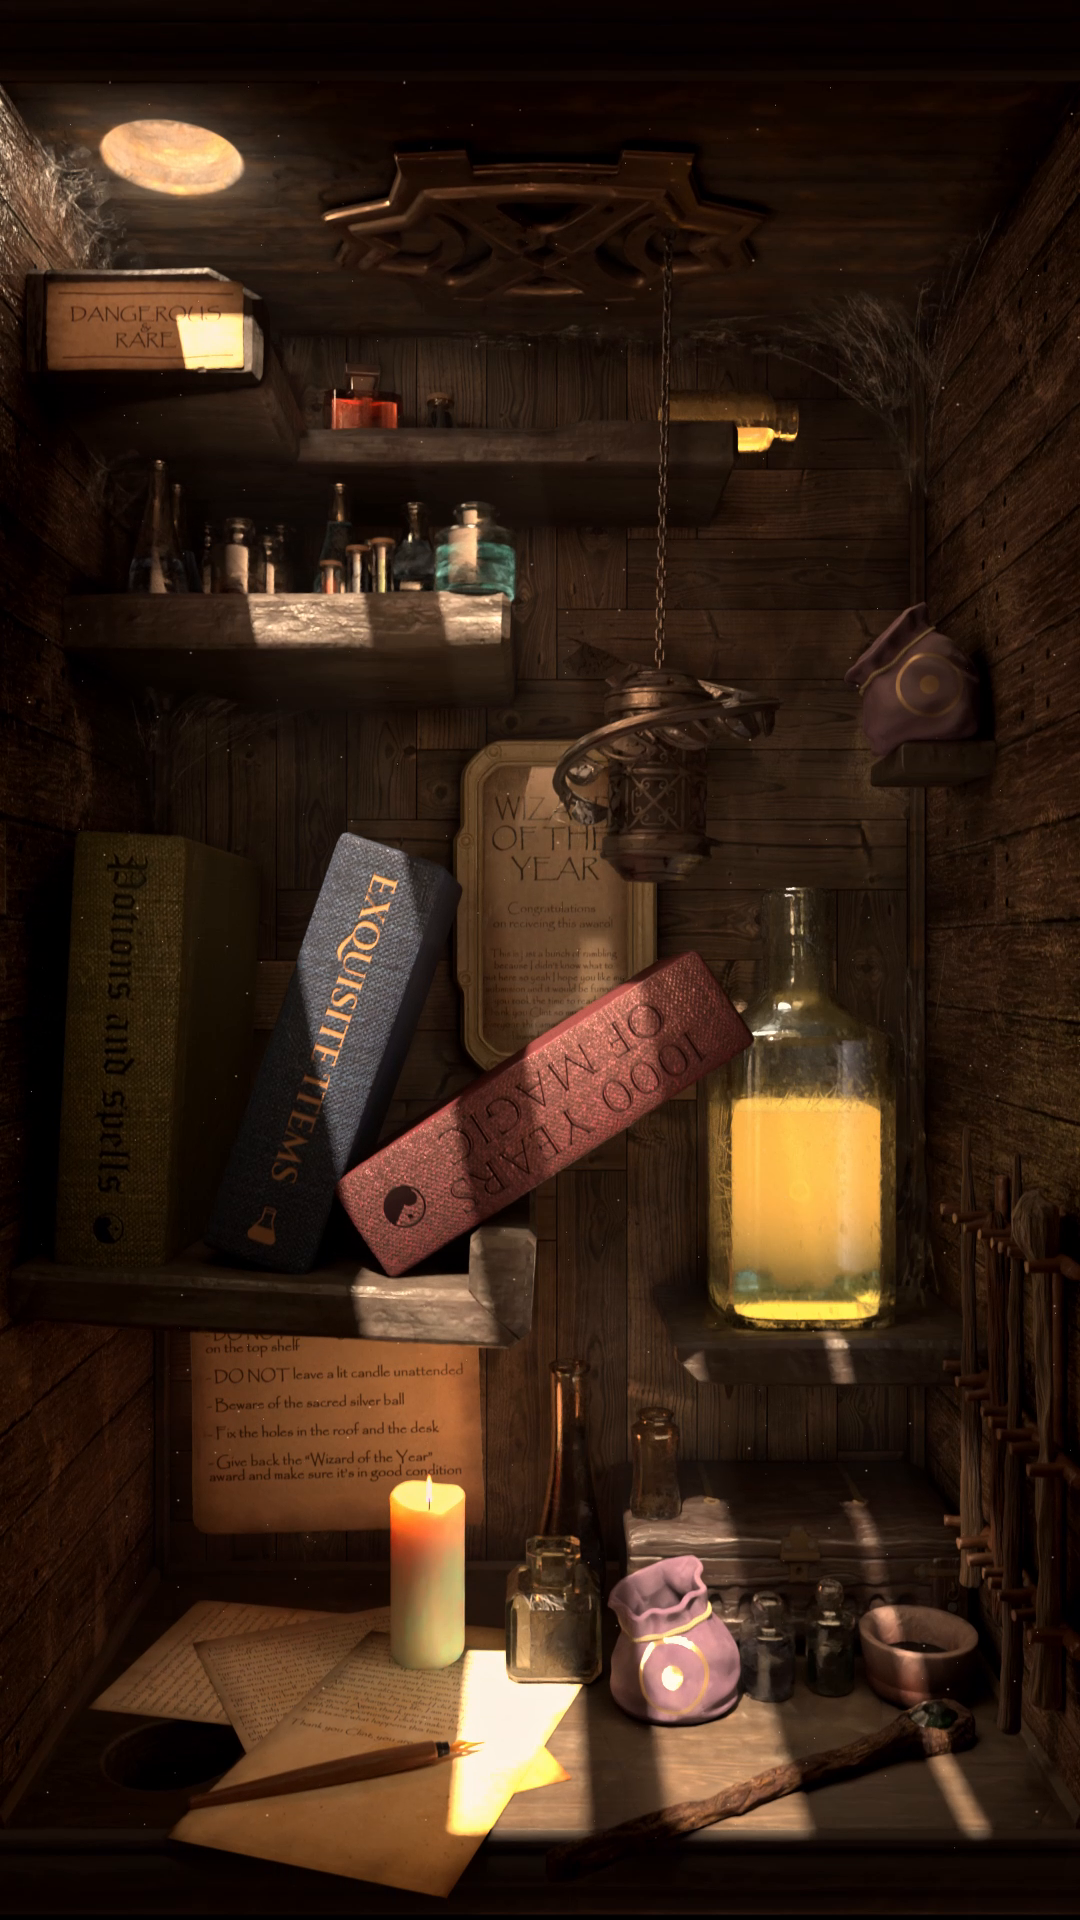
After all of that hard work, here is the final submission:
Final notes
This project was massive for me. It was the biggest thing I have ever accomplished. When I started this competition, I set out my goal not knowing if it was achievable with my skillset and the amount of time given. Over this past year, I have accomplished more than I could have imagined.
Here is my message:
You should never base what you aim for on what you think you can achieve, instead, decide what you want to accomplish first and then do everything in your power to achieve that goal. You have no idea what you are capable of.
Thank you.
About the author
 Robert Kouts, 3D Artist and Programmer


Really amazing! I love this idea of making an entire dynamic scene so much I think I’m gonna download that template and give it a go myself.
Thank you for your very detailed explanation of the entire process. Do you have any clue as to how many hours you’ve put into the entire process an over the course of how long a period?
Oh, and congratulations with winning first prize!
Thank you for the kind words!
The competition went for 3 weeks. Apart from 2 days, I spent 100% of my free time on the submission, about 6 or 7 hours a day. As an estimate, I would say I spent about 120 hours on this, from start to finish.