
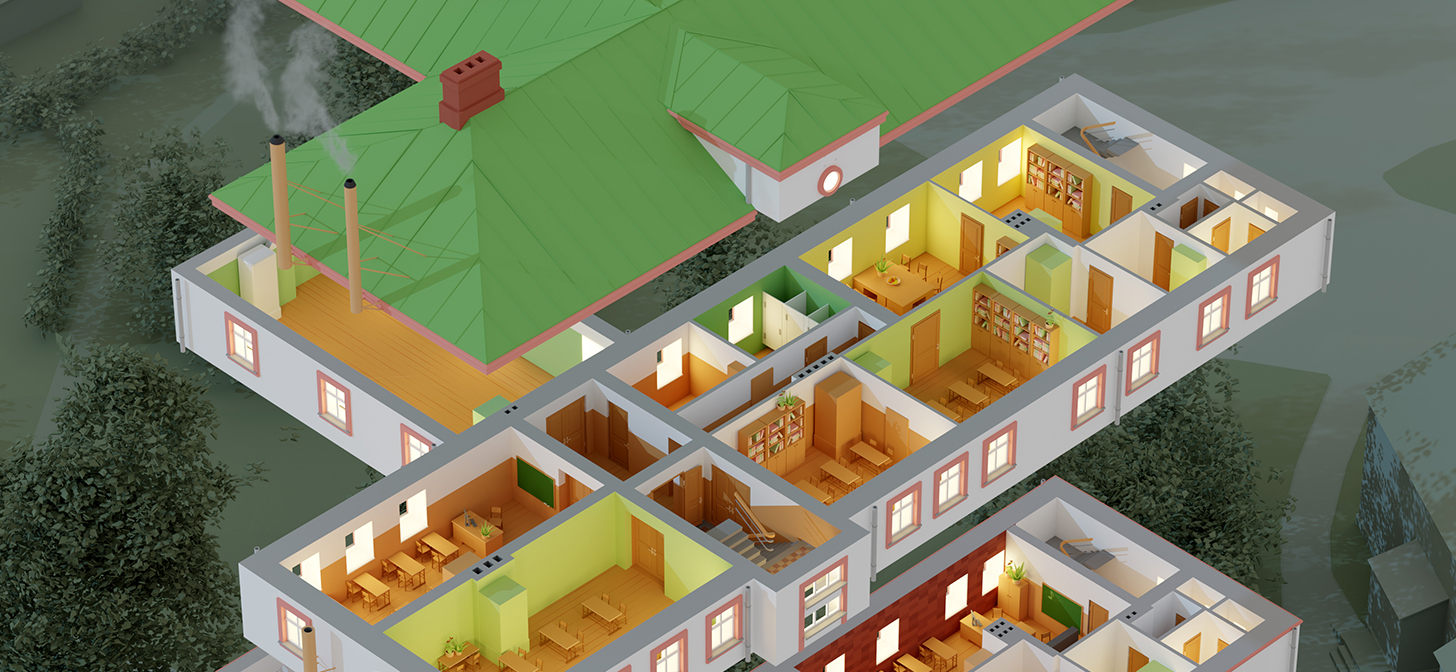
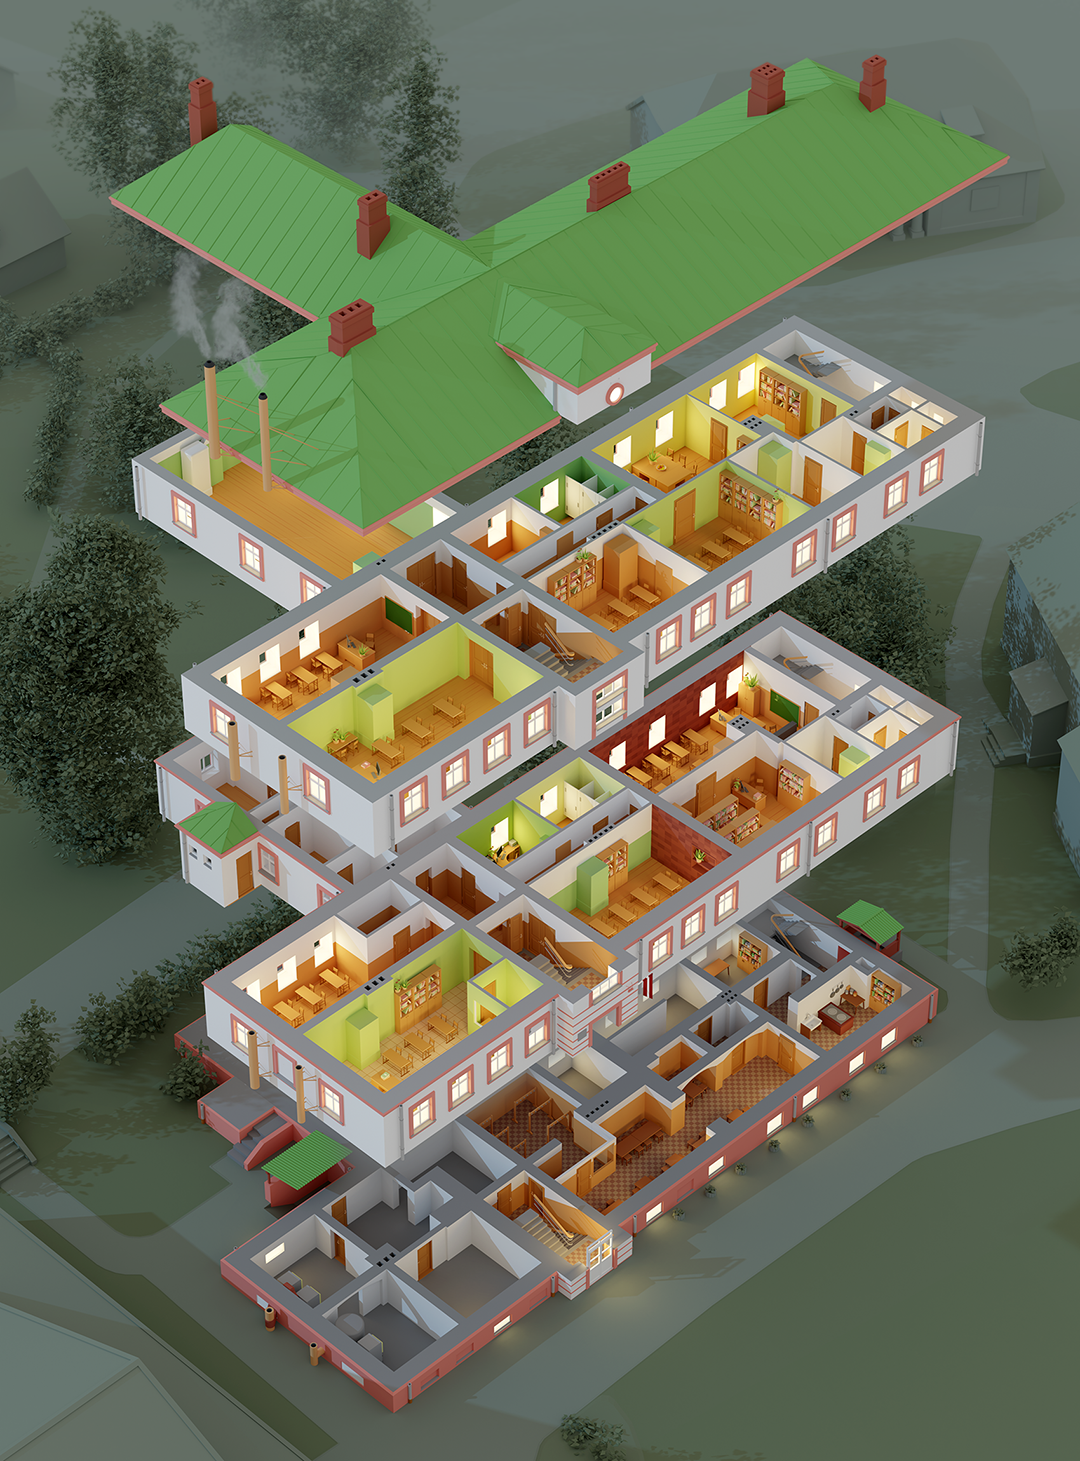
Behind the Scenes: School Building 3D Layout
About me
My name is Artūrs Vītols (sometimes I go by Arturs Vitas). I’m a 3D enthusiast from Latvia. I have tinkered with 3D for the past 21 years.
My first encounter with 3D was in MS Powerpoint. While it doesn’t seem like the typical 3D software, it did have some capabilities to place 3D primitives in a kind of 3D space. One of my first ‘3D’ models there was this very same school building, although much simpler than this.
Then the next stepping stone was AutoCad 2000. Still not an obvious choice. It had 3D primitives and boolean operations whenever I wanted to make something that had to be carved out from a cube or grown on it by unifying different 3D primitives. I learned by studying AutoCad 2000 help materials.
[sponsor id=”qarnot”]
Around 2005 a friend told me about a software called 3D Studio Max. This was huge. Finally, I didn’t have to work with primitives. In came all the fancy stuff like extrude, cut, bevel, and so on. I got good enough to do some freelance in architecture. And so I landed my first job with a company that distributed Cinema 4D in Latvia. Now I only had to learn Cinema 4D—the basics were the same, so transferring was easy.
The only problem was that working with all those visualizations wasn’t for me, and it even made me doubt my passion for 3D, so I took a break from 3D altogether and studied mechatronics. I then worked for a while as a mechatronics engineer, but I guess the passion for 3D and game design was stronger in me. So I switched to mobile games in 2012 and have worked in the field ever since. I like to be hands-on in all development stages: I do level design, programming, game physics, UI, and, of course, 3D modeling. This is where Blender came in. For a new game studio, it was so important to save money any way we could, and after toying around with Blender, I concluded that it is a fully capable 3D software with a great community.
Quick story of the building
This was my school. It is celebrating its 100th birthday this year, as it was opened in 1921 in the former manor of Baron Blankin.
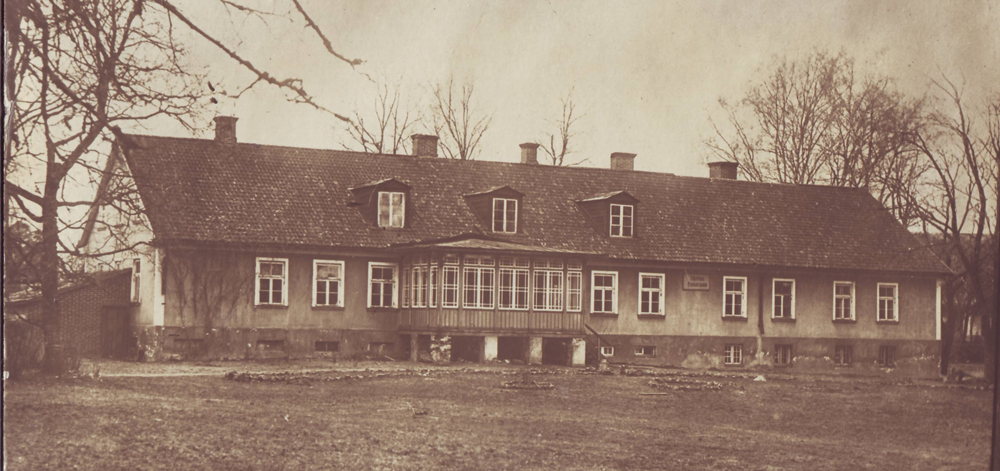
In 1937 another floor and a sports hall were added to satisfy the growing number of pupils and to meet more modern requirements.

Now, after 100 years, my school is closing down at the end of this school year because of safety concerns.
Back to 3D: Biggest challenges
- Finding the correct camera angle so that most of the interior would be visible. I considered making cutouts in walls, but after a couple of tests, I decided that they cluttered the interior and made it harder to perceive the layout of the building.
- Keeping the focus on the interior. This was achieved by having one cold color in different shades for all the surroundings. Also, giving as little detail to the environment as possible.
- Not to over-clutter the interior. It was important to have a layout that is easily understandable. Adding any unnecessary interior objects to the interior risks cluttering the perception of the layout. To prevent this, for the furniture I chose colors that have very low contrast with their surroundings.
- Which layout to choose? Which classroom goes where? Over the past 100 years, the placement of classrooms changed a lot and this model represents the school as it used to be in the past decades.
Software Used
- Blender
- Photoshop
Modeling
I have a background in interior and exterior visualizations so making a 3D model on top of the floor plan was a straightforward process.
I start by importing floor plans as reference images.
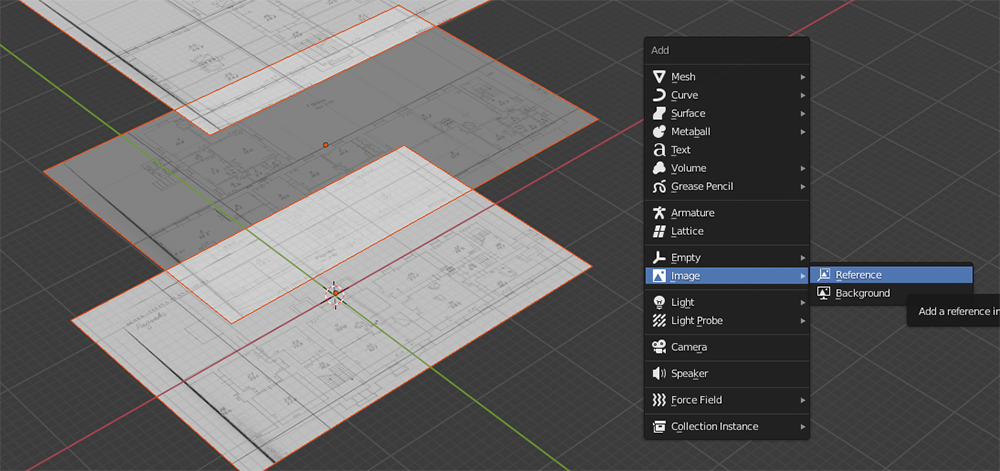
If the floor plan is an image, I make sure that the scale matches the units in the drawing. After that, I start by adding a plane object and trace the walls by extruding and joining edges.

After wall tracing is done, I extrude the plane object, which is done in 3 heights. The first one is to the bottom of the windows, the second is to the top of the windows and the third one is to the top of the ceiling. This makes cutting out windows much easier afterward and keeps the mesh clean.
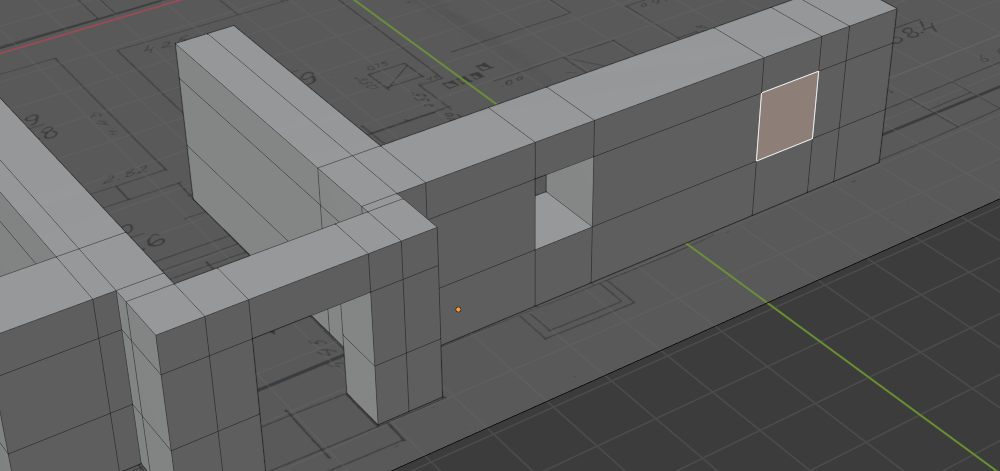
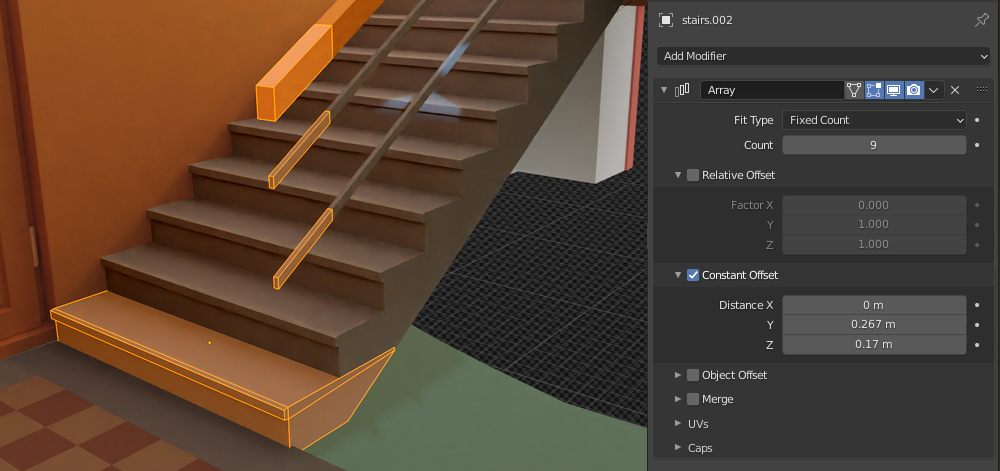
When modeling stairs, if close-ups are not necessary, I make a model for one step and let the array modifier do the magic.
This was the first project in Blender where I extensively used one mesh for many objects (Alt+D when duplicating). For a project with this many small details, I could not imagine how I would have done it without instances. It saved me a lot of time having the possibility to make small changes on many objects simultaneously, if needed.

Texturing
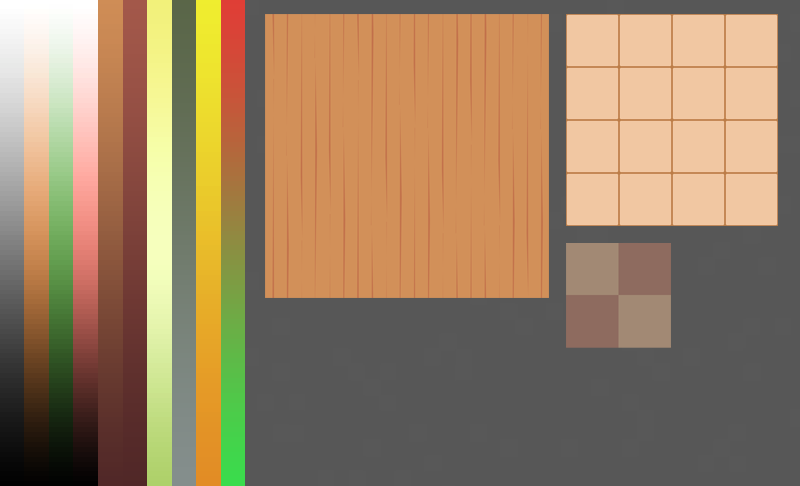
I knew that I did not want to use textures—or use them as little as possible—since UV mapping this whole building would be complicated. The first attempt was to use separate materials for each color needed, but it was hard to keep track with material names ‘orange’, ‘dark orange’, ‘even darker orange’…you see where I’m going with this. And if I needed to change the tone of the base orange, I would have to go over all other materials associated with the orange color. I ended up creating a texture map in Photoshop with gradients that could be easily adjusted. The only place where textures and proper UV mapping were used was the floors.
Lighting
That is something I was afraid of many years ago. I could spend hours upon hours adjusting lights and waiting 15 to 30 minutes to see a disappointing result. Now, thanks to Cycles render engine, lighting is super easy. All the changes can be seen within a matter of seconds, which was another reason for me joining team Blender. Since Cycles render engine came along, whenever I have had to purchase a new PC, I always went with the one that had the most CUDA cores and now, of course, OptiX is the next level.
For this project, I used one directional light as moonlight in combination with a bright ambient light to make shadows lighter. The interior is lit by a mesh and emission shader that is placed in each window. To hide it in the final render, I disabled the ‘Camera’ property under ‘Ray Visibility’.

Smoke
This is a straightforward one. Objects > Quick effects > Quick smoke.
To achieve motion, I added a Wind effector.

Whenever playing with a fluid simulation, be sure that the cache is cleared. For some reason, the default cache clearing type ‘Replay’ did not work for me. I ended up switching to ‘All’ and manually clearing the cache.

Before making this adjustment, the simulation was exactly the same, no matter what parameters I changed. I spent a lot of time pulling my hair.
Trees
I toyed with the idea of modeling the trees, but at the same time, I didn’t want to spend too much time on the background, as the whole focus needed to be on the interior of the building.
The easiest way for me that worked was using a particle system:
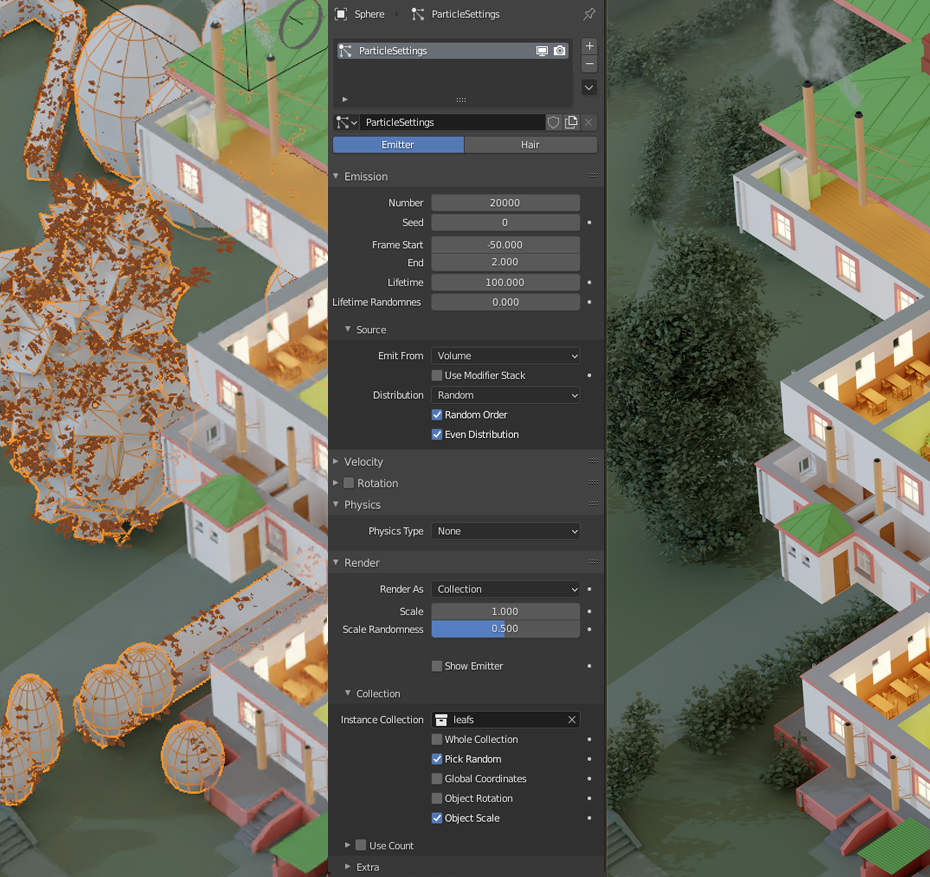
I created a collection with 3 different leaf objects and used it to fill the volume of the tree meshes. Don’t forget to set ‘Physics type’ to ‘none’, otherwise, your leaves will fall down. Some minor ‘Scale randomness’ was added and under the ‘Render’ tab I disabled ‘Show Emitter’ to hide the base mesh.
Post-processing
After seeing the final result, I wanted the building to stand out more from the background environment. Quick googling around showed me how to render a mist pass with Cycles. Using the mist pass I desaturated the background and added minor blur effects to it.

Final result
Timelapse

About the Author
 Artūrs Vītols, 3D artist, mobile game developer.


This is actually a lot of fun to read and look at! I have been doing something “similar” for 3d models for TTRPGs. I like the idea of using a plane and extending it (I’ve used a “block” and then extended it with holes cut for doors and windows (loop cuts for heights). Very similar. Same with stairs. I really like the low-poly look and the use of colors. that came out fantastic!
Thanks! I am glad you enjoyed reading it :)
Have great day!