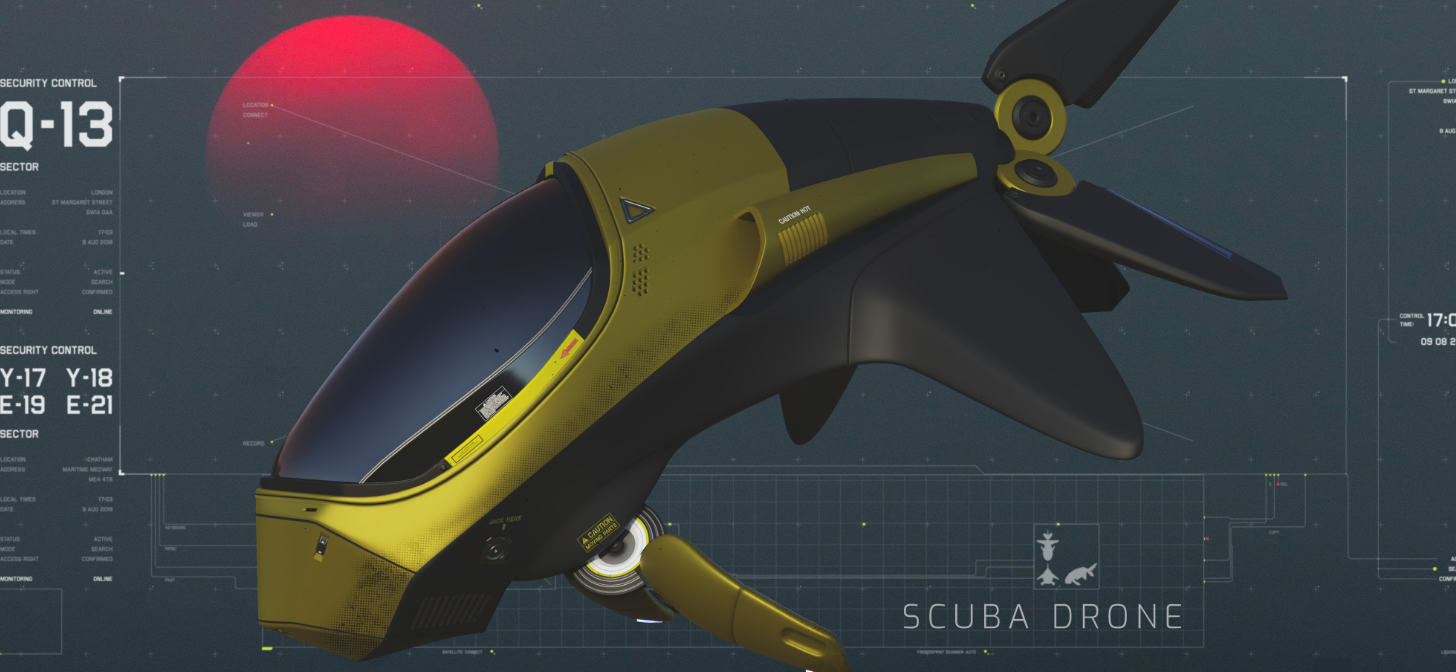
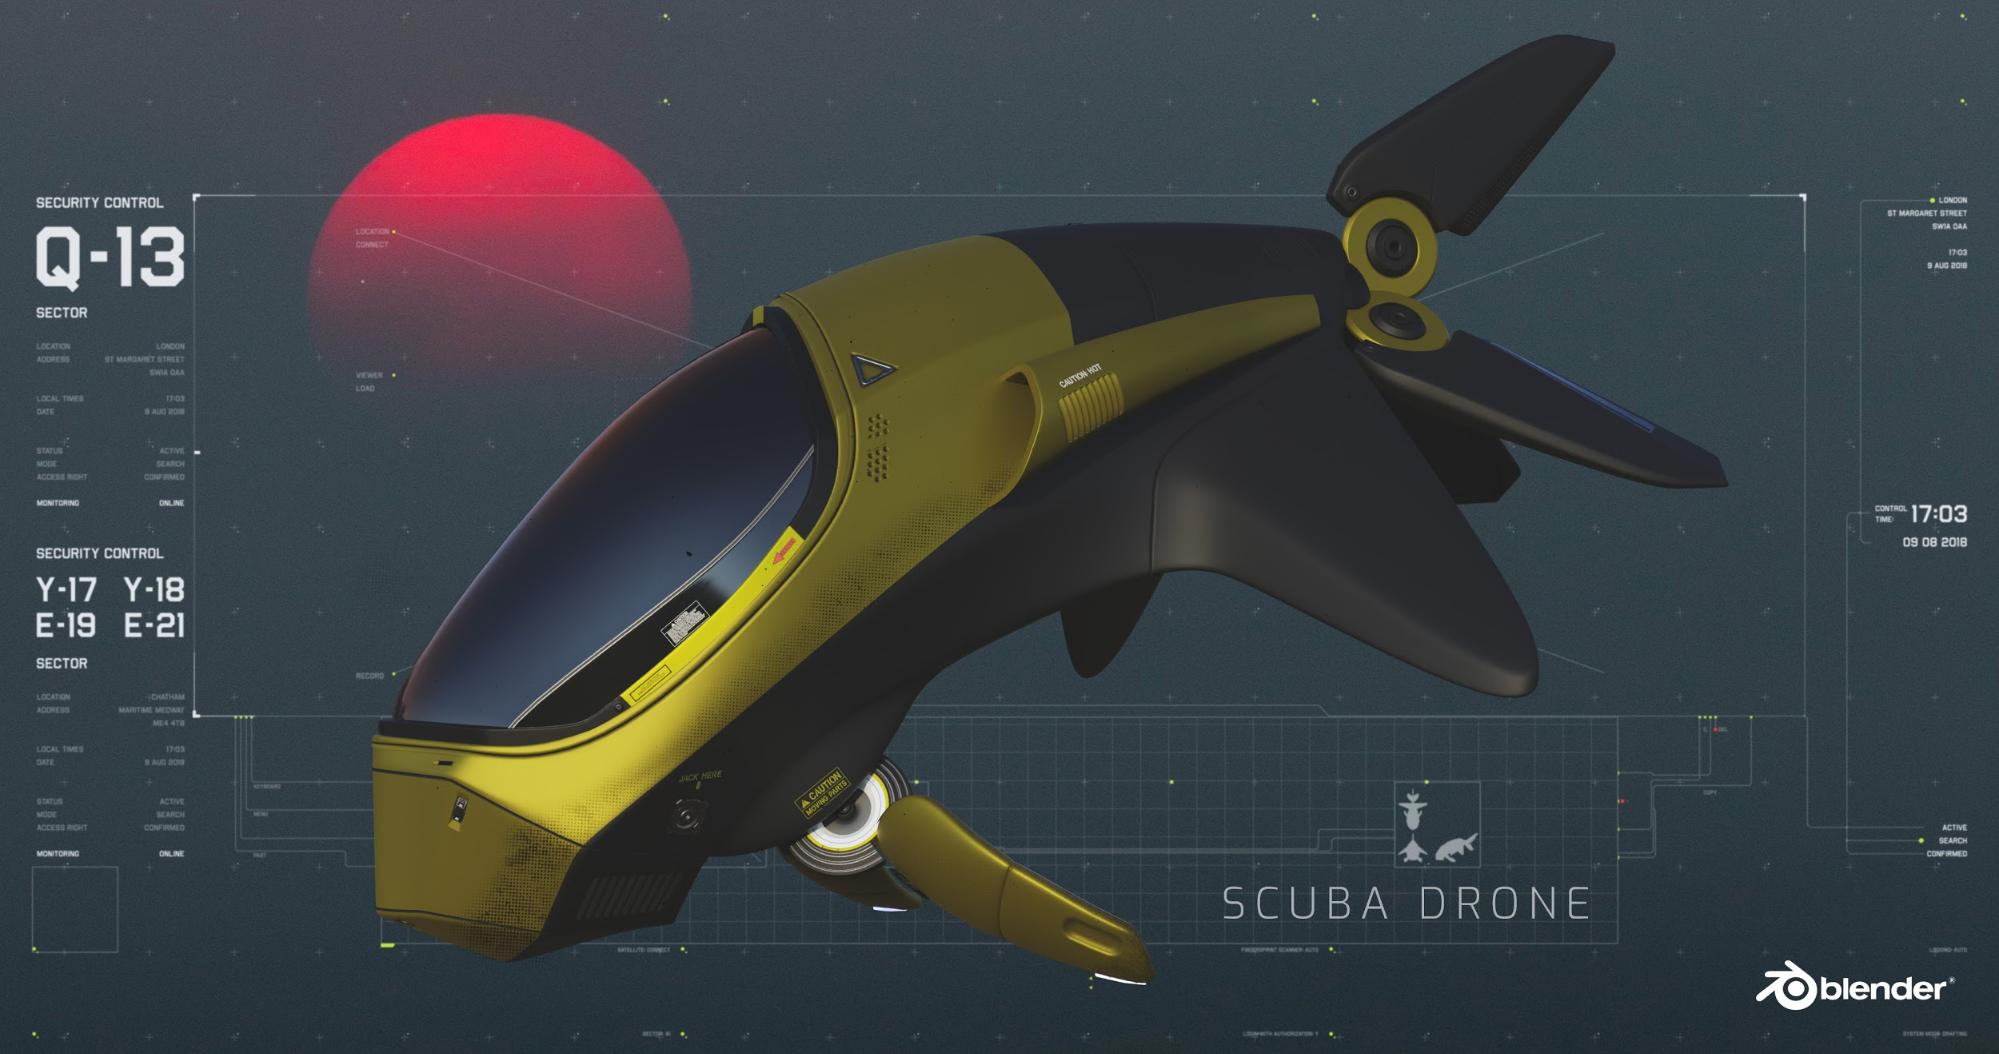
Behind the Scenes: Scuba Drone 2020 Concept
About
Hello, my name is David Drayton and I’m a UX Consultant at kuehlhaus AG in Mannheim, Germany. This is also my hometown and a beautiful place to live in.
I started my career in the field of CGI in 1999. Back then I was exposed to Alias Wavefront’s Maya. I saw it for the very first time in action at a tradeshow called FMX in Germany. And it was love at first sight. So I took all of my new impressions of the 3D world back home and tried to get a copy of Maya. Unfortunately, Maya was insanely expensive (I may be slightly off, but I remember it was something around $16k). But I still managed to order a DEMO DVD from Canada. ;) After weeks of waiting for it to arrive, I wasn’t able to get it to run on my machine.
So 3D had to wait and I started studying communication design. Then a friend showed me Cinema 4D. This was in 2000 and I was overly excited about how well it performed and its ease of use. So I have stuck with it until today! In 2005 I joined the development team of Cinema 4D & BodyPaint 3D as a content manager. I built content that the marketing team could use on the website or for print content. A year later I became the very first UX-Designer at MAXON Computer GmbH and led the Team until the end of 2013. Thereafter, 3D stayed with me in form as my hobby. In 2009 I started studying at Animation Mentor and became an animator.
I am also a die-hard MoGraph guy and love this C4D tool down to my bones. So motion-design has also been on my menu at all times. :)
In early 2019 (I think it was March or so) I started dipping my feet into Blender 3D. I had tried the previous versions of Blender 3D before but really disliked the application and never got too far in using it. After Blender released 2.8 things changed for me, and I really wanted to learn it. Now here we are a year later and I’m able to translate my 20 years of 3D experience in almost all areas of Blender 3D.
Inspiration
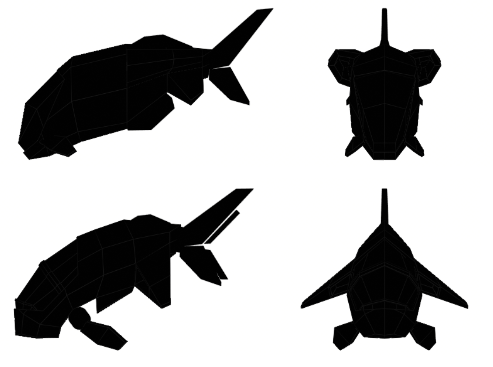
The Scuba Drone was modeling practice. As I still need to learn all the Blender 3D secrets, I wanted to take a deep dive into hard-surface modeling with b3d and this is the final outcome.
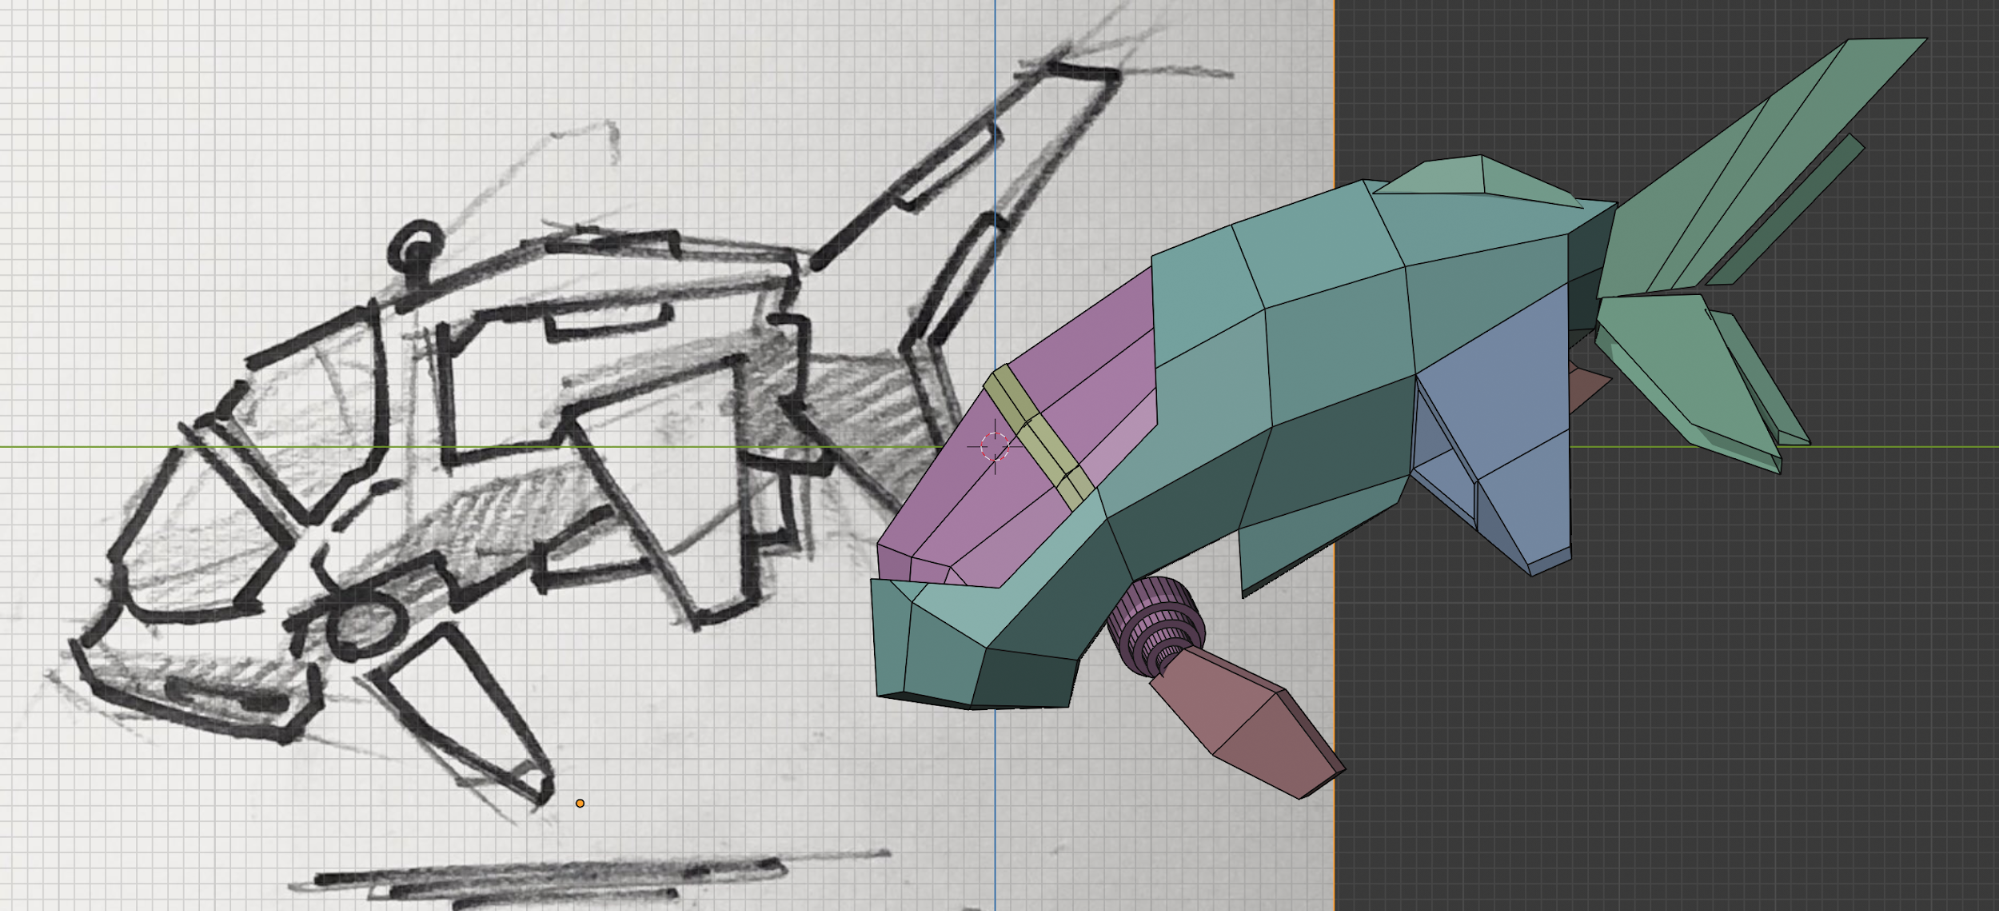
I’m very often inspired by great art or nature. In this specific case, I was inspired by mother nature. A catfish to be specific. But I also love Mechas and robots, so I tried to combine both worlds and came up with this rendering.
Tools
As my base tool, I used Blender 2.82. I run it on my 2016 MacBook Pro. I also use some very effective and awesome workflow tools like MESHmachine, DECALMachine, BoxCutter, and HardOps. All tools that make Blender3D an even better tool for modeling. For compositing, I used Affinity Designer to build the background graphics and Affinity Photo to combine everything.
As I wanted to deepen my knowledge about hard-surface modeling, this project really was challenging to me. A.) because I am still a Blender 3D noob and b.) I am also a hard surface noob. But I wanted to model it as cleanly as possible without any N-Gons, triangles and such. And I mostly succeeded :) Some weeks ago I bought the “Hard-Surface Modeling” course by Gleb Alexandrov and Aidy Burrows and it has carried me through my hard-surface journeys ever since. Things like going from a higher density into a lower density part of your mesh was something I had to deal with a lot on this model. So the tutorial really helped me sharpen my skills.
Workflow
My main workflow was like this:
Step 1: Modeling
I added, modified, deleted, and merged geometry wherever and however I wanted with the focus on the main shape and its readability. At this stage, I didn’t care about topology too much.
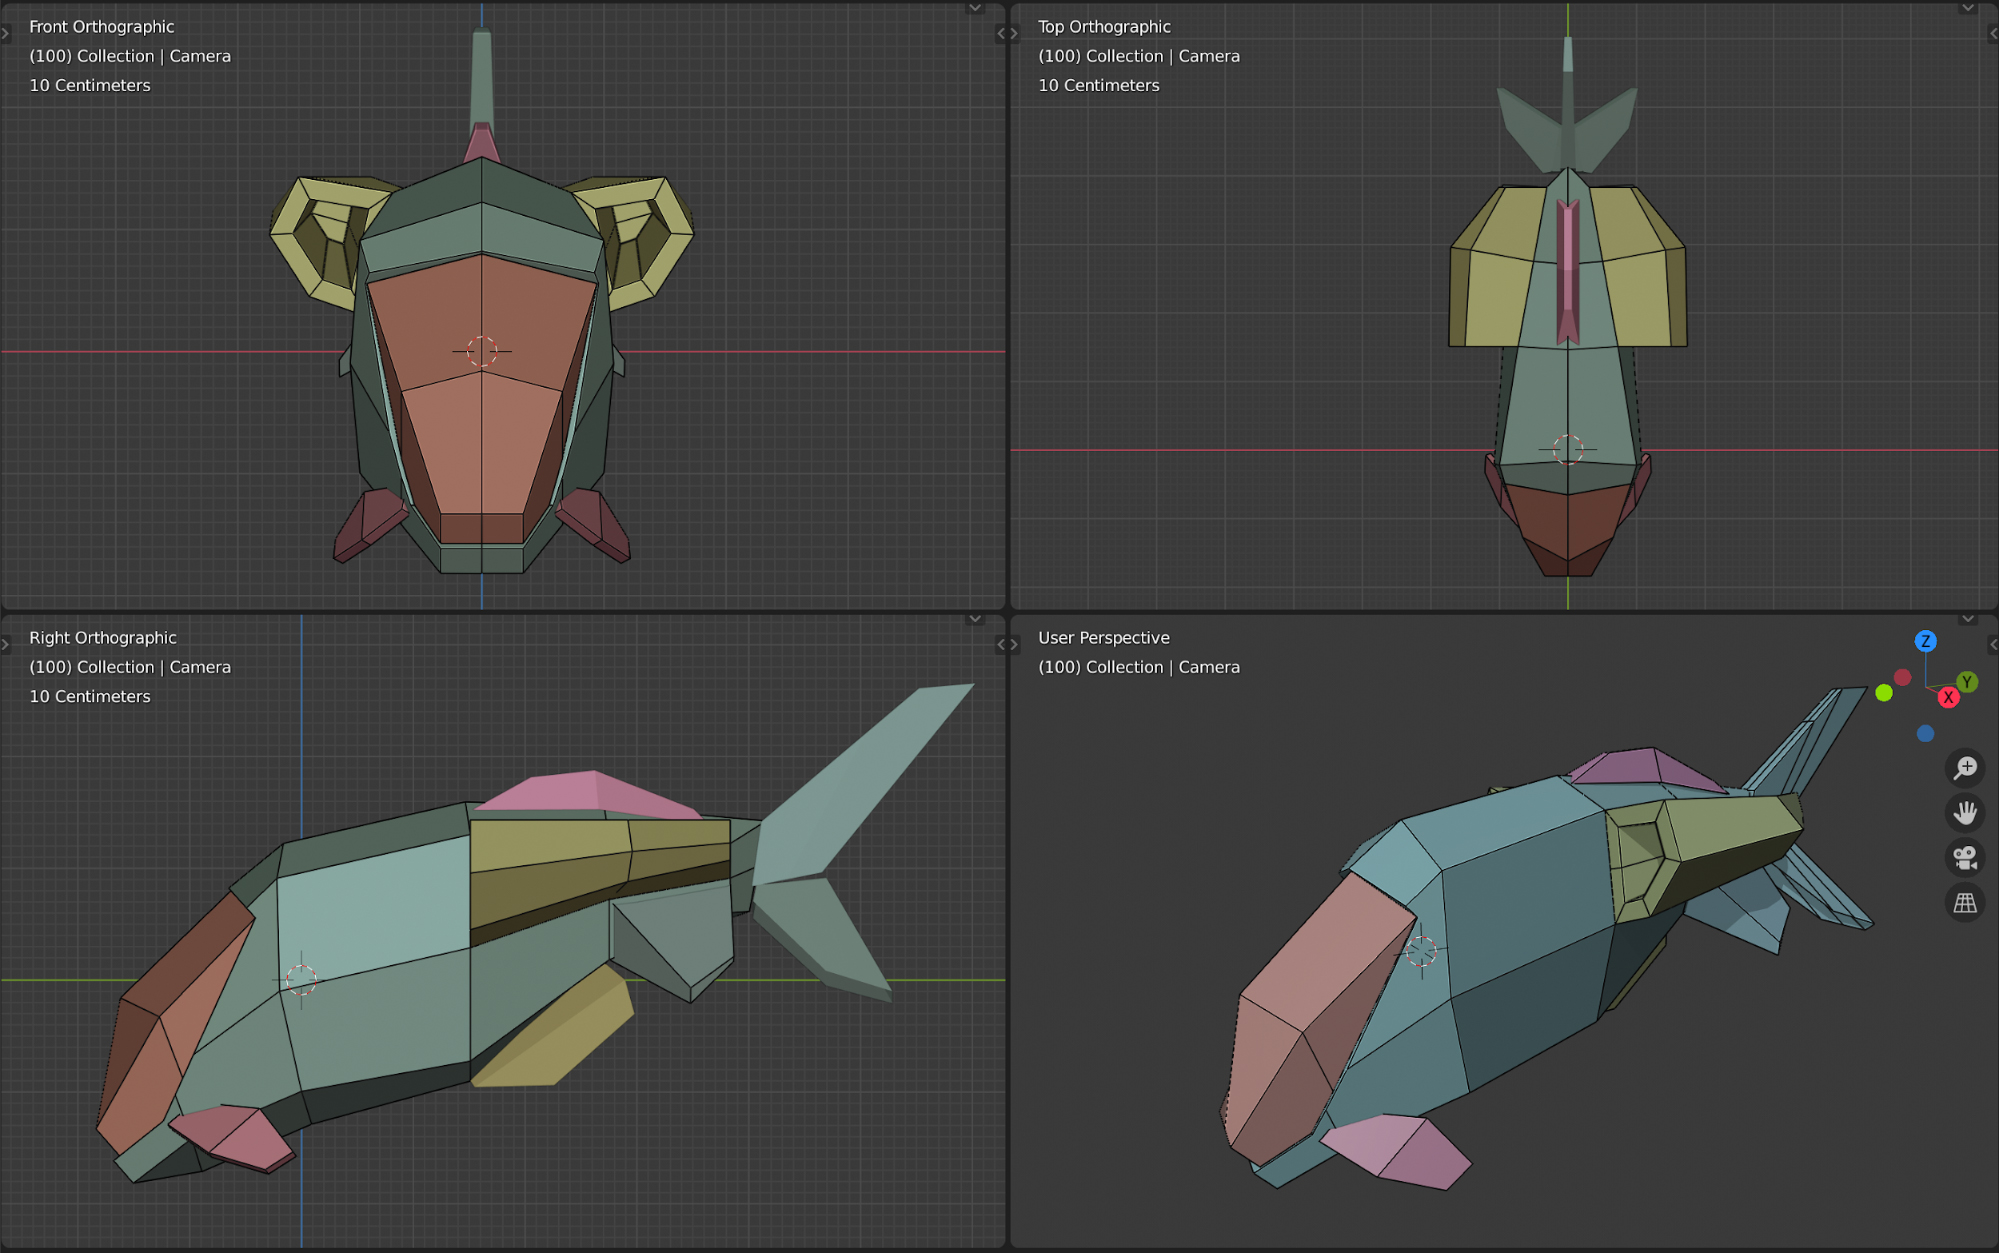
Step 2: Retopology
I tweaked the mesh and started to make the topology as clean as possible. At this stage, I often applied the SubD-Modifiers at a lower value (1-2).
Step 3: Fixing the Ugly Parts
I used the MatCap shaders within Blender to find ugly mesh parts like pinches and overlaps.
Shading
As I’m a very visual and less technical person, I try to make my end result count as much as possible. That being said, I’ve done the shading for my Scuba Drone entirely using EEVEE. Why? It’s fast and reliable, even on such old hardware as mine! I also love bloom, which is such a cool way to show the viewers where signal lights or interesting parts within your model are. As I really don’t know 60% of EEVEE, I was happy to get away with mostly the default settings.

Lighting
Lighting was done using an HDRI by HDRIHaven.com—I used the Noga HDR. It gave me the necessary reflections without selling the illusion of being a futuristic environment.
Details
For all the details on the drone’s hull, I used DECALmachine, a commercial add-on that’s totally worth every penny. You can create your own decals, which I didn’t do for this project but have done for others. It comes with hatches, trims, and such, and I made heavy use of them as well. Because I’m limited in hardware resources, I planned for the final model to use decals instead of “real” geometry. This approach not only enabled me to keep working on a slim mesh but also influenced my modeling. The hardest task to overcome during modeling was not to over-design the drone and add to much detail that wouldn’t make any sense in an underwater scenario. It can be a curse and a blessing at the same time being limited to mid-range hardware; you must come up with other strategies you would never consider if your machine simply chews through whatever you throw at it. I made use of Blender’s “Scenes” a lot. So whenever I wanted to try out something, I copied it into a new scene within the project. I’m not sure if this is the best practice but it definitely helped me to develop my project further without losing some previous work. Scenes are also an awesome way to experiment without having to save dozens of scene files. Love it!

BoxCutter was mainly used in the beginning stages to rough out the main shape and from there on I touched and re-touched each and every quad. The shader setups are standard Principled BSDFs that make heavy use of the metallic feature. I wanted to combine a matte finish, but also wanted to keep the metallic paintwork. When using multiple materials in Blender it’s very important to name them properly, not because Blender will punish you for not doing so, rather for yourself and organisation when trying out different styles, colors, and effects. I also love to use Node Wrangler—if you’re like me and love yourself some nice shortcuts, Blender is for you, hahaha. No really, after you manage to overcome your muscle-memory you’ll be able to work at the speed of light.
Post-Processing
After rendering, I brought the 4k PNGA into Affinity Designer and worked on the background graphics for the final compositing. Affinity is an awesome tool to design in because it has all the tools one could wish for and more. It’s not free, but it’s way cheaper than Photoshop and it’s not subscription either. After I finished the composition of all the elements, typography and artwork were done in Affinity. I did some color correction work using Photoshop. I also used Photoshop to add some dirt and scratch layers on top of the drone to give it a more stylized look.
Final Artwork
360° Turntable
https://www.instagram.com/p/B9ZmrlqnkIr/
About the Author
 David Drayton, UX Consultant at kuehlhaus AG


Great!