
Behind the Scenes: Halloween Party
About me
Hi everyone. My name is Mauro Fanti, I’m a construction engineer from Sardinia, Italy and for about a year I have been trying to make my way into the world of CGI, character, and environment design.
I come from a family of artists and artisans in the field of traditional arts and from an early age I found myself with pencils, paints, and brushes in my hands. During my university years, I studied the world of 3D and deepened my use of 3ds Max in the field of architecture and I have continued to use it during the first years of my profession until I transitioned to Blender in 2019. As a distinctive trait, I have always detached myself from a realistic style, preferring the search for a personal and recognizable style, more attentive to the search for emotion in the image than to a simulation of reality.
My strong passion for the world of comics, animation, and CGI in general, as well as a certain amount of courage, helped me to make the leap by detaching myself from archviz, taking advantage of the skills acquired over the years to devote myself to the development of characters and environments, both for personal projects and professional collaborations.
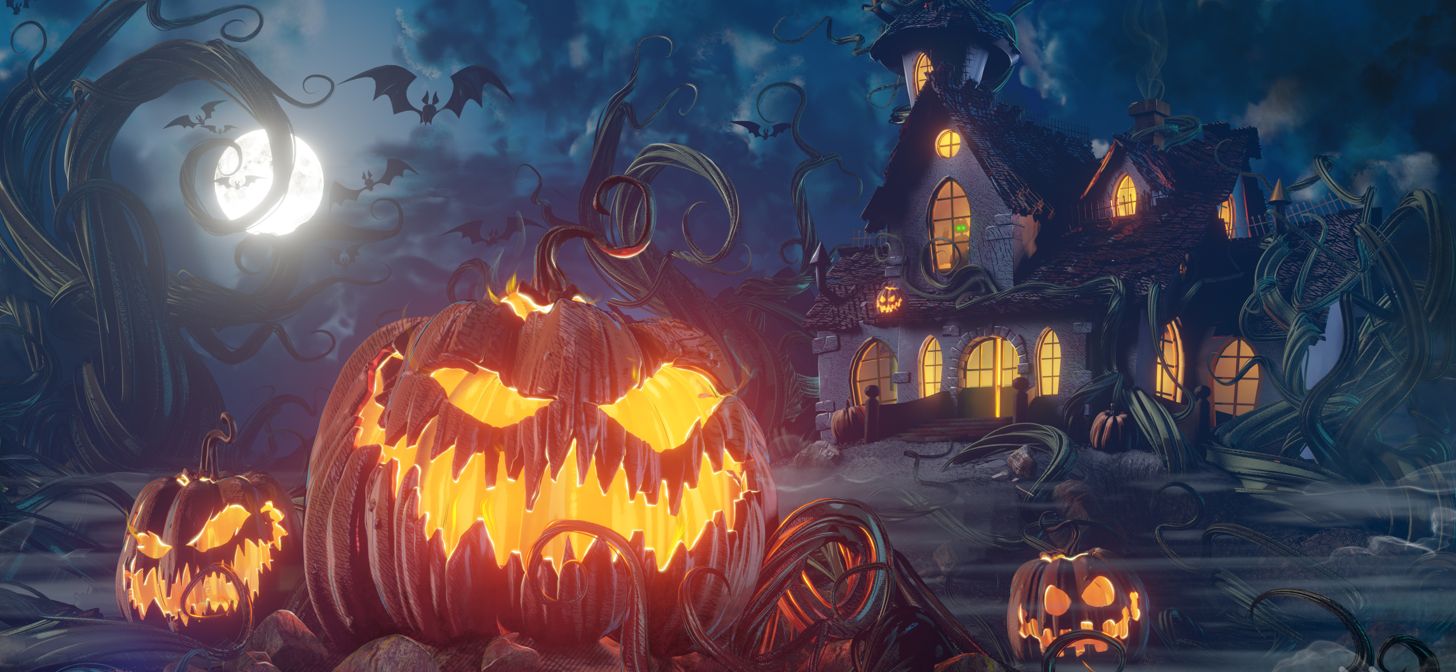
“Halloween party”
Around the middle of October, I started thinking about a scene to make for Halloween. Initially, my idea was to develop a very small looped animation, but then I changed course, thinking about an environment governed by a foreground character in a scene that could mix a toon look with a typical creepy character.
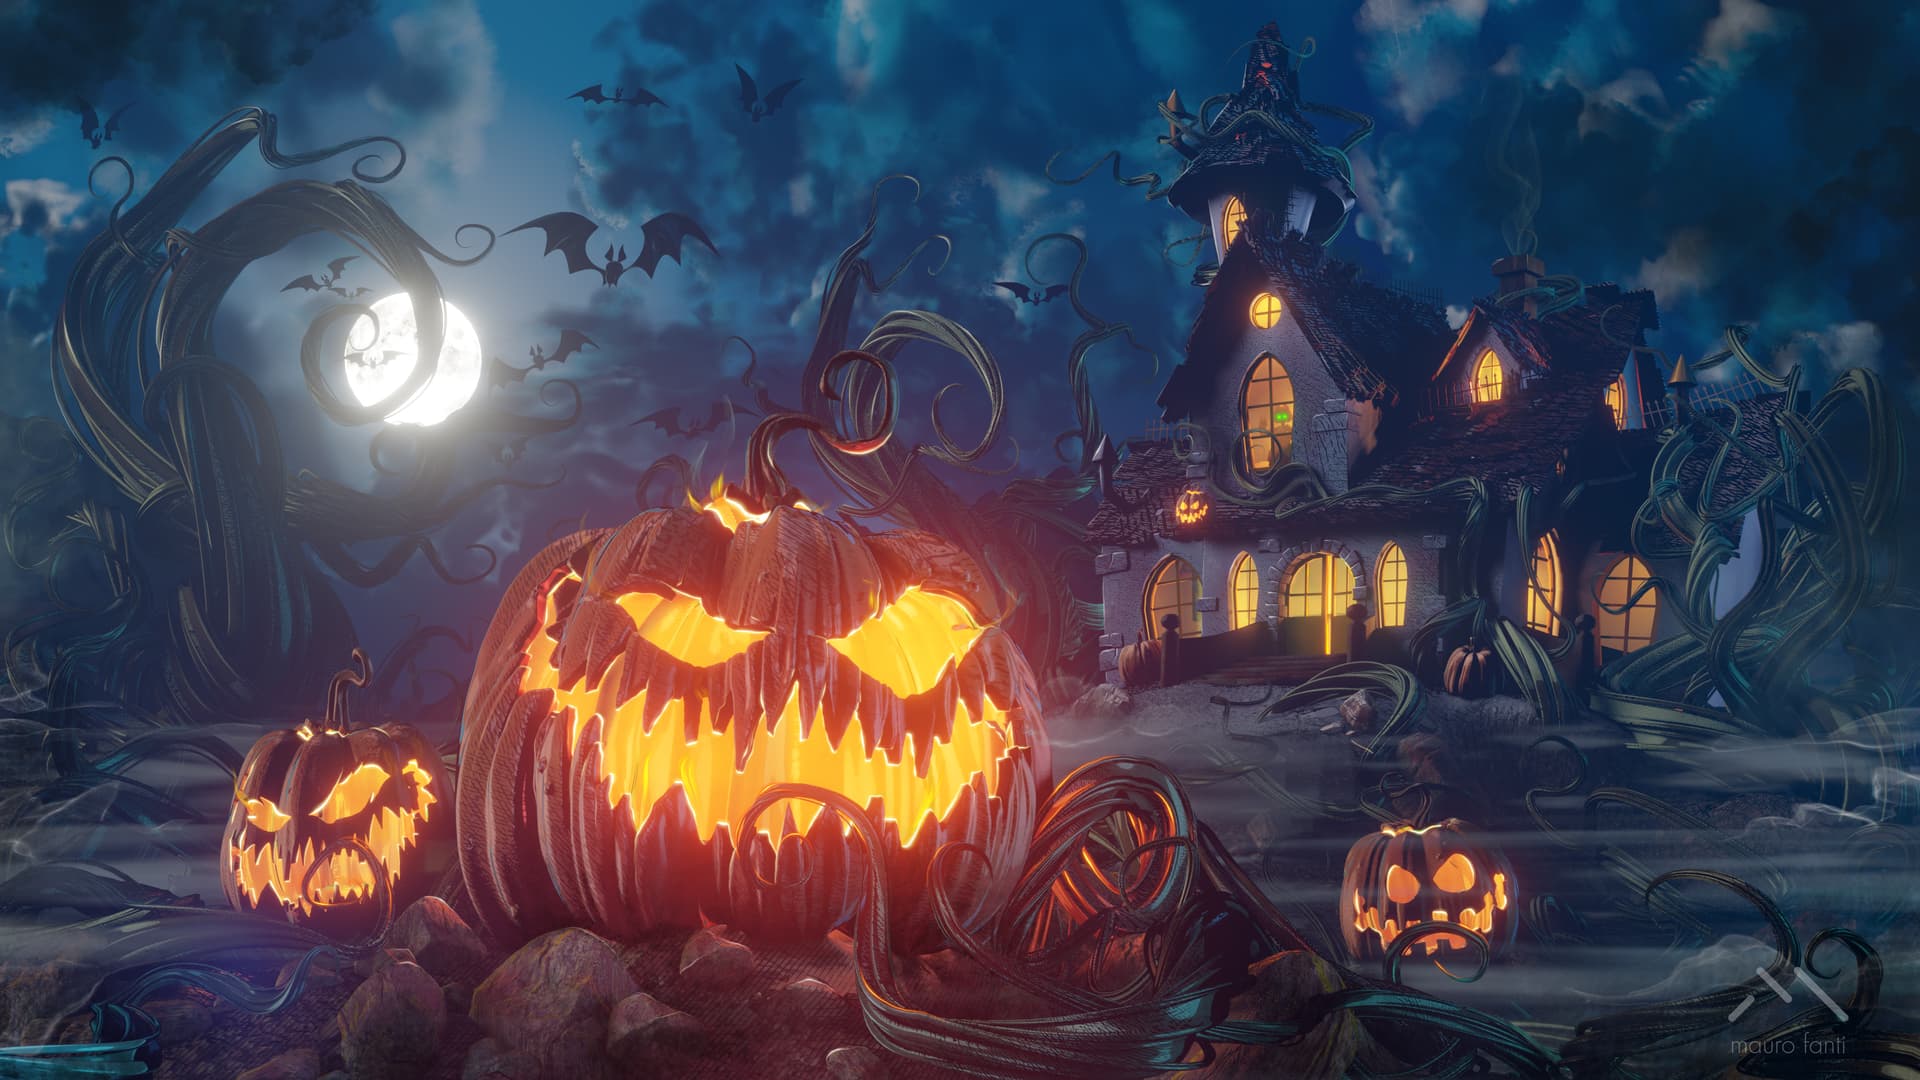
The development has been quite rapid, given the limited time available and the strict deadline of October 31st. So I started from a very quick concept with regards to the composition of the image: a sort of farm immersed in the fog, with a haunted house in a raised position and a group of creepy figures dominating the scene, everything under a dense sky of clouds, from which a full moon shines. Starting from this setting I started working in Blender, developing ideas as the modeling progressed.
Inspiration
First of all, I carried out careful research into the graphic language of a “toon-horror” scene and obviously, the eye could only fall on the works of Tim Burton (the tribute to The Nightmare before Christmas in my scene should be rather evident).
Tools
For the entire production process up to the rendering stage, I used Blender with different techniques—somewhat as a personal exercise—from geometry nodes to Bezier curves, from sculpt to booleans.
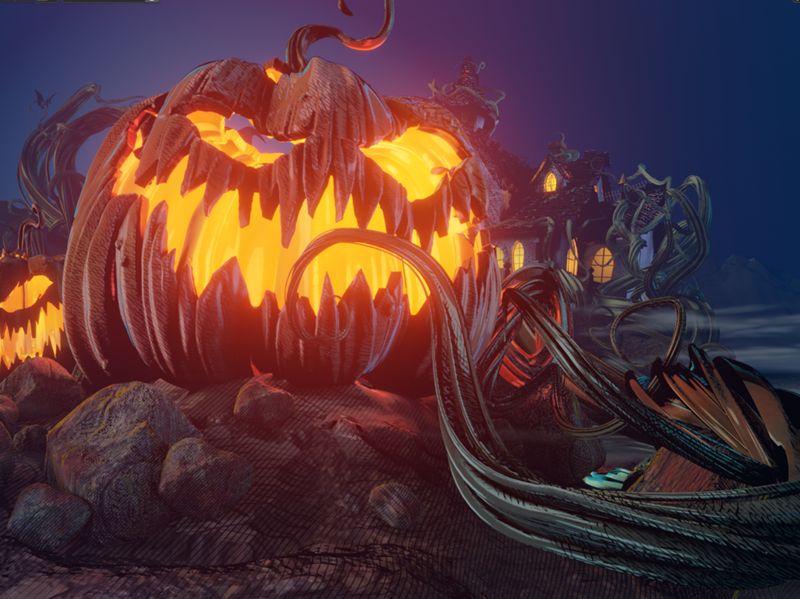
As a stylistic choice, I have reduced the use of textures to the minimum; the pumpkins, for example, have a soft diffuse map made with vertex paint directly on the high-poly model.
I rendered with Eevee and, to finish the scene, I added a little post-production with the Procreate app on the iPad, creating some hand-painted light details.
Modeling
Initially, I dedicated myself to arranging the main elements on stage in order to be able to define the scene in space on the basis of the compositional scheme: a large plane to create the base of the environment, a large cube to think about where and how to place the house, and finally some elements created with the Add Mesh: ANT Landscape add-on arranged in the distance to mark the horizon. At that point I inserted a sphere for the moon, a sun light to think about the main lights and shadows, and a camera to define the frame right away.
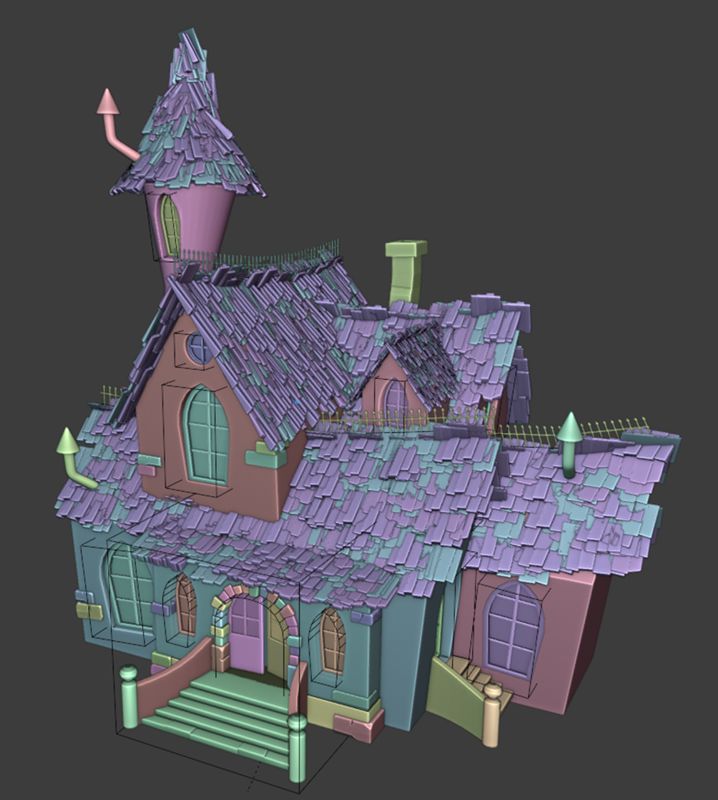
The first element of development was the haunted house: a classic and, in some ways, raw modeling, I focused only on the visible elements, considering the distance from the point of view and containing the level of detail and the polycount. A series of deformed cubes defined the main volumes; a set of 3 types of windows and an entrance portal related respectively parented to a subtraction solid to create the openings with Booleans. The roofs are made with fairly basic geometry nodes, and so I added some scattered details such as chimneys, railings, steps and protruding bricks—all absolutely low-poly—to give interest to the house.

After placing the house in the scene according to the shot, I started an initial modeling of the ground in sculpt mode with Dyntopo. This allowed me to be able to manage the topology, concentrating the detail only on certain points without making the polycount grow exponentially, thus creating the small hill on which the house rests and a few hollows here and there.
Moving on to the realization of the first pumpkin:

Starting from a simple UV-Sphere, I flattened the poles with Proportional Editing and, in the same way, I selected and scaled 8 loops to give the basic shape to the pumpkin. Then with the sculpting tools, I made a whole pumpkin and then painted the carved areas with masks and, with mask extract, created the carved pumpkin. Next, I worked on the details of the Halloween pumpkin. I followed this process for 3 different types of pumpkin.
Once the pumpkins were made and placed on stage, I further defined the terrain and began to work on the vines.
Having created a simple type section starting from a circle, I made all the vine elements with Bezier curves, controlling the rotation of the vertices and the scale point-by-point.
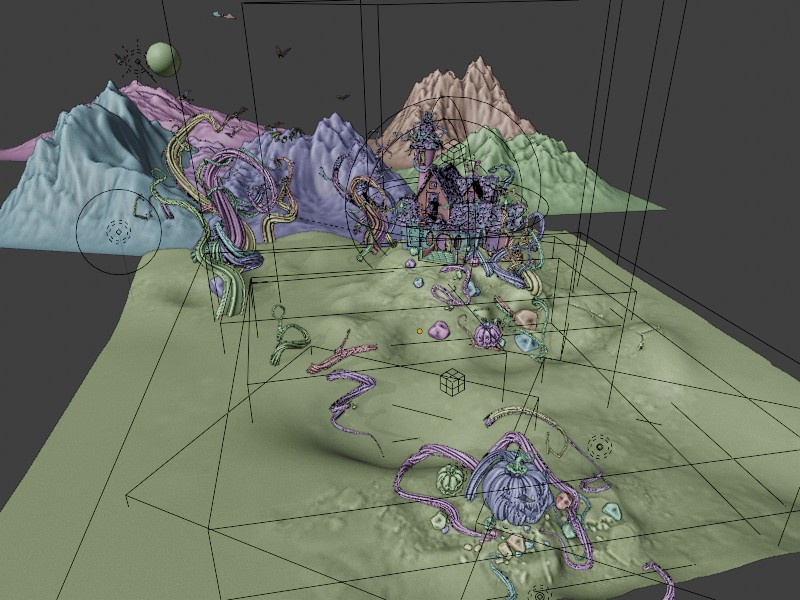
After completing the scene with the creation of some stylized bats and rocks generated with the rock generator, it was time to focus on shading.
Lighting and shading
In addition to the previously positioned Sun light, useful for simulating the light given by the full moon, I inserted point lights inside the pumpkins and in the house. I also added some lights outside the frame to create tangent lighting effects and give greater depth to the elements in the scene.
For all my scenes, I have created a custom and very elaborate shader that allows me to control almost every toon detail such as cel shading, cross-hatch, reflections, rim light, and so on, allowing me to follow my vocation for a comic style.
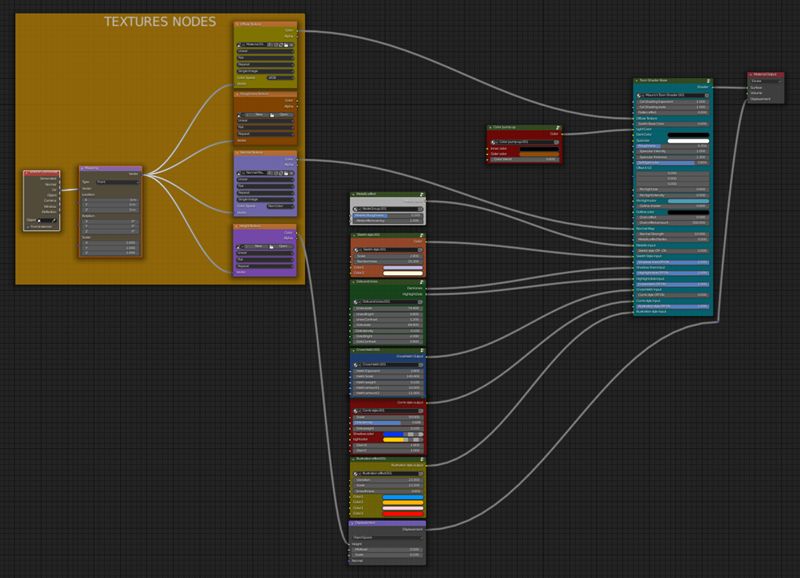
After several lighting settings and attempts, I made the bake of the lights and I applied the shader to the various elements in the scene, managing the comic style and checking in detail the proportions between light and dark, as well as giving an almost hand-drawn and colored look. The only textures in the scene are the ground and the stones in the foreground (I would have liked to create these textures by hand but the time available did not allow it). I applied a vertex paint to the pumpkins, while for the rest of the scene I used a procedural control to give an illustration effect.
To finish the scene, I inserted a volumetric fog and a system of procedural clouds to get the atmosphere I was looking for.
With a bit more time available, I would have liked to do the retopology of the pumpkins (I usually use the RetopoFlow 3.0 add-on) and create a small looped animation, but the realization and rendering times would have increased dramatically.
Render
Once all the settings such as bloom, ambient occlusion, screen space reflections and volumetric lights and shadows on the render engine were set, I rendered the final scene with Eevee.

I fixed tones, exposure, and contrast with Compositing and finally I imported the image into Procreate to add details by hand and thus obtain the final image.
My hardware configuration
- AMD Ryzen 9 3900x
- NVIDIA GeForce RTX 3060
- 64GB
- Huion Kamvas Pro 16
About the author
 Mauro Fanti, construction engineer-architect and freelance Visual Artist interested in character and environment design with a great passion for comics, animation and retro-gaming. Based in Sardinia, Italy.


