
Behind the Scenes: Paranoid Ostrich
Hey, I’m Kevin Ruffenach and I have been working in Blender on and off since around 2011 when I started becoming interested in the world of 3D design while in high school. I studied 3D animation at Dakota State University in South Dakota, where I used primarily Maya and 3ds Max. After that, I moved to Tulsa, Oklahoma where I got hired as a 3D designer at an interior design company called Little Mountain Productions. We use primarily Blender for all of our designs and illustrations, so it has been exciting to return to the world of Blender and have the opportunity through my job to get more proficient with it.
[sponsor id = ‘qarnot’]
Inspiration
Recently, during one of our projects at work, I needed to use hair systems for one of our illustrations and quickly realized after not getting the results that I wanted that I had only a rudimentary understanding of how they worked. Given the time constraints of the project, I didn’t really have time to learn and experiment. However, I had been itching to do some artwork outside of work and figured that it would be a great opportunity to do the learning and experimentation that I couldn’t do at work.
I was also greatly inspired/helped by this tutorial from Nita Ravalji!
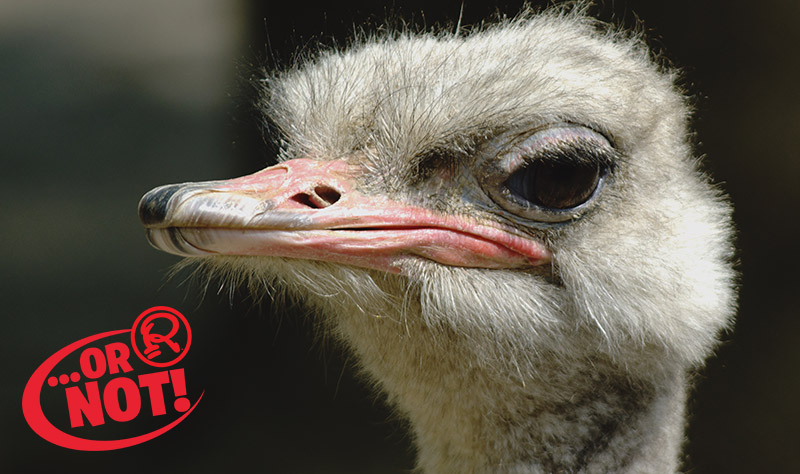
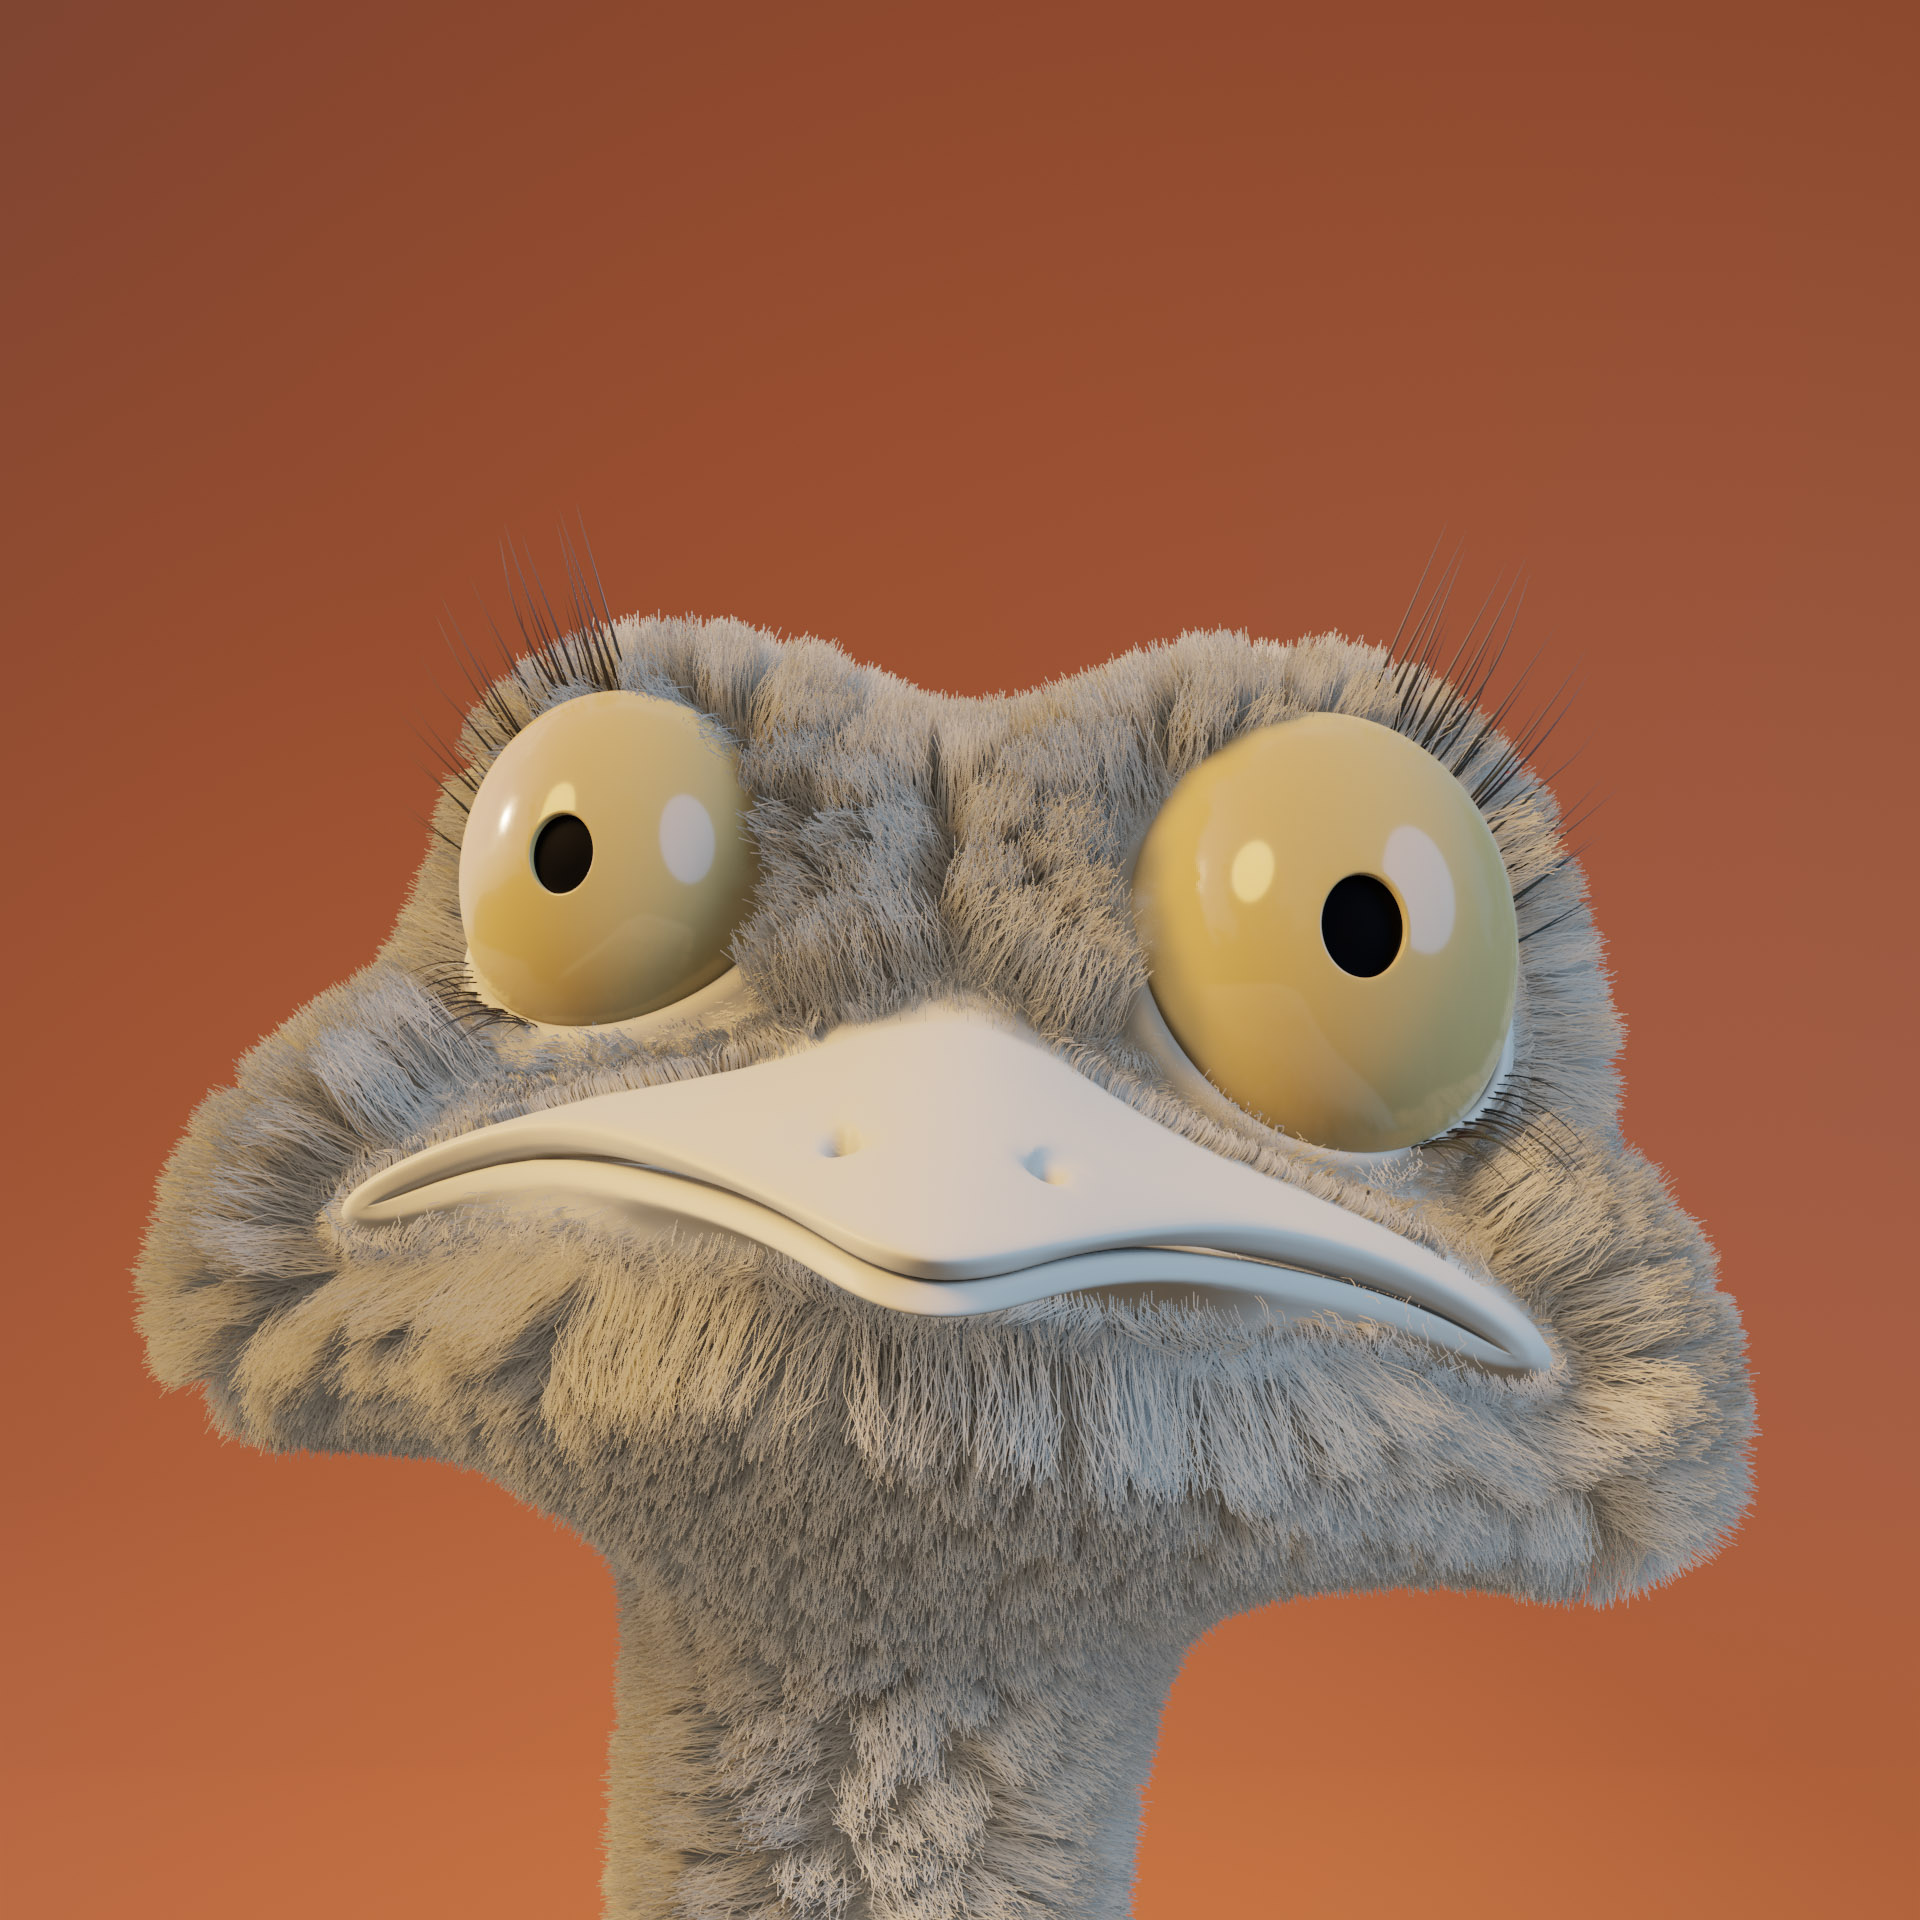
Obviously, the animal I chose to create isn’t one that immediately comes to mind when you think of a fuzzy, hairy animal, but I wanted my character to have a distinct personality and, for whatever reason, an ostrich came to mind. Upon looking at reference images, I was pleasantly surprised to find that ostriches have fairly fuzzy heads; it would be perfect for experimenting with different kinds of hair.
Modeling
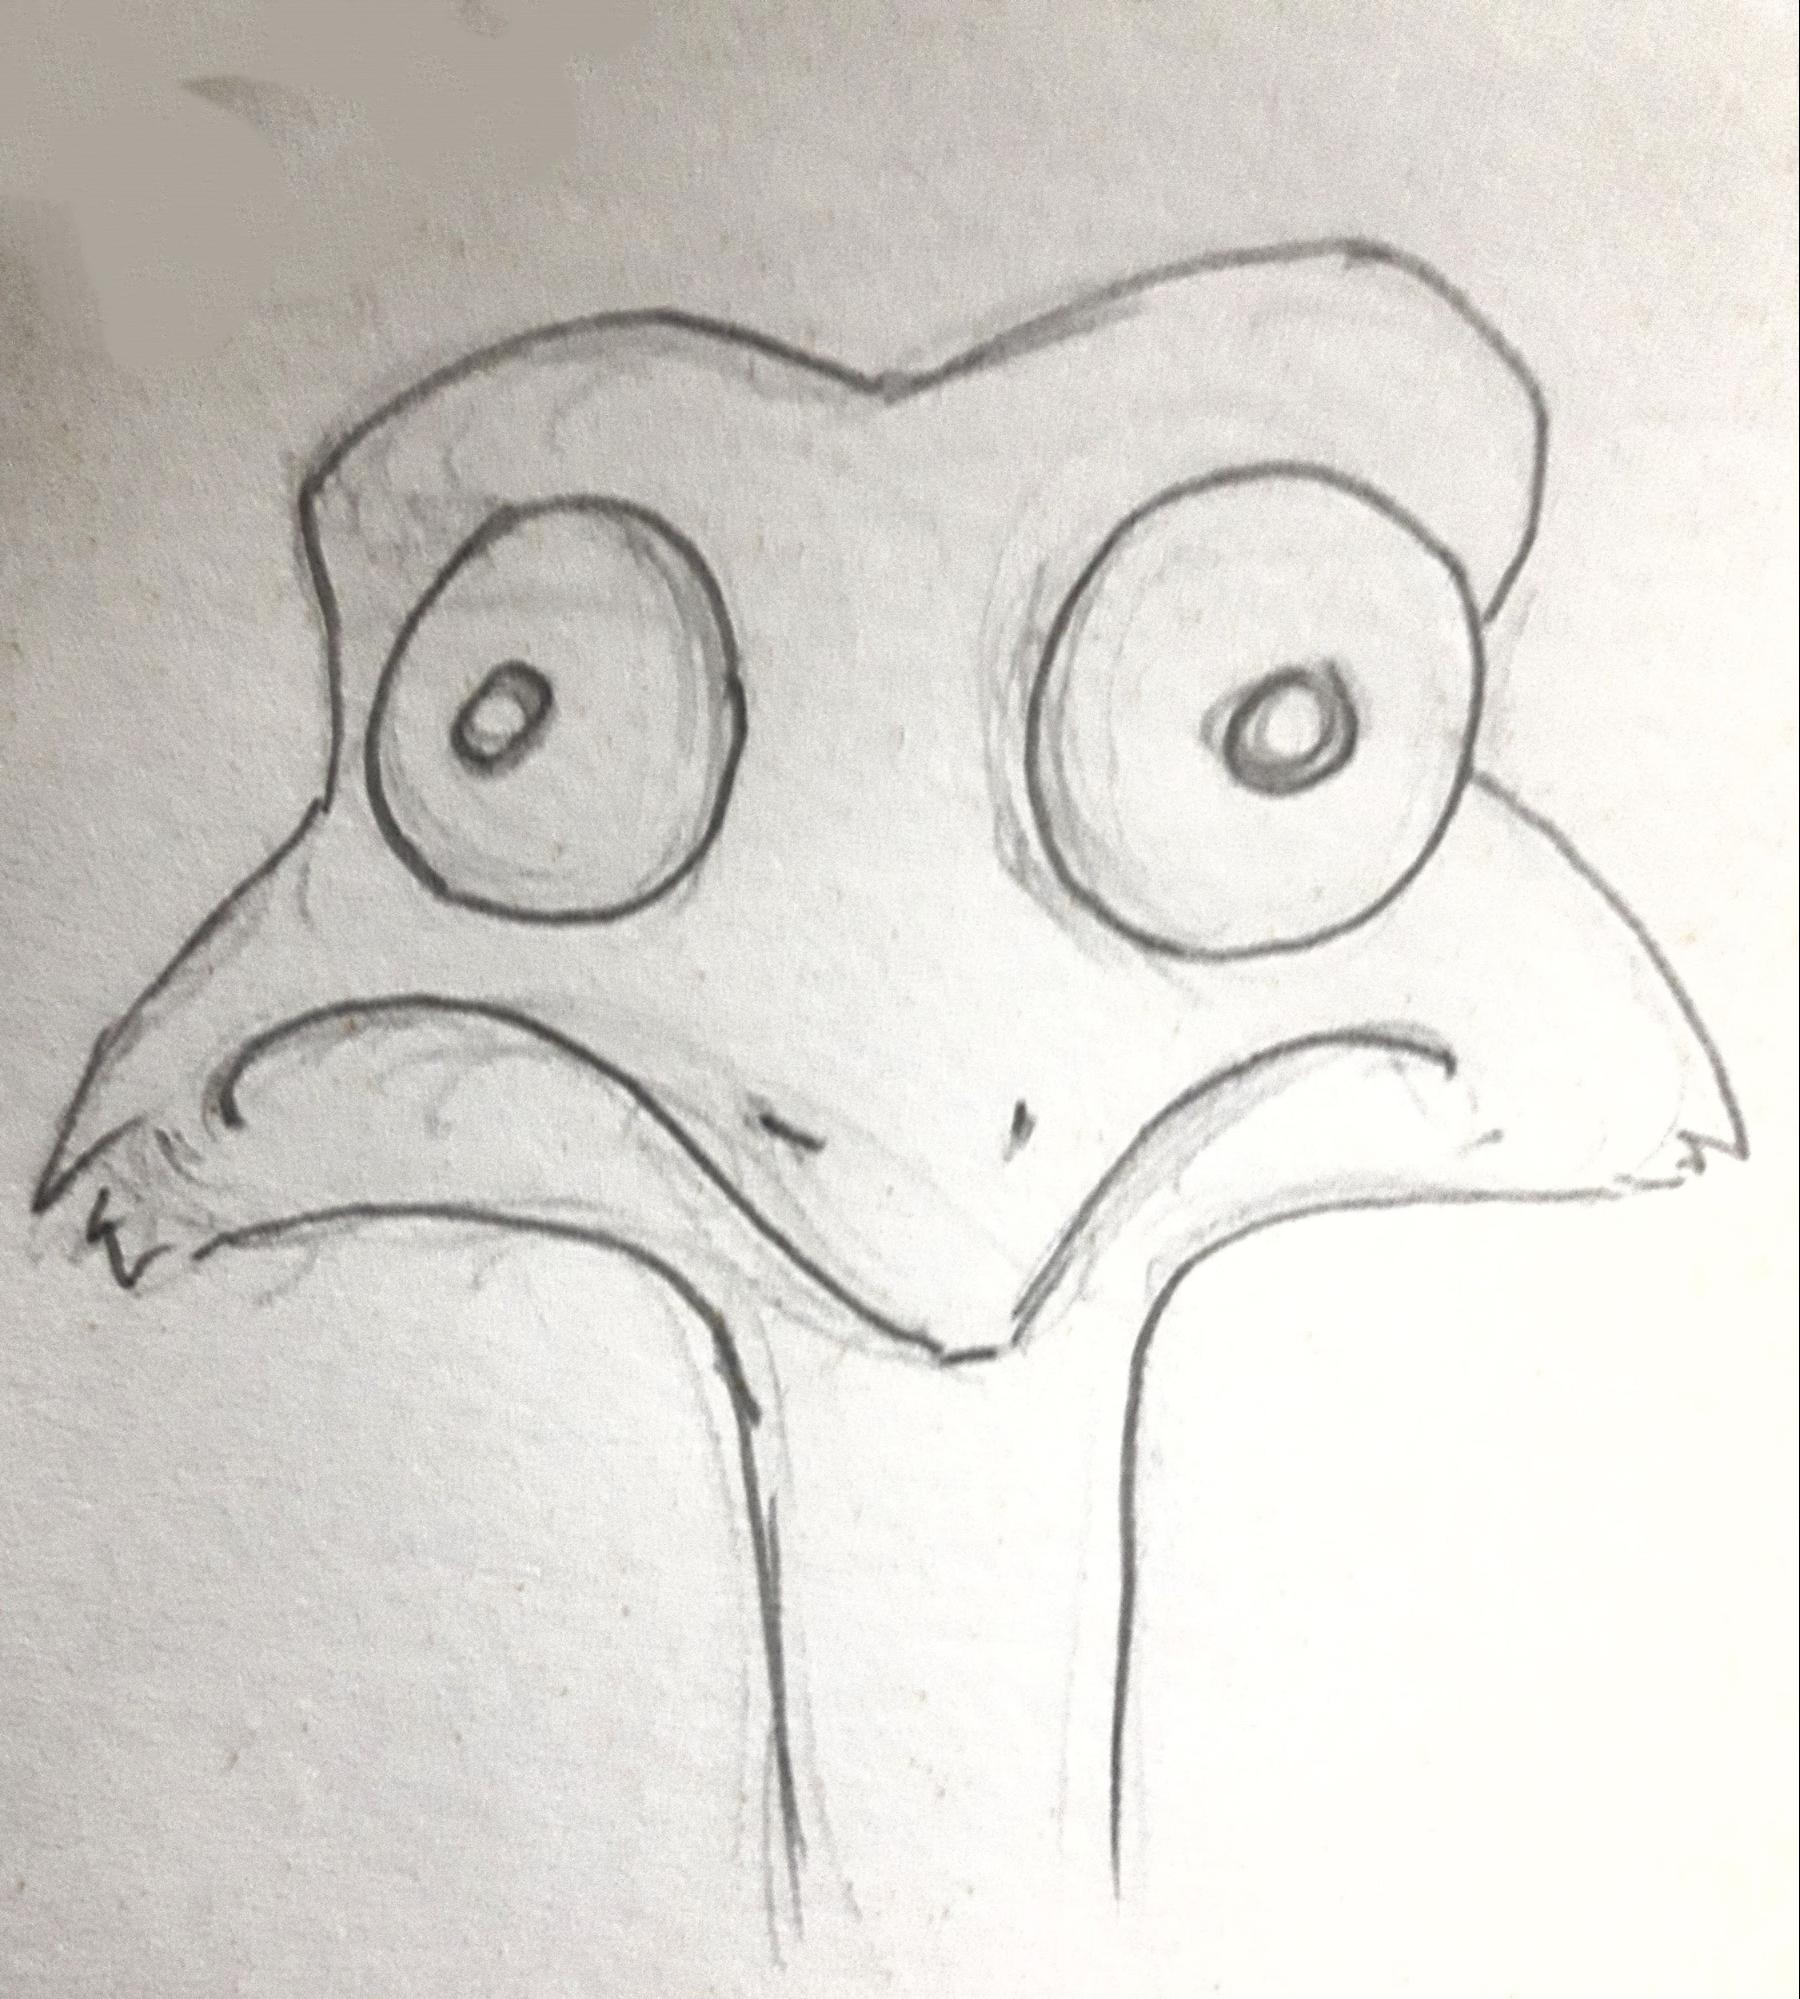
I began with a quick, but extremely rough, sketch in order to have a reference for the personality and pose of the character.
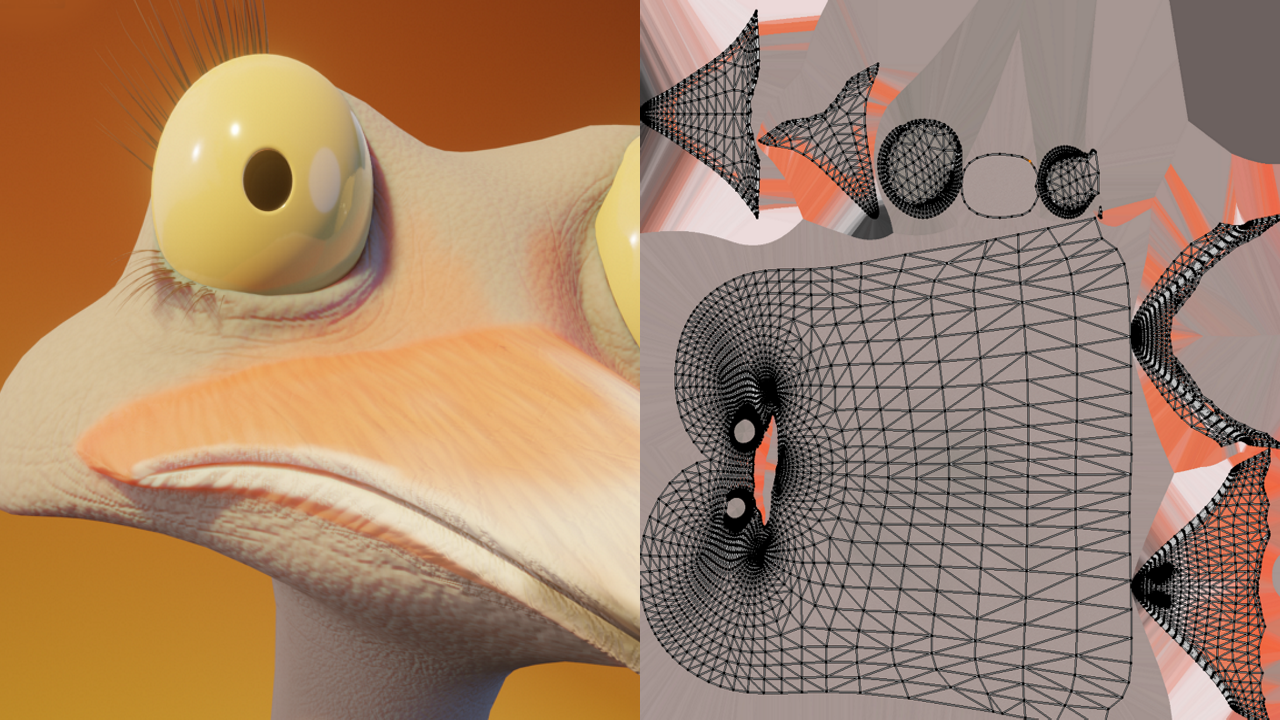
Then I began the modeling process, creating separate pieces for the beak and the eyes.

After getting the basic building blocks built, I joined the beak and the head and sculpted the details with dyntopo on. I also began getting the pose nailed down.
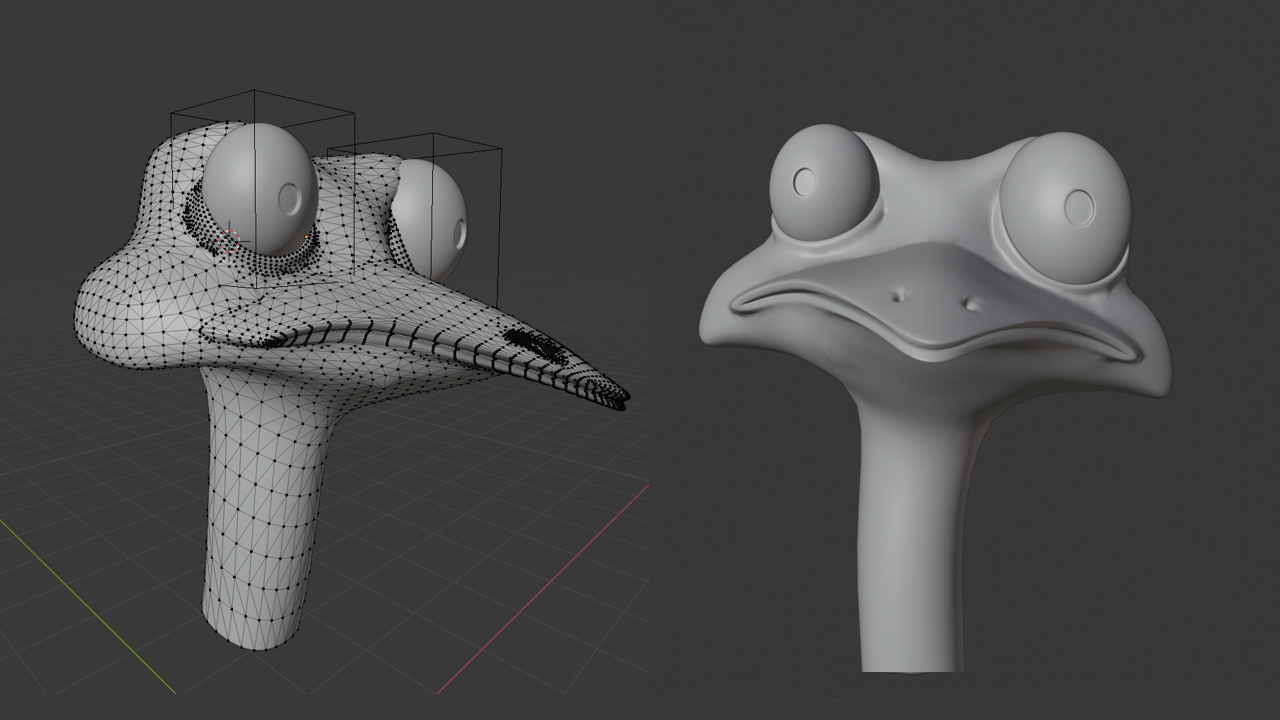
You will notice that the character is very disproportionate and ugly from any view except the camera view (and I mean, not great in that case either). However, I knew I wasn’t going to use this character for any other purpose except for the one image and I primarily focused on learning hair, so I didn’t prioritize making a clean model (and didn’t retopo the model for the same reason). At this point, choosing an awkward ostrich as my subject was looking like a wise decision!
Lighting
At this point, I like to set up my lights and background. It’s easier for me to see what each light is doing when nothing has been textured yet (except, in this case, the eyes).
The lighting for this piece is a simple three-point lighting system with an HDRI (from HDRI Haven) set to about .6 for the reflections. I made all the area lights disks so that the eyes would have nice round highlights.
The background is a curved plane with a gradient texture.

The lighting values and positions would, of course, be tweaked throughout the process, but they essentially remained the same.
Hair Systems
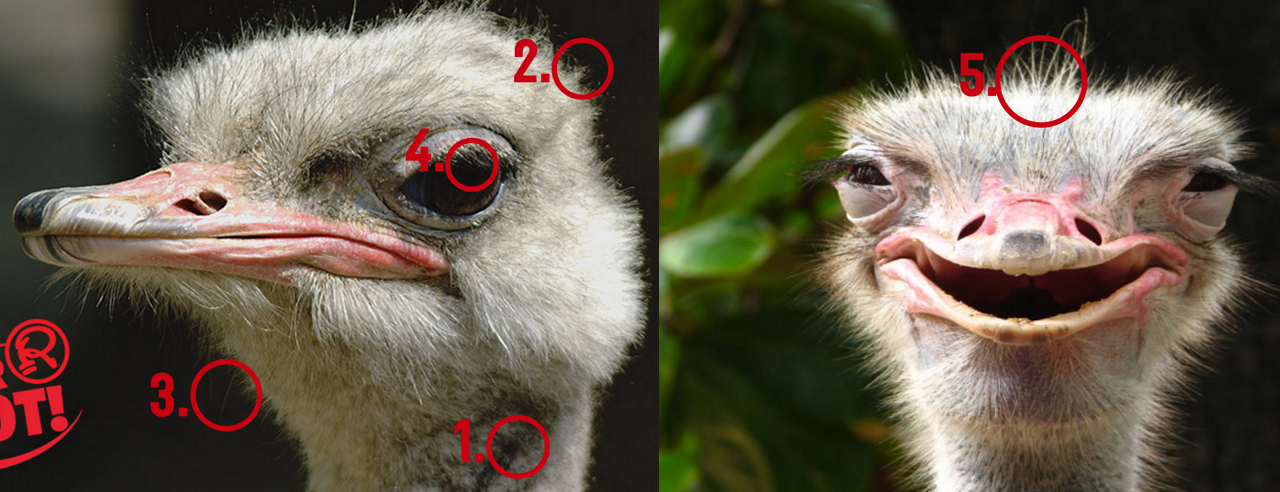
For similar reasons as above, I also set up the primary hair system before texturing. The first thing I did was to identify the different types of hair that occur on an ostrich’s head. Using my reference image, I identified 5 different types:
- Short curly hair.
- Medium general coverage hair which bent upwards slightly.
- Long straight stray hairs.
- Eyelashes.
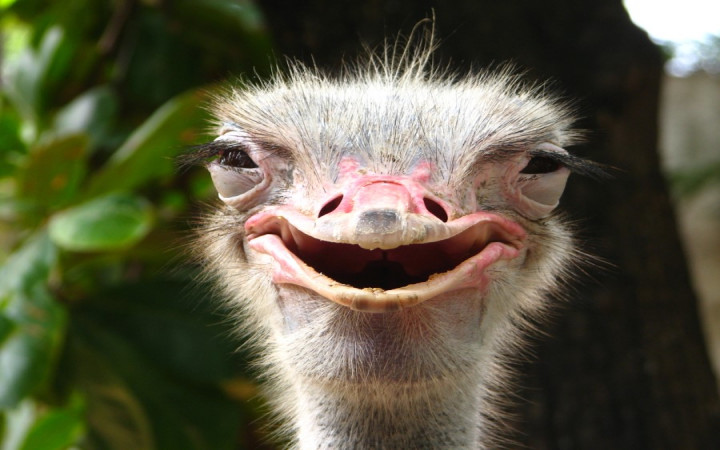
- Mohawk hair. Because this last fellow has it and I love it.
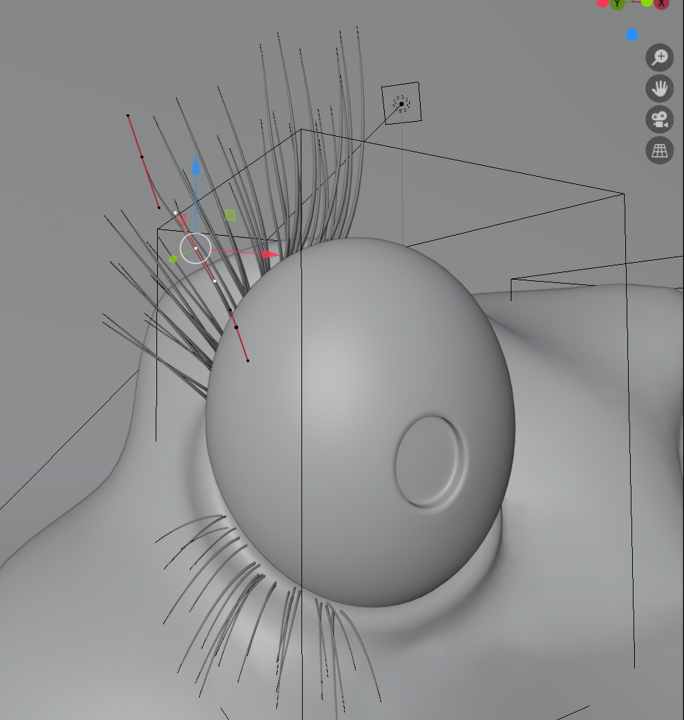
The eyelashes were the easiest because I didn’t actually use a hair system for them—I just modeled them using bezier curves.
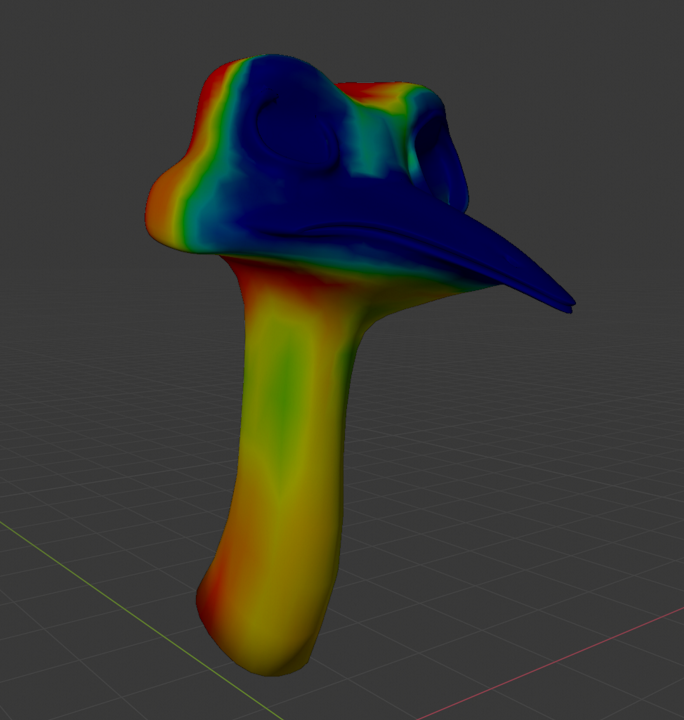
For the rest of the hair, I created 4 different systems and used weight painting to keep them away from the eyeballs and the beak.
After that, I set up my 4 remaining hair systems! My first attempt was, well, lacking…
I would have a similar expression if I suddenly grew a luscious coat of shag rug.
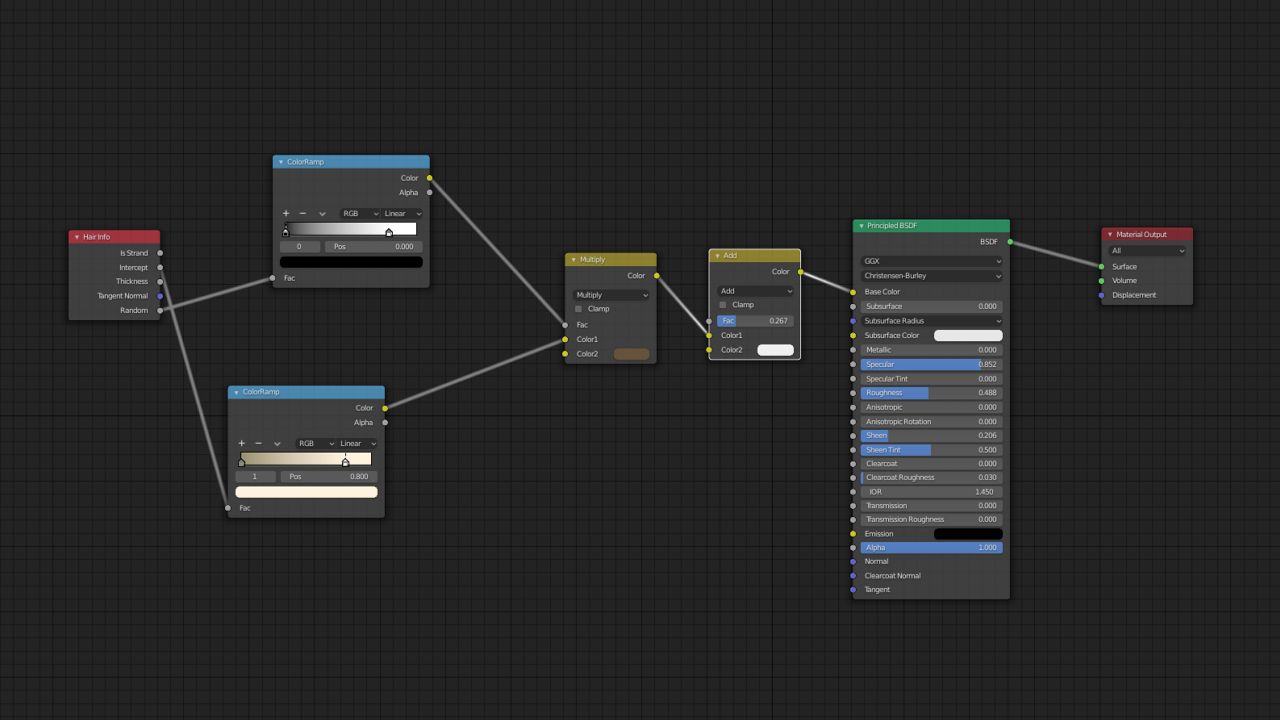
A lot of experimenting, tutorials, and adjustments followed but to boil it down, my main issue was having my hair set to “strand” instead of “strip” in the render properties for EEVEE.
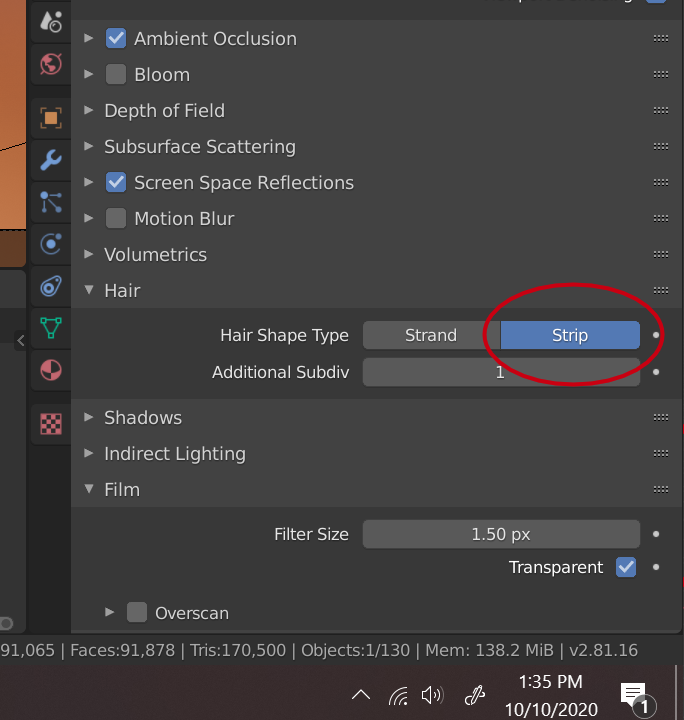
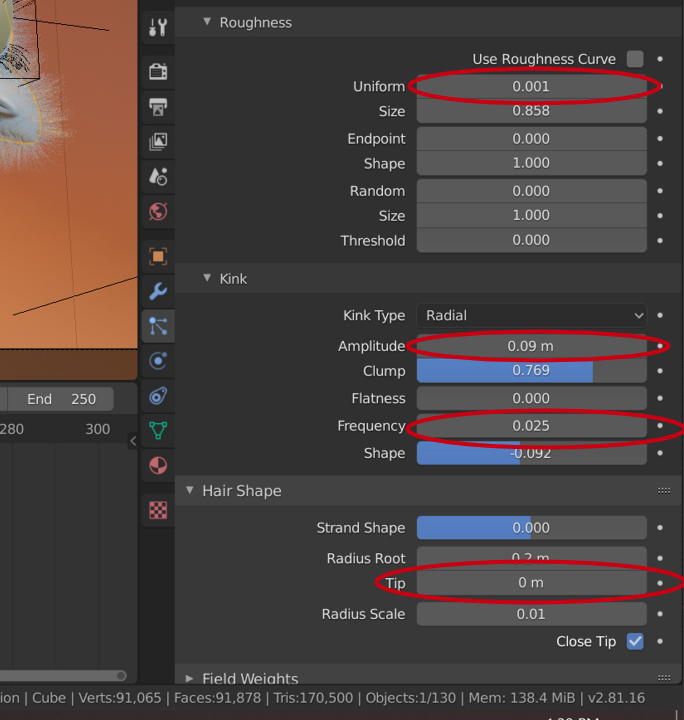
Without “strip” turned on, your hair shape settings won’t have an effect on how the hair renders, and you can’t get fine-looking hair. I also found that a little goes a long way in the kink and roughness settings, which give shape to your hair particles. Below you can see some of my settings for the primary hair system.
With these new changes in place, I had a much better result.
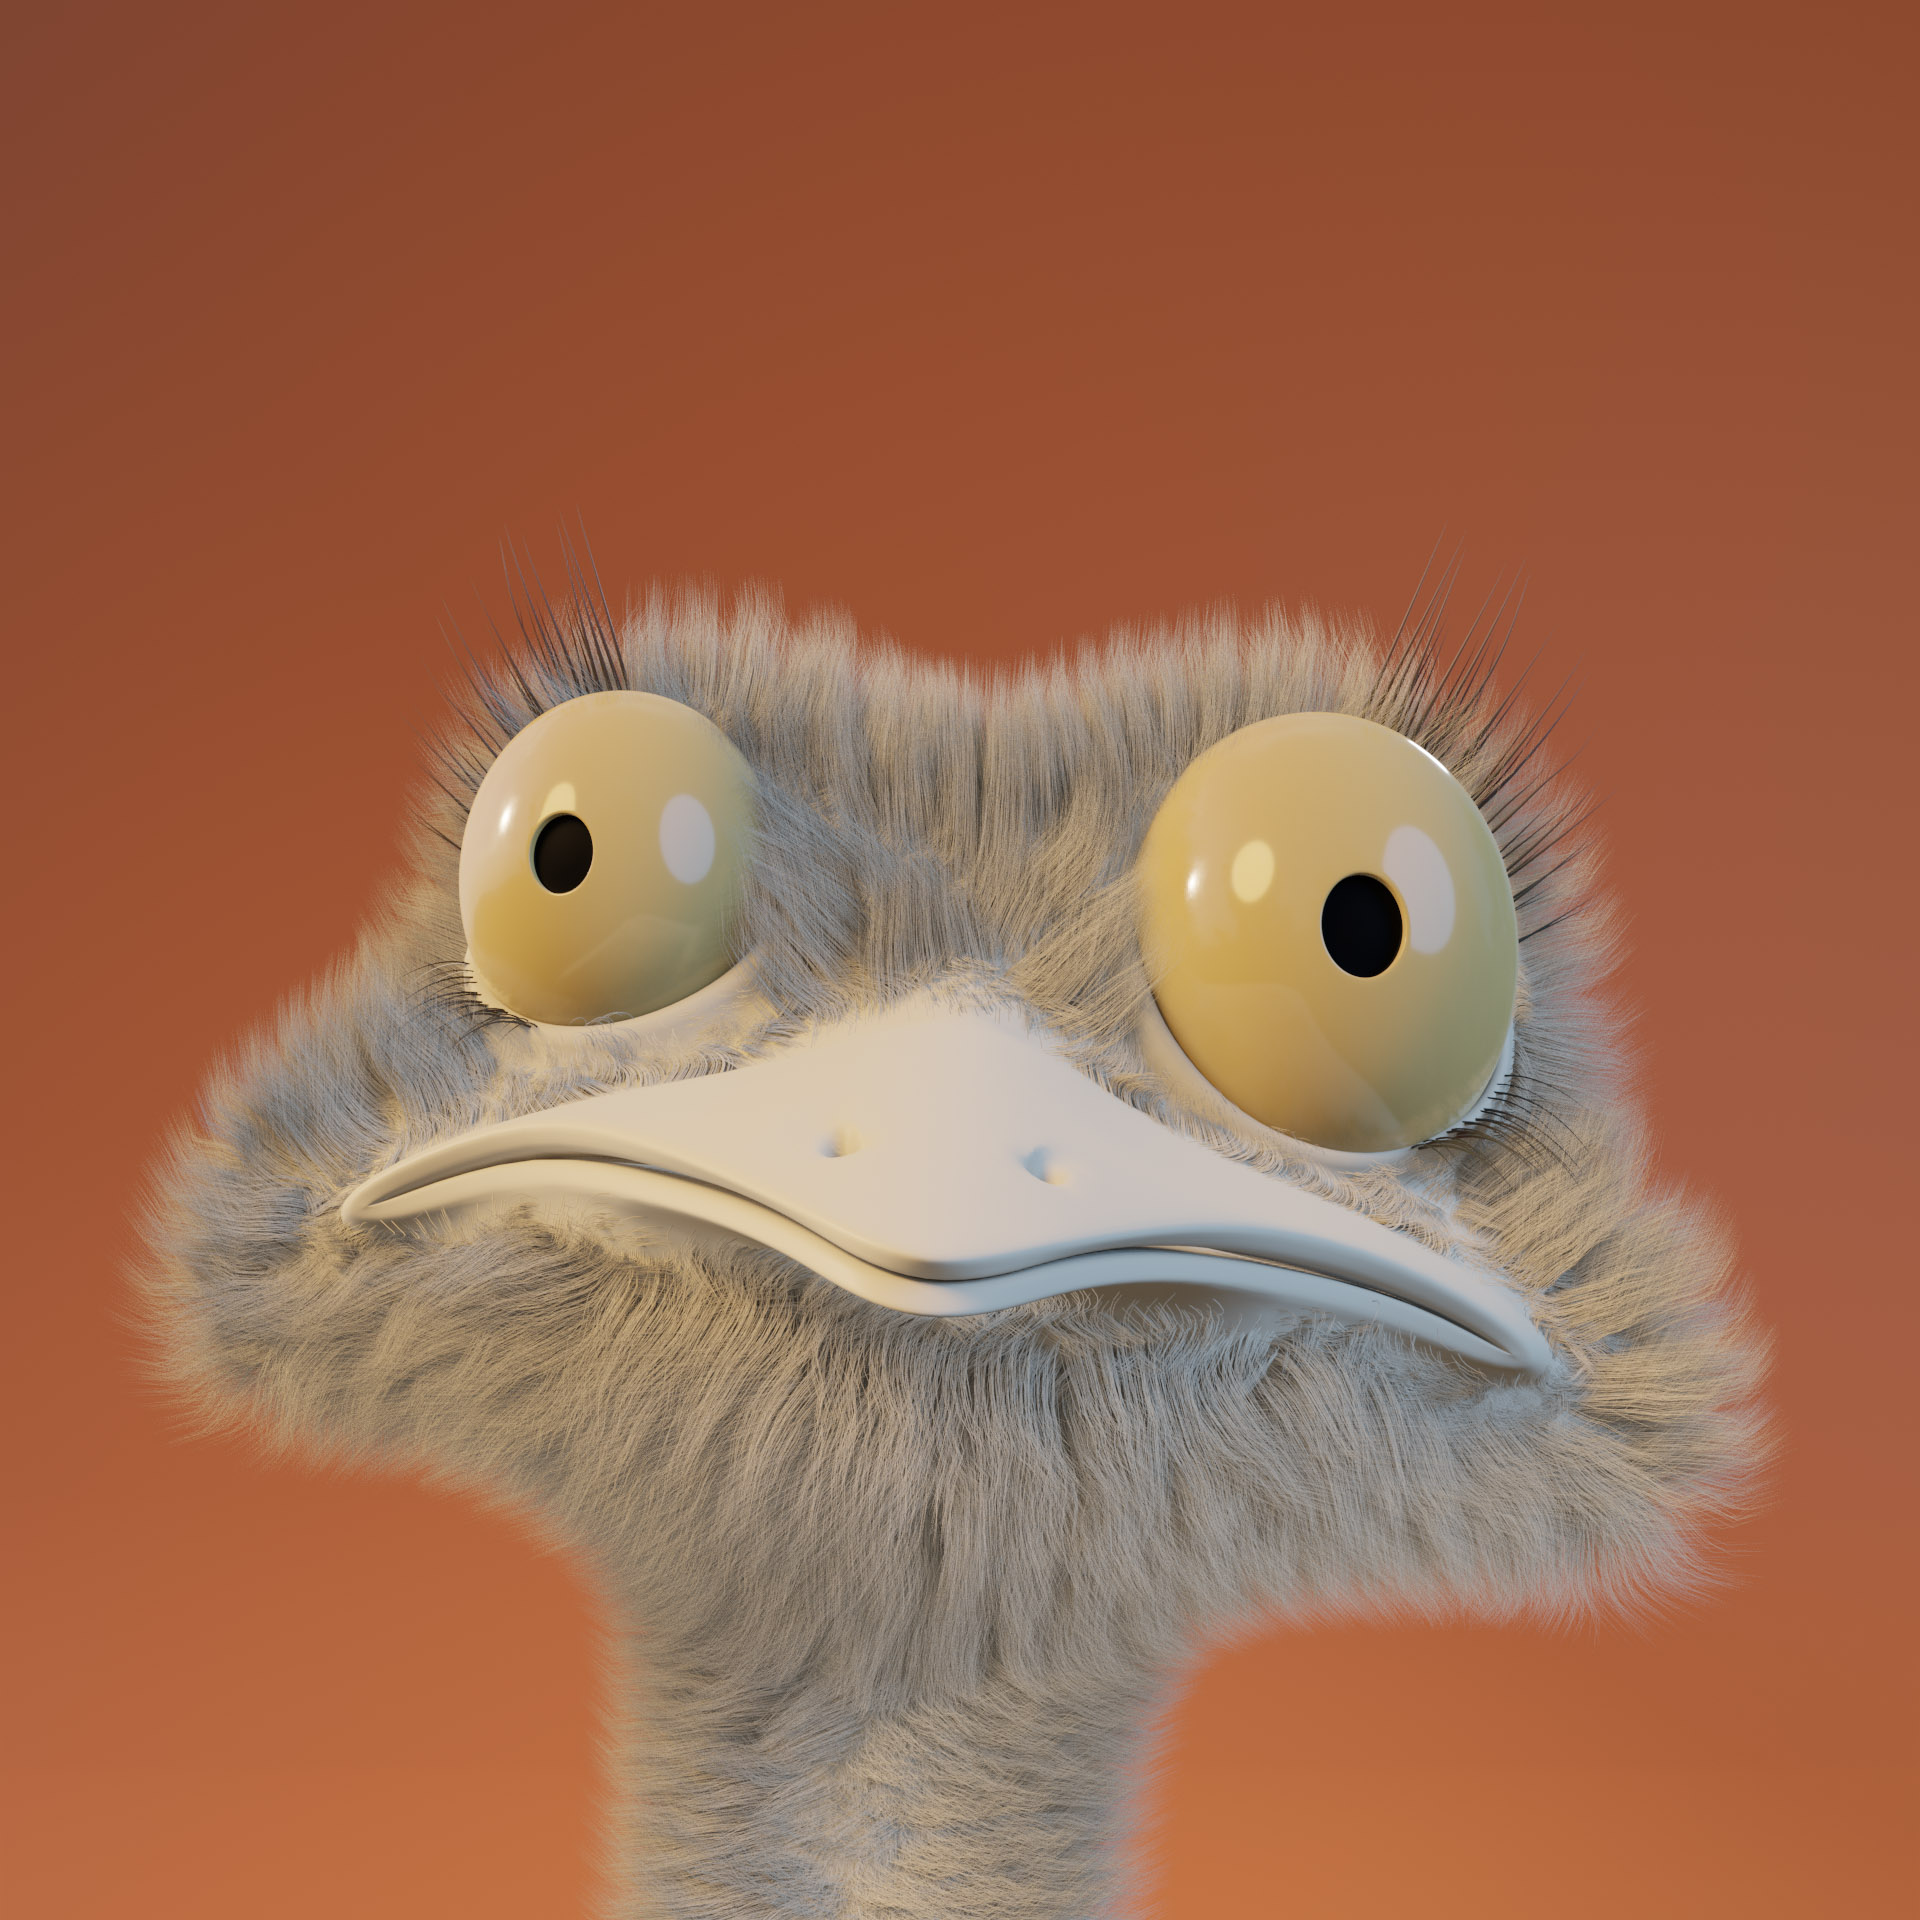
She still looked like a muppet, but now I could proceed with combing the hair particles, adjusting which hair systems appeared where, and reducing how much hair overall appeared on the character.
As I worked on the hair I also made adjustments to the overall head shape and pose.

Texturing
The eyeballs are a simple principled shader with a low roughness setting.
The head itself I unwrapped and put into Substance Painter. I gave it a bumpy skin texture, painted the colors on the beak, and painted details such as wrinkles around the eyes and scratches on the beak. I don’t have much experience in Substance Painter, but this was a great excuse to learn some of that as well.
Once I got the textures back into Blender, I gave the entire head some subsurface scattering, using a mask created in Substance in order to lessen the amount of scattering on the beak.
The hair material has a gradient that goes from dark to light along the length of the hair, which gives it some contrast.
Final Touches
At this point, I had accomplished what I set out to do, which was to better understand the hair systems, but I still wasn’t happy with the final piece as a whole. The composition was lacking and it still wasn’t clearly looking like an ostrich to me.
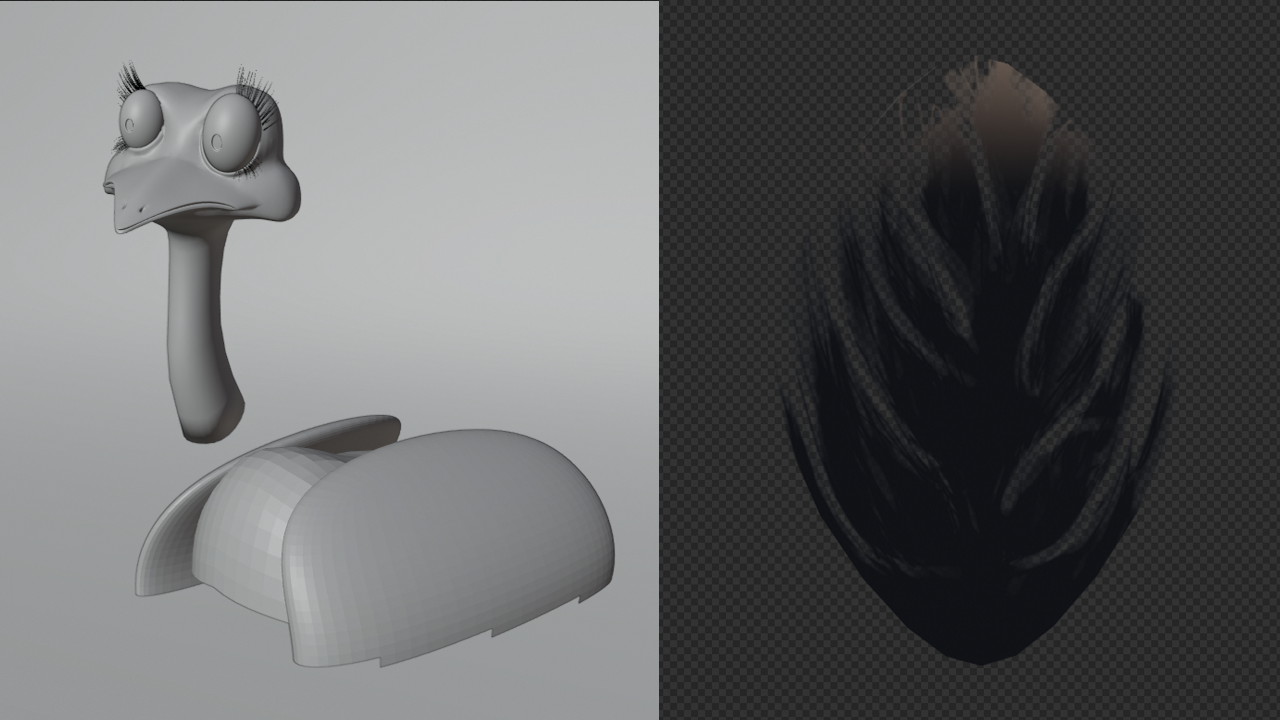
I realized that something that would really help make it as clear as possible that this was an ostrich was to add some sort of a body to her in the background. They have very distinct body feathers, and considering the background was only a color gradient, I thought it would add some depth to the piece as well.
First, I created a very rudimentary body shape, wholly disconnected, and placed it where it would look appropriate in the camera view. Then I created a plane with a feather texture painted on it that I would use for another hair particle system all over the new body object.
All that was left after that was cropping the frame for a more vertical composition, adjusting the light strengths, putting a slight depth of field on to blur the body slightly, and minor post-processing in Krita for color correction.
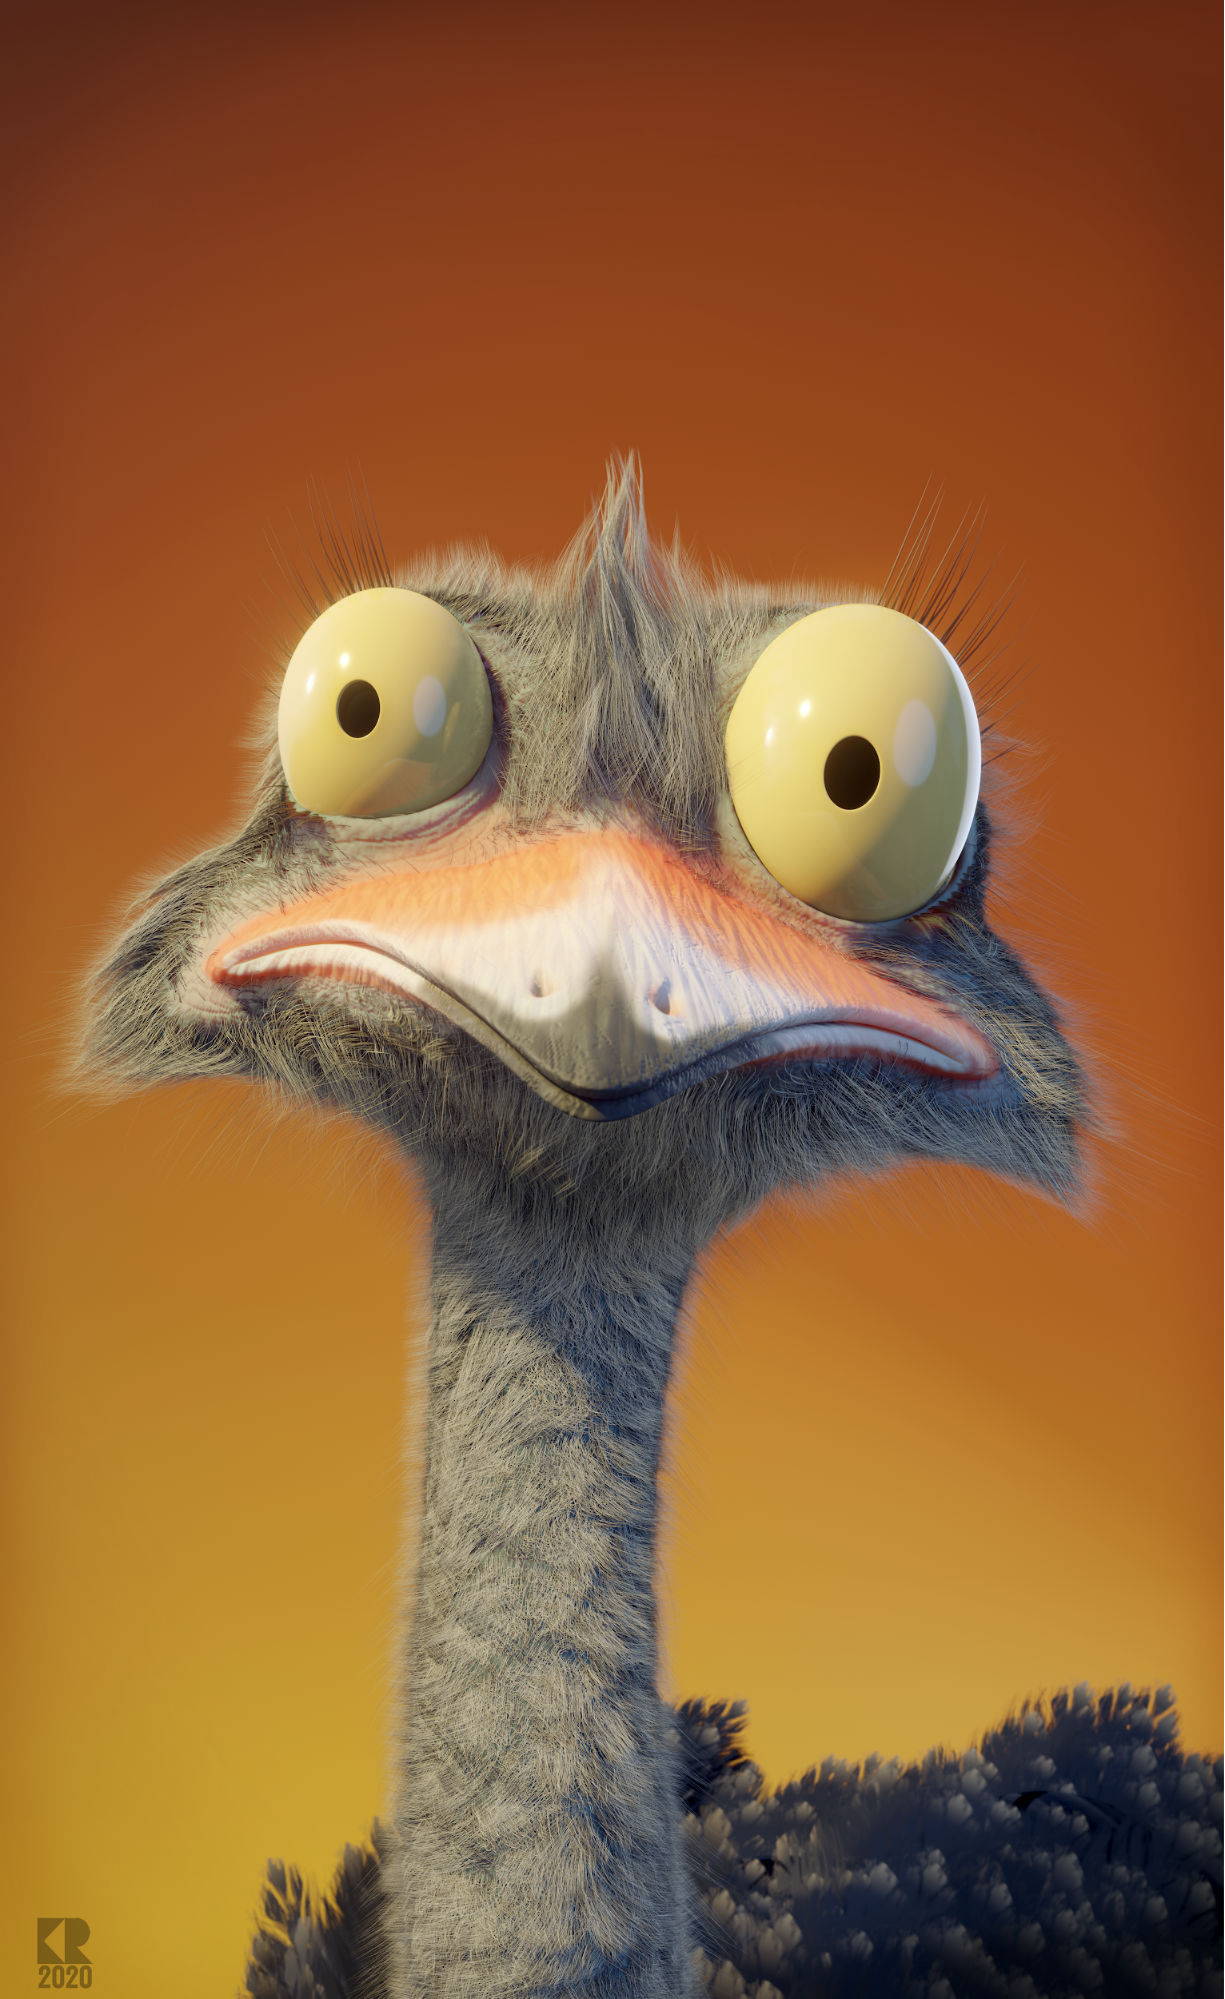
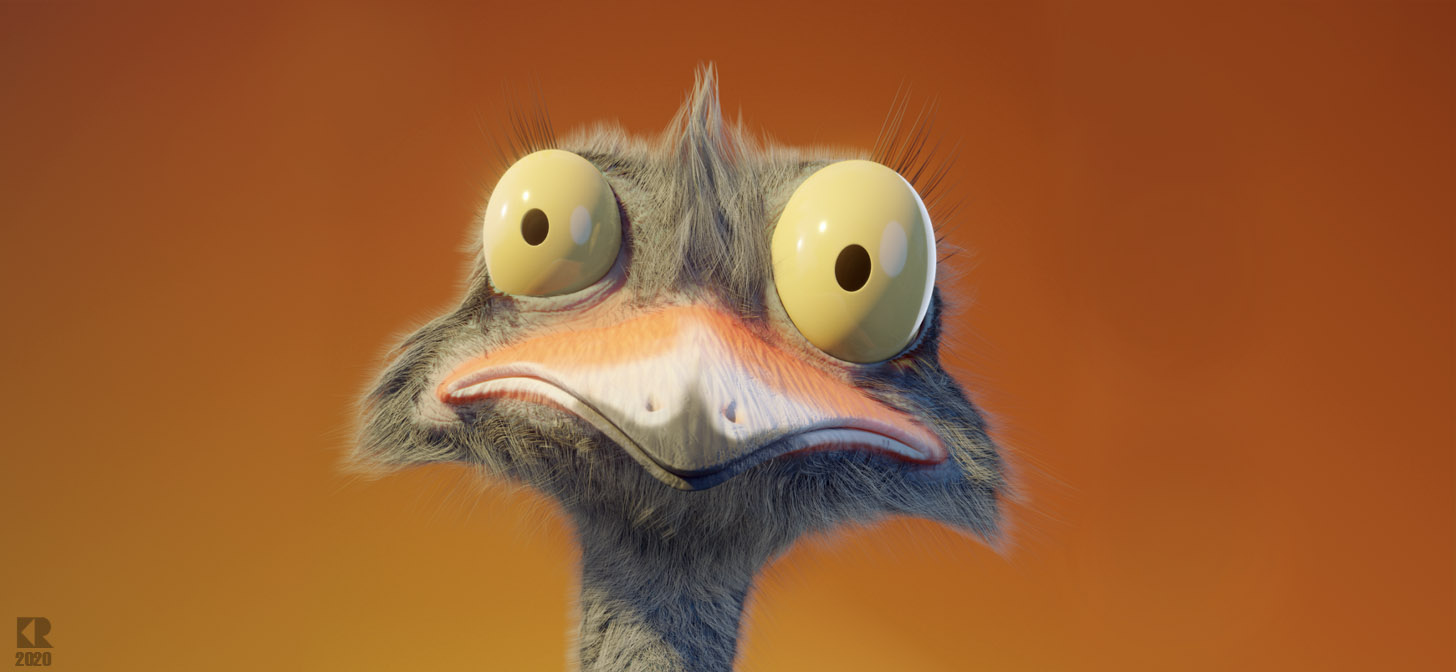
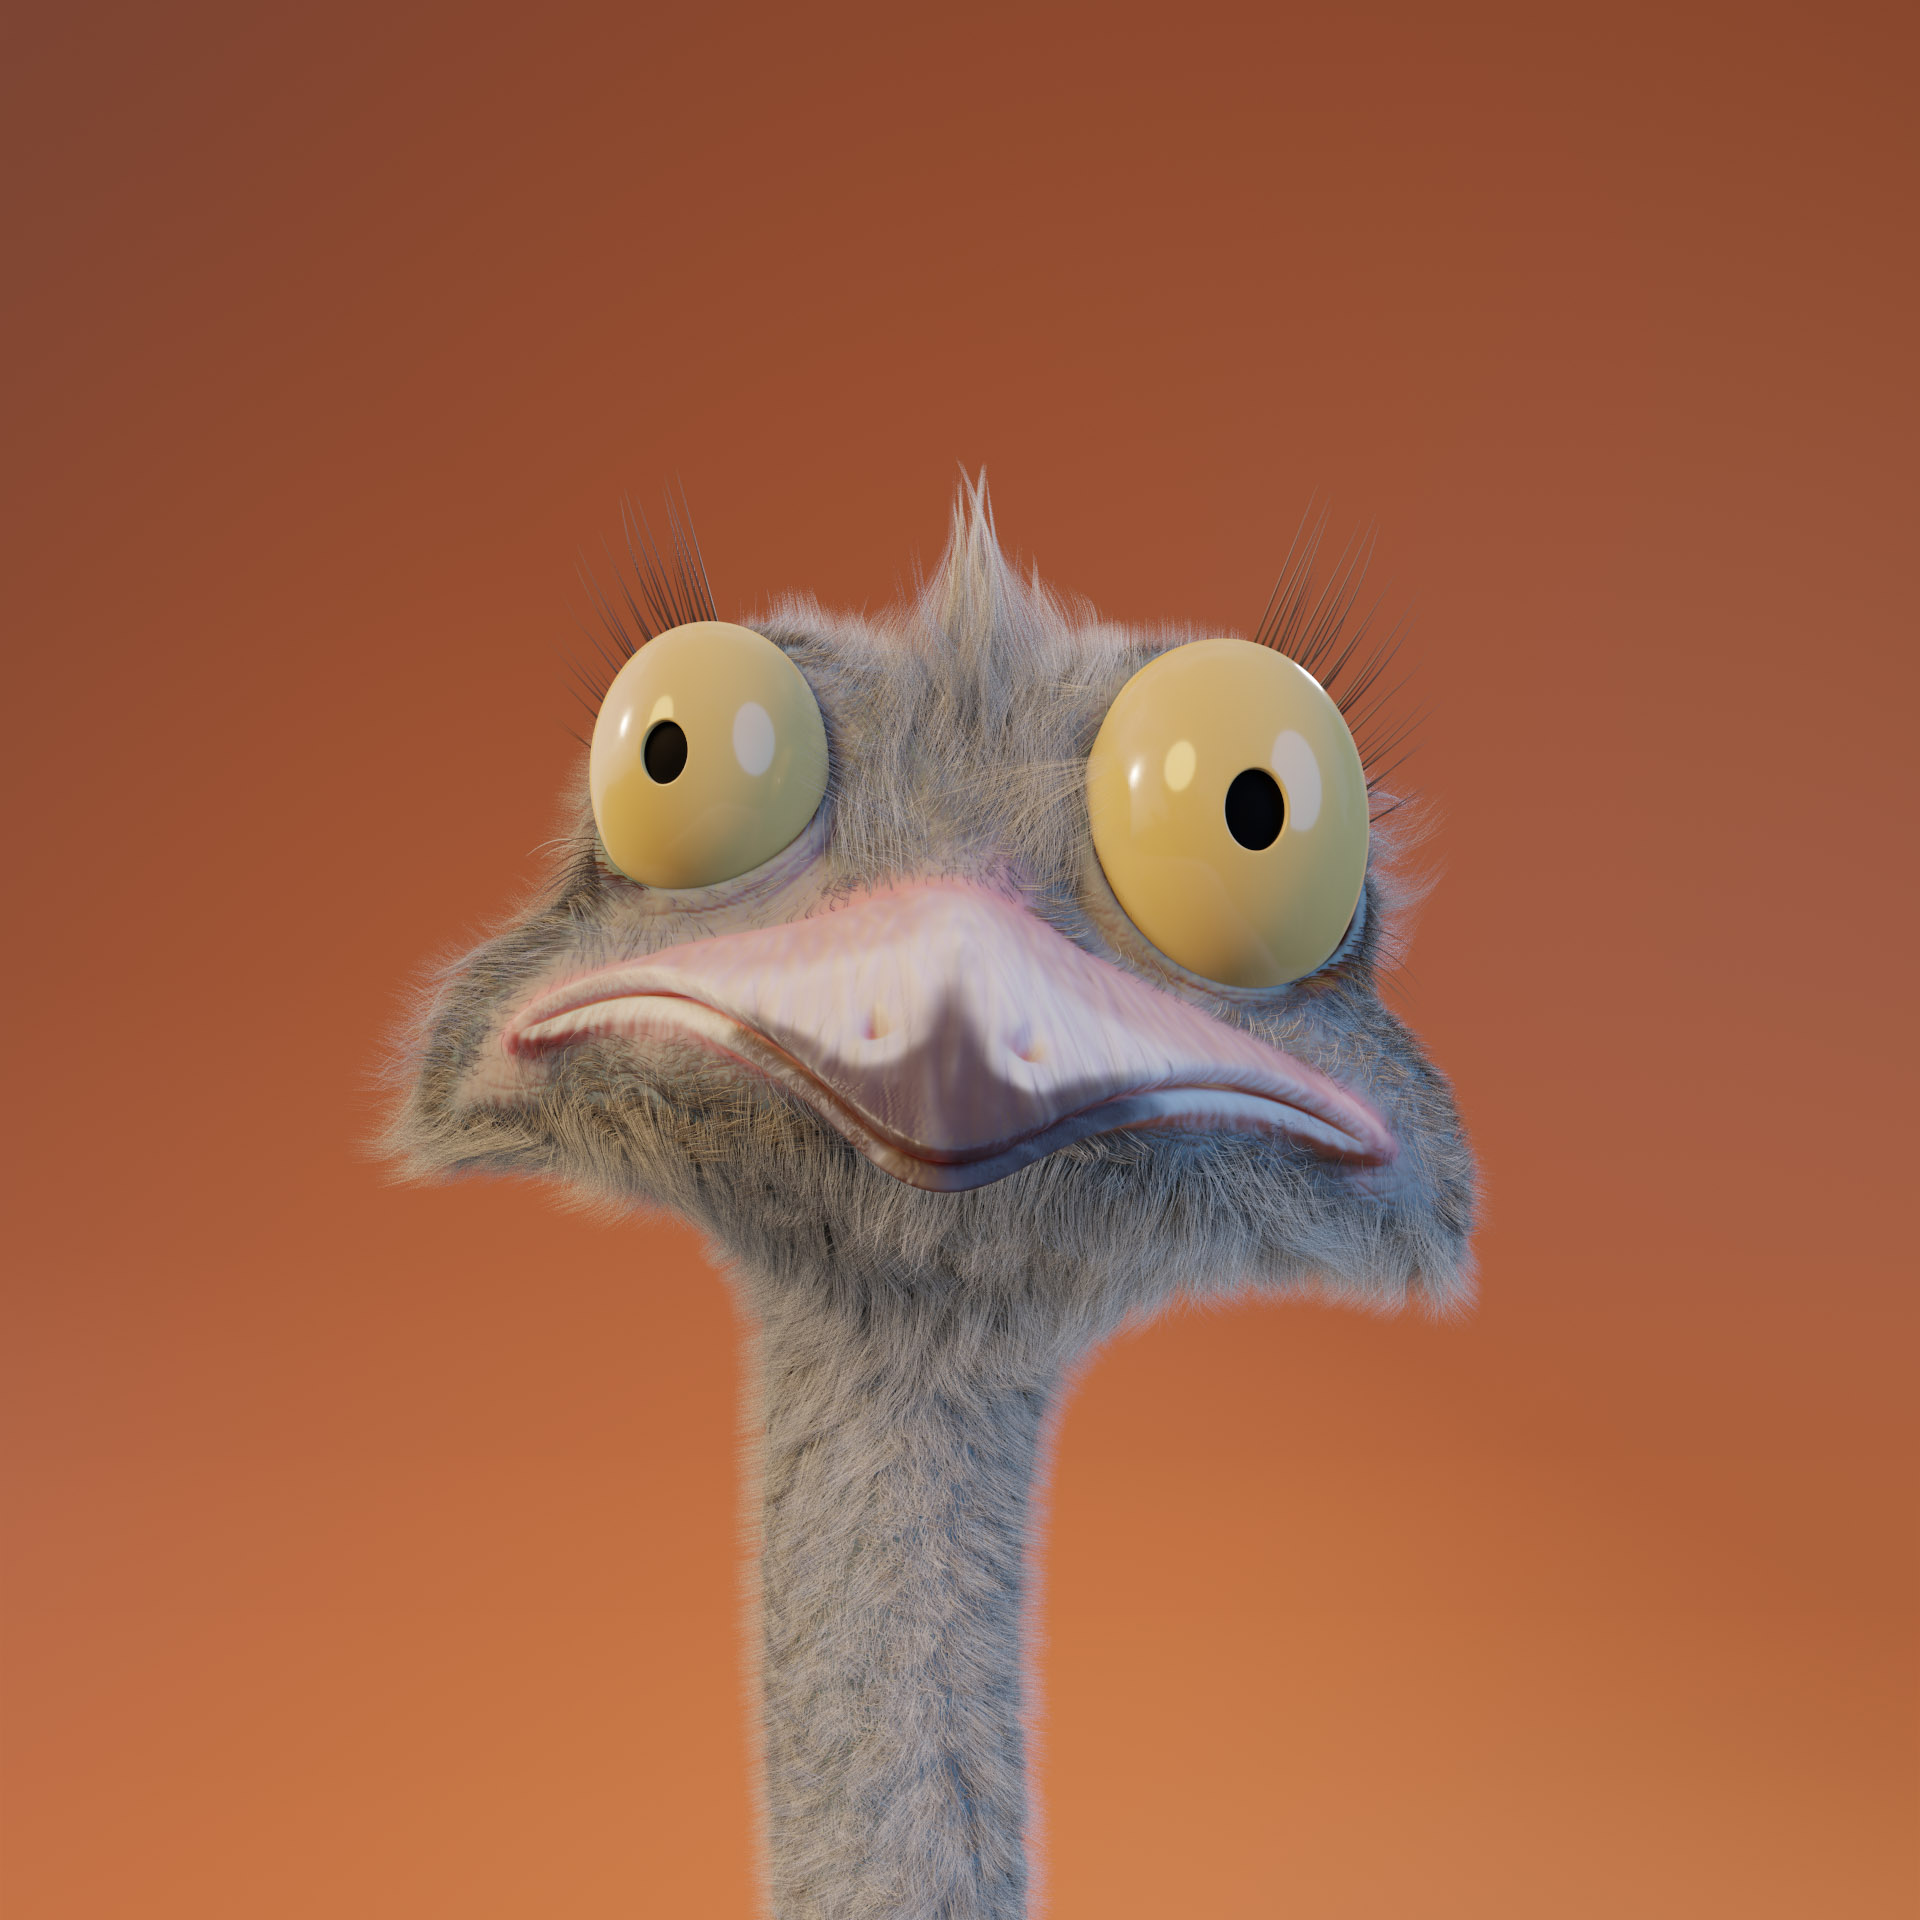
And there you have it! A “Paranoid Ostrich”.
About the Author
 Kevin Ruffenach, Christian, husband, artist, gamer, dragon tamer.


What a great site to check whats happening