
“The Secret Ingredient to Photorealism” – How to use High Dynamic Range in Blender
“High Dynamic Range” is the current buzz-word in the Blender community, and with new tools like Filmic Blender and Gaffer you can get Blender to render much more realistic images – if you know what you’re doing. Andrew Price explains what HDR means, why it’s important and how to use it in Blender.
Andrew writes:
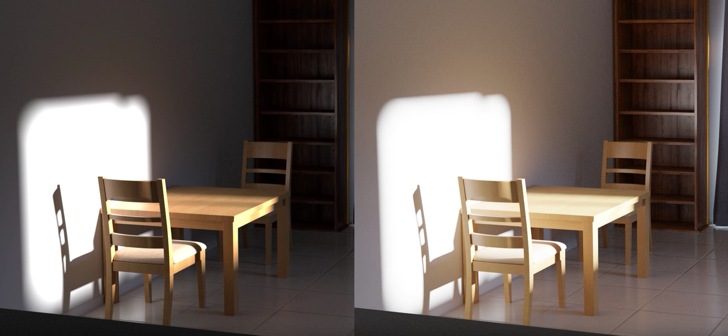
Discover why the restricted dynamic range of Blender is causing your renders to look fake. Why sRGB isn’t suitable for rendering, and how ‘Filmic Blender’ is the magic solution that fixes everything.

Blender’s guru says that Filmic will break the Multiply mix node. That’s going to break a lot of shaders. Where can a tutorial with a workaround be found? When building texture layers it is frequently necessary to use Multiply as an influence factor. Kent Trammell’s crystal texture in the shader forge series uses the Multiply mode to break up the textures. If Filmic breaks the multiply mode/node, much of the Shader Forge series will need updating.
I am pretty sure he was just talking about the postprocessing nodes. Since these colorspace transformation models apply after the image is rendered nothing of this applies to how materials are set up. After rendering an image blender has an HDR representation of its calculations saved. HDR meaning that each RGB value is not restricted to the fixed number of LDR images. So in an HDR image you can have colors like (4, 1, 0.561230934) (that Blender uses this internally can for example be seen when editing color values on materials or lamps, here you can exceed 1). For displaying it on monitors the image has somewhere be converted to a colorspace the monitor supports. You can in fact save it as an HDR image but then this conversion has to happen sometimes later. This is also the reason for the terms display vs scene referred workspace. Display referred means you are working on an image meant for display on screen (it has to be in a colorspace a monitor supports).
So this is the problem we are having, these functions are not meant to be used with HDR values meaning we will get artifacts by using them before “finalizing” the image to “Display colorspace”. But since multiply nodes in shaders usually support those kinds of values these problems dont exist.
This is a very rough explanation and as such is off in some areas, however it is meant to get the basic idea. Note that I dont really know how this all is handled internally in Blender so these informations are just my educated guesses.
Yes, I had the same understanding that Andrew was talking about post processing and not about materials and textures.
Actually Andrew made a mistake there. Multiply doesn’t break.
What breaks is any mix node that assumes 1 as the maximum value, and that breaks with ANY scene-referred image with pixels with intensities > 1.
The mix node modes that are purely arithmetic operations (like add and multiply) won’t break, others like overlay, screen, etc. will.
To be clearer: It’s not that those blending modes break with filmic. They are just unsuitable when values go above 1, because they are display-referred operations.
They were always broken for HDR, Filmic doesn’t change anything (except the potential of more intense light ratios which make them break earlier).
Regarding the same nodes in shaders, it depends. non emissive materials use color input as albedo, which is never larger than 1, so you can mix display-referred textures without expecting big troubles.
You shouldn’t use mixRGB for non-colour data, so…
Don’t worry.
I am pretty sure that non emissive materials can use color values larger than one. In fact you can also use HDR images as textures.
@Sven: You can, but for realistic materials you shouldn’t. Colour input in non-emissive shaders like diffuse and glossy are albedos, which is a reflectance percentage that in real world materials is always larger than 0 and smaller than 100% (expressed by display-referred textures in the range of 0,1).
A realistic material will never bounce more light than it gets neither it absorbes all the light received.
Okay, this is second time this is high lighted? There was a post in november about this as well.
Your point being? This post is mainly about Andrew’s new video.
That its all the same again, andrew takes the info of what already was posted in november. Its taken a bit of a different shown to the viewer, but its esentially the same info
Andrew also points out the Filmic will break important mix modes.
Ah, so according to you, I can only post each piece of information once? This is a new video, it deserves a new feature. That’s how a news site works. If you don’t like an article, just skip it :)
No, according to me, I am worried that Filmic has a hidden flaw and am just trying to figure out a workaround. I’m actually in favor of repeat announcements as it keeps important issues up front. At any rate… Andrew said point-blank that it will be necessary to remove the Multiply mode from the mix shader, and nobody seems to care about this. Maybe Kent can find something out over on CGCookie.
You got a point there sir ;)
The main info is the same, i would be more interested in implementation on images, podsible errors. Workflow with display images etc etc.
I I installed Filmic Blender. It is powerful to create photorealistic scenes. I’m happy with it. When I need non realistic colors or textures, I switch to the old sRGB color management.
Good! Interesting, but I’m thinking the “log” is too compressed if you are using 8/10 bit compared to the log of the cinema digital camera.
Generally I use “Exposure” 2.2 in “Film” menu in the render setting, sometime I need to correct the set value of the intensity of texturized Emission or the world Background to 1/2.2 = 0,454545455
Clipping direct to 4
Clipping indirect 1
May be is wrong but seem right for many purpose.
As you know different cameras have their own “log” curves, so when you deal with a log image you need to apply a transform that matches that specific log transfer.
Don’t try to grade or linearize filmic as it was Cineon, as the result would be wrong. Make sure you take the lut from filmic to your external grading/compositing software in order to get the correct results.
OH, and btw, Blender’s DPX output is broken. You’re currently better off using TIFF if you want to take your filmic renders to a grading app.
Regarding the rest of your comment: Avoid clamping. Specially direct. That will defeat the purpose of filmic, as you’d be clipping the maximum intensity of your lights to a ridiculously small value.
Two things I like to point out and these are about so called old screens and the use of limited colour space rgb.
My knowledge is a bit dated but let me say this:
1.
about a couple of years ago old crt screens were not in favour anymore against the fact that most of them were better than the flat screens. This is because in general there are two types of computer flat screens. De majority consist out of tft panels, not sure about the present days if this is still true (but most people use laptop and I don think they will choose the screen themself). Simply said these tft panels were build up with a colour layer and a lamp behind it to lit it up. This method causes for horrible colour display. This is why old crt screens were better at displaying colours. This is why I kept my old screen for years and can indeed say that this story is true.
There are better flatscreens but they are expensive. In comparison an old crt screen cost a fraction of the price. For production work on a small budget you should look out at graphic companies who are switching to high end flatsceens and selling their old high end crt screens.
http://www.gamersnexus.net/guides/1890-panel-comparison-tn-ips-pls-va-crt
Also note to work with good colour not just mean to get a high end monitor but it also has to be calibrated in tune with the whole pipeline of other tech stuff used; software used and equipment used; camera, printer, tv, mobile phone; everything has it’s own a colour space.
(I guess: When everybody has an oled screen with a lifespan of a bout ten years filmic will be at itś right place for the general public.)
2.
I noticed when other colour spaces where introduced and used by most people, there where some stubborn ones out there. Indeed the higher ranges gives a lot of potential as final product and also aid with the development. But what these people were saying was: why switch to a ‘difficult’ process and producing a high end product when most people uses a rgb screen and won’t even notice the improvement. For the worse the result is worse on a rgb screen because the colours are not presented right because they were made for a bitter screens, which at the time hardly anyone uses.
There were two good reason why using higher dynamic ranges was good.
The first reason is that high dynamic range gives you more workspace. For example when you colour enhance your work, with fine tune adjustments, select colours you didn’t know they exist. When saving to lower rgb colour space some of your work get lost by the compression but the endresult is better when working in lower colour space because you couldn’t finetune to these perfection.
The other reason for using hdr is because you want to produce a real photo material out of it and the colour has to be right.
Last but not least; don’t look at a photo but look at real life for the right colour grading. Do not copy from a copy, a copy from a copy goes bad really fast. Instead look at the product/environment itself.
Even a dude in the past century could achieve this with ease just by using a few mirrors. (And he is not even an graphic artist by far!) Go watch the documentary > …
https://www.youtube.com/watch?v=CS_HUWs9c8c
http://www.dailymail.co.uk/sciencetech/article-2517051/Johannes-Vermeer-DID-use-mirrors-camera-obscura-paintings.html
I’ve copied and named the file in the blender/2.78a/datafile directory, but my version of Blender isn’t picking up the additional items for filmic. I’ve checked that the following files all sit beneath the colormanagement file [Looks, Luts, _config.yml, config.ocio, index.md & readme.md]. Although one thing i do note is that colormanagement was the only file under ‘datafiles’, there wasn’t the fonts and locale as in the 2.78/datafile directory.
Any ideas?
Further to the above query, I’ve installed the latest 2.78b version and repeated, all options under Color Management were missing this time, so I’m a little confused.