
Behind the Scenes: Coming Home
INTRODUCTION
Hi! My name is Thijs de Bruin, a self-taught 3D artist from Utrecht, The Netherlands. I am currently freelancing for a variety of clients in the Product Design and the Architectural Field. I studied Industrial Design Engineering but ended up dedicating my career to visualization as this fits right up my alley, combining technical proficiency and creativity.
Moreover, this isn’t my first article on Blendernation; I have previously written an article on one of my artworks, Early Morning Fog. You can check it out for tips on architectural visualization and realistic lighting in Blender.
INSPIRATION
Since I was a little kid I always loved the forest, a place full of mystery and peace. I was lucky and grew up next to one in the center of The Netherlands. Everyday I walked underneath the trees with our family Dog and during those trips I started to imagine how it would be to live a peaceful life surrounded by nature.
As I grew older I moved to the city, first for college and later on for work, but my love for nature never faded. In fact, the urge from within to life in a place surrounded by nature only grew bigger.
I found out about the “Home” render challenge by CGMood, and decided to enter.This challenge was the perfect opportunity for me to make a clear visualization of what I hopefully will be able to call my home someday. A place where it is possible to live a calm and peaceful life in harmony with the natural elements, in a sustainable and ecological way. A place to hang out with friends, make memories with my loved ones and explore my creative passions.
PROCESS
Step 1: Collecting References
The first part of a new project is always collecting good references. This will give me a clear goal and vision while working on the project. I try to collect a reference board for every aspect of the project I have in mind.


Step 2: Scene Block-out
After I collected all the references, I started out with a quick landscape study. I added a plane, subdivided it a bunch of times, and sculpted a very basic landscape from a camera perspective.
Afterwards, I added a forest ground environment with the Geoscatter add-on for Blender. This add-on is in the same category as Forestpack for 3Dsmax but feels more intuitive in my opinion. I used assets from the Graswald Library, which are the best vegetation models I’ve used up until now. I placed a cabin that I modeled for an earlier project and added a tree scatter system using trees from the Forestation add-on for Blender. These are again the best-looking ones I’ve used so far, as they combine 3D scanned trunks with well-optimized branches and leaves. For the water, I used a Quixel texture and combined a few bump nodes to create the ripples.
For the lighting, I used this HDRI from textures.com and tuned down the brightness a little.

This scene study proved that I was headed in the right direction, so I continued developing the scene.
Step 3: Scene Development
I played around with the lighting, composition, and added more assets like fallen trees and branches from the Quixel library through the Quixel Bridge add-on. I tried to capture the forest environment as best as I could, so I kept looking for little details to add to the scene.
I decided to remodel the cabin. I modeled it in a separate file to keep things organized. I used a lot of photo-scanned materials and assets from Textures.com, Polyhaven.com, and Quixel to achieve a realistic result.

After finishing up the modeling, I switched back to the original HDRI, as this gave the preferred results.

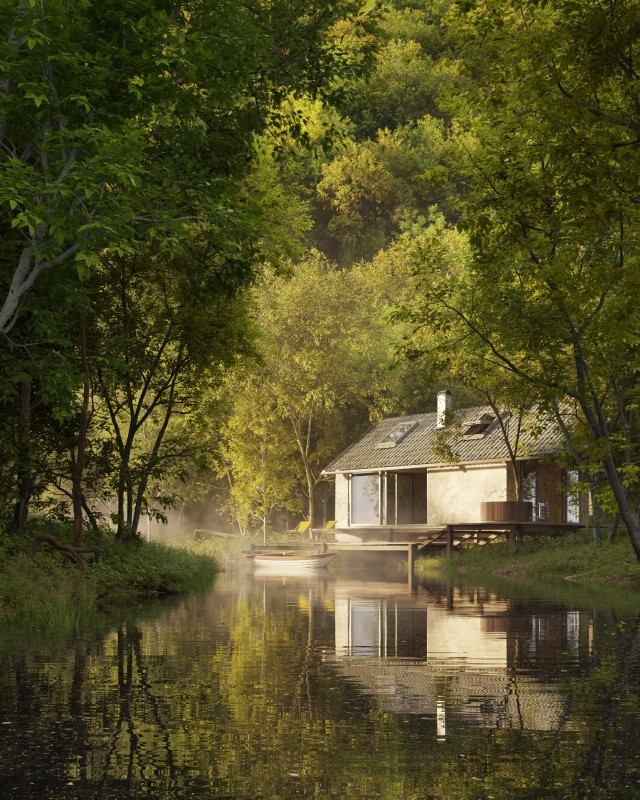
Below is the raw render straight out of Blender,

A few tips and tricks to keep your scene running smooth, and reduce the VRAM usage:
- Use high detail, high resolution meshes in the foreground, but lower resolution meshes in the background.
- Use the simplify option, located at the Render properties, to scale down all of the textures. It is not necessary to have 4k textures on each and every model, 2k will do just fine most of the time if not working with a close-up shot.
- Use camera culling with your scatter systems to reduce any unnecessary geometry in your scene.
Step 4: Photoshop
I rendered out the image at a 4K resolution and switched over to Photoshop afterwards to finish up the image. I added several PNG cutouts of forest animals and added a campfire to tell more of a story with the image. After I added the animals, I used the Realpaint FX add-on in Photoshop. I came across this add-on through this tutorial from Piximperfect, and I was amazed by the end results, so I tried to give it a go for this project.
It turned out my image was lacking some resolution to implement all the fine painterly details I was looking after, so I used Topaz Gigapixel AI to upscale the image by 4 times. After upscaling the image, rerunning the script and fine-tuning the image with the same techniques as shown in the PixImperfects tutorial, I was really happy with the paint effect. It still feels like magic to turn a 3D render into a painting!
After adding the paint effect with the add-on, I added a little bit of a vignette and adjusted to colors, contrast and saturation a little bit with the Camera Raw Filter.
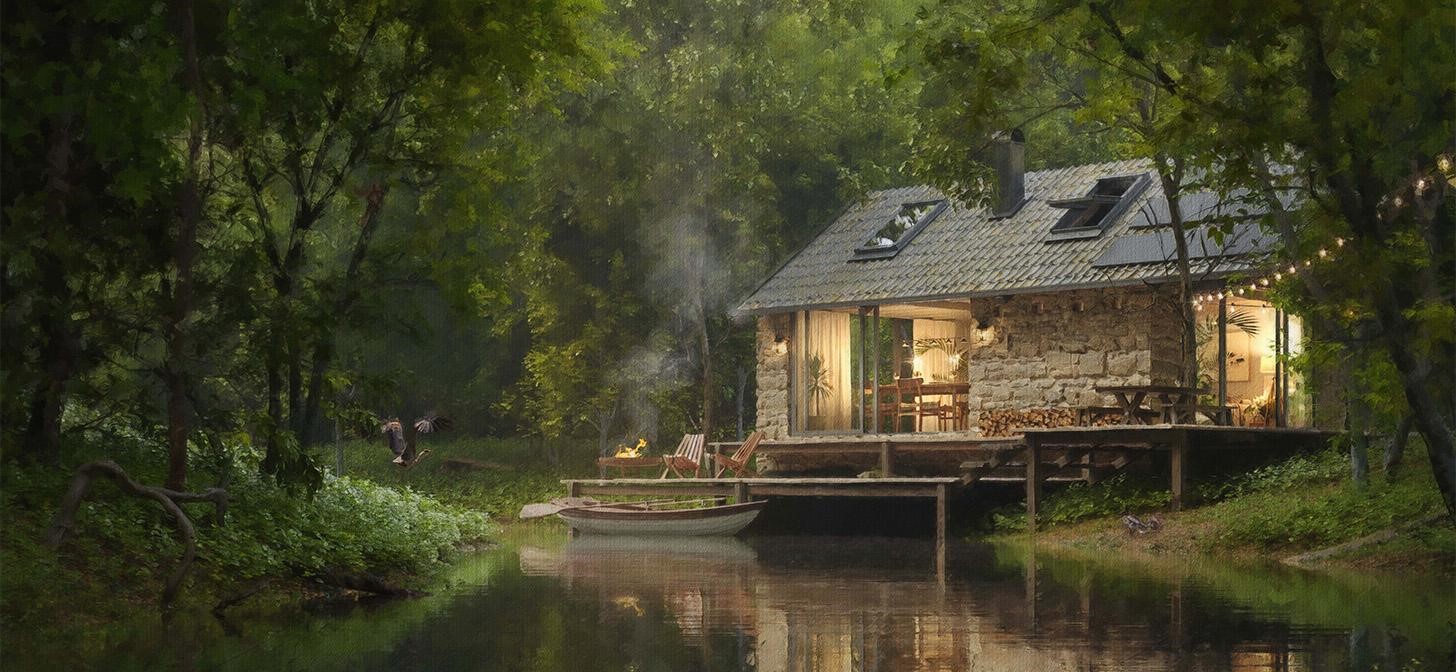
RENDER – Coming Home


That was it! It was a fun project to do as it combined my passions for nature, architecture, visualization, and storytelling.
Hopefully this brief breakdown has taught you a few tips and tricks, and if you have any specific questions, feel free to reach out on my Instagram page. Have a nice day!
About the Artist
Thijs de Bruin is a 3D artist from Utrecht, The Netherlands, currently freelancing for a variety of clients in product design and the architectural field.


Wonderful and inspiring.
The paintings look very artistic. These must be masterpieces.