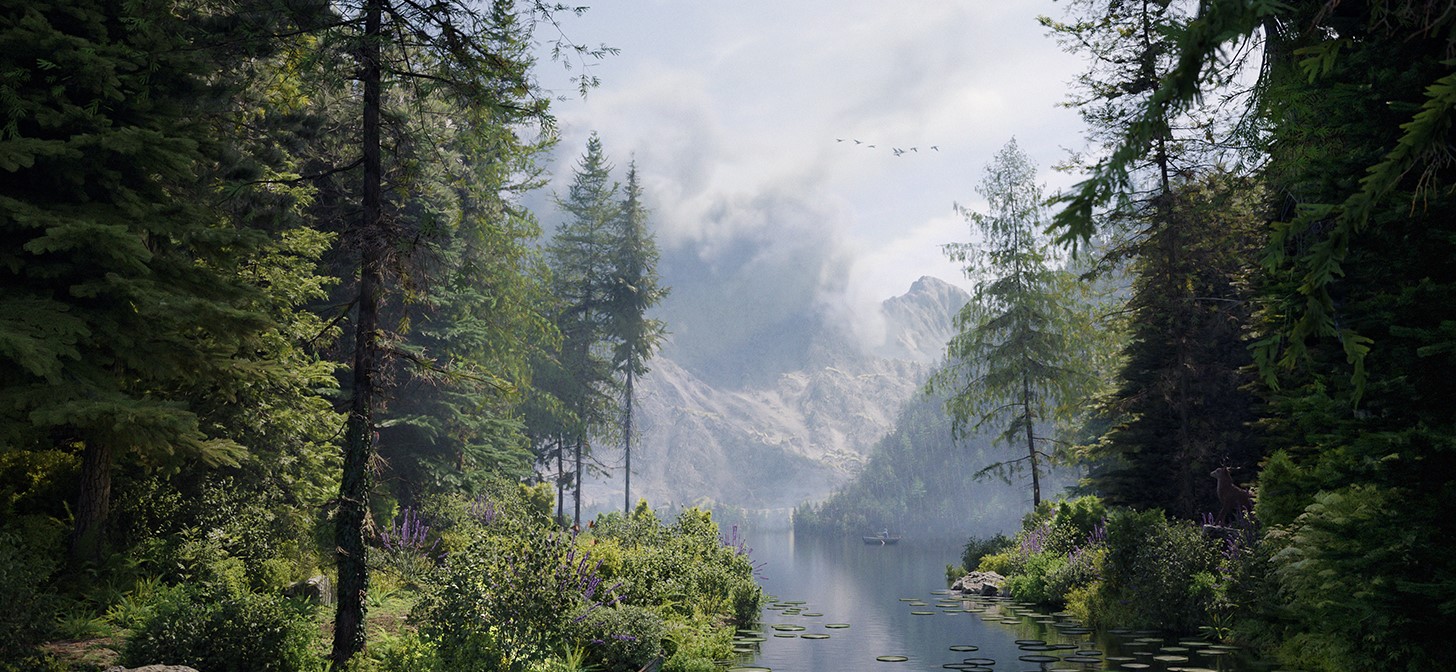
Behind the Scenes: Misty Mountains
INTRODUCTION
Hello, my name is Jaspreet Singh Matharoo. I’m a 17-year-old self-taught 3D Artist from India, specializing in environments. I have about 3 years of experience using Blender.
INSPIRATION
My main inspiration was this photograph by Luca Bravo. I found this image while scrolling through Unsplash looking for inspiration.

My other inspiration was Bob Ross and his scenic paintings.
LANDSCAPE
For the base landscape, I used A.N.T Landscape addon (which can be found by default in Blender). I used the River preset and made no changes in the settings apart from the resolution. I deleted the faces below the water and then sculpted the mesh to give it the look I wanted. Then, I added a water cube. That gave me this result:

VEGETATION
I brought vegetation assets into my scene from a bunch of different addons/asset packs, which are: PRO Forest Bundle, Botaniq, Tree Vegetation, Forestation, and Moss Biome Ground Scatter. To scatter them all on my landscape mesh, I used Geo-Scatter.

After scattering the vegetation, and adding a basic HDRI, I got this result:

BACKGROUND
For the background mountains, I used Gaea. It’s a really simple node setup, just the first 3 nodes make up the mountain shape. I imported this into Blender and textured the mountain via a custom node setup that takes multiple materials (Grass, Rock, Gravel) and combines them based on masks imported from Gaea (Like Slope, Flow).

Then, I added some clouds from CloudScapes interacting with this mountain. For the midground mountain on the right, it’s a basic plane deformed by Proportional Editing, and scattered with Alpha Trees (right now I’m using real 3D trees but later I switched to Alpha Trees). This got me this result:

LIGHTING & VOLUMETRICS
The lighting in this scene is simple. I’m using a Sky-Only HDRI from AmbientCG and a Sun lamp with strength set to 10, angle set to 2, and with a slight orange tint.
For the volumetrics, I’m using a cube that spans the entire scene with these settings:

After this, I got this result:

I also used some fog cards placed behind some parts of the scene to have them stand out more and not blend with the background.
For the foam, I used a texture from texture.com and in Photoshop, made the edges darker, and used a levels adjustment to add more contrast and de-saturated the whole image. Then, I used the “Images to Planes” addon and just placed the foam around the rocks/log.

The scene was pretty much complete after this. I only made minor tweaks here and there, such as adding lily pads, some animals, and insects (including birds, a woodpecker, a deer, and butterflies), as well as placing a boat in the distance to make the scene more lively.
This is what I had by this point:

POST-PROCESSING
I post-processed this scene in Photoshop. I mainly used Camera Raw Filter and made color changes there. I also brightened some darker areas of the scene, and added a man in the boat in the distance.
With that, the scene was finished.
RENDER – Misty Mountains


Thanks for reading the article, I hope you found it useful!
You can see some of my work on my socials. Have a wonderful day!
About the Artist
Jaspreet Singh is a 3D artist from New Delhi, India, specializing in creating environments and props.


My jaw dropped, your creation looks more real to me than your inspiration picture haha. Fantastic work, I just wanna keep staring at it.