Behind the Scenes: Cooking Class For Animals
INTRODUCTION
Hello everyone,
I am Hoya Choe, a 3d artist, currently living in Korea. I worked as a 2D graphic designer for a game company for 7 years. I taught myself Blender 3D and achieved my childhood dream of making animations through it.
Now, I am the founder of “HOYA CHOE Art Studio,” a one-person company. I create short advertisement animations for other companies. My goal is to continue making animations steadily, and Blender 3D will be my companion on this journey.
INSPIRATION
My animal character friends have similar concerns to ours. How can I create a fun content video? This is the same concern. Eating shows and cooking videos are popular in Korea, so we decided to cook because it would be burdensome for one person to eat a lot of food.

I remember watching cooking videos by Jamie Oliver and Gordon Ramsay as a child. I designed a studio to depict a cooking video shoot, drawing the art direction inspiration from miniature house toys and models.
PROCESS
This animation was created using only one tool, Blender 3D. It has all the necessary tools to create animations. Even video editing was possible using the composite node.
MODULE MODELING
When I’m modeling a cooking studio, my goal is not the final completion. When working on a large project with many components, I prefer to create small finished products, modularize them, and then assemble them.
I wanted a stage that could be recognized as a finished product even in the early production stage.

By creating small objects and environments like this, I can obtain various types of finished modules. If I don’t do this and aim for the final product from the beginning, I will only see an unfinished screen during the long production time.
What makes this possible is Blender 3D’s powerful resource management tool, the “Asset Library Browser.” We can save multiple objects and environments modularly at any time and recall and reassemble them as needed.
MODIFIERS
The term “modify” has been used extensively in object modeling. When creating animations, the timeline speed of Blender 3D should be at least 30 frames per second. If Blender 3D’s performance drops below 30fps, it means the animation cannot move at the correct speed.
All characters and objects are modeled using modifiers to optimize them in the animation stage. When creating animation keyframes, I make modifiers with high load collectively invisible.
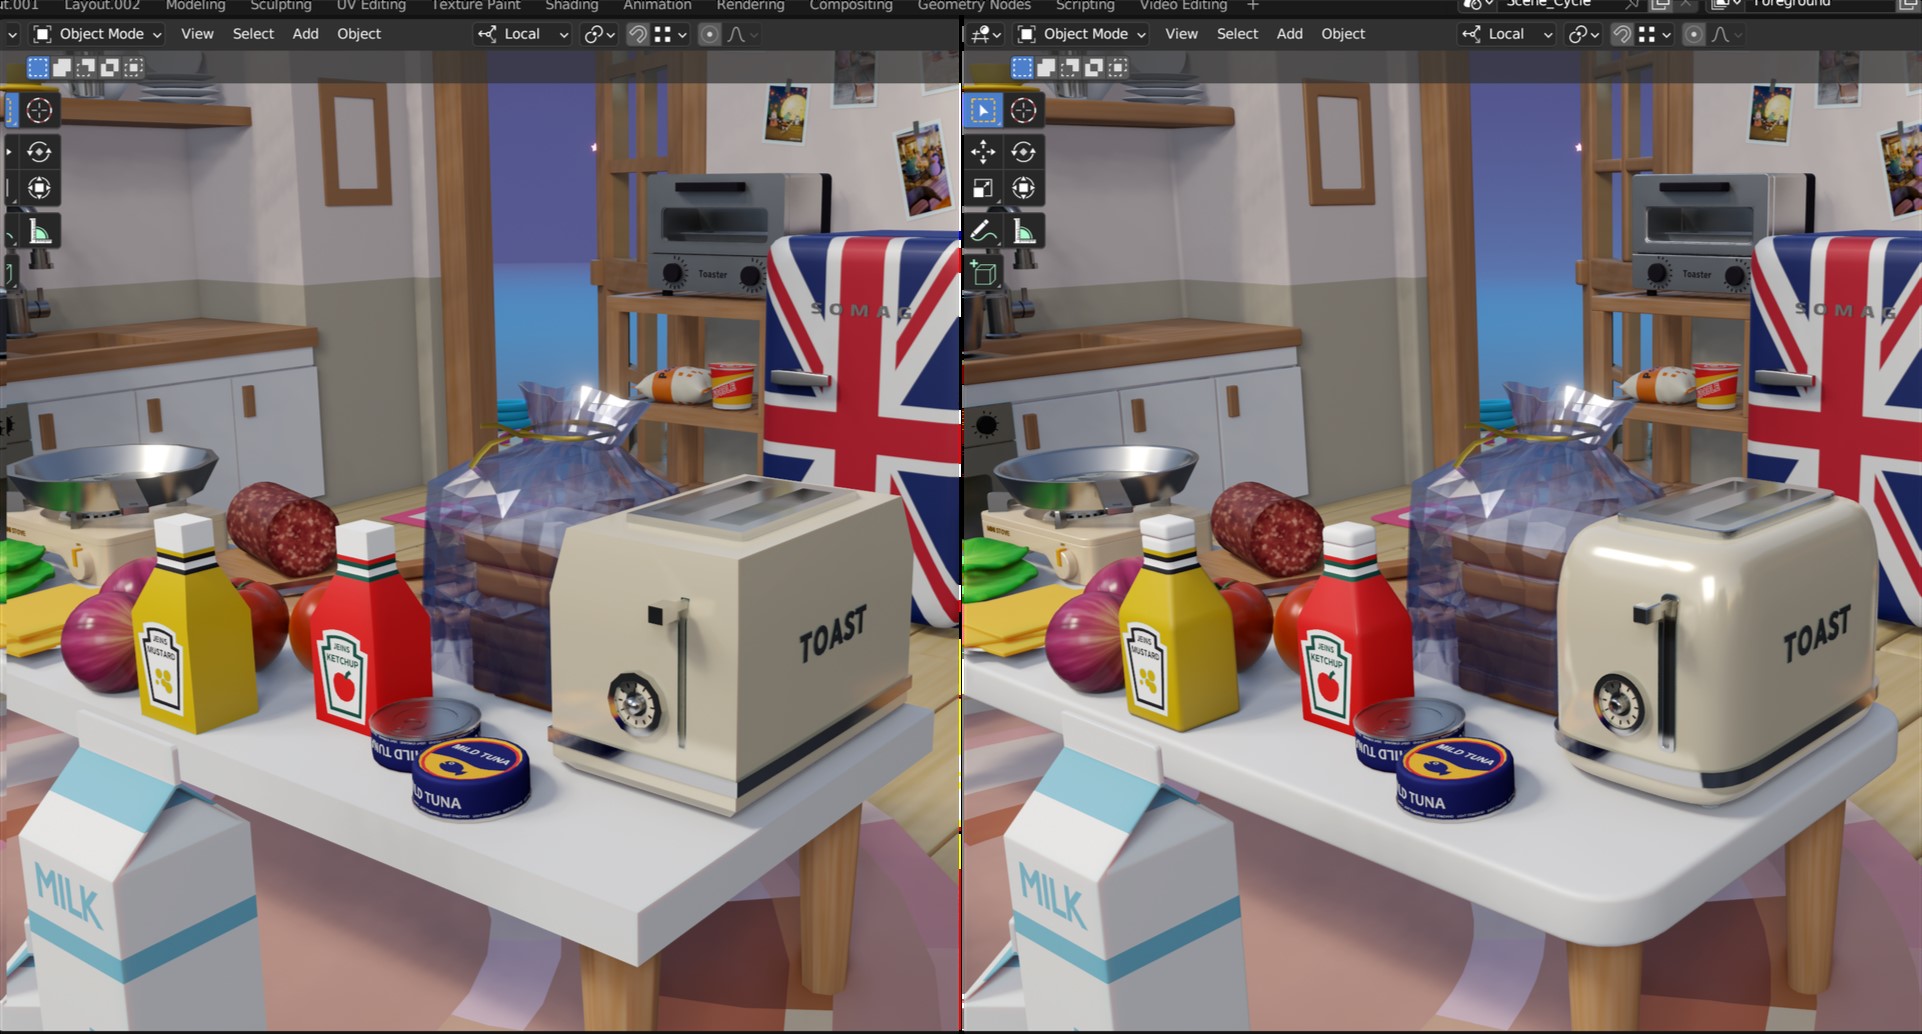
On the left, all modifiers with high loads are invisible, and on the right is the final rendering quality.
RIGGING
As for the character’s rigging, I made the Armature bone myself. Rigging using a script-based add-on was heavy to operate and not lightweight.

Also, my animal characters have parts of their bodies that don’t look identical to humans. Therefore, it is better for me to create the skeleton myself to achieve the desired behavior.

Stretch bones were also used to express exaggerated movements of the characters.

The implementation of the character’s expressions involves creating several patterns of eye shapes and connecting them to the Blender driver. This allows the selected mesh in the driver to be activated while the rest are deactivated.
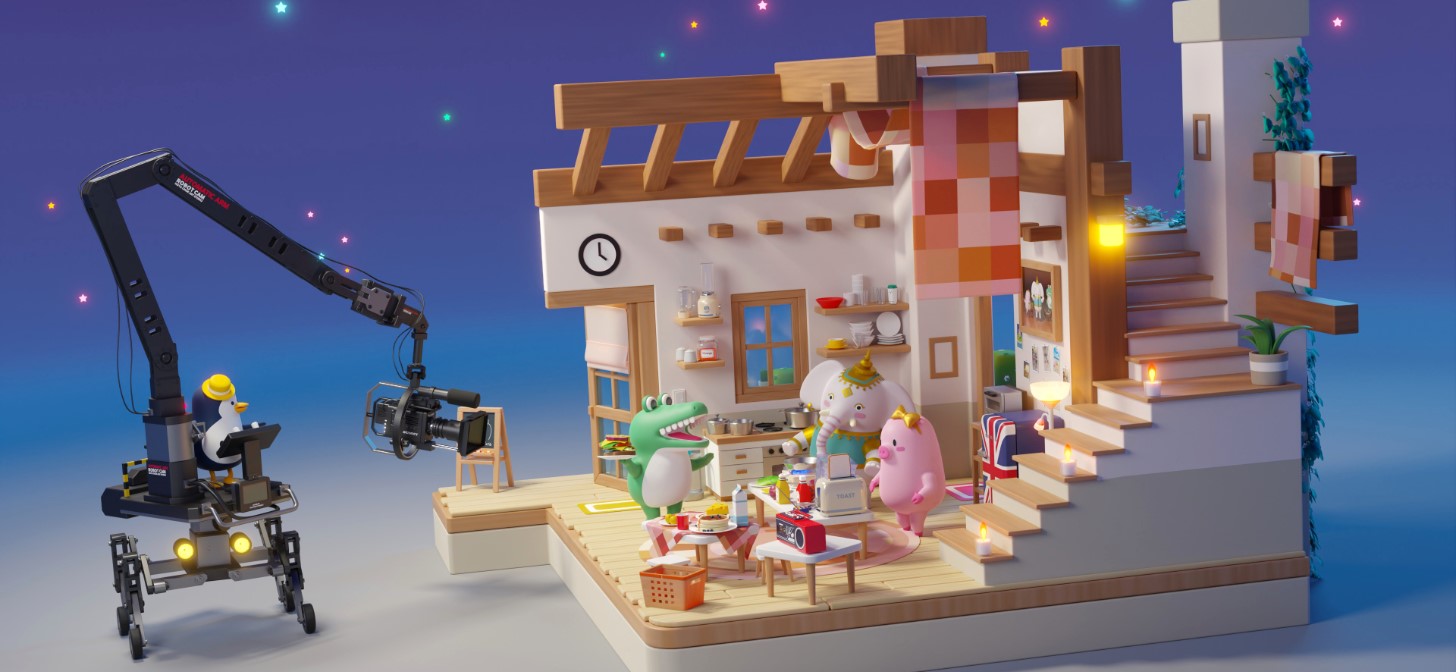
CAMERA ROBOT
An important part of this project is the robot camera. In general, film sets use ‘Jimmy Jib’ cameras. However, controlling the camera in the ‘Jimmy Jib’ is difficult because my animal characters have short arms and legs.

Furthermore, the ‘Jimmy Jib’ camera was not fun because there were few dynamic elements that could be animated. I made a robot camera, and it felt more fun to imagine that my character friend would control the robot camera. The shape of the robot camera was inspired by construction machines like tower cranes and excavators.
Making the robot cam was a lot of fun for me. It was my first time creating a robot with a limited turning radius.

ROBOT ANIMATION
It is a bit challenging to keep the camera fixed on a specific object, so a combination of two IKs (Inverse Kinematics) was used. It was difficult for the robot cam’s legs and arms to move freely while the camera remained stationary.
In particular, I spent a lot of time studying the hierarchical structure and bone constraints to eliminate the flipping phenomenon when rotating 360 degrees. Limits are applied to the rotation axis of the bone in the lower layer of IK, excluding the axis that can actually move.
Moreover, by applying the constraint of limiting rotation, the maximum rotation radius was specified.

VEGETABLES
Vegetables cut with a knife are modeled in a pre-cut state and attached with rigging.

Four texture images were used for this animation project. The first image on the left is responsible for the crocodile character’s eye expression.
SHADERS
All other objects and characters are made up of materials created as nodes in the shader editor. I’m quite satisfied with the functionality of Blender’s shader nodes. One great advantage of using shader nodes is that they can be animated, unlike image textures.

The eye expression image mentioned above is used to change the expression of the eyes by altering the UV coordinates in the shader node. Except for the texture images aforementioned, all other objects use materials created from shader nodes.
CASSETTE PLAYER
Younger people these days may not be familiar with cassette players. I personally like the classic cassette design.
When listening to music on a solid device like a current cell phone, no mechanical movement is felt. It’s very convenient, but it doesn’t feel as enjoyable when animated.
Cassette players from the 80s have a range of motion that can move around like a mechanical device. The cassette tapes containing music data have a structurally fascinating design.
I used ‘Bake Sound to F-Curves’ for the cassette player to move with the music. The cassette jumps to match the bass beat. The speaker next to it changes its scale to match the sound waveform.

After baking the sound curves into keyframes, we can further refine the curves and remove unnecessary movements. The cassette player jumping to the bass beat had to be erased, just as it deleted frequencies other than the bass beat.
FRIED EGGS
I put in a lot of effort to animate the fried eggs. The materials for the eggs were created using shader nodes. The oil in the frying pan was also generated using a shader node. Furthermore, the oil splash effect was achieved using the particle function.
The reason I didn’t use an image texture for the fried eggs was because the egg whites had to gradually transition from transparent to white and have a crispy exterior when cooked in a frying pan.

I used shape keys to change the shape of the egg. The shape of the egg changes by switching the shape key.
MUSTARD
The animation of the mustard sauce was not possible with liquid simulation. Instead, I processed the metaball as a particle and made it move along a curve.

CAMERA
For the animation of the shooting camera, I used rigging with two bones. Different roles were assigned to the bones to prevent gimbal lock.

COMPUTER HARDWARE
System: AMD Ryzen 9 7950X, RTX 4090, 64GB RAM.
This artwork was made using Blender 3.4 Version and rendered in 4K resolution (3840×2160) with 1100 samples at 30 FPS over a period of 10 days. The 2-minute animation I created 2 years ago had an estimated render time of 30 days, so I didn’t attempt to render it using Cycle and used EEVEE instead.
However, Blender has become much more powerful now. I rendered it for 10 days using Optix at 1100 samples. If I had a little more money and another computer for parallel rendering, I believe it could be shortened to 5 days. This is a significant improvement for me. I have noticed that Blender’s rendering time is gradually decreasing while the tool’s capabilities are continuously increasing.
RENDER – Cooking Class For Animals


“Dongmul Chingudeul-i Yoli Han Saendeuwiji” (The Sandwich Cooked by Animal Friends),
Thank you for reading my article, I hope you found it useful and informative. You can follow me on my social media accounts below to see more of my artwork.
Have a nice day!
About the Artist
Hoya Choe, a self-taught 3D artist, currently living in Korea. They are also the founder of HOYA CHOE Art Studio, creating short advertisement animations for companies.


