
Behind the Scenes: Kitsch (Christmas Short)
Jon writes:
Greetings Blender Enthusiasts,
I’m Jon, a self-taught Blender hobbyist in the US. I got my start with Blender in 2020 when I wanted to 3D-print a replacement chime barrel for my grandfather clock so that it would play a different tune. But I quickly became fascinated with Blender’s animation capabilities, and although I have no background in 3D or the visual arts at all, I threw myself into Blender, and was eventually able to create an animated Christmas short called Kitsch, to enter in our local film festival.
I hope this behind-the-scenes tour will encourage other beginners and hobbyists like me, who aspire to make scripted short animated films with Blender.
THE SCRIPT
I wanted to make an animation in the spirit of “A Charlie Brown Christmas” with an emphasis on music, jokes and some kind of existential crisis. I knew the production would hinge on having a strong script. No matter how good my models look or how delicately I animate the characters, if the story is boring or if the emotional beats don’t resonate, then it could all go to waste.
When I wrote the script, I numbered each scene and each line of dialog. This came in handy later when organizing my lip-synch efforts and scene files. Once the script was done, I made a spreadsheet of all the assets I would need to make. I resolved to make every single model myself in order to get more practice.
FILE ORGANIZATION
I knew I would be working on the project all year, an hour a day, in my free time, so I had to be organized about it. Although I was working alone, I broke my project into separate files for each model. This turned out to be a great idea because it kept each file small, which meant they would load and save faster when editing. I save them into Google Drive, which handles backups and versioning, and since each model is in a separate file, I can restore an old version if I need to, without losing any other work.
I also animated each scene in its own file. This meant I could render one scene in the background while simultaneously working on another scene, without fear of messing something up. This also kept cloth simulation data separate for each scene, which made things a bit more manageable.
CHARACTER MODELS
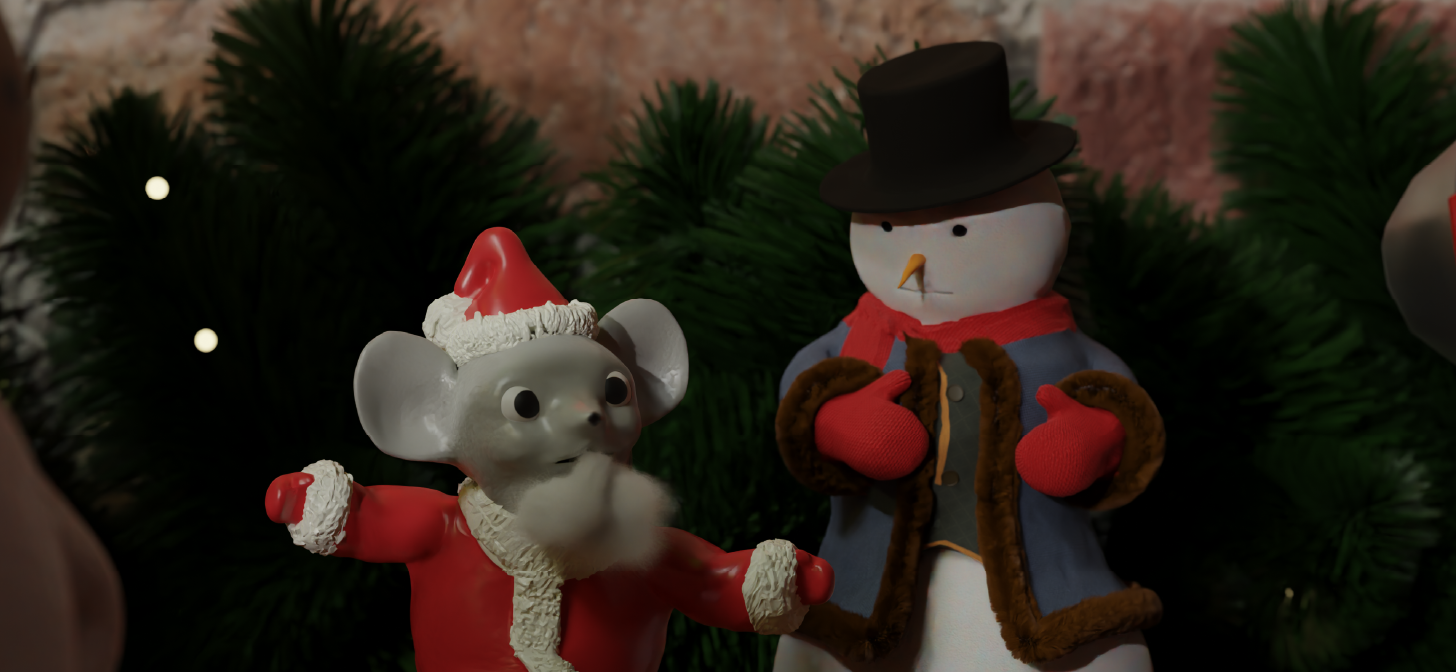
The story is about some Christmas figurines. Some are old and carved from wood, others are new and plastic, or porcelain, or cloth. This meant I got to use a number of different approaches when modeling the characters. The crude wooden characters of Nutcracker and Mary were hard-surface models. More organic shapes like Santa Mouse and Black Santa were sculpted. I looked at vintage figurines on eBay for inspiration.
I learned a hard lesson too late in the project. When designing the characters I should have thought about their movements and not just their shapes. My design for Nutcracker turned out to be very problematic because there wasn’t room for him to turn his head without clipping. In the end I just let his head clip, but next time I will definitely think ahead about range of motion when designing non-organic characters.
Mary was a special case. Instead of having her face move, I wanted her face to be drawn on with ink, and the ink needed to flow across her face to change her expression. There are tutorials for doing this with a set of fixed expression images, but I wanted her face to move smoothly. I rigged some simple Grease Pencil shapes for the eyes and mouth, animated the rigs, and rendered that animation into an image sequence that could be included in Mary’s face material. So when I finally rendered the actual scene, Mary’s face material itself would be animated with her mouth and eye movements.
PROPS
I modeled the fireplace mantel, garland, pinecones and other props using hard surface modeling, following various tutorials online. I found some tutorials on how to make flickering candles and blinking Christmas lights. There were a few techniques I could not find tutorials on and had to come up with my own techniques.
I had a star ornament that looks like it is made out of copper wire. For this I modeled a star ornament out of planes, then used a particle system to distribute points across its surface. Then I wrote a python script to connect the points with line segments and a subsurface and skin modifier to turn the segments into a continuous bendy wire. I was really proud of making this work and it was the first time I was able to solve a problem myself instead of using someone else’s tutorial. Now that geometry nodes are available I think I could re-do this in a way that is more flexible and automated.
At the start of the short we see some “tissue paper” Thanksgiving turkeys fly past the camera. These are a bit of American Thanksgiving kitsch which you can find on Amazon. To model these I made a plane, made a series of loop cuts and bent them into a zigzag. Then I carved it into a turkey wing shape using the knife tool. A mirror modifier and array modifier turned it into a honeycomb stack, and then a curve modifier wrapped it around an axis. This worked surprisingly well; it’s a very brief sequence in the film but one of the moments I am most proud of.
ANIMATION
Before I started the slow and laborious process of animating the characters, I blocked out each scene, placing the camera and the characters so that I could understand where they would be in relation to each other and the viewer. This was a huge help because I didn’t want to spend a single minute animating something that wasn’t on screen. The blocking phase was also a great learning experience since I have no background in film and even simple topics such as framing the characters and using depth of field were new to me.
There were a few elements I didn’t hand-animate. One was Mary’s shawl, which was a cloth simulation. This was my first cloth sim and I struggled a lot to get it right. I started each scene with the cloth flat above Mary and let 100 frames go by to let it fall and drape across her. This ensured it started each scene in a natural drape over the figurine. But I had a few cases where the fabric got caught on a mesh somehow and I was never able to solve the problem. This is something I hope to gain expertise at because the cloth simulation is so useful.
In the scene where Santa Mouse is throwing holly berries at Snowie’s hat, I used a physics simulation. This worked really well in creating a natural trajectory for the berry and a realistic deflection off of the hat. I am constantly amazed at Blender’s broad range of capabilities and was really grateful I didn’t have to animate this by hand.
Snowie, the snowman, moves around by rolling the bottom ball of the snowman, like “BB-8”. For this I wrote a Python script that calculates the correct roll for the ball in any direction based on where Snowie has moved since the last frame. This meant I could simply drag him around when animating, and my script would correctly roll the ball later. I was glad to finally use some high school trigonometry 25 years after graduating from high school.
My computer was not very powerful and during the animation process I learned the importance of low-poly proxies. This was the only way I could animate smoothly in the viewport and get the feedback I needed to make artistic choices.
RENDERING
Rendering the short film was the most painful part of the process, but a lot of the pain was self-inflicted. I kept finding mistakes in my animation and often had to re-render segments after making a correction. Next time I will improve my workflow for proofing the animation so that it is perfect before rendering. In the end I reached the deadline for our local film festival and had to submit the short even though it was far from perfect. But, as they say, “it’s done when it’s due”.
SUMMARY
I am pleased that my short has featured in a few film festivals and won “best animated short” in one of them. I hope other beginners will be encouraged that you don’t have to be a full-time 3D artist to make a short film. It just takes the discipline to do a little every day, and of course a limitless appetite for learning!


