
Behind the Scenes: Rat Rod
About me
I am a self-taught artist/hobbyist living in Italy. I have always been curious about the 3D modeling/CG world but never had the chance (and time) to sit and learn. During the second wave of the pandemic, we had a very strict lock-down in Italy and I suddenly found myself with a lot of free time on my hands. I managed to grab one of the few remaining graphics cards, and decided to take a chance in 3D modeling. At least something good came out of this s**tstorm, right?
Making of “Rat Rod”
The “Rat Rod” project started as an exercise. I am pretty new to Blender (and 3D modeling in general), so I decided to invest some time to learn the basics of hard-surface modeling and texturing.
I love sports cars as much as the next guy, but for this project I wanted something different. I decided to go for an old-mean rusty hot rod. That would give me the chance to learn how to create textures for grungy/rusty materials, as well as to familiarize myself with hard-surface modeling techniques.
Inspiration
Before jumping into Blender, I took a couple of days to refine the basic idea in my head. I wanted something halfway between a crazy Mad Max-style hot rod and something you would see at a real-life hot rod rally. After some research, I decided to go for the iconic Volkswagen 1967 Beetle, which is a car people do not usually associate with the “hot rod” world (and also a car that I love). Perfect!

I started with a simple (low poly) model in Blender. I was happy with the geometry itself, but I felt it was not quite what I was looking for. So I decided to spend some time playing around with the model: changing the overall proportions, trying different layouts, stripping parts away to create a more “aggressive look”. This was definitely the most fun part of the whole process. I find that playing around with shapes, proportions, and layout is somehow refreshing (and funny!).
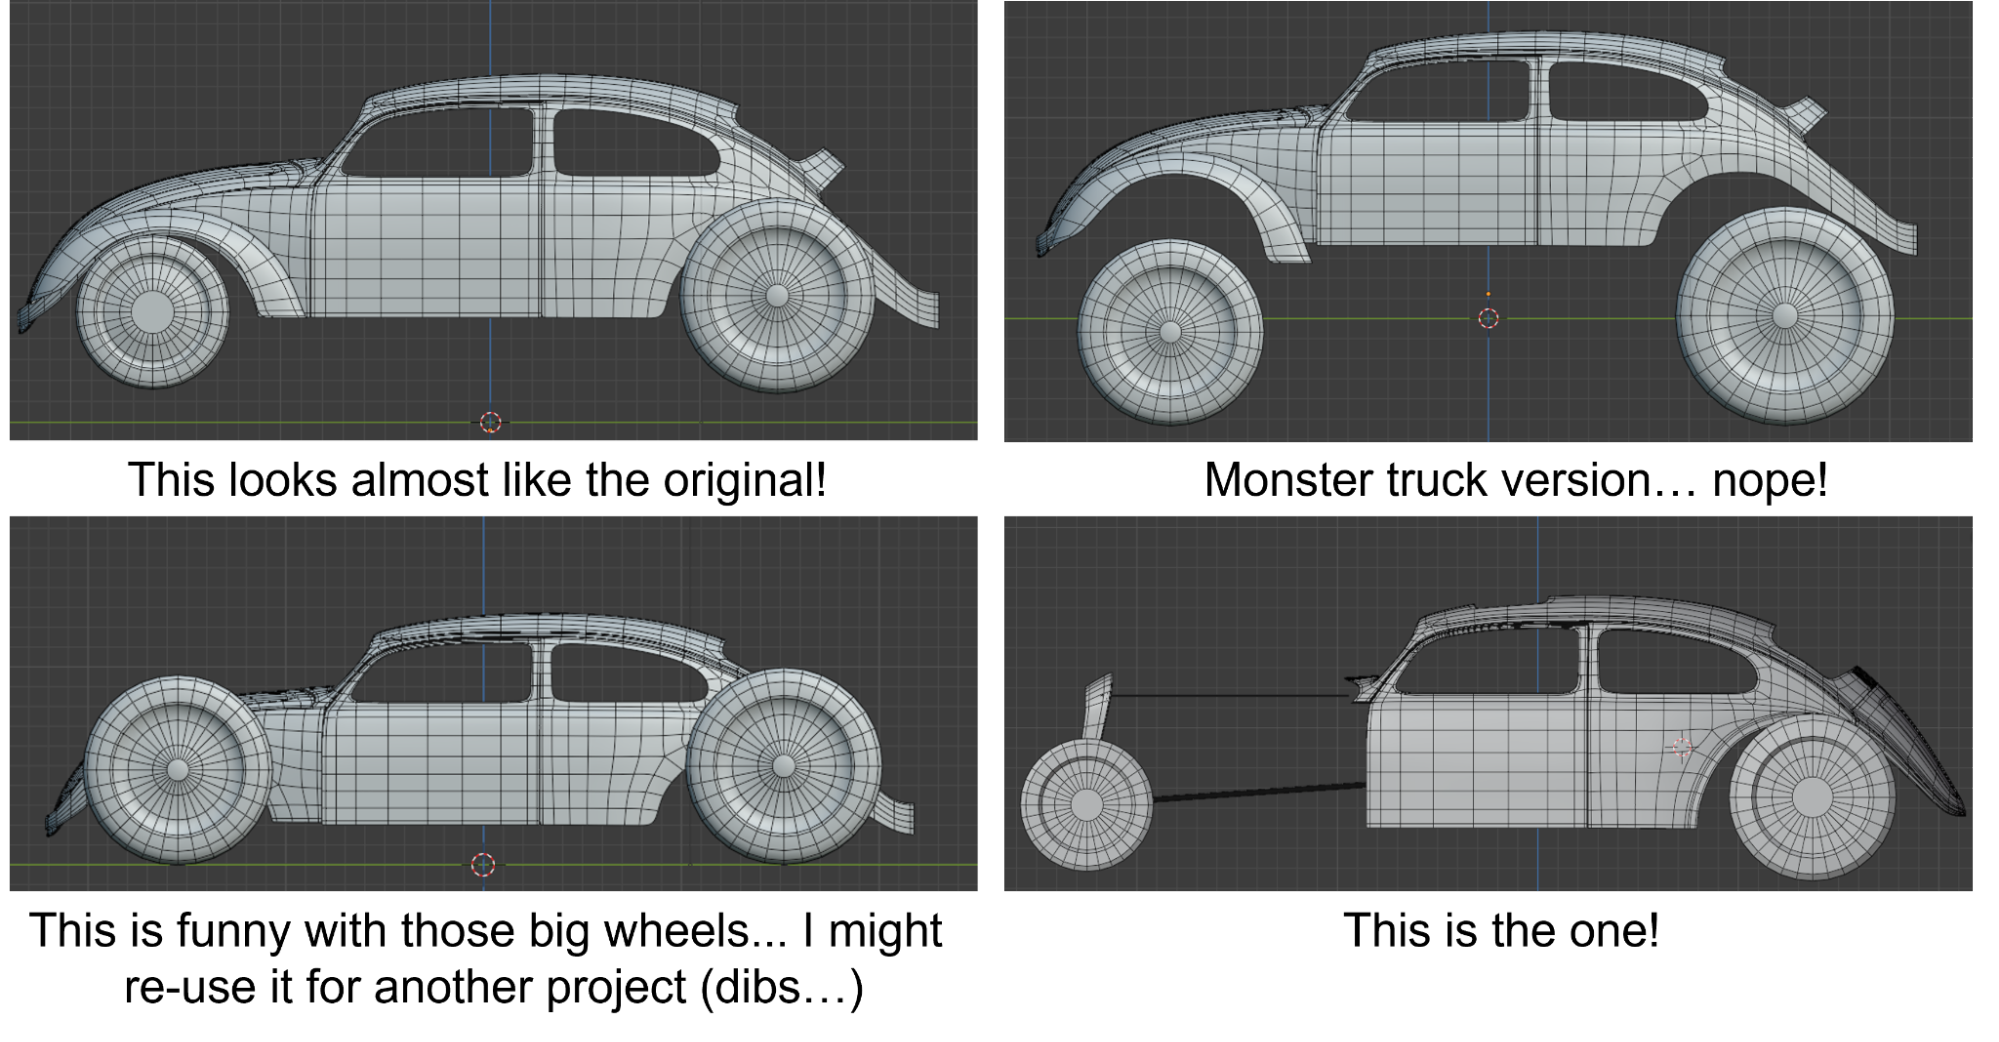
Finally, I found the look I was aiming for. The “Rat Rod” was born!
Modeling
In my opinion, creating an interesting model is not just about subject, texturing, and composition. There is also the difficult task of finding a good blend between big simple shapes and details. Too many details and your model looks messy (I believe the term is “visual noise”). Too few, and it looks only partially completed.
For my rat rod, I already had a very simple clean shape for the car body, so I knew I had to go the full length for mechanical parts.
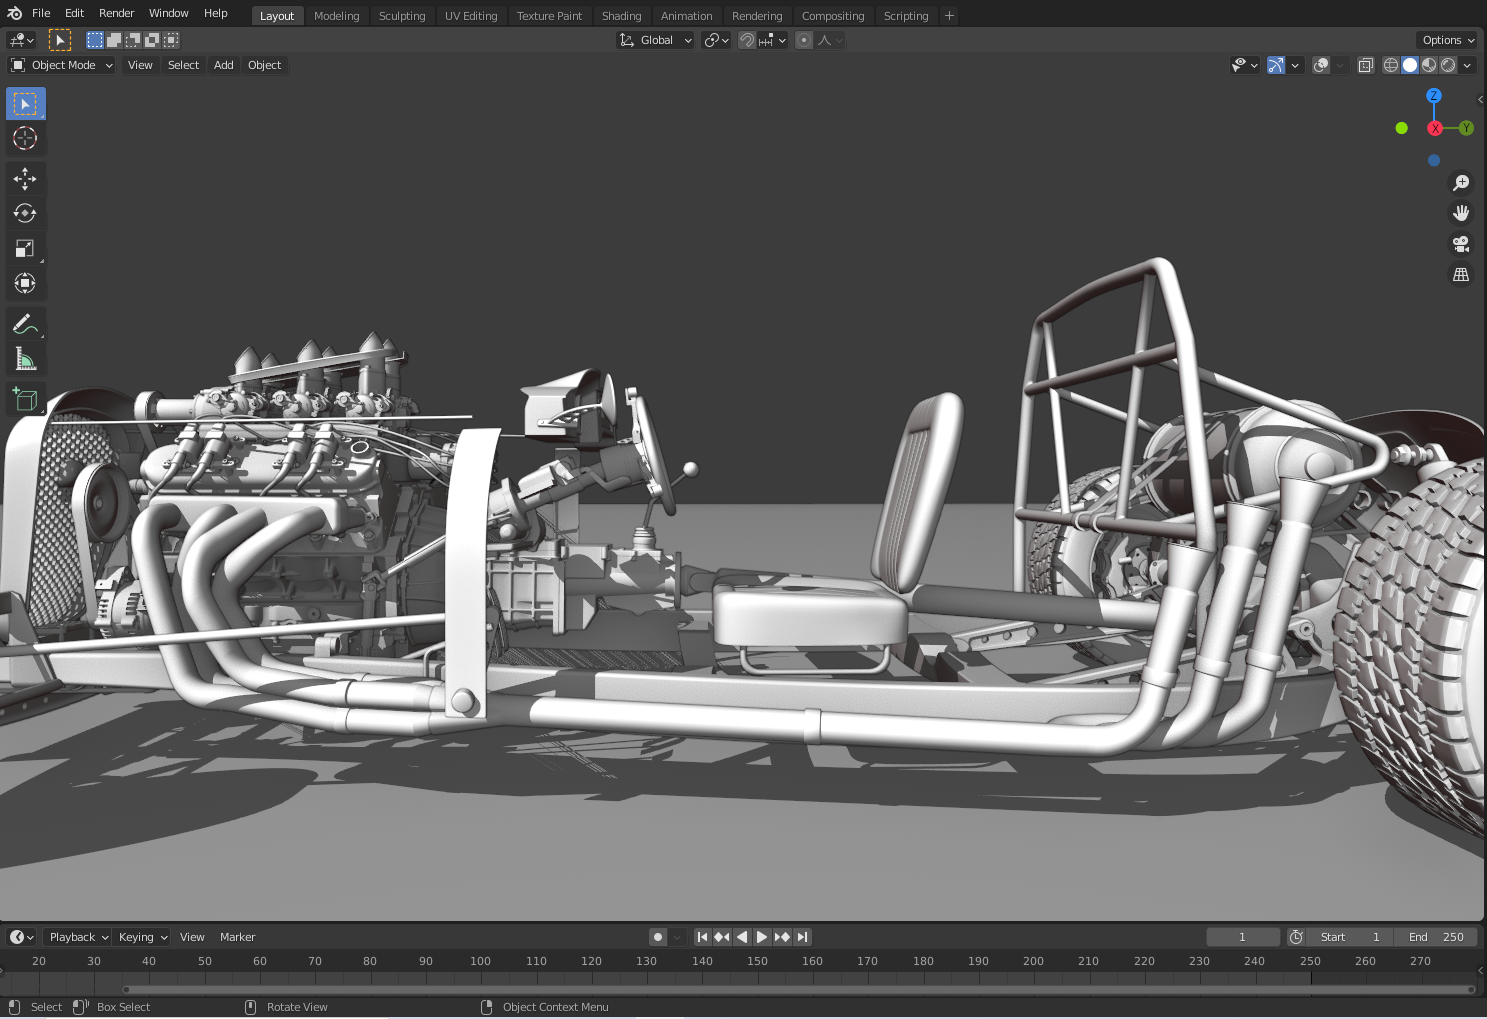
Modeling mechanical parts
This was certainly the most difficult and time-consuming part. Originally I wanted to use only boolean modifiers in order to be able to go back and change things on the fly. It turned out that I am not very fluent in “boolean”, which meant that I ended up with broken meshes more often than not. So. I decided to go for the old-school approach: polygonal modeling using only basic tools.
I started blocking out simple shapes, and then I refined them over countless hours of work to add all the tiny little details. It might seem boring, but the truth is that, eventually, I managed to learn a couple of tricks to speed up the modeling process (and those will come in handy for the next project).

Modeling interiors
The original plan did not include car interiors. However, after so many hours spent on mechanical parts, it just felt incomplete to leave the rat rod without an interior. So I invested a few extra hours to create a simple dashboard, a seat, and… well, I don’t even know what a tank in the rear passenger seat is supposed to be used for…
Texturing
I decided to start with the car body and wheels since those set the tone for the entire car.
Car body
The most obvious choice would have been a rusty-grungy metal. But I don’t like the obvious (who does, anyway?). Instead, I decided to go for a texture that would have looked like an old worn leather jacket.
The texture was created in Blender. I started with a basic shader for a dull material with a brown(ish) color and added some color variations (dark yellow, orange, bright red, dark purple). All the different colors were mixed using noise textures with various scales and levels of detail. The basic idea was to create a sort of fractal-like noise (if that makes any sense…).
To break the repetitive pattern, I started to incorporate other textures randomly selected from my “VariousImages” folder (aka “where-downloaded-images-go-to-die”). I used various kinds of textures (grunge, scratches, paint stains, etc.)—basically, anything with an irregular, natural-looking, and unique pattern. Lastly, I added a few large areas with a more uniform look using a hand-painted blending mask. Also, I created “worn-edges” using a dedicated (hand-painted) mask.
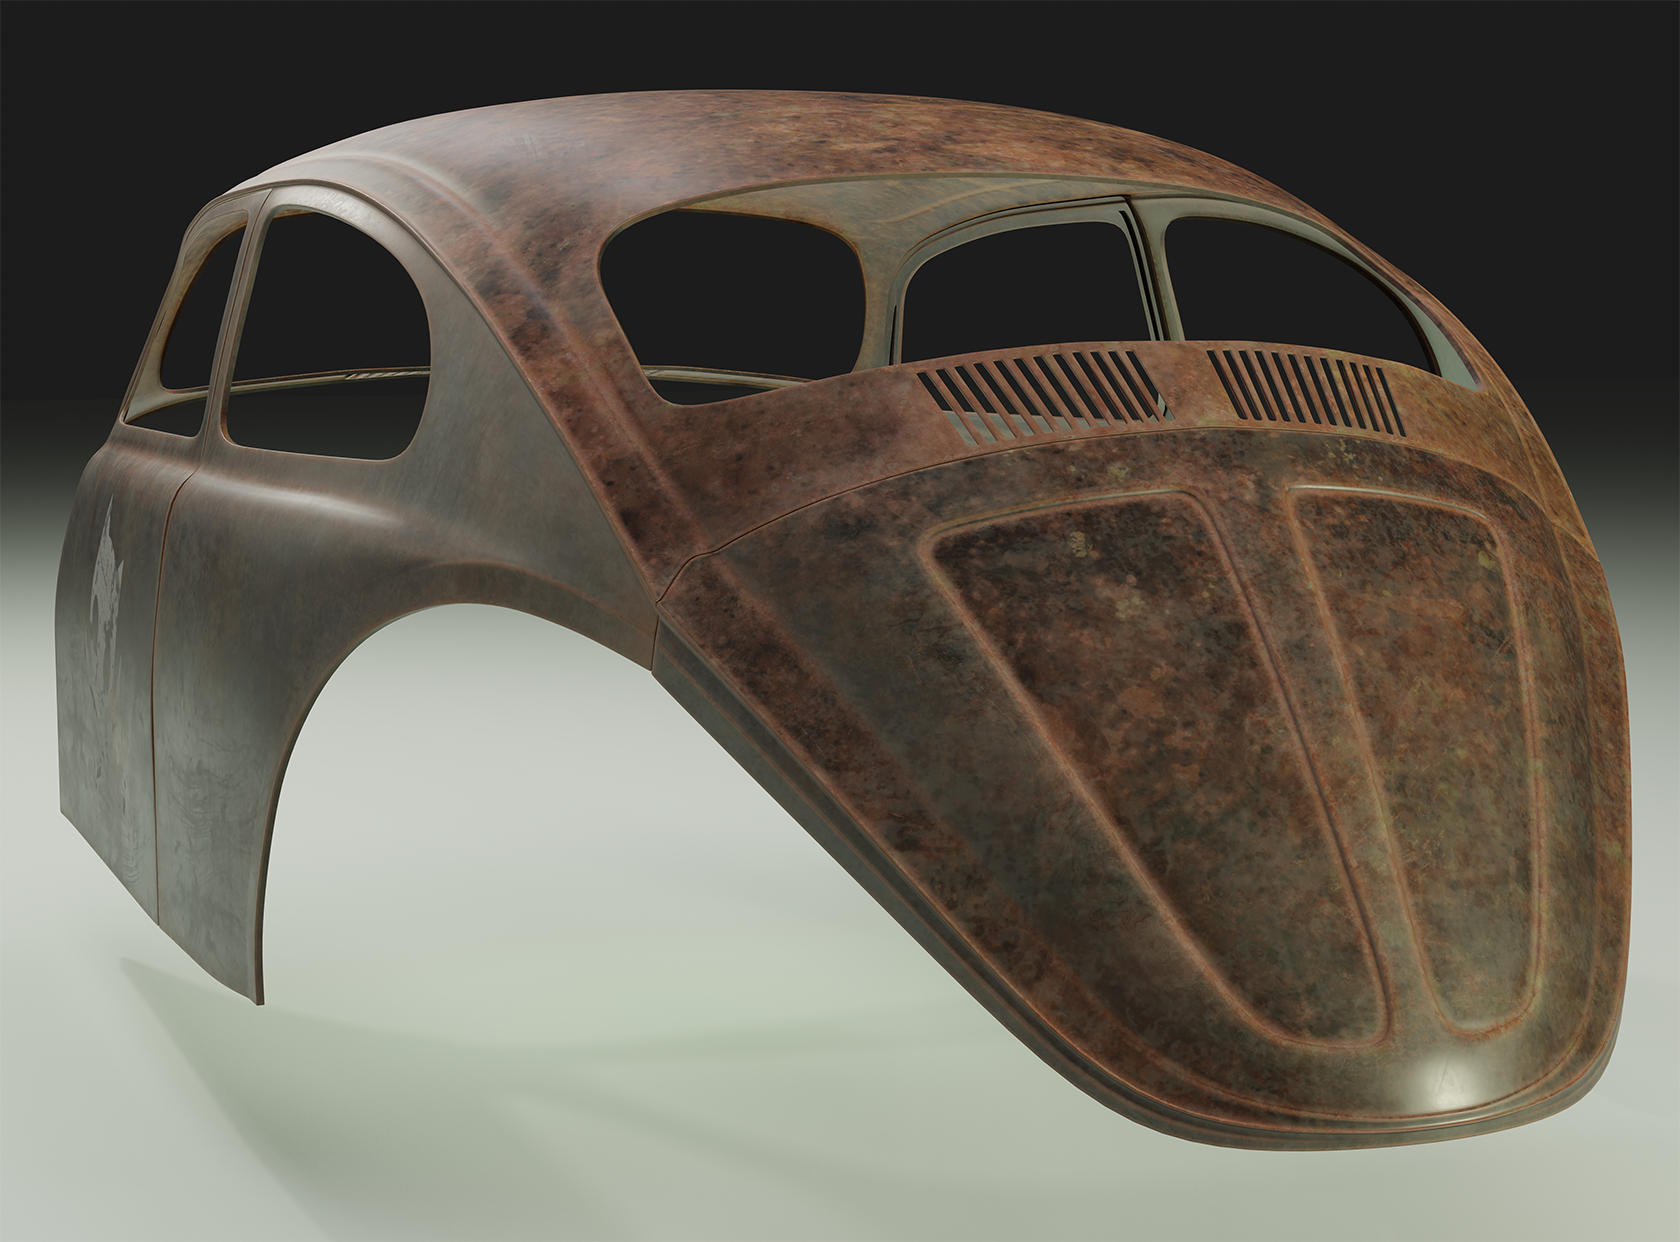
Lastly, in order to create the effect of different layers of semi-transparent/glossy paint, I mixed the basic shader with several glossy shaders, using Fresnel as the mixing factor. This is not something I came up with. I learned this trick on blender.stackexchange.com (I don’t remember the post, though).
In the end, the shader for the car paint looks overly complicated, with dozens of parameters to tweak. Probably, the whole node setup could have been simplified a lot, but I am happy with the result. After all: “if ain’t broke, don’t fix it!”
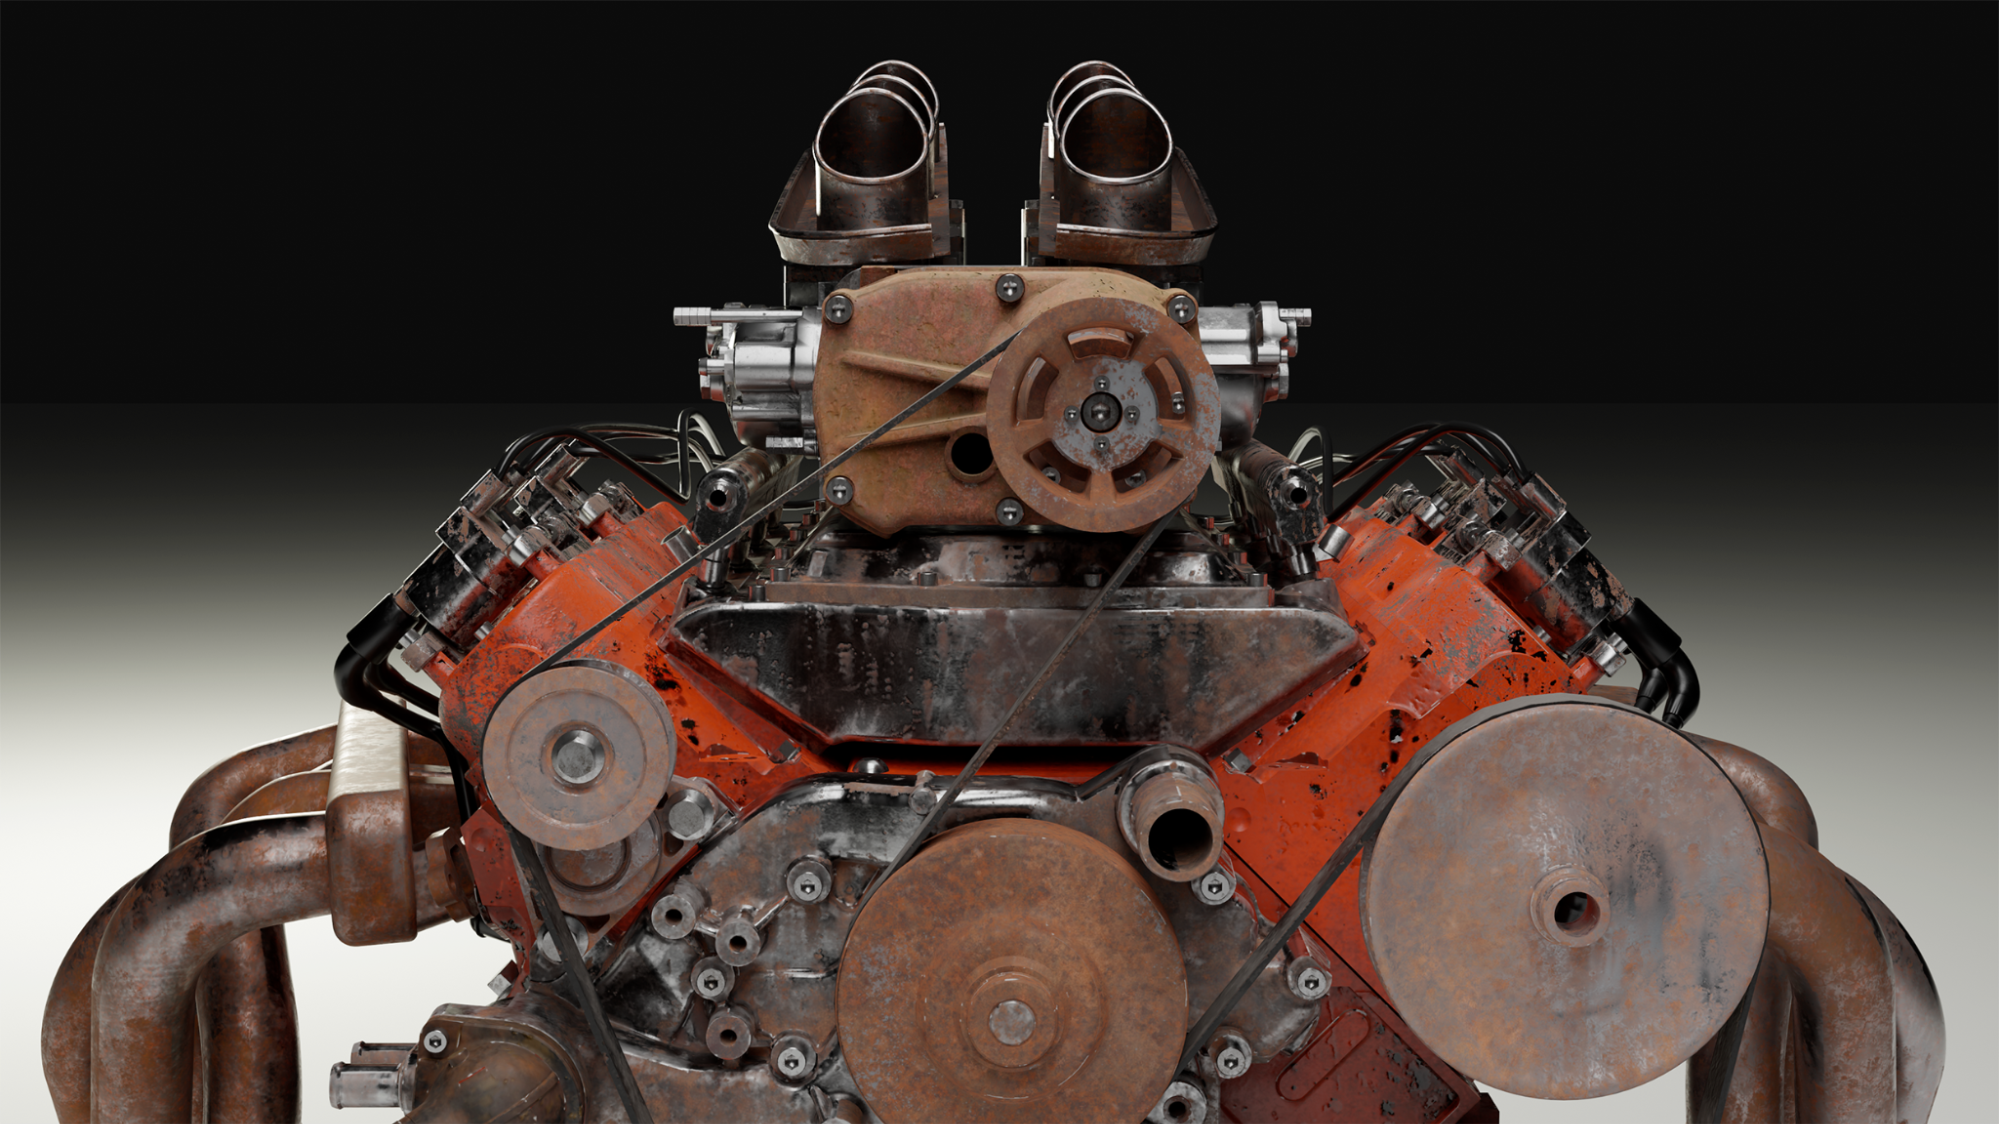
Mechanical parts
For the mechanical parts, I decided to try a different approach. I am still experimenting with various software and techniques, trying to figure out the best tools for my needs. So, I decided to try Substance Painter.
I wanted to give the impression that the rat rod was assembled in a scrapyard, using recycled materials. So, instead of using the same few materials applied consistently across the whole model, I generated several variations of some base PBR materials, and then I applied a different variation to each component.
I found that the workflow in Substance Painter is quite easy and intuitive. Smart materials are really powerful (and you can combine them!), so I was able to quickly generate dozens of variations of the “basic” materials in a very short time.
The main problem with this workflow, however, is that you don’t get to see how textures will really look with your rendering engine while you are still in Substance Painter. In my case, I had to bounce back and forth between Blender and Substance Painter several times to check that all textures would look fine in Cycles.


Render Time!
Creating the scene
My original plan was to set the whole scene in an industrial environment (something like an old abandoned factory from the beginning of the 20th century). During the texturing phase, however, I started to have this “Burning Man” kind of vibe. So I changed my plan and decided to go for a rocky mountain-desert setting. The car model already contained a lot of details, so a simpler scene would have worked even better.
For my first render, I started with a simple jpeg image. To turn that into an HDRI background, I generated a few versions of the same image by changing the exposure level in Photoshop. This trick does not work all the time (you cannot fake a whole dynamic range if it’s not in the image), but in this case, I was very lucky. Overall, I liked the result, but I felt that the Rat Rod deserved more dramatic lighting.

I switched to the “Kiara” HDRI image set. They have a great dynamic range, and they can be downloaded for free (up to 16k resolution). The final terrain was created in Blender by combining several Voronoi/noise textures. I also added some props to the scene: rocks, twigs, etc.
My second experiment worked pretty well. The low color saturation in the background creates a nice depth of field. However, I found that rocks and props were too distracting. So, I simplified the terrain even more.
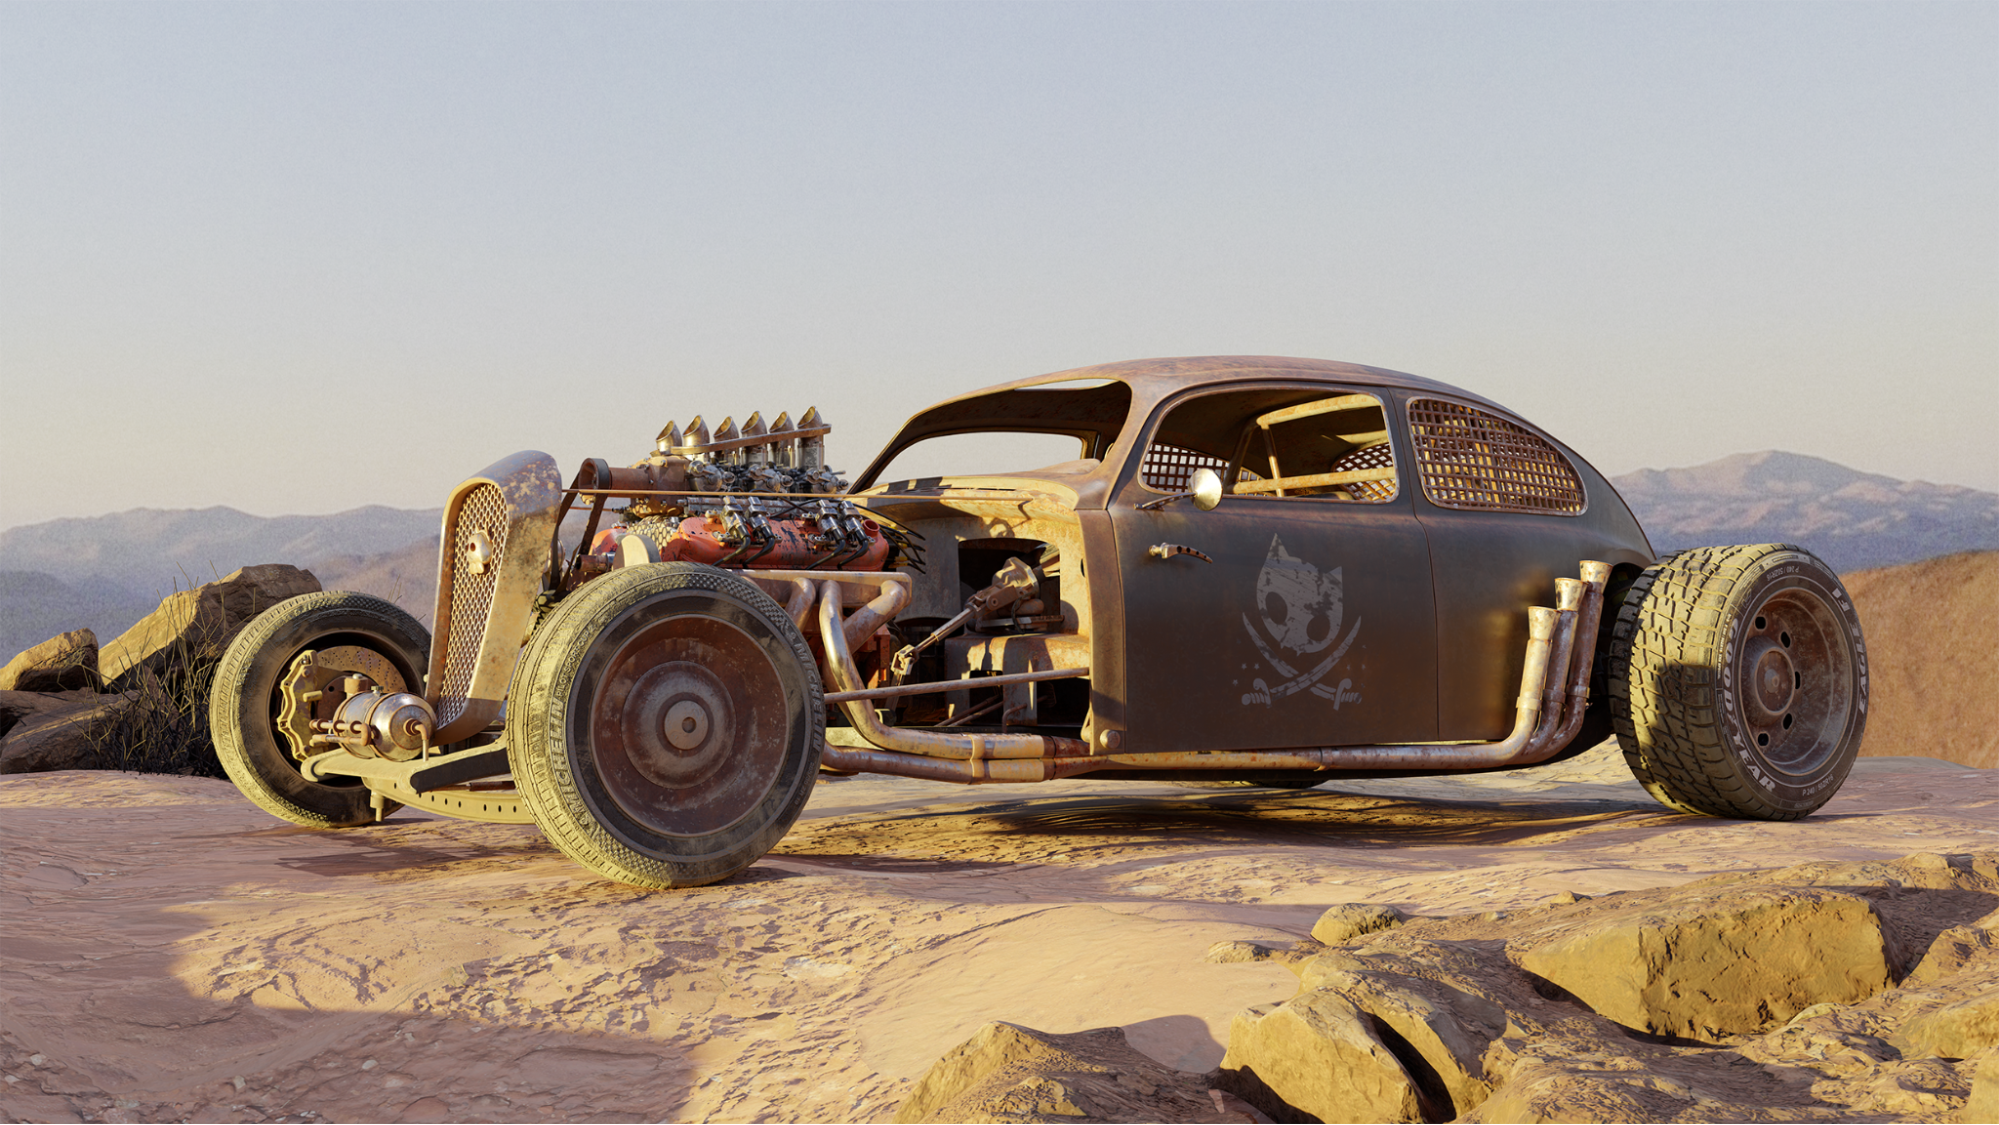
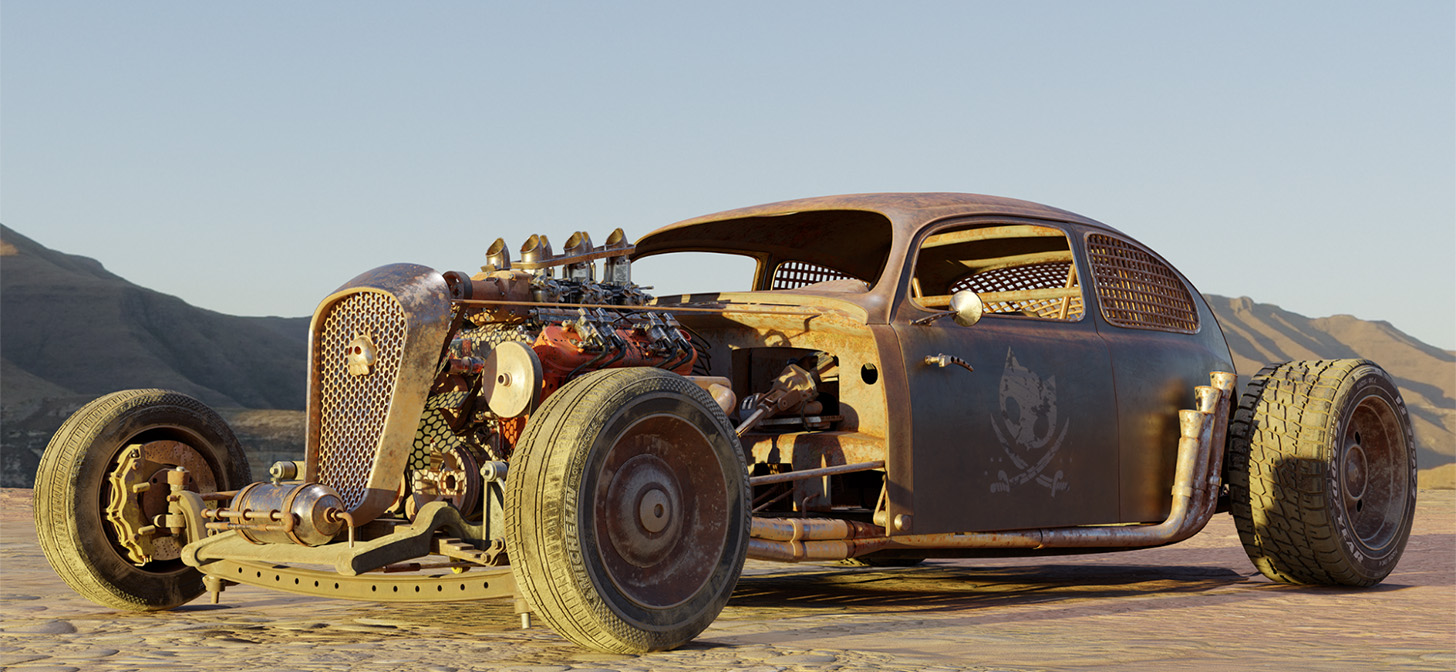
The final render
The final model has approx. 4.5M triangles. Combined with 4K texture atlas for the various mechanical parts, the Rat Rod model takes around 6GB of GPU RAM to render. I was scared that with a 16k HDRI background image, my graphic card (a simple GeForce, RTX 3070) did not have enough texture memory to handle the entire scene.
So, I created a stand-alone package and I was ready to purchase a few GPU hrs on AWS (which unfortunately don’t come cheap these days). To my great surprise, Terry (yes, my computer has a name) handled the whole scene without a fuss. The final rendering (8k resolution) required approx. 12GB of GPU memory, using 64-by-64 tiles and 512 samples per tile.
I turned the NLM denoiser on (in my opinion, it works ridiculously well) and started production, which would take approx. 20 minutes for a single image.
And here it is, the final result!

About the author
 Alessandro Alaia, 3D artist/hobbyist


Awesome job Alessandro! Looks amazing!!
Wow, really great work. Looks fantastic. Thanks for sharing your process too
This is weird, but I had a work computer that was called ‘Terry’. That was odd to run across.
It’s the most amazing rat car design I have ever seen. Hopefully one day I can start a rat car project in real life. Just by the looks it might go well over $35kUSD (Lot of money for me)
Hi what are your computer specs?
Thanks