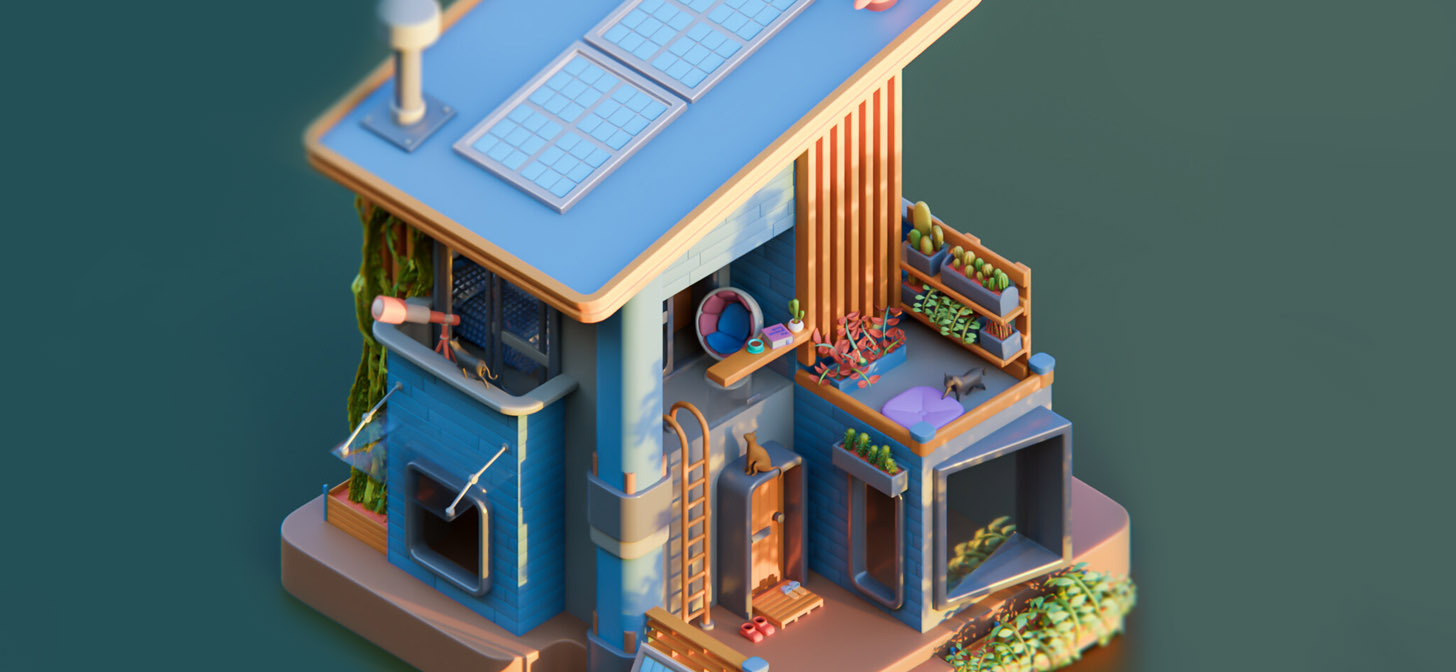
Behind the Scenes: Aki’s Sims House
About
Hello, my name is Ângelo Fernandes and I’m a 3D artist from Portugal.
My first steps in 3D happened around 8 years ago. I had experience with photography and graphic design and I wanted to experiment with a different medium. 3D always felt like a more complete platform, but at the same time, it seemed quite difficult to learn and also to achieve great results.
My first models were bad. It was me trying to create creatures and weird monsters, but the lack of anatomy knowledge was an obstacle and so I went a completely different route: archviz and hyper-realistic renders. That was my core “business” for years. A year ago I decided to start creating low poly and isometric renders.
That’s basically what I do nowadays, but sometimes I might change it a bit, which is the case with “Aki’s SIMS house”. It’s not high poly, but it’s not low poly either. It’s more curved and rounded figures, but I try to convey the low poly aesthetic and feel.
[sponsor id=’qarnot’]
Inspiration
“Aki’s SIMS house” came to life in a random but also natural way. I was browsing Instagram and came across Erika Bonezzi’s profile, specifically this one illustration she did for her Sims house. Her style is quite impressive and there was something about this house in particular that I really enjoyed, so I decided to do my rendition.
https://www.instagram.com/p/CCQ1dmmIDfc/
When I’m creating something in which the concept is not mine, I always like to interpret it in my style and add some bits that are kind of my trademark. I don’t like to do linear and direct translation of a specific illustration or inspirational reference.
When I’m creating a new project it can have a different starting point: or I create something new or I adapt an illustration or a concept in my style. Regardless of how it starts, I recommend having solid references before opening Blender. It could be for colour schemes, mood, look and feel, or for a specific model. Having good references is crucial for me, it helps the process flow and to organize each stage as well.
Modeling
Process-wise, when adapting a 2D illustration and translating it into a 3D environment, sometimes it happens that we need to adjust and adapt some aspects. In this case the depth and height of the house and some other architectural aspects had to be adjusted.
My main goal on this work was to avoid the low poly feel of triangles and sharp edges, so I opted for curved and rounded models. The Bevel modifier was key in the process. I also wanted to give it the feel of a toy house, a miniature that was made in plastic, cute and almost edible.
Lighting
Lighting this scene was particularly difficult. Sometimes it is just hard to find the best light that a scene or model needs to come to life. The video shows a bit of the process and it shows some of the light iterations I did. I wasn’t happy pretty much until the very last tests.
Shading
The same goes for colours. I knew I wanted soft tones, but during the process I did several tests with different colours. At one point, a soft red was the main color, at another it was green and yellow, which kind of prevailed. But in the end, blue and yellow-ish are the main colors, as they complement each other quite well.
Tools
It was all done in Blender and rendered with Cycles. I didn’t use any specific tools or various software, but I do use Loop Tools (which come already with Blender) for modelling, it’s a time saver for me. For everything that is wood planks and similar objects I used the Solidify and Bevel modifiers. For the cats, I used Subdivision Surface to guarantee smooth shapes. The plants were basically done with NurbsCurve with a bevel profile.


Thank you for reading.
Hope this description helps you in any way.
About the Author
![]() Ângelo Fernandes, Portuguese 3D artist who focuses on creating colorful and detailed low poly isometric.
Ângelo Fernandes, Portuguese 3D artist who focuses on creating colorful and detailed low poly isometric.


