Behind the Scenes: Now Where Did This Come From?
About
Hello everyone! My name is William Phillips, and I hail from the Land Down Under (Australia). I’m a 16-year-old, literally just finished school. I started learning Blender when I was 12, and did a heap of tutorials by Blender Guru and such. From there, I bought a couple of online courses, and have gradually increased my skills. I haven’t had any ‘official’ 3D training, but I am hoping to do something this year.
Tools
I don’t usually use anything much except Blender, but in this case, I used Substance Painter for the texturing, and Photoshop for a few touch-ups after rendering.
Motivation
As of November 2019, I wasn’t really getting anywhere with increasing my CG skills, so I decided to find some artwork I liked and recreate it in Blender, as practice. I hoped to challenge myself, while still doing something that wasn’t completely out of my range.
Inspiration
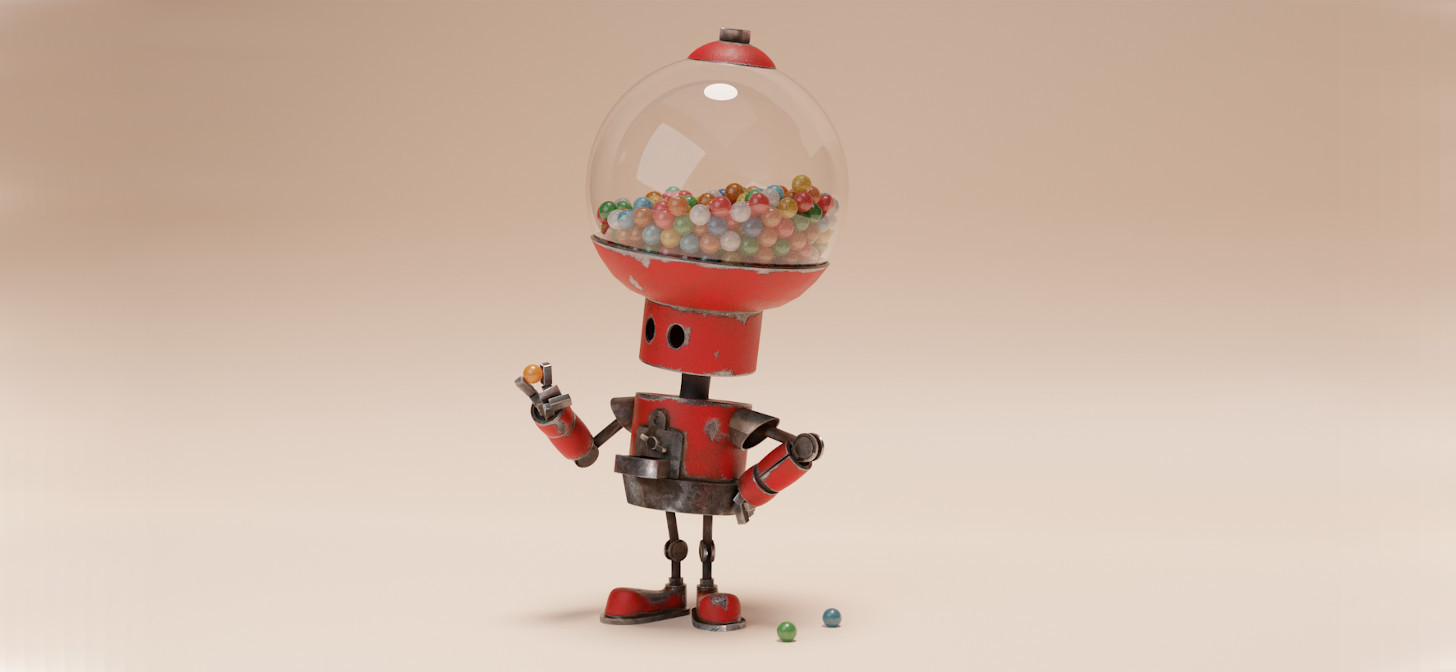
I’ve always liked robots, so I went on Google and browsed around for a while until I found one I liked. It was by a guy named Matt Dixon, who’s drawn a heap of cute little robots called ‘transmissions’. I browsed through his list, until I found one I liked. It didn’t look super easy, but at the same time, I could visualise how I would create it.
The Model
Beginning with the robot, I broke up its parts into simple cylinders, spheres, and cubes. I boxed out the mesh that way, then went through and refined it piece-by-piece.
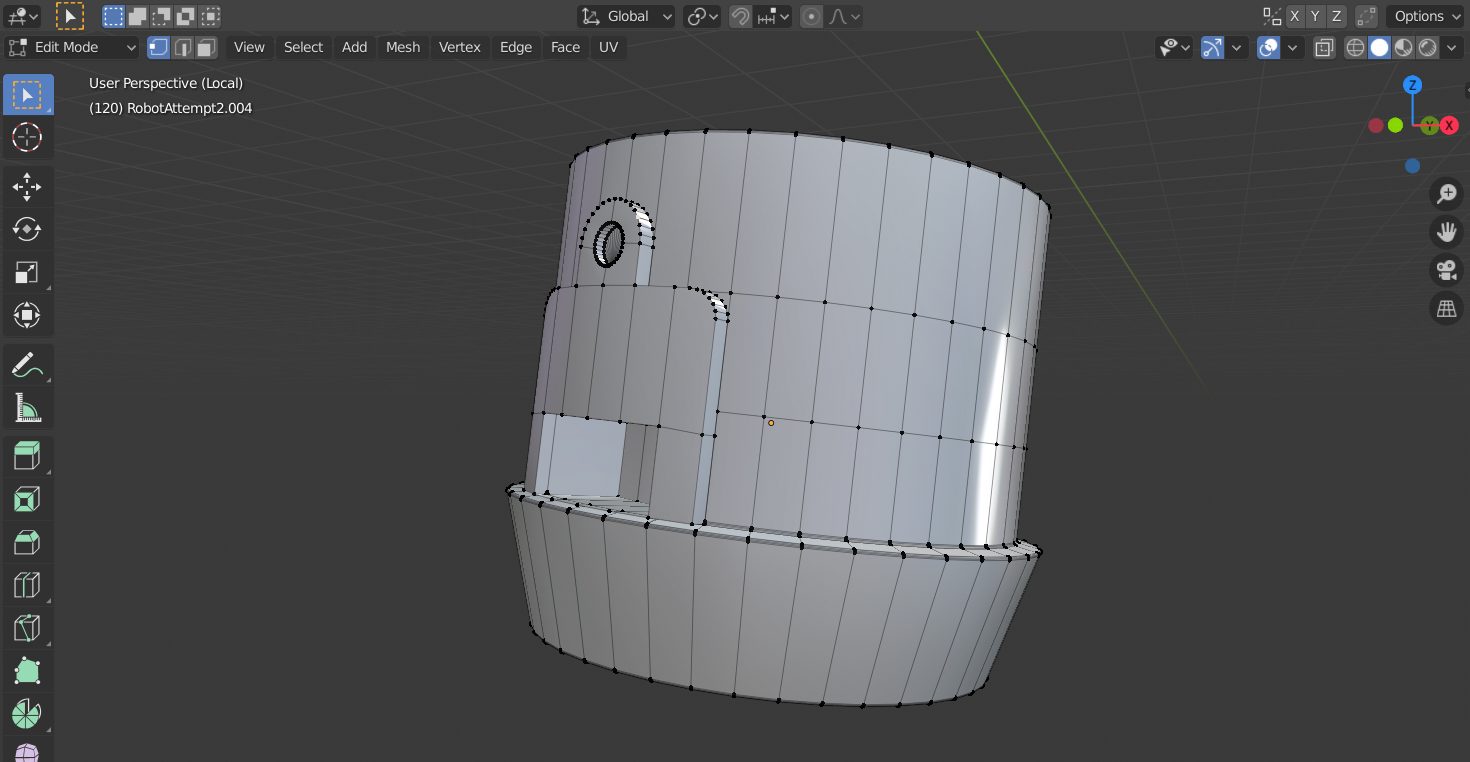
I tried to keep a good topology, but in the end I realised (after watching something by Gleb Alexandrov on n-gons) it wouldn’t affect it heaps. Some parts are all quads, while others are a big mess.
I used simple Booleans for the eyes, then applied them and cleaned up the topology a little bit (although I was still lazy). The head started with a cylinder, which I then fused with part of a sphere.

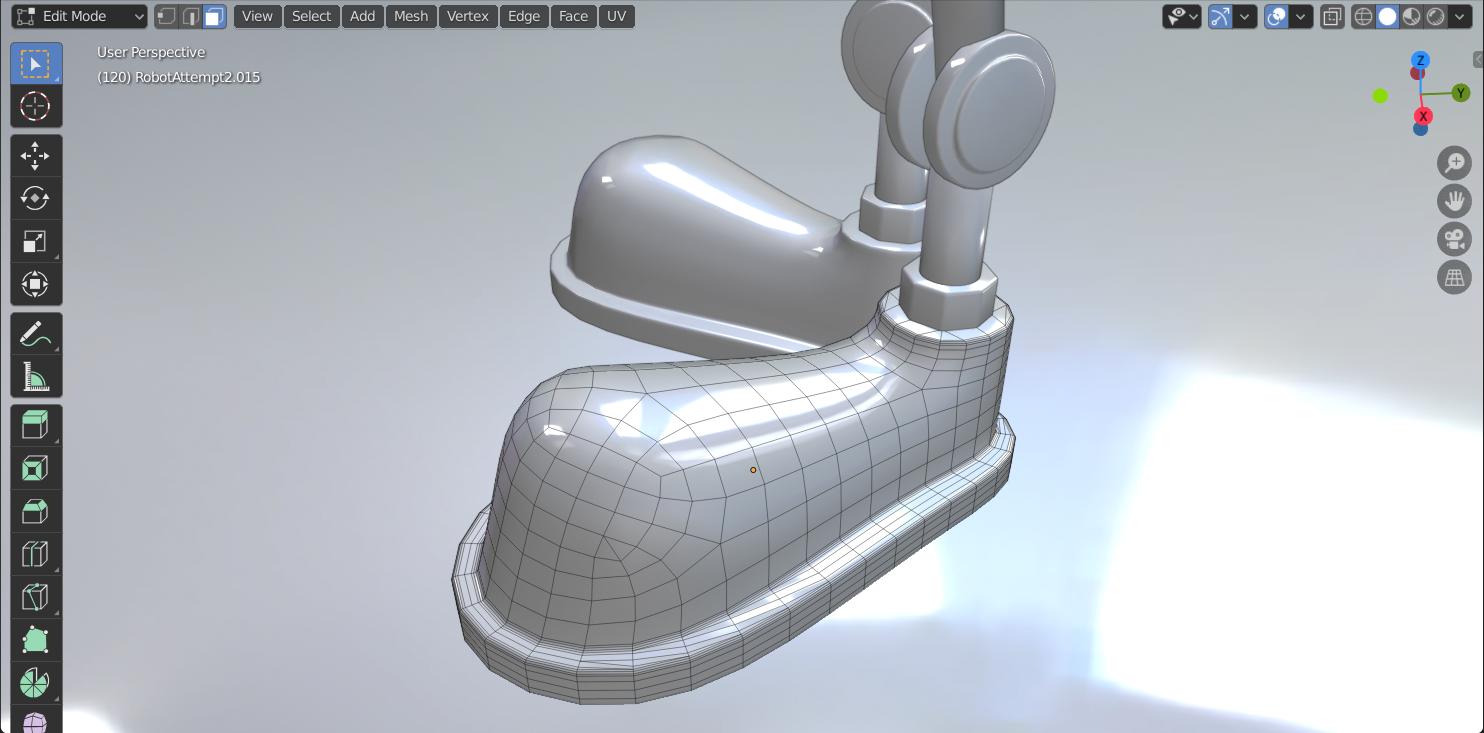
In the end, the shoes just started as a cube, which I then extruded, and put heavy subsurf on. I played around with loop-cuts and moving vertices around until I was happy with the final shape. (Sorry, I didn’t have an image prior to applying the subsurf).
The rest of the mesh is essentially composed of the simple shapes I started with, with a little bit of editing, booleaning and basic touch-ups.
Once the base mesh was done, I created a passive rigid-body hemisphere (that’s half a sphere, right?) atop the head. I then created a heap of spheres with far too many subdivisions, and dropped them all into the bowl.
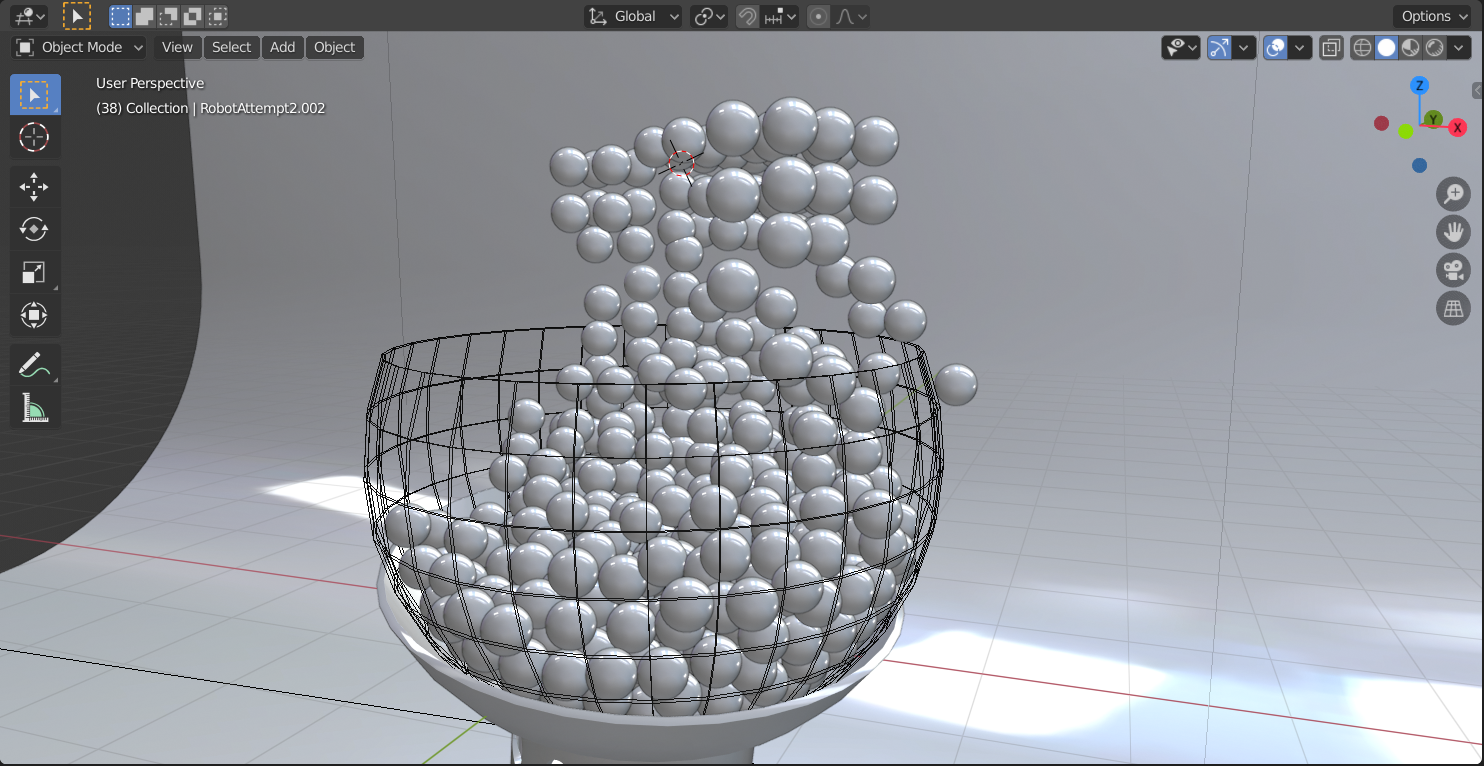
Apparently, a couple fell out.
Materials
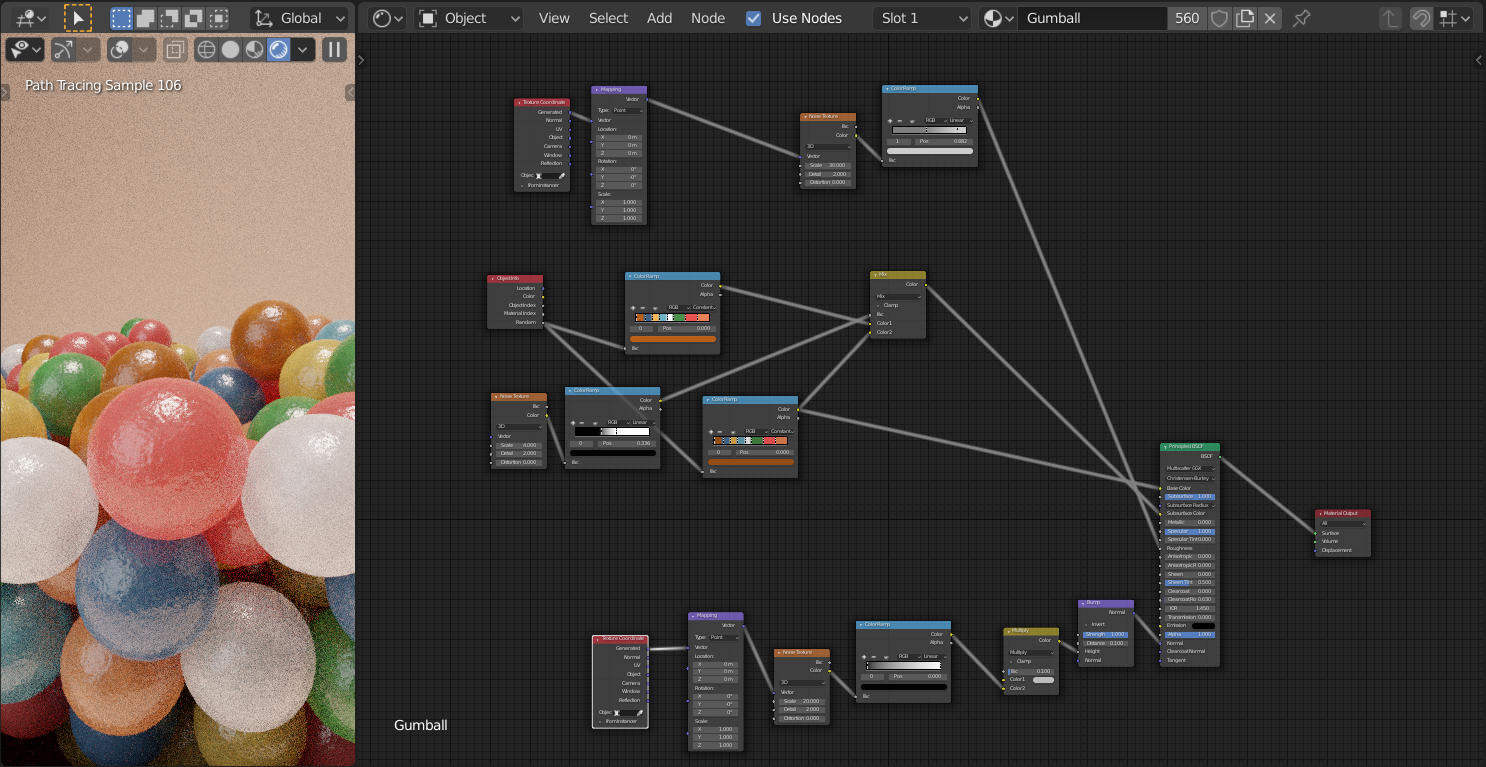
The only things not textured in this were the gumballs and the glass. The glass was a simple glass shader with default colour and IOR, nothing more. I think I should have textured it in the end, as some people recommended, but, well, I didn’t.
The gumballs were made more/less from noise textures. I took a colour ramp, and put a heap of random colours in it that I thought gumballs should be. I then took the random factor from an Object Info node to randomly colorise them.
Then it’s noise texture for the bump, and noise texture for the roughness. Pretty simple, in the end.
I think I did make them too shiny in the end, but that’s another ‘ah well’.
Texturing
So first off, I UV unwrapped the whole thing, then exported it as an OBJ. However, in Substance Painter the UVs weren’t very good, so I removed the UV maps and let Substance Painter auto-unwrap them. It did it very well, except for a few cylindrical objects. I blurred out the errors in Photoshop afterward anyway.
I’d only just acquired Substance Painter, and did a tutorial course to learn it a few weeks back. I used it for this project to learn the program even better, which I successfully did.
To start with, I put a few premade Smart Materials onto the mesh, the metal, the black hoses, and the red paint.
I then went and manually added scratches, blemishes, and smudges of dirt.
I found Substance Painter very easy to use, as I know my way around Photoshop a reasonable amount, and I found all the layers and brushes and such extremely similar.
The textures went through several iterations, where each time I just added more and more scratches, blemishes, and dirt. In the end, I was happy with it, and exported the textures.
But then I had a problem. Seeing as Substance had auto unwrapped it, I didn’t have those UV Maps back in Blender. That meant I had to dump the original mesh, export the file from Substance as an OBJ, import that into Blender, then add the textures back on in Blender.
I then spent a while giving the mesh back it’s good topology, which exporting and importing had ruined.
Touch-ups
After adding all the textures into Blender, I tweaked some of the texture maps with math nodes, until they looked the way I wanted.
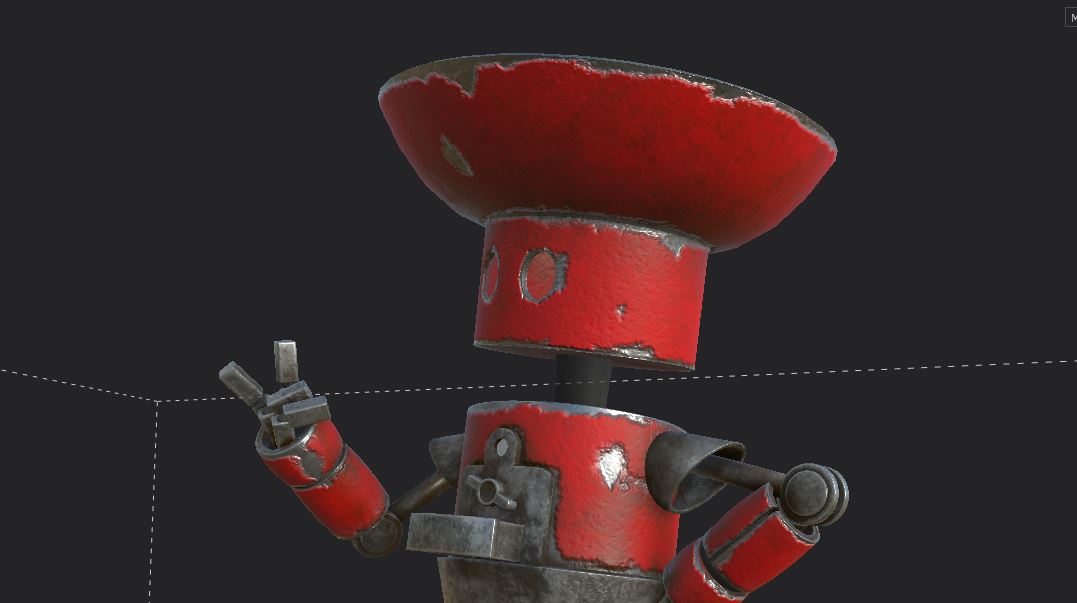
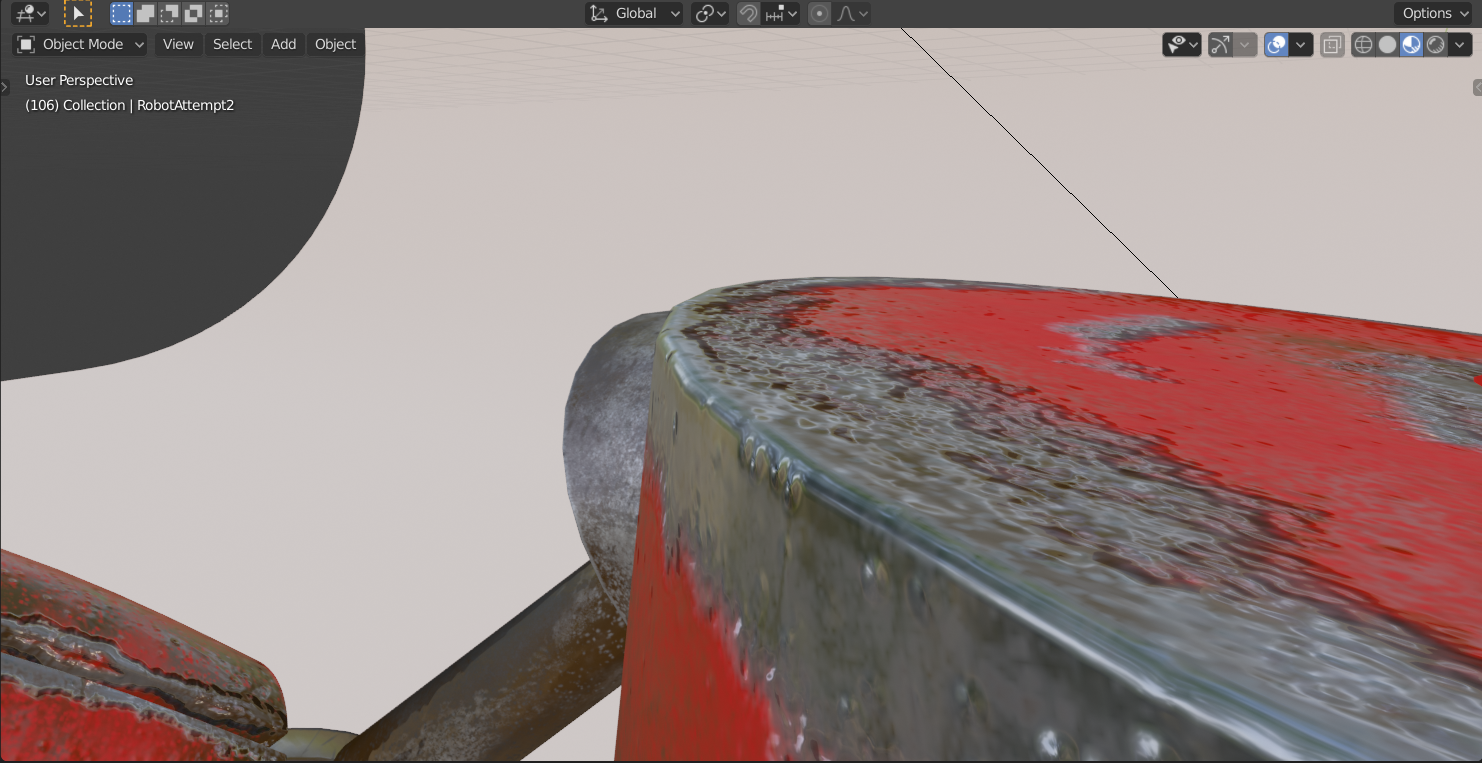
Then I went and added bevel to all the edges (IMPORTANT), and re-added some subsurface around the place.
Lighting
Lighting was a fairly simple procedure. First off, I went and made a background for the robot to stand on, which was just a plane and a wall with a heavy bevel on the corner.
The lighting was a fairly bright sun lamp from above, with a couple of area lamps from either side.
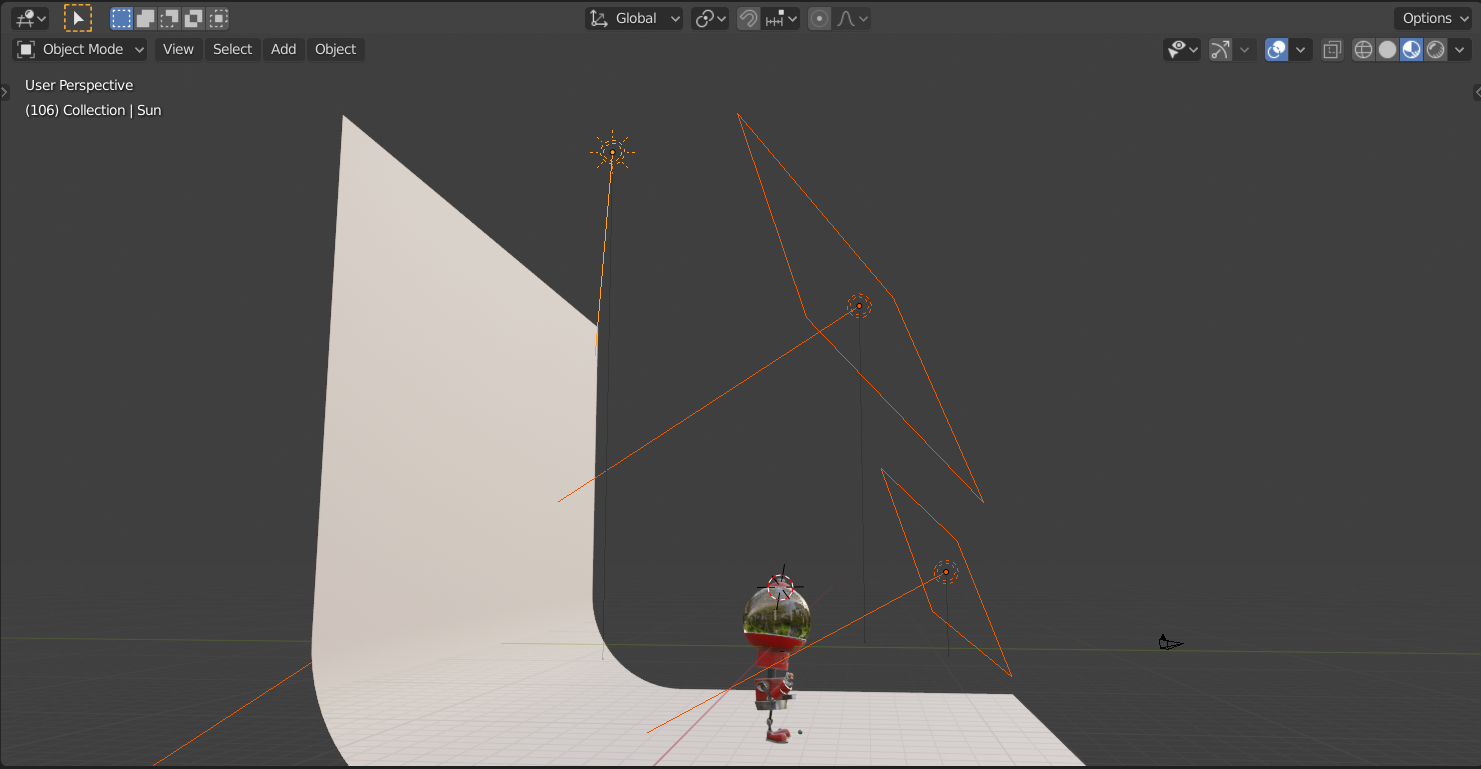
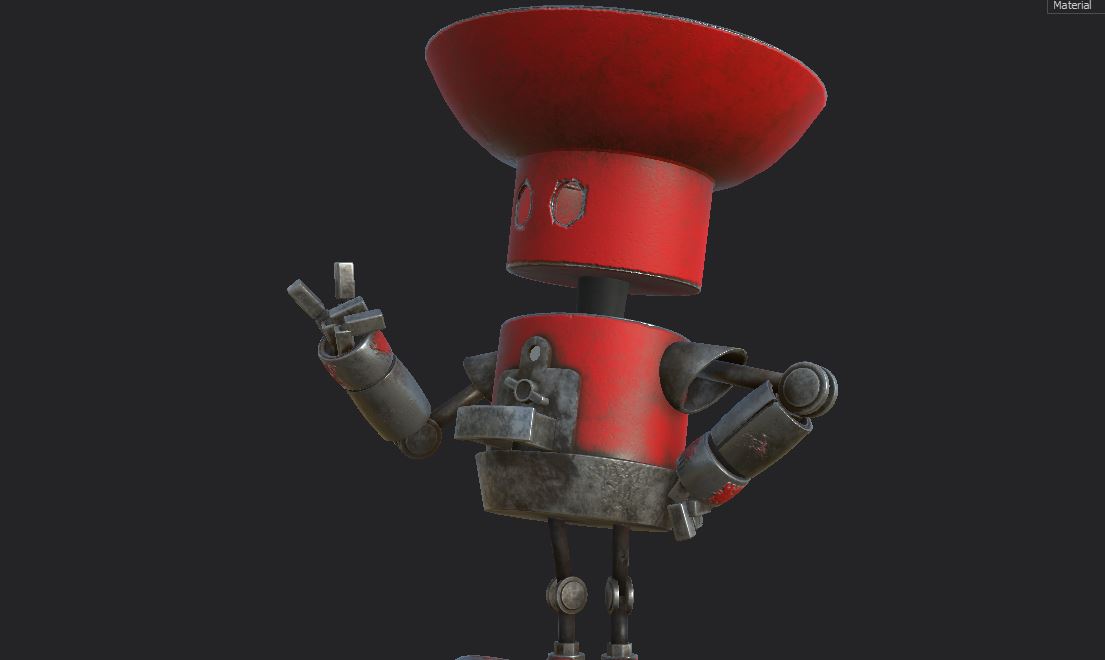
Initially, I had the sun lamp’s angle too high, and the robot looked like it was floating. That was in the image I posted online, and that was the one critique people had for me. So for this Behind the Scenes, I went and re-rendered it, and hopefully fixed it.
Rendering
I rendered it on 500 samples, then used the AI denoiser in the compositor to get rid of any noise. I colour-graded it a little, then saved it. I then took it into Photoshop and blurred some of the UV seams.
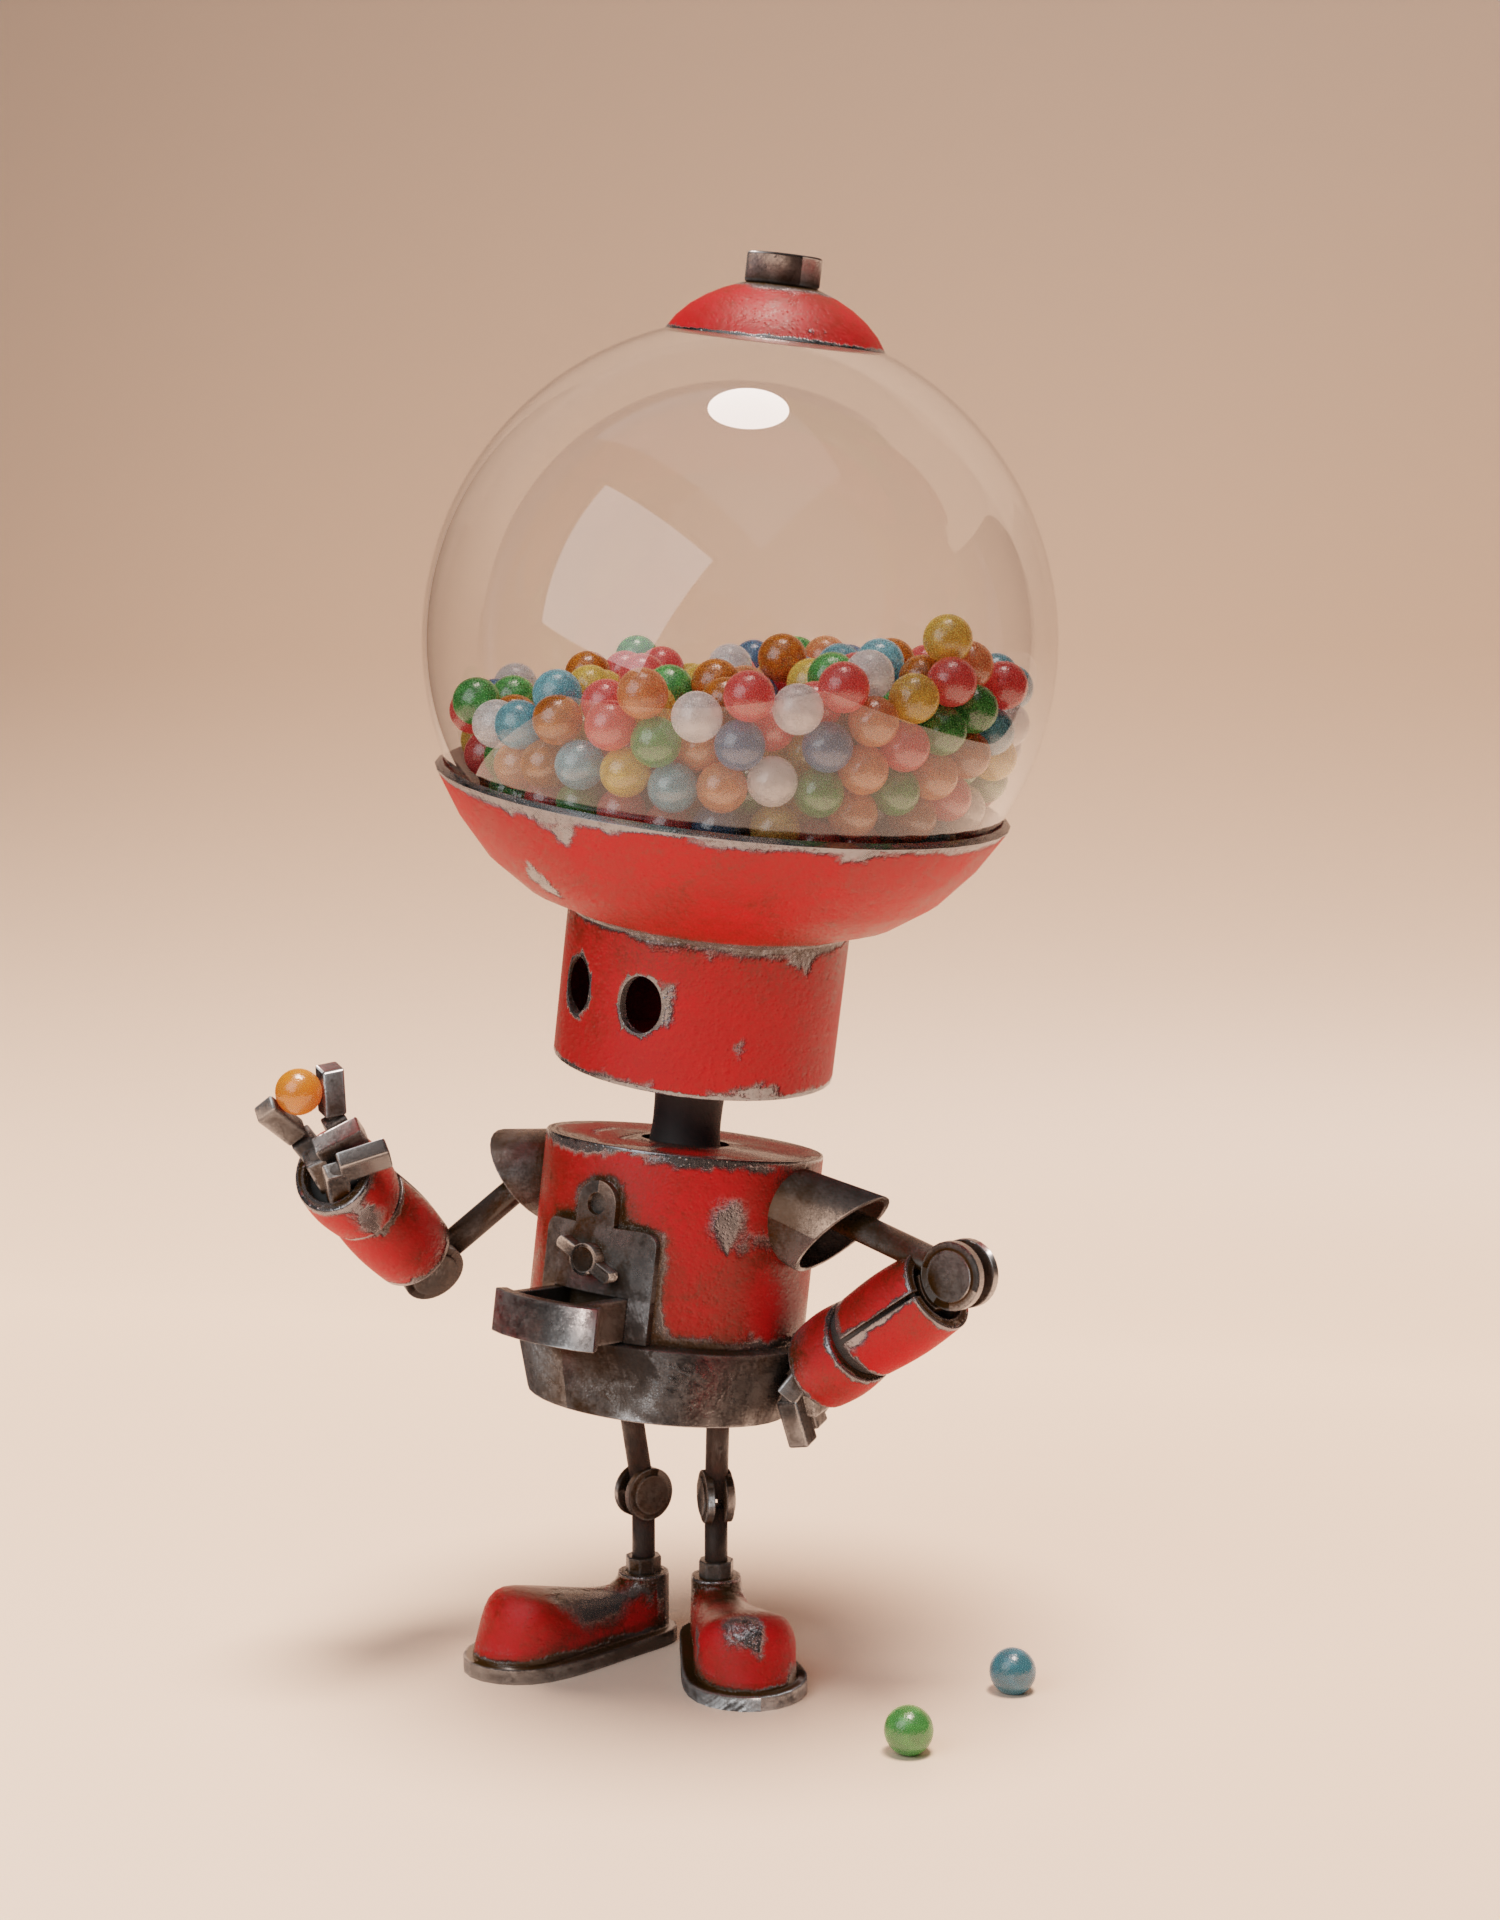
The final render ended up like this:
Closing
This was a very fun project to work on, and showed me a little of what I was capable of. I’m quite proud of it and have learnt a lot. But there’s still a lot more…
About the Author
 William Phillips, a young 3D artist in the making.
Links


Very nice! I’m always doing complicated things but never take the time to make simple(r) thinks like this and do them well! Your dent and wear looks great, although I would point out that inner corners collect dirt, not wear off paint!