Behind the Scenes: Aston Martin DB5 Blender EEVEE
About Me
My name is Jason Battersby, I’m a Canadian automotive exterior designer currently working for Audi Design in Ingolstadt, Germany. I have always been passionate about automotive design, as well as anything 3D related. Ever since my first 3D courses in college—Solidworks & Alias Studio Tools at the time—I have been drawn towards using 3D modeling as an effective design tool in my professional life, as well as for my own personal projects such as this one.
Beginning
In 2016 I took it upon myself to learn polygon modeling after years of watching from the sidelines. In the automotive industry, Nurbs modeling is used to create a car’s “Class A” surfacing. While Nurbs can achieve a greater quality for actual production parts, it is a very time-consuming process and a completely different way of modeling. For years I followed the development of software such as Maya and Cinema 4D, and eventually chose Maya to start building the Aston Martin DB5 you see here. Aside from being a James Bond fan, I chose this car because of its simplicity in construction. A very clean body side, simple proportions, and enough details to learn the wide range of polygon modeling tools. It wasn’t long after diving into Maya and following other artists on ArtStation that I discovered the power of Blender’s polygon modeling tools, as well as Cycles. With 95% of the car finished in Maya, I eventually moved into Blender, learning all of its tools as well as moving on to other personal projects, leaving this DB5 on the side and spending the next 3 years mastering polygon modeling and rendering in Blender.
EEVEE
As I watched the beta version of 2.8 emerge, I figured the DB5 would be the perfect test bed for trying the new Eevee rendering engine. Since I had the majority of the car finished and already inside Blender with some Cycles materials, it was the perfect starting point to light, texture, and eventually render out an animation of the car—something that previously would have taken too long to render in Cycles. With so many great tutorials already out for EEVEE—even before its official release, I had enough information to dive right in and set up my scene.
Scene Reference
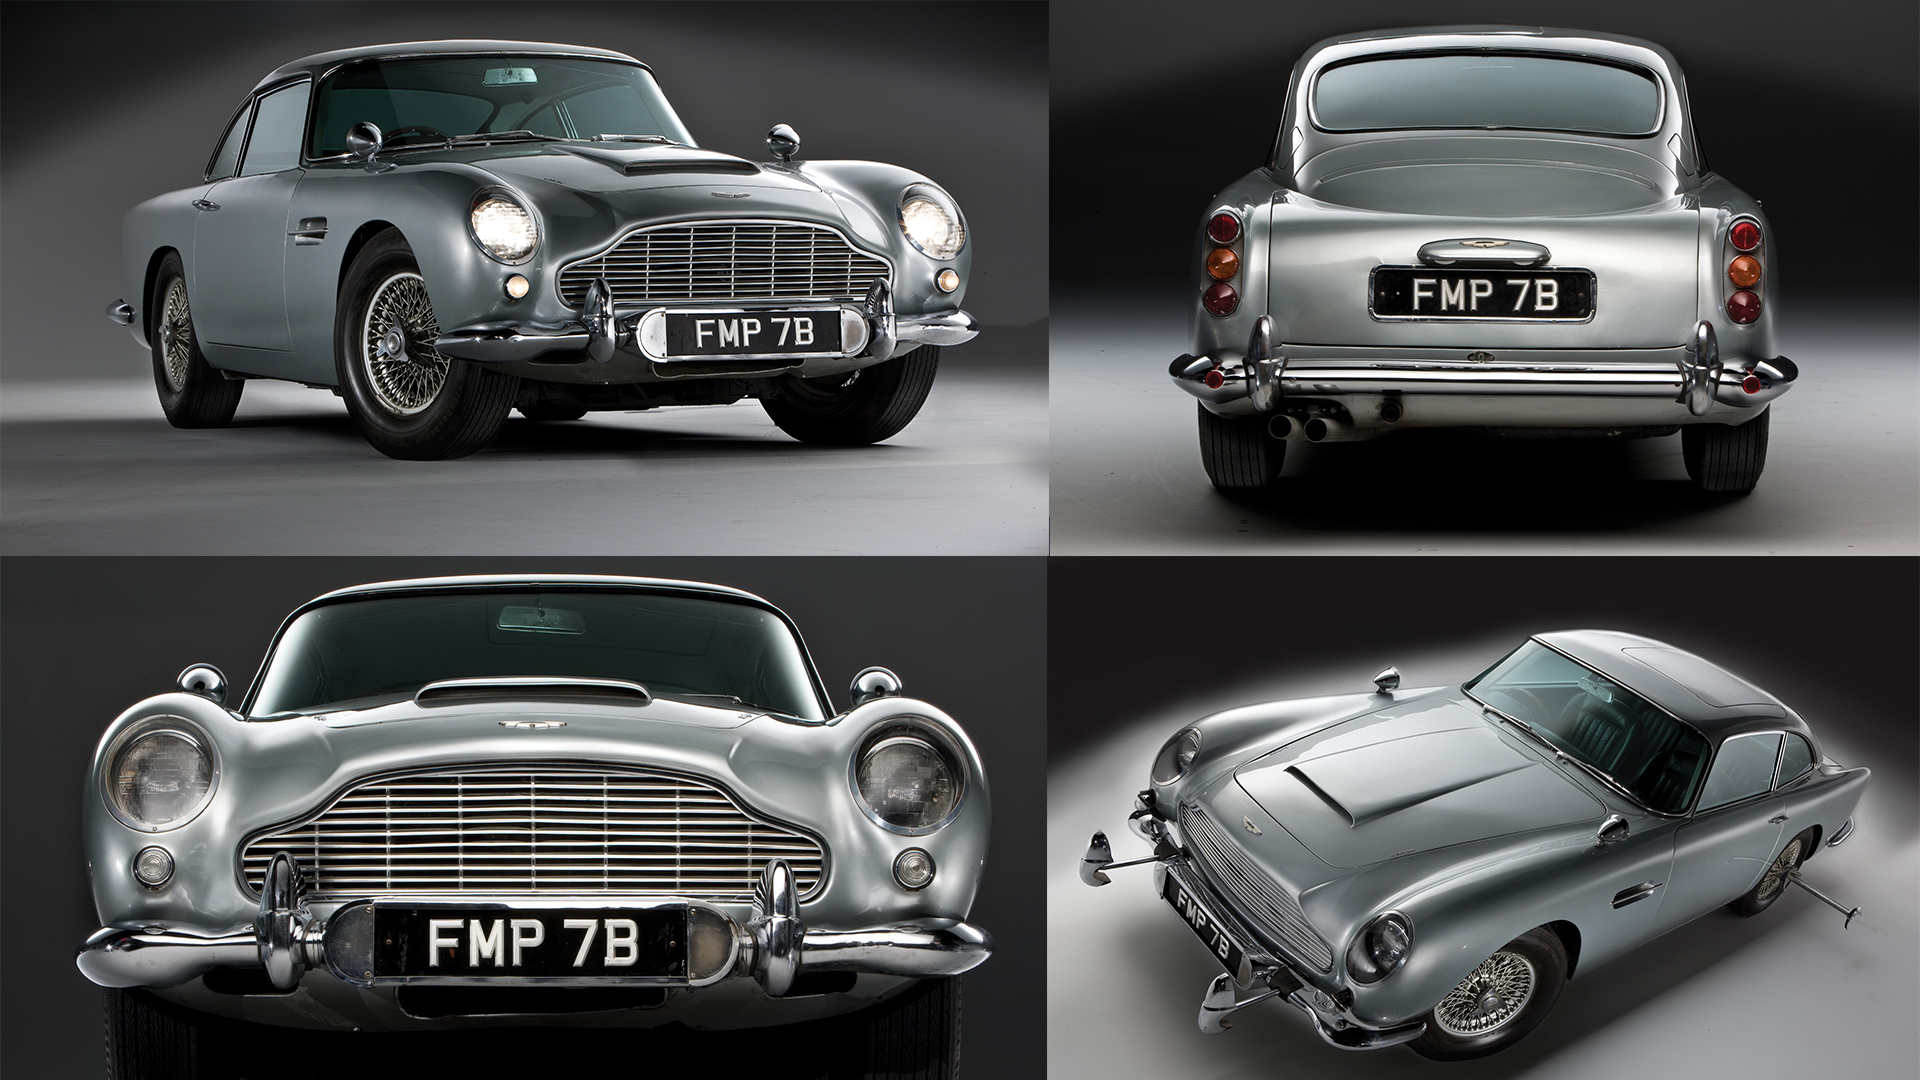
I wanted to create a simple studio setup, and these photos provided the perfect reference. It seemed as though 1-2 lights, or the use of a studio-style HDRI Map might be enough to recreate the lighting. I later found there simply wasn’t enough lighting to define the car’s features.
Lighting Set-up
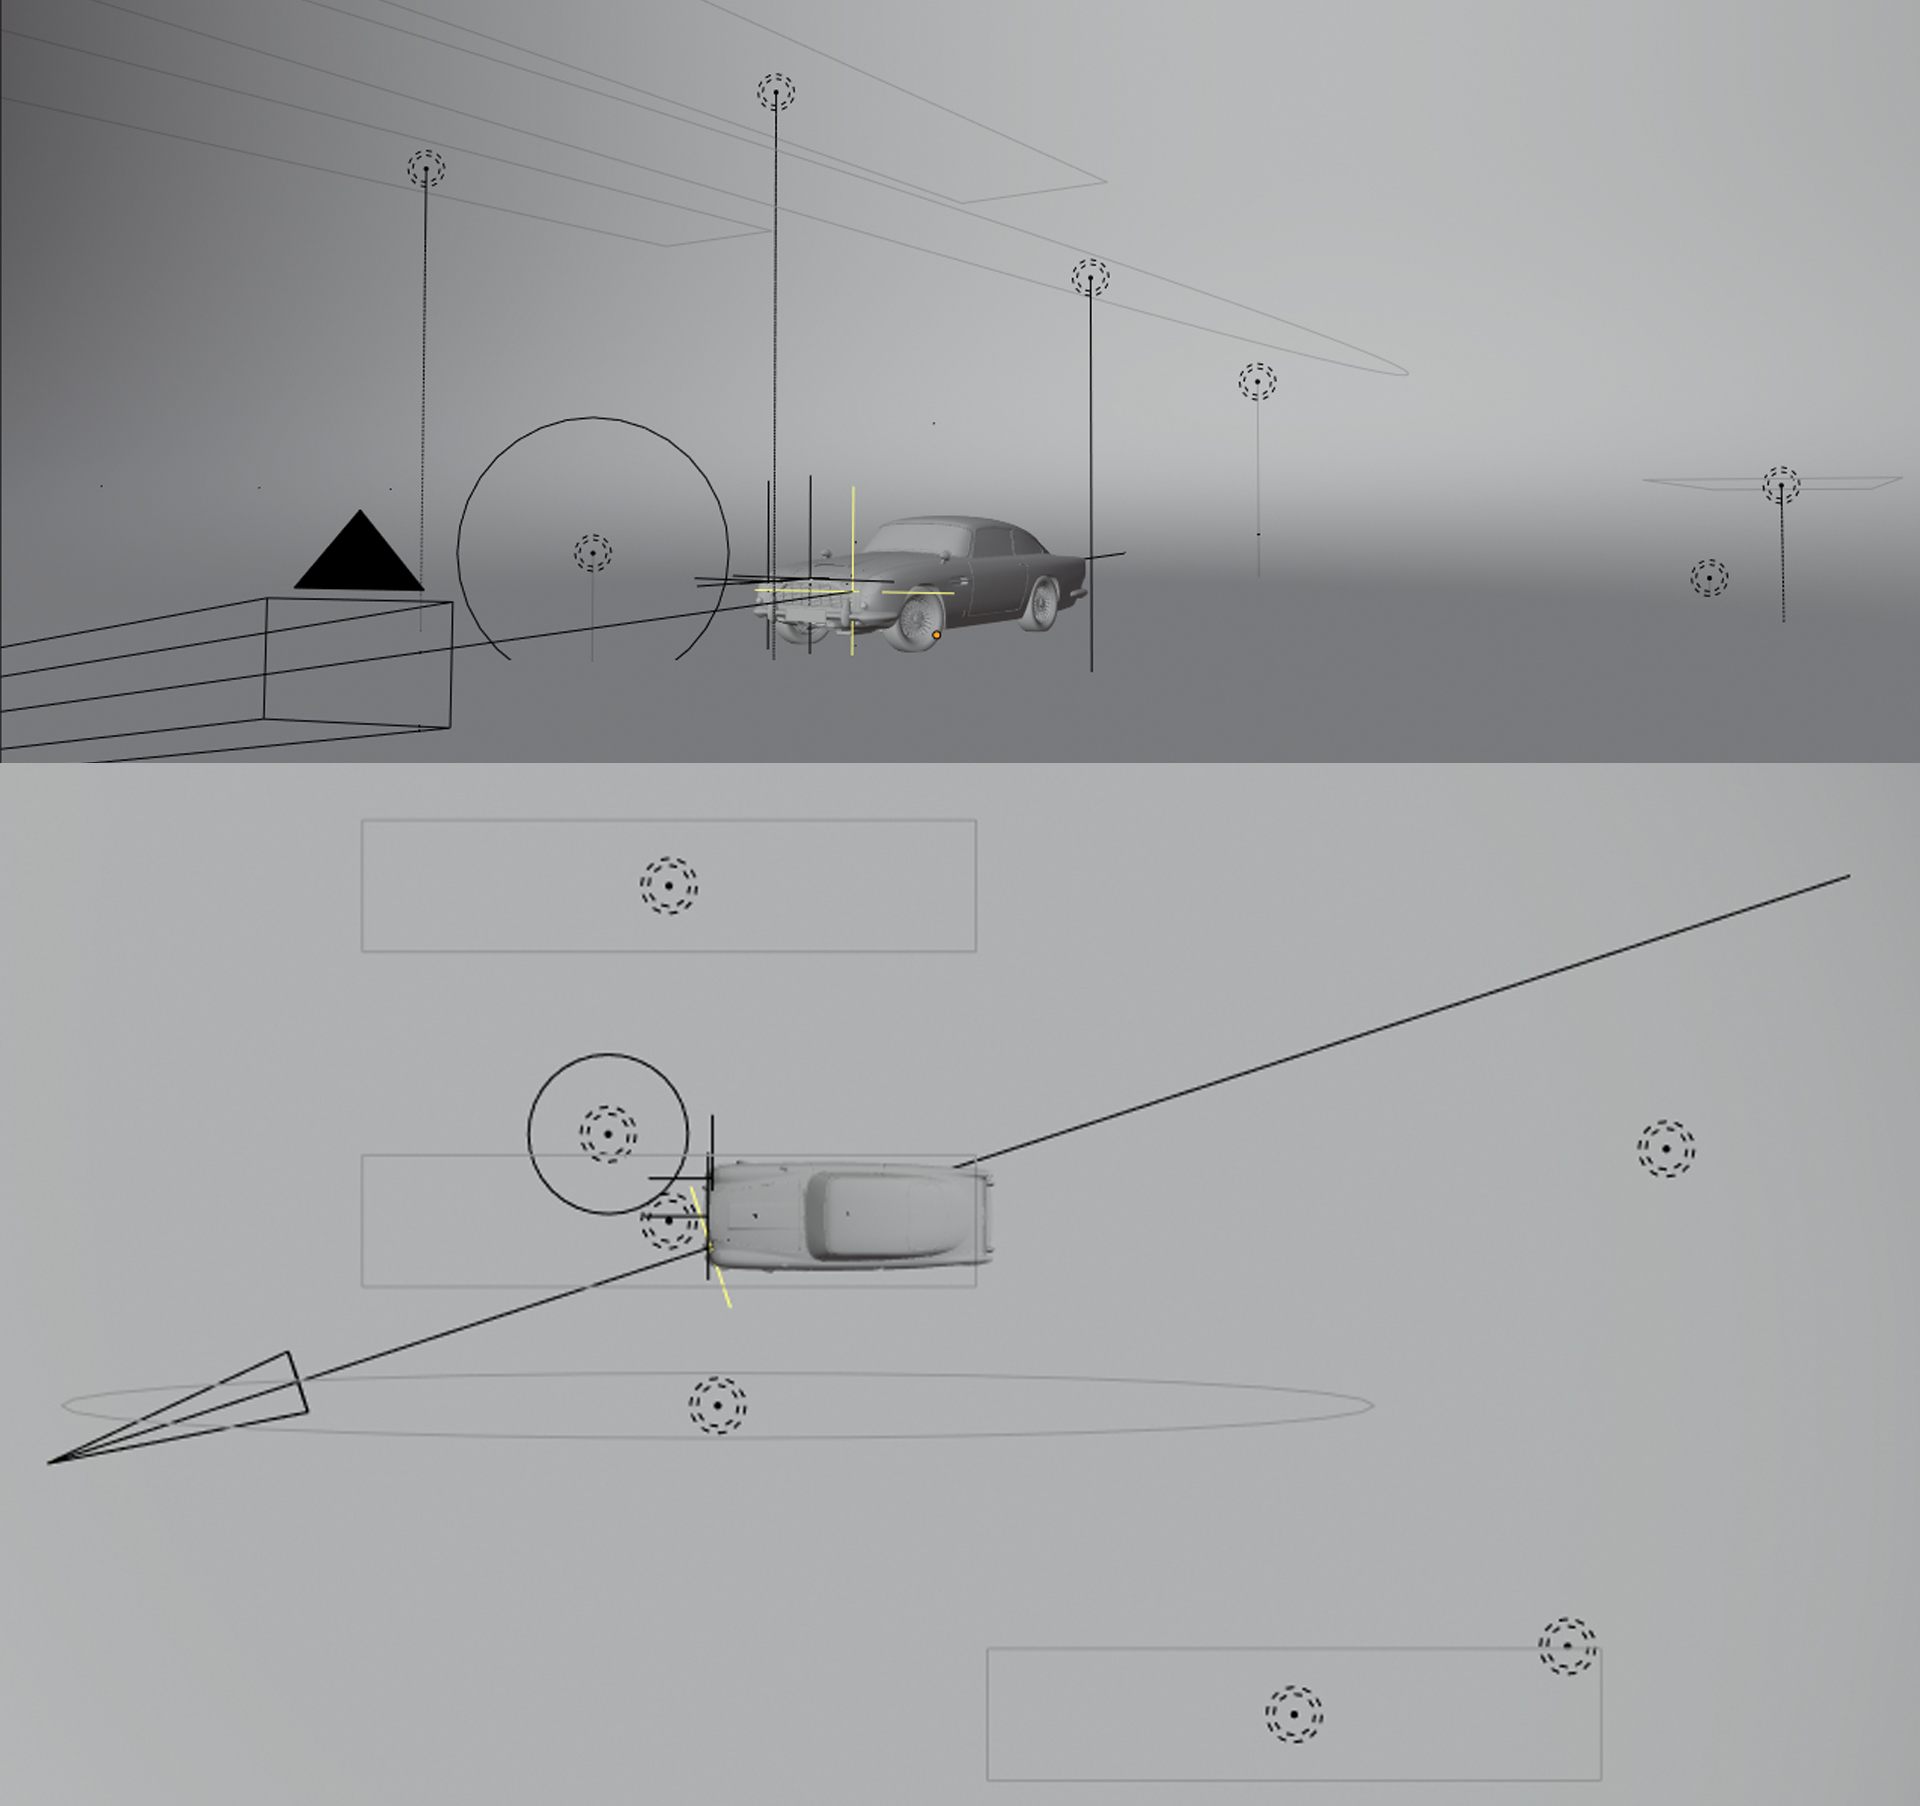
For this one shot I have 7 different lights to highlight various parts of the car. Just as a real photographer would do in a studio setting, I have a mix of area and point lights to achieve different effects on the body, either hard or soft reflections. The GIF below shows how each light gives life to specific features of the car. Together with all of these lights, I use the HDRI with the strength set at 0.10 to give added reflections on the body and especially the chrome—without these reflections the chrome parts tend to look lifeless.

The backdrop for the scene is just a cylinder with a subsurf modifier to create a typical photography backdrop.


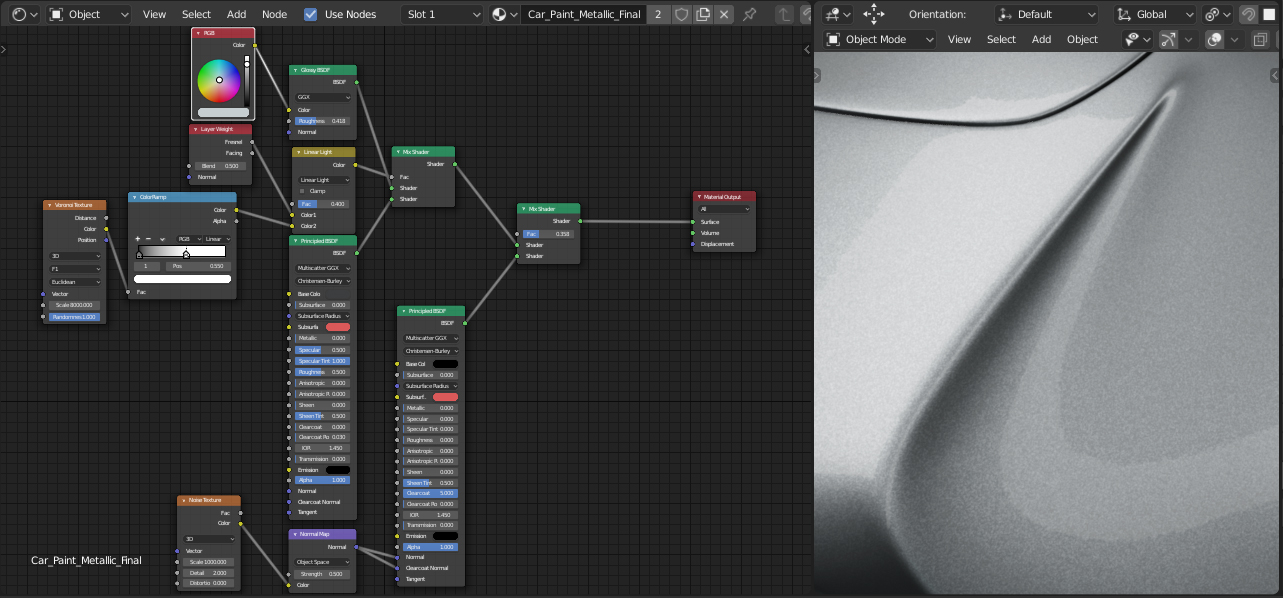
Textures and Materials
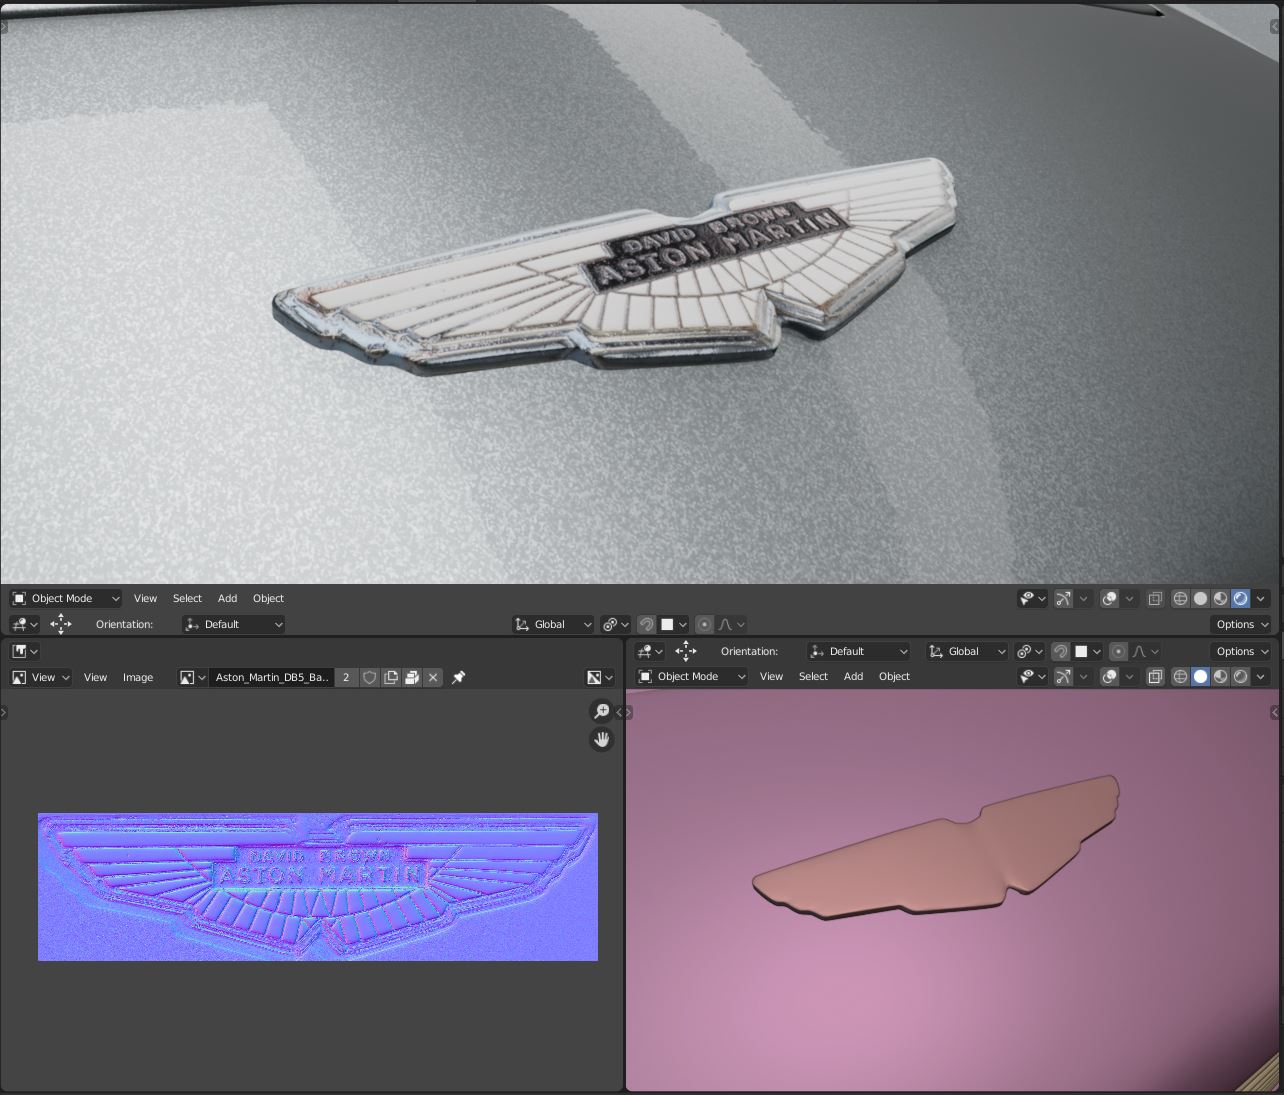
High-resolution textures and normal maps played an important role for the detailed parts. I was lucky enough to see a DB5 at a local car event and took some photos to use for texturing. I generated normal maps from the images I took using Photoshop. For all of the materials, I created my own node setups depending on what worked best. You can find the various other textures that I used for dirt maps on Poliigon & Friendly Shade.


For the headlight glass material, under settings on the right side panel, I have the Blend Mode set to Alpha Blend, Shadow Mode to Opaque, and turned on both Show Backface and Screen Space Refraction.
Rendering & Color Correction
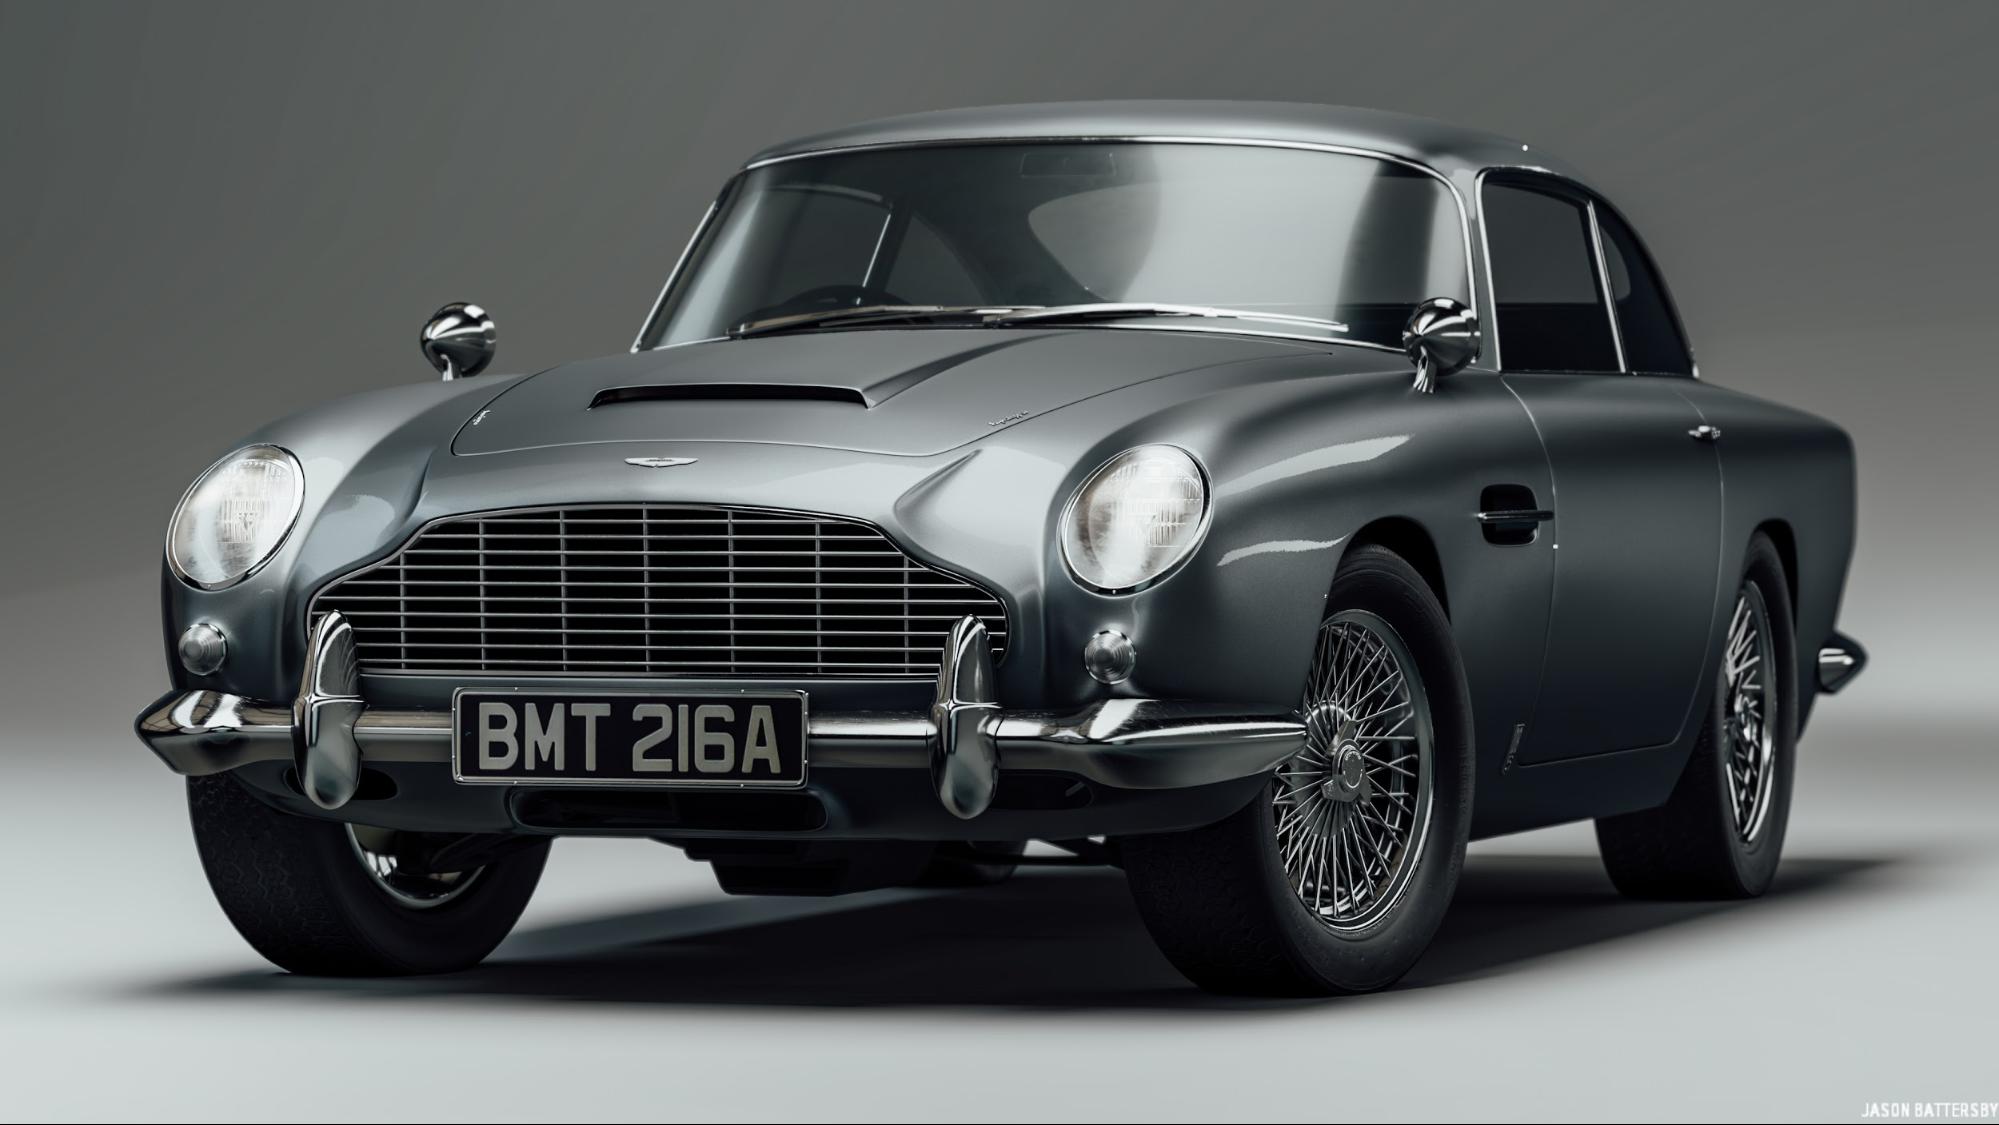
I rendered the final image at 3840×2160 Pixels, with EEVEE’s render samples set to 1024, and the Screen Space Reflection trace precision set all the way up to 1. Render time was 5 minutes on an Nvidia GTX 1080ti.
For color correction I always use Adobe Lightroom along with VSCO presets for Lightroom. VSCO presets mimic most classic film stocks, and are a great starting point to make your renderings look a little less computer-generated. From there I always end up modifying the preset depending on what look I want to achieve. In this case I went in a more blue/green direction as seen in the reference images. I try my best to light everything in the rendering itself and not rely on Photoshop or compositing to make drastic changes in lighting. This allows me to create animations with the same lighting and quality as the still images.
DB5 Turntable Animation
Thank you!
About the Author
 Jason Battersby, Automotive Exterior Designer, currently working for Audi Design in Germany.


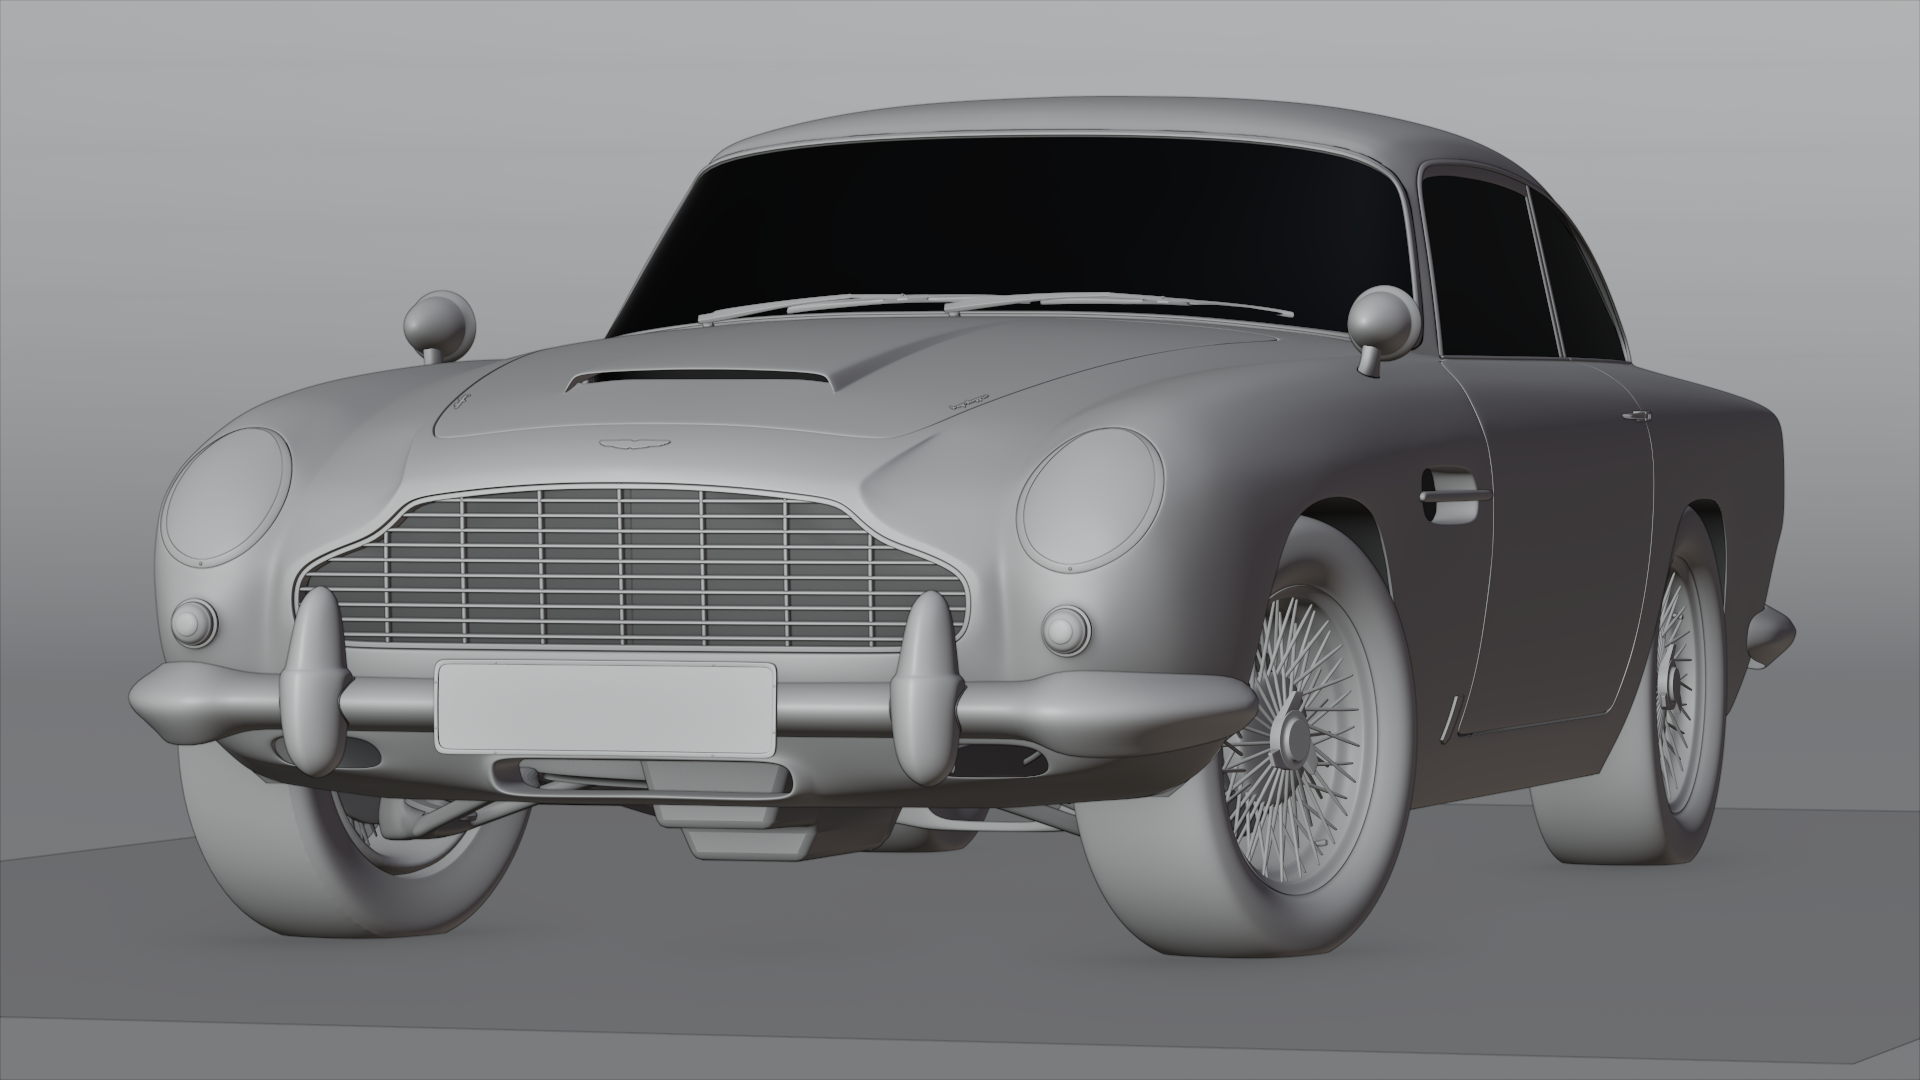
I would love to see the wireframe.
You can find the wireframe here:
https://cdna.artstation.com/p/assets/images/images/023/724/110/large/jason-battersby-db5-wireframe.jpg?1580149656
How about the construction wireframe
Unfortunately I only exported the smoothed version to Blender years ago, I will have to dig up the original Maya file with the original construction and post it on my Artstation.
Great work.
Shaken, not stirred…………excellent. I remember the movie well….OO7
I”d love to see a tutorial on the complete job, from start up to the very end…..wow.
You amaze me at how you know what shader to use and where…..I”m still shaking my head on all that. But, again, excellent job.
keep smilin my friend.
Excellent read, thanks. This is great work.
I do think there is a room for a little critique though?
The normal maps on the badge. You could improve this by creating them in Blender using Texture Paint , use draw line on a normal channel and stroke out the pattern, this will create a superior normal or height map for you. Many people would have used Substance for this kind of effect (or baked high-to-low normals) but you can do this in Blender using simple strokes removing Photoshop from this step.
https://youtu.be/tDN4Wwl6EOY?t=85 and 2.8 is really great for texture painting. Jayanam has done a series on tetxure paint in 2.8 here: https://www.youtube.com/user/jayanamgames/videos You can also stroke curves as well as lines and freehand.
The studio setting, I would use a larger bowl with a more subtle bend in your bowl. The background gradient, where sides meet floor causes a gradient mishap compared to the actual studio shot reference.
In the animation, there is banding in the video export on gradients, flashing render artifacts under the wheel arches and the rear passenger side indicator gets such a strong highlight across it that it almost turns completely white as the car rotates past.
As for render time / samples, I imagine you could also get that 5 minute render time down to under a minute using a denoiser in the compositor in latest Blender builds. https://cgcookie.com/tutorial/denoising-renders-in-blender-2-81
I hope I have not offended you with crit, I think what you have done is great work and some features in later blender releases may help iron out a few niggles spotted.
Cheers
Thanks, all great tips!
Awesome work! Dumb question. How do you set up your HDRI such that the chrome doesn’t “see” the cylinder backdrop, but only the HDRI? I’m guessing some fancy work with light paths?
It’s still visible, nothing fancy done. The HDRI just overpower’s the reflection of the backdrop.
Wow, i just find out this post and i really love it, i have been messing with car paint shader over the days and did not get any pleasant results. Do you mind sharing your thought on how you create the shader, especially the flake and the clear coat.
Thanks in advance.