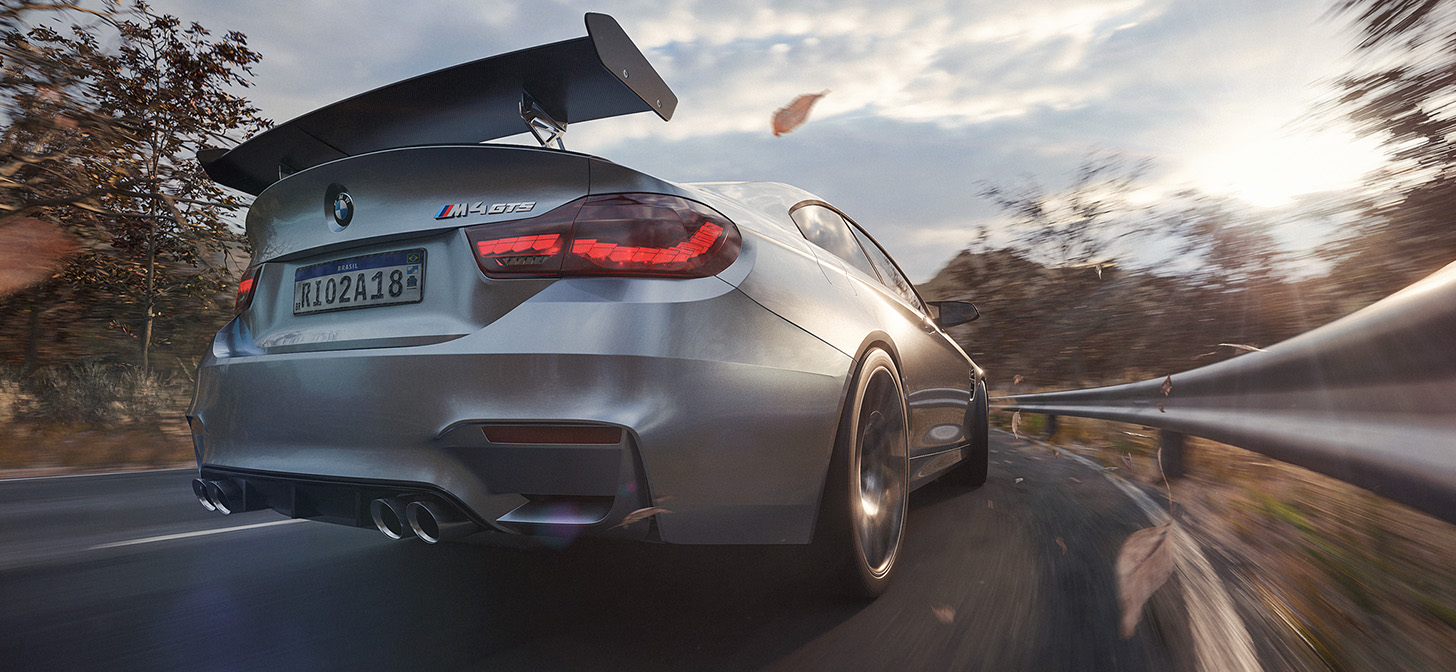
Behind the Scenes: BMW M4 GTS Cycles
About Me
Hello everyone, my name is Rafael Diniz, and I’m from Rio de Janeiro, Brazil. I started in 3D in September 2018 with the purpose of complementing what I was doing in Photoshop, but it turned out to be a passion, and the main tool I’ve used since then has been Blender.
The work I pick up is usually related to advertising. I’ve worked in a studio on post-production, which opened my mind and made me want to use 3D more than Photoshop. Of course, it was not an easy start, following those YouTube tutorials, then always researching more, testing things, courses, plugins, everything that could improve my workflow, but logically always trying to understand the technical part, always wanting to learn why something happens, to learn to control.
Inspiration
First of all I love cars, and my goal in 3D is environments, so nothing better than combining these two things together.
My main inspirations come from studios and photographers doing car works, such as Recom Farmhouse, Platinum FMD (where I’ve worked), Lightfarm, Agnieszka Doroszewicz, etc. Feeling movement in an image is amazing, and it easily happens in car images.
Tools
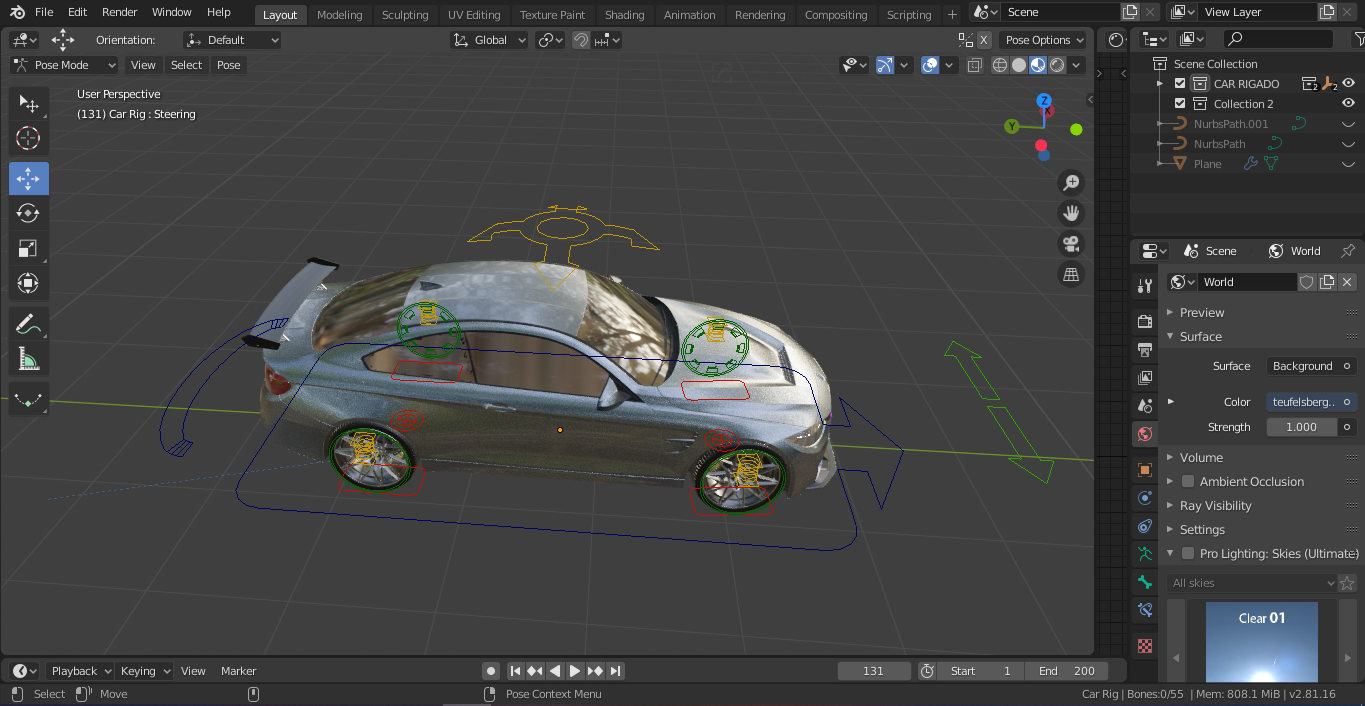
As a main tool I logically used Blender (Cycles), where I modeled the environment. Still in Blender, I used the Graswald add-on for much of the vegetation. Other parts of the scene were made with textures from Quixel, the trees were made with ”The Grove 8,” which is another amazing plugin, and an HDR from Pro Lighting: Skies. The mountains in the background were made and textured in World Creator. And in the end the post was finalized in Photoshop.
Models
I took the main model for the car from a studio project I worked on. I usually get other cars from the Internet (ps: I hate to model cars, I already tried. haha). The materials were made with the help of the course “Master Car Creation in Blender.” If you want to learn more about modeling and car materials, I recommend this course a lot. But remembering that it is no use copying and pasting, the car you are making can be quite different; as I said before, understand how things work so that you can control them.
Just like the car, the terrain was made using references. I think is no better tip than: use references images. Some of the textures were from Quixel and others were from Poliigon.
One thing that I did to have a lighter file was to create the vegetation and mountains in a separate file, linking to the main file, and then creating instances. It is still a heavy file in the viewport if everything is visible, but this approach dramatically decreases memory usage during render.

Movement
To give a sense of movement, the camera had to be attached to the car and the car had to be animated to pass over the track. But before that I made the rig, with the help of the Rigacar plugin. It is a free plugin and the control you get is great.
Just after that comes Motion Blur, which you just enable in the render properties. Don’t worry if your car is not fast enough in the viewport—you can control motion blur very well with the Shutter option.
Post-Production
This being the area I have the most experience in, it was very simple and I just had to repeat my process on all the images. I used Photoshop 2019. One of the great benefits of a 3D project is the passes; you can have a selection of things, be able to control reflexes with the gloss pass, be able to control the mist, etc. Another thing that changes the image nicely is the color gradient and flares.
I’ll show you more about my workflow in post-production:

First of all, I organized a base group, which would contain the render result, and also the non-denoised version. This way I can balance them if I change the background.

Then I merge everything, and do some very simple settings on camera raw, and then I start developing the basic structure of the image, where I will correct errors, such as vegetation passing inside the track, etc., This is also where I start using passes, especially gloss passes to enhance the reflections on the car.

After that, I tackled the leaves. I had rendered them separately so I could better control them in post. I applied a little dodge and burn (this is a good trick for post-production, sometimes it makes a great difference), and I increased the intensity a bit from the headlights of the car.

Now comes one of my favorite parts: applying flares, dust, particles, etc. Those things, combined with a good color gradient, make a lot of difference.

Finally, color gradient. This is where I see that the image worked out, haha, with some combinations of LUT, color balance, hue/saturation, etc., you can completely change the image. Even better, you can control the feel of the image, whether it is cold or warm, something more colorful or monochromatic or more alive. This part really changes everything.

After that I apply a high pass technique to sharpen, sometimes merging everything again to use some camera raw settings like vignetting, noise, sharpening, etc.
Hardware
CPU: Ryzen 5 2600
GPU:Gtx 1070 8GB
RAM: 16GB
About the Author
 Rafael Diniz, 3D Generalist, Creative Retoucher


That looks really good – nice job! Thanks for linking to the Rigacar plugin, I’m definitely going to use that in the future.
For the headlight, did you just use a emmit shader for it?
Hi, where i can find a good tutorial for car modelling ?