Behind the Scenes: Modern Bathroom (EEVEE Test)
Hi, my name is Svenja Strobel (“Icesturm” online). I’m a self taught Blender user, live in Germany and am 18 years old.
I started learning Blender when I was 13, and it’s been an important and addictive part of my life for the five years since then. I discovered Blender through YouTube and I also ended up learning Blender exclusively through the platform and by experimenting on my own. There really are great resources available there, today even more than five years ago.
Just having finished high school I’m now planning on studying computer science while continuing to freelance in my free time or just to create my personal 3D art. In the future I hope to be able to find a job in which I can combine both fields.
At the moment I use Blender on a weekly basis, creating smaller personal projects, which can be finished in a few days. On average I spend about 25h working on a piece. It’s really a lot of fun seeing your ideas come to life!
Most of my projects are collaborations I do with Colin Behrens, who is an awesome guy I met through the Blender community a few years ago. Working together has the benefit of having two pairs of eyes critiquing the image and spotting more mistakes. Also you can motivate each other, which helps when you do encounter frustrations in the workflow—and it’s just a lot more fun! I’d highly recommend trying collaborations :)
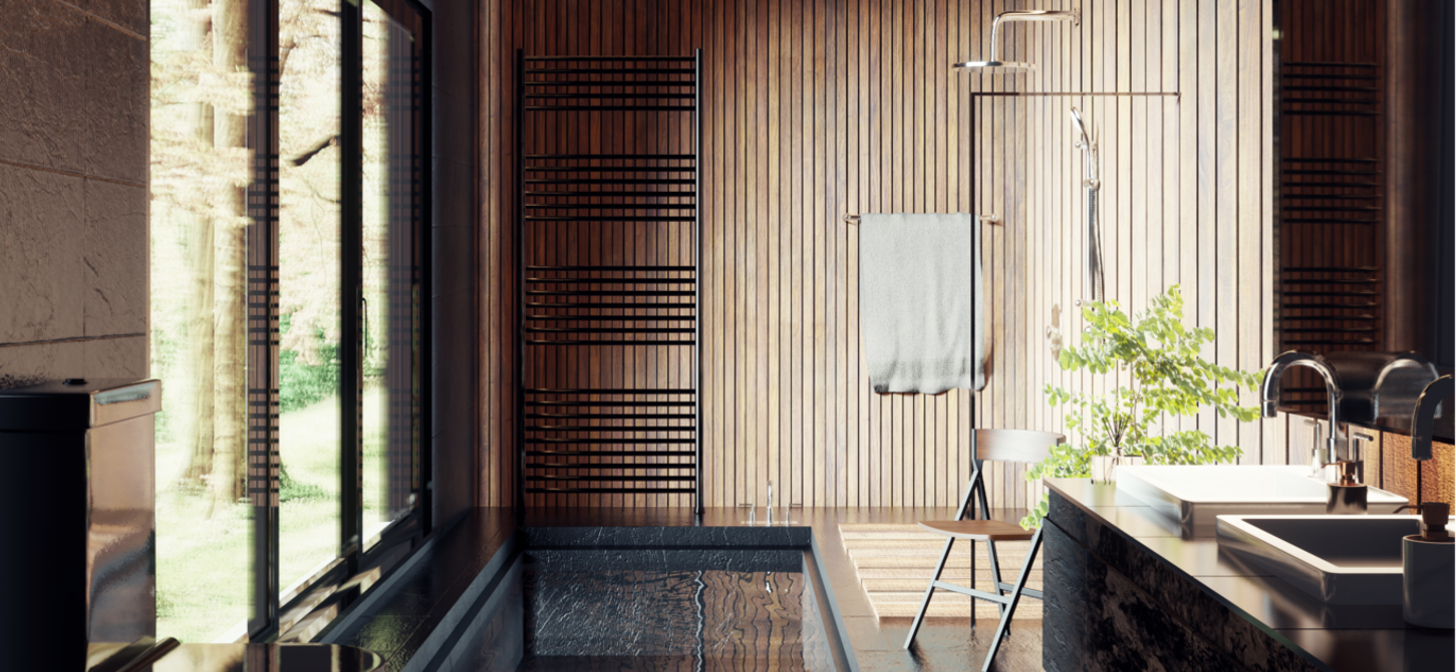
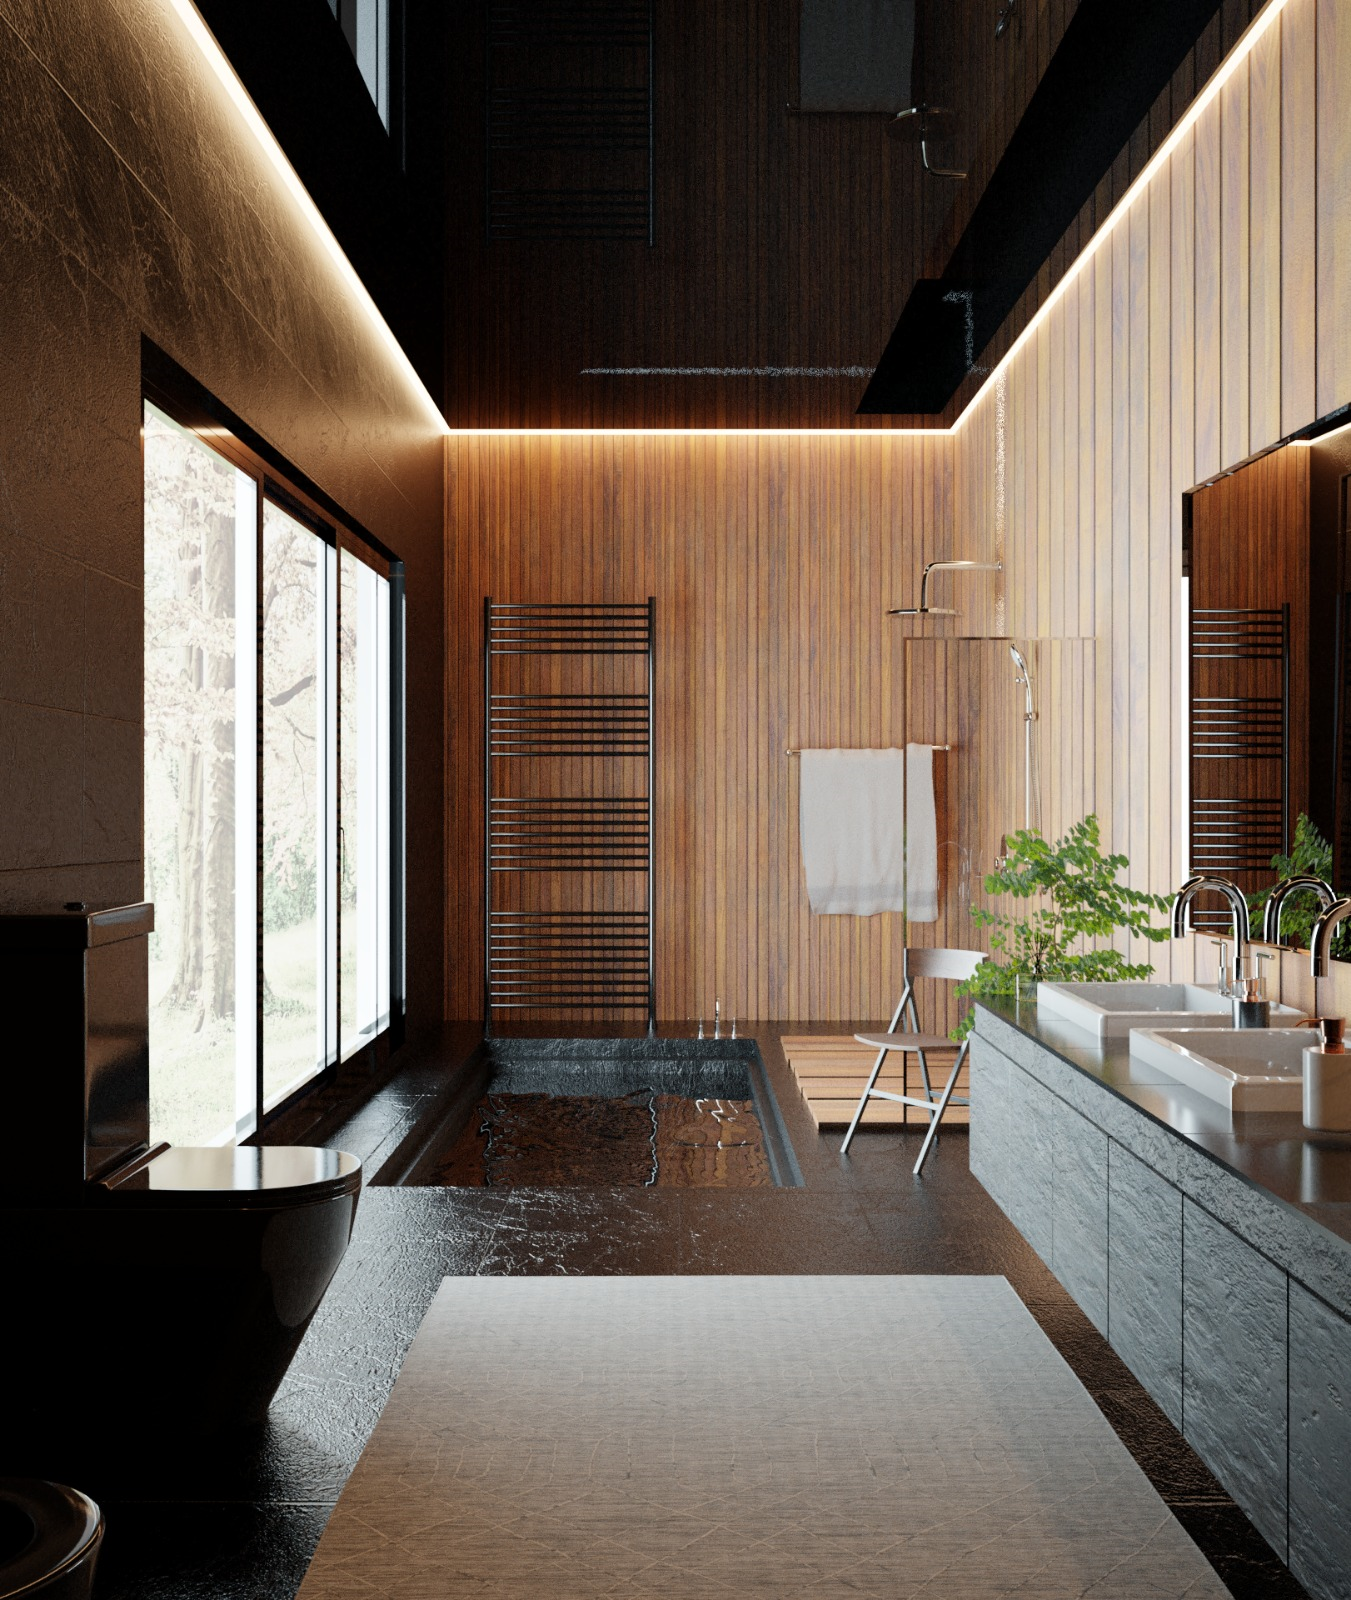
The bathroom render is one of my few solo projects.
Inspiration and Idea
Finding an idea for what to make is always difficult in my opinion. In the search for inspiration I usually browse Pinterest, searching for random things, always hoping to find images that really pique my interest. I usually end up with three to five reference images, which then lead to me coming up with my own idea. Often I then do a quick sketch to make sure that I don’t forget the idea—it never ends up being pretty, though.
Most of the renders I do are character renders. What inspired me to try something different this time were the many ArchViz in EEVEE videos and renders I saw on YouTube and blenderartists.org. I wanted to try this out for myself and started searching for ArchViz inspiration on Pinterest. After a few hours of browsing through the app I’d come up with an idea I liked. I then started to execute it and was actually able to finish the entire piece in less than a day.
My goal with this scene was to find out how the workflow in EEVEE compares to that in Cycles. And that’s what I want to focus on in this article as well.
Modeling
For this project I used some assets from Poliigon.com, such as the chair, the toilet and a few other small things. I did this because my main goal with this scene was to find out the differences between EEVEE and Cycles, and well, modeling is pretty similar in both. The rest of the scene I was able to quickly model on my own. I switched the unit measurement to meters, which is really important when it comes to ArchViz. In the past I always had problems with getting the scaling to look right, but if you switch to real world units, this becomes a lot easier. In order to get the scaling right, I actually ended up going into my bathroom at home and measuring the size of some furniture there in real life.
This is the order in which I modeled/added the objects:
- The main structure of the room
- Window and tub
- Main pieces of furniture, such as the sink cabinet or toilet
- Smaller pieces of furniture, such as the shower
- Details to make the scene look more realistic, such as the soap dispensers or the towel
So basically I modeled the large pieces first, and then kept adding smaller and smaller details.
Lighting: Or – How to get rid of lightbleed in EEVEE
So this is the part that was new for me. Lighting in EEVEE is quite different than lighting in Cycles and getting it to look right in the end took quite some time and experimentation.
I had recently learned online that area lamps are supposed to work well in EEVEE, so instead of using an HDR as I would have normally done, I added an area lamp to simulate the soft light coming from a cloudy sky.

And, well, while the lamp wasn’t as large as the sky, it was still pretty big. I also positioned it rather far away from the window in order to imitate the distance of the sky and get the right light falloff. And now my room had some light in it! Unfortunately there was a problem: lightbleed. Getting rid of that took a bit of experimentation.
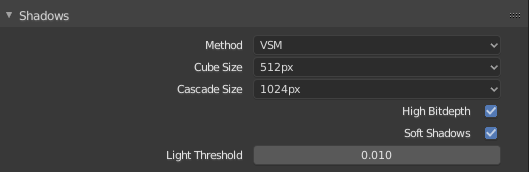
I started out with changing the shadow method from ESM to VSM, because this improves the quality of the shadows. I also enabled High Bitdepth and Soft Shadows, with the same goal. Enabling soft shadows makes lamps in EEVEE work more similarly to lamps in Cycles. The shadows end up getting softer depending on the size of the lamp, which is also a reason why the area lamp in my scene was so huge. In order to make this look good though, you really have to increase the amount of samples.
Another step in getting rid of the lightbleed, was increasing the thickness of the room’s walls. They ended up being way thicker than normal walls, but fortunately that wasn’t really visible in the final render and the lightbleed was definitely decreasing and was almost gone.
Some other tricks I learned to improve lighting in EEVEE, which I also used:
1.
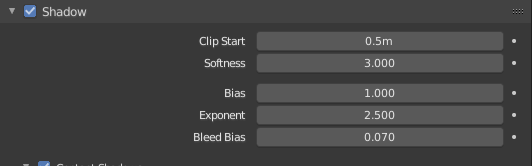
Under the lamp settings, you can increase the amount of softness. This has to be used very sparingly to look good, but it can improve the look of your scene.
2.
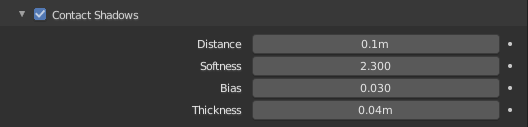
Contact Shadows can also increase the realism of your scene—if used sparingly! It’s not meant as a method to get rid of lightbleed, instead it’s a way to compensate for EEVEE’s rather inaccurate shadows and make sure that objects really seem to be touching the floor.
3.

Experimenting with the Ambient Occlusion and Bloom settings can also help to improve your lighting. What settings you use depends on your scene and personal taste.
In total I have to say that lighting in EEVEE really is rather inaccurate and feels rather buggy in the beginning. Still you can achieve great results with the render engine.
Texturing and Materials
Texturing in EEVEE is rather similar to Cycles. You do have to experiment with many values though, such as displacement, glossiness etc., because the render result can end up looking a bit different than what you’re used to in Cycles if you were to use the same values.
In order to achieve a photorealistic result, you have to use good textures in both render engines, though. I always use PBR textures from Poliigon.com that have a resolution of at least 3k.
But now comes the one major difference to Cycles: The texturing process is way faster in EEVEE! In Cycles you always need many test renders to find the right material settings. This step usually takes up the most time while working in Cycles, because test renders often have long render times. In EEVEE, however, you can just adjust settings in real-time and find the right look for your scene.
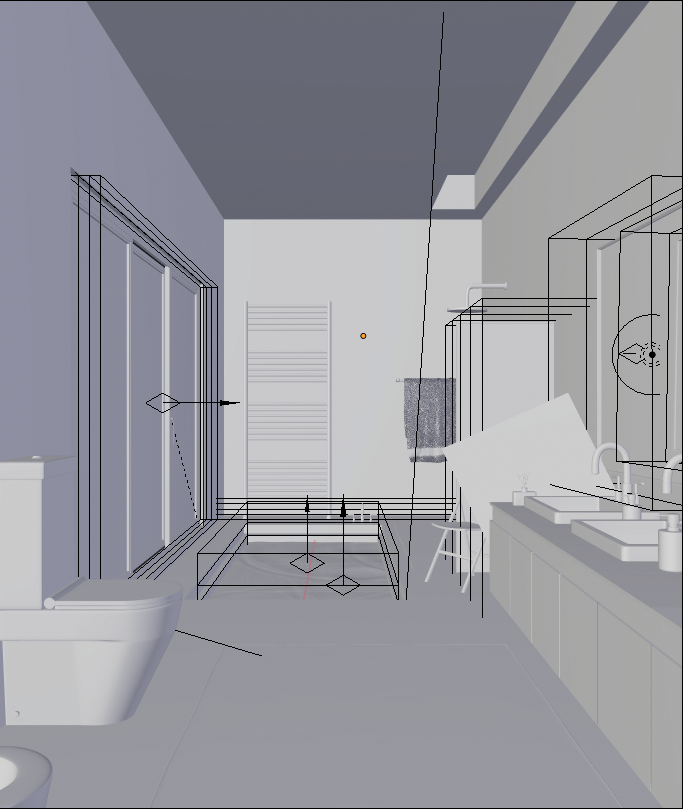
One thing that EEVEE isn’t particularly good at, though, is glass and reflections in general. Setting up glass is also quite an annoying process in EEVEE and needs some experimentation. First of all you need to know that in order to achieve good reflections in EEVEE, you have to use reflection planes.
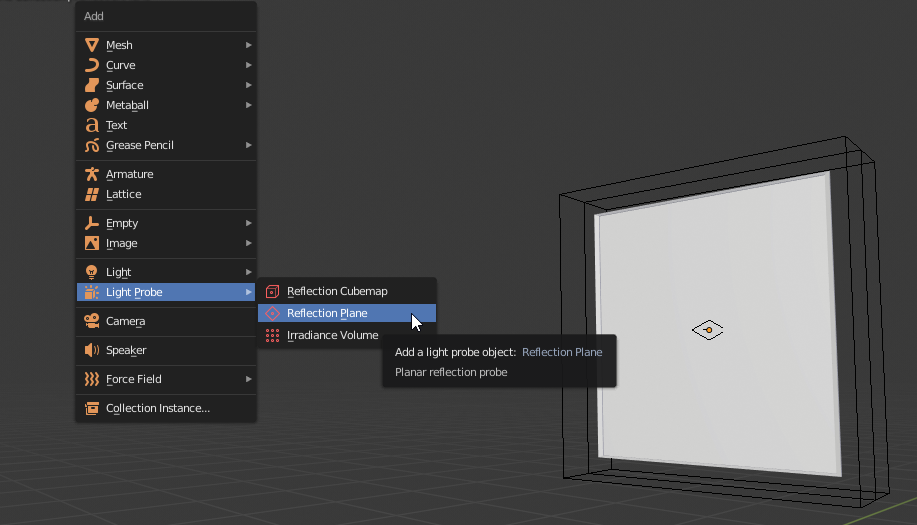
They should match the size of the object that is supposed to have reflections. In this case you can see the mirror and the reflection plane surrounding it. The arrow of the object also has to be facing in the correct direction in order to get the correct reflections.
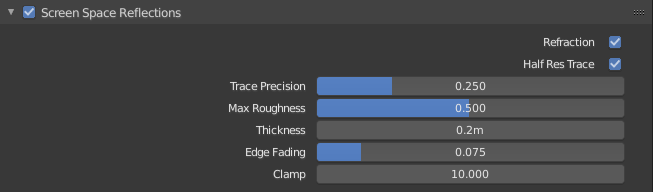
If you have glass or other reflective objects in your scene, you also have to make sure that screen space reflections and “Refraction” are activated in your render settings.
I needed quite some time to figure out how to get glass and other reflective objects to work in EEVEE; I hope my tips help you.
Here you can see some renders of the water and the mirror, which were some of the most challenging parts of the scene to get to look right:

Rendering – EEVEE vs. Cycles
Now the scene was basically finished. And I still wanted to find out how the render result in EEVEE would look compared to that in Cycles.This is what the scene looked like rendered in EEVEE and Cycles with the same amount of samples (700):
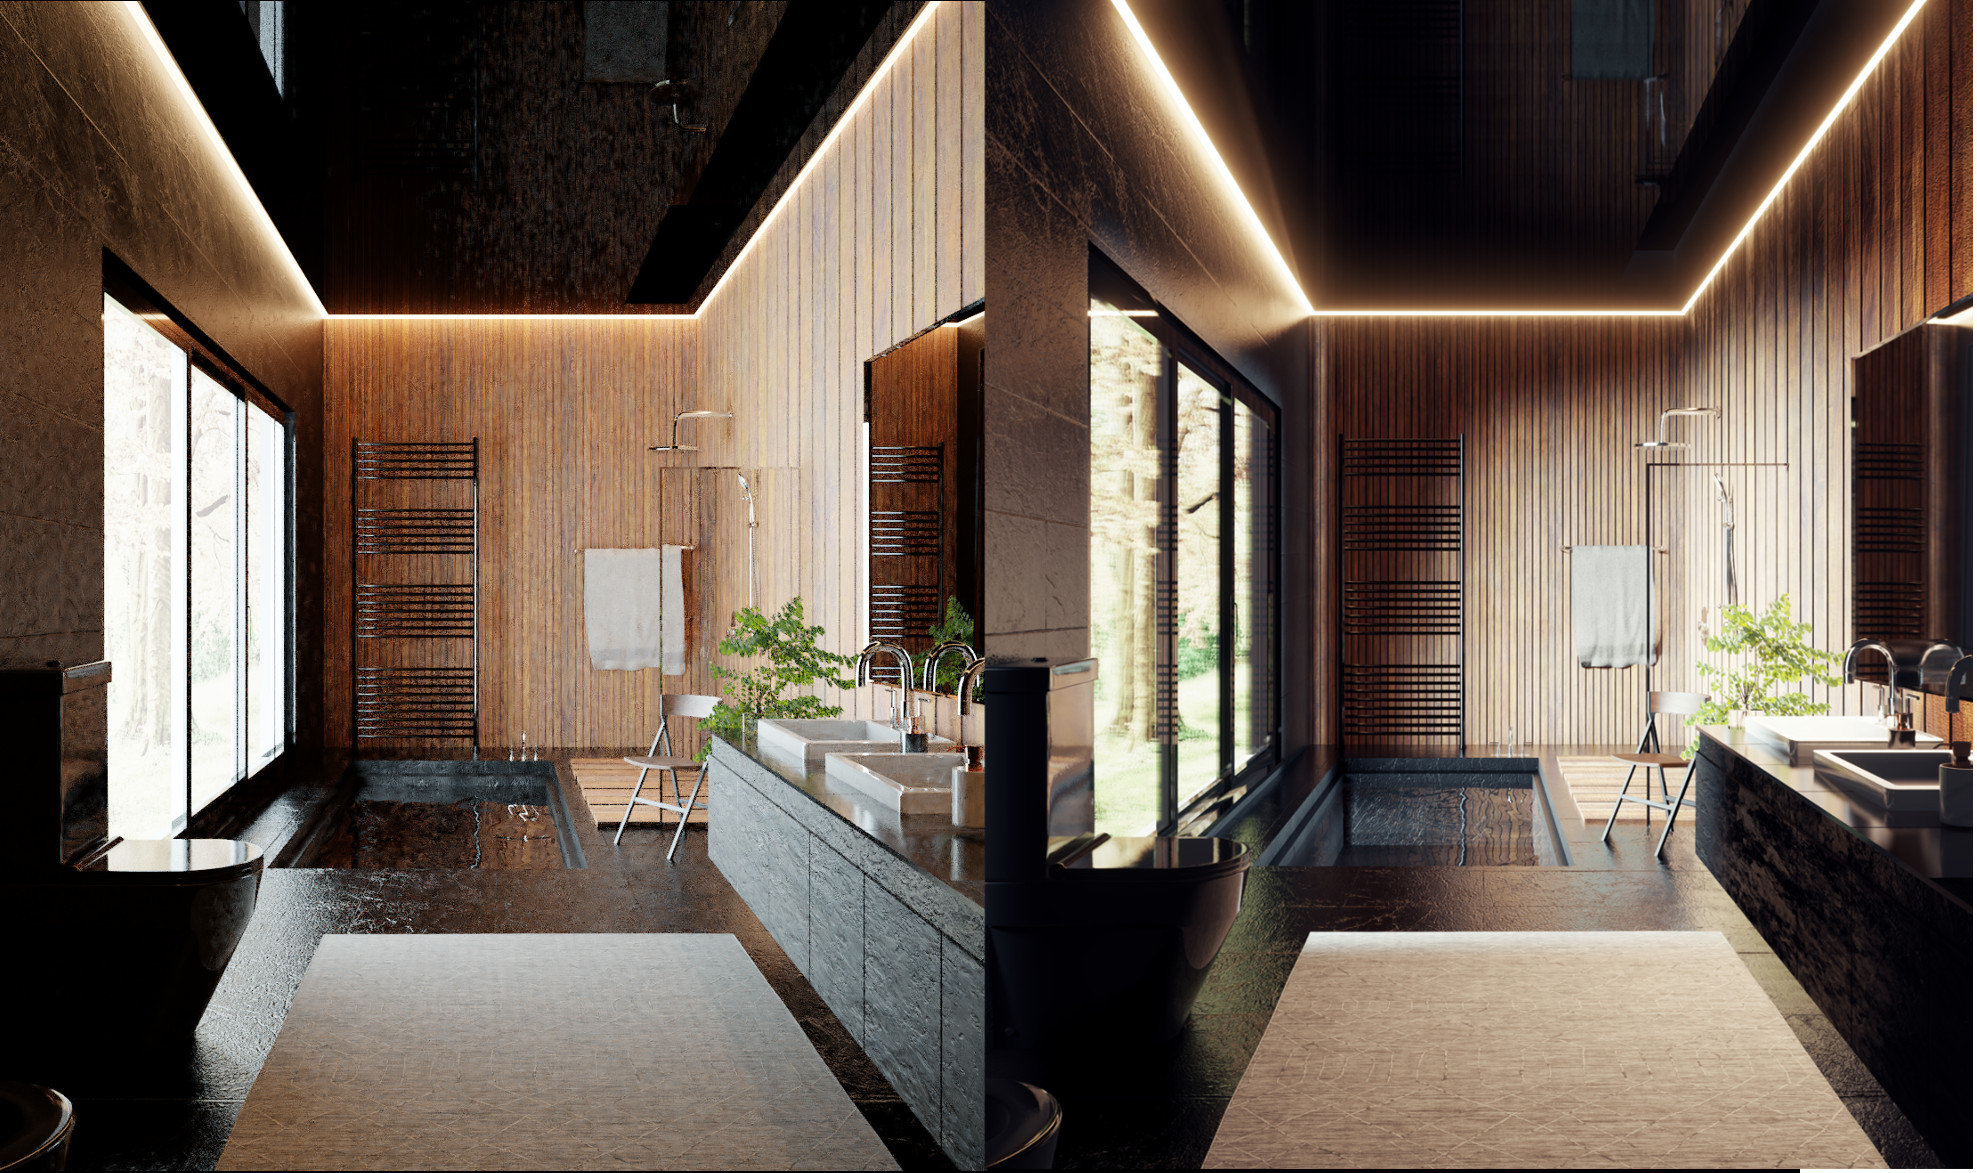
The scene in EEVEE was noise free with about 100 samples already. In order to achieve a noise-free result in Cycles, I had to use 12,000 samples. The render time was about 5h—so about 150 times longer than the render in EEVEE. However, the render does look more realistic than the EEVEE version, especially due to indirect lighting.
Cycles version:
Conclusion
In the end I have to say that EEVEE’s power lies in the shorter render times, which speed up your workflow. However, figuring out how to get good lighting in EEVEE can be very challenging and feel buggy. Also the final results don’t look as realistic as the renders Cycles produces. So I think that EEVEE can be a great tool for look development, where you really don’t want long render times to slow down your artistic process. You want to be able to figure out the correct composition, colors, etc. EEVEE really helps in this case. For final realistic renders I’ll stick with Cycles, though, and that’s what I’d advise others to do as well. EEVEE can produce pretty realistic renders, but Cycles still does a better job.
About the Author
 Svenja Strobel, self taught 3D Generalist from Germany


Very nice render.
Cool video tutorial? please
Cool, video tutorial? please
I’d say your conclusions are in line with what the official word on EEVEE was from the start. EEVEE was never meant to compete against Cycles in terms of actual photorealism, or be easier to setup (nothing is ever easier than a path tracer). Just an attempt to achieve as much photorealism as possible while remaining real time (-ish), with minimal extra work, working within the constraints of real time rendering engine limits. It means the indirect lighting won’t be as pretty, reflections less accurate, etc, but overall, “that still looks pretty good!” is the goal.
If you’re doing final still frame renders where all that matters is the absolute quality of things, Cycles is the way to go and that isn’t going to change at any point in next few years.
Where Eevee shines is for rendering animations, in my opinion. Since it’s so fast you can feasibly render an entire 1hr movie on one computer with a $1000 GPU in a reasonable length of time, if you’re willing to invest a bit in optimising the speed for fast render times per frame, limit the number of lights per scene, and keep the sample rate reasonable (say 50 samples). I’ve achieved good quality results with render times per frame as low as 5 seconds from my experiments of moderately complex scenes (with a GTX 1080 Ti).
At 5 seconds a frame, I can render a 1hr animation in a day at work and it’s finished before I leave, just on my workstation, and the quality can be “almost as good as a pathtracer but not quite”. Where EEVEE would become absolutely amazing is for rendering NPR style animations, with characters like something you would expect from say Overwatch, with a stylised appearance. In those instances, absolute realism wouldn’t matter.
Do you figure out the problem with the reflection in the mirror cycles vs eevee . The reflection of the mirror seen missing if you look at eevee render ? Any issue for that ?
The reflection isn’t missing. The wall on the other side is just black, which is why it seems as if there is no reflection. I should probably have placed something more interesting on the other side xD
Hi, from Brazil!
Did you use the irradiance probe?