
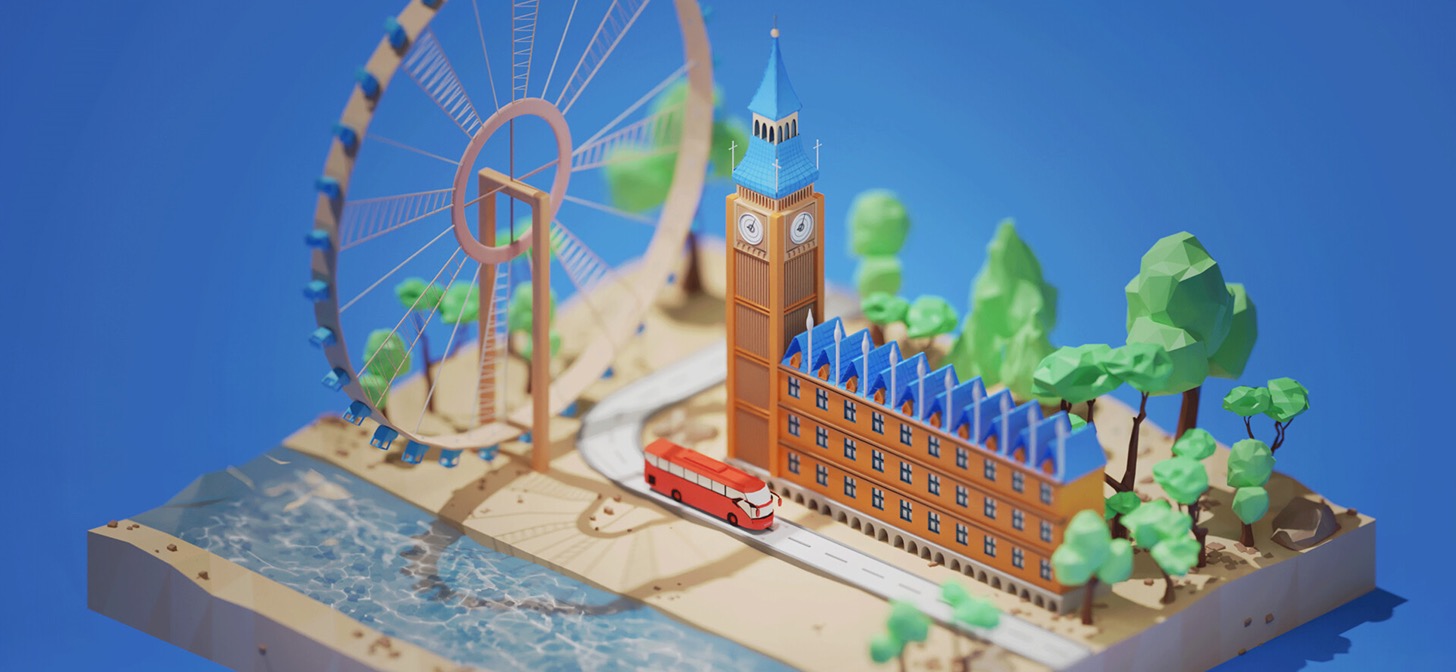
Behind the Scenes: Big Ben
About Me
Hi. My name is Burak Gök. I was born and live in Turkey. I’m 27 years old and a father of a 20 month old daughter who is a big inspiration for me as well as my wife. I was studying Visual Arts in Bosnia in 2011 but I quit after a year because I thought learning by myself is more effective than spending tons of money on scholarship.
I always into art. I drew all the time since I was 4 years old. I created many games on blank paper to excite myself. I always dreamed of creating my own game. Then I started high school and quit drawing but I was still into art. I started playing the guitar. I really dedicated myself to playing electric guitar. I was practicing 8 hours a day but I knew I had to start doing visual art again so I began photographing landscapes. I was learning composition and lighting techniques at the same time. Photography dragged me into short films. Then I started to shoot short films with my friends. I was waking up with Vimeo short films and sleeping with them. People’s creations were my tutorials, actually. Then one day I needed to explode something in my short film but I didn’t know how to, as it’s really dangerous. Then I met the Videocopilot website and this is when I started working on After effects and 3D stuff. It was 2008. A few years later I started working in my cousin’s office to learn more about 3D. This office was working on Architecture Visualization. I wasn’t into the architecture that much but I started learning 3ds Max. I quit after a few months and then I met Blender in 2016 and it had a huge impact on my 3D journey. I wish I had known about Blender earlier. Of course, I also did the doughnut tutorial. Thanks to Andrew Price. It’s a good start for beginners. I learned UV’s, rigging, texture painting, etc., but I started working on stylized low poly more on Blender. I sculpt in ZBrush.
I was thinking about creating iconic places on earth in a stylized low poly concept so I created my first artwork called Maiden’s Tower and really enjoyed it.
So I had decided to keep up working on the series when I came up with the Big Ben artwork.
Here’s a timelapse of the process:
Part 1: Finding References and Thinking about the Composition
I always start with finding reference photos on Google. Then I start thinking about the scene composition. This is a good start for me because back in my photographing years, when I was a wedding photographer, I was calculating “the environment light and the model + the retouching process = final image.” So I start thinking about the final image first because I already know the model and light. All I need to do was think about the retouching process while shooting.
So I basically sketch what I’d like to create first when it comes to 3D artwork.Then all I need to do is just stick to the sketch while enhancing the foreground by using proper lighting and complementary colors.
Tip: Pureref is awesome. Check it out!
Part 2: Modeling
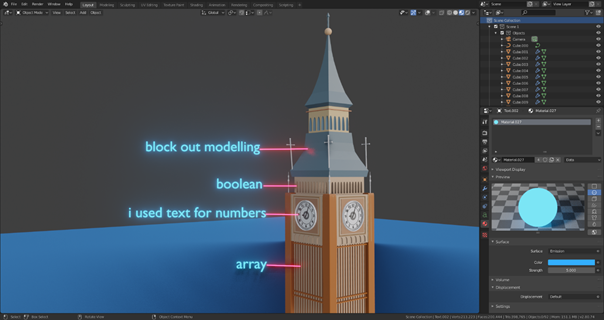
I start by modeling the foreground first. That means the tower, buildings and the Ferris wheel.
I start by blocking out the model. Once I am satisfied with the look, I start modeling the details such as the clock, cross model, and holes in the tower. I don’t really care about the topology a lot because this is not going to be a game ready model and I didn’t use textures, so I use booleans freely.
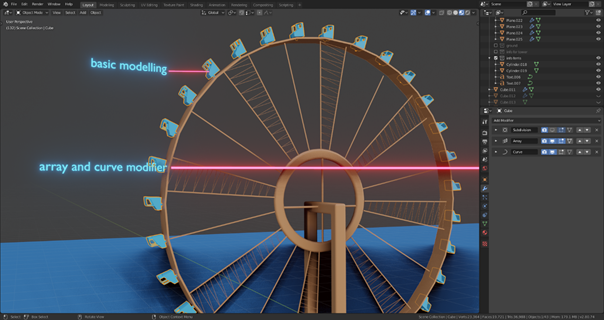
I make the Ferris wheel using primitive objects, using a cylinder and cube to get the result. I model the car figure then use array and curve to wrap it around the wheel.
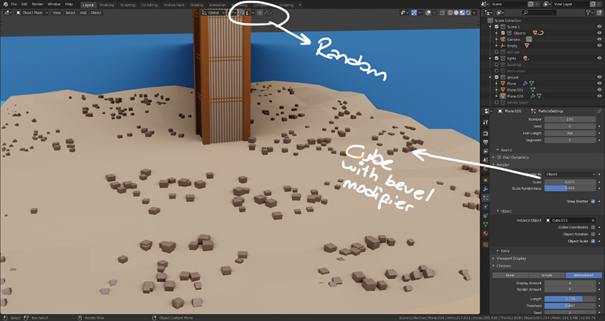
I create a basic cube ground then I go into edit mode and only subdivide the top face of the cube 4-6 times. I choose random 5 vertices and enable the proportional editing random mode; I just uplift on the Z axis until I am satisfied with the look.Then I add a particle system using a cube with bevel modifier on.
Creating the road and bus: There are many ways of creating a road. I start with a bezier curve. I just shape one side of the road with bezier curves then add extrude and some depth, depending on the scene. I duplicate the first bezier and rearrange the other side. Once I have finished with the shaping, I convert the curve into a mesh. I add edge loops between two sides of the road and just select the inside edges. Then the bridge edge loop will make the exact road and just recalculate the normals. I don’t have to model it by using this method. I add thickness to the road by extruding. Road strips are also easy to create but fitting them into the road is a little tricky for me. I just create a plane or cube in strip sizes. I place edge loops down the middle of the road and separate the edge from the object, convert it to a curve so that road strips will follow this curve neat and clean. I add the first array, choose the fit curve and select the bezier. I normally give a value of 1.7-2. Then I add another array and I give an exact value of 1.1. Then I add a curve modifier to strips and choose the bezier curve again. Voila! If there are extra parts coming out, I just convert it to mesh and clean the unnecessary strips. It looks a little complicated but it’s a time saver for me.
Here you can watch how I create road:
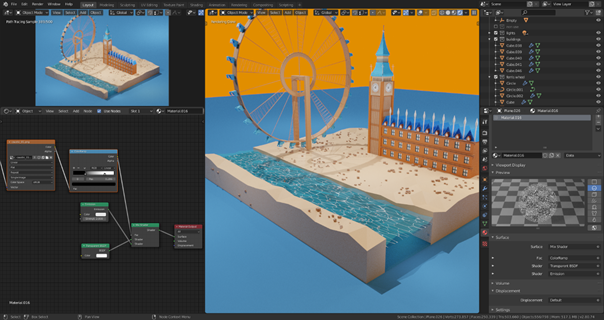
And finally the water. People ask me a lot about this. It’s really simple. Creating the top of the object is like creating the ground. Same procedure. I add a plane underneath it. There’s only one texture in my scene and that’s on that plane. I googled caustic texture. I use this texture by separating its alpha and adding an emission shader to it. You can see on the node editor. You can create this even in EEVEE 2.80 by changing the material’s blending mode from opaque to additive. Then I add a ground surface underwater and there we have our faked good looking water!
Finally, time-consuming parts have finished. Now I add the background objects such as trees and rocks to create a more appealing composition so the scene won’t look boring. I already modeled trees and rocks before for my library so I use them to save time. It’s good to have a library. Modeling those kinds of props was good for me especially when I had an art block.
Part 3: Camera,Materials and Lighting
I always put my camera to my scene before I start modeling anything. I found some artists were using depth of field so I gave it a try and got such a cute and amazing style. The point of this kind of scene is looking appealing and I believe DOF helps a lot. So using the value of 2.5-3.5 works fine for me. I use the orthographic camera but I change it to 300mm perspective when I have trouble with 2.80 EEVEE. I also take advantage of composition guides, as well as thirds. I had a chance to get a good critique on Reddit for my older artwork and somebody said that my artwork was not centered. I didn’t notice that while I was creating the scene. So using composition guides are important.
Editing Materials and colors are one of my favorite parts.This is the step where my scene comes to life. I use my own color ideas usually but I go search on Pinterest, Dribbble, ArtStation or Color Hunt when I get stuck. I like soft complementary colors. If you want to get better at using colors, check out the following:
There are many awesome videos on YouTube.
Lighting! I believe it’s at least 85% of a successful 3D artwork. This is where the magic happens. If an artist can use lights properly, even a potato can look cute or dramatic. So by knowing this, I care about lights a lot. I start with sunlight to get hard shadows so I know where the main light should come from. Then I start to add point and area lights, in places such as the tower’s watch, the roof, the Ferris wheel, and the water, to enhance the foreground a bit more. I add rim light if necessary. It always looks boring with only sunlight but once I start adding those tiny values of point lights, the foreground starts to look more colorful and cheerful and this is what I want. I am also pay careful attention to the shadows. There is always one main light in real life, which is the sun, so there should be only one shadow. There could be shadows overlapping in your scene if you use more than one sunlight. Of course we are not creating some realistic-looking artwork, but peoples’ eyes get used to that natural light. That is why we love golden hours and natural light. So I prefer always using natural realistic lights for this kind of scene. I don’t use this lighting method for my night scenes because there are many light sources in dark environments, which allows a lot of freedom for an artist.
Part 4: Rendering and Compositing
When it comes to a single frame render, Cycles is still my favorite but EEVEE is so fast if animation is needed. I rendered this scene in Cycles. I chose 1920×1400 resolution. I create many test renders at 50% resolution and once I am satisfied with the look I go to a 200%, 4K render. I use AI denoiser—thanks to Grant Wilk for the addon. It’s quite impressive.
I edit my final image in Photoshop. I have not gotten used to GIMP yet, but I will. I enhance the foreground a bit more by using curves so that it doesn’t mix with the background a lot. I don’t usually do much in Photoshop—I only use it if I need to add some contrast or saturation to my foreground buildings.
That is how I created the Big Ben Artwork.
I hope you like and enjoy the Big Ben project and this Behind the Scenes.
My System Specs
- Ryzen 7 1700
- MSI GTX 1080 8GB 256Bit
- 8x2GB DDR4 3200MHZ RAM
- Samsung 256GB M2 PRO SSD
- 27” Samsung 60HZ Monitor
- Rival 110 Gaming Mouse
About the Author
 Burak Gök, Character Artist and Low Poly Enthusiast


Looks great, although the Houses of Parliament and the London Eye are on different banks of the Thames river, a rather important detail ;-)
Great job Burak, water looks pretty sweet! (:
The picture with the node editor looks really small :( we couldn’t see the actual nodes used for the textured water. Nevertheless thank you for writing this behind the scenes, which are the favorite articles for me here in blendernation :)