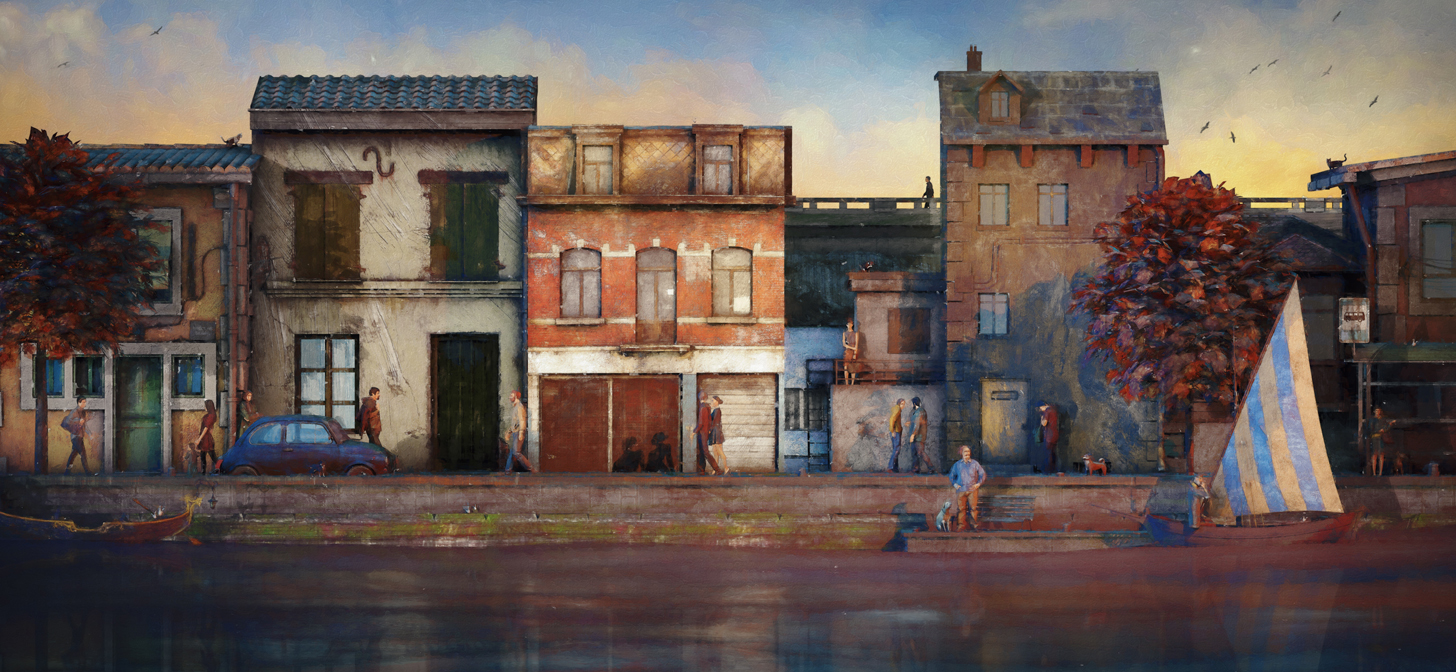
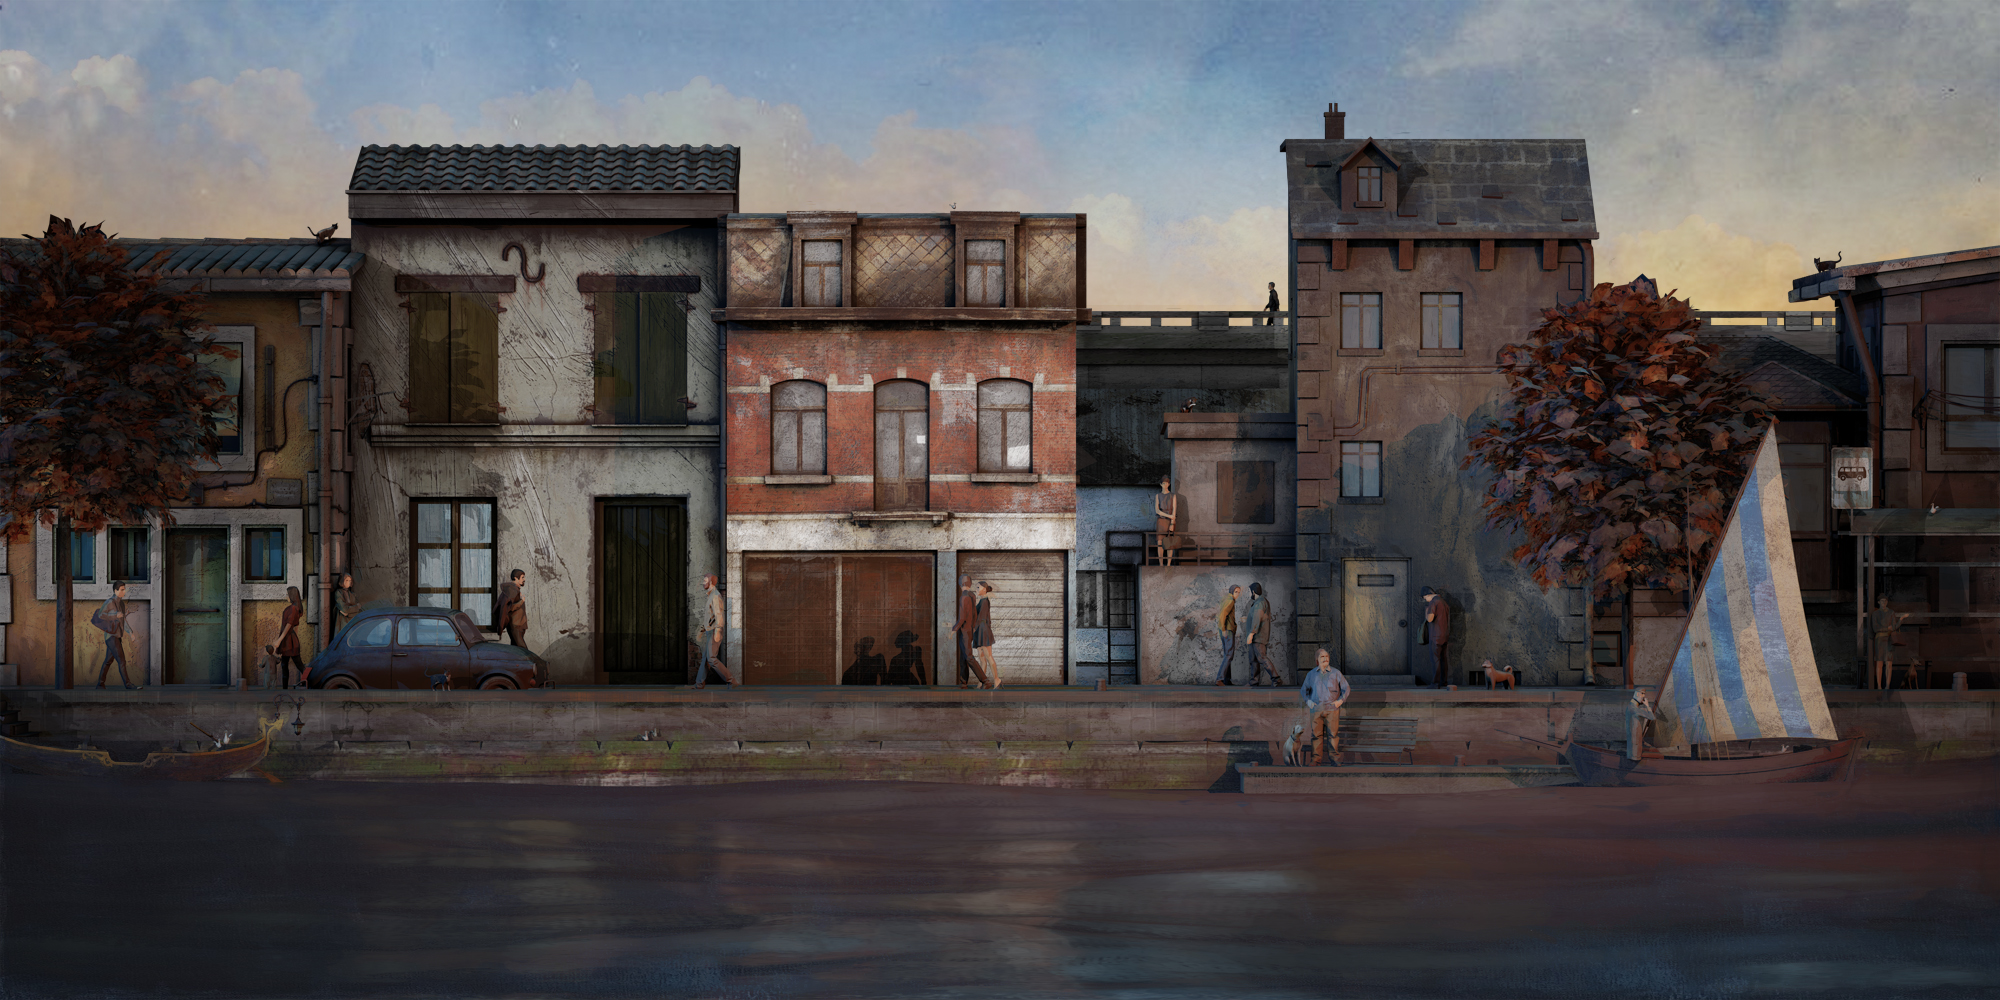
Behind the Scenes: Le Rue d’Automne
About
Hello!
My name is Davide Pellino, blending stuff from Italy and currently working as a freelance 3D artist in the videogame industry. I like to design dreamlike scenarios and fantasy characters, focusing on finding my own way to mix many different things together, such as combining handmade sketchy textures with a realistic ambient lighting, or low poly fairy-looking models with procedural materials. After a long time (and a million failed experiments later) I finally came up with something that would like it was drawn by Tim Burton and painted by Hayao Miyazaki, spiced up with some of my own personal taste.
I’m a self-taught 3D artist which strongly believes into self-formation. Knowledge is so accessible to anyone today! Everything you’d like to learn is one click away.
All you need is time, effort, and passion. Be passionate, always and anyway.
Inspiration
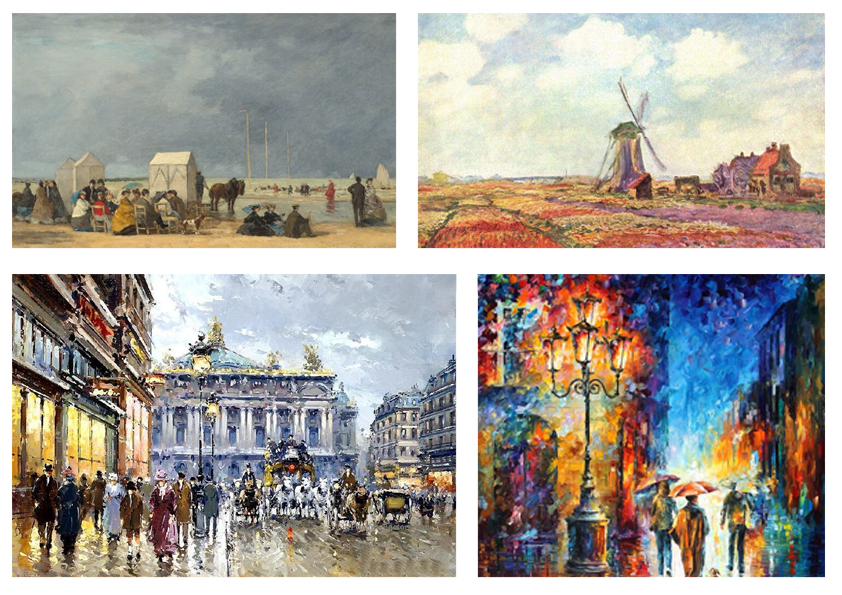
For this specific artwork I was aiming to recreate an old fashioned street view with that typical oil painted/impasto effect of the late 19th century impressionist painters, such as Monet, Degas and Renoir. I really love this style of painting and I was really excited to challenge myself to see if I could achieve something so vibrant and non-homogeneous starting from a 3D modeled scene!
Tools
Blender 2.79 (experimental build)
Adobe Photoshop
Sketchfab
Modeling
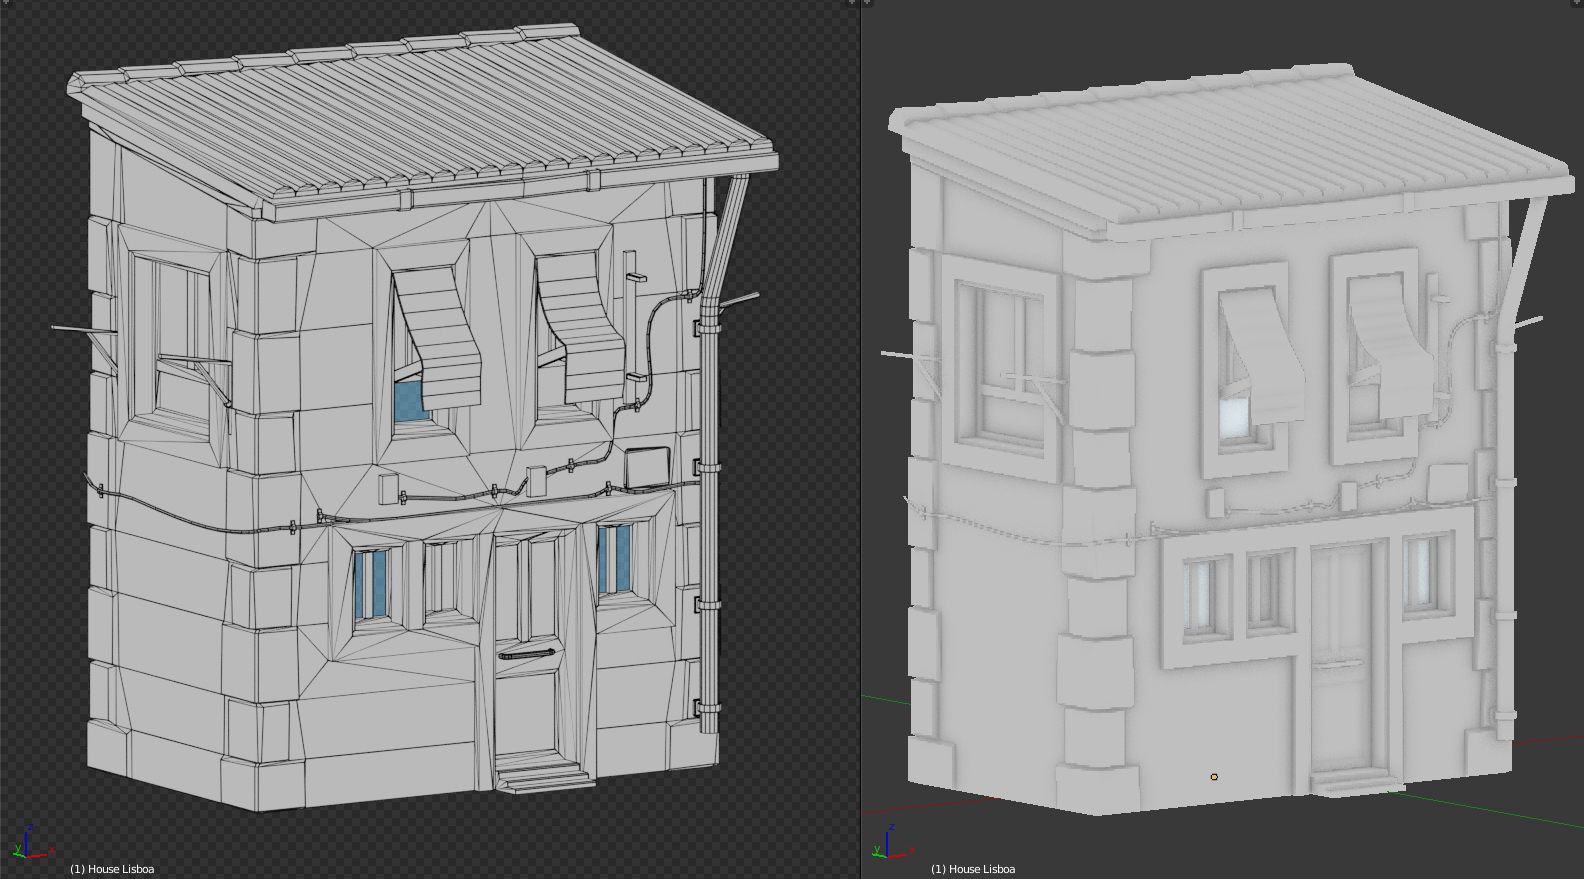
For this project, I used a combination of free CC models downloaded from Sketchfab*, purchased models on Sketchfab and other specific assets modeled by me in Blender. Since I was mainly focusing on the overall painted effect (and this was kind of experimental), I decided to save some time off the modeling phase by proceeding like this.
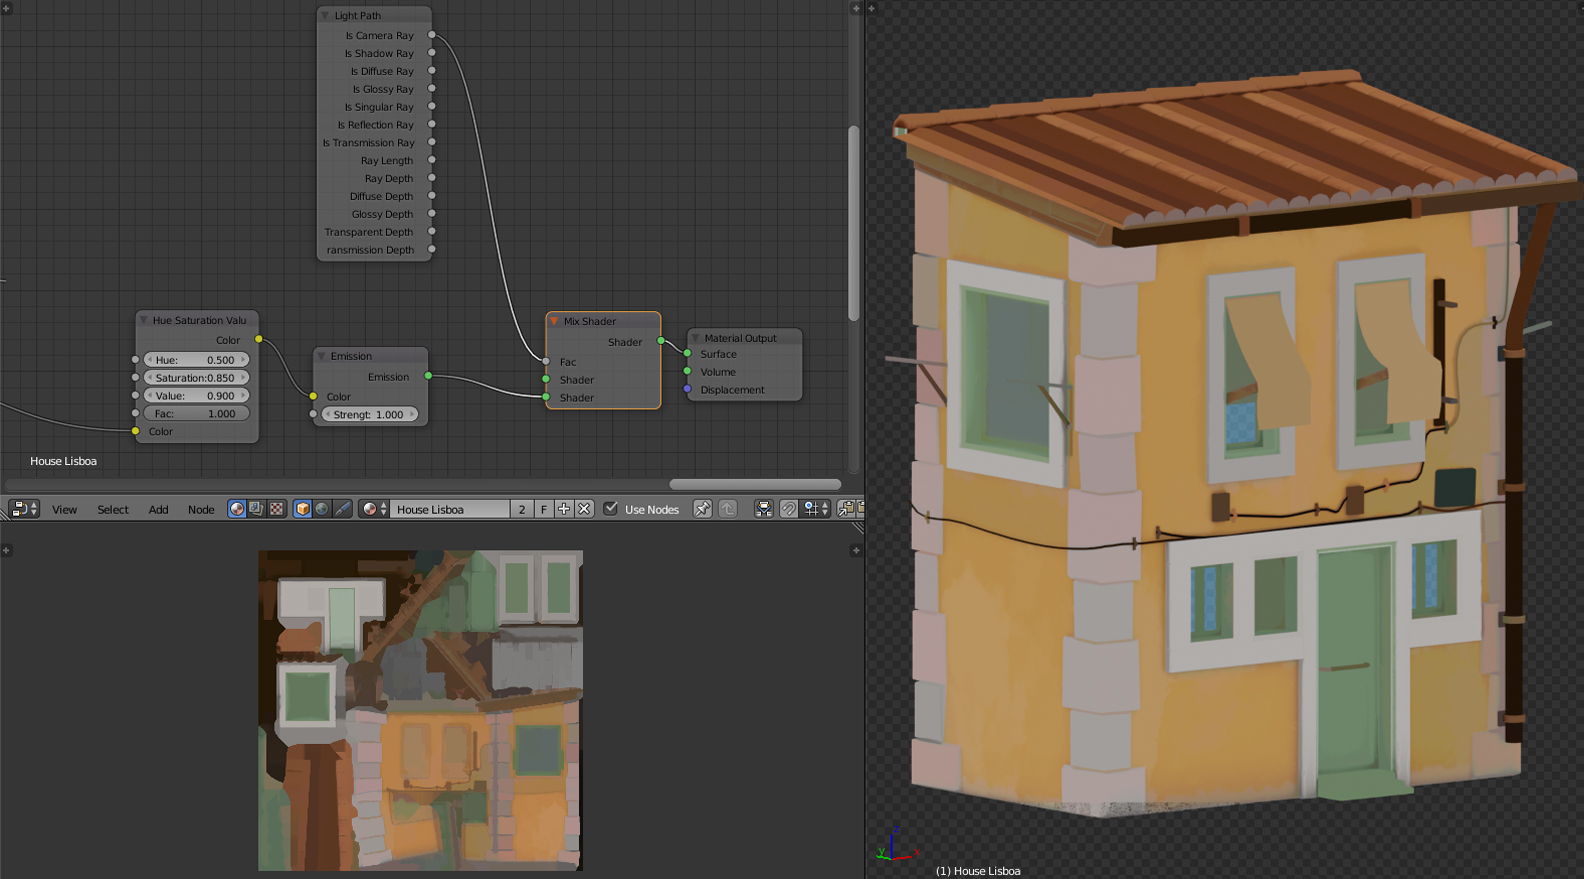
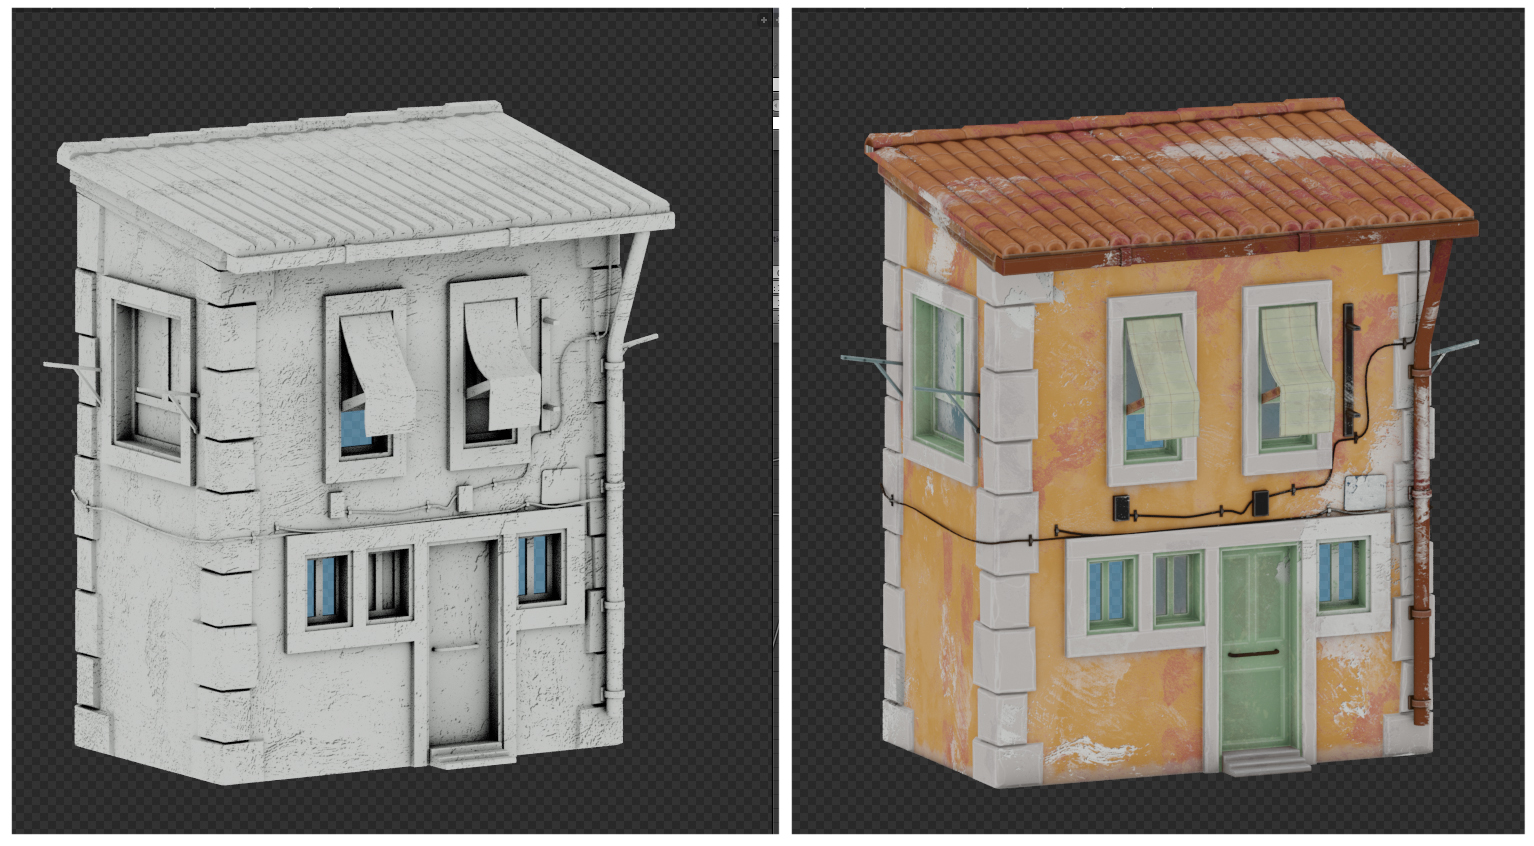
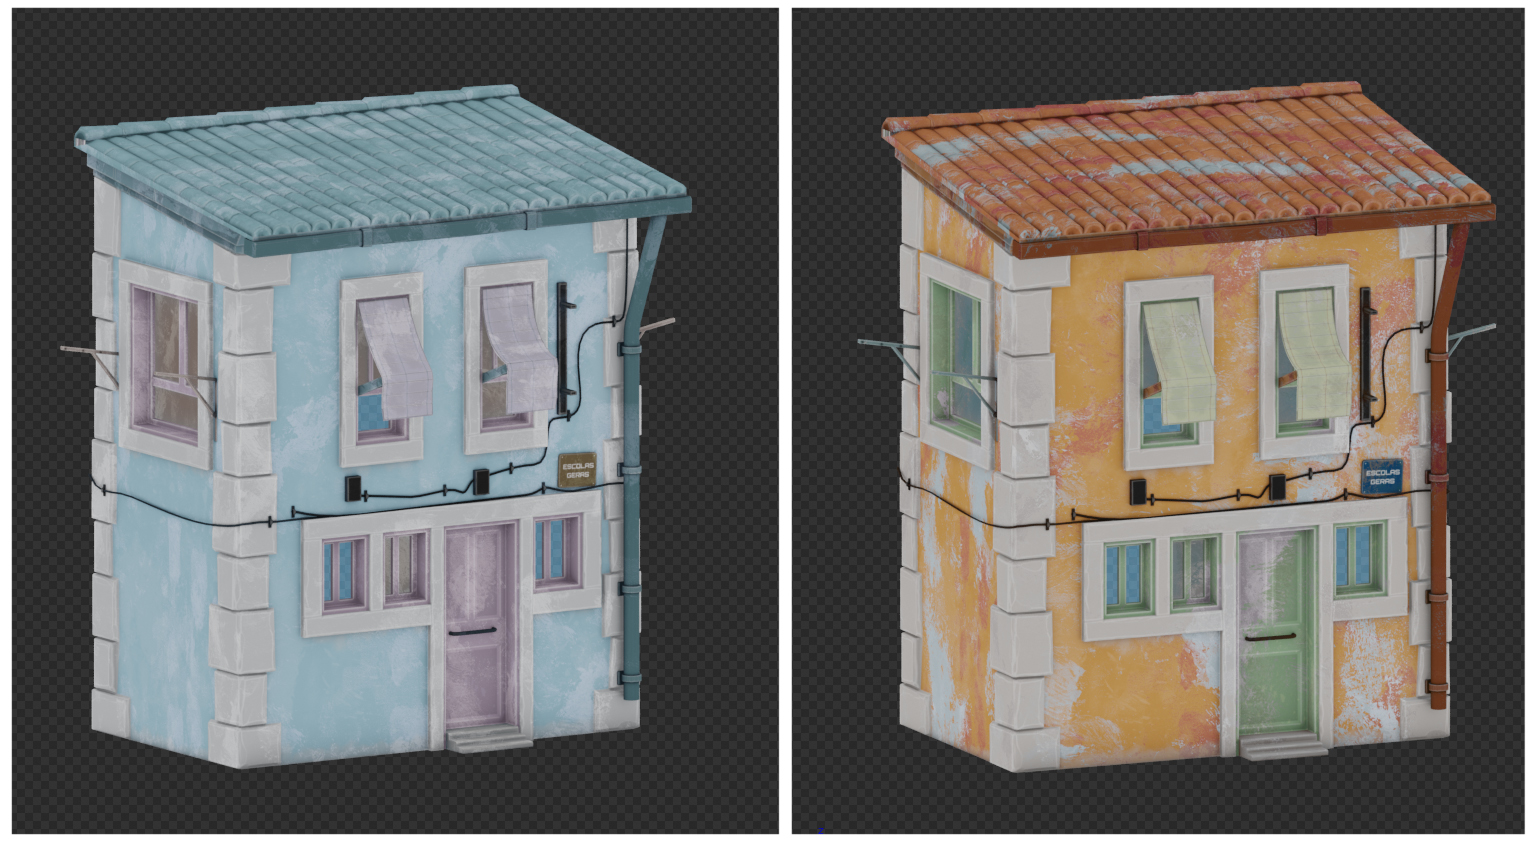
This house (Lisboa House by beluca59) is a very good example of the target asset I used in the project: low poly houses (from 2k to 4k tris) and props to build up the street view I had sketched in my mind. Considering the final result, I figured out that a lot of finer details would be blended anyway due to the oil paint effect, so no more than this level of detail was actually required for any of the assets.
My rule of thumb is: If my goal for the scene is to be around 80k tris, even if I could build it up 10 times bigger than that without slowing or causing any issue performance-wise, increasing the level of detail was unnecessary. Always try to know what your target level of detail is and always avoid overdoing it just because your hardware allows you to!
*as reported on the Blenderartists post, the models downloaded/purchased from Sketchfab were from:
Houses: Azel, 3DMaesen, linhtatoo, DerMische, Denis Loginovskiy, Nikolayy, DafVader.
Fiat 500: Francesco Coldesina.
Textures/Colors
The texturing/coloring process of the assets had a rather simple workflow. As for the textures, only the albedo color maps were used, and they were mostly just simple flat colored maps, without any sort of ultra-detailed or hand painted touch to them. As long as the final result will be different, the actual starting base I like to go with is really as simple as this.
Some of the objects don’t even have any maps at all, as they are just vertex painted, such as this sailboat.
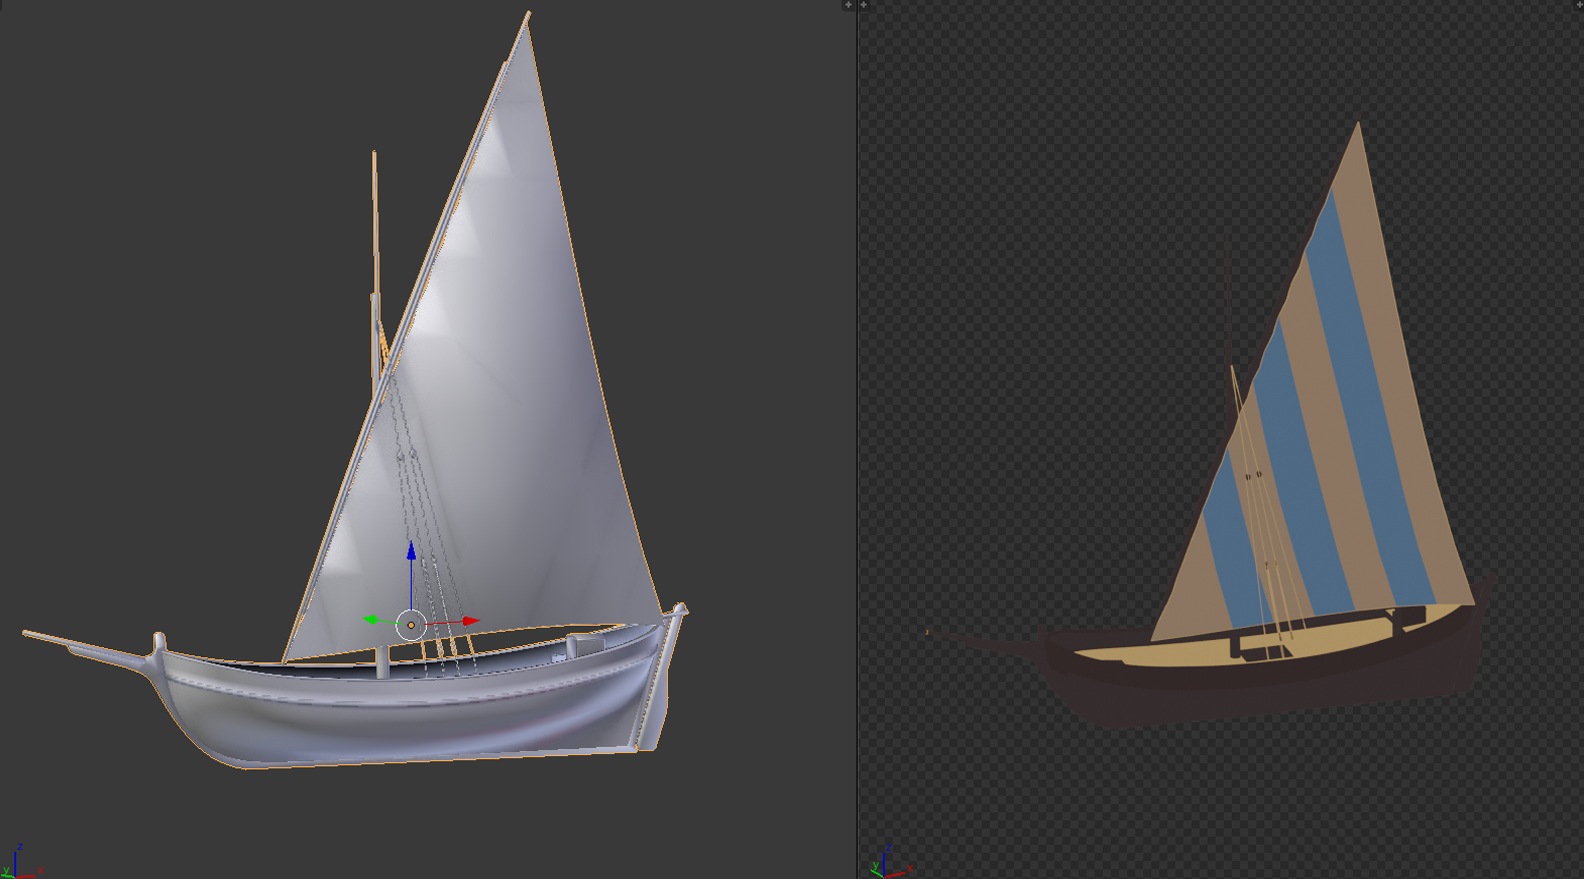
Since the oil painted material I’ve made for this will be a procedural one, there’s no actual need to map the objects at all, so having textures or vertex coloring will work in the very same way. From this starting point we are now ready to jump over to the core of this process: working on the material.
Watercolor Material
Since breaking down the whole shader into a step-by-step tutorial would be a really long journey, I am just going to try to point out the basic process of it. Most of it (as big as it seems) is just made by repeating the same steps over and over and stacking them until I achieve the desired result. So, the first thing to notice is: I’m just using flat-emissive shaders with a light path node. No shadows are cast or received on any of the objects. (At least on the main render layer…this is discussed further in the article.)
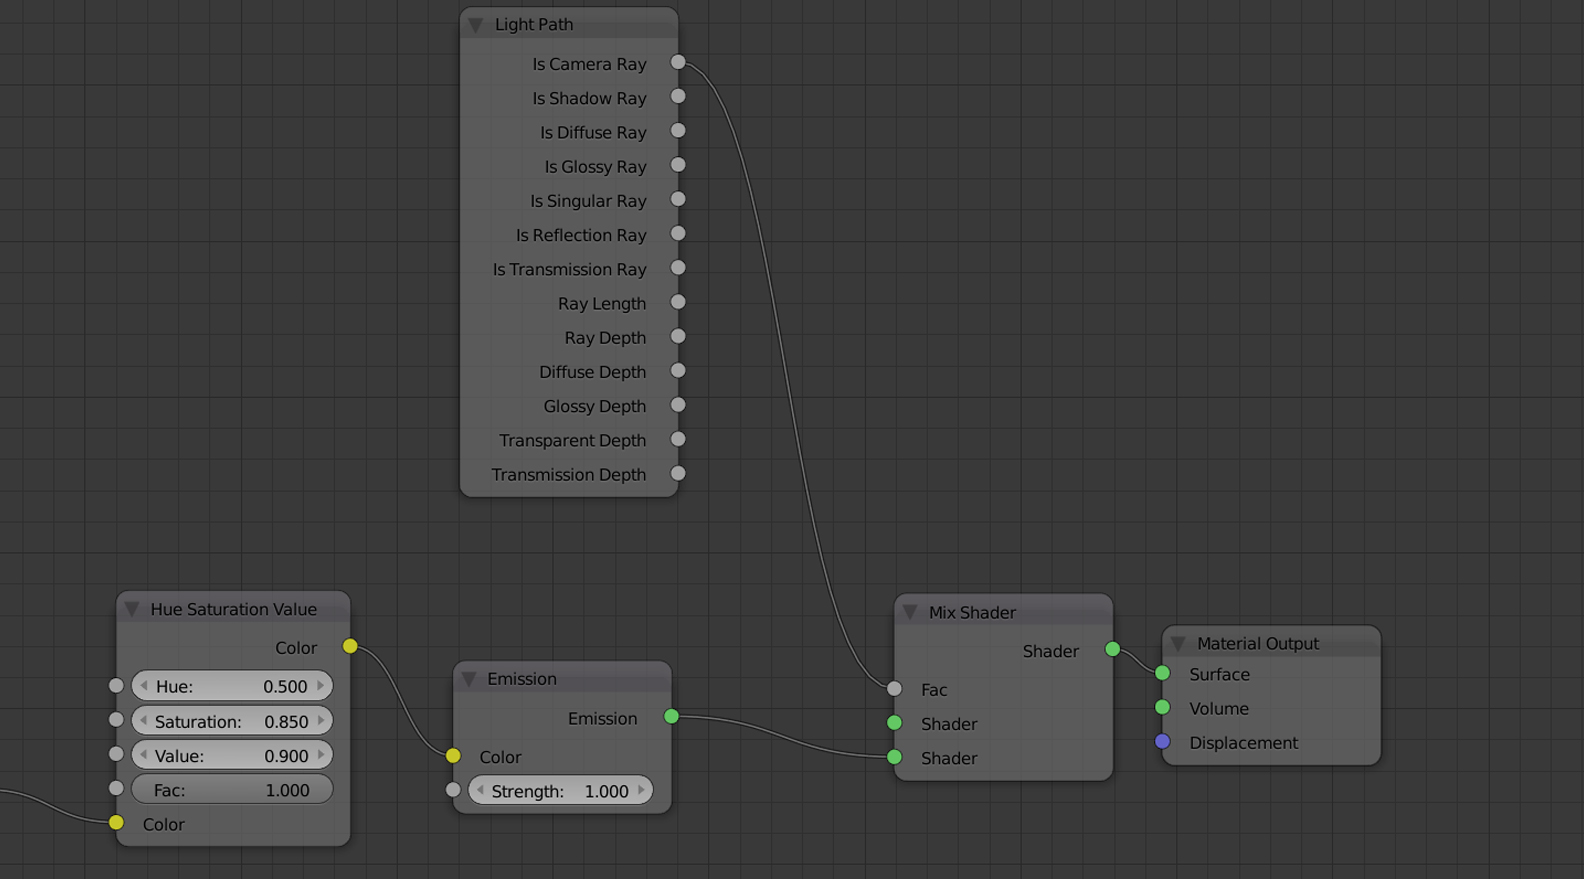
So, in order to achieve that painted effect, all I am doing is passing the flat-colored maps (or color vertex) through a series of specific textures such as brush strokes, impasto, watercolor pattern, and so on.
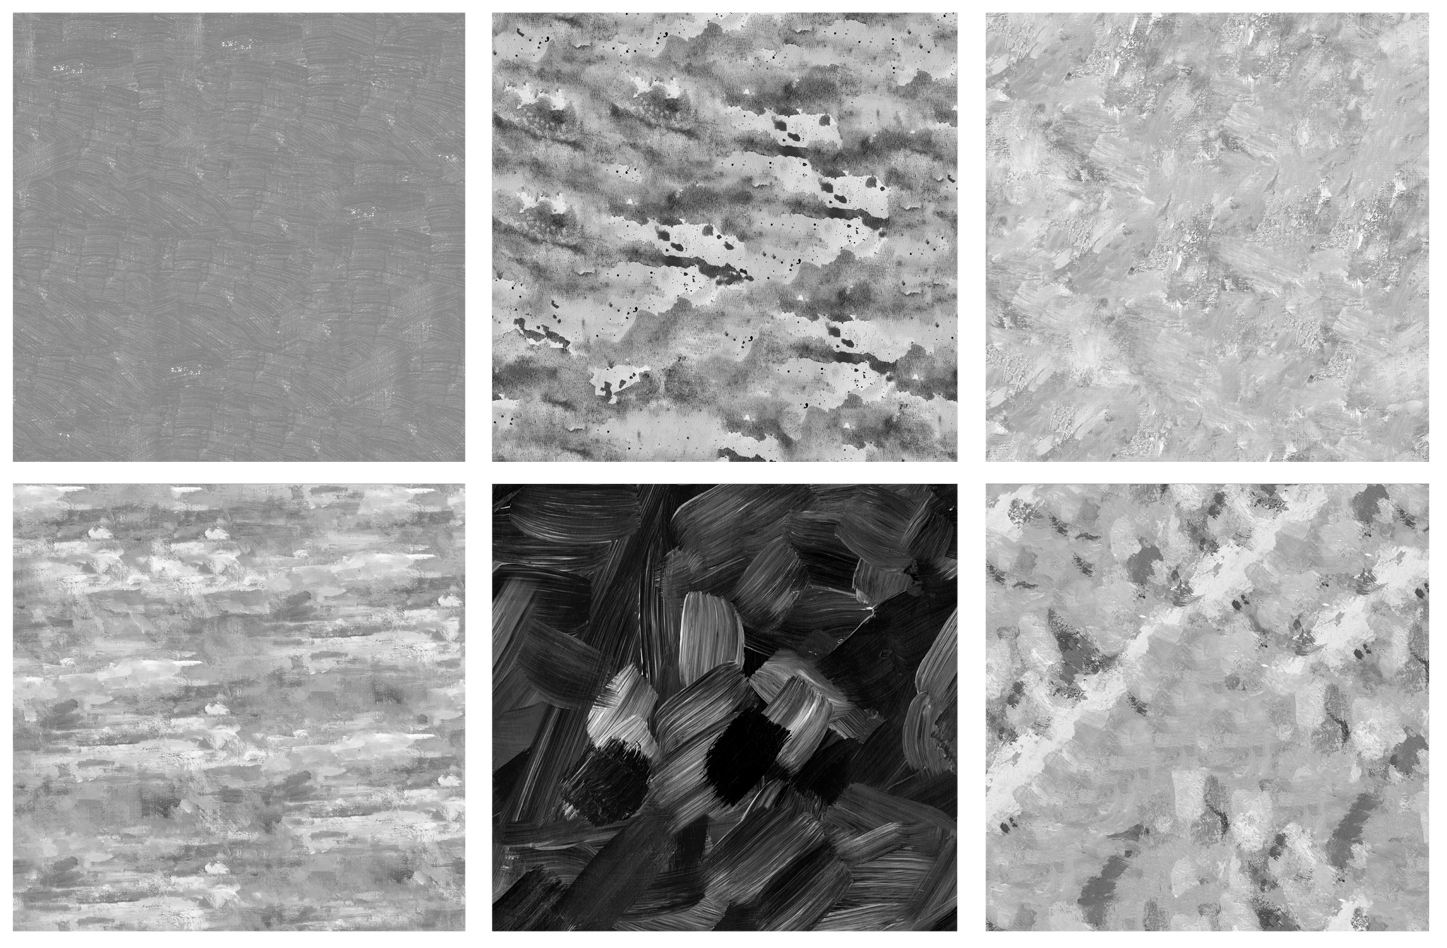
These are some of the textures I’ve used. Some of them were painted by me in Photoshop and some others were eventually bought, but the 3 aspects we can focus on are:
- They are all grayscale textures, since I’m just going to use them as a mix factor,
- They are all seamless, so they can be tiled in a procedural way,
- They are no bigger then 1024×1024, since the finer details would be lost anyway due to the overall blended effect of the style.
As you can imagine, there is not a “specific rule” on what texture you can use for such things: it’s all up to your taste and imagination!
So, once I had the textures, I could start using them as a mixing factor between two different variations of the base texture/vertex color.
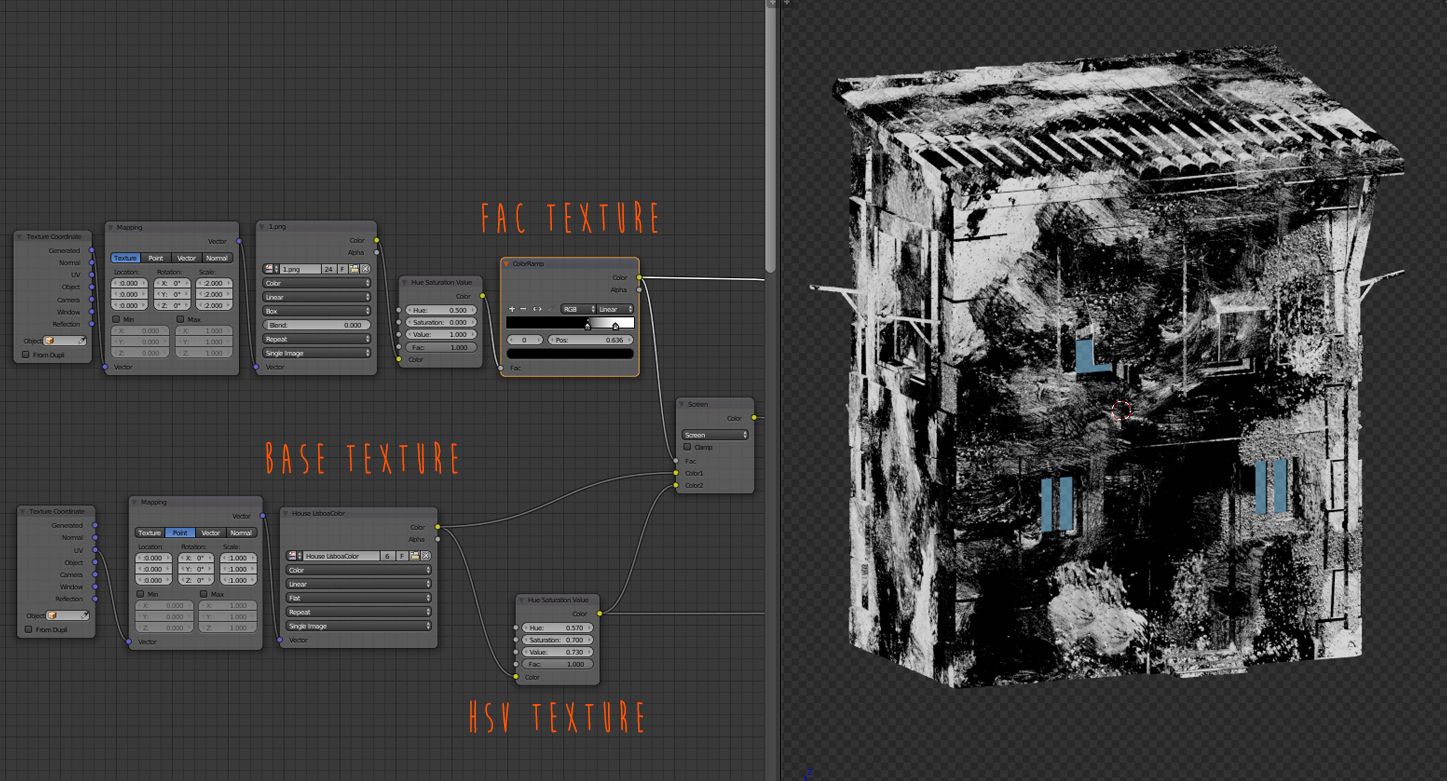
As you can see, the base texture is mixed with an altered version of itself (HSV node, with +H and +V, resulting into a green-ish variation) while one of the above watercolor-pattern textures is used as fac. Pretty basic!
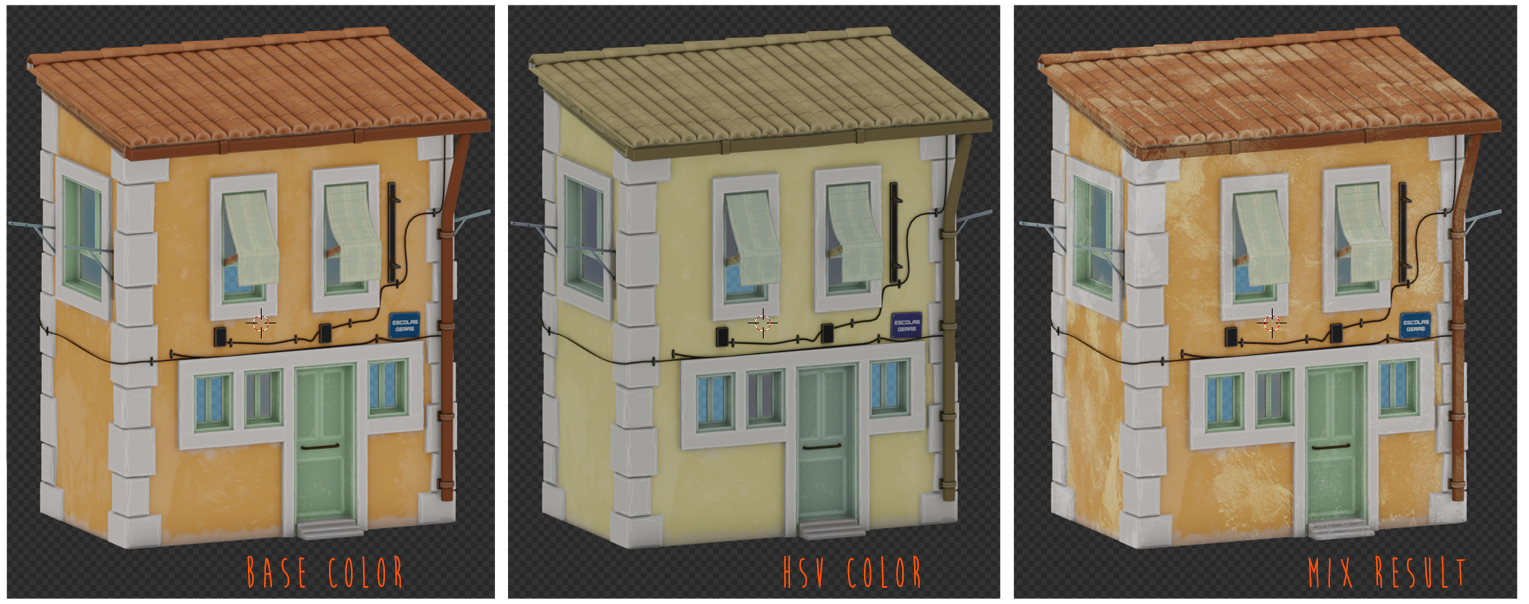
In this step, a Lighten blend mode is used but you can play around with different blending modes and textures, resulting into an infinite scenario of different combinations!
So, imagine this as a cascade: the output of this first pass is then used again in another mix with another painted-texture, with another HSV variation.
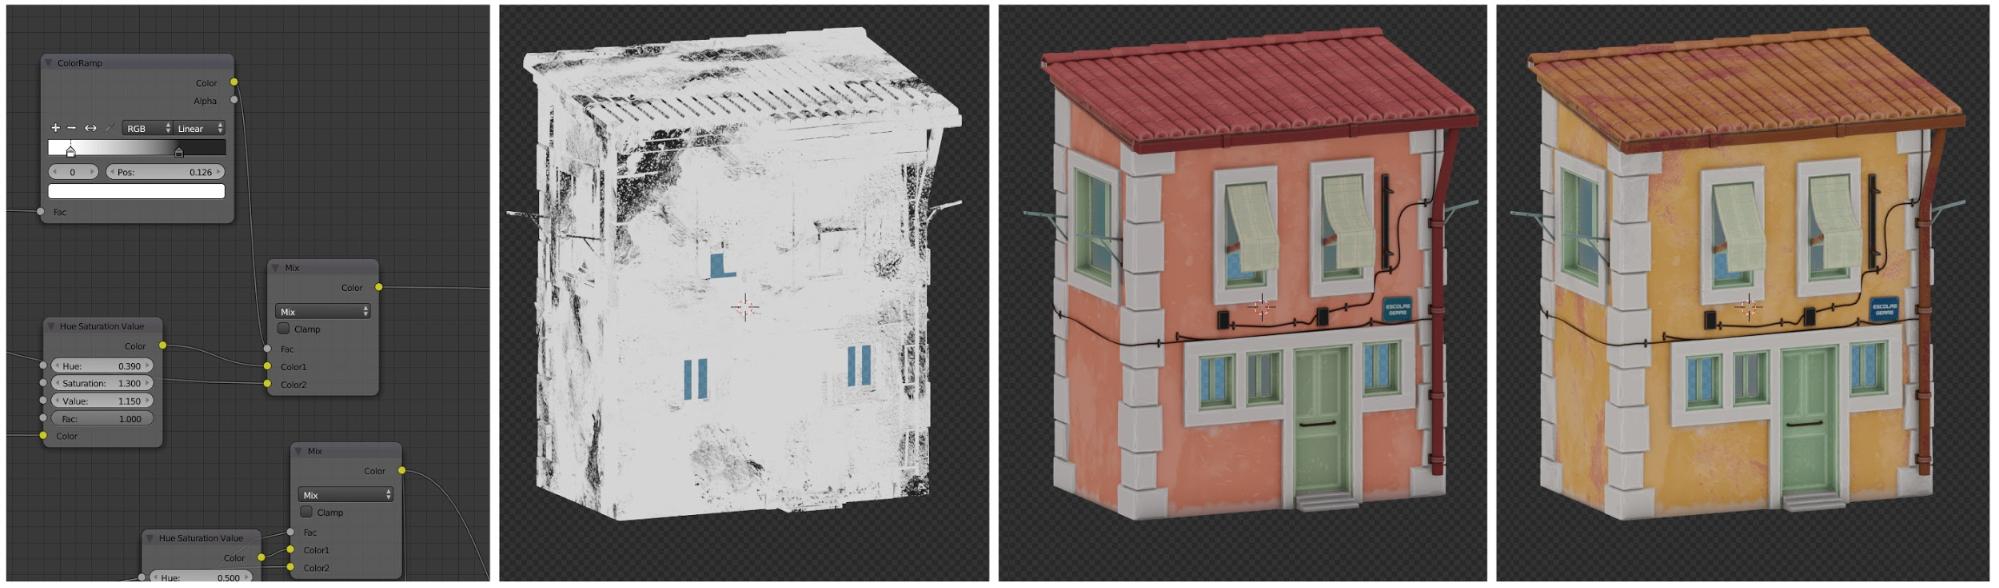
Now I had a touch of warmer color on the base color palette!
At this point it is as simple as: keep mixing the result with another different texture, keep adding those typical color variations from the traditional paint.
Since this is all up to the imagination, I’d like to share some of my favourite passes that I used all along the making of Le Rue d’Automne.
Just try to experiment with different textures, different blending modes and different HSV variation according to your taste! The funny part of this process is that you can keep going on as long as you have ideas and inspiration to keep implementing the cascade system.
As for me, this was the result I settled on: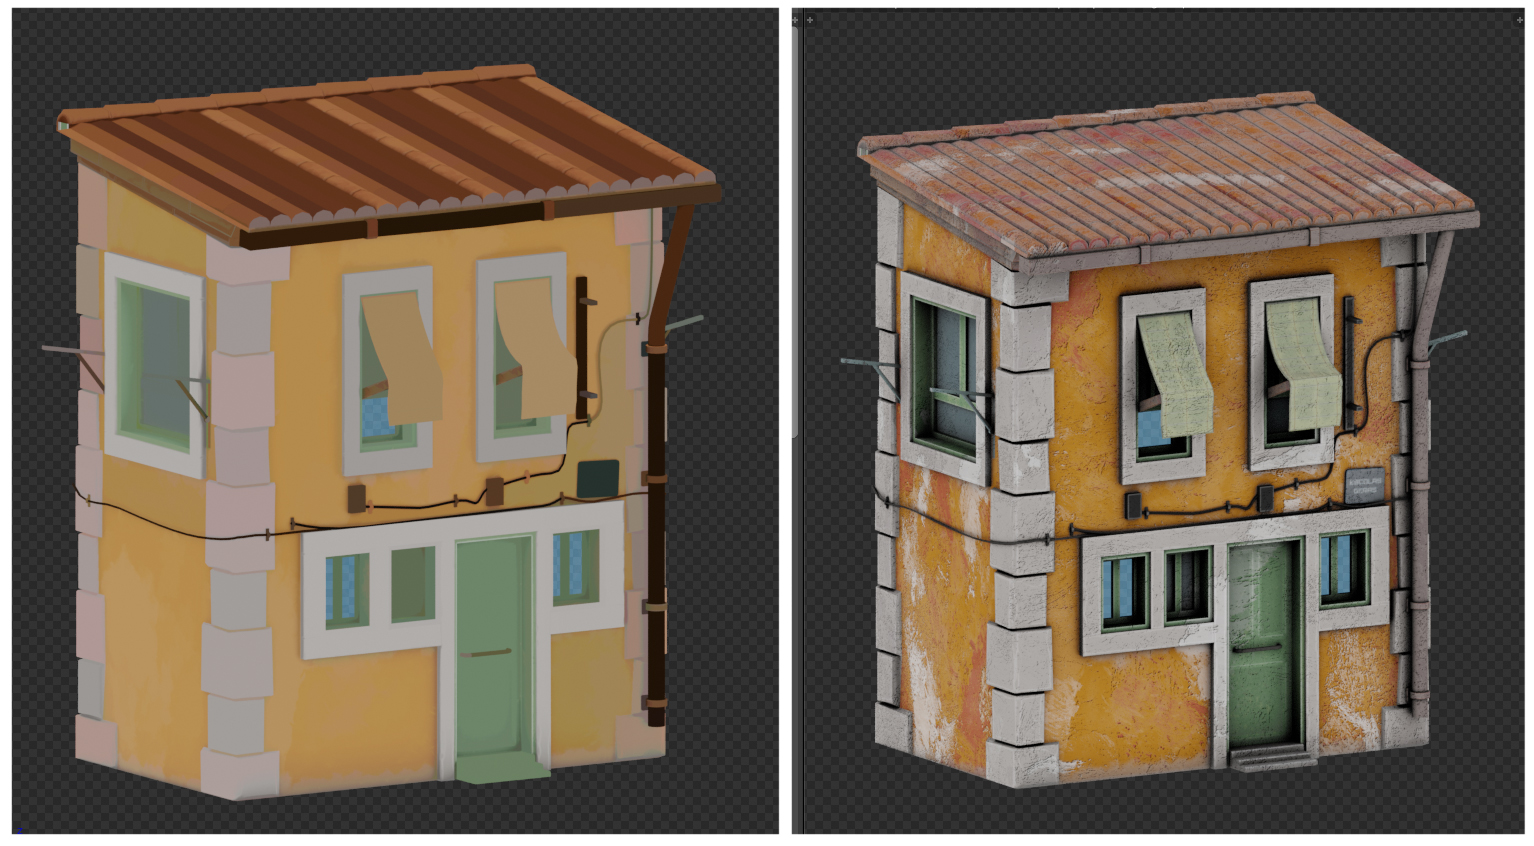
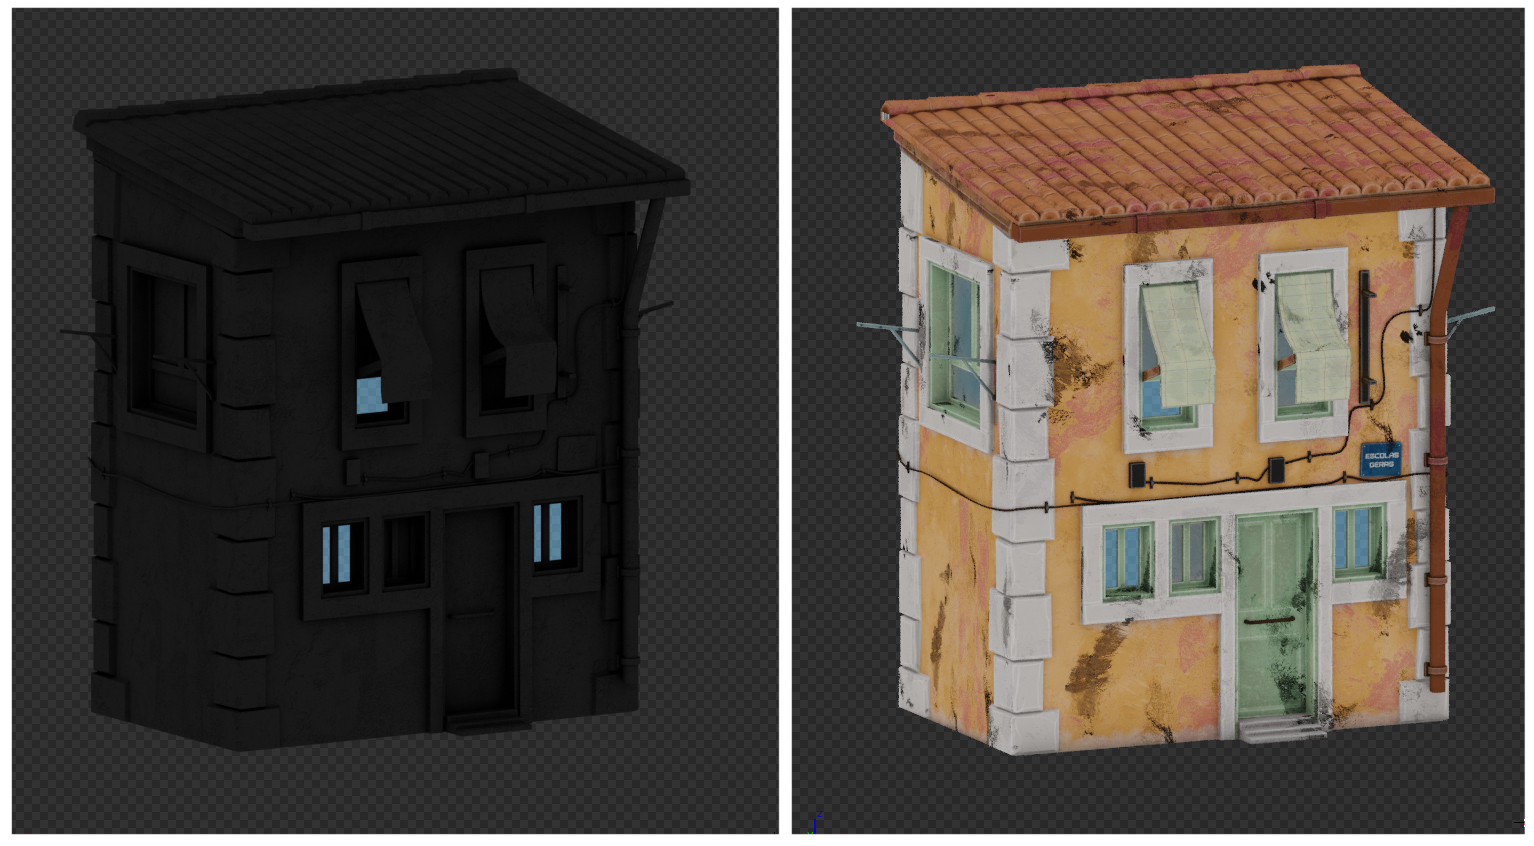
The painted effect is pretty neat at this point, and before calling it done, I’m always likely throwing an Ambient Occlusion node and a Bevel node into the nodes to create some “fake” edges and shadows.
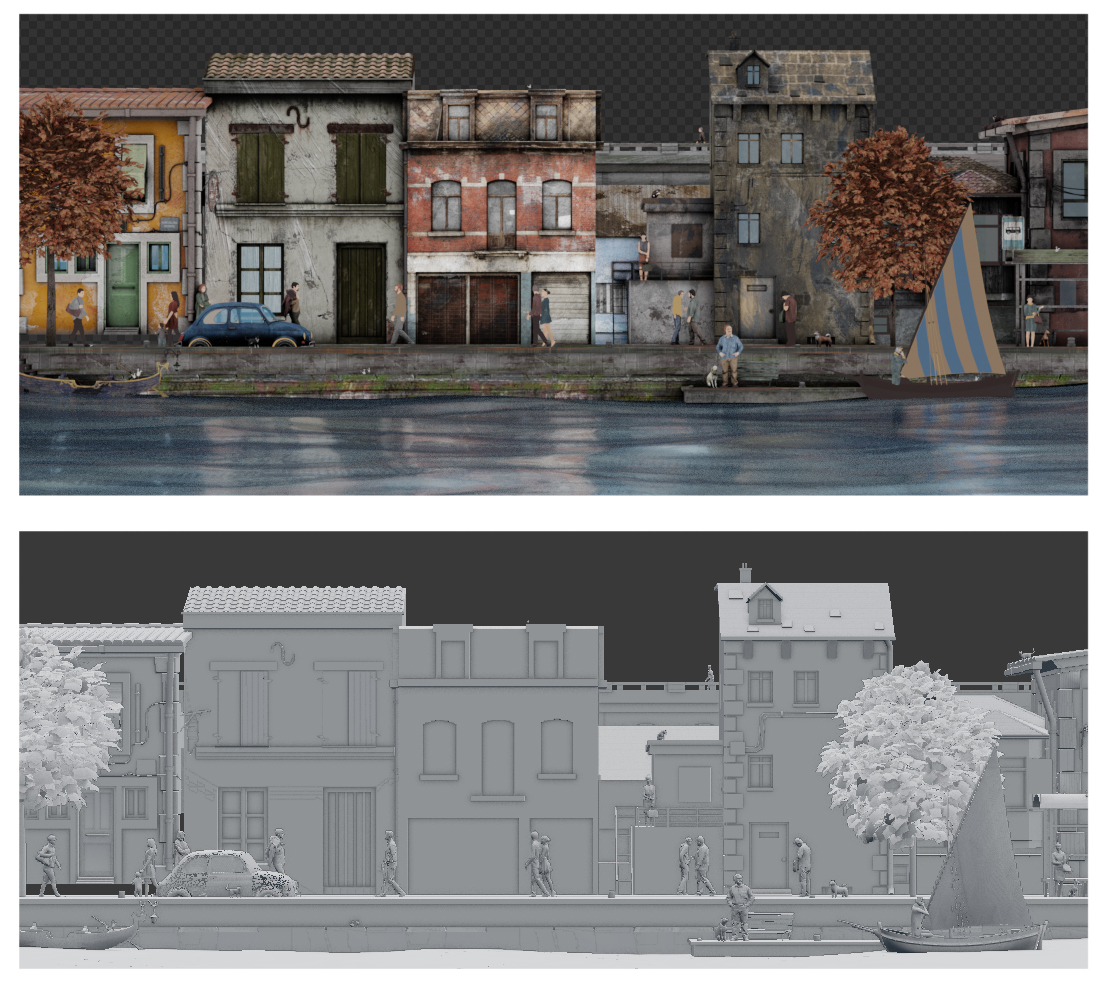
Building the Scene
Once the “main material” had been set in stone, all I did was place my houses around and model additional stuff such as trees, benches, the sailboat, etc.
People were the very last thing I added into the scene, since I was not even sure I wanted them, maybe deciding to just go for a pure “houses-on-the-river” street view.
After adding a bunch of them I then noticed that they were adding a touch of “life” in the scene, so I kept placing people around, trying to simulate different situations all around the picture.
Each one of those elements, both the houses and the people, were using some slight variation of the main material, in order to achieve even more randomness across the scene.
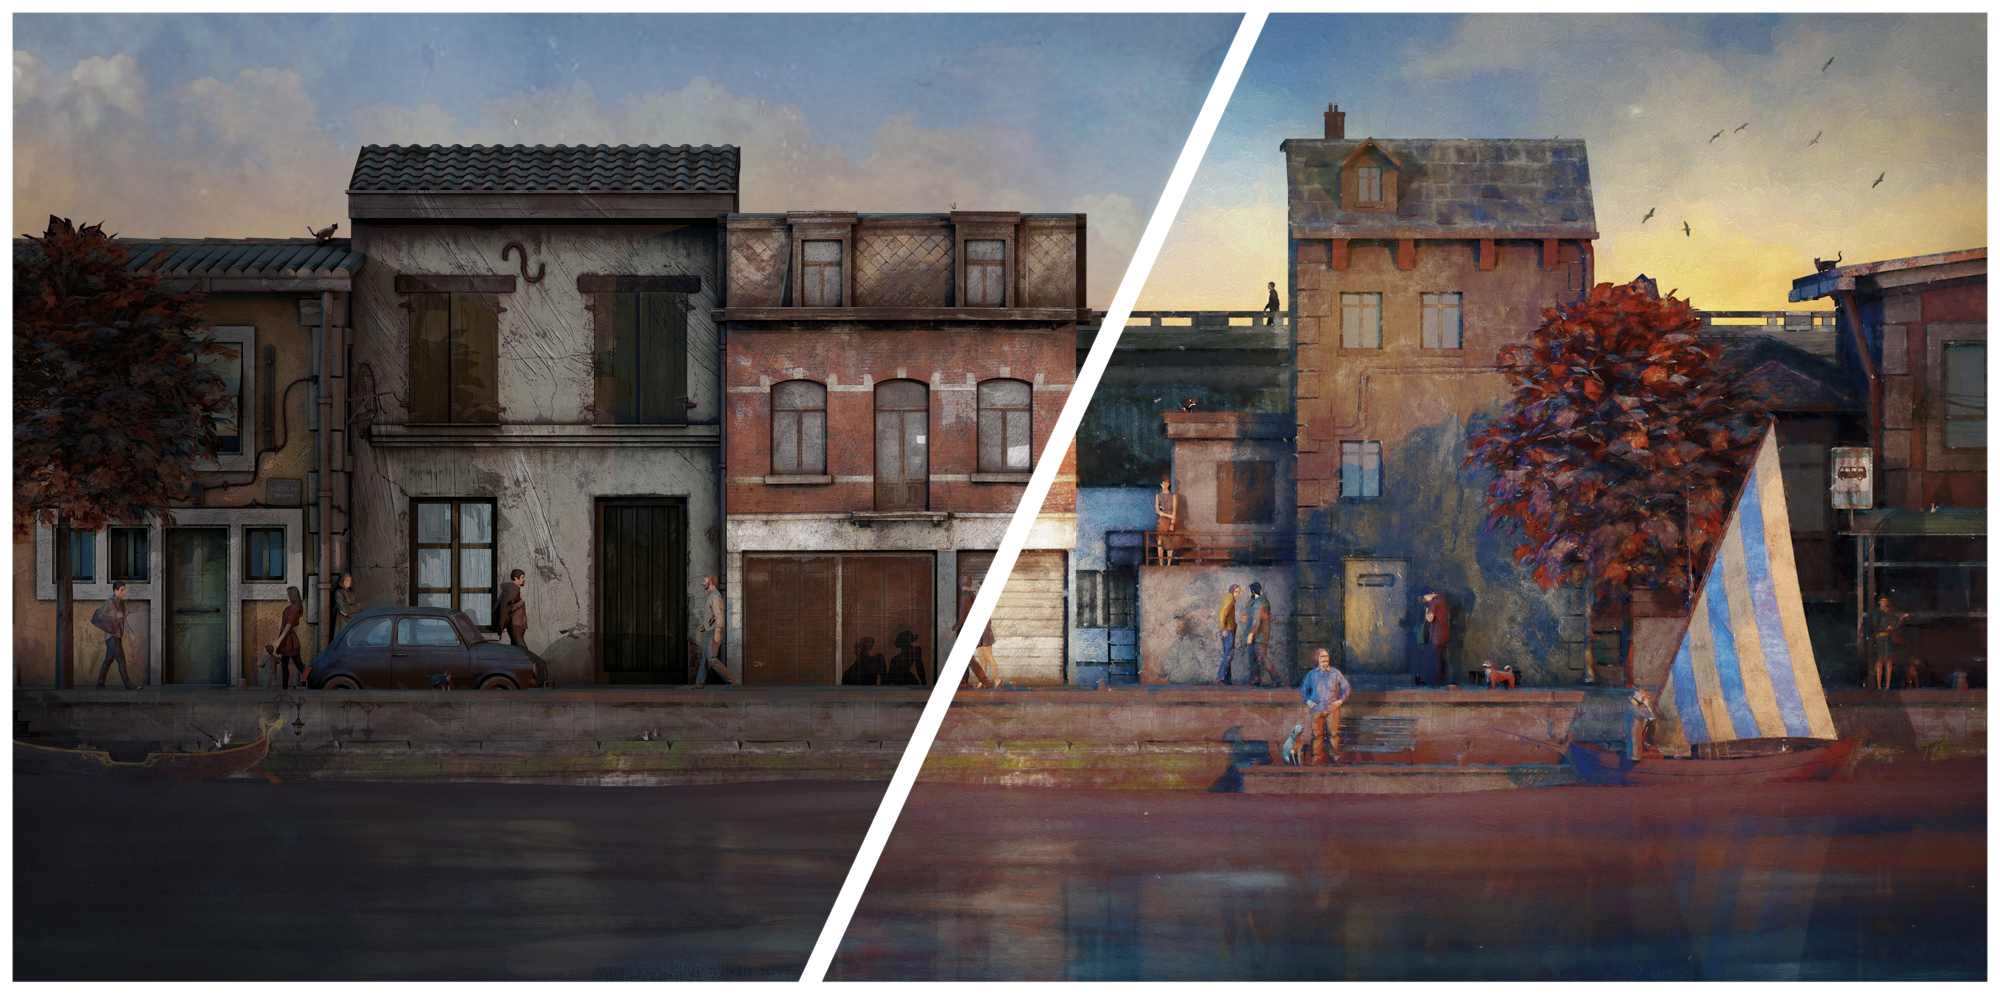
Render Layers
IMHO, one of the key aspects of achieving a non-realistic look is avoiding working with a realistic light setup. Even if you have everything set with custom materials, painted textures and such, a realistic approach light-wise will bring everything back to a more “standard 3D” result, which is rather the opposite of what we are looking for.
In order to have something like this and work on a more customizable layer setup, I always like to generate different passes and mix them later on. All I do is use different materials to override everything in the scene and generate custom passes. For this project this was my setup:

From top to bottom:
Color pass: Just flat colors, this is my main layer. No shadows, no lights (materials are self-emissive!). You can set a render like this at 20-30 samples and get absolutely no noise. Fast and accurate.
Glossy pass: This is the only render layer in the scene with actual glossiness, which needed more samples than anything else. I like to keep stuff like this on a separate layer and push the samples just on this specific pass. (250 samples were enough.)
Hard Shadow Pass: One sun light at 0 samples (hard shadows). All the objects were overwritten by a toon shader which had just 2 shades: black and white.
Fake Rimlights: A render with a custom made material which has color1 (orange, in this case) on the left side and color2 (blue) on the opposite side. The material is just a combination of normal and layer weight nodes.
Global Illumination: Just some spotlights (warm and cold) lighting up the scene. All the materials were overwritten with a normal white diffuse material.
With all of these layers, now it is just about mixing them (both with Blender compositor or any other external software like PS, Krita or GIMP) to complete the whole picture:
What I did externally was just add a painted-sky background that would match the mood of the picture. This is good enough to start having some post processing fun!
Post Processing
When trying to recreate this specific type of painting, these are the key steps that I usually work on:
- Color Vibrance/Saturation: I’m adding some extra vibrance/saturation since I really love to have a colorful mood for these types of scenes!
- Contrast: As above, I’m almost always pushing the contrast up to get more defined colors and contours.
- Painting Extra Lights: When I’m not 100% happy with the lights I’ve got from the render, I like to just add some subtle yellow/orange spotlight to enhance lights.
- Painting Extra Details: I add details such as reflections in the water, or some birds in the background. I’m not really a talented painter at all, so I’m just adding subtle details for the most part.
- Layering Filters: Finally, to enhance the painted effect even more, there are plenty of art filters both on the internet or in Photoshop. A few of those, mixed really low with the original base (from 8 to 15% opacity) will also help to improve the overall effect.
The very final tip is: EXPERIMENT!
Rules are made to be broken when trying to do something which is everything but a realistic render! Do not be afraid of try different stuff and workarounds as, nowadays, we have a great advantage that Renoir, Magritte, and Matisse did not: you can always hit CTRL+Z and clean your canvas! : )
About the Author
 Davide Pellino, Self-taught 3D artist, Italy-based. Loves videogame, pizza and memes. Sharing his apartment with an 8-year old bunny


Beautiful! Brilliant technique :]
Been waiting for this one. Nice work.
Super usefull and inspiring artifle! Thank You for sharing with us. :)
wow now thats how you do it :) Fantastic work sir.
Beautiful! I wish there were a 3840×1600 desktop wallpaper size… hint, hint! ;-)
Really nice work!