(This tutorial is also available in German and Italian)
About Blender
Blender is the open source software for 3D modeling, animation, rendering, post-production, interactive creation and playback. Available for all major operating systems under the GNU Public License.
You can download Blender free of charge on www.blender.org. On the Blender site you will also find a gallery with cool Blender art.
Introduction
Well, this time things aren't going to be as exciting as the ride in the mines, but I'm sure I can show you all some very useful Blender techniques.
This kind of stuff is actually the kind of work that pays computeranimators. While not being very sophisticated, this may be important to remember ;-)
The techniques that you will learn in this tutorial include:
- Rotoscoping (tracing a background image)
- Working with curves
Tracing your logo
Note before you begin: unfortunately as of Blender 2.37 the Background Image that is used below is broken. To do this tutorial you'll need to grab a copy of Blender 2.37 from the Blender Release Archive.
The most tedious part of creating a logo animation is tracing the logo. In most cases all you'll get as a freelancer is a paper print, or a bitmap of a companies' logo.
In this case, I just ripped a cool looking logo from the internet.

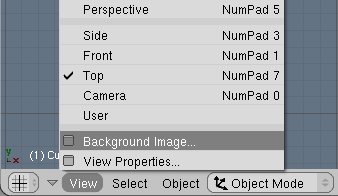
Fire up Blender and remove the plane from the middle of the screen. Select 'Background Image..' from the View menu:
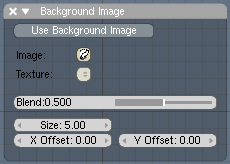
Press the 'Use Background Image' and select the Open Folder icon next to 'Image'.
Select a file, and load your logo into Blender. When you're done (hit enter to load the image) you'll see the background picture in your viewport.

Next, add a curve (a Bezier curve is fine). While still in edit mode, go to the editbuttons screen and select the 'Convert to Poly' button. I always find it easier to create a general outline of a logo in straight lines first. Later, I'll convert everything back to smooth curves - don't worry!

Now, move the vertices to strategic locations on the logo. Keep drawing by holding down the control key and left-clicking your mouse. This will add new vertices and connect them to the existing curve.Make closed shaped by hitting the 'c' button. When you need new vertices for a new shape, duplicate an existing vertex (shift-D), and move it to another position.Don't worry too much about being very precise yet.

The picture above is the result after tracing only the numbers. For a bit of detail, look at the following picture, and pay attention to the way I drew the corners. This is important, because later on, I'll convert the polygons back into Bezier curves and the corners will be perfect this way.

Keep drawing, and don't worry about overlapping lines. Here's the result of tracing the entire image:

Yes - chaos. But I'll change that now! Select all vertices and convert them back into bezier curves. Now comes the real trick: for vertices along smooth parts of the logo (like the circles on the left), select the vertex, and hit h-key. This will align the bezier handles and create a smooth curve at that point.This is also the time to pay attention to positioning the vertices more precisely. In this case, the logo was scanned at a pretty low resolution, you you'll probably need to do a lot of quessing about the correct positions.Here's an example of a part of the '3':

I'm afraid that for the rest, it's just a lot of work, but in the end you should have a pretty good looking trace of your original bitmap. Also, keep the final purpose of your model in mind. For some low-resolution web designs, you probably don't have to worry too much about being very accurate!

The fun part
This is, or course, the better part of this tutorial ;-)
I'll just assume that we have what I like to call a 'default' customer. That is: a customer who wants a shiny, metallic looking logo. Oh well. Let do that!
First, give the object some depth. Leave editmode, go to the editbuttons screen, and set the following values:
Ext1: 0.2 Ext2: 0.02 BevResol: 4  Next, because I want to create a nice, smooth looking , I crank up the DefResulU value to 25. (Ton will propably disagree on me here, but hey!)
  Now I'd like to give the numbers in the logo a different material than the rest of the logo. I need to convert the numbers into separate objects for this. Enter edit mode, and select a vertex on one of the numbers. Hit P. The number is now separated. Repeat these steps for the other numbers.I'll leave the rest up to your own imagination. This is what I did with it:
123 Comments
thank you for this tutorijals.
Best regards from Zlatko Nikolic - SERBIA
Nice tutorial, ill use it sometime. Thanks!
at the shit-f7 i cant find ‘Background Pic’ button. A ‘load’
can someone help me find it??
Andrew,
I checked and there are two problems: first the interface has been changed. I fixed that in the tutorial. Next, the Background Image is broken in the latest Blender releases. Get a copy of 2.37 to do this tutorial from http://download.blender.org/release/Blender2.37/
Bart
how do you fill in the faces i don tunderstand
?
Hi,
Congratulations for your website, it's very well done!
I like your tutorial and am actually trying to make a 3D logo with Blender. I have a problem:
- how can I fill in the bezier curves? For example, the big curves around the logo: I have the same big rounded curve than you have in your logo. I have created two bezier curves, one that follows the inside part of the curve and one that follows the outsidepart of the curve. Then I use the same values than yours, the logo begins to look 3D, but the inside is empty... I can't fill in the part between the two curves. How do you fill it in?
Thank you if you can help me!
Gabriel
Curves are filled automatically; just close them with C. If you have curves within curves then Blender will automatically determine which part should be filled and which part should be left open.
Even if it's outside the scope of this tutorial, the same result can be obtained with an external tool: Inkscape (an open source vectorial graphic program available for linux and win) have a quite powerful tracing option that usually does a very nice job converting bitmaps to curves on the first take (and you can anyway adjust the result, it's the program job!). You can then save the curves in pure SVG format and load them in Blender via the Paths python script. I used this feature a couple of times and it was quite satisfied with the results (this reduces a lot the manually adjusted bezier knots ;) )
Hey thanks for the Inkscape tip furio - that bitmap tracing function saved me a load of time! In fact Inkscape uses a component called potrace so you could even bypass it and use poscape directly: http://potrace.sourceforge.net/
great tuorial egt wel goed hoor ook al kan je dit niet lezen!!! really greeat by the wy
what exactly am i doing when you say to "add a curve"? am i tracing the background or just adding a curve anywhere?
great logo but the .blend file is replaced some where could you put it back (update the link)? or mail it to me? tnx, you did a great job :) nathankroon at hotmail.com
@nathan: I've decided to remove the link alltogether. You don't really need that file when you have just learned how to do this in the tutorial, right? :)
Nice tutorial, I'm only new to Blender, and have learned heaps from your tutorials. Awesome :)
The logo really cool but I get real problem to manipaulate the bezier curve I studying A naiamation and got the work to trace out a logo for test and I can tell you it turn into a real nightmare . plz help your advise will be the most welcom
I have a problem with filling in faces also, it dosent do it automaticly. An exsample is if u ADD>MESH>CIRCLE. its not filled in. I need to fill in one for my animation im doing, plz help.
You never explain how to make the numbers different materials...can you please do that?
great tutorial. bwa ha ha ha. I've been doing logos from cubes.
silly me!
deep.--- curves are really difficult to handle. that's why the dude converted them to poly.
Tokay--- I don't know about cirles but in the tutorial, you only need to select the poly/curves in edit mode and hit C. if you having trouble closing the path, just select the two endpoint and hit F to make a segment.
alpha--- you should look another tutorial regarding materials
http://www.blender.org/cms/Materials.247.0.html
Thank you blender nation!!!!!!!!!!!
thank u for the tutorial it really helped and i will probaly use this quite a bit.Ive been making logos different but this way is so much easier and better.
Thanks
-Guerven
I have no trouble at all selecting things to make squares and triangles (and i thank this tutorial), but i cant seem to do circles, and if i make something that is round and flat, i cant just make a circle and connect it... i have to use a grid, plz tell me if i can do it any eaier or if i can connect a circle
i solved my problem, and to anyone else wondering, here --
u have to add a vertex in the middle, if u look at a cilinder, it has one in hte middle, that is the only way ive found, but ti lets u make a surface in like a circle.
the 8th image from the top (not including the Blender-nation logo).
Can you make it bigger? I'm having a lot of trouble seeing all the lines... thank you for any support.
Sorin
I liked the tutorial alot bart, one question! How do you get the metallic effect?
I can´t draw with the beizer curve, it just moves over the logo...
You actually have to hit shift C in blender current to close off a belzer curve. (make it not hollow)
I can't draw with the bezier curve either. Does this have anything to do with the newer version of Blender?
Must select a vertice first, then ctrl-rmb click, in edit mode(tab) !
Is any knows where "Paths python script" is located and how to use it?
drizzle: Try blender3d.org.
bart: Cool tutorial, useful for games if I ever make something good enough to publish.
I forgot, if you want the the pic: right click on it, and click "Save Picture As..."
Yeah hi the new versions of Blender dont have the Ext1 and Ext2 things. Hod do i do whatever they are supposed to do in Blender 2.42
Oh i got it. Use the 'Extrude' option in object mode editbuttons.
I tried to create 3d logo of my company using this tutorial. My boss likes it. Thank you very much.
Best regards from Ukraine.
hi i tried creating a logo with this tutorial but with no success. can you help me. cheers. radha
I used this tutorial a while ago and had good results with it. I have one question, let's say you're tracing something where the inside needs to be hollow (e.g. a large D)...how do you get it to hollow out?
Think I found the answer - create two sets of vertices, but don't close them until the end. Select All vertices and use Close when both are selected and it magically does the right thing....Not sure I'm completely comfortable with how it 'knows' what to do....but it seemed to work.....
@Rich: to create a hole, simply create another shape inside the outline. Blender will detect and render the hold correctly. For example, to create an 'O', simply create two circles.
Dear Sir
Creating a Logo is only goo for 2.37 but when it comes to 2.42a I donot find the function "convert to poly" how do i achieve this in 2.42a"
Heya Thanks for the Tutorial i found it well cool and learned loads. I will be using this technique alot in the future. Thanks again.
This is FRUSTRATING!!! Where the HELL is editbuttons window???
HOW DO YOU CONVERT TO POLY!?!!?? HOW DO YOU GET TO EDITBUTTONS WINDOW!?!??
Help- there is a button under the "curve tools" panel under the word convert click on the one that says poly.
oh and nice tutorial ... i haven't done it yet but i looked at it and it looks nice I'm gonna try it tomorrow probably.
Help - trying to import a SVG file, Phyton not isntalled ...
what version? wh
Compiled with Python version 2.4.
'import site' failed; use -v for traceback
Checking for installed Python... No installed Python found.
Only built-in modules are available. Some scripts may not run.
Continuing happily.
----------- then I try importing SVG file:
...
In BPY_call_importloader(name=c:\Products\Graphics\clipart\food\pear.png)
Traceback (most recent call last):
File "C:\opt\Blender\.blender\scripts\bpymodules\svg2obj.py", line 1387, in fo
nctionSELECT
scan_FILE(nom)
File "C:\opt\Blender\.blender\scripts\bpymodules\svg2obj.py", line 1325, in sc
an_FILE
t=filtreFICHIER(nom)
File "C:\opt\Blender\.blender\scripts\bpymodules\svg2obj.py", line 273, in fil
treFICHIER
f=open(nom,'rU')
IOError: [Errno 2] No such file or directory: '//..\\..\\..\\Products\\Graphics\
\icons\\EZWIconLG.svg'
------------------------------- question
do I have re-install Blender?
thank!
Help - importing SVG file from Inkscape --
Compiled with Python version 2.4.
'import site' failed; use -v for traceback
Checking for installed Python... No installed Python found.
Only built-in modules are available. Some scripts may not run.
Continuing happily.
---------- and then .. importing SVG
In BPY_call_importloader(name=c:\Products\Graphics\clipart\food\pear.png)
Traceback (most recent call last):
File "C:\opt\Blender\.blender\scripts\bpymodules\svg2obj.py", line 1387, in fo
nctionSELECT
scan_FILE(nom)
File "C:\opt\Blender\.blender\scripts\bpymodules\svg2obj.py", line 1325, in sc
an_FILE
t=filtreFICHIER(nom)
File "C:\opt\Blender\.blender\scripts\bpymodules\svg2obj.py", line 273, in fil
treFICHIER
f=open(nom,'rU')
IOError: [Errno 2] No such file or directory: '//..\\..\\..\\Products\\Graphics\
\icons\\EZWIconLG.svg'
--------------
since I installed Python 2.4.4
should I re-installed Blender?
thanks!
hi, i need a bid of help. i use blender 2.42a and i can't seem to not have all the options you have on the screen. i can't create points, i read all 45 comment but non seemed to work. i tried extruding, ctrl+rmb, shift+rmb, and nothing happened. yeas i was in edit mode. when i create a bezier curve all i get is a preset 5 point shape. please help me :/ i'm new and want to learn 3D.
--
tikki
--
Tikki:
i use 2.42a as well and to exturde press e in exot mode
oops i mean edit mode
hey good tutorial...I made a logo for my dad and he liked it.. thanks!:)
For tikki....when you are coverted to poly, select one of the last points...the ones at the end of the curve and then just hold Ctrl+LMB anywere in the 3d screen..hope this helps you :)
I've got a little problem, I followed the tutorial, which was great, I traced the logo I was doing but somewhere along the line I must have done something wrong, there is a line jutting out from the top of the logo and I can't figure out what I did wrong so that I can make it go away. Anyone know what I did wrong?
The tutorial seems to be everything I need to convert a logo.
However:
I loaded my image as a background image. The steps were very clear.
Now things start falling apart:
>>
Next, add a curve (a Bezier curve is fine).
While still in edit mode, go to the editbuttons screen and select the ‘Convert to Poly’ button.
>>
How do I know I am in "Edit Mode"?
I am using version 2.42. What is the "editbuttons" screen? I found a "Curve Tools" panel but the Beizer button under "Convert" appears to do nothing.
>>
Now, move the vertices to strategic locations on the logo.
Keep drawing by holding down the control key and left-clicking your mouse. This will add new vertices and connect them to the existing curve.
>>
I cannot add a vertex to the curve, let alone create a polygon of line segments.
I figured out what I had done wrong and the logo turned out great.=)
awsome now i can make better looking logos for my movies and things like that now i just need to know how to color it
Man, awesome tutorial, however I was wondering of you interested in expanding this with the step required to import paths from another program to ease the process of tracing the logo, there are so many programs that you can easily make a path from.
Richard Hall:
1. "How do I know I am in 'Edit Mode'?" - in 2.42, press Tab to switch between Object/Edit mode. A mode selector, located on the bottom toolbar of 3D view window, just next to the menus, will show you the actual mode name. It also allows you to select the mode with your mouse.
2. "What is the 'editbuttons' screen?" - 'Editbuttons' refers to Edit window in 2.42. This is the bottom panel where you found the Curve Tools
3. "I found a 'Curve Tools' panel but the Beizer button under 'Convert' appears to do nothing." - It won't do anything to Bezier Curve as it converts TO Bezier. As stated in tutorial, you have to convert bezier curve to poly, so click on the Poly button under Convert.
4. "I cannot add a vertex to the curve, let alone create a polygon of line segments" - After you have converted your bezier curve into Polygon, unselect all vertices by hitting A, then select one vertice on the end of poly line. Now while holding Ctrl, left-click on the screen with your mouse, a new vertice will be created and a line drawn that connects both.
Hope this helps.
Let say you already have the logo in vector format .AI or EPS
In theory you would not have to trace it right? You could import the paths?
ummmm when ever i try to load a image it just lets me load the one in blender that i have already saved how can i get one from out side of blender ?
Hey, I just started using Blender (I have been using other 3D apps before) and this tutorial helped me to familiarize w/ Blender tools.
Thanks a lot.
ps: hehe, i love my glass looking logo :-P
could we create a subsurf modifier to de numbers and objects to give'm a reaally smooth looking , if it is possible could you tell me how? thanx
colud we create a subsurf modifier to the letters, and object around, if it is possible could you tell me how i do this? thanx, very good tutorial
Did you use 2 versions of blender for this? it looks like the first part is newer blender and then further down you used older blender? like 2.2..
Other than that, nice tut.
Great tutorial!
But I have a problem, I'm stuck in object mode, I'm literially stuck there. Edit mode isn't even an option. Anyway to fix that, or am I stuck not coloring the numbers?
blender wont let me open up any files as a background image, they are the same pics you use in the tuarials but thay wont open up....please help me
Matt; go to View > Background.
Be mindful of the types of allowable image file formats.
Kinda good tutorial. And hey! Applying different materials can be done without separating the numbers to different objects:
1. Press "New" twice in editbuttons under "link and materials". This will create two materials linked to the object.
2. In material buttons, make the materials different from each other.
3. In edit mode, select the numbers (or anything you want to be different color with the rest), and back in editbuttons, under "link and materials", change the selector to show "2 mat 2", and press "Assing". In case it's all still same colour, select everything but the numbers, change to "2 mat 1" and press "Assing".
Blender not work & with TTF???
Thx !!! Exactly what i needed. I already did my first 2 Logos and it worked fine.
Exactly what i needed. I already did my first 2 Logos and it worked fine.
how do i change the color of the numbers with out changing the color of the out line.
I really dont understand how to draw in Bezier curves i have read all replies but im still stuck
Hey Rune,
in order to draw with the Bezier curves you need to make them into Poly curves that is in the edit buttons menu.
when you finish drawing hit the "A" button and click Bezier in the button menu.
Good Luck
Matt if you need any extra help im almost always on.
I figured out how to get the colors to be changed
Thanks anyway.
Hey!
Really a great tutorial, but I faced a problem tracing one of my own images. The tracing went nicely with the bezier curves, but when I tried to Extrude it and to set some BevReso, the half of my shape went "BevReso'd", but the other half "BevReso'd" into the inside of my shape. What's the problem here?
Regards, XamaX
Hello , great toturial =D. How do i get some "shiny" effects to my logo?
I want it to look like metal,silver or chrome or something like that. Pls help :D
Great, just what i was looking for...im totalt new to Blender and this is a precise tutor for someone like me.
Hey! Good tutorial. How did you make it so glossy? I want to make mine like that.
The background image works on blender 2.45 if you are in orthogonal view and top view.
tks a lot for this tutorial...easy and useful.
hi tnx for the tutorial. am using the latest blender, 2.45 i think. but a total newbie. took me a while to realize that the interface had changed a bit but managed to find them :) thanks again.
I too am having issues when selecting bezier curve, it just moves over the image. while clicking ctrl+ the left mouse button no additional verts are displayed. Any suggestions?
Blender's still the best! I'm proud to be part of this.
c'est interessant!
thxs man
Thank you sooo very much, you saved me a lot of time by using this style of modelling. Thanks again!
select the vertex, and hit h-key. This will align the bezier handles and create a smooth curve at that point.This is also the time to pay attention to positioning the vertices more precisely.
i cant to the bezier handles, when i press h-key the line or vertex disappear.
hi
just a quick question i use illustrator if i have a illustrator outline file can i import it in.
many thanks
Hi tone,
from illustrator export plain svg, remember to export only an outline, no fill, no pattern, no nothing else
from blender import svg path
;)
Hi,
I have the problem with adding new points to Bezier curve, just nothing appears when I hold ctrl and click the left moouse button. Somebody help me?
Ok, I've got it :)
Wonderful tutorial but there is one thing. The link to go to the older versions of Blender does not work.
Whats wrong when my logo always looks like dis:
http://img184.imageshack.us/img184/9180/hedgascf0.jpg
I do everything just like in teh tutorial, but always it just left those holes into my logos. :0 Can somebody help me ? =)
wow i haven't try it yet but i know it's going to be real fun! imagine the stuff i can convert lol!
Hi. I am only a beghinner at this, but how do I move the points in the curve. I have changed it to a poly, but i can't find put ho wto move the points to the logo. By the way, I am using the logo you supplied.
Oh no. don't worry about my last post. figured iot out
Hi. I am facing a new problem. How do I make more point son the outline of the shape???
THX, many!
Really a great tutorial
Great stuff.. this is a really good way of impressing clients!!
This is the first tutorial that I've read when I discovered Blender..
well, i've used the effect and this tutorial hundereds of times in the stuff i'm making... and it usually works. however, i started making another logo and blender was having trouble calculating putting holes in the object. i know that i have to push "C" and everything to fill it in, but it wasn't making it hollow when i put another shape inside of it. Do you know the reason it wasn't calculating it correctly?
Thanks!
I'm new to blender and I want to know how I can import an AVI or MPEG VIDEO file into Blender
hi guys, um im new to like.. blender and when i search for my image file, the screen is reeeeaaaally confusing. i dont know the path to my logo so im not sure how to browse the files on that screen.. can you make a tutorial about that
can I make in blender edit mode automaticly face from 5 verticles (4 edges) not besiere and nurbs? I can make faces from 3 or 4 verticels, but 5 or more?
This is a great tut. Very easy to do!
Hello,
your tuto is very enlighting thanks ;) but I have a problem... I've tried to make the logo of my club of judo, a stylized sakura flower which has some very angular parts... ( you can see the logo here: http://www.toribeauvechain.be/ )
I have used a besier curve with the 2 tangente in the same direction to fit the curve, but when I try to extrude the mesh, some big spikes appears... so i suppose I can't use (or very badly use) the besier to do so... do anyone have an idea?
thanks a lot!
Panda
ps: sorry for the english mistakes
Thx, so much for this tutorial, just what i looked for!.. :D
I did just a bitmap of my name and and made the letters bubbly. It is now my desktop background. thx man, this was fun...
how do i make a bacground
pic?
I did all those steps, although I didn't get as much as you did. On the other hand, I got a pretty cool logo made from this.
The only thing is I don't have any Ext1 or Ext2; I have Blender 2.49. I do have the Extrusion option, though.
I am a blender noob and I did this tutorial in one go. Very good explanation, thanks.
i did that but for some reason its empty from the inside.... anyone knows how can i put in a fill?
it`s very Difliculty on the blender v 2.49b
I have a nice line drawing but can't get to the extrude function v 249.2
i want to drAW a logo in my python program please tell me the instructions
i cant get the hang of the bezier curve. it just wont go where i want it to.
do i have to create many bezier curves for say a simple logo like the number 1. or do i make it with many?
im happy..
nice tutorial and can i do the same thing by using blender 2.49b???
WOW! this was a long time ago...Blender 2.37???
PLease- Help-- Total newby- Need to create an edrawing from a VECTOR image created in illustrator & IMPORTED into Blender 2.63.---Basically a #D Model from imported vecter svg------Alls the tutorial LOOK different- perhaps older versions- AND I AM Confused- NEED IMMEDIATE HELP.
This is where I got a PROFESSIONAL and ATTRACTIVE logo: http://fiverr.com/prologomakers/superfast-24hours-design-a-professional-and-attractive-logo
http://www.youtube.com/watch?v=DCLriq0mDbs