Look at the picture. Watch the videotutorial. You can now do this, too.
Peter Drakulić writes:
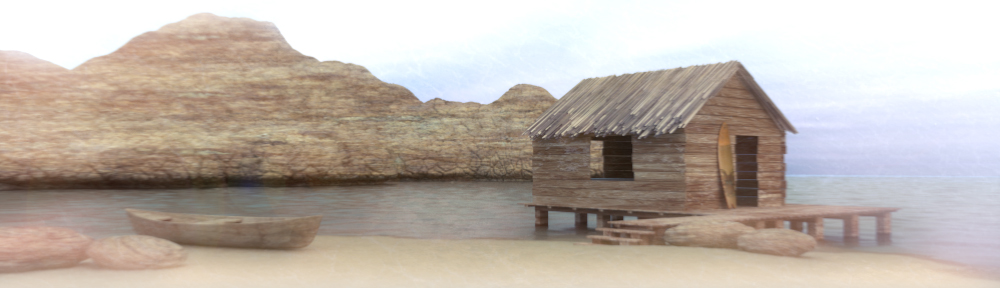
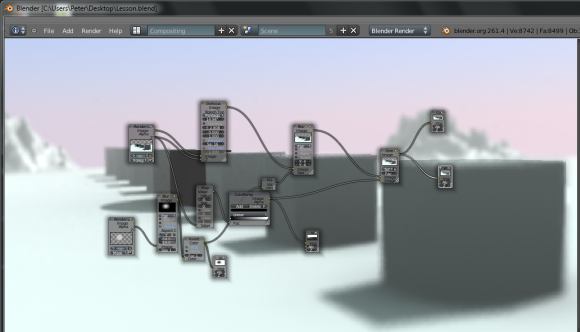
In this tutorial we're going to learn how to setup and adjust a Defocus and a Mist effects,in compositor,using nodes.We're also going to learn how we could eliminate any artifacts caused by the Defocus node,using a very simple implementation ( used,in here,only for "still" renderings) of a technique that I,personally,call "3D Rotoscoping".
A more detailed tutorial on this technique is about to get published ,hopefully,soon,(I'm still experimenting...).
http://www.youtube.com/watch?v=V9bnqeS1Gwg&feature=channel_video_title

17 Comments
Yay! Thank you! I was just wondering how to use defocus effects!
Thank you lotus-san!Happy you appreciated it! Peter
big buck bunny voice actor. :D
LOL! this is the second time I was told this lately...I'd better start believing that's the case with me I guess!...:-)
on the other,how about big buck bunny sharing some tutorials about the software that made him?...sounds interesting,huh? :-)
Wi Cked cool comment,honored,thank you Johny D Wi cked!...(going meeting Frank,for now,and have a "talk" with him!:-))Peter
I would look at using the mist function instead of the z-depth for the mist effect... this will give anti-aliased edges for when you map it on.
nice blender theme. please share settings:)
Thanks for the tutorial Peter, great idea with the mist. Anyway I've got an annotation: Imho the Map Value Node is not necessary, simply use the Normalize Node. That saves you from fiddling around in such a big values range. The ColourRamp isn't necessary as well, because the Z-Buffer does already deliver a greyscale image.
Keep up the good work!
Thank you Donnervogel for the annotation you are very right.The only reason we,usually,choose to add a combination of a Map Value plus a Color Ramp node,though,is that,this way we allow our flowchart for some greater interactivity (both by adjusting the Map Value and the (much more versatile imo) Color Ramp node.
It might seem a bit more cumbersome,but trust me it gives you a great deal of freedom for pulling exactly the type of "mist" you want.
Now,if you need just the "plain" Z buffer pass,it's fine and dandy if you chose the Normalize node,it works equally well in most of the cases,you can even use the very versatile combination of a Normalize + Color Ramp node,if you wish,either way,though,I 'm sure,you'll appreciate the freedom that some more adjustable nodes (like the Map Value and Color Ramp ones) are offering to your creativity.
Thank you so much for commenting in such a constructive way and for allowing me to afford the opportunity for talking about these things, Peter
The problem is, if you have a changing furthest value, the fog acts weird.
I see the point of colour ramps, that does of cause give you more flexibility. Only n your very example it didn't make sense because you haven't changed the value, fair enough.
Regarding the the Map Value Node I would nevertheless add a Normalize Node before. You can than work in a range of 0 to 1, and if you're not satisfied with that you can use offset and scale this range again by the Map to Value Node afterwards. For myself I prefer clean input values that I can easily understand :) and the Normalize Node shouldn't cost to much computing power here. But that's just a personal preference.
Thanks a lot, you made me think about this a little bit more ;-).
very well said,I agree with you and thank you for the contribution,you shared a piece of info with the community that could prove useful for many of us,and this is the key thing here,I think...:-) Peter
Hey Peter,
can you share your theme you used in your tutorial?
btw i hope you get hired for mango an some characters voice acting;)
thx dave
Hi dave62,
thank you for commenting and support (cool what you wrote
about mango...lol) ,glad you liked the theme,please do bear in
mind,though,this is not a 100% complete theme,might still need some
adjustments made by you.
You can find this theme at this link >
http://blenderartists.org/forum/showthread.php?246114-My-theme&p=2052428#post2052428
Just unzip the .zip file,but please make sure that you have first
installed the "Theme Manager" add-on so you can import the .xml
file.Here's the link to this add-on (or you could have this already
packed with the build you're already using) >
http://wiki.blender.org/index.php/Extensions:2.6/Py/Scripts/System/Theme_manager
(I don't know why,the link seems to be broken,though)
This theme is quite similar (but NOT the same) to the "ZBrush"-like
theme shipped (along with a bunch of other themes) with
5828_blender-2.61---43747---unified-contrib-add-ons--fastest-cuda build
(that's the latest build I've used containing those themes) I'm
sure,though,you'll find a relative,more recent build if you try a
Graphicall.org search.
Please feel welcome to ask me any questions you might have on this
Thanks again,Peter
Yeah.. ah, no... actually ok, so!
We will follow this useful brodcast with a 60 minute tutorial on how to create a cube in Blender.
Picka materna! Why on earth did I waste 20 minutes before giving up on this piece of junk??
What are you talking about?
hey peter,
thx a lot for your theme link.
I think to load different themes, there is no need for any thememanager anymore -already in trunk:)
i will try your theme when i am back home and will upload my changes when they are done on ba.
Thanks a lot and have a nice day.
cheers dave
i dont have landscapes??? D: