
 Several months back, blenderage posted a mini tutorial showing how to use a smoothing groups-like technique to get better detail from low poly models. Game makers, you might want to see this if you haven't already.
From the BAÂ thread:
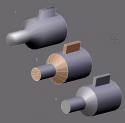
By selecting the appropriate sections, then pressing P to separate them, you can get rid of those [black]lines and with the added bonus of an increase in detail due to the better way in which the light falls on it.
Simple, I know, but the results really do make a difference. Take a look at the post for an comparison image as well as the results of this technique on a car.

20 Comments
It's easier to use 'Y' instead of 'P', because that will split the polygons without creating a separate mesh object.
Yes, is a good tip to do the "smoothing groups", bot for some reason the link is broken.. at least for me :S
The edgesplit modifier added during the modifier stack recode allows edges to be marked as sharp. It's documented here:
http://mediawiki.blender.org/index.php/BlenderDev/EdgeSplitModifier
@brecht:
EdgeSplit Modifier? The wiki shows it to be a 2.4 feature (possibly incorrect) but, I don't see it. In what build can it be found?
It's a nice technique but to create the appearance of smoothing groups the separated areas creates more vertices to maintain the mesh structure.
AFAIK, smoothing groups creates independent normals for those groups. The split modifier gets close to create smoothing groups until you apply the modifier, after that, the areas marked as sharp gets splitted.
If there's a way of maintain the areas without separate them, please let me know.
Why bother seperating the objects then joining them back together!
you can just go into edit mode of an object then select the area you want to smooth then press set smooth :D
@GBOI: Except that wouldn't work if you have two areas that are next to each other, each needing smoothing but you want a hard crease in between them. Take a look at the pic at the top of the page.
Any CVS build since 2 months ago or so has edge split modifier
huh?!?
What's the difference with selecting groups of faces in Edit mode, and then Applying Set Smolid area by area? It seems to me a very complex (and not so straightforward) for smoothing only parts of a model???
It's a commonly used technique: suppose you have a cylinder and that you want it to be smoothed: on the flat ends, the shading will be wrong it you use SetSmooth on the whole mesh. So set smooth the entire cylinder, enter Edit mode, select one end : SetSolid, unselect all, select the other end: SetSolid.
The trick is done!!!! (and you can do it since ages...)
I don't want to bash blenderage's tip, it's just that i'm wondering if i misunderstood something about the point of this...
You can find the docs of Edge Split modifier at http://mediawiki.blender.org/index.php/BlenderDev/EdgeSplitModifier. Note that you can mark edges to be sharp as well.
Whoops. Should have read the comments better before posting. :)
@olivS:
The difference is, you can have different areas with set smooth with different shading. With Set Smooth / Set Solid technique you have faceted areas.
To illustrate the alternatives:
http://img.photobucket.com/albums/v116/landcf/smoothing_groups.png
And for me (imho) the best solution for smoothing groups is to maintain the different shading areas without splitting the faces. Other softwares (3dsmax with smoothing groups and Wings3D with hard edge/soft edge solutions) don't create new objects or split areas but control the normal of those areas.
My two cent.
@ZanQdo:
Oh, CVS. Well, I don't even begin to try and keep up with that because I wouldn't have time to actually get anything done. :)) I would end up spending most of my time experimenting with new features, getting the next CVS build, experimenting...
I have a hard enough time keeping up with the rate of the official releases. Thanks for the info, though!
@ Carlos:
thanks I see now... I really has had misunderstood the point of it.
what about creases, are these only usefull when subsurfing?
@FreakyDude:
Yes
blenderartists.org site seems to have some (bandwidth?) problems.. Sometimes it works just fine and just next moment it doesn't load any pages. I don't know if this is just a problem at my end or what.
my long dream, to have smoothing groups.. never thinked it could be done other ways, well ill be damned..
Hi,
firstly I apologize for I didn't read the whole discussion. But I must say that this tutorial is exactly what I've been searching for a long time. And it's _exactly_ the way I wanted it to be. But do you know, what would be REALLY nice? (Maybe it actually is possible and I don't know of it.) The possibility when selecting an area of certain faces (which can lay next to each other - that's the point) to mark the "selection border" as a sharp edge. In other words, these are those edges of selected faces, which have no neighbour (I mean another selected face.). The rest of the selected face edges sharpness would be cleared. You would simply use the same approach as when using the "P" key but using a different (and better) tool. Really nothing more but making the existing thing even more comfortable. I hope you understand what I mean though I apologize for my terrifying English :)
Thanks for your answers.
Hi,
I realized that function I was writing about is not neccessary :) It works pretty well as described in the tutorial.