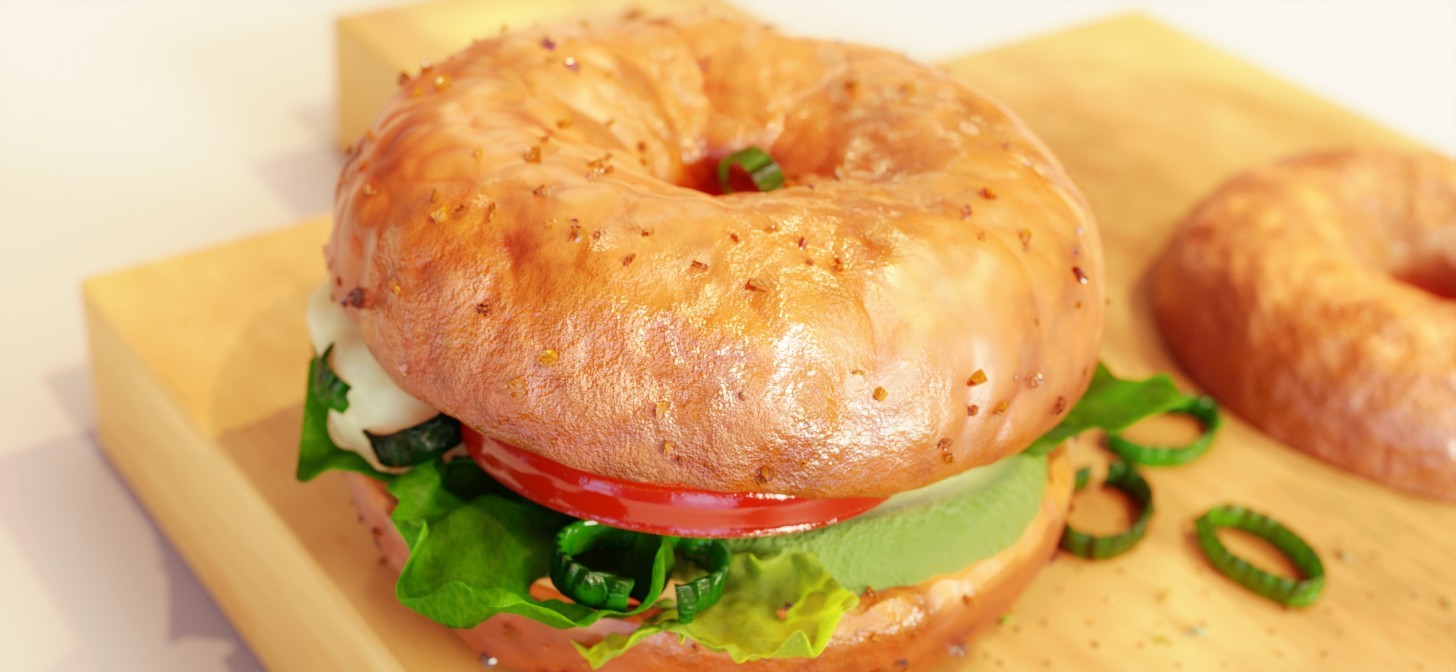
Behind the Scenes: Bagel in Blender
INTRODUCTION
Hello, I’m Joakim Tornhill from Sweden, a.k.a “Blender Insight.” I started using Blender over ten years ago as a hobby and somewhere along the way, it became clear to me that this should be my everything and not just a hobby.
So, I quit my job as an IT consultant, started online courses (and rented out parts of my apartment) to keep me afloat financially, and then went back to school in my 50s to get a proper game developer education. For the last few years, game development has been my life so currently, I’m employed at “Ernst & Borg Studio” as a technical artist for the video game “Midnight Ghost Hunt.”
INSPIRATION
This, like many other pieces I have done, started as a material test. Often, I try to use rather simple shapes and then spend more time on the material instead. I really like the end result to be photorealistic and can sit for days tweaking parameters. Here are some of my earlier works, so you get the idea.

In the specific case of the bagel, it was a question on my Facebook group on how to do “bagel material.”
I sat down for a couple of hours, tried out some ideas, and presented an answer. It looked okay, but I was not totally satisfied and I also got some feedback that it still looked more like a donut compared to a bagel, which I also felt.
So, I decided to do something about it. I googled a lot of reference images, and tried to find the specific differences in structure between donut bread and bagel bread so that I could present something better this time.
PROCESS
For the bagel, I used Blender all the way, so the modeling, lighting, procedural materials, and postprocessing (slight color changes in the compositor) were done in that tool.
There was no Photoshop or any other external tool to adjust the raw render.
Modeling
I started with modeling. Since I used easy-to-do shapes, there was no real block out of how it should have looked, so the final shape was directly done on each part.
However, I’m always very careful with following the scale so that it matches the “real world” to make the texturing correct in the end.
In this case, the only thing I had to work a little bit more with was the lettuce. I sculpted it quickly to get something that looked okay. The rest was just a torus, some cylinders, a big cube, and small distorted cubes (a subdivision where I changed “fractal” parameter to destroy the shape) to have some bread crumbs.
To make distortion on the bread, I subdivided a couple of times and then used the displacement modifier. I did the same with the leek and the avocado. This would be a still render, so I was not concerned about polycounts.

If the modeling takes more than an hour, I get restless since it is the material I want to work with.
Composition
After that, I set the camera.
The composition is a vital part of the end result. Having used the correct scale helped me when I then added the depth of field.
Then I added basic colors like solid brown, yellow, green, and white to get a feeling of how it would look.
Lighting
The next step was to use a good HDRI. When I have color and camera, I can get a good idea of what would fit the scene. The HDRI changes a lot on the colors, so I added that before I went deep with the material.

In this case, I went for a strange one, you might think, for it needed to be inside and not take too much from the image when it came to reflections and lights, but at the same time have a bit of yellow and green to it. So, I finally went for “Hotel_Room_4K.”
Wood Material
Now, I could start with my material for real!
First, I fixed the table. It should be soft and almost “eat” the reflections, and in those cases, I often use “Velvet” (which is renamed to “Sheen” in Blender 4.0). I love the material where I don’t want the background to interfere when I do renders of smaller products. The only thing I added to this material was some ambient occlusion to get a good distinction between the table and the wooden plate, so it looked like this in the end:

Then I took the next simple material for the wooden plate. Wood is easily done in Blender by mixing noise and wave texture.
Here, I also used that, but added some musgrave to break the repeated pattern a bit and get islands of variations.
The pattern part for the complete wood plate (excluding colors) is just these few nodes:

I did not use too much time here since most of that plate would be in a blurred state, so as long as you got the “feeling” of wood, it was okay.
Bagel Material
Now I went for the bagel material!
I wanted to start with the bagel material as soon as possible for it was to be the main thing in this scene and also what I wanted to make realistic. I checked all the reference images closely to find some specific things and made a list in my head of what to think about. This is what I found:
- Darker on side, brighter on top -> Use Z of Normal output from Texture Coordinate.
- It had rim light, but almost unnatural, so fake it -> Fresnel/Refraction.
- Color variations (darker) in the valleys/crevices -> Pointiness would work.
- Rather sharp changes in roughness -> Noise + Musgrave + Colorramp
- A lot of small color changes -> Noise on Hue/sat/value + Overlay mix x 2 times
- Sharp bumps/crevices – > Will need some displacement output as well.
That is about it! If I just take out the color part of the bread, it would look like this:

There is no reflection here, so you can see that I faked the brighter rim light to make it stand out more in the render. You can also clearly see the redder and darker crevices that I used “Pointiness” to find. It is also slightly darker on the side which I control by separating the Z-value from the normal output of the texture coordinate. Then I got a good mask that not only can be used for getting it darker on the sides, but that also reacts a bit on the bumps on the bagel, so I get some color variations.

The rest is just a lot of tweaking with noise to get correct colors. I often use the “Hue/Saturation/Value” node to get the color variations. Here, I changed it so it still is in the same color range, but with just slightly different tones.
The first part where I use the normal output, Fresnel node and “Pointiness” is really the base for all and it is just these few nodes:

Everything else is more or less just a tweaking of noise, which is really amazing. Below is the complete “bread material” on the bagel.

I will not go through the rest of the materials. They are secondary in this scene and I really tried to keep them as simple as possible, like the variations of green on the leek is just a wave texture and if I go close or have the wrong angle, it will look distorted and bad… but here, it works!
RENDER – Bagel in Blender

Thank you for reading the article. Feel free to explore more of my work on my social media accounts. Have a great day!
About the Artist
Joakim Tornhill is a Blender lover, currently working as technical artist at Ernst & Borg Studio when not at home, doing materials in Blender.


