
Behind the Scenes: Blueprint of a Home
INTRODUCTION
Hello everyone! My name’s Jamie, and I’ve been working professionally as a 3D artist for the past few years. 3D art, specifically Blender, has been a huge passion of mine since I was 17, and thence it became my job. I choose to live a nomadic lifestyle: I type this on my gaming laptop (used mostly for Blender) while sitting on the grass by a river in France. In a few days time, I will fly to Cyprus to live, and work, on a campsite for the summer! I’m looking forward to giving you insight into how this piece came about and how it was made!
INSPIRATION
“Blueprint of a Home” was first thought about a year and a half before I finished it. I was looking into, and daydreaming, about houses and apartments that I could only afford in my most affluent fantasies.
I found a house in Athens, on a real estate website. A beautiful penthouse apartment with a cozy open-plan living room, a window-lit carpeted staircase snaking up the side with wooden beams, leading to a mezzanine, and a bedroom overlooking the spacious and natural core of the house. This was what gave me the idea for this project.
The way I seem to work is: I get strong images where even just a line, a song, or a memory conjures up scenes, art pieces, and correlations in my head vividly. These always stick with me for years—and the tip of an idea can bring them right back with absolute clarity. I still remember the layouts of cafes I visited a decade ago! Thanks to this strange ability, and a dash of Autism, I can sit on many different ideas for years, allowing them to find the right time to be developed. With no rush and a relaxed nature to my creative process, this is how I can not only really enjoy the work I do and get the most out of it, but also give justice to the original idea. Enjoy life, create the work: let it all flow naturally.
So this is the story of how “Blueprint of a Home” came to be.
The name “Blueprint of a Home” is important as when this idea first came up, it was the start of 2021, right at the beginning of my envisioned idea of being an artist. A cozy, relaxed home on a hill full of things that make me happy. The name refers to how I was blueprinting and concepting my life in this period of time, dreaming what could be in my future.
PROCESS
Concept
I made a quick hour long concept of the image and the main colors making up this house in Blender. As you all know, to get an idea out, it’s good to make a whole block out first before going mad with small details you can add. Get the idea for the full vision first and see if it holds up when it’s out there in front of you. This is what that looked like:
As you can see, the main elements are mostly here just in the first draft. Everyone has a different process but for me, I see what it looks like before I start it. Then it’s just about bringing that into the real world.
Modeling
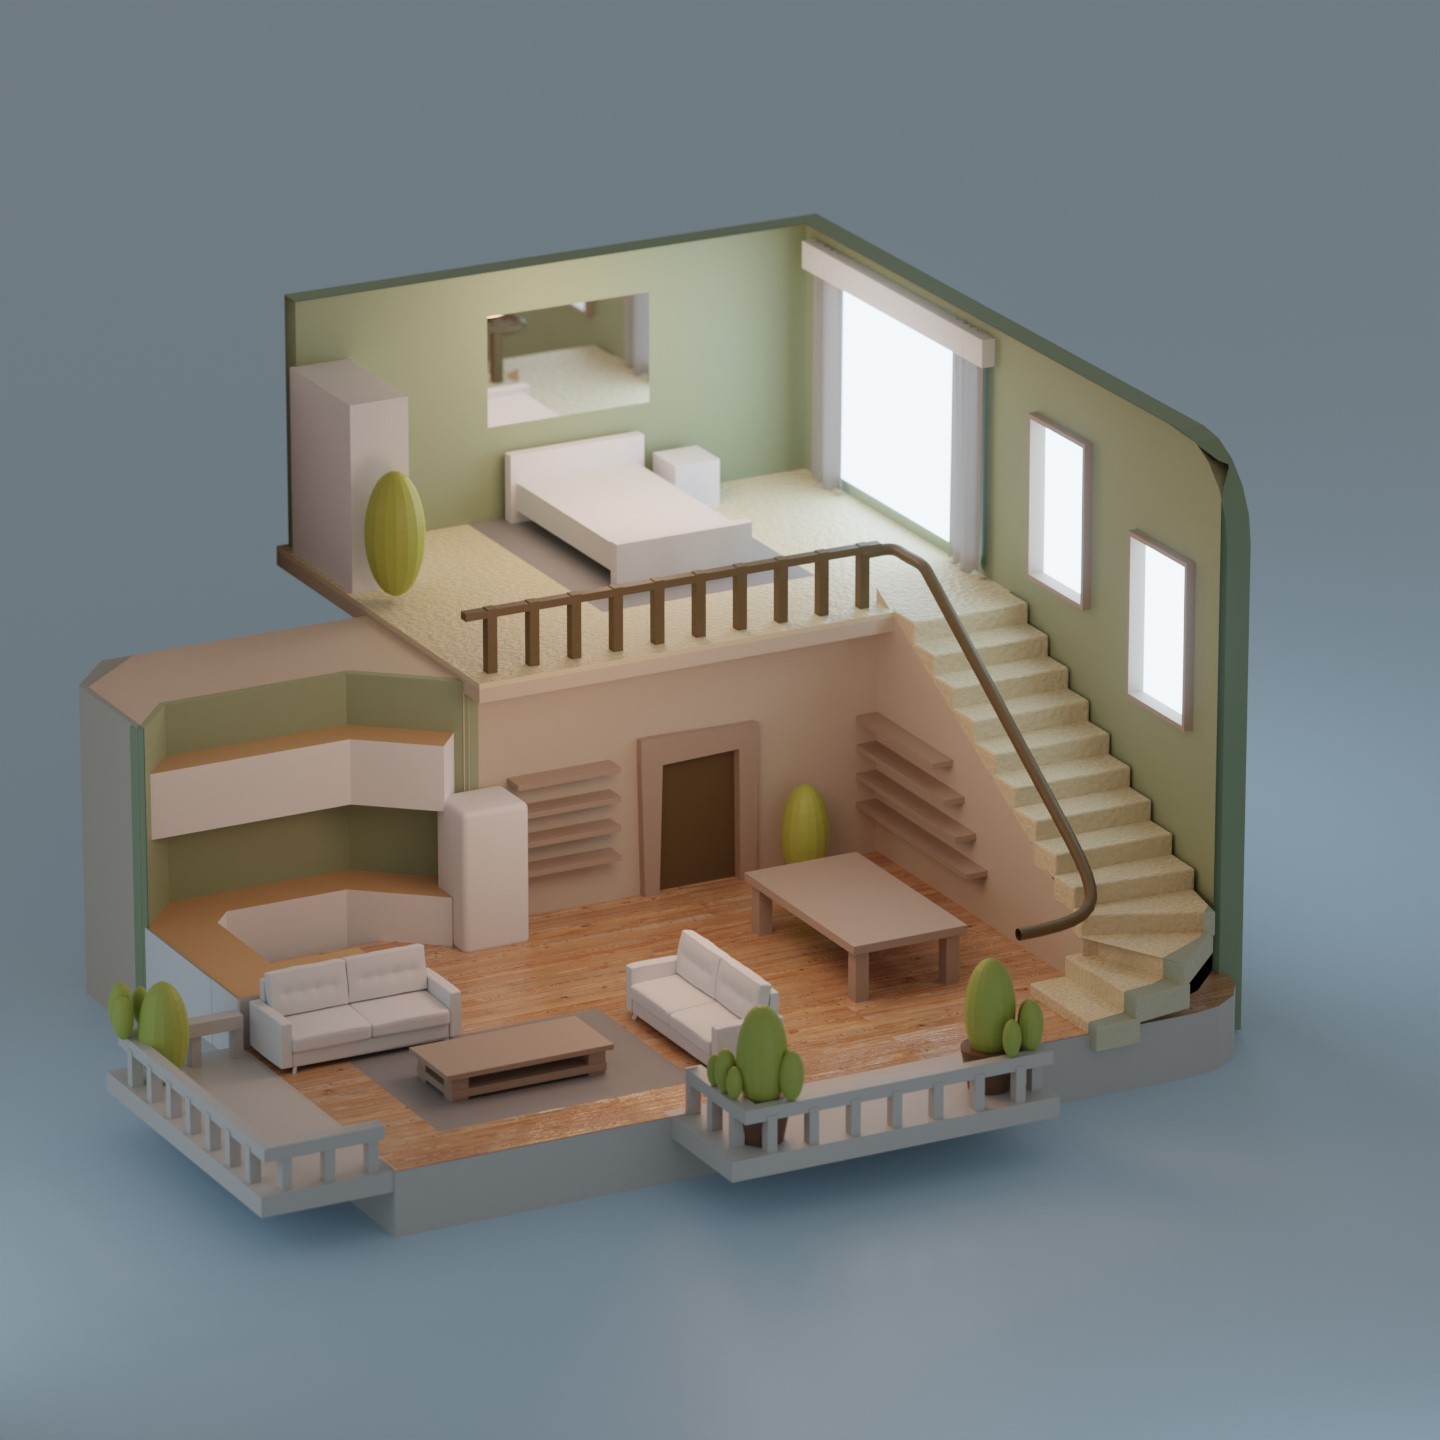
After making this first draft, I left this to pursue other things. I revisited this about 6 months later, building up the scene more, adding more colors, more plants, and some basic details. Essentially blocking out what would be seen as large detail elements. For this, it’s just as simple as adding in primitive shapes, giving them a base color and for now, calling that done. I find it very hard to not be too detail-oriented at the start and it’s important to take note of where you are with the process of creation. Too often I’ve zoomed in and fully modeled a tiny element before deciding I’ve actually changed my mind!
I’ve never tried to balance the colors and tones of a whole living space before. It’s so much harder than you’d imagine—even just with this simple example! I have a lot more respect for interior designers after this.
Making a balcony
The wonderful thing about Blender and wider 3D work is that you get to dig as deep as you want to in so many areas, like architecture, lighting, room design, properties of materials and too many more to list. It just all depends on what project you decide to take on!
Often the choice of positions of things even at this stage are visible right in the final work. This is why making the creative decisions about the high mid and low densities of detail is so crucial to nail down early. Otherwise, it can quickly become a mess of different ideas you can try for hours to tie together.
I decided at this point to fully build on the idea of having a balcony allowing me to incorporate a subtle sense of height into the image. I knew, based on looking at other artists I like, that many people do these isometric rooms but there’s less that builds the environment into the scene—I knew this was something I wanted. This is what it looked like then:

Lighting
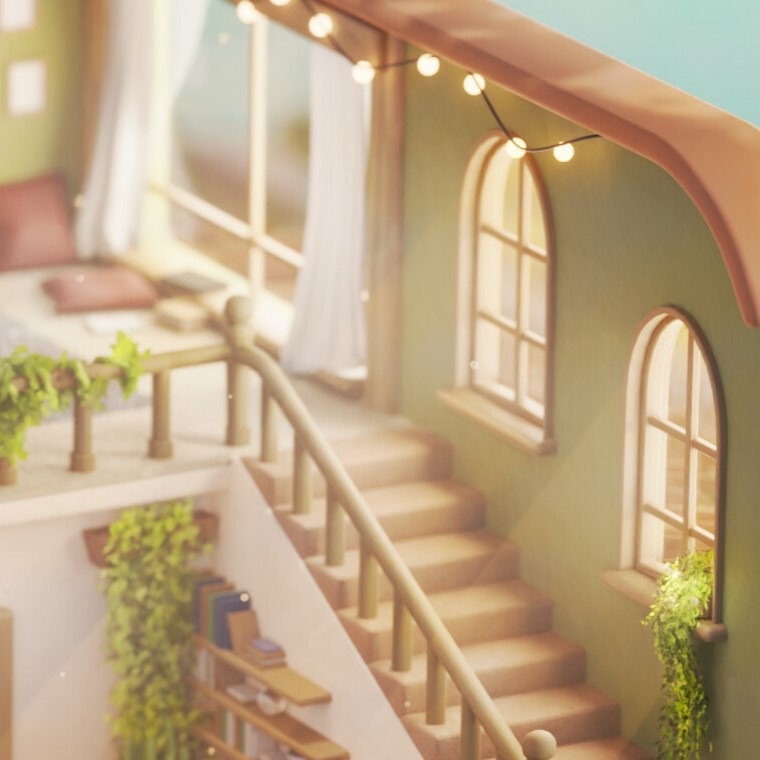
I really wanted to get that soft lighting from the window cascading down into the space. While doing this, it was also important for me to allow the cutout of the room to look inviting. Getting these two to balance with each other was hard, but that’s it. Making a cozy space is about making it feel small and comfortable like a cardboard box for a cat, but with this open space it could easily feel too open to the outside.
I put a lot of focus into balancing these two aspects of what I wanted to make. I feel in a lot of artwork, lighting is so crucial to the feeling you want to bring to your images. With just lighting alone, you can make a place warm, comforting, and safe. Or, on the other side, imbued with mind-bending madness and everywhere in between. I feel that getting a good understanding of lights and how they interact with each other to tell a story can make or break a 3D artist. Fundamentals all the way through, for any discipline of art you choose.

Having felt confident that I’d nailed the concept of the idea, I relaxed and put this in a folder and got on with client work. As any budding artist knows, there is a dynamic relationship with client work and personal work. Bread and butter, I needed to eat—client work it was. About a year later, I was traveling in Greece and I had more time for my own work. I felt a sudden urge to complete and finish this idea. I mean, I’m literally in the landscape! And so as the obsession began, now we get into the fun parts!
Post-processing
I added some nice post-processing—darkening the edges, as well as some glare for the windows. I also added some volumetrics, a subtle fog, in the house to give a greater sense of depth and atmosphere. As you can see, this adds a lot to the image. It’s easy to litter a space with lots of details but to bring in this feeling really goes a long way. This is one half of it, the other half is filling in the gaps.
I was originally going for a house literally sitting on blueprint graph paper. I later went on to abandon this idea opting for the more isometric perspective (often used in architectural visualization) of the whole scene to tie the name and image together. Although a big choice and change to make as the image progressed, ultimately it was the right decision. This allowed me to put so much more detail and interest into the scene with the final lush green foliage and idyllic backdrop.
Adding foliage
That switch in ideas from blueprint surroundings to fully making an environment was brought on by expanding these plants and grass from the house, outwards. I realized that I actually want to make this a full place, and not just set the house in an unfamiliar setting that might not be clear right away.
The choice was also made to veer away from the original reference with this being a penthouse apartment in a city. I’ve learned to accept my choice over the last few years to love nature. I’m an introvert, I love my spaces, I love plants, and peace: this is my dream house. And gosh, I won’t have anything like reasoning (or not having a toilet for aesthetic purposes) to tell me otherwise!

Vines, plants, and further details. So much of the process, especially with something as tangibly fun as this, is just about experimentation. Go ahead make the fridge the size of a moose, doesn’t do anything for you? Okay move on. These sorts of things.
Adding more models and details
I knew I wanted a cozy reading space in the bedroom to wrap up with a book on rainy days, as well as an entrance at the front to allow the viewer to step into the image. A workspace for me was important too. Wherever I travel as a nomadic artist, finding a good place to work is such an important part. You can see this as a pivot point and a sense of stillness in the ever-changing world around you. Portraying this space in the image was really important for me, even if it’s just a laptop on a table with a glass of wine. This is also why my laptop is named Calcifer, a fictional fire spirit from the film Howl’s Moving Castle. He is the spirit that keeps the furnaces burning and powers the moving castle. I’m sure I don’t need to point out the symbolism here!
I will ruin this for myself because I like to add little things into my work that only I will notice or care about. The awesome thing about being an artist is that you can create everything you do with a signature “youness”—making your art so much more unique and personal. If you also want to look at this from a business perspective too, nobody else can replicate that. The more you show yourself that you hold value, the more people will be interested in commissioning you for this aspect of your work. Then you’re just flying as an artist.
At this point, I added details such as:
- Red wine to the tables, because that’s what I was drinking when I thought it was a good idea.
- On the main coffee table, Calcifer, my laptop.
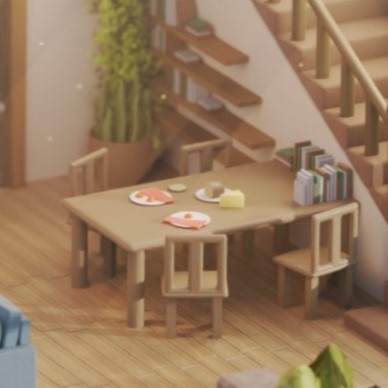
- The food on the table as well as in the frying pan—bacon, eggs, bread and cheese, served in the same way as in Howl’s Moving Castle.
- The red toaster in the kitchen, from one of my earlier art pieces called “Fresh Toast.”


Making the surroundings
As you can see, a lot of this process is just playing the sims. You’re building a house that you like, and if you know the tools (Blender), the rest is just like decorating your own living room. This thought reminds me of a quote that goes along the lines that once you’ve learnt the tools of your craft and become one with you, then the disconnection melts away and you can just play. There’s a fine delicate balance to be played—yes, you can stuff every nook and cranny with things, but while there is a place for this, I also hold a deep value for artistic and personal minimalism. I convey this here too. Do you really need that bookshelf of a million books, a thousand Hello Kitty plushies, photos adorning every section of the bare wall? There is a place for all of this but where is this space dialed to? You can keep that consistency.

I further developed the inside of the house and fully created the surroundings, adding basic trees, bushes, and grass. I made it a focus to keep these simple to not detract attention away from the point of the image, which is so easy to do. A great element of creating scenes like this is you can really bump that depth of field right up and get that beautiful out-of-focus background. This can give it that almost miniature-esque look which often leads to finding things cute.
Adding a lot of green naturalness to the scene was important for me—I didn’t want this to look soulless, clinical, and lacking in spirit. This was the main motive behind adding this scenery around the house. Lived in, natural, and homely.
Refining the artwork
So much of this work can be boiled down to understanding what makes something beautiful, seeing that and knowing how to make it that way. This makes seeing through the eyes of what is beautiful quite possibly the most important skill you’ll be able to look at as an artist. Finding yourself out in the world, pointing something out, and being able to have the vocabulary to express and identify why you find this particularly interesting. The world is a playground of sight and perspective. The moment you break out and start to hold any power to the way you see things is the same moment you will start to wonder just how much we can get out of our mere senses, available to us at any point in time.
I also added roof tiles above the kitchen, as well as above the small porch to the right of the house—a small touch, but that terracotta… she can terracotta me if you catch my drift.

Ultimately, we have the final piece! I implemented a gobo at this point too, which surprisingly is not a species from Lord of the Rings but a light texture. This gives your lights a more speckled look with darker and brighter points—think sunshine filtering through trees. Not many lights in the real world are as simple as just a source with a flat value. You can see this most clearly on the very top of the building, but more subtly throughout the whole space.
The polishing stage always takes such a long time! It takes me so many small changes, going back, shifting something slightly, re-rendering, until I’m entirely satisfied with how it looks. By which point I am either vibrating with caffeination, it’s mid-day, and I haven’t slept, or I am just utterly delighted to call it done and go for a walk. Sometimes it’s a combination of all three.
Details added in the final version
The way I allow myself to call something complete is I go through many different iterations and with each one, I write down a long handwritten list of changes and improvements to make. I’m only happy to say something is finished when I can look at it for a while and see nothing I would add, remove, or change. This is the most fun part everytime! Taking it from the space of getting near the idea and just seeing a bunch of issues to tackle till I see exactly what I imagined at the start of the project.
Some interesting things to note with the final version is:
- I added Lola, a cat I used to live with, sitting on the sofa. For this, I took a top down photo of her and just projected it on to a vaguely cat shaped object.
- Highlighting the light coming down from the windows by giving them a hard edge as well as adding in a particle simulation with non-descript particles in the air that just adds to the ambiance in a way it’s hard to express.
- Adding a subtle desaturation of the colors as you go towards the edges of the picture, alongwith the vignette and depth of field which add to that “leading you into the picture” effect.
- I used subsurface scattering, typically only used for things like skin and wax, for the soft furnishings in the house. This might be unrealistic but even just a touch really brings up that soft, comfy look of things like the sofas and bedding where you could just collapse into them and let them envelop you.
- Adding in a writing desk into the bedroom with an early version of a plant I forgot to swap out because I missed it (classic).
- Finally, I added a stone Buddah statue of mine on the table, because of my interests in Buddhism.


Luckily, with this, it was quite a simple scene with not too many complex materials or volumetric effects. Something I come up against too often is the complexity of the scene which really slows me down. All of this is done on a laptop so I can travel, but it’s hugely restrictive of the rendering and viewport power I can use. When I live in a house like this, believe me, I’ll spend an abhorrent amount of money nerding out on a desktop and buying those thousand Sanrio plushies.
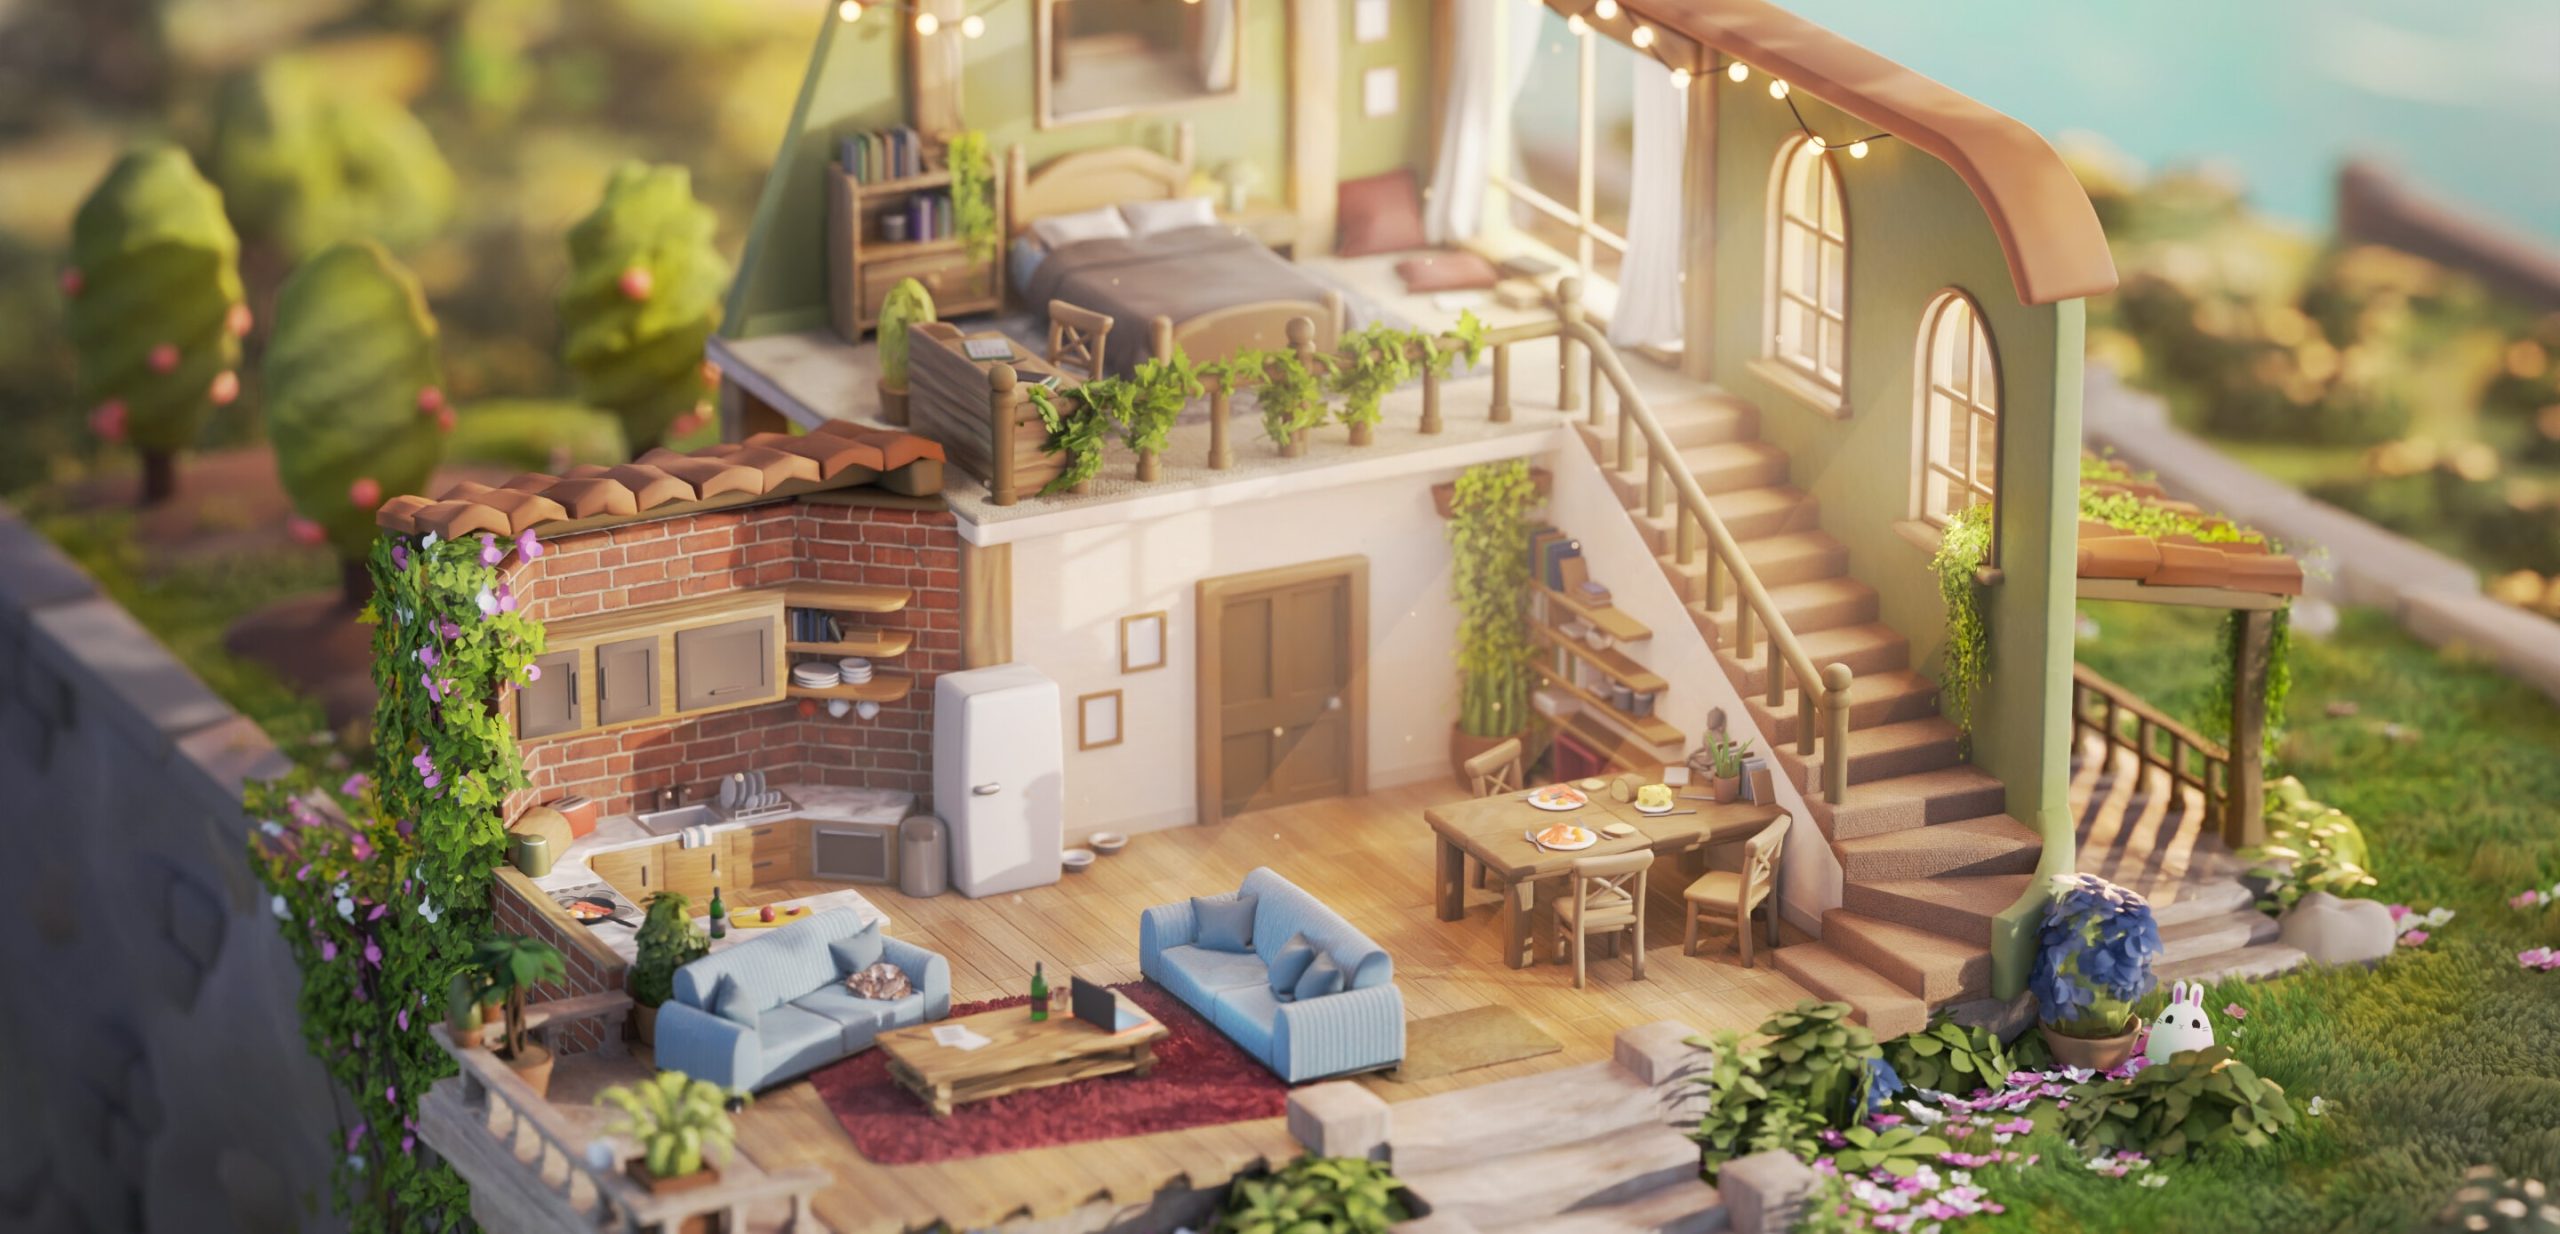
RENDER – Blueprint of a Home
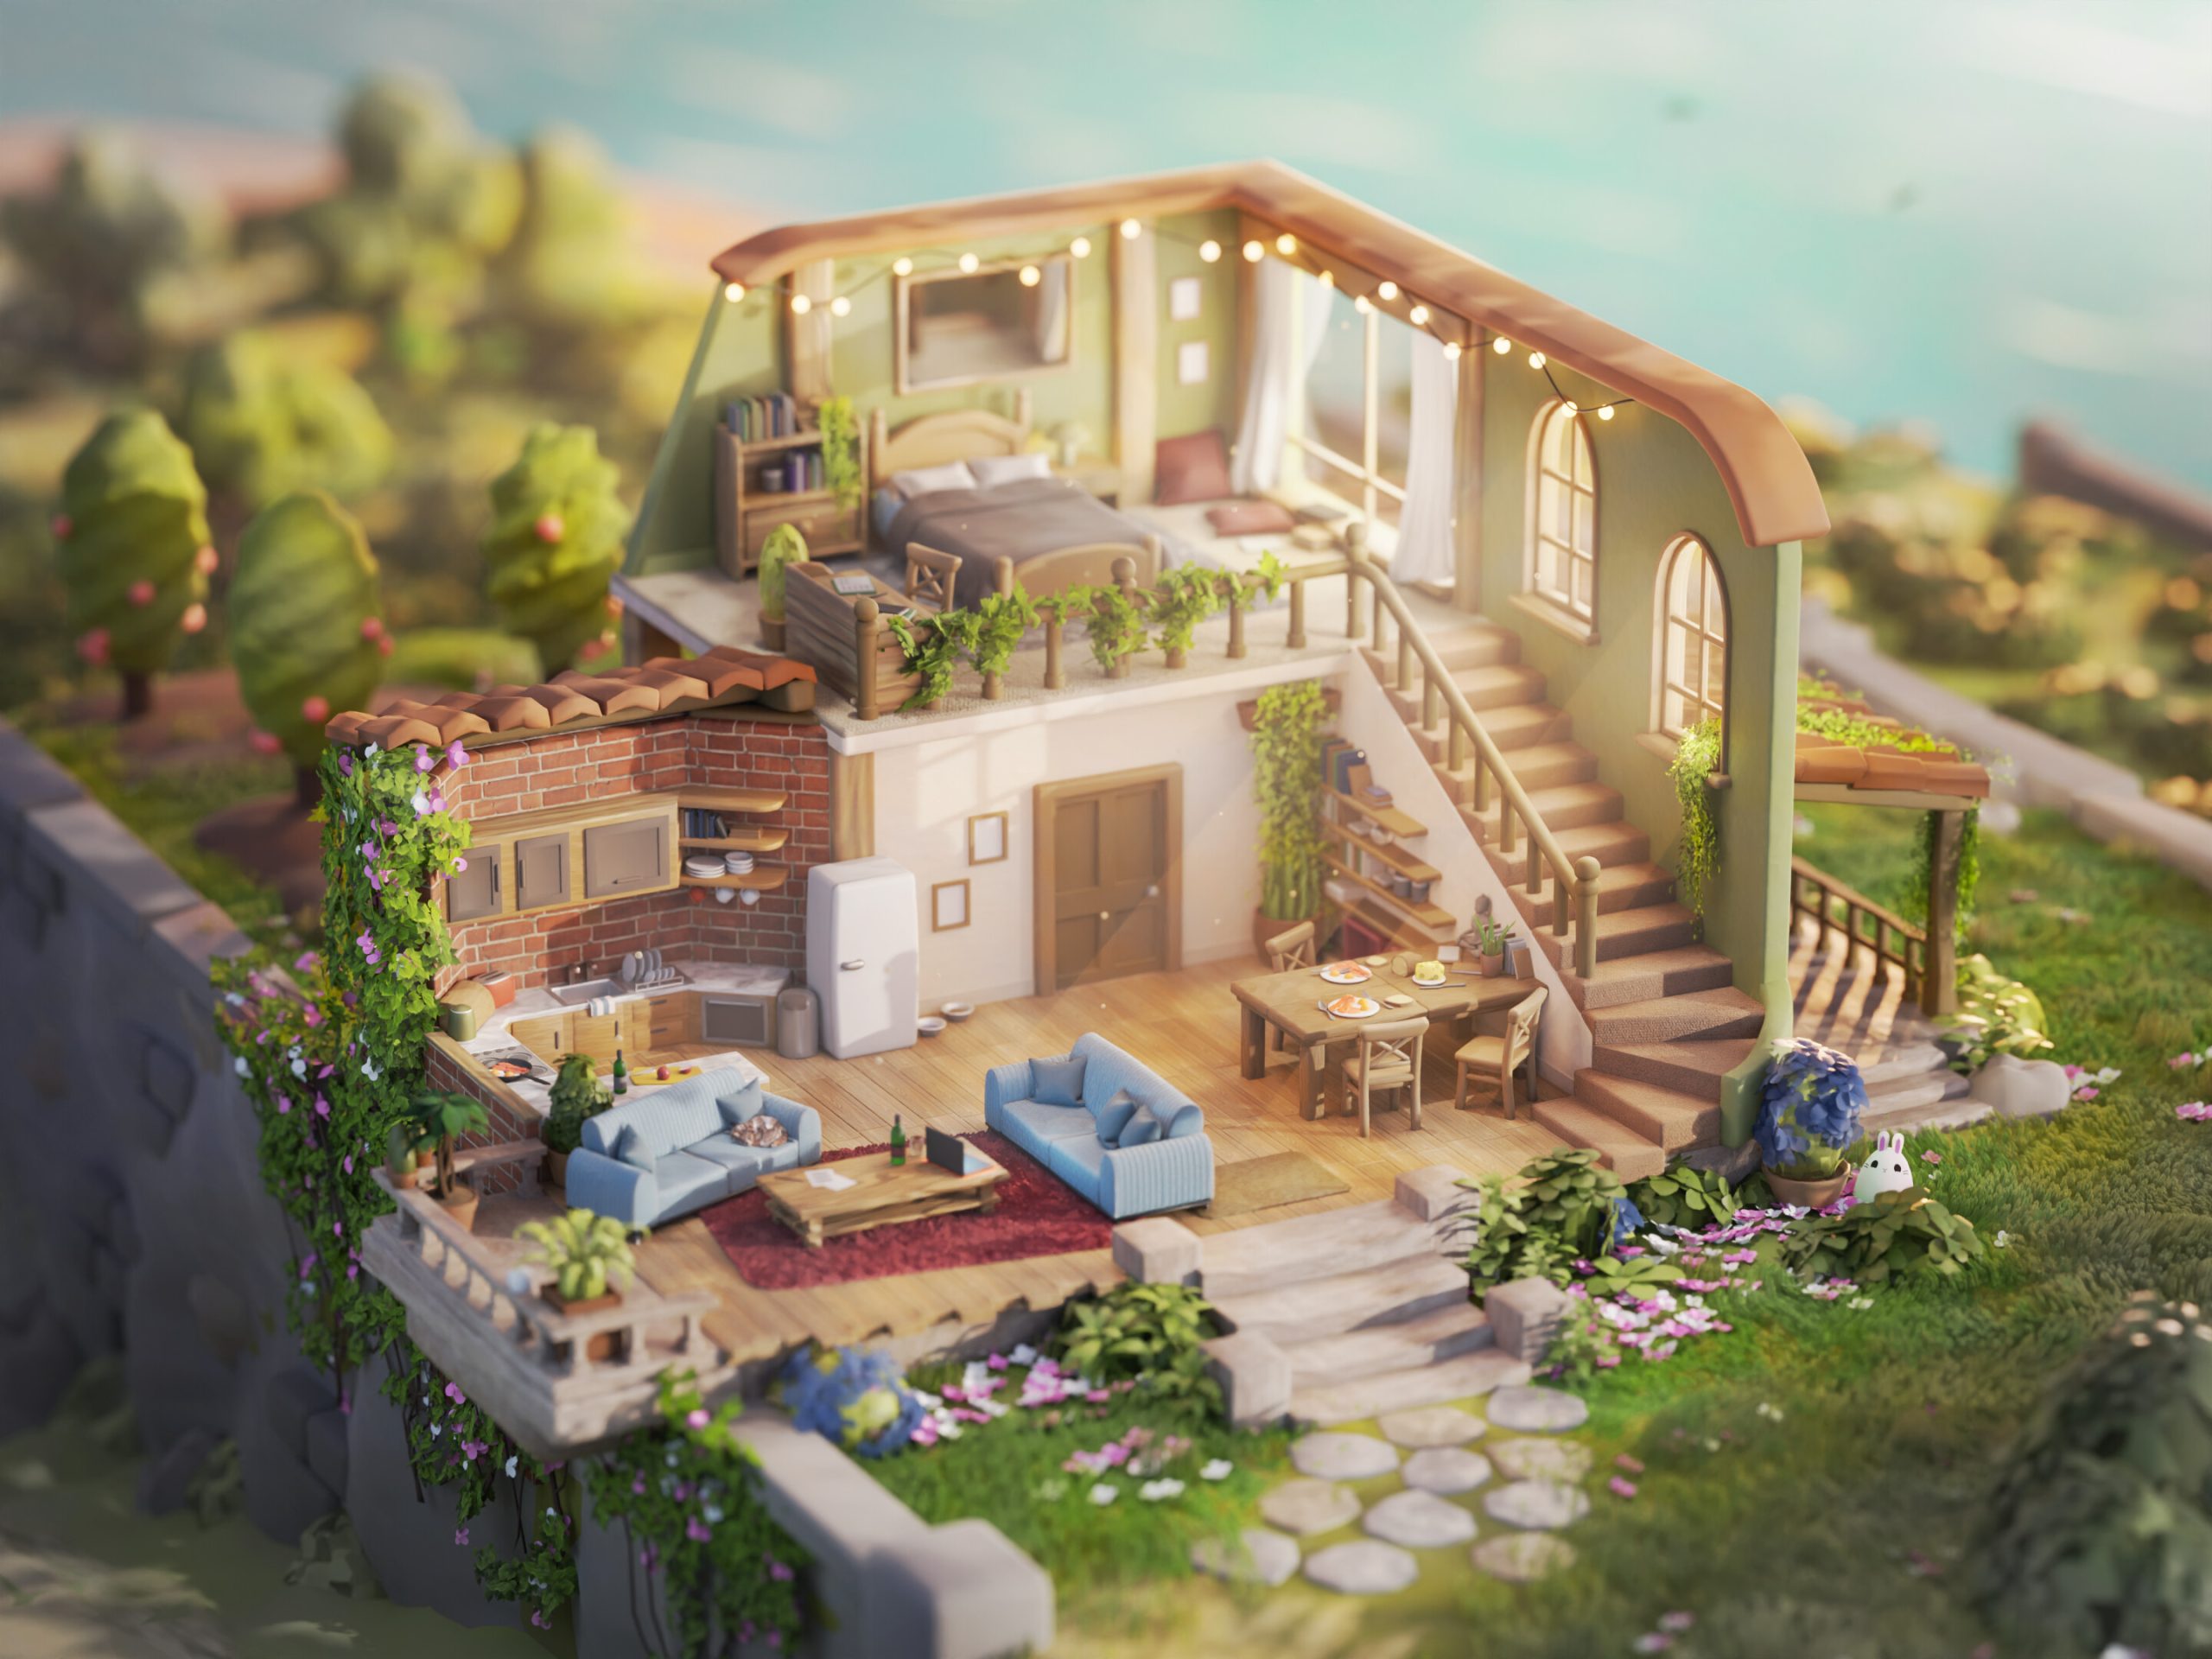


As you can see from reading this, it was a very personal piece for me. I just loved making it! It brings me right back to sneaking downstairs late at night, making hot chocolate and playing Sims all night while my parents were asleep. But this time, I’m allowed! I just love the look of these tiny spaces and houses, and showing you the layout of a life and a home. I finished this on my 22nd birthday on a windy balcony, living in a completely abandoned hotel on the Greek coast. Making all these different objects and bringing them together in a way that looks nice is ultimately the base practice of this project, and I’ve been delighted to write about the creation process of this!
I’m now going off for a swim in the sea, and maybe if I’m lucky, I’ll find the next piece of inspiration hiding in between the waves!
I hope this was somewhat insightful on how to make something like this for yourself. Thank you very much for reading! I wish you all the best on the journey you’re on. Keep on exploring, and keep on creating!
About the Artist
Jamie is a nomadic 3D artist who has turned a passion for Blender into a thriving profession. Currently he is working in France and soon heading to Cyprus for a summer campsite gig.


