paddywwoof writes:
This post is a copy-paste from chapter 12 of my book get-into-blender.com so it builds on top of lots of familiarity with the nuts and bolts of Blender learned over the previous 240 pages. However I think that it stands on its own as a useful walk-through showing how to add constraints into an existing animation. You can download a version of the book with a few pages removed (but none from this section) for free.
The video for this section of the chapter is below:
The exercise starts with an animated character that you will need to download from Adobe. You need to register so you have an account then select character "Lola B Styperek" and animation "Climbing up Wall". Use the default options to download as a binary .FBX
...For the third exercise of this chapter you are going to take the two characters you downloaded from Mixamo and use their animations in a creative way. The first problem is to stop Lola’s hands from moving while they should be gripping a hold, which you can do using an IK constraint. You then need to apply the climbing up the wall animation to the peasant man, and when they both reach to top of the wall you need to apply the salsa dancing animation to Lola so the two characters can celebrate together. You will use the wall factory add-on to build the
castle walls and a cloth simulation to create a rope.
1. Save the last exercise and start a new scene. Delete the start cube then import the .fbx file of Lola climbing a wall which you downloaded for Chapter 6. Add two empty objects to the scene and rename them left_hold and right_hold.
Making Hands and Feet Stick
2. You now need to find where would be a good place to fix the holds. Run the animation one frame at a time by pressing RIGHT, and when the left hand looks to be latching onto a hold move the empty up so it lines up with the tip of the hand bone. You will need to change the Viewport Display option for the armature to In Front in order to see all the bones. Use orthographic view from the side and the front to help position the empties. As you move the animation on, the hand will slide slightly but that’s the point of doing this exercise so don’t worry.
3. You will add an IK constraint for each hand to make them stick to each of the holds, and you will animate the strength of the constraint from 0.0, a few frames before the hand lands on the hold, to 1.0 at the start of holding on, then 1.0 at the end of holding on, to 0.0 at the end of letting go. Because the animation loops very nicely, the constraint for both hands should be 0.0 for the first frame and the last frame, otherwise there will be a discontinuity in the hand positions. Move back to the first frame, select the armature, switch to Pose mode and select the right hand bone. In the Bone Constraints Properties tab select Inverse Kinematics then set the Target to right_hand and Chain Length to 4. The right hand is actually on the hold in the first frame but set the Influence to 0.0 and add a keyframe, move forward three frames, set the Influence to 1.0 and add the next keyframe. The frame to start letting go is when the left hand starts to curl over its hold. Move forward to that frame and insert another keyframe with Influence still at 1.0 then allow the motion to blend smoothly into the animation by setting the Influence to 0.0 ten frames later. Figure 12-6 shows the sequence of keyframes.
4. Repeat the procedure for the left hand. The first keyframe should be for Influence 0.0 ten frames before the hand reaches the hold and, at the end of the loop the influence should drop smoothly to 0.0 again by the last frame. When you run the animation the hands should stay in place once they’re grasping a hold.
Ideally the animation would last for several loops, to allow you to record a few seconds of continuous climbing, and you can probably see one way to do that. It would be quite easy to copy and paste all the keyframes so they were repeated a number of times, then in the Graph Editor, increase the values of the Z component of the armature root bone so that the second loop continued from the end of the first, and the third continued from the second. However there are deficiencies with that technique, the first one being that the empty objects controlling the IK constraints would have to be moved up at the end of each loop. The second problem is more practical, where you are using a short animation repeated many times, for instance the legs of a bug scurrying along, it becomes very hard to manage a scheme based on copying and
pasting.
Baking Constraints to an Animation
The best solution is to bake the animation, including the IK constraints, into a series of posed positions, which is essentially the form of the animation imported in the .fbx file. Blender then gives you the option of creating an action from the animation, which you can can use to make a strip to repeat multiple times. You can also apply the action to other armatures, so long as they have the same bones.
5. To bake the animation, select the armature and enter Pose mode. Select all the bones then from the menu click Pose->Animation->Bake Action and tick the four check-boxes Only Selected Bones, Visual Keying, Clear Constraints and Overwrite Current Action. If you don’t tick the last option, you
will preserve the animation imported with the .fbx, and Blender will generate a second action with the generic name “Action”, “Action.001” and so on. This might be useful if you were going to make different versions of the animation, each requiring tweaking, but in this case it will be fine to just overwrite it. Bake Data should default to Pose but make sure the Start Frame and End Frame are correct, then click OK.
6. After a pause the keyframes should have been overwritten and, when you run the animation, it should look no different. However if you check in the Bone Constraints Properties tab with either hand bone selected you will see that the IK constraints have gone and the two empty objects can now be deleted. If you select both of the hand bones and look in the Timeline area you will see that the two channels of keyframes are still there, but underlined in red to show there is an error.
Delete each of the lines.
The Dope Sheet and Nonlinear Animation
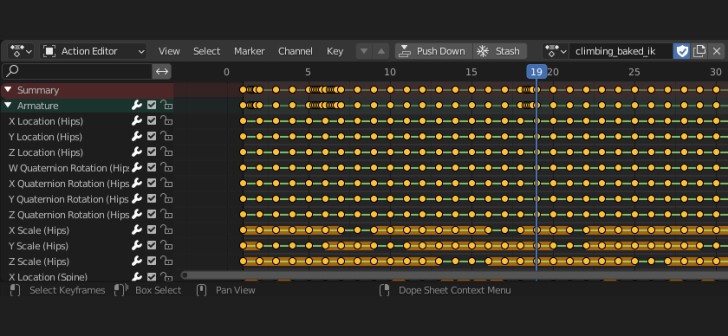
7. There are two more editor types that you will need to use for more complicated animations. The first one to look at is the Dope Sheet which allows you to see keyframe positions for a variety of different types. Change the area at the bottom from Timeline to Dope Sheet, then change the Editing context drop-down from Dope Sheet to Action Editor. As shown in Figure 12-7. At the top of the area some options have appeared; Push Down, Stash and a drop-down to Browse Action to be linked to the object. At the moment there is just one action, but now is a good time to rename it to climbing_baked_ik. When you import the Peasant Man .fbx there will be another action and this is where you will be able to swap them, to make the Peasant Man climb and to make Lola dance.
8. In order to make an action strip which can be repeated a number of times change the editor type to Nonlinear Animation. This view has a different section for each animated object in the scene, and each section has a list of actions in orange, for this scene there is just one object and one action. On the left of Figure 12-8 you can see that there is a button; Push Down Action that will convert the action to a strip as shown on the right of Figure 12-8, press that now for the climbing_baked_ik action.
9. The bright orange block can now be moved, split, duplicated and generally used for building more complicated animations. The idea is that other animations can be overlaid on the basic one. As an example, you could make a short animation of just the neck and head to make Lola look over her shoulder for a fraction of a second and if you placed that strip above the climbing it would override the default climbing animation, just for those bones. If there were face bones, or shape keys available you could then make Lola’s face either smile, or grimace in horror, as a third layer of composition. The potential, and complexity, of this animation editing facility is enormous but, for now, you simply need to duplicate the existing strip twice using the RMB context menu. The copies will be placed in a new track above the existing one so drag them down so they are all in a line and delete the newly created, but now empty, tracks by clicking the track name on the left and pressing DELETE.
Animating Parent Objects
10. If you now change to the Timeline view and increase the End frame so you can see all three strips playing you can see that you still need to correct the start position for the second and third strips. The tidiest way to do this is to have one empty object that can be moved around the scene to provide the start location for the animation, and a second empty that will move up by the correct distance at the end of the first and second cycles. Create two empty objects and rename them lola_start and cycle_start. Select first the armature object then the cycle_start object and hit Object->Parent->Object, then, in a similar way parent the cycle_start object to the lola_start object.
11. In the Timeline move to the last frame of the first animation cycle and with the cycle_start object selected add a keyframe for its location by pressing I with the cursor over the 3D Viewport. Use the orthographic view from the side and zoom in so Lola’s head is about half the height of the screen, then pan the view so the tip of Lola’s nose is exactly in line with the top edge of the window. Move forward one frame then move the cycle_start in the Z direction until Lola’s nose is in the exact spot it was at the end of the previous cycle. Add a location keyframe for the cycle_start here. Repeat the process at the end of the second cycle, adding a keyframe in the same location, and on the next frame a location that keeps her nose in the correct place. Now you can move the lola_start empty to different locations on the castle walls and she will climb there.


