
A texel density walkthrough for Blender artists
If you’ve ever played video games and appreciated the level of consistency in detail (or even noticed a lack thereof) among the 3D elements around your point of view as you traversed the game world, you have experienced the good (or bad) application of a concept known as texel density. Texel density refers to the number of texture pixels (texels) per unit of 3D surface area. To create a sense that the various props and sets belong to the same world, 3D artists must maintain a consistent texel density across all the 3D models.
For video games, texel density is particularly important because it directly affects both the immersion of the players and the performance of the game engine. A lower texel density can improve game performance but at the cost of lower texture quality, while a higher texel density can improve texture quality but can negatively impact game performance.
When creating 3D renders as stills or animations, managing texel density is just as important for the same reasons, and in this article, we’ll take a closer look at how to think about texel density as it relates to creating 3D scenes in general, and how to do it in Blender using a great addon by Ivan Vostrikov.
An intuitive understanding of texel density
Let’s have a look at these rock models:

Something doesn’t feel right, does it? If we take a closer look, we can see that the smallest rock has very crisp textures, while the largest rock’s textures are blurred, and the remaining rock is at an awkward middle. These rocks all share a single UV space, but the sizes of their UV shells don’t reflect their actual size in the virtual space they occupy.


By resizing the UV shells of each rock in accordance with its size, we’ll get a more consistent level of fidelity across all three. We can do this by applying a checker texture on the models and resizing the shells until the checker tiles on all rocks are the same size.


That, in the most basic terms, is texel density. While the texel density of any given object or surface is an absolute value, the real importance lies in how proportionate the densities of surrounding objects are to it. To illustrate, let’s say we were preparing to create a render based on an image we found on Pinterest:

Texel density in scene creation
As we make our plans, it would benefit us later on to determine what texel density to work with as early as now. For this image, the ground could serve as a good starting point since it’s relatively close to where the camera would be. Let’s start by creating a plane with a checker map texture 4096 x 4096 pixels in size:

The texture detail at this size and camera range seems sufficient, so let’s go with it! Now that we have a point of reference, we would start creating our models and unwrapping them. Let’s assume that’s over and done with.
Here’s our scene at this point:

For this article, we’ll be working with the foreground elements and the characters’ clothing, but we’ll save the mountains and the characters themselves for a future article about UDIMs. Stay tuned!
We could approximate the texel density for each of the elements based on our checker mapped ground plane, but that would be tedious and thanks to the work of Ivan Vostrikov, unnecessary! Instead, we’ll use his handy Texel Density Checker addon, which is available for free, but certainly worth leaving a donation for!

Let’s pull up the addon from within our UV Editor:

We have our ground plane’s UV shell occupying the entire UV grid, and we know our checker texture has a 4K resolution, so we’ll set our Texture size accordingly and (arbitrarily) have our units at pixels per meter.
By hitting “Calculate TD” we can see that our shell occupies almost 100 percent of the 0-1 grid, and has a density of 524.665 px/m. Let’s hit “ Calc-> Set Value” to establish this value as the point of reference for our other UVs:

Now if we select any other unwrapped mesh, we can use the “Set My TD” button to scale the UV shells or islands in proportion to the reference value.

Starting with the tent flaps, let’s select all the islands in the UV Editor and choose “Average” for the “Set Method” field in the texel density checker panel. Choosing average will scale all of the selected islands proportionally to the value that was set.

Let’s do the same for the tent poles.


Since the poles are much smaller compared to the ground, the islands have shrunk correspondingly, and we’re now left with a lot of empty space in the UV Grid, which would be a waste of texture space. Here are some ways we can optimize things:
1. Change Texture Size
If we wanted a dedicated set of textures to this mesh, we could reduce the texture size.

By changing the Texture Size from 4096 to 2048 and hitting “Set My TD” again, we can make use of more texture space.
2. Set Custom Texture Size
A size of 1024 would have been ideal, but the islands were just a little too big for the grid. We could set a custom size to get around this, but that would mean having to work around any unpredictable tiling during our texturing phase.

3. Share UV Grid with other models.
Sharing the UV Grid with other meshes is the optimal way to maximize texture space and reduce the amount of maps your render engine will have to compute during rendering. This makes the project file lighter and render faster, though by how much depends on the number of models in the scene that use image textures. If we were to animate this scene and use an online render farm to render out frames, this method would help immensely in driving down expenses.
The downside of this approach however, is that texturing each mesh that shares this UV grid will require more manoeuvring in our texturing application, especially if the meshes are meant to have different surface characteristics.
In any case, we’ll use this tactic for our demonstration.
A note about UV layout
When using Texel Density Checker, there can be instances where setting the texel density on multiple islands at once leads to overlapping UVs. A workaround for this is as follows:

Use Blender’s annotate tool to mark the length of a shell. Then use the Pack Islands operation to ensure that everything is laid out well.

After, simply scale the islands down until the shell you used as reference aligns with your mark.

For the sake of brevity, let’s have a look at the final UV layouts for all the objects that were achieved using the steps outlined so far, (with a few changes here and there to some seams in meshes for better layout).


Here is a density check for the render:
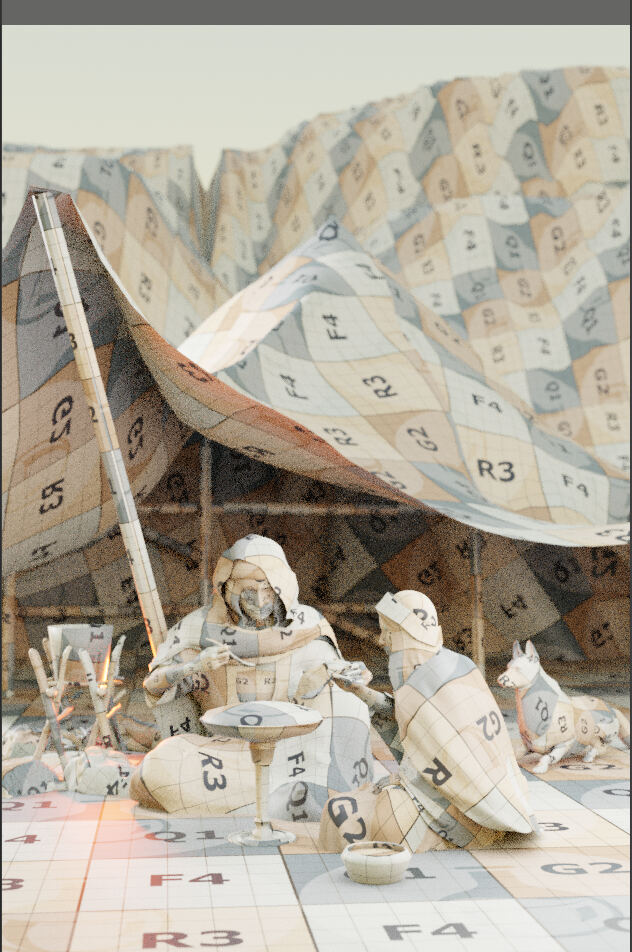
Every element that we worked on in the shot has a consistent Texel Density!
And here’s an initial render to serve as our work in progress:

Parting words
While the concept of texel density is more frequently discussed among game artists, hopefully this article has shown how essential it is for 3D rendering in general, as well as how to start incorporating it into your practice in Blender. Keep in mind however, that outside of creating assets for games there are much less technical constraints imposed upon you, and so the age-old wisdom of “if it looks good, it IS good” bears remembering. I hope this article was useful to you, and as always, Happy Rendering!
The article was originally published at https://garagefarm.net.


Great article, learned a ton. Always wondered about this stuff, you made it so clear!
Wonderful article!
Thanks for sharing