Behind the Scenes: Helmet
Intro
Hi! My name is Brendan Bottomley. Before I begin, I have to say I’m surprised, honored, and excited to be writing this article for BlenderNation.
I’ve been doing 3D since the 90s, so I consider myself a bit of a grandfather in this industry. In my constant quest to improve my 3D skills, I’ve explored many workflows and programs. Some of the software I’ve used professionally includes Real 3D, LightWave, Softimage, Maya, 3ds Max, and Modo.
With Blender, has my quest finally come to an end?
After working at several different studios such as Sony, THQ, and Atari, I now teach Maya at the Academy of Interactive Entertainment and have plans (don’t tell my boss) to add Blender as an invaluable option to creating industry-standard 3D models. The speed at which Blender allows me to model has literally blown my mind and it seriously leaves Maya in its dust.
There are so many aspects to Blender and its strong vibrant community that are incredible, and I can’t wait to expose my students to it. I love the highly active and evolving addon community. There are so many amazing tools to play with which are constantly being developed and actively supported.
Anyway, that is enough blabbing on…time to share with you guys some of my findings and parts of the workflow I’ll be showing my students.
[sponsor id=’qarnot’]
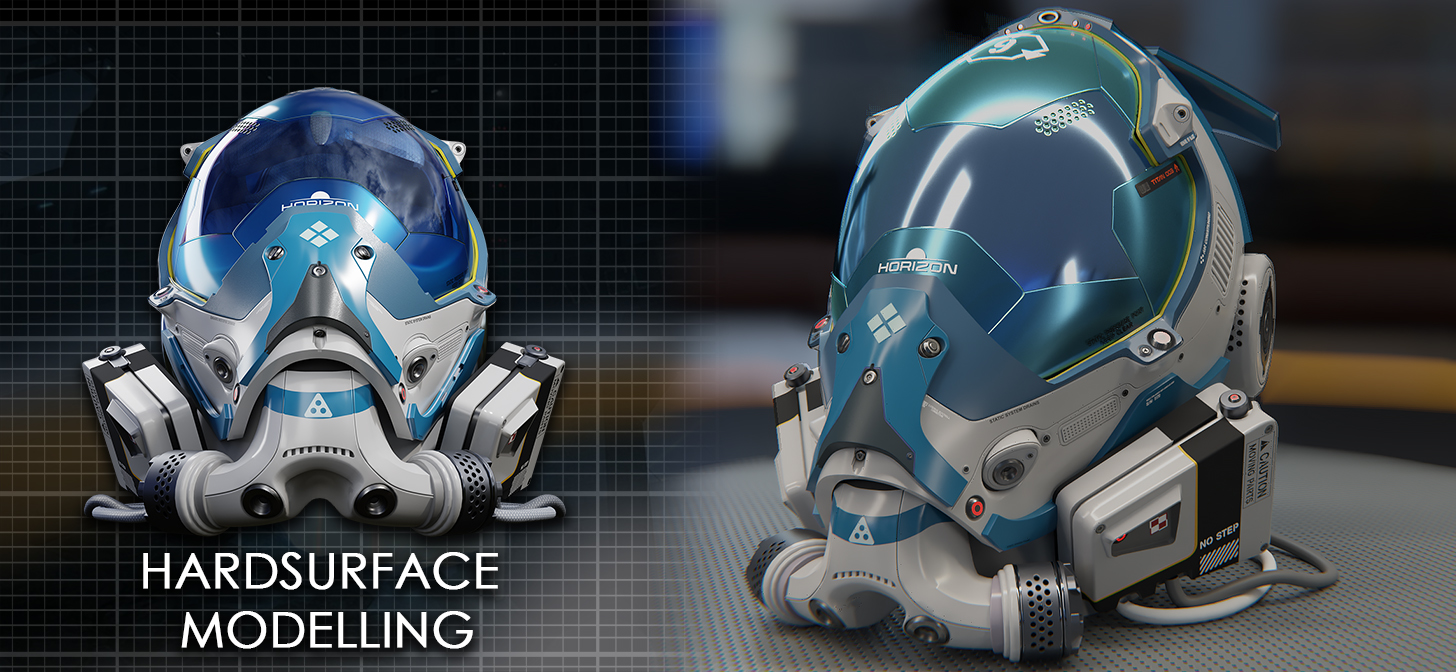
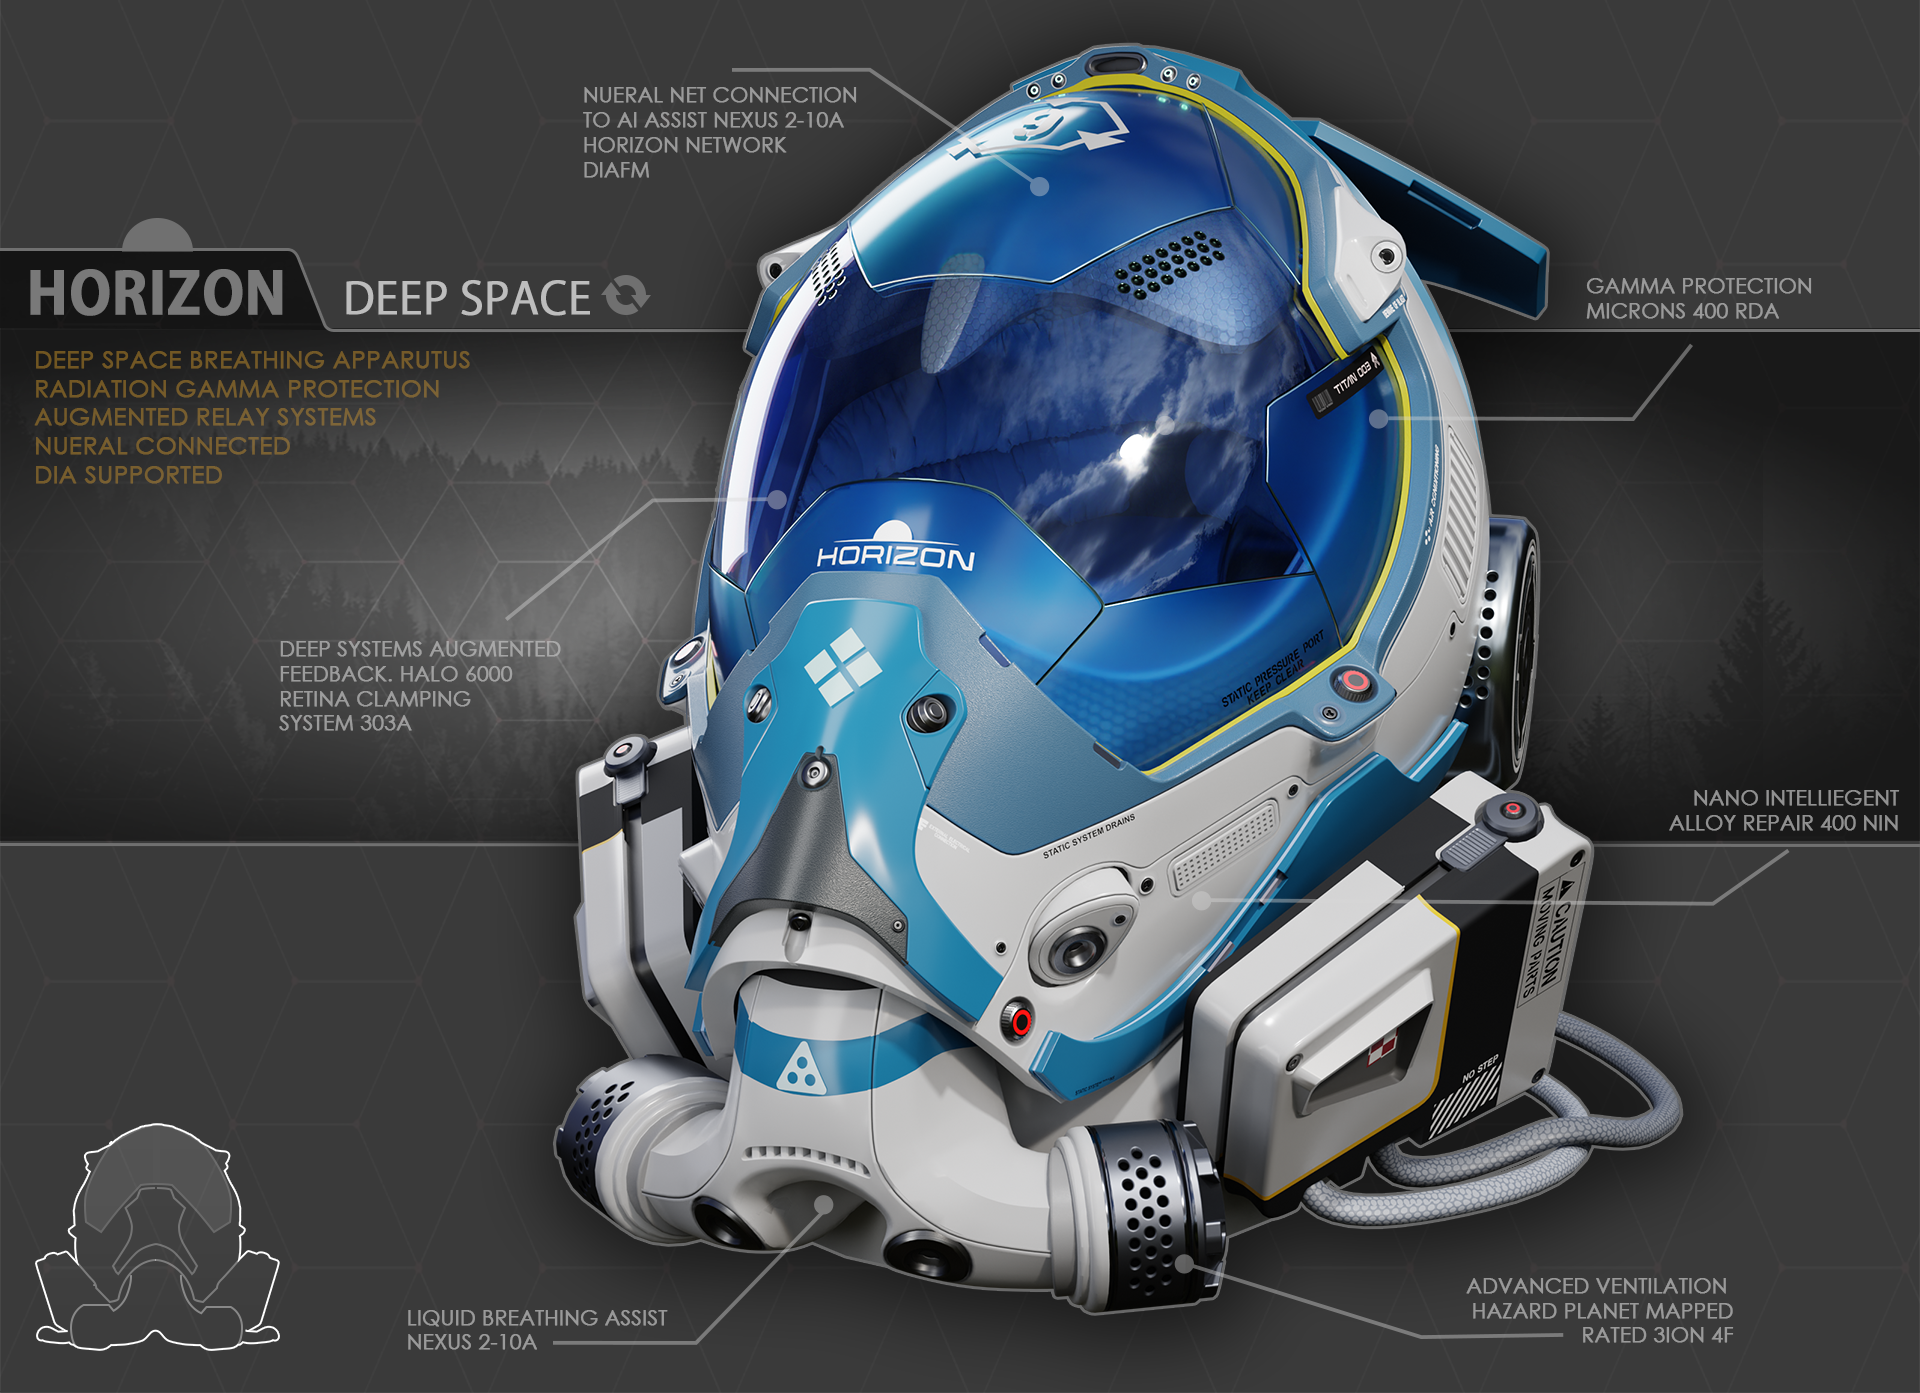
The Helmet
As this was my first full, end-to-end project in Blender, I decided to create a helmet for a few key reasons. Firstly, I’ve always wanted to create an awesome realistic sci-fi object, and secondly, it’s a great challenging object with its overarching organic form intermixed with hard surface shapes and details.
This would be the perfect object to test my skills. I also decided after much research not to work with Blender straight out of the box, so I installed several useful addons to speed up the overall modeling process.
When it comes to designing, speed is critical. If I am spending too much time button clicking, I find this can become a serious distraction from my focus on what I’m trying to achieve to the process of how I’m achieving the end goal.
The addons I used in this project were:
HardOps / Box Cutter These add-ons are essential for speeding up the day to day hard-surface operations and extra functionality not found in the standard tools.
DECALmachine / MESHmachine addons that do the finishing, allow you to add details in no time at all and finish the project to a level unattainable with the standard workflow.
I normally would create a reference board and do several sketches but for this project, I pretty much bypassed that part (don’t tell my students). Although I did Pinterest a couple of helmets.
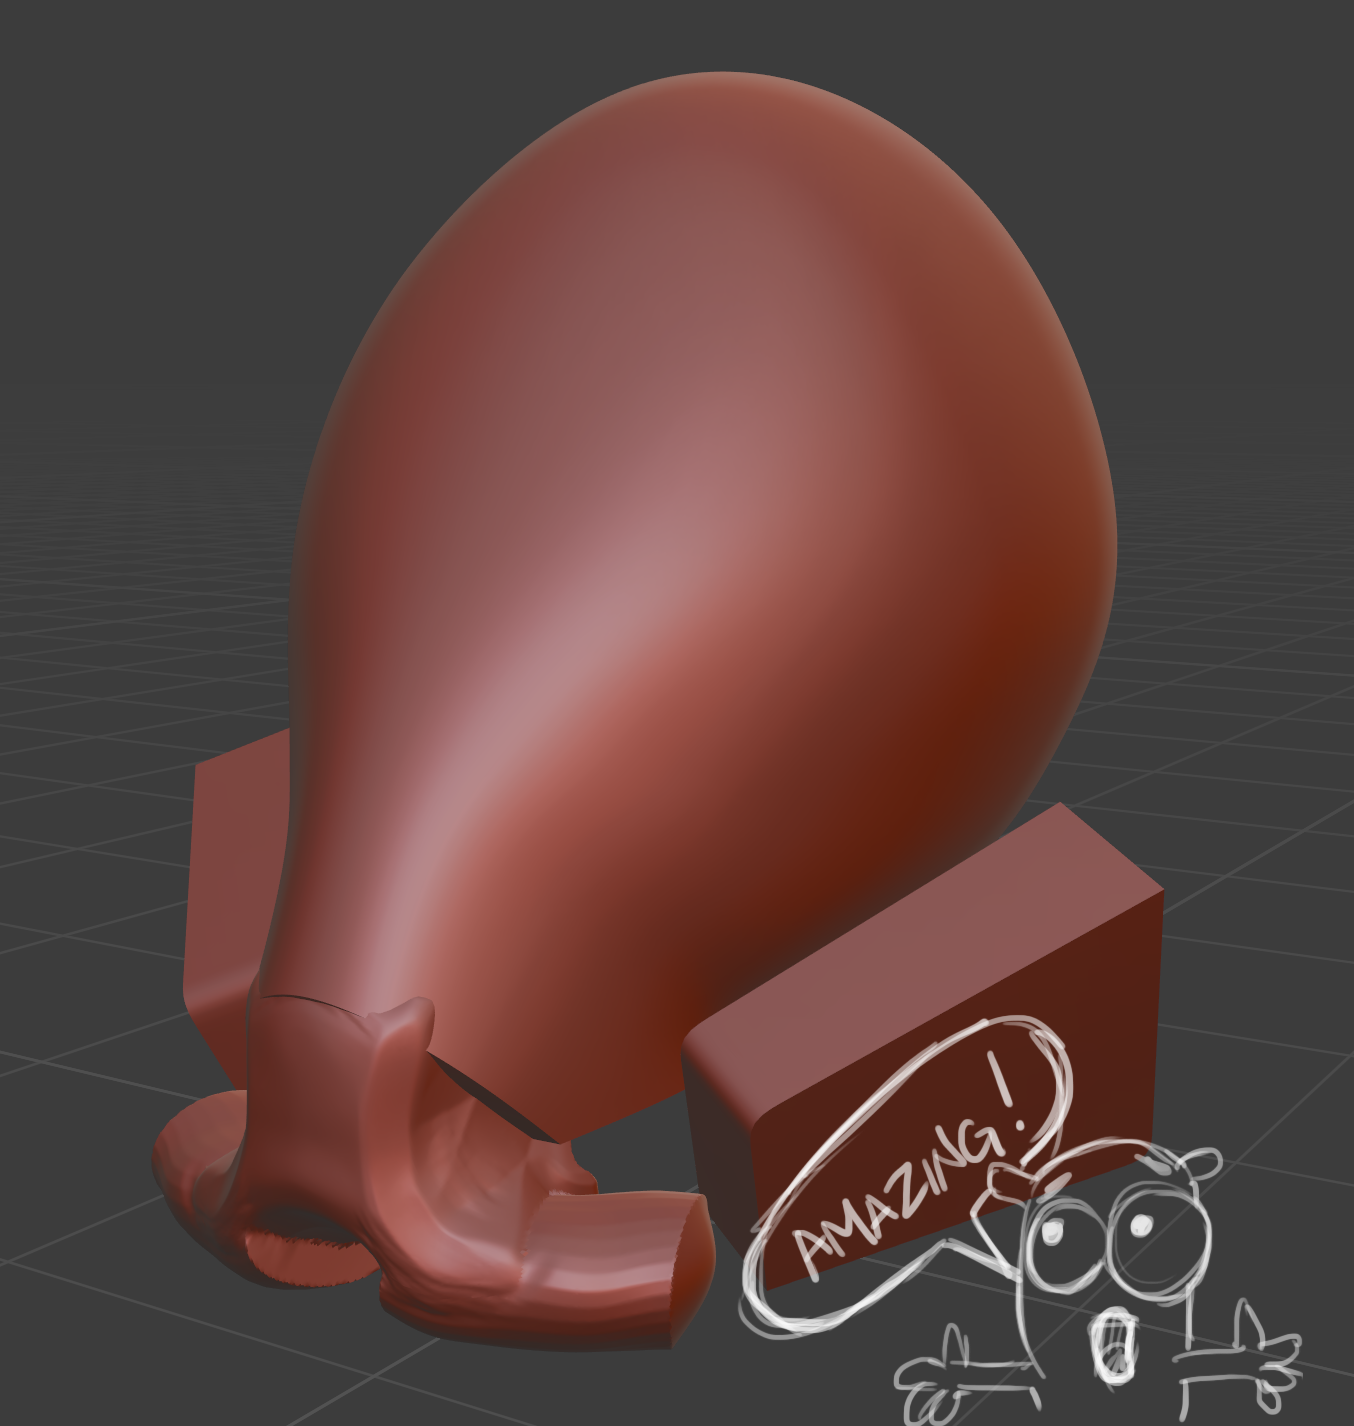
1. The Block Out
I started by sculpting the main form. As I’m fairly new to Blender, I didn’t spend a great deal of time sculpting—I more or less just wanted to play with the tools.
The sculpting tools have real potential, and I can see myself favoring them over ZBrush in the coming years. The workflow I really wanted to test out was manual retopologizing of a sculpted object.
Here are the fruits of my sculpting labor. I know it’s magnificent, get ready for it.
2. Retoping the block out with Modifiers
The next step was to retopo the sculpted block out. OK, so here I wanted to explore some of the non-destructive workflows that I’ve been hearing all about in Blender. It has taken a bit to get my head around the modifiers, but holy smokes they are amazing.
What I did here was to create a plane, shrink wrap it to the block out and place a Subdivision modifier to create a clean surface. I would then edit the plane until I was happy with its placement, give it some depth with a Solidify modifier, and clean the edges with a Bevel modifier.
The final touch was a weighted normal to make sure it rendered cleanly. Done, you have a non-destructive panel shape!

I created a video as it is so much easier to see it demonstrated. I’m super happy with the results and it’s extremely flexible.
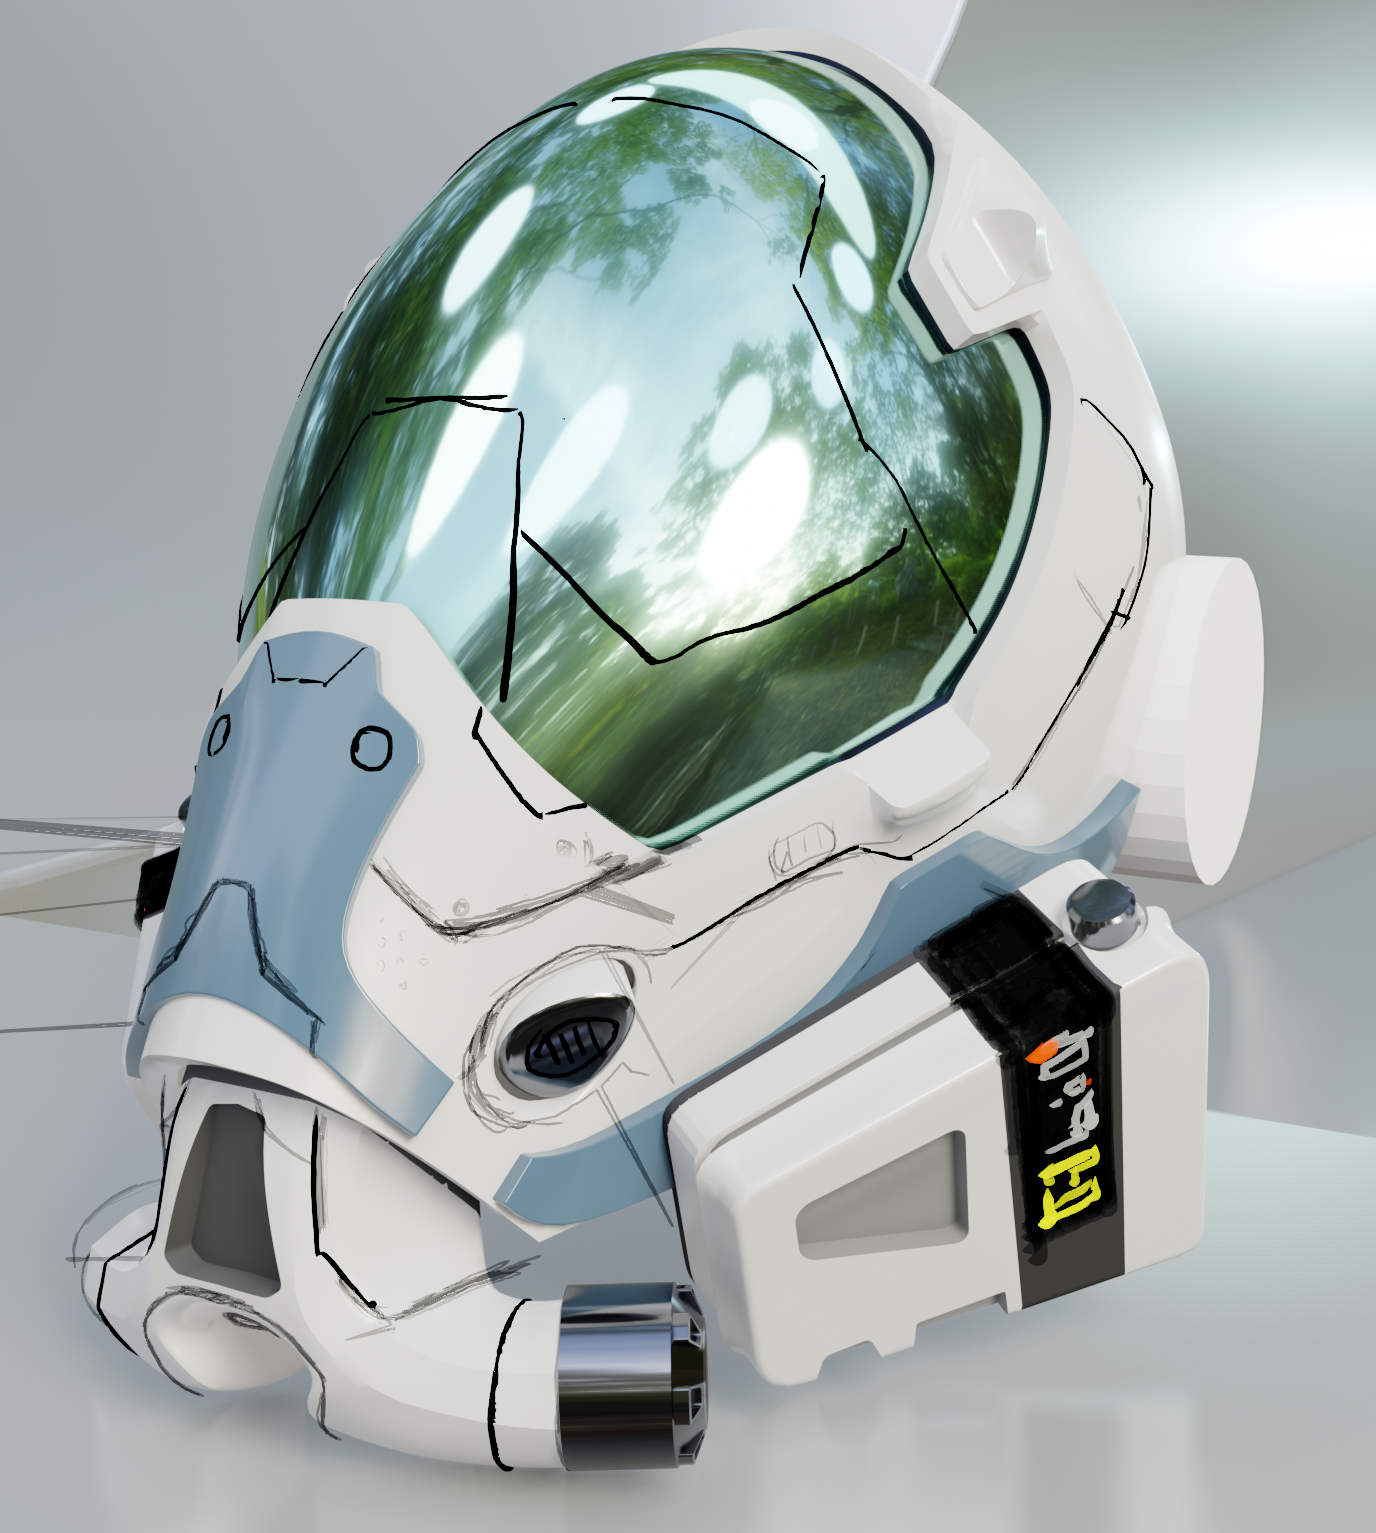
3. Grease Pencil… so good!
Now that I had worked out how to create the forms, it was on to add my very own design touch by painting over the object. You have no idea how much I have been praying to the 3D Gods for a tool like this. To quickly sketch over the object to work outflow lines and form details is incredible.
It takes out a lot of the guesswork and I find drawing a much faster medium than building in 3D. Again, here’s a quick video on how I used grease pencil for designing the details of the helmet.
Below is an example of how I used grease pencil to draw over the helmet; remember, this is drawing in 3D and not drawing over a screenshot.
3. DECALmachine: The Icing On The Cake
This tool should be outlawed, it is that good. Basically, this addon allows you to add details to your model with flat planes that contain Parallax Occlusion details. The result is nothing short of incredible—you are able to add details that can be moved anywhere at any time.
This will be the last video, I swear. But I just had to show this in the real as it is crazy cool to see it in action. Below is an example of them off and then on. Makes all the difference!

Conclusion
Due to the overwhelming response on Facebook, I decided to do a better render with a proper glass shader.
This project has cemented my belief in Blender and I will definitely commit to learning and developing my skills with it. Its future is very exciting and I’m so happy to be a part of it.
Thank you.
About the Author
 Brendan Bottomley, 3D artist and instructor at the Academy of Interactive Entertainment


Have to agree after many years, decades on all the other software choices in the professional work environment the current mix of Blender + community make it a powerful modelling software combo, doing stuff I simply cannot get done with other modelling software, (grease pencil is awesome for concept work) and for organic modelling it’s really a joy to use. I have the same cluster of addons as a standard compliment rather than just vanilla blender, would I go back to modo, maya, or Max. No not unless forced with one arm behind my back – the blender workspace is simply the nicest most flexible out there for work in progress which is your daily mode you will spend most time viewing work. I am picky with my tools, and often toss stuff out my toolbox for simply not being good enough for the product job, blender is most definitely now my goto modelling app.
I am at a weird place with other software apps now as they generally get relegated to the back seat in my toolbox and really I cannot justify sticking with their slow development, I am definitely much faster modelling on the blender ecostream than any other app, with complete artistic flexibility , getting a job out the door I find is simply better done in BL and what an upgrade development path on steroids, that is fully transparent.
It’s funny becay I remember around 2010 or so I gave blender a shot and hated it! I couldn’t figure out anything, the right click totally threw me off and I was so frustrated I never gave it another chance until around 2.7 and iv’e been amazed ever since. Now I love the right click and I feel like blender is a much easier program than others… Though I still have a lot to learn.