Behind the Scenes: Teenage Witch
Hi, my name is Igor Keki (Kekeljevic) and I’m an assistant professor at the Faculty of Technical Sciences in Novi Sad, where I’m teaching future engineers of computer graphics. I love to make 3D characters, You can see my works on my Instagram page.
This is my second article for BlenderNation, the previous one was for the digital sculpt, Singing in the Shower.
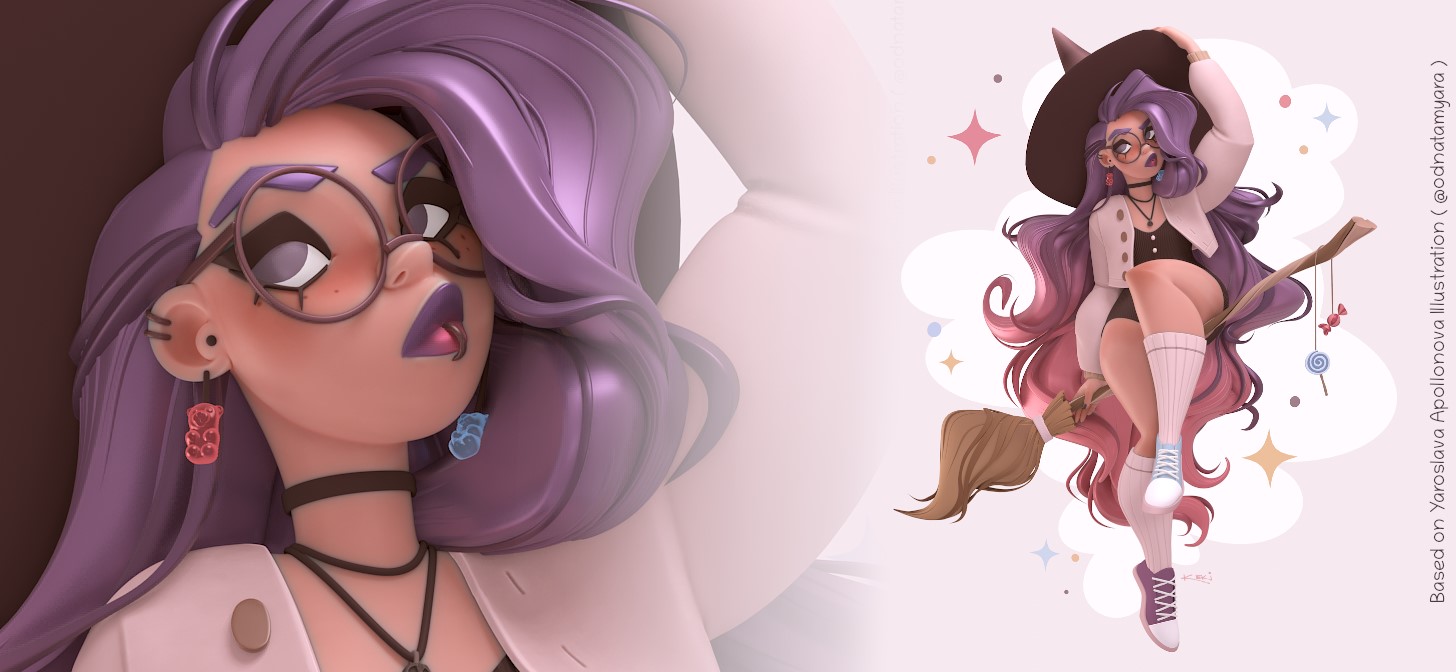
This digital sculpt is inspired by an amazing illustration from Yaroslava Apollonova. She published the illustration to celebrate 100K followers on her Instagram page. I was drawn to this illustration and I just had to make it in 3D.

In this article I’ll write about my workflow for this project and some practical solutions I used. Some techniques I used are learned from amazing timelapses and tutorials on YouTube, so I’ll share links to these YouTube channels.
The whole project has been made in Blender 2.90 and rendered in real-time with EEVEE.
I usually work in 4 phases: sketching, blocking, polishing, and rendering. This time I had Yaroslava’s illustration as a starting point, so I could do a jump start from blocking.
[sponsor id=’qarnot’]
Blocking
Blocking is the most important phase of the process. It’s like the foundation of a house—if it’s not good enough everything will collapse. I always spend as much time as needed for blocking because it always pays off.
If you are trying to transfer forms and contours from a 2D illustration, it’s necessary to fit the geometry and camera to the illustration as soon as possible. I’m using a technique I picked up from Sebastian Cavazzoli’s tutorials.
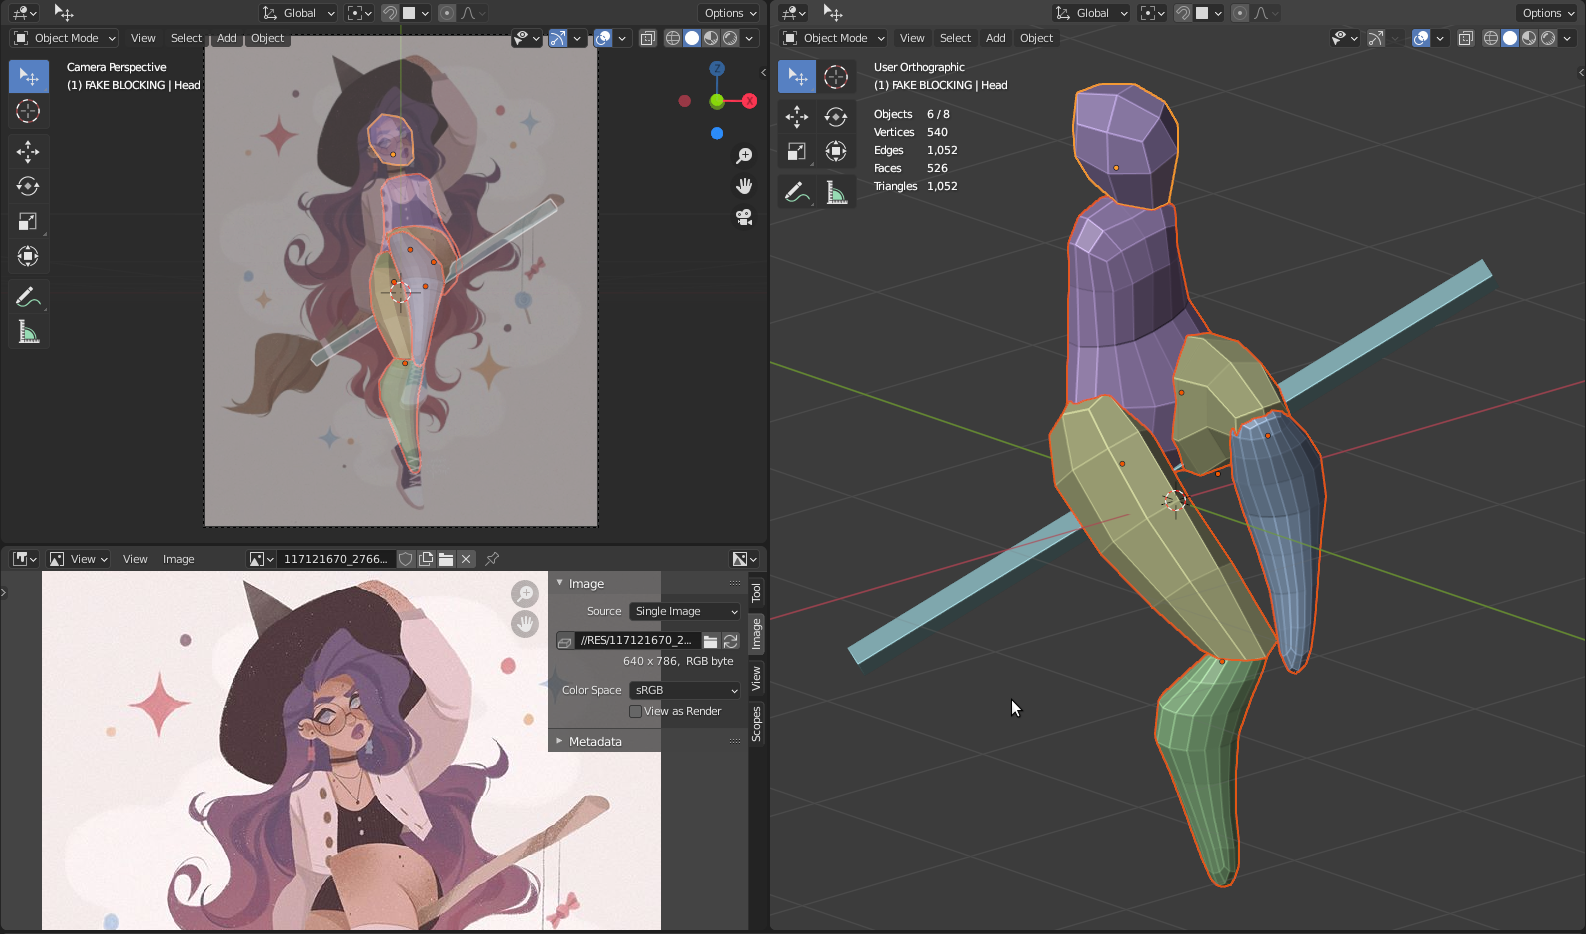
Matching with the illustration was done manually. At first, I roughly created the torso, head, legs, and broomstick and added a camera with the Background Image set to the original illustration. The rendering size has to be set to the same size as the original illustration. The original illustration doesn’t have much perspective distortion, so I set the camera’s Focal Length to 50mm and it looked good. Fitting the geometry and camera with the illustration was a trial and error process. This technique depends on personal sensibility and experience, so is maybe not well suited for beginners.
Shapes are made from cubes with the Multires modifier and sculpted using the Grab brush. I usually start with a subdivision of 1 and gradually progress to 3.
From Zach Reinhardt’s tutorials, I learned how to use pivots to make my life easier when doing blocking. The torso has a pivot in the middle and was sculpted with symmetry enabled. The head has a pivot at the position of the natural joint with the neck, so it’s easy to scale and rotate the head while it stays in a good position. Upper legs have pivots at joints with the hips. Calves have pivots at knees joints. Shapes for the right leg are instances of the left leg, only mirrored with scale for X axes set to -1. When modeling the left leg, any changes are automatically transferred to the right leg.
I needed around one day for setting the camera matching and blocking all larger details.
Polishing

In the polishing phase, I join separate objects from the previous phase and sculpt fine details. For joining, I don’t use Voxel Remesh or Quadriflow because they destroy some fine edges and details from the blocking phase, produce ugly artefacts, or require an enormous number of polygons to look good. Instead, I use a Boolean modifier to join separate shapes into a single mesh.
Boolean gives the best results, but it’s the slowest method and has some pitfalls. Problems with the Boolean modifier are caused by instances, flipped normals and scale.
- First I select all objects and convert all instances to single objects.
- Next, I apply scale with CTRL+A and pick Scale.
- Then I apply modifiers with CTRL+A and pick Visual Geometry to Mesh.
- Then I enter into Edit Mode for all objects, do ALT+N and pick Recalculate Normals Outside.
It sounds like a lot of work, but when you get used to it, it can be done in a minute.
The Boolean modifier can still produce issues. I always set the display to a bounding box for the secondary object and use Difference for Boolean to check if it’s OK before using Union. Then I polish the joints and sculpt the fine details using Dyntopo.
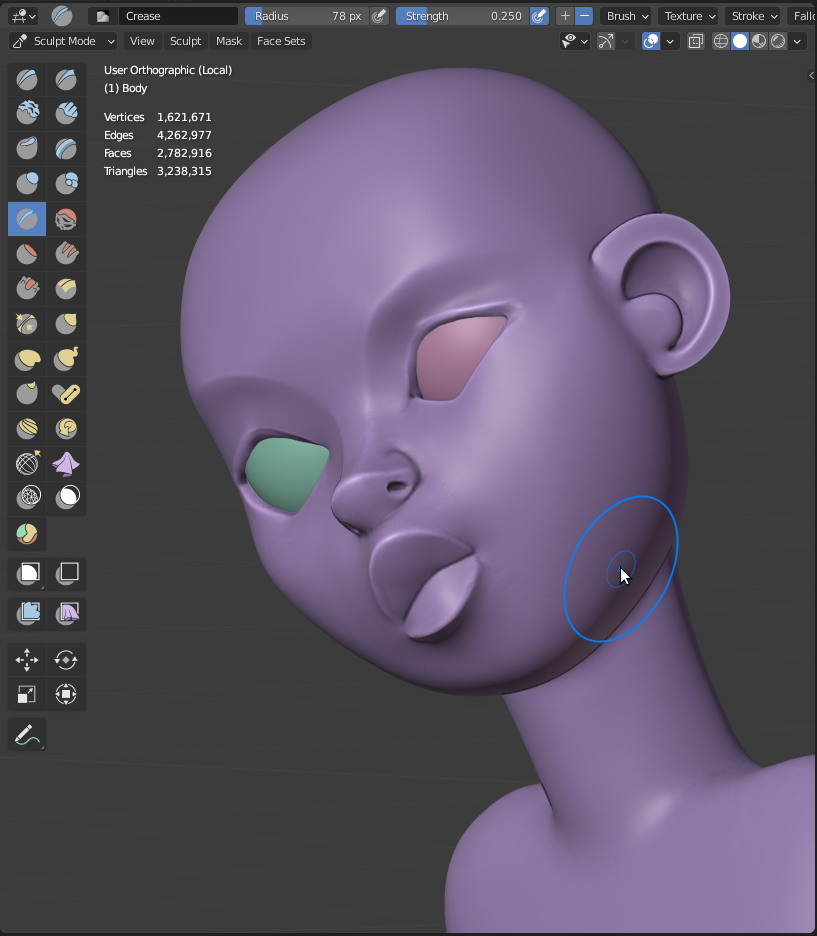
The head was modeled from 3 shapes: head base, nose, and ears. The shapes were connected with the Boolean modifier and polished with Dyntopo. I usually model a head from these separate shapes because it’s easier to edit facial features and proportions.
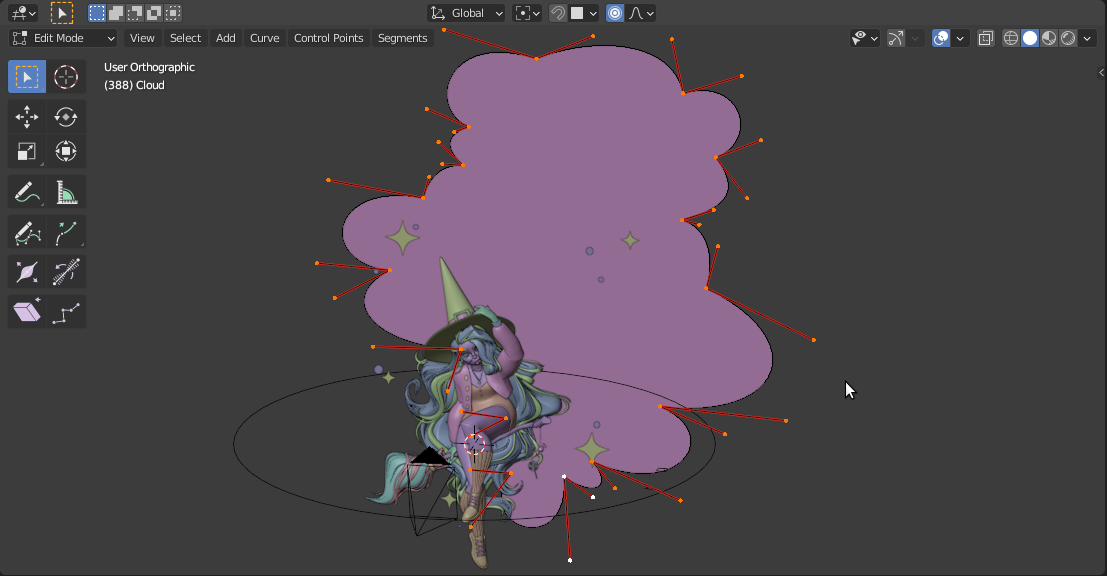
Background elements have been made as simple as possible, just 2D shapes made with curves.
The final scene has 2.2 million vertices. Using object modes when the object has a high number of polygons is a painful experience, especially Vertex Paint Mode and Edit Mode. Maybe this is just a problem with my computer :-), but that’s why I separate everything I can, for example the torso, head, arms and legs are separate objects.
I needed two days to polish everything and model clothes and other details. The hair scared me a little bit, so I left it for last.
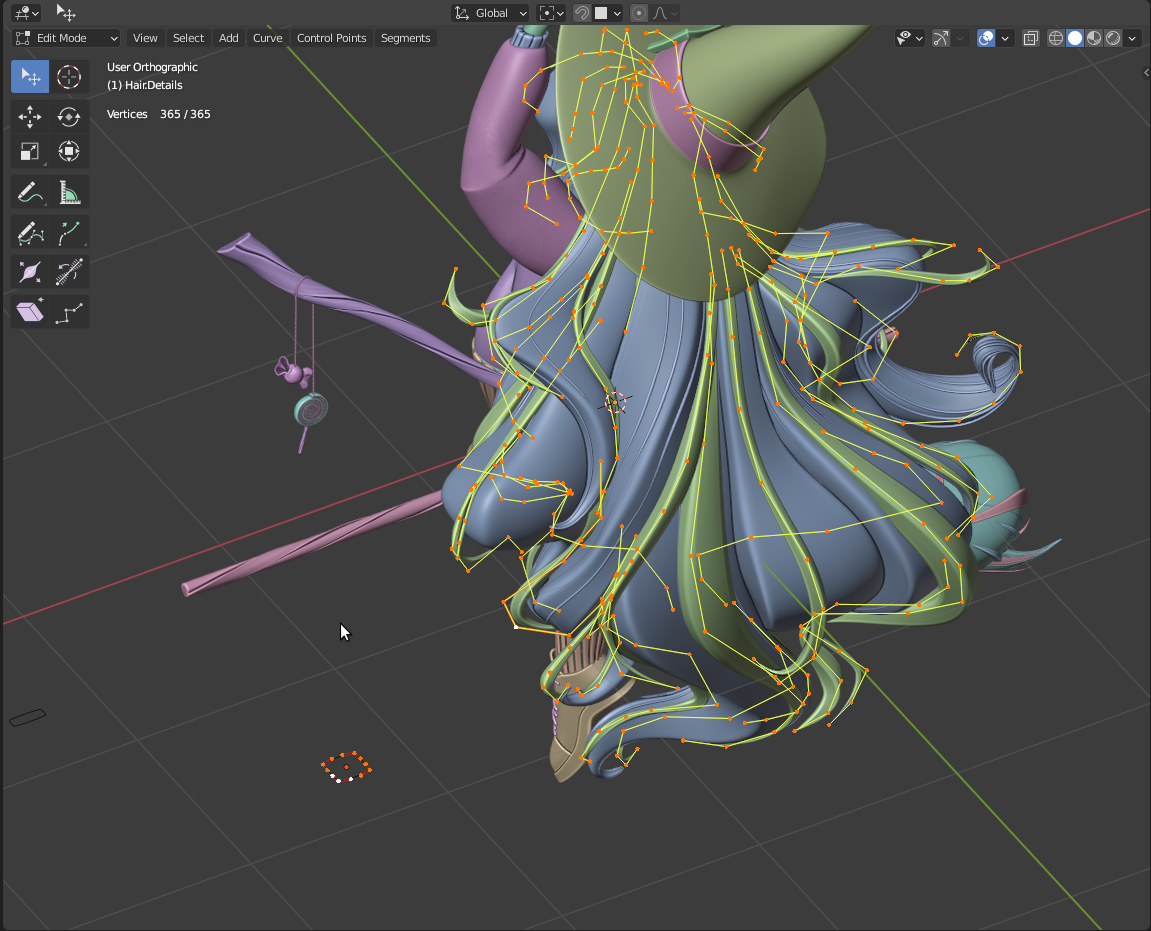
The hair has been made with Path curves, with another closed Bezier curve used as a Bevel Object. This method I learned from a Danny Mac video on YouTube. This technique results in very nice and clean forms and provides a lot of control over the look of hair strands. You can set the Point Radius using ALT+S to control thickness. Twisting can be done using CTRL+T. And, best of all, it works great with the Proportional Editing option.
I always model the largest hair forms first, then medium forms, and, finally, I do narrow forms and hair details. When modeling the largest forms first, it gives me an idea of how hair will look.
Some people keep every hair strand as a single object; I like to join them in clusters. The hair is organised into 3 objects: LargeHair, MediumHair, DetailHair.
I spent almost 3 days on hair, almost half of time that I spent on this project. I really need to get faster at this part, to change something in my workflow. :-)
Materials and rendering

For coloring, I use a trick learned from ZBrush users. Retopo and unwrap takes time, just go with vertex colors. :-) On my computer it is painful to work in Vertex Paint mode—the lagging is horrible. My coloring is just to fill everything in with a single color and to click on some places for color variations.
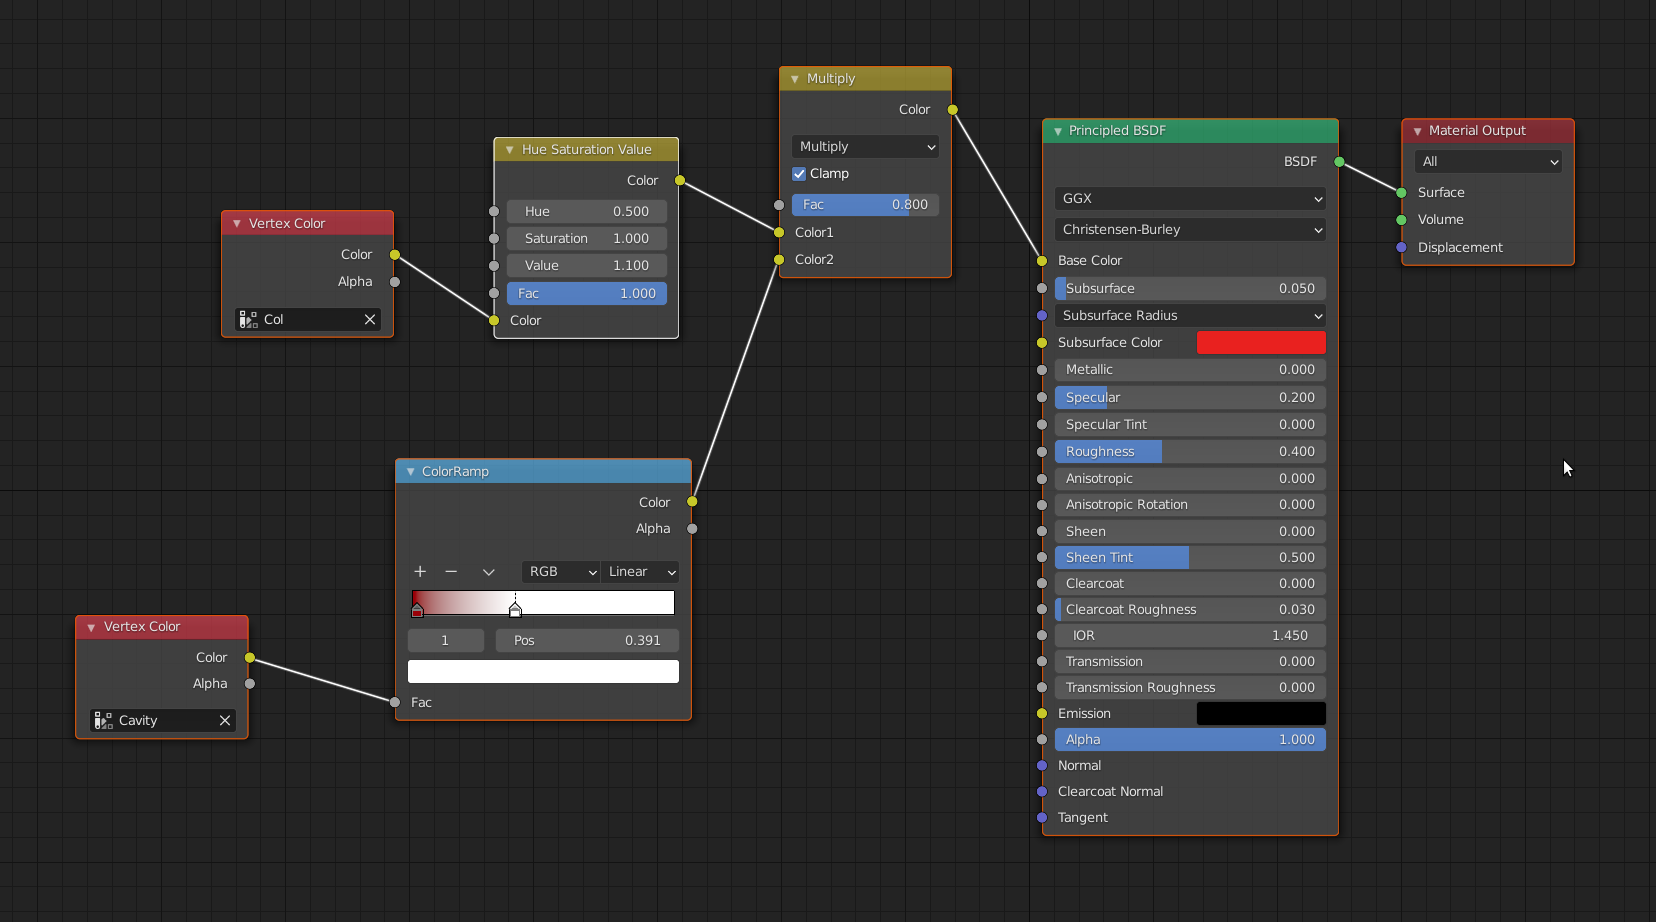
Materials are quite simple, just a Principled BSDF with a Vertex Color. The skin uses one of the most complex materials in this project. I used an additional Vertex Color layer, a grayscale with Cavity made with the Dirty Vertex Color option. It has been added to the base color using Multiply Blend to make details on the skin more visible.
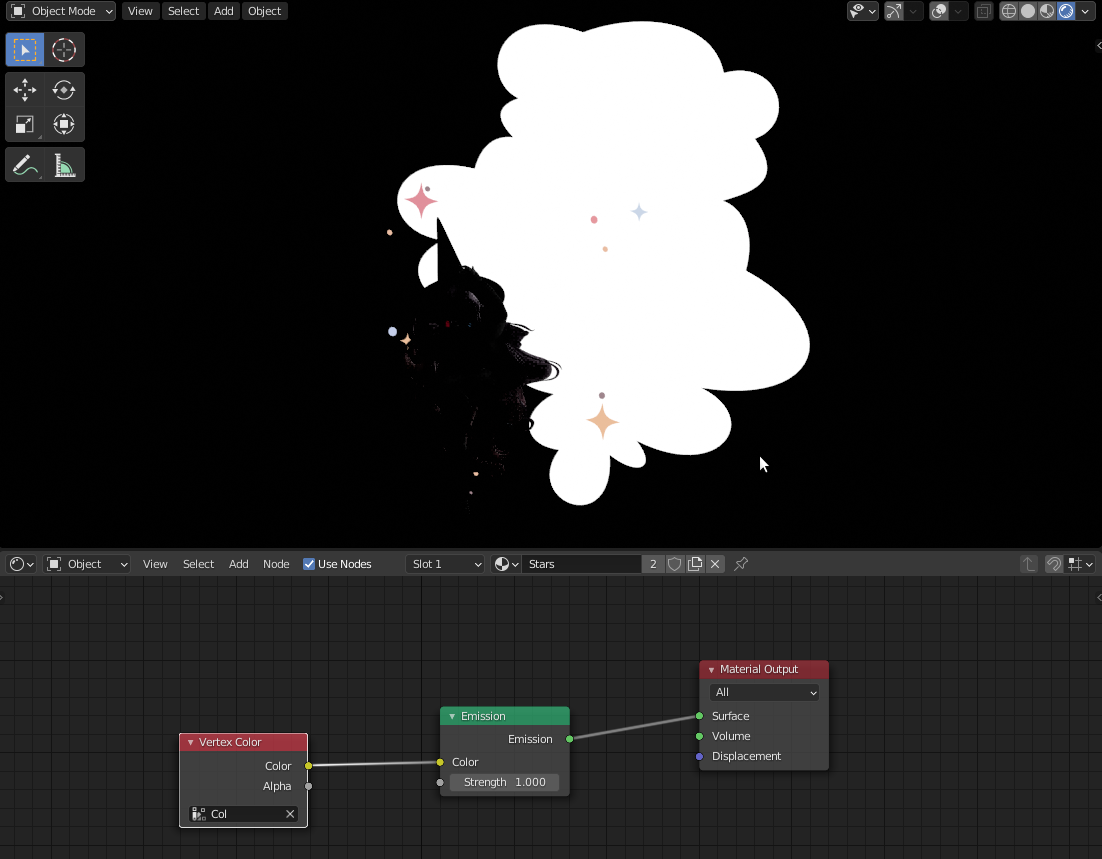
For all background elements (cloud and sparkles) I used just an Emission shader set to 1, with Vertex Color.

I used 4 light sources for this project:
- Side light, point type, 700W, radius 2m, warm white color, used to make left contours more visible.
- Main light, area type, 200W, radius 3m, white color, used to emphasize volumes.
- Focus Face light, point type, 15W, radius 0.15m, white color, used to make the face more visible.
- Focus Leg light, point type, 30W, radius 0.15m, white color, used to emphasize depth.
Shadows in EEVEE usually give me a headache, there are always some problems to solve. Of all the light types, the Area light works best and I usually use this light type for the main light. Nevertheless, I love using EEVEE, but not only because of speed. Cycles is great for photorealistic art, but EEVEE gives an artificial look which is appropriate for stylized art.
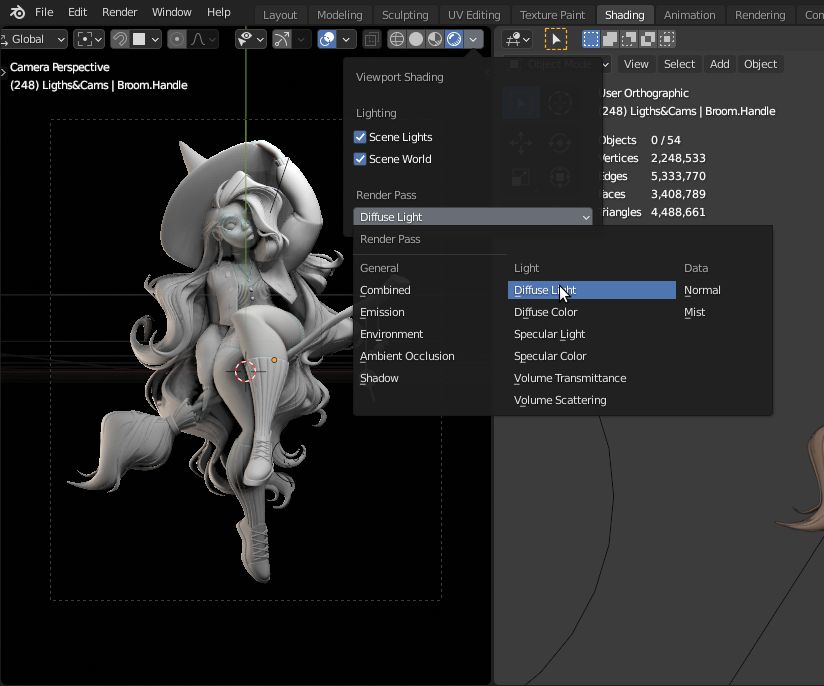
When working with lights, it is easier to see what is going on if looking only at the Diffuse Light pass.
This phase went quite smoothly, I spent one day on materials and rendering.
Conclusion
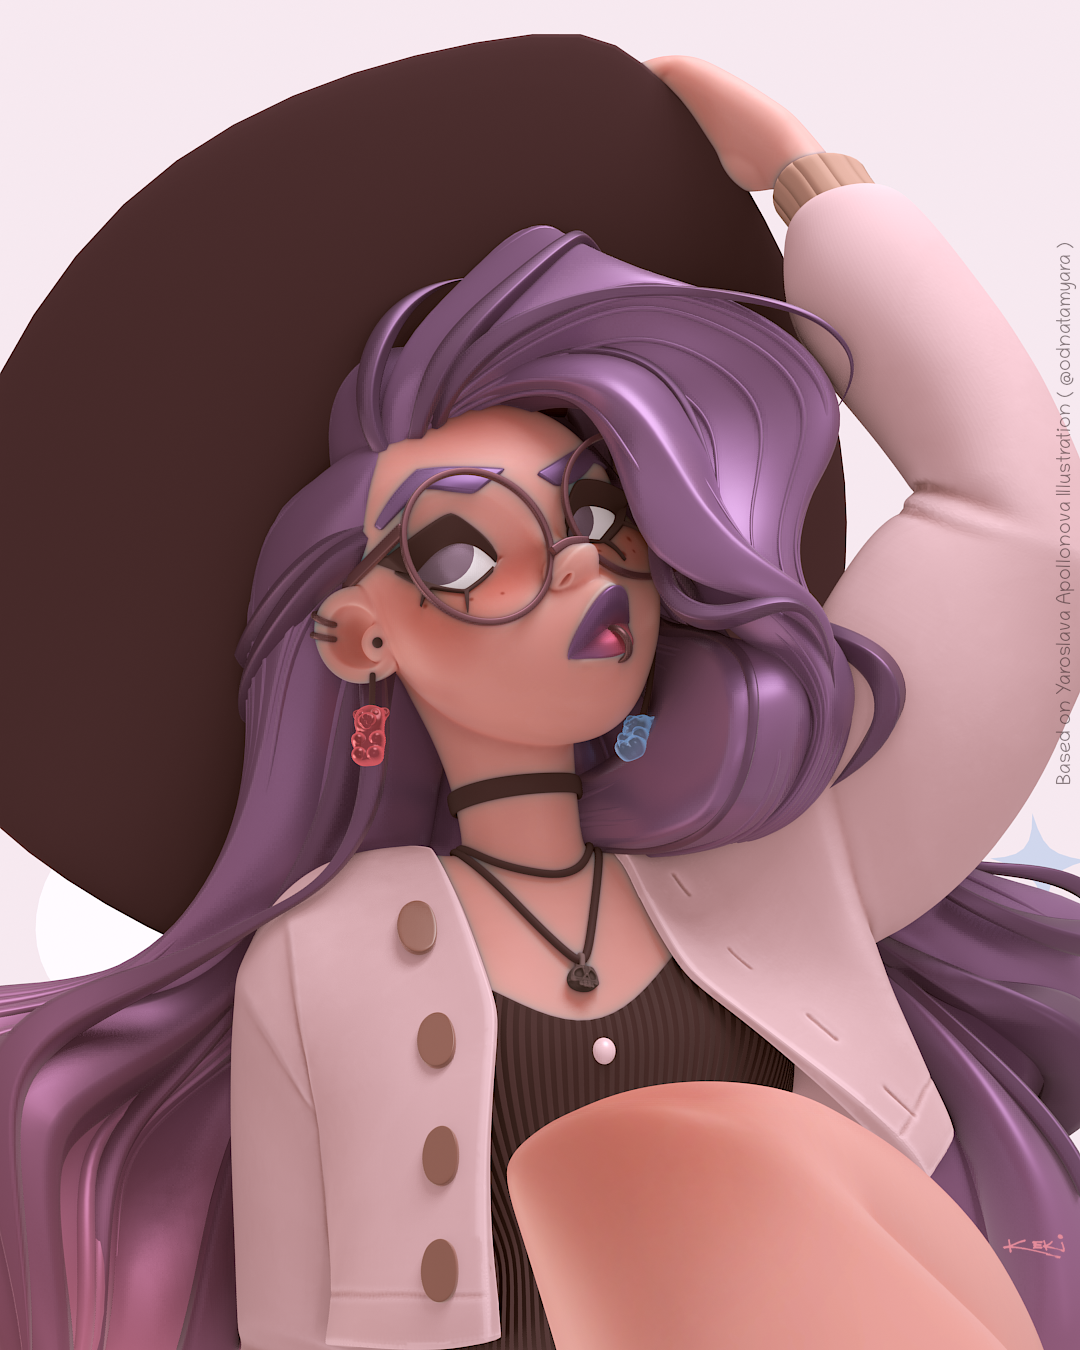
It took me quite some time, but this project was really fun to do (as fan art should be :-) ). And public reactions on this project were very positive. It’s my most successful artwork so far, with over 3,500 likes on the Blender Artists Instagram page and over 700 likes on my personal Instagram page—much more than usual. I got very positive feedback from Yaroslava and many other artists that I admire a lot.
If you like this project, you can download a free desktop wallpaper:

About the Author
 Igor Kekeljevic, assistant professor at the Faculty of Technical Sciences in Novi Sad


