Behind the Scenes: LTX Concept

About Me
My name is Nika Zautashvili, I am a self-taught 3D artist from Yaroslavl, Russia. I have been working with 3D art as a freelancer for a couple of years now, even though my main job is not 3D or art-related whatsoever. In the near future, I am planning to do art full-time.
I started with 3D when I was in school, with my favourite RTS game (it was Blitzkrieg by Nival). I really wanted to create mods for it and add my own 3D models of tanks to the game. :) Since I didn’t have access to the internet at that moment, it was rather challenging for me. I bought a printed book for 3ds Max 6 (if I remember correctly) and started to learn 3D stuff… and no, I did not have 3ds Max back then. I tried to recreate things from that book in some very simple 3D modeling software I found in a local store on CD (it was a thing back in the day :D). Since then I have modeled from time to time for fun (there were times when I ditched 3D for many years, but I always got back to it eventually). In the last couple of years, I have started to work as a freelancer.
3ds Max was my primary software for a long time, but eventually I switched to Blender (I made the switch at Blender 2.78, I think). It wasn’t a completely smooth process and took me a couple of attempts, but in the end Blender has grown on me. You know how it goes. :) At the moment, Blender is my main 3D software. With its current development speed, I believe it will become more and more awesome very quickly.
LTX: The Idea, Inspiration and References
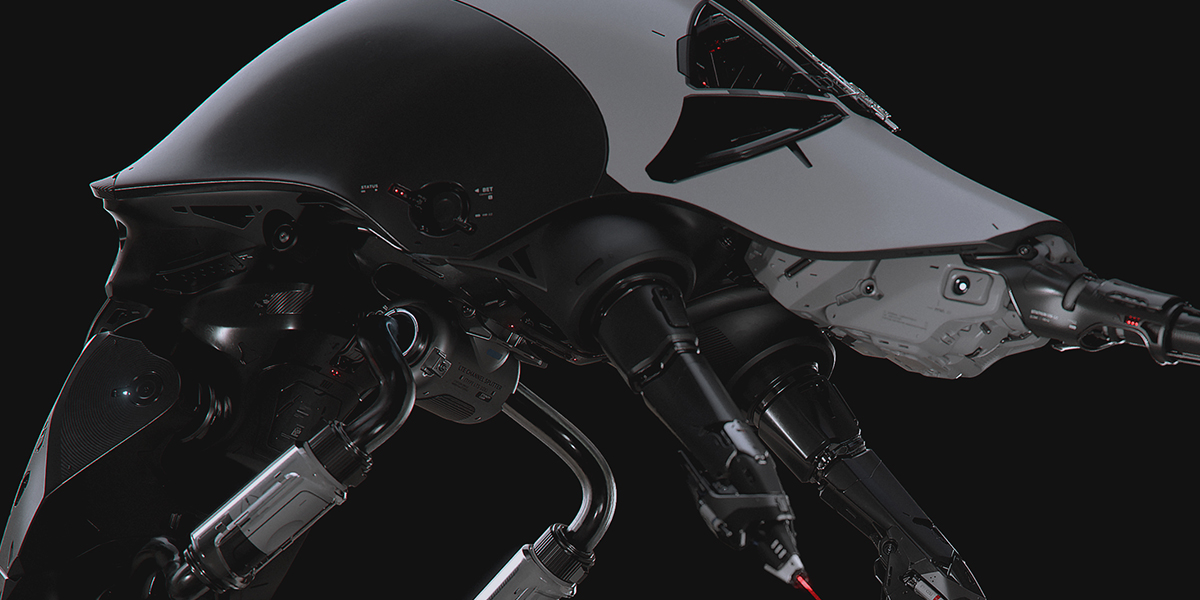
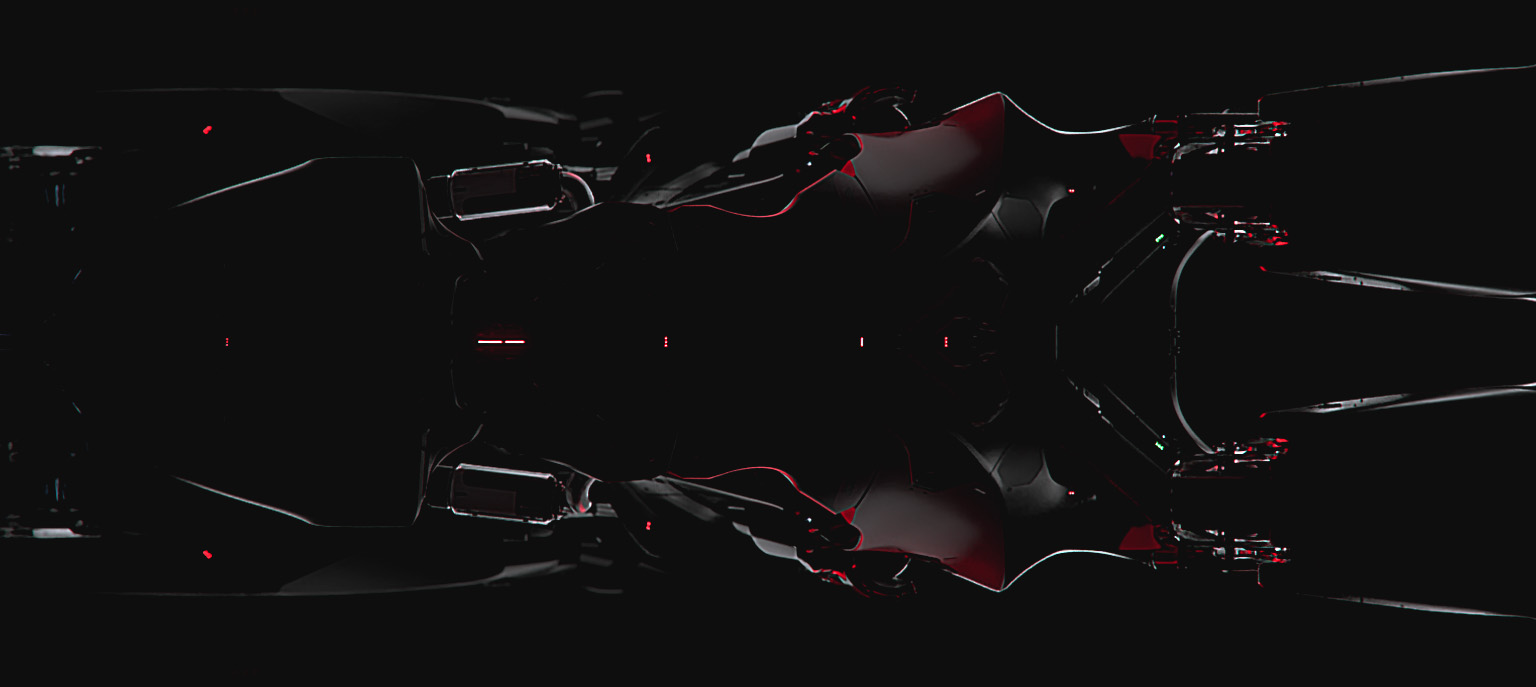
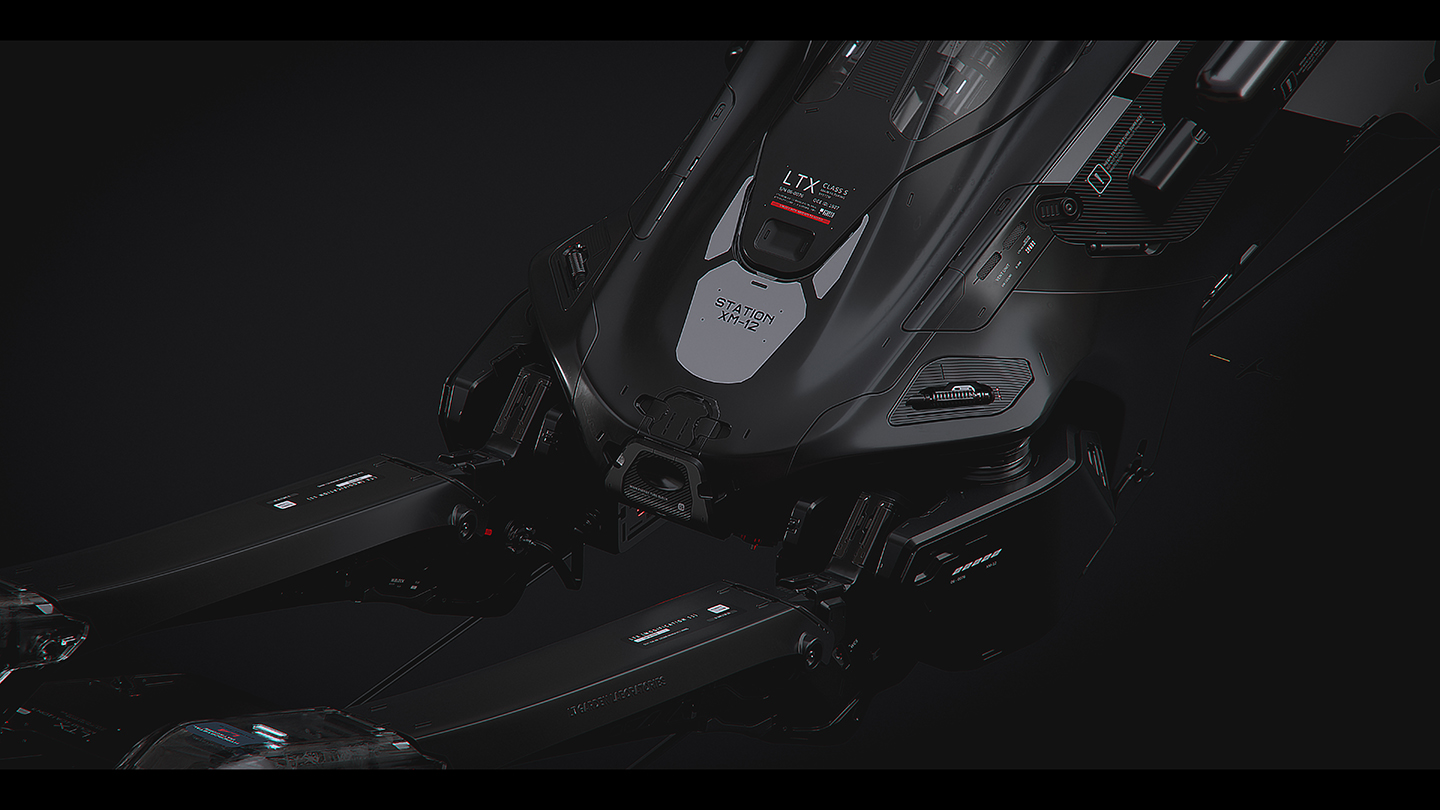
LTX is a stylized machine, a character for a sci-fi story that I came up with (the story itself is not ready for publishing yet—I need to write it properly first). The purpose of the unit is to collect the “blood” (“LTE”) of alien organisms on distant planets, filter it, and store it. As I mentioned, this is a heavily stylized work, with pretty experimental design, and it shouldn’t make sense in terms of real-life machines, but all parts of it were modeled with a story and purpose in mind. It slows down the process very significantly when you start to think: “sooo… what this thing is for?”, but, in the end, it makes the project more valuable, in my opinion. I am not sure if I managed to express the ideas fully, but I tried. :) Some parts of it are not what they seem. For example, legs are not for walking but are more like lifting mechanisms with additional devices built-in.
I can’t say how exactly my “inspiration” thing works, to be honest… I mean, there is nothing special about it. I just have an archive of movies, books, artworks, and life experiences in my head that inspire my own art. My initial ideas always come from pencil sketches on paper—I feel like this is the fastest way to develop them. I just start to draw, and, at some point, I start to see The Stuff. :)
Regarding refs, when it comes to personal work, I try not to use references. When I talk about references, I talk about art references. I try to distance myself from other artist’s artworks, but I can use real-life objects as a reference. For example, if I model mech, I can use photos of real-life mechanisms, but I will never use mech artworks. Don’t get me wrong, I admire many artists and love their art, and I know that there is nothing 100% original in modern human culture and art (I guess), but I feel like this forces me to think more and makes me better as an artist.
The Tools
Obviously, I use Blender. :) Let’s talk add-ons. My set of addons for this kind of hard-surface work includes HardOps, Boxcutter, MeshMachine, and DecalMachine (a little bit of Fluent recently). I can’t see myself modeling without them—they are such awesome tools and timesavers, and I highly recommend them for every Blender modeler.
Besides add-ons, I feel like I need to mention the importance of setting up Blender for your personal style. Blender is highly customizable, and this is one of the strongest aspects of it. Try to cut to a minimum the repetitive tasks, create shortcuts, write scripts (it is easier than you think, I am not a coder myself), use custom pies and menus that fit your workflow (I recommend the awesome Pie Menu Editor addon). Hard-surface modeling is a time-consuming genre, and you need to keep the process as efficient as possible.
Besides Blender, I used Marvelous Designer and Photoshop on the LTX project. MD was used to make the center “hose” and PS was for final color correction and post.
The Workflow

1. Shapes and modeling
LTX was built in a non-subdivided fashion, even though I used subdivision modeling in the early stages of work. First of all, as I mentioned, I try to come up with the idea by drawing by hand. Simple, ugly sketches, but they help enormously. I usually draw a silhouette, which is enough for me. After that, I start with 3D, and there are a couple of scenarios for creating base shapes (primary forms):
- Hard-surface sculpting followed by retopology.
- Building the base shape with polygonal subdivision modeling followed by carving out and/or addition of shapes (LTX was modeled this way).
Simplified:
- I build an overall big shape with poly modeling and the subdivision modifier on (I always save the initial shape as a backup or MeshMachine stash to use it in the future to correct normal and shading issues).
- After that, I cut out big/medium shapes and look for negative spaces (I use Boxcutter and HardOps to speed up booleans). At this point everything is still non-destructive—I can change boolean cutters, make changes to the initial shape, etc.
- When I am done with the overall shape, I apply mods and bools and further refine the shape with bevels/chamfers (usually in places where boolean cuts were) and maybe new smaller bools where I feel they are needed (let’s call it the second pass).
- Finally, I add small details to the model (sometimes I use kitbash kits, but not in this case).
- When the model is finished, I apply mods and bools from the second pass, add decals, and correct normals/shading issues with MeshMachine using the initial shape before bools (Normal Transfer). If you don’t have MM, you can use the standard data transfer modifier for that.
Designwise, I want to mention two important concepts: details distribution and negative spaces.
Both are pretty simple, but they make a big difference. You can get a good explanation of the first one here.
Regarding the second one…well, subtract instead of add. The way I see it is when you have a great overall shape you are absolutely happy with, you have a good chance to ruin it by adding big or medium details to it. Instead, consider adding hollow spaces within the shape itself (where it makes sense, of course) and fill it with details to create interesting visual contrast. In my case, this way of thinking gives me better results. There are probably different explanations regarding negative space in design out there, but this is the way I use it. Hope it makes sense. :)
2. Shading
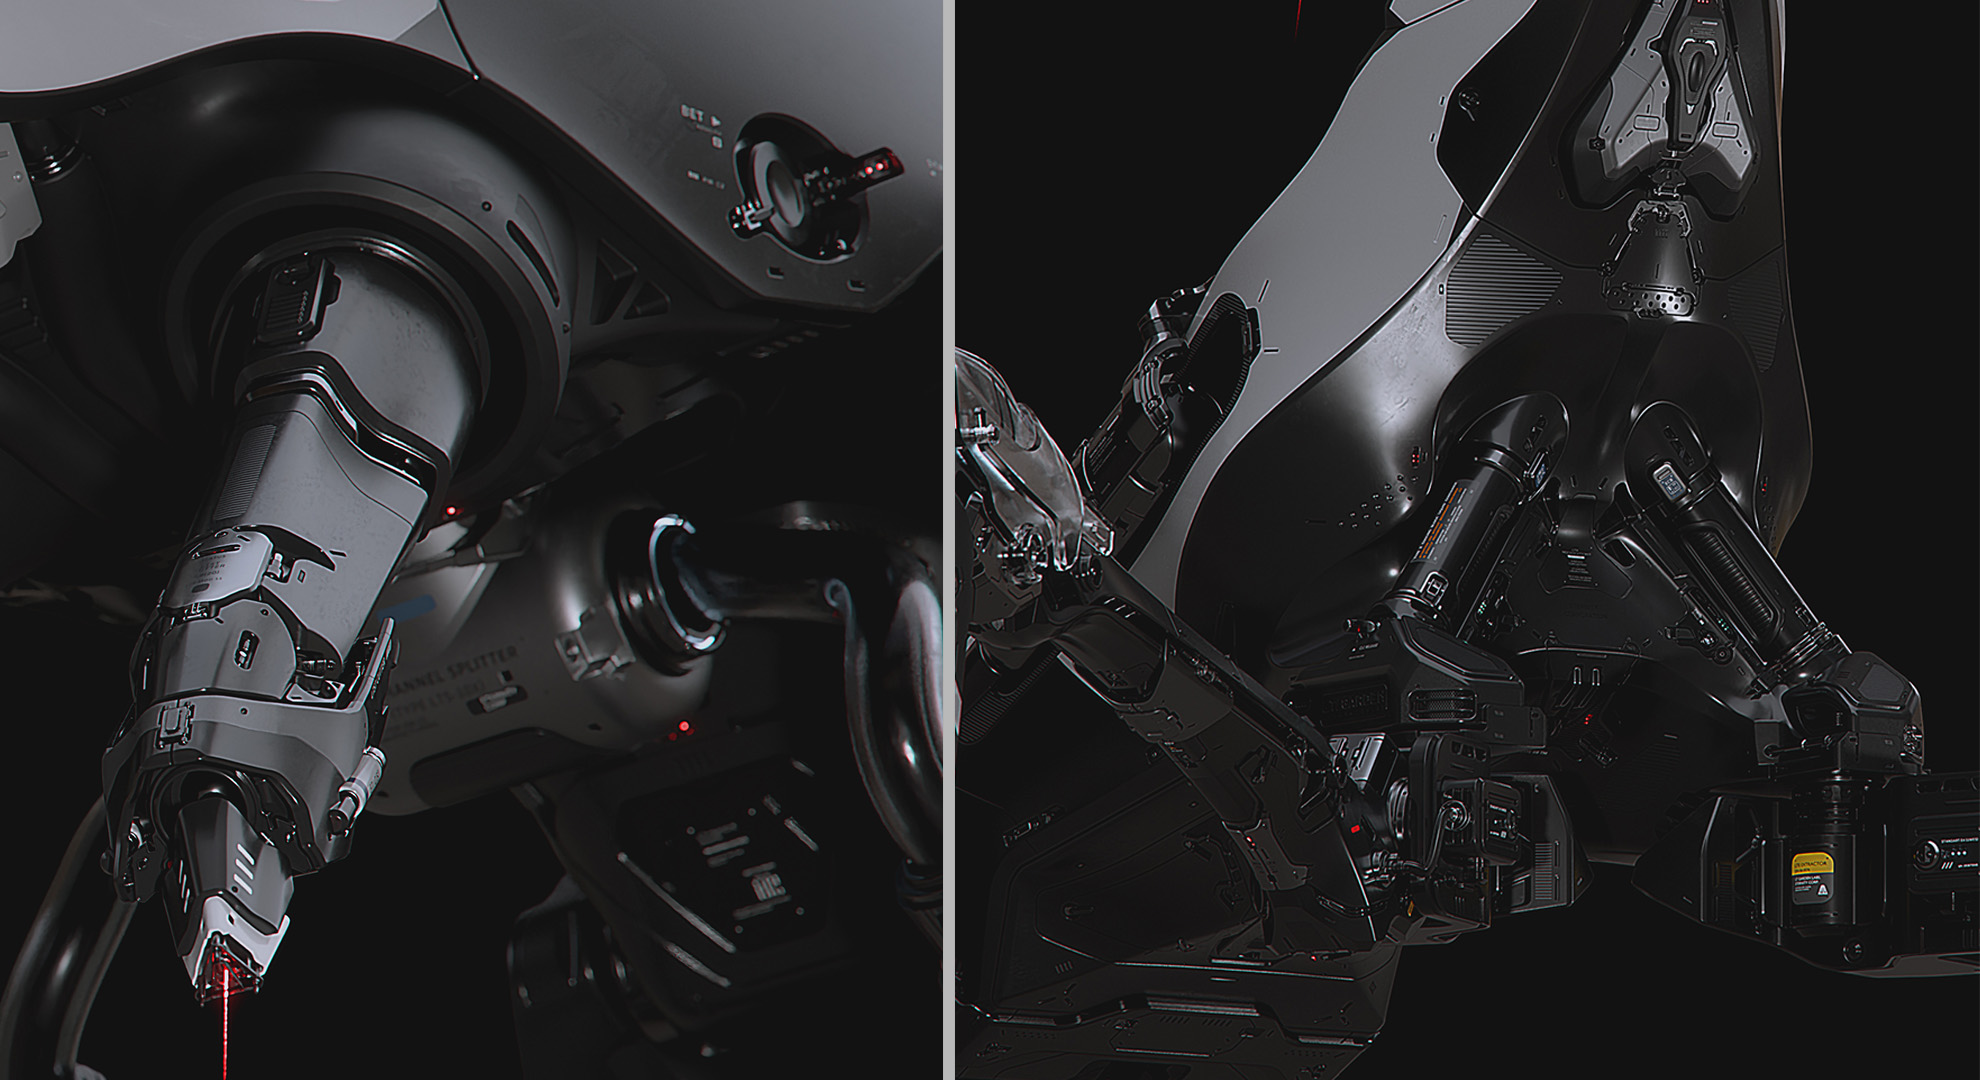

The shaders of LTX are pretty simple. In most cases, it’s just the usual Principled BSDF with subtle roughness maps or procedural noise. On some parts, I used simple painted black and white masks to mix black finish and white paintover. I chose not to add AO dust or edge wear (usual for hard-surface stuff) in this case because I aimed for a relatively “clean” look. In my experience, in most cases you can achieve good looking renders with pretty simple materials, you just need to be sure they work with the light in your scene. You don’t need to overcomplicate shaders (unless shaders are the main topic of your project)—you are better off spending time on lighting and post.
The other thing I need to mention is the bevel node. I used it on this project extensively. It’s a shame that shaders with bevel node can’t be rendered with OptiX in Blender currently (hope it will change soon). Personally, I think this is an absolutely awesome node and helps with hard-surface concept art enormously. It’s almost cheating. :)
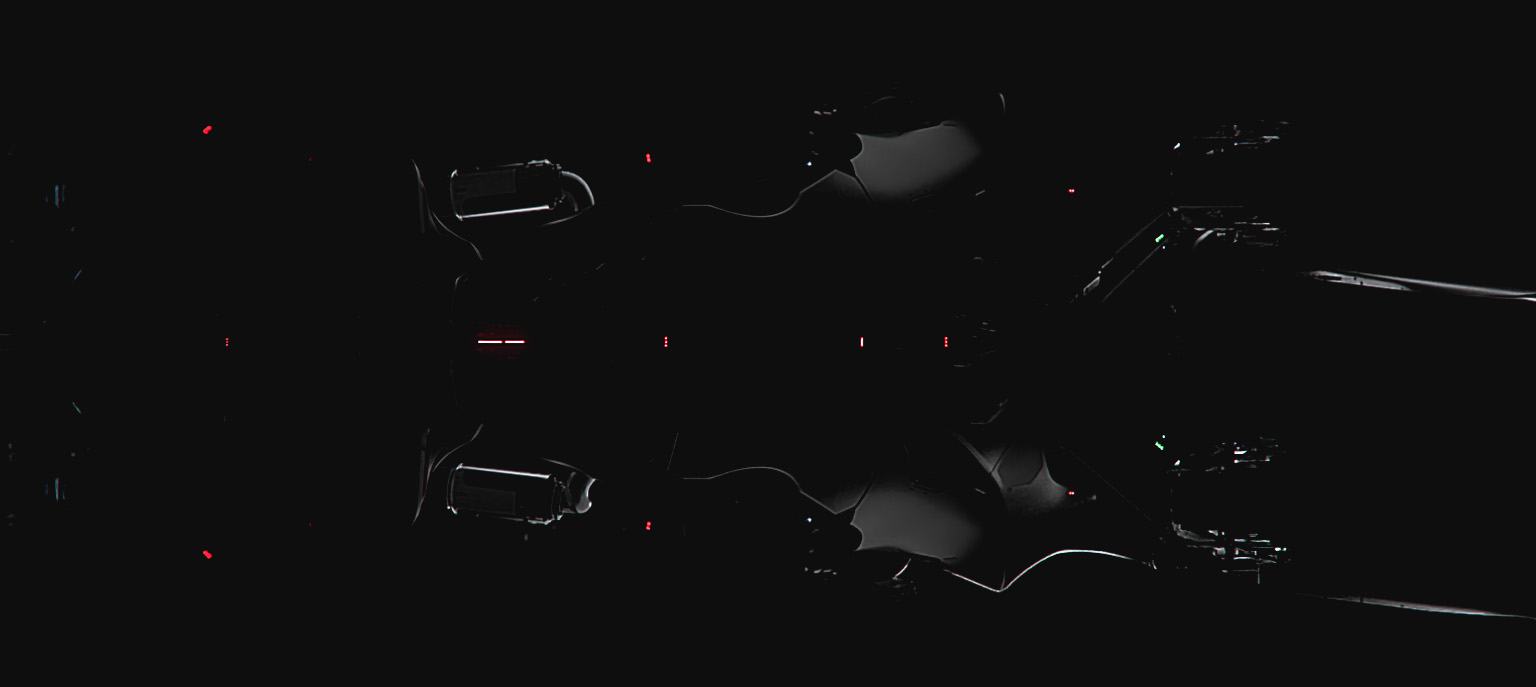
3. Lighting
My approach to lighting depends on the project, but for characters, my light setup process is always the same (ok, almost always). I usually create a separate lighting setup for each render shot. My Steps, simplified:
- When I’m happy with the camera position, I turn off every light in the scene, including background HDR lighting. Complete blackout.
- After that, I start to add lights to the scene, one by one. I am trying to find an interesting light silhouette (rim/back light).

- At some point, I start to experiment with color lights or big, more diffused light sources to add some accents to the shapes. I like this process. It’s like painting with light. I never think in terms of a “3 point lighting” scheme or anything like that. I just add lights where I feel they are needed and look interesting, play with their position and parameters in a visual way.
- When I am happy with the silhouette, I do the main lights.
- And, finally, I turn on environment lighting (HDR) and set up its strength, hue, etc.


4. Rendering and Post-Processing
The project was rendered in Cycles. The render setup is pretty much “out of the box”. I think the only parameter I changed is “Indirect Light” in Clamping (it helped with fireflies on glass surfaces). I prefer rendering at higher resolutions (6K-8K) with fewer samples and with a denoising node (I usually downsize images in post a bit). The only node I used in the compositor besides denoise is glare to add a subtle glow on emission parts.
Final post and color correction were done in Photoshop. The most important step is sharpening in my opinion. Renders are never sharp enough “by default”. Also, I added stylized effects like chromatic aberrations (I love them!) and vignette. Other stuff is just simple levels, curves, and other basic Photoshop adjustments. I recommend using filters and adjustment layers on images and converting them to “smart objects”—this way everything stays non-destructive. Oh, and work in 16-bit mode; in some cases, it helps with “banding” (here you can find a good explanation on the topic).


You can check and download full-res (5K or so) renders of LTX on the Blender Artists forum (unfortunately, ArtStation downsizes the images pretty significantly).
About the Author
 Nika Zautashvili, freelance 3D artist, Russia. https://www.artstation.com/nikvili


You have nailed the fine detailing level at the product design scale – certainly one of the best examples I have seen in many years.
My only constructive comment might be (as a product designer) that as the scale and mechanical details (and manufacture techniques) change across a product the level of detail refinement can change. So for example internal detailing on a highly detailed piece of electronic equipment, with it’s die-cast tight panel and surface treatments, can quickly change as the piece parts of larger scale elements have less refined manufacture processes. It’s a small point that can add to the variation of radii, surface roughness, etc across a larger scale model. And I only raise that as an observation.
Otherwise certainly one of the best hard model product projects I have come across in the last 5 years. Well done.
Hey, Otto! Sorry, missed you comment. Thank you for constructive feedback. After reading this, i feel like i need to read some good in-depth books about how real machines are working and build. There is always be a good amount of “fiction” in my mechs that gonna make sense only in fiction universe where they exist, but it can be helpful overall and can give me many good ideas. :) Thanks again!
That’s okay > check out visually >> https://danielsimon.com/product-design/roborace/ << for the type of 1:1 product scale detailing that I talk about. The robocar design and full size prototypes has a great level of detailing that explodes out the nature of how radii and minutia in panel to part detailing comes alive in that uncanny valley as the CG future actually becomes reality. This might surprise you, but it's the best example I can point you to explore. Enjoy.
Hi, Otto, sorry again for slow response. My notifications from BN were off… Unfortunately, i got “page not found” on your link, but i googled it and this is beautiful example indeed. Thank you to pointing it out!