CG Masters Character Creation Volume 3 – Texturing Review
Terry Wallwork reviews CG Masters’ ‘Character Creation Volume 3‘, by Lee Salvemini.
Terry writes:Lee Salvemini of CG Masters.net contacted me recently to ask if I would review his most recent release: “Character Creation Volume 3 – Texturing”.
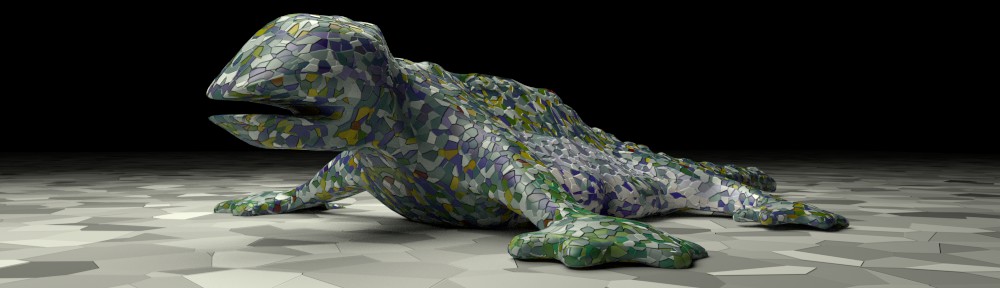
This is the 3rd of a multipart series which covers the creation of a Ninja character using Blender and various other tools such as Gimp.
The previous volumes of the series are:
- Character Creation Volume 1 – Modeling
- Character Creaton Volume 2 – Rigging
Each DVD covers a different aspect of the Ninja characters creation.
Those of you that have read my previous reviews of Lee’s work know that he is a very talented Blender user who has worked on some of the Blender Foundation Open Movies as well as produced many different types of Blender tutorials and video.
This time around Lee covers the topics involved in Texturing the Ninja character model that was previously created in the other volumes of his training series.
I am reviewing the downloadable versions of the training materials but the material is also available on a physical DVD; Either way the contents and price are identical no matter which method of distribution you use.
Product Specifications:
- Name : Character Creation Volume 3 – Texturing
- Author : Lee Salvemini
- Price : $60 (on 23rd May 2013)
- Runtime : 10h 38m 43s
- Format : Downloadable Video
The downloadable files are roughly 4Gig in size, and so assuming you have a reliable connection to the internet the downloading the files should not take too long. For me the downloads were reliable and fast.
Once the downloads had completed I extracted the files onto my desktop; All the files and resources you will need to both watch and follow along to the video tutorials are provided; This includes all the blend files, textures, Blender application, original Gimp resource files and VLC media player for playing the videos for those of you who need it; The concept art that the ninja character is created from is also provided; The was created by David Revoy; It won’t come as a surprise to anyone that knows David that his concept art is amazing.
All of the resources and videos are accessible either through an easy to navigate web browser interface or you can access the resource directly on the file system. The web browser interface breaks the texturing videos into chapters. Each page in the browser also indicates all the keyboard shortcuts and tools used in a particular video. This should be useful for people who are new to Blender.
This 3rd volume is not really aimed at beginners but if you are a beginner, you would just have to take it very slowly and you should be able to understand what is happening. Lee even includes an introductory video covering the use and differences between Blender 2.49 and the newer 2.5/2.6 version of Blender.
All the videos are encoded in high quality and are very clear to watch. As with the other volumes the production values on the videos are very good. Lee uses a combination of realtime video instruction and time lapse video when needed. The vast majority of the video content is recorded in realtime.
There are 15 chapters of training material videos, each chapter covering a different part of the Ninja character as it is textured.
The basic workflow in all the videos is unwrap a different part of the ninja for Uv texture mapping and then use a combination of Gimp and Blender to do the texturing of the character.
Gimp is used extensively to do UV texturing, and Lee really knows his way around texturing with Gimp; You can view this 3rd volume as both a tutorial on texturing with both Blender and Gimp. If you are one of those strange people that just have to use another bitmap editor then Lee is clear enough in explaining what he is doing that you will be able to convert reasonably easily; Lee uses a combination of UV Texturing and Procedural Texturing to fully texture the ninja character.
The rendering engine used in these tutorials is Blender’s Internal Renderer. Some may be a little disappointed that Blender Cycles Rendering engine was not used. You should not be as Lee does amazing things with Blender’s Internal Renderer which will make you have a re-found respect for Blender Internal Renderer. It may be older than Cycles but it is more than powerful enough as Lee shows. Also if you want to use Cycles to do texturing then converting what Lee does with the Blender Internal Renderer to Cycles should not be too difficult. Lee mentions on his website that there will be a Cycles based video at some point, but I have no other information on when it will be released or how in-depth it will be. Another possible reason that Cycles wasn’t used as the rendering engine could have been that Lee uses render baking a lot in all the tutorials and Cycles currently doesn’t make that easy to use; The same is also true of Sub-Surface Scattering which at the time these videos were recorded, was not available in Cycles.
The 1st chapter goes over setting up a basic studio lighting setup and camera positioning, and useful starting material node setup to show off the ninja character in clay type material. This setup is used to view the ninja as it gets textured throughout the rest of the chapters. The use of the normal relighting method is very useful to see and it goes to show just how big an impact it can have on surface shading of a character. Using normal relighting and shading is used throughout all the different videos.
The 2nd chapter goes over unwrapping and texturing the eyes of the ninja character. Texturing is done in Gimp mostly, with very clever use of Blender’s Material shaders to give the eyes a very realistic look. Lee also shows a great way to fake reflections to give the eyes even more impact. This was a fairly indepth chapter and is a very good introduction to Blender’s materials and Gimp’s texturing features and filters.
The 3rd chapter is a multipart chapter it covers the various texturing aspect of different parts of the face of the ninja. Clever use of premade Uv face texture shows a quick way to get real looking face skin. This chapter also shows Blender’s Sub-Surface Scattering ability. This really does make skin look much more realistic. Gimp’s clone tool is used extensively to improve the skin texture to make it look more even and usable as a face texture. It was a reasonably short chapter but had a lot of useful information in it. Part 2 of Chapter 3 covers texturing eye brows and eye lashes; This is done using particles and Blender’s Particle Editing mode; Features such as Particle combing are covered. Lee uses a novel technique to fake shading around the eyelids by using objects to influence ambient occlusion. I don’t think I have seen this technique used before, but it was effective. Part 3 of Chapter 3 covers taking low detail proxy hair that is currently used by the ninja character, and shows how to convert it to particle hair which looks much more realistic. Lee makes this look easy and with just a few clumps of particle hair gets a very effective hair appearance. Part 4 of Chapter 3 covers creating a specular map and adding extra texture details to the eyes to make them look more realistic. Chapter 3 was an excellent chapter just make sure to be paying attention when watching so as not to miss some of the clever tricks and techniques.
The 4th chapter covers the texturing of the cloth head wrap that the ninja wears to hide his face. This forms a mask by wrapping around his head multiple times. Lee shows how to add a texture motif to the wrap around cloth, such that it follows the cloth flow. He shows clearly how to unwrap the cloth in a simple way to allow texturing to happen. Once the pattern texture has been added to the head wrap a material shader is created which alters how the cloth looks depending on the angle you view it from (Fresnel type shading). This is really impressive and gives a big pop in quality.
The 5th chapter is another multipart chapter that is split into 3 parts. It covers texturing of items on the torso of the ninja. Some very nice examples of how to make materials look like they are knitted and also a very useful way of making leather items look worn and used. This ageing of leather materials is used in almost all the videos. It’s created in Gimp and tweaked even more in Blender using the material system. The leather shoulder pads on the ninja are modeled and textured and look really good; Even scratches and dents are included.
The 6th chapter covers unwrapping and texturing of arm objects such as wrist wraps. Shows a very good method of applying textures to bandages so that they look wrapped and grimy. The displacement modifier is also demonstrated to make the wraps look uneven and displaced.
The 7th chapter goes over how to unwrap and texture the hands of the ninja, by giving him knitted cloth gloves. This chapter uses the same techniques as in previous chapters. One thing I did like was that when adding the cloth glove to the hands Lee even takes account of the slight increase in hand surface volume when wearing gloves. Now that is attention to detail.
The 8th chapter covers unwrapping and texturing of the ninja’s belt, and using previously described techniques makes the belt look worn and used. Also covered is a nice way of using face select mode with seams to isolate parts of a mesh when selecting is happening. Blender’s UV pinning and live unwrap feature is also described.
The 9th chapter describes how to unwrap and texture the ninja’s pants. Some very impressive tips and tricks are described, such as a quick way to fake stitched seams on the pants and faking creases that happen in baggy pants the ninja character wears. The end result of these tricks looks very effective to me. I would also imagine the ability to fake stitched seams is something you can use in many modeling situations.
The 10th chapter covers texturing of the shoes of the ninja using the techniques described previously.
The 11th chapter covers methods for texturing of a bone animal skull and horns. Lee shows a method of texturing the skull and bones using Gimp and a photograph of a real skull. It would have been nice to see Blender’s Projection painting system used here just to demonstrate another way to approach this type of texturing, but the Gimp way was just as good.
The 12th chapter is another multipart chapter split into 3 parts. Together the 3 parts cover texturing the small accessories the ninja has. This chapter also goes over how to make realistic looking metal materials. Which I really liked the look of; The gold metal items looked gorgeous. Also covered in this chapter are glass lens like materials of the ninja’s goggles.
The 13th chapter covers the ninja’s swords. Everything from the blades, handles and even the handle wrapping on the sword are covered. Lee demonstrates yet another clever technique for making wound string wrapping for the sword handles using curves and a mesh deform modifier. By the end of this chapter we have a almost completely textured character.
The 14th chapter is another multipart chapter split into 2 parts. The first part covers fixing up oversights and missed parts of the ninja that needed extra work. The 2nd part covers using the cloth simulator to give the ninja’s pants a more realistic look; Also in this part the compositor is used to improve the final render result to give the whole render the polished look. Lee shows a useful way of doing a vignettes.
The 15th chapter is a bonus chapter, it’s an overview of how he made the teaser trailer that was used to promote the this 3rd volume. It really goes to show how much work Lee put into the trailer to make it look good. Yet if you watched all 3 volumes of his training series you could at least in theory be able to do something like that yourself. As by this point you have seen all the techniques he uses and if you have a very good memory or studied the tutorials a lot you could do the same.
By this point a lot of information has been imparted by Lee to the viewer, some of it was a little fast and took real effort to keep up with but you can always rewind. I think unless you are a total hard core Blenderhead you will be going back to watch certain parts of the videos again and again.
You know this DVD is good when the only thing I can think up that comes even close to a mistake is that he doesn’t know how to say the word Fresnel properly (well I had to come up with something I mean no one should be allowed to be this good!)
But seriously, brilliant videos, just like all his other volumes and well worth getting if you can.
Review Score 95%
Link

Looks, nice, but these videos are expensive.
Hey, it’s a premium series. The quality seems well worth the price. A lot of effort and time, as well as expertise, went into the series–it’s worth its value. If one sets aside a little bit of their paychecks for a little while, they can have it in a little over a month.
I bought the rigging version, Lee knows his stuff and very very clear plus the quality of the content is top notch……wasn’t really into modelling, so I opted not to get DVD 1 which am certain is good…..sorry for sounding like an infomercial “actor” but it is worth it
I do not think it is so expensive, considering the amount of work that goes into something like this. it looks really great
i bought the first two, very good service also :)
I definitely will buy this, paid tutorials always are better than free ones, fact of life!
Lee is a great teacher also, judging by the “intro to rigging” video he did as a guest for Blender Guru.
I love the CG Masters promo videos, they are just amazingly good!
you said: paid tutorials always are better than free ones
please forgive me but I think you’re wrong on something you said
mmm we have cgcookie, we have oliver and his blendtut, we have andrew price, we have… and we have… many free tutorials and they´re outstanding
Please don´t overlook the work of others
they give us the best and totally free and we should appraise it
CG Masters promo videos are amazing, it’s worth its value but free tutorials are amazing as well
and “sometimes” paid tutorials are not better than free tutorials
Hugs…
it’s worth its value
the quality is HD
and it is not so expensive
i won´t pay ´cause i have the complete collection BUT if idon´t,i would pay !
I just bought the three bundles and can’t be happier…
Expensives? Naah…it has a lot of work…
BTW: Of course there are great free tutorials also… :-)
hello!!my name is jimit!!
i wont help you!!
you alrady buy Character Creation Volume 3 – Texturing
so can you give me Character Creation Volume 3 – Texturing index file!!!plz….am pray for you!!
am very poor!!i wont help!!plz help me!!thanks for adwans!!