
Introduction
You have already seen that you can use Blender to create interesting images. Adding objects, materials, lights and a camera allows you to set up a scene in exactly the way you like. Blender will calculate the correct lighting and shadows automatically for you.
But there is more! There is a complete animation system inside Blender. Making an object move is as easy as defining its beginning and ending position. Blender does the rest for you - calculation of all the frames between beginning and end are done automatically.
In this chapter I will create a simple scene consisting of a chessboard and a pawn. The pawn will jump happily across the board and it will deform a bit when it hits the ground.
Creating the Pawn
To create the pawn I use a technique called 'Spinning'. Using this, I will only need to draw an outline of the pawn and then Blender will calculate how the object should look based on this outline.
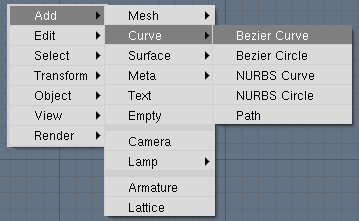
Start with a new Blender scene, delete the default cube and switch to front view ([NUMPAD-1]). Add a new Bezier curve from the toolbox: press [SPACE], select 'Curve' from the right button bar and then select 'Bezier curve' from the list:
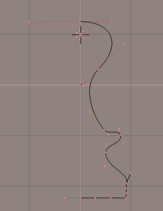
You can add extra points to the curve by selecting an endpoint, holding down[CTRL]and LeftClicking. Try playing with the curve a bit before going on - also pay attention to the way the 'handles' affect the direction of the curve in a particular point. Shape the curve as indicated below, and pay special attention that the endpoints on the left are located on the blue axis (the Z-axis). I will be using the Z-axis as the axis of rotation later.
When you want to create a rotation object, you must indicate the location of the rotation axis with the 3D cursor. I want to place this somewhere on the Z-axis. While still in front view, LeftClickon the blue Z-axis to place the 3D cursor there.

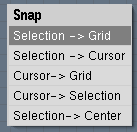
A nice trick to align the 3D cursor or objects is to use the snap function ([SHIFT][S]). With this, you can do four things:
- Align a selection to the grid. For example, when in editmode you can place vertices exactly on grid corners with this.
- Align a selection to the cursor. This moves the currently selected object or vertex to the 3D cursor location.
- Align the 3D cursor with the nea- rest grid corner. Useful in our current case to match up the cursor exactly with the Z-axis (place the cursor somewhere near a grid corner and activate this option).
- Align the 3D cursor with the curr- rently selected object or vertex.
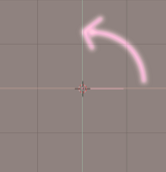
The rotation axis is always perpendicular to the screen. Switch to top view with NumPad [7]. You now see the 3D cursor, indicating the position of the rotation axis and our curve which will move in the direction of the arrow in the illustration.
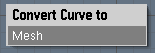
I am almost set to create the pawn. There is only one more thing to prepare: the spin function only works on meshes, and not on curves. So first convert the outline curve into a mesh by leaving editmode ([TAB]), selecting it and pressing [ALT][C]. Select 'Mesh' or press [ENTER]to perform the conversion.
Now switch to the Edit Buttons screen. Enter Edit Mode ([TAB]); in the Mesh Tools panel you see a button labeled 'Spin':.
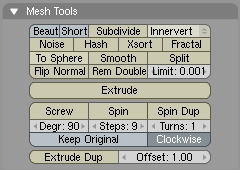
Underneath it are inputs for 'Degrees' and 'Steps'. Set degrees to 360 and steps to 21. (This value determines the resolution of the resulting object - higher values increase the smoothness). If you SHIFT-Click in the number panel, you'll be able to manually enter a value.
If you wanted to create only half an object, you would set the degrees value to 180.
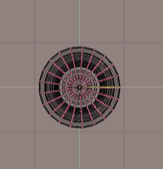
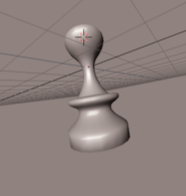
All set? Now first select all vertices with [A]; next switch to the top view with [NUMPAD-7]. Press the 'Spin' button and watch the result. The curve has been extruded and rotated, leaving behind a complete pawn.
Hint: If you have set up your screen to work with multiple 3D windows, Blender will need to know in which window you wish to perform the spin operation. The cursor changes into a question mark and you must click in the top view window to proceed.
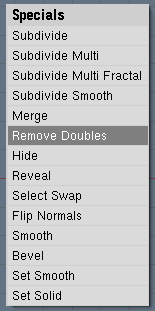
All is not ready yet, though. It may not be obvious, but there is still a seam in the object where the 'beginning' meets the 'end' of our spin sur- face. I have found an easy trick to close it: while still in edit mode, first select all vertices in your object with [A]. Next, press [W] to bring up the Specials menu and use the 'Remove Doubles' option to weld the double vertices together.
After performing this operation, Blender reports on the amount of vertices that have been deleted. Just confirm this requester.

As a finishing touch, smooth the pawn by clicking on 'Set smooth' in the EditButtons window:
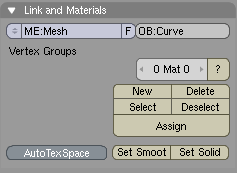
There is a good chance that the buttton on your screen will say 'et Smooth' because of the way the user interface is scaled on your screen.
Try holding down [CTRL] and dragging with the MiddleClick to modify the size of the interface elements. (And, yes, [SHIFT] and MiddleClick will move the interface panels instead of resizing them).
Show time! Switch to solid perspective mode by pressing [Z] and NumPad [5] and drag around with the MiddleButton to look around your object.
Continued on page 2...
93 Comments
Nice to see those old tuts revamped. They should all kept up to date for an upcomming manual. Only thing I miss is that you should show the new capabilities of Blender too, like vector motion blur.
Hi Toon,
maybe that's better suited for a new tutorial! This one is only about keyframe basics, the motion blur was a little 'bonus' ;-)
Cheers,
Bart
This is a great tutorial
I'm begining and it has cleared some dudes about it.
hi,
Isn't there a way to do the chessboard by bscript?
Chess are often used for programmation example, so why don't do the same with blender? :)
thx
I love this tutorial. I'm afraid I'm a tad past it though. This site has grown so much and provides GREAT resources that It's my new home page :D
wow, it's greate. thx.
Great Tutorial...
It helped me alot with some of the Blender Animation Tools I was missing.
My 1st 30-frame Blender Animation came out pretty good.
I sort of Tricked-Out the ChessBoard, BackGround, Pawn, Lighting and Paths + added 150-Frames amd WOW... Awesome Output !
Appreicate this site very much !
Much Thanks,
Orion
This tutorial is very educational.
Im a newbie so I struggled with this one a bit. Would be a good idea to mention that duplication can be achieved with SHIFT-D.
I also managed to create the chess board as part of the pawn object :/
I'm still trying to work out how to separate it out into a descrete object.
These things may seem obvious to experienced users, but you can't assume too much for the people who need the tutorial the most.
I hope these suggestions are useful.
I'm gonna have a crack at the other ones on this site.
wow, nice tutorial, thx
This is by far the best tutorial i've done!...I gained so much from this!
This was my first introduction to animation and all the rest looked so complicated,
But when you said press alt + A i was amazed at what i had done without much work at all!
Thank you so much!
wtf i cant add a color to just half the squares.... when i select half the squares then add color it adds it to all the squares
i cant figure out how to find the New effect button in the Anim Buttons window, i just dont see it can someone help
Here's a helful hint: When making your pawn, if you find that there is a hole in the top or bottom of it, simply select all the vertices around the hole, press [w] , select merge, then select 'to center'.
WOW! thats all i can say. exept that i never thought it would be so easy to animate something like this thankyou very much. :)
Dear Author,
Thank you so much for taking the time to make this tutorial. I have every intent of following it to completion. However, I am sure the steps below leave a number of things out. For starters if you created that plane in Front view, you wouldn't be able to have it lay directly on the grid. Please revise this portion and send me the steps, because as it exists now I can't follow.
>I start by adding a new plane to my scene. In front view, enter editmode ([TAB]), select all vertices ([A]) and >extrude the vertices upward a bit ([E]). With the vertices still selected, scale them down somewhat to create >beveled edges.
Thanks,
Christian Blackburn
Hello,
I too would like to thank you for this tutorial. I have really enjoyed learning how to do the modelling and rendering and now I get to add animation to the list. I just have one question. When I play the avi everything goes perfect. Makes me thrilled! But when I go to watch the video on winamp or any other program it just shows a black screen. Did I miss something??????
Thanks for your time,
Laura J.
Very nice and clear tutorial. I have put my avi on Youtube. Thanks Domin
the link is http://www.youtube.com/watch?v=256DqiItA-4
Yo this very cool tute very clear
good lesson :)
To add more points in the curve doesn't work at my version.
I dont get it, the curve line thing is werid and I cant figure it out.
THATS PRETTY DANG SWEET DAWG!!!
Great tutorial!
I have one question though. If we make the pawn and the chess board separately. How do we import the pawn into the chess board scene?
thanks
great
Felicidades por el tutorial
Lo seguà paso por paso, claro que previo ya habÃa visto
2 o 3 tutoriales. Excelente tutorial para aprender algo
más sobre rendering.!!
Muchisimas Gracias.
Nice tutorial! I'm rendering mine now. One little comment: rotating 180 degrees doesn't seem to make the "black" squares fit, you have to rotate it 90 degrees instead.
@Barney: I'm sure there's a way to do that, but personally I just didn't make them separate. Since the pawn in the first frame is pretty high up, it doesn't get in the way of the board.
THANKS , ITS MY FIRST WORK IN BLENDER AND ITS PRETY GOOD
THANK YOU VERY MUCH.
first of all im only 15 so i prolly shoudnt be messing with this program but im trying to figure
out how to delete the default cube . as well as understand how to get to the point in which you can draw out the object i can move it i can copy it and make mutiple of the same i just dont get alot of this if any one would no of a manual or a starters guide that would be much apriciated
obsticle714 osc official stencil crew dbk drippy bomber kids
@obsticle: A great introduction to blender, along with basic tutorials, can be found in "Blender 3D: Noob to Pro" @ wikibooks - http://en.wikibooks.org/wiki/Blender_3D:_Noob_to_Pro
Good luck - blender rocks!
awosme tutorial this would be the first successful thing i would make
i did something wrong it turned into a vase not a pawn lol
This tutorial is awesome! Didn't realize it was so easy to make a smooth, good-looking animation. Props man, very well explained, it introduced a lot of new concepts and helped me practice a lot that I already knew but was still uncomfortable with.
hey....
is there anyway that I can animate a texture using keyframes?
email me at [email protected]
Thanks
Hello,
I wasn't playing much with animation in Blender before and found this tutorial really nice.
I have encountered a small problem though. I'm using Blender 2.42a and for me the pawn sinks a little into the "ground" when it's rotated on frames 12-15 and 17-20. It looks like if the rotation is calculated by Blender using the object center.
Rotation was created with 3D cursor as a pivot set on the bottom edge of pawn and manually rotating the pawn was looking correct. Keyframes 11, 16 and 21 were set with pawn position and rotation as shown on pictures in this tutorial.
Did I miss something?
GREAT TUTORIAL
I'm a begginner and this is one of the only tutorials I actually understand. I have a question though (it's not about the tutorial itself but about blender and my computer) is it normal that it takes so much time to render an animation?
thanks for answering
Anonimous
BIG EXTRA
PS: this is a big extra if you want to make it neater (you really should consider it). To make the pawn land in an elastic way on the shessboard, first go to frame 41. Now move the pawn to the right and down so it is at floor level. Rotate it so it's horizontal. Then make it like in frame 16 (squished). Insert keyframe (I) LocRotScale. Now go to frame 51 and make it like befor (z axis: 1.3, y axis: 0.7 and x axis: 0.7). Now insert keyframe (I) LocRotScale. This will make the pawn land elasticly. GREAT WAY TO IMPROVE: IT LOOKS REALISTIC.
thanks for acknowldeging.
hi when I press [I] in the animation part of the tutorial i do not see the key option LocRotSize all I see is LocRot, could somone help me pls?
Wow that blur is cool, but it slows the render r-i-g-h-t d-o-w-n!
Thanks from a Blender noob. 8-)
Oh and chuckwagon, in my version of blender (243) it's LocRotScale in the key-frame menu.
Hello Bart,
I found it easy making animations in blender. I'd be so grateful if you started some tutorials on 'Lighting' and 'Texturing and shading'
Thank you
Swietny tutorial!!
Dziekuje
The squashy effect really is brilliant, and so simple to do. thanks!
This is a great tutorial, and has left me inspired with an idea for my first Blender comedy short - "A Prawn in a Curry" :p
what happened to the next pages???
Where is the whole tutorial I can only find the first part
Oops, sorry guys, I had installed a new plugin that ate some of the HTML. Everything's back to normal now.
a really nice tut
I know it has nothing to do with this but, do you know how to make more human shapes?
thanx
for all the other newbs (like myself) that had issues with the pwn being attached to the checkerboard ... i figured it out!
when go you to make your surface (" ... I start by adding a new plane to my scene. In front view, enter editmode ([TAB]), select all vertices ([A]) and extrude the vertices upward a bit ([E]). With the vertices still selected, scale them down somewhat to create beveled edges ...") make sure that all other objects are deselected. That was is. Happy modeling
how do you paste??? I'm using 2.43 :)
this is a cool program
It's not that easy to work with the curves... =/
hi im having trouble with this step
On frame 16, Place the 3D cursor at the base of the object. Enter scale mode and start decreasing the object's size by moving your mouse vertically. Next, click the MiddleButton to indicate that you only want to change the objects Z size.
where is scale mode?
just want to say thankyou for sharing your knowledge openely so that others can get to grips with the tools on blender complete beginner!!! but following your instructions is much welcomed many thanks again
mark
this is the most clear tutorial about blender i have seen.
CAn anyone tell how to add extra points to the bezier curve because when i hold ctrl and left click on the endpoint it doesnt do anything i also dragged it and it made a gray line but then it went away when i left go of the mouse click
can sum1 tell me what im doin wrong plz
wait i worked out a different way to do it i think its coz i got versoin 2.44
but its such a good tutorial thanks!
When i spin it it tuns into a wierd cup like thing or sometimes the normal one but with curved lines but when i press all the things and press z and 5 it satys the same and doesnt go 3-d or anything
can sumone help me please
locRotSize
I don't seem to have this I'm only showing locRotScale?
Hello Bart,
It's great that you make tutorials to help us all getting better in such a fun program but i have some problem.
i tried out your tutorial but as strange as it is when i ended part 2 of the tutorial i stopped because i inserted all key frames with the I key and LocRotScale but when i play the animation it isn't animating, but just at the same place.
I don't know why it is doing like this though.
- Roel
Hello again Bart,
it is getting even stranger now, i just made a short animation of something like 2 seconds where you see some model rotating while it moves a little, i did it by using the LocRot buttons at different Keyframes but the strange thing is.
If i try the same thing again now in other new projects, it doesn't work :/
Maybe you can help me out?
Help is appreciated.
Oh, i think i already found out what the problem was, just switching to object mode while pressing the I key and using LocRot seems to work.
Thanks anyway, and especially for the great tutorial. :)
How do i apply the materials to multiple objects at once. i have selected all the chess board objects and select the colour i want, but it just appears on the last square i clicked.
Fantastic tutorial,
many thanks.
exelent tutorial! :)
I can't seem to add more points in the Bezier curve... can anyone help me???
RE: new guy
I had a problem whereby my window manager [kwin] was intercepting some modifier+click commands. Check the settings in your WM.
very good tutorial, but in the machine world ther is always a weird problem, here's mine:
http://img340.imageshack.us/img340/407/model2rf6.jpg
can you see those extrange shadows in the squares?
i tried changing the light but it doesn't seem to be the problem.
before rendering and before seting them smooth i could see that too in the 3D view.
i'm more curious than worried, if someone knows what causes that.
unfournately i'm using win XP so maybe that's the problem XD
My pawn comes out looking awful.
Cara, muito bom tutorial !!!
Aprendi muito !!!!!!!!!!!!!!!!!!
Obrigado !!!!!!!!!!!!!!!!!!!!!!!!!
Thanks a lot,
I got blender several hours ago and the techniques in this tutorial really helped me.
Thanks again =)
~LightningIsMyName (LIMN)
Help wanted,
why is it that when I render on Mac tiger, all I see is black surface on blue background? but when render on PC, I se the fully shaded textured object??
Thanks.
that's cool. really cool.
In the tutorial the second figure with the curves of the pawn is there a larger picture somewhere because when I zoom in it gets blurry? But other than that a great tutorial.
Is anyone out there willing to message me on Blenderartists with this?
Thanks for this tutorial. It has some very important concepts that a beginner can learn quickly.
I'm having trouble creatingthe shape of the prawn with the bezier curves, it's really hard controlling the lines and stuff, I guess this is the 3rd tutorial I've stuffed up already.. ;__;
how do I delete keys? I mean, ive got a little problem with the keys I dont want... they eat up my animation sequences. please help!
@Andrew: This is what I was talking about with the pic being small and have wondered if there was anyone out there who has a bigger pic with the bezier curves for the pawn.
Ik wil beginnen met blender . Wie kan mij helpen? Hoe en waarmee start ik?Waar kan ik terecht voor een avondcursus / privécursus in de omgeving van Antwerpen?
@desseyn johan: To start I suggest the book 'The Essential Blender' it's for 2.44 but it can still work, the Blender.org website, blenderartists.org, Introducing Character Animation With Blender. These should help you get started.
DJ_Boxer
I found a link on the wiki page for modeling a house to a pdf of the Blender Tutorial Guide. It is from the NaN days but it is still good to get started. I will post the link later when I can.
The links are:
http://download.blender.org/documentation/BlenderTutorialGuide1.zip
and
http://download.blender.org/documentation/BlenderTutorialGuide1.tar.gz
It includes this tutorial among others through the noob2pro wikibook.
Happy Blending!
Very good tutorial, Although I modeled my pawn using extrusion. The steps were nice and clear, And you actually explained what you were doing, As opposed to some other tutorials.
Next, Do a Complex Texturing tutorial!
im new to this kind of animation...but still im interested!
Hi guys this tutorial totally rocks my socks. We have to do this in our animation course at school.
p.s. i like it hard.
Nice tutorial.
Hey everybody,
I'm just staring with this 3D esign program,it's very nice, but unfortunately I'm stuck at the beginning of the third page of the Pawn : I made my pawn smaller and fatter while being on frame 16, but when I pres the [I] button to click on RotLocScale (or size), all my sequence is made of pawns that are just ... fatter and smaller, but no bouncing !
If anybody knows what I did wrong, I'd appreciate the help.
Thanks.
oh well, it didn't work yesterday but it does today !! Don't know what I did diffferenty though. lol !!!
Not Very Clear...
"You can add extra points to the curve by selecting an endpoint, holding down[CTRL]and LeftClicking. Try playing with the curve a bit before going on - also pay attention to the way the 'handles' affect the direction of the curve in a particular point. Shape the curve as indicated below, and pay special attention that the endpoints on the left are located on the blue axis (the Z-axis). I will be using the Z-axis as the axis of rotation later."
i maked it :)
ty for u
im confused... i have the 'Bezier curve' but now i dont know what to do next... if anyone could help me that would be rly nice...
Ive made the pon but i want to use it in an animation with somethingelse , when i import something it replaces the other one, can anyone help me , please thank you
Dan Blue,
I had the same problem for a long time and just barely figured it out myself.
To import something from another .blend, go file>append and select the file you want to import from. You will be given a list of classes. Select "object," and then select the name of the specific object you want to import.
Good luck.
Hi,
I have already done some tutorials and everytime I add something (mesh - bezier curve ) it always
comes in the TOP VIEW. I mean when I do NUMPAD 1 for the FRONT VIEW and than I ADD CURVE BEZIER CURVE, I only see a straight line. I have to switch to TOP VIEW to see the curve and to work with it.
It was the same when I made a dolphin with the tutorial, the result was that the fin didn't stand on the
dolphin but lays flat.
Can you work with a bezier curve in the front view, and how doe I doe it.
Please help
Same question as JEF, top view is fine but most of these tutorials say to start off in front view which is making a thin straight line, How can we work with planes/cubes/curves in front view?
Excuse me Admin, PLEASE FIX THIS PAGE! I am only able to view the first page! Thanks in advance.