
INTRODUCTION
Hi BlenderNation. I'm Server, a young 3D artist from Spain. I have been working and learning 3D for a few years. Nowadays, I think I’m a beginner who wants to continue with his learning.
I discovered my love for art in my childhood when I started drawing every character from my imagination or from my favorite TV shows.
HOW I STARTED IN BLENDER
When I was 18, I started my Fine Arts degree at the university where I spent four amazing years and met nice people and learned a lot about art, thanks to my teachers and even to my classmates. It's incredible how much you can learn only from them, and all of that knowledge has been extremely useful to me to this day today.
3D art was a discovery for me, thanks to a friend who showed me Blender at the university. The first time I saw Blender, I thought that these types of programs could only be used by very smart people; I mean, I saw it as a tricky maze so it wasn't interesting to me at first. But I remember that step by step, I started watching some video tutorials on YouTube just for fun, and when I realized all the stuff that Blender makes possible, I began to be attracted to it. I remember the first video that helped me to get started with Blender. It was uploaded on YouTube by Eme Uve and it was about a low poly car. I learned tremendously with that video and when I started doing simple things that worked, I wanted to learn more and more.
My second “teacher” was the legendary Blender Guru with his famous tutorials about doughnuts. Since then, my learning hasn't stopped, by watching video tutorials on YouTube or Artstation or even by following other artists whose artwork has become a significant reference for me. So, yes, you can learn a lot just by using the Internet. We have a zillion opportunities to learn almost everything through our screens. So if you think you don't have enough means to learn 3D, be mindful and take advantage of it!
As for my social media, I decided to create them to share my artwork with people, receive feedback, learn a lot from following other artists, and use my profiles as a window display to be able to make a living from my art.
AN OVERVIEW OF MY WORK
What about my projects? In general, I love 3D Art because I truly enjoy creating everything I have inside my mind. Most of my projects are portraits of different characters, some of them created from my imagination, and another sizable part of them is based on pre-existing characters that I want to remake with my style, from my point of view.
Regarding pre-existing characters, I started being inspired by cartoon characters such as SpongeBob, Doraemon, and Homer Simpson. At that early stage, I had many artists to inspire me like Yan Blanco, Miguel Vasquez, and Wil Hughes, although I didn't start in 3D doing those characters just because I was inspired by them.
As I said, I always loved painting and drawing my favorite characters and when I learned 3D, I wanted to do the same but digitally, and their results amazed me. And that dark, disturbing, and “grotesque” style was always inside me in some way. But obviously, these kinds of artists were and are a huge inspiration for me.
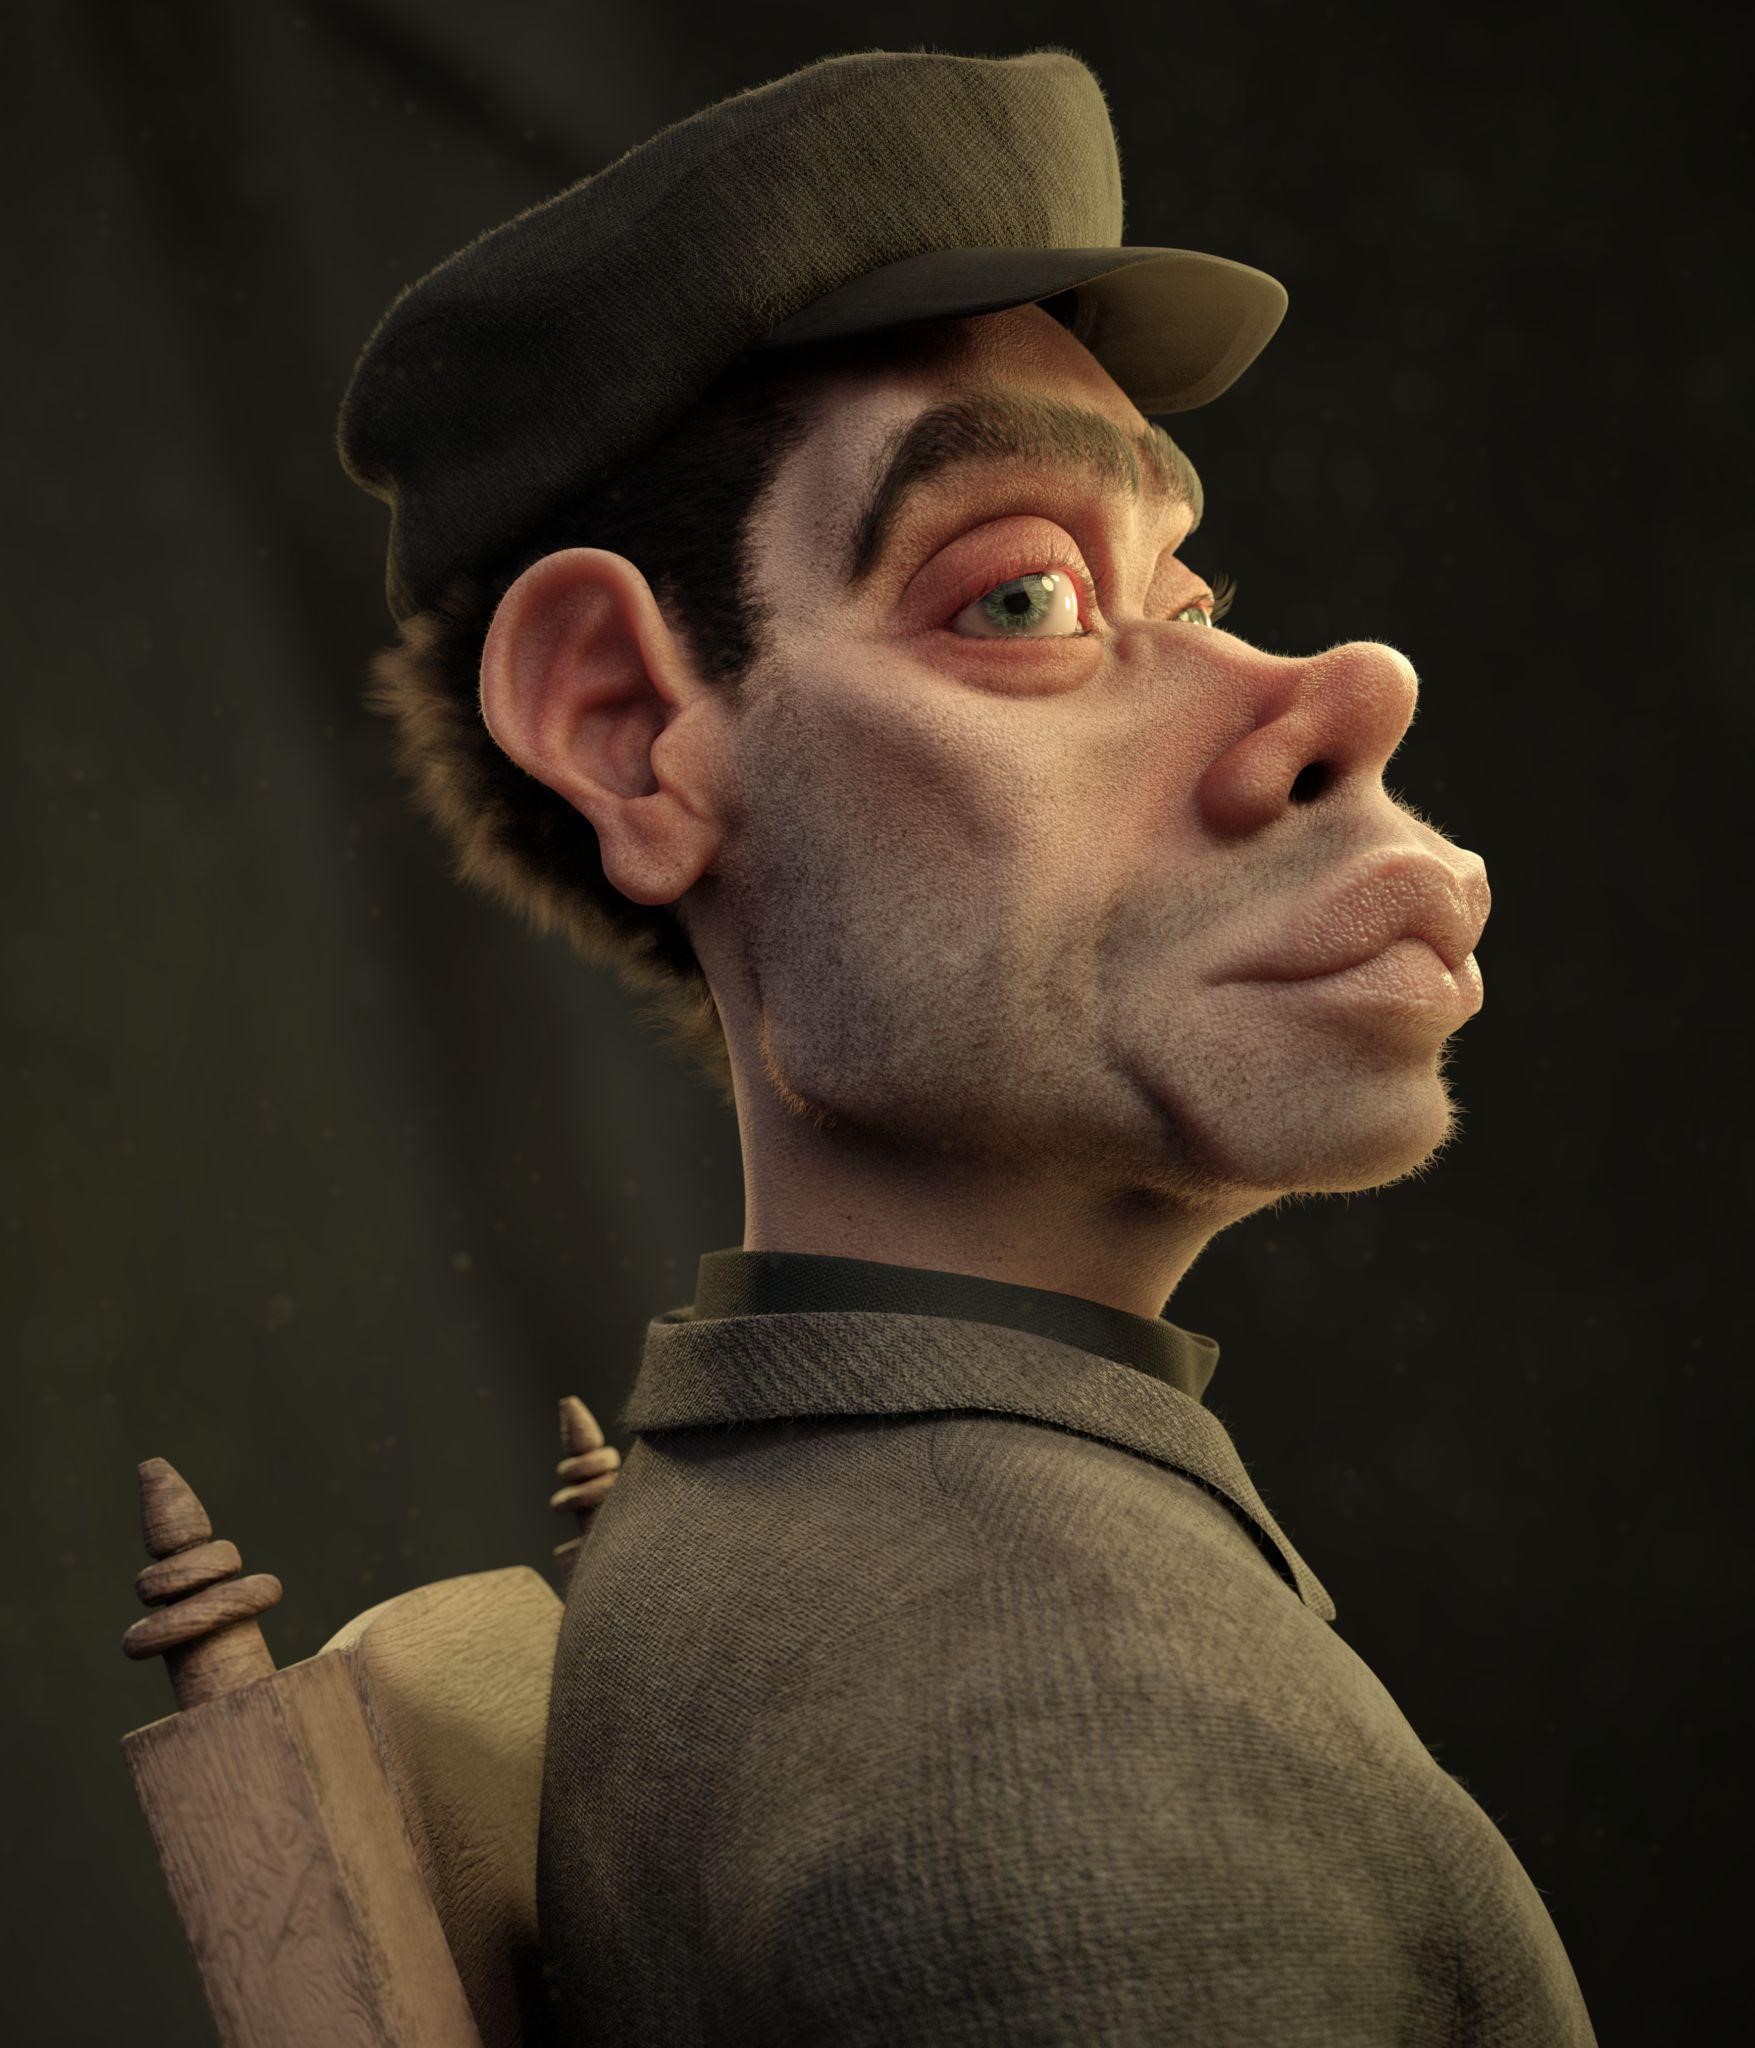
Now, I want to start a new project, a series of artwork based on characters portrayed by painters like Vincent van Gogh, Picasso, or Goya, are among a wide variety of artists. So let's talk about one of these last portraits: “Potato Eater.”
REFERENCES
Before I start sculpting, I do brief research, looking for some reference images that help me along the creative process. Obviously, in this case, I needed a reference to the original painting, “The Potato Eaters”, painted by Vincent van Gogh in 1885.
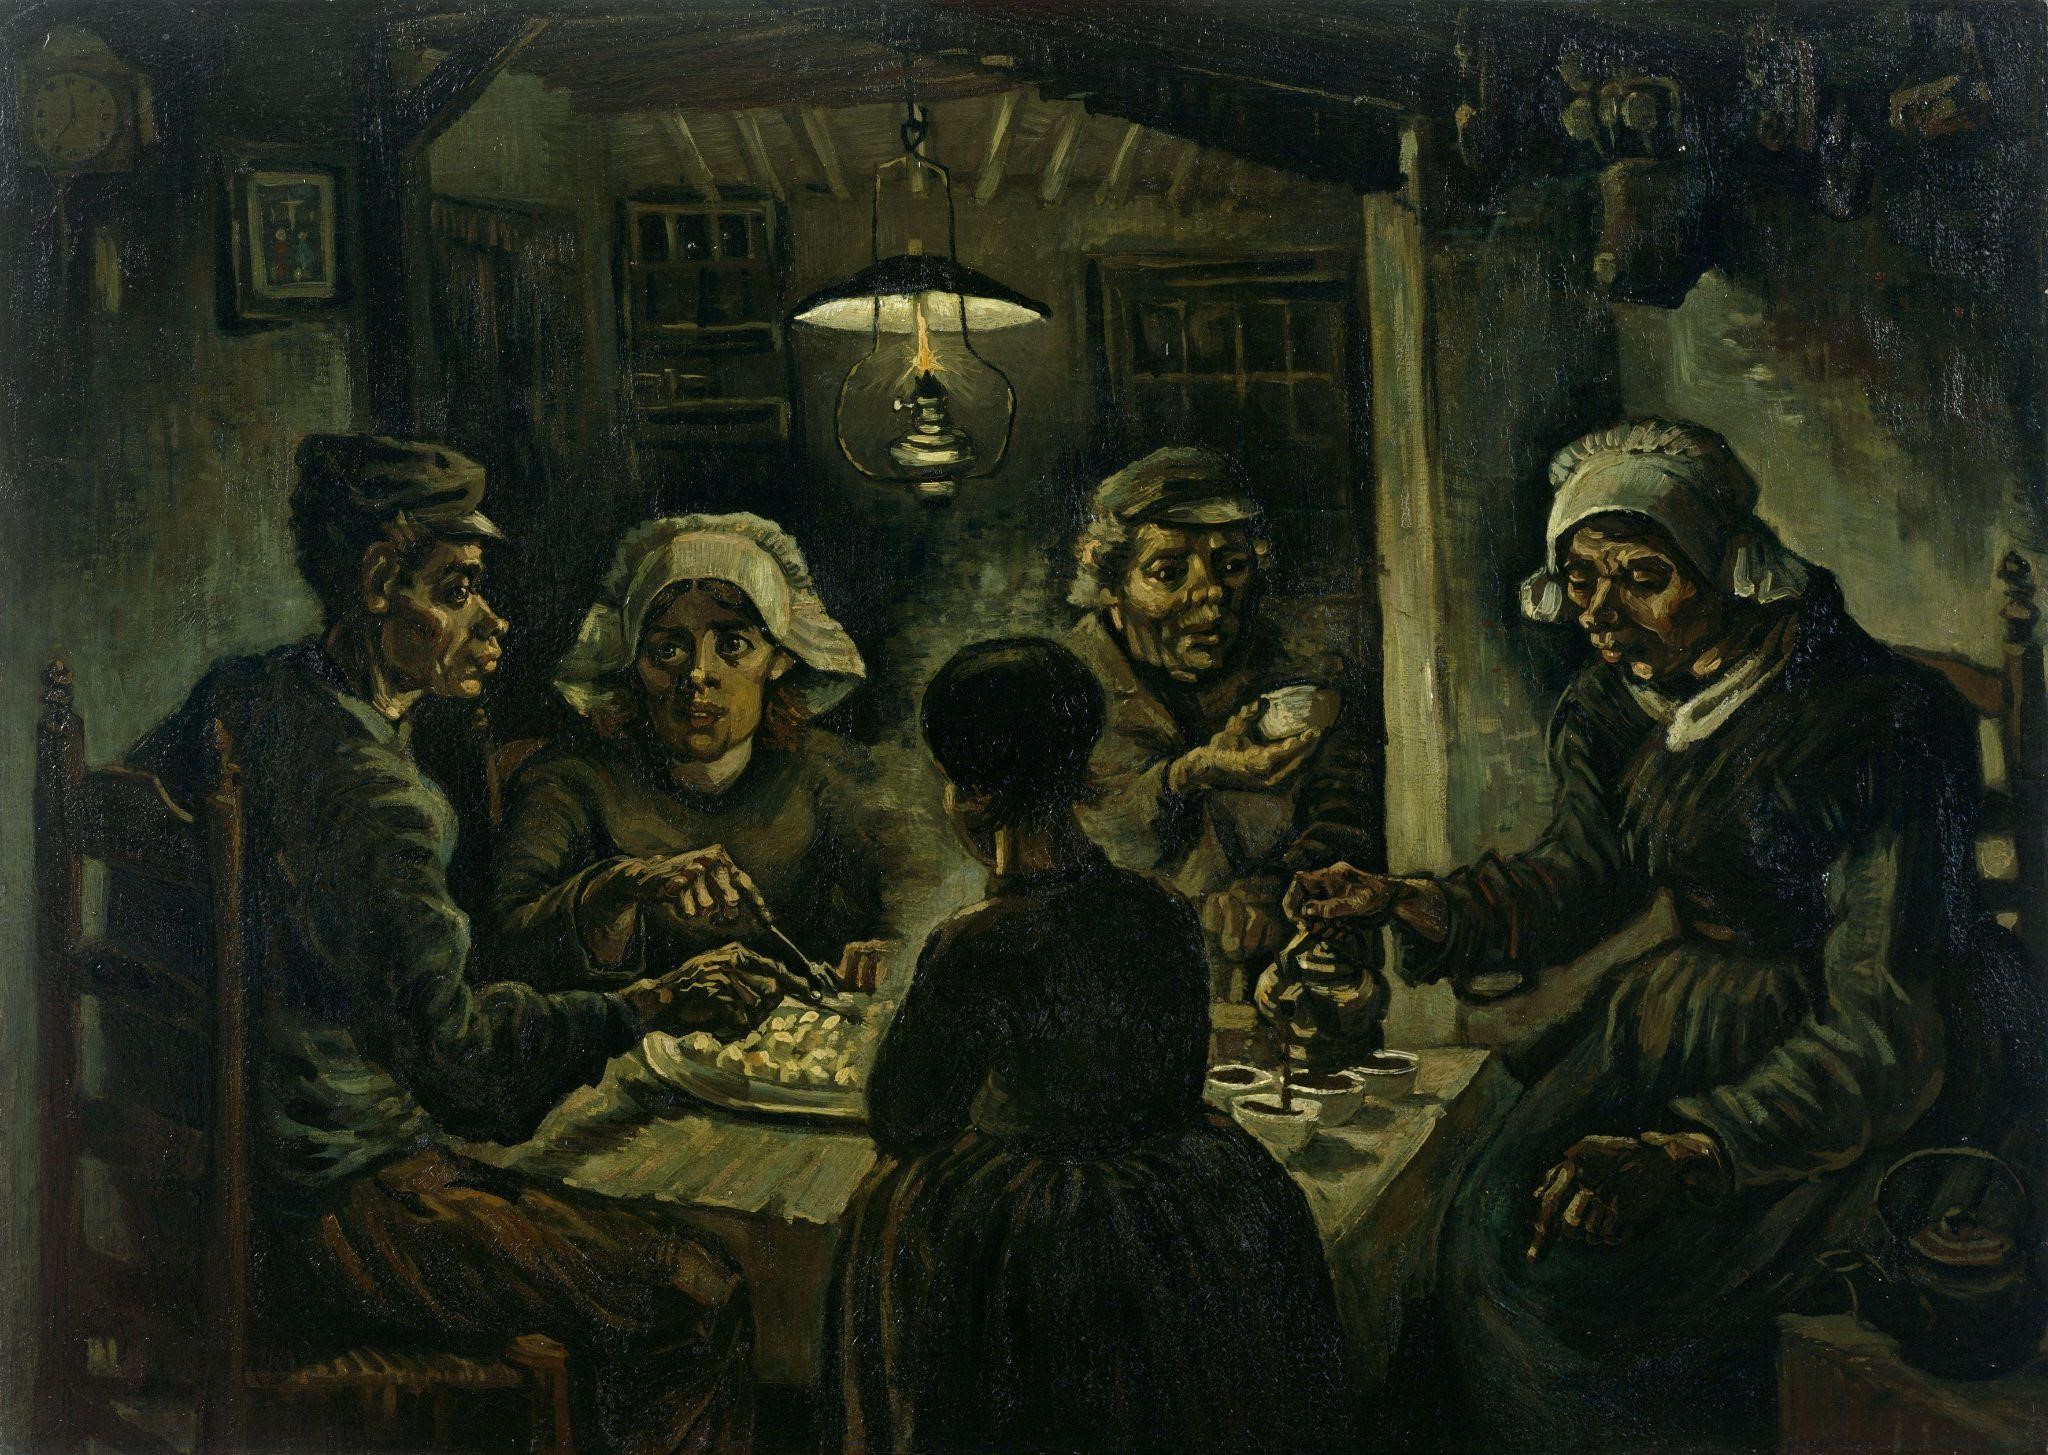
I decided to make a portrait of one of these characters because I love their facial expressions and their proportions. They come across as very striking to me.
Continuing with the references I needed besides this image were some anatomy references and texture references. I even used photographs and artwork done by other artists as a guide, to know what kind of result I wanted to get.
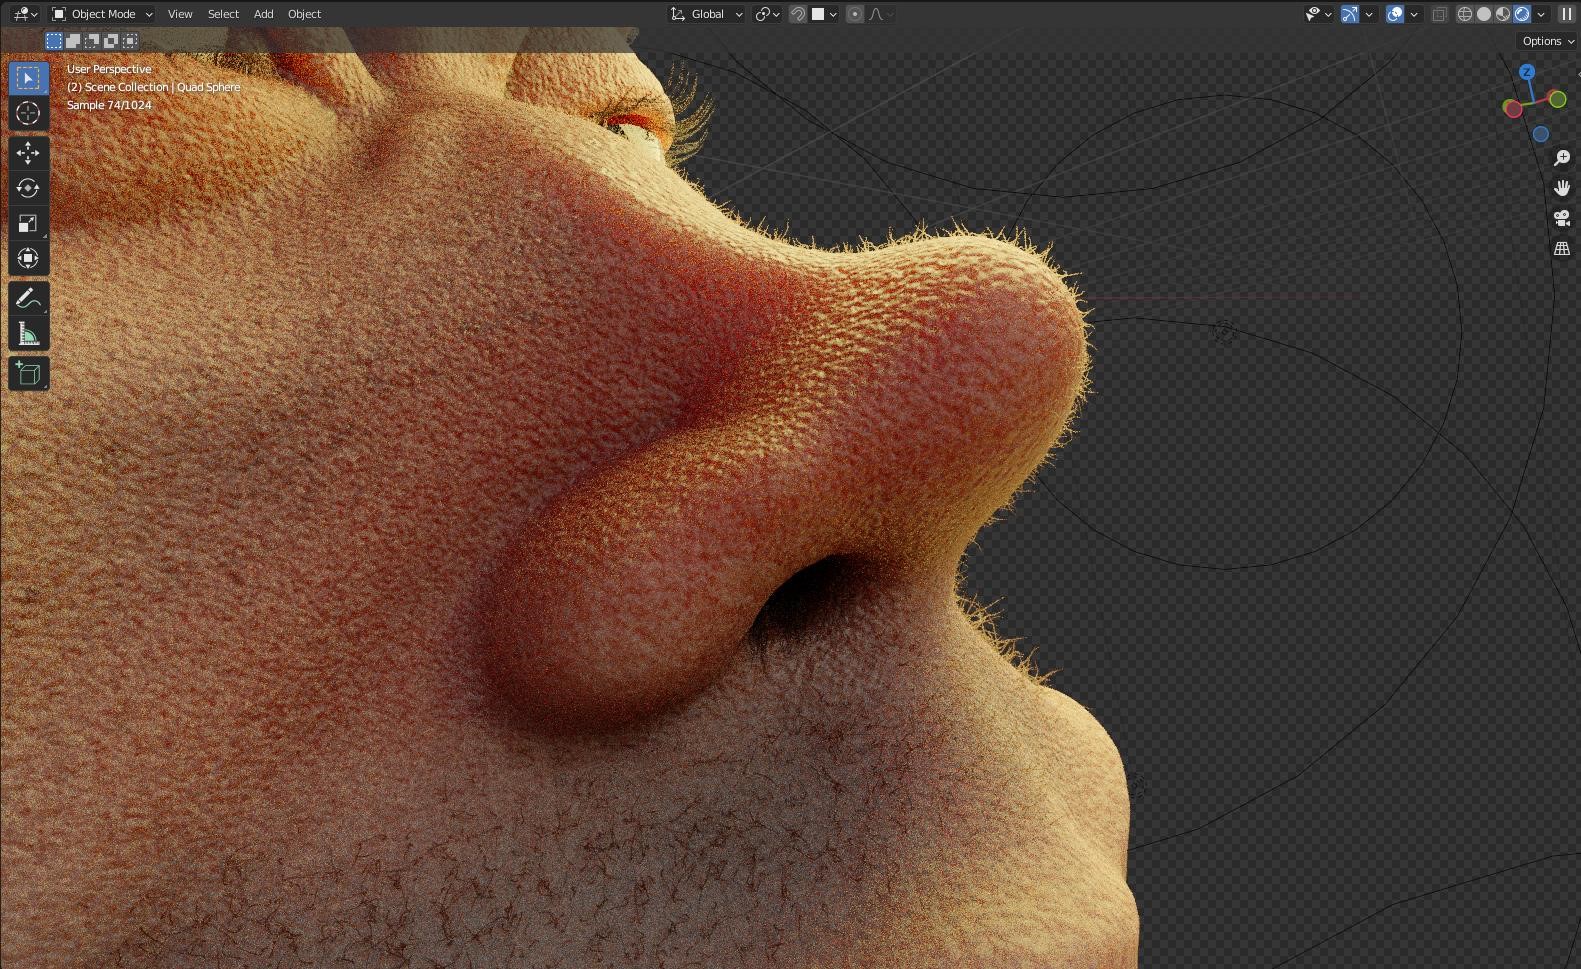
SCULPTING, MODELING, AND SOME DETAILS
As for the first steps, the modeling, and the sculpting process, there is nothing too original about them. I just created a new project in Blender and started to sculpt the main parts of the character, and in this case, I only needed the head, the neck, and the upper torso.
Firstly, I sculpted those parts separately and when I thought the shapes were correctly sculpted, I used remesh to merge them. Once I did this, I could continue with more detailed work.
Usually, when I find a character that is more or less acceptable, I start to model other stuff like clothes, props, or even a background. I don’t wait until I finish the character to start with them. I do everything at the same time. Maybe I work like this because of the workflow I followed while I was studying Fine Arts. For example, when I paint, I don't normally go bit by bit; in other words, I like to work equally on every part at the same time to avoid leaving something behind.
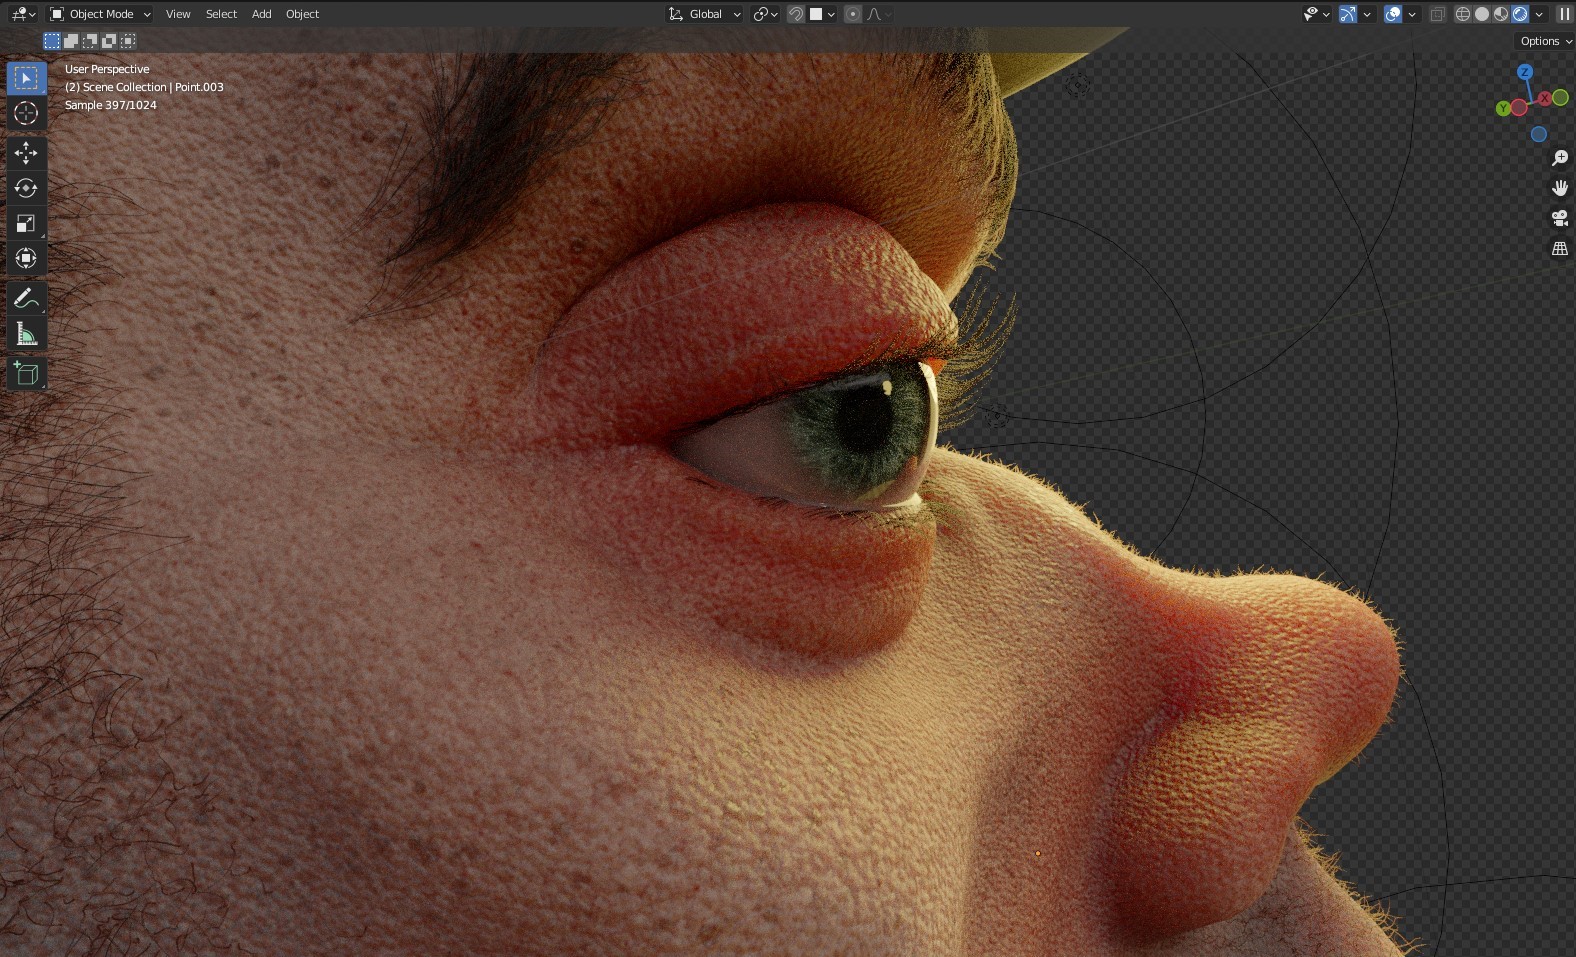
Before starting with the textures, I used the particle system to add hair. I used this not only to make the main hair but also to add facial/body hair to the character like a beard and that thin facial hair that gives the character great detail and realism.


Concerning the background, I have to say that I don't usually model backgrounds to my renders. Sometimes, I prefer to use some HDRIs or images with a wide defocus effect just to avoid a simple black background.
So I decided to make a quick and easy background based on the character’s room. I sought to make the character the only point of interest in my work and I didn’t want a background that would be a distraction. So I did it without too many details, something quick that works.


TEXTURING
To make the textures, I use Substance 3D Painter. This part is one of my favorites of the whole process. I enjoy this moment, and I guess I spend a lot of time on this part. Just as the Old man said in Toy Story 2 while he was fixing Woody: “You can't rush art.” The way the textures allow you to bring to life anything, is incredible. This is probably one of the most significant parts to make something realistic, even more than the sculpting process itself, in my opinion.
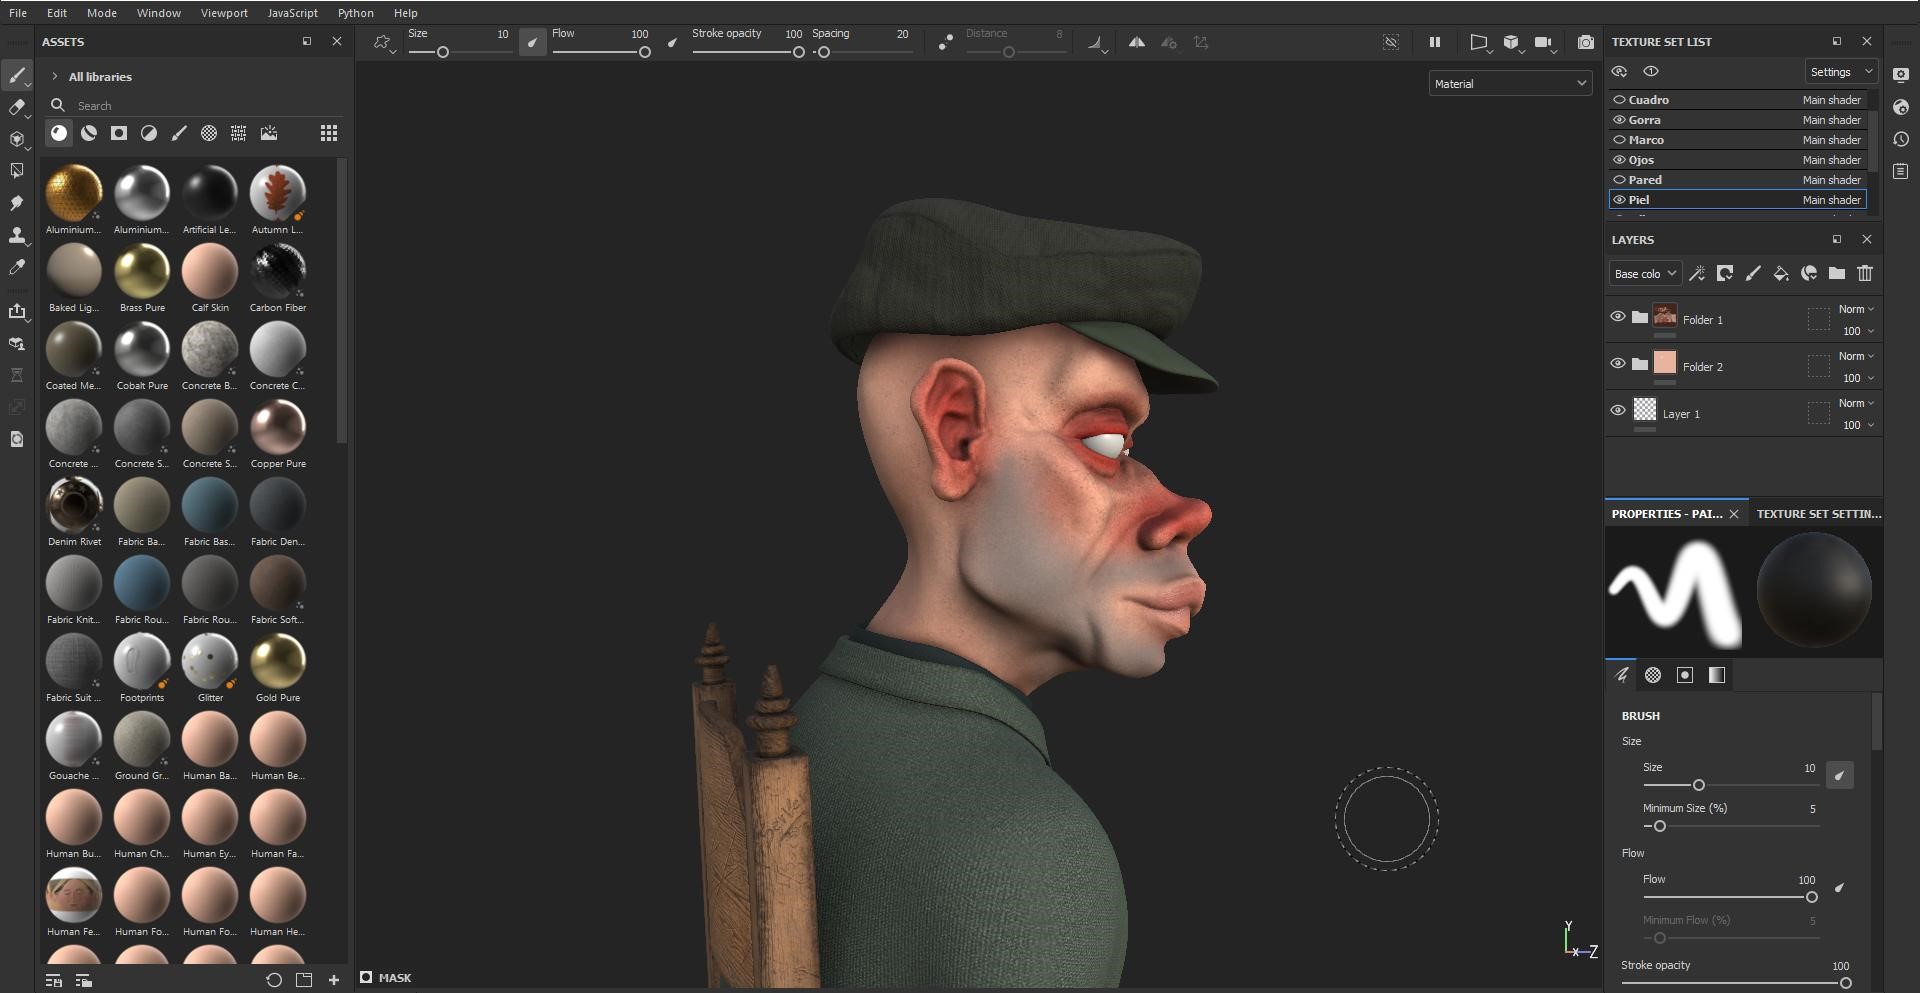
Sometimes, like in this case, I used Substance Painter not only to add color, roughness, or subsurface scattering to the character's skin but also to make the skin textures such as the skin pores that I didn’t do in Blender during the sculpting process.
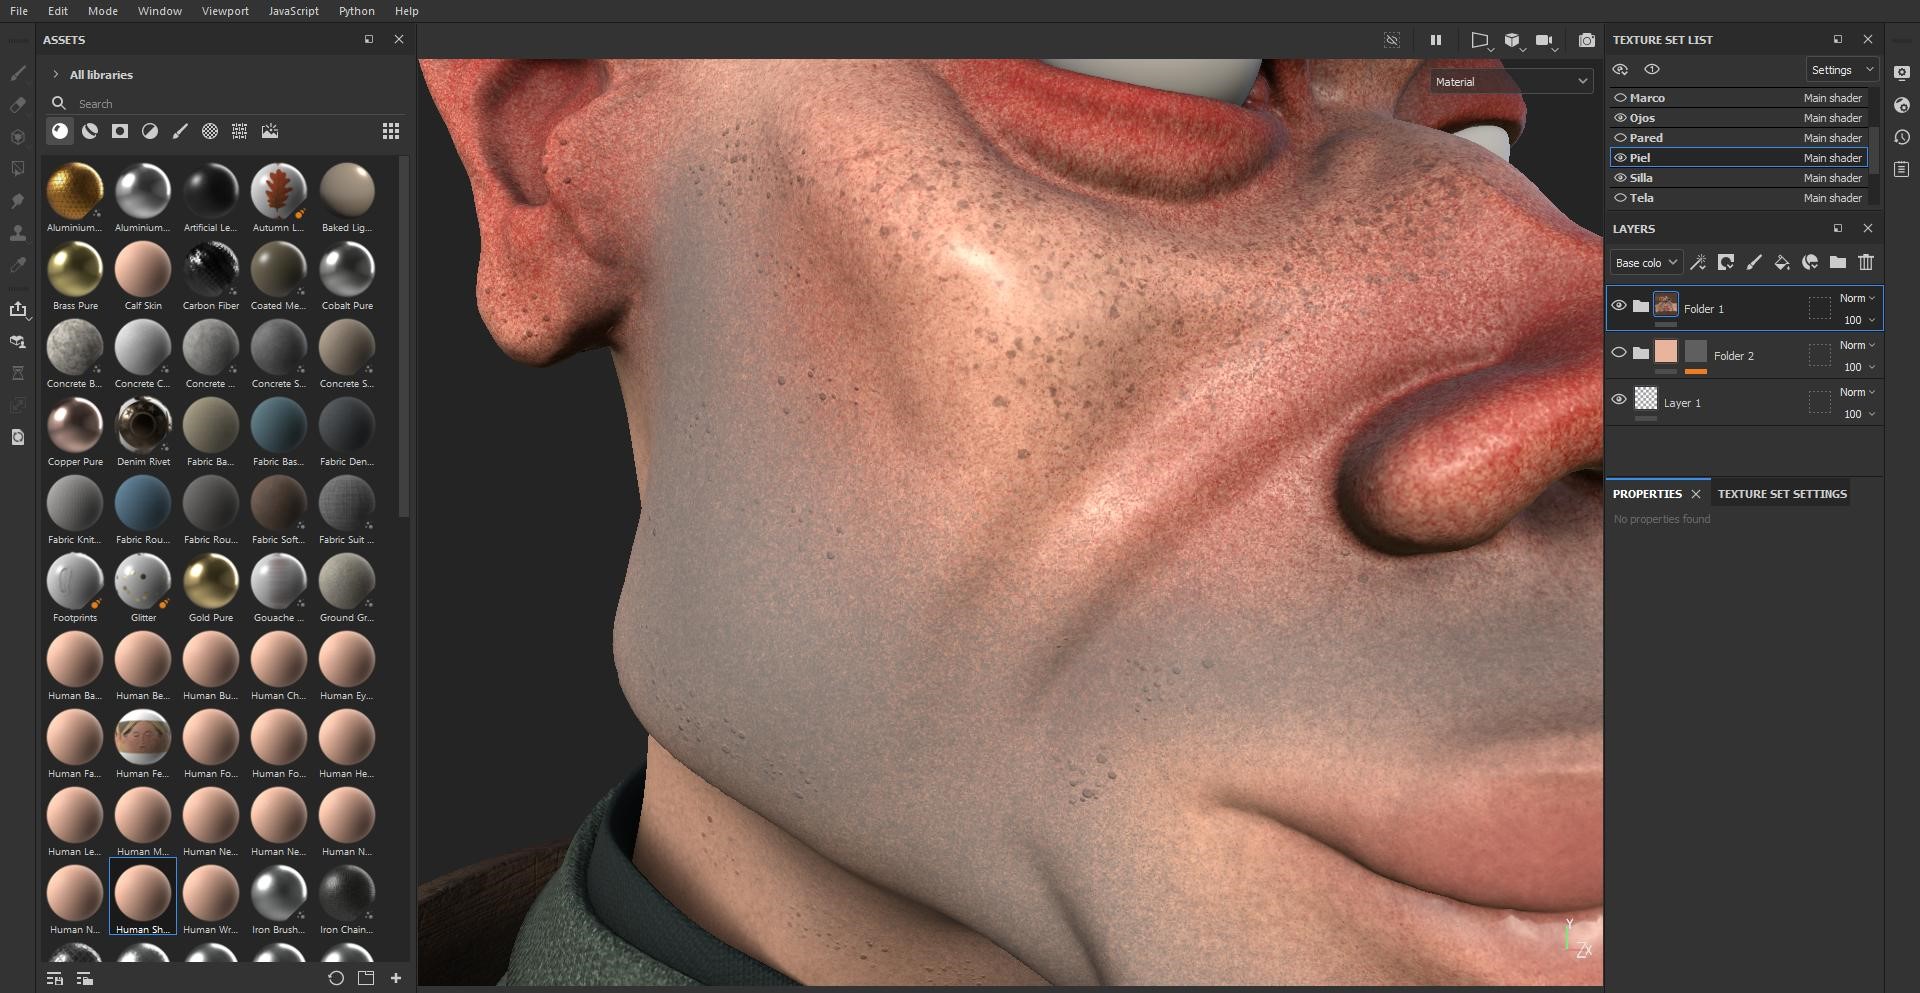
I know that a wide variety of brushes to sculpt skin textures exists, but Substance Painter also offers a lot of materials and brushes that are very useful to create this effect. I am used to this method because my last GPU (which I used when I started this project), wasn't strong enough to sculpt skin textures in a high-poly mesh with a gazillion faces. So this way of working was a solution for me then. But even now, with my new GPU, I often prefer this way of texturizing my characters.

FINAL STAGE (INSIDE BLENDER): SCENE, LIGHTING, AND RENDERING
Now we are nearing the end. We need to compose the scene to do a render with a nice result. Let's start with the camera angle. I usually use the camera angle from the start of the project but sometimes, once I see how the scene is, I prefer to try another better angle. Also, I use some more cameras to do different shots of various details.


Another significant aspect is the lighting. From my point of view, this is very important because bad lighting can ruin your render; on the other hand, a good lighting can improve the final result immensely. It can even help you to hide some mistakes or parts that you don't like very much… Yes, you can't rush art but sometimes we need to use some “magic tricks” to save time!
For this project, I used different light points to get the result I wanted. In general, the set of lights is formed by some general lights with a wide range to illuminate the characters from different angles and to get soft shadows. Another group of lights is behind the character, and I love to use them not only to separate the character from the background but also to get an attractive effect with the hair particles.
Other lights are set with a thin radius to get some contrasted shadows onto parts I like and to cast a shine on the eyes and the tear lines, bringing more life to the character.
Finally, I adjusted some camera values to add depth of field and to do some test renders in a medium quality to check the result. And let’s go, everything is now ready to do the final renders.
RAW RENDER

EDITION
To finish the images, I always edit the renders to give them a better aspect. As I said with the lighting, this is also a very essential aspect of our process so we need to do it carefully to get a great result.
For this process, I used GIMP, a free photo editing software, which is very useful and easy to use. With it, I retouch some values like the lights and shadows, the levels, and the color and use some effects like vignettes or particles to add atmosphere to the image. And don't forget to put the background that I rendered separately. And there you have it, it's finished!
POTATO EATER


Thank you for reading!
About the Artist
Server, is a 3D artist based in Spain.