

About
Hi, my name is Miguel Eduardo, I am 26 years old and I am originally from Mexico. I am an illustrator with a focus on 3D; on social media I am known as Kiddo. I chose this nickname because, when you separate the word, you have Kid and Do and most of my projects contain cute and colorful elements that evoke that childhood: "The kid do".
I studied Graphic Design. During my university training, in an extra class, I got to know the world of 3D. I immediately fell in love and from that moment, in my free time, I began to learn everything I could about 3D and its development.
Since I was a child I have always been fascinated with animated films, mainly Pixar productions, but I always mistakenly assumed that developing 3D was a process too far from my reality.
I remember spending hours during my childhood watching "making of" or behind the scenes of Pixar movies that my parents rented for me at Blockbuster. I watched them over and over again as I was fascinated to see the creation processes and how professionals existed with such specialized knowledge that allowed them to create just the hairs of a character or the simulation of fluids, to give some examples.
So it was a great surprise for me to discover in university that 3D software now allowed anyone to develop projects—it all depended on how much interest you had in learning. This new knowledge was what motivated me to improve and investigate more on my own.
Lucha Bot
For a while I had wanted to do a more complex scene, especially to focus on texturing since at the end of 2020 I had started using Substance Painter and I loved how easily it worked with Blender and PBR materials. So I gave myself the task of looking for a 2D concept to make my 3D version. I spent a few weeks searching until I found the amazing work of illustrator Elita Elkana.
View this post on Instagram
LUCH4-B0T seemed like the perfect concept for this personal project. To begin with, the illustration was focused on a robot, which is one of my favorite elements to illustrate. Secondly, it represents part of my culture by having a luchador. Additionally, texture-wise it had a set of perfect surfaces to practice what I had learned in Substance Painter.
Finally, the little boy in the illustration is named Miguel, just like me hahaha. So I took this last sign to choose this concept and start working.
From the beginning, I knew that there were many elements of the illustration that would be a challenge for me since I had never modeled something like this. Nevertheless, I decided to choose this concept to improve during the development of the project. In other words, get out of my comfort zone and push myself to improve and learn new techniques.
In addition, working from someone else’s concept meant that I had to stick to it as closely as possible and could not change elements. This part I saw as an extra challenge for the project.
Inspiration
My main inspiration for the look of the illustrations is stop motion studios like Laika and the work of Wes Anderson. I just wanted to achieve that feeling of real materials applied in a scale model, to achieve that sense of being able to feel the materials and their textures.
Regarding the lighting, I was very inspired by the Pixar film Luca, especially in the interior scenes where the light entered from the side and gave the film a warm and comforting look. It was what I wanted to achieve with my illustration.
Another element that I found very fun was adding many easter eggs from series and movies that kept me inspired during the development of the project.
Tools and process
I started the project modeling all the characters and elements of the scene in Blender. Several add-ons helped me to be more efficient in this process.
- BoxCutter: to create the hard surface elements of the robot
- UV Zen: to optimize and accommodate UVs
- Texel Density Checker: to have the same texel density in all textures
- Node Wrangler: to set up the textures from Substance Painter in Blender
There were two elements that were complicated to model during the project. The first was the poncho since I had never modeled an object with these characteristics.
First I tried to simulate the fabric inside Blender to create a more natural drape but the end result had too many folds and was a distraction from the final composition. Additionally, it was important for me to keep the silhouette as close to the original artwork as possible. I solved the problem of the poncho by dividing it into two parts, the front and the back. I simulated the back part by holding a set of vertices to the back of the bot, which gave me enough folds. On the other side, the front part of the fabric was manually adjusted without any simulation in order to reach that intermediate point where it preserved the silhouette but had enough folds that the shape could be better understood.
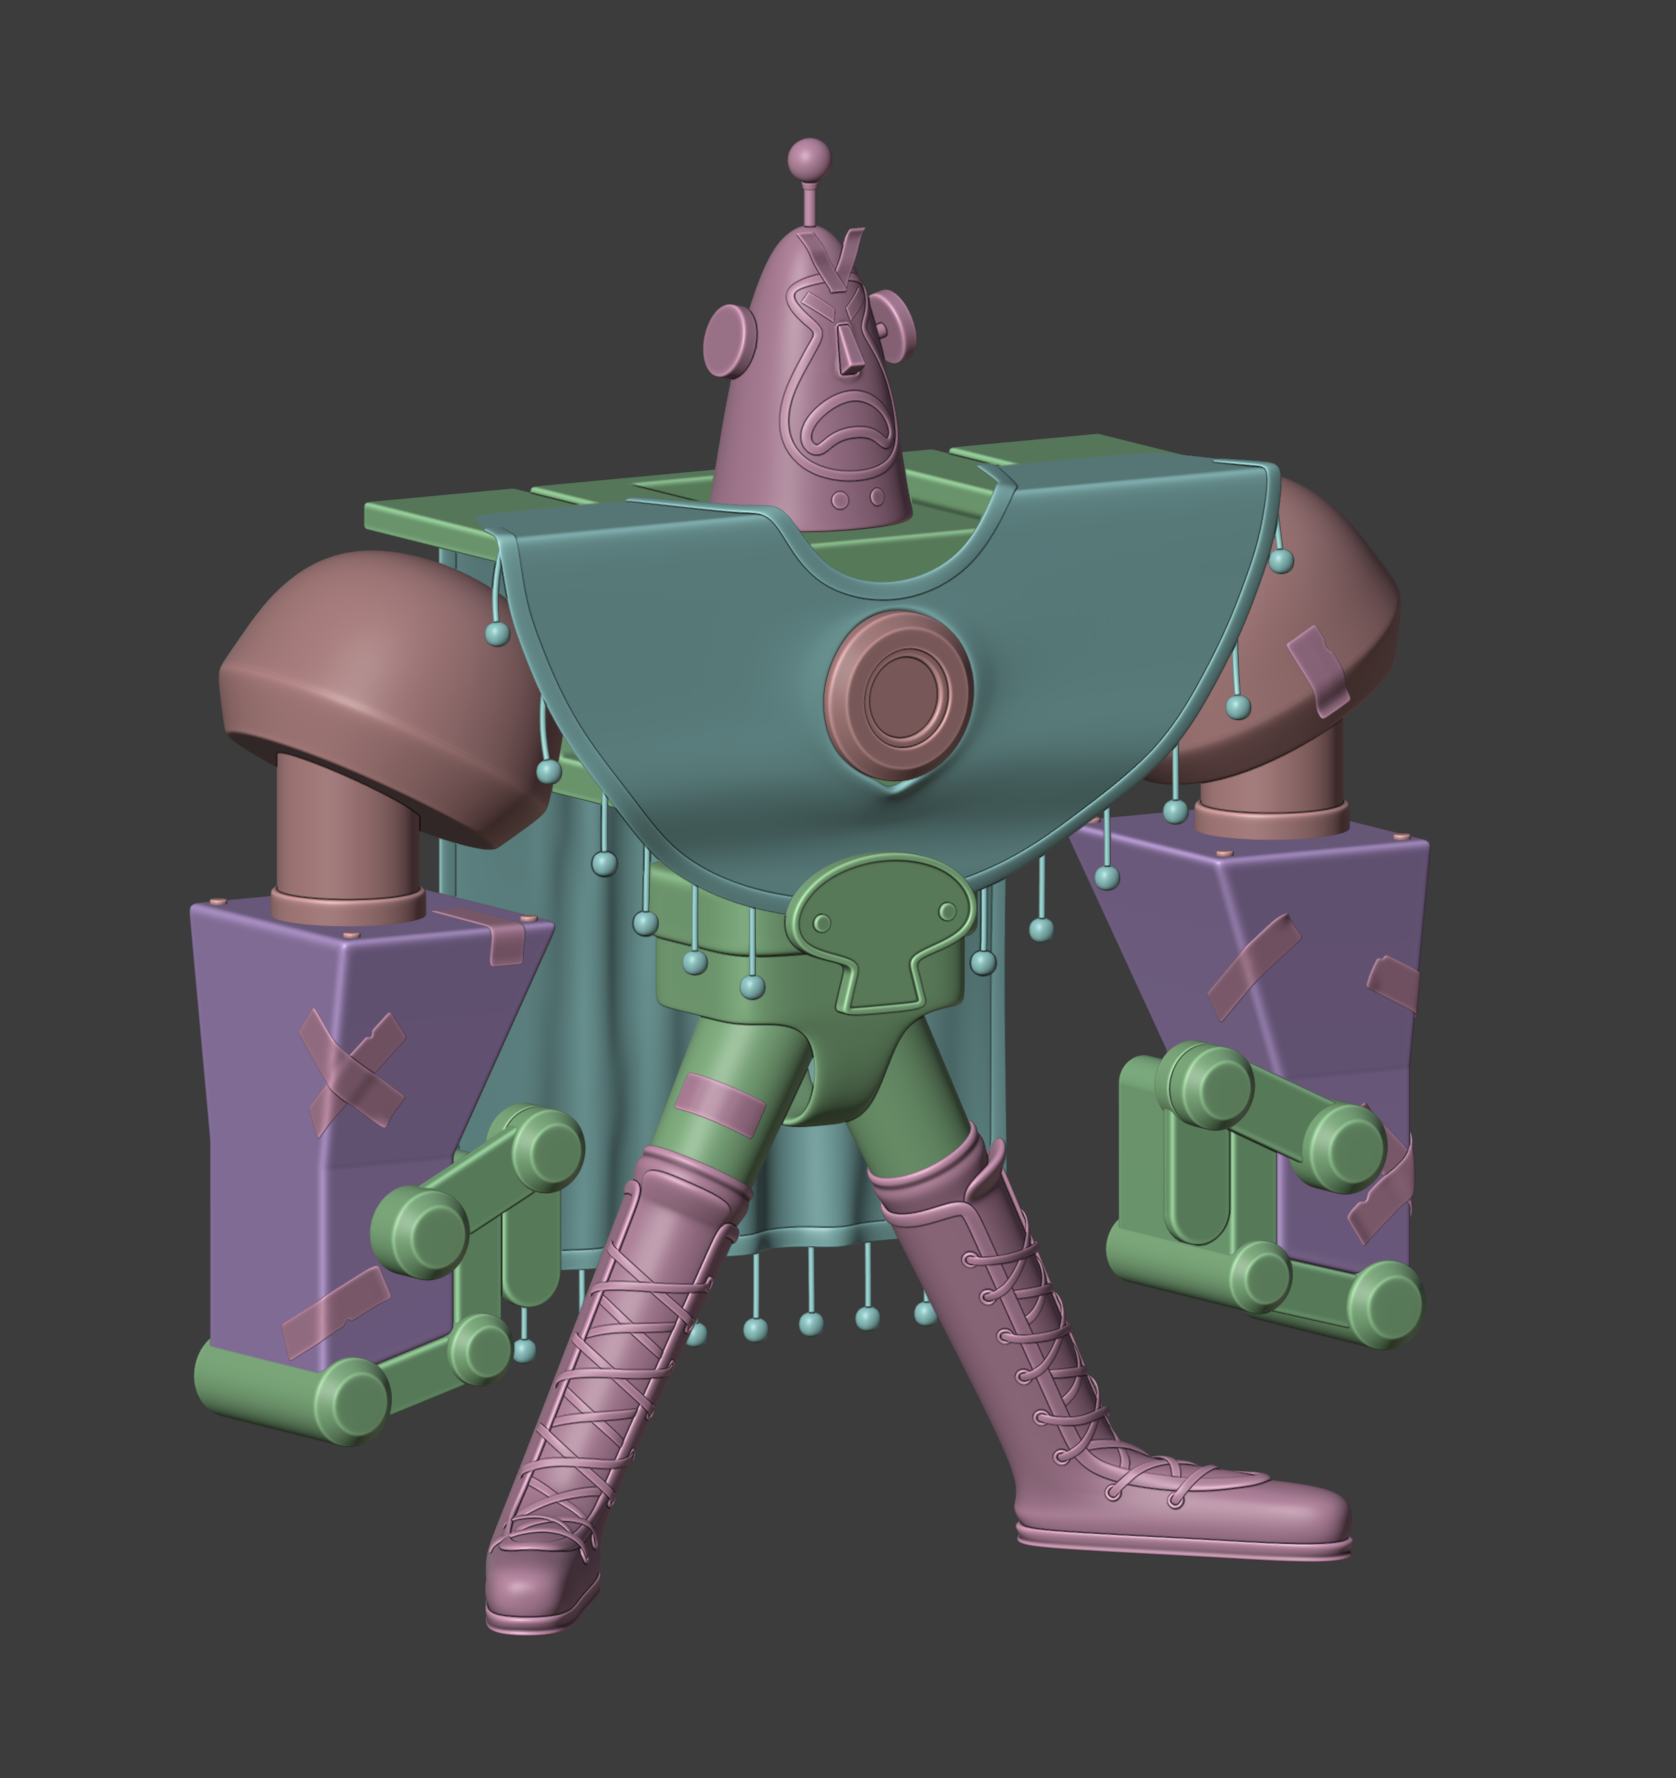
The second element that represented a challenge were the fists of the robot. In this case, it took me a lot of work to reach this final look; just seeing its silhouette in the concept it would seem that the fists were made from some fabric but the inner lines suggest that they could be made of metal. I did many tests until I reached this final result, keeping a hard surface element but following the silhouette from the concept as closely as possible, preserving the separation of the fingers and the closed fist in general. In the end, this was one of my favorite elements of the illustration although it was a headache to arrive at this result.
Speaking of lighting, something that totally changed the final result of the illustration was to make use of the Nishita Sky Blender node. This tool allowed me to use more convincing lighting and bring that comforting and warm element to the scene. With this node, it’s possible to control the time of day and the inclination of the sun, which allowed me to generate interesting shadows in the scene. At first, the characters were in a set without walls around them, so when using the Nishita Sky I gave myself the task of modeling a very simple scenario around the characters, which allowed the light to enter more naturally.
A little tip that I could give in this part is to always work with real scales; this approach allows the light to fall in a more intuitive way and with more convincing results.
During the texturing process, something that helped me a lot to improve the final result was to use a large number of references. This is when I remembered what my drawing teachers always mentioned during college classes: ALWAYS WORK WITH REFERENCES. Working like this allows you to understand how materials behave, where they are brightest, roughest, or where they normally wear out. For this part, PureRef is incredibly useful.
Another aspect that is extremely important to me is to add storytelling with the textures, since these small details help to illustrate the nature of the characters and, little by little, add more context. In this case, I stopped to think about how and where the textures of the robot would have more wear considering that it is a fighter.
All the textures were developed in the latest version of Substance Painter. I returned the textures to Blender to make the final render in Cycles and, finally, I did a bit of post-production and color correction in Photoshop.


This was my first illustration in Blender and now that I see it published I can only feel happiness to have finished this personal challenge.
I can also say that I enjoyed the whole process too much and now I am excited to start my next project with a new concept that represents other challenges.
Something that I think is important to mention is the community that exists in Blender. During different stages of the project, illustrators who are references for me took the time to help me with technical aspects. I would like to thank Giulia Marchetti, Cecy Meade, and AENDOM.
About the author
 Kiddo, 3D Illustration / México
2 Comments
Yess, I hoped you'll make a behind the scenes :)
Great stuff Miguel!
And now I'm really inspired to try Substance Painter finally. You've done a beautiful job on the textures.
Thank you for your kind words :)