

Background
My name is Lee Rosario Jr. and I am a professional concept designer based in New Smyrna, Florida working for a major marine manufacturer as an advanced designer. I’ve used Blender on a regular basis since 2016 as my preferred tool for creative concept design. I chose Blender for its diverse platform that works to create a unique “sculpted” approach to concept design. My fascination with 3D design began in 1993, at the age of 8, when I opened a library book on basic CAD design and it has never left me since. I have always been fascinated by organic forms in nature and apply themes in nature to my designs on a regular basis. Many of my influences come from the works of designer Daniel Simon (Tron, Oblivion, Bugatti, Roborace) and design legend Luigi Colani
I’ve had designs featured on international design publication Yanko Design, Blender Artists, BlenderNation, and CG Masters. As a songwriter, I have songwriting credits on shows such as The Voice, WWE, Say Yes to the Dress, Mob Wives and for networks such as A&E, TLC, and Discovery Channel.
I earned a degree in Drafting and Design from Valencia College, which taught me how to approach design from an engineering standpoint; however, most of my experience is self-taught. I incorporate many of the principles I learned in college into my personal design projects and my dealings with independent clients. My technical training allowed me to expand my knowledge beyond Blender, as well as increase my exposure to CAD platforms such as AutoCAD, Solidworks, Revit, Alias, Lumion, Keyshot, and Sketchup.
Outside of my day job, I am an independent 3D designer with a lifelong passion for concept transportation design, arch viz and product design, but I also use my 3D design experience in working with various clients from multiple backgrounds. I have worked with several inventors to help realize their designs in the prototyping stages, graphic design presentations, marketing promo material, product development, and patent documentation.
Steps on how you did the piece (where idea came from, posing textures, tools you used, modeling, anything else specific to your piece)
Sky Wolf - Synopsis
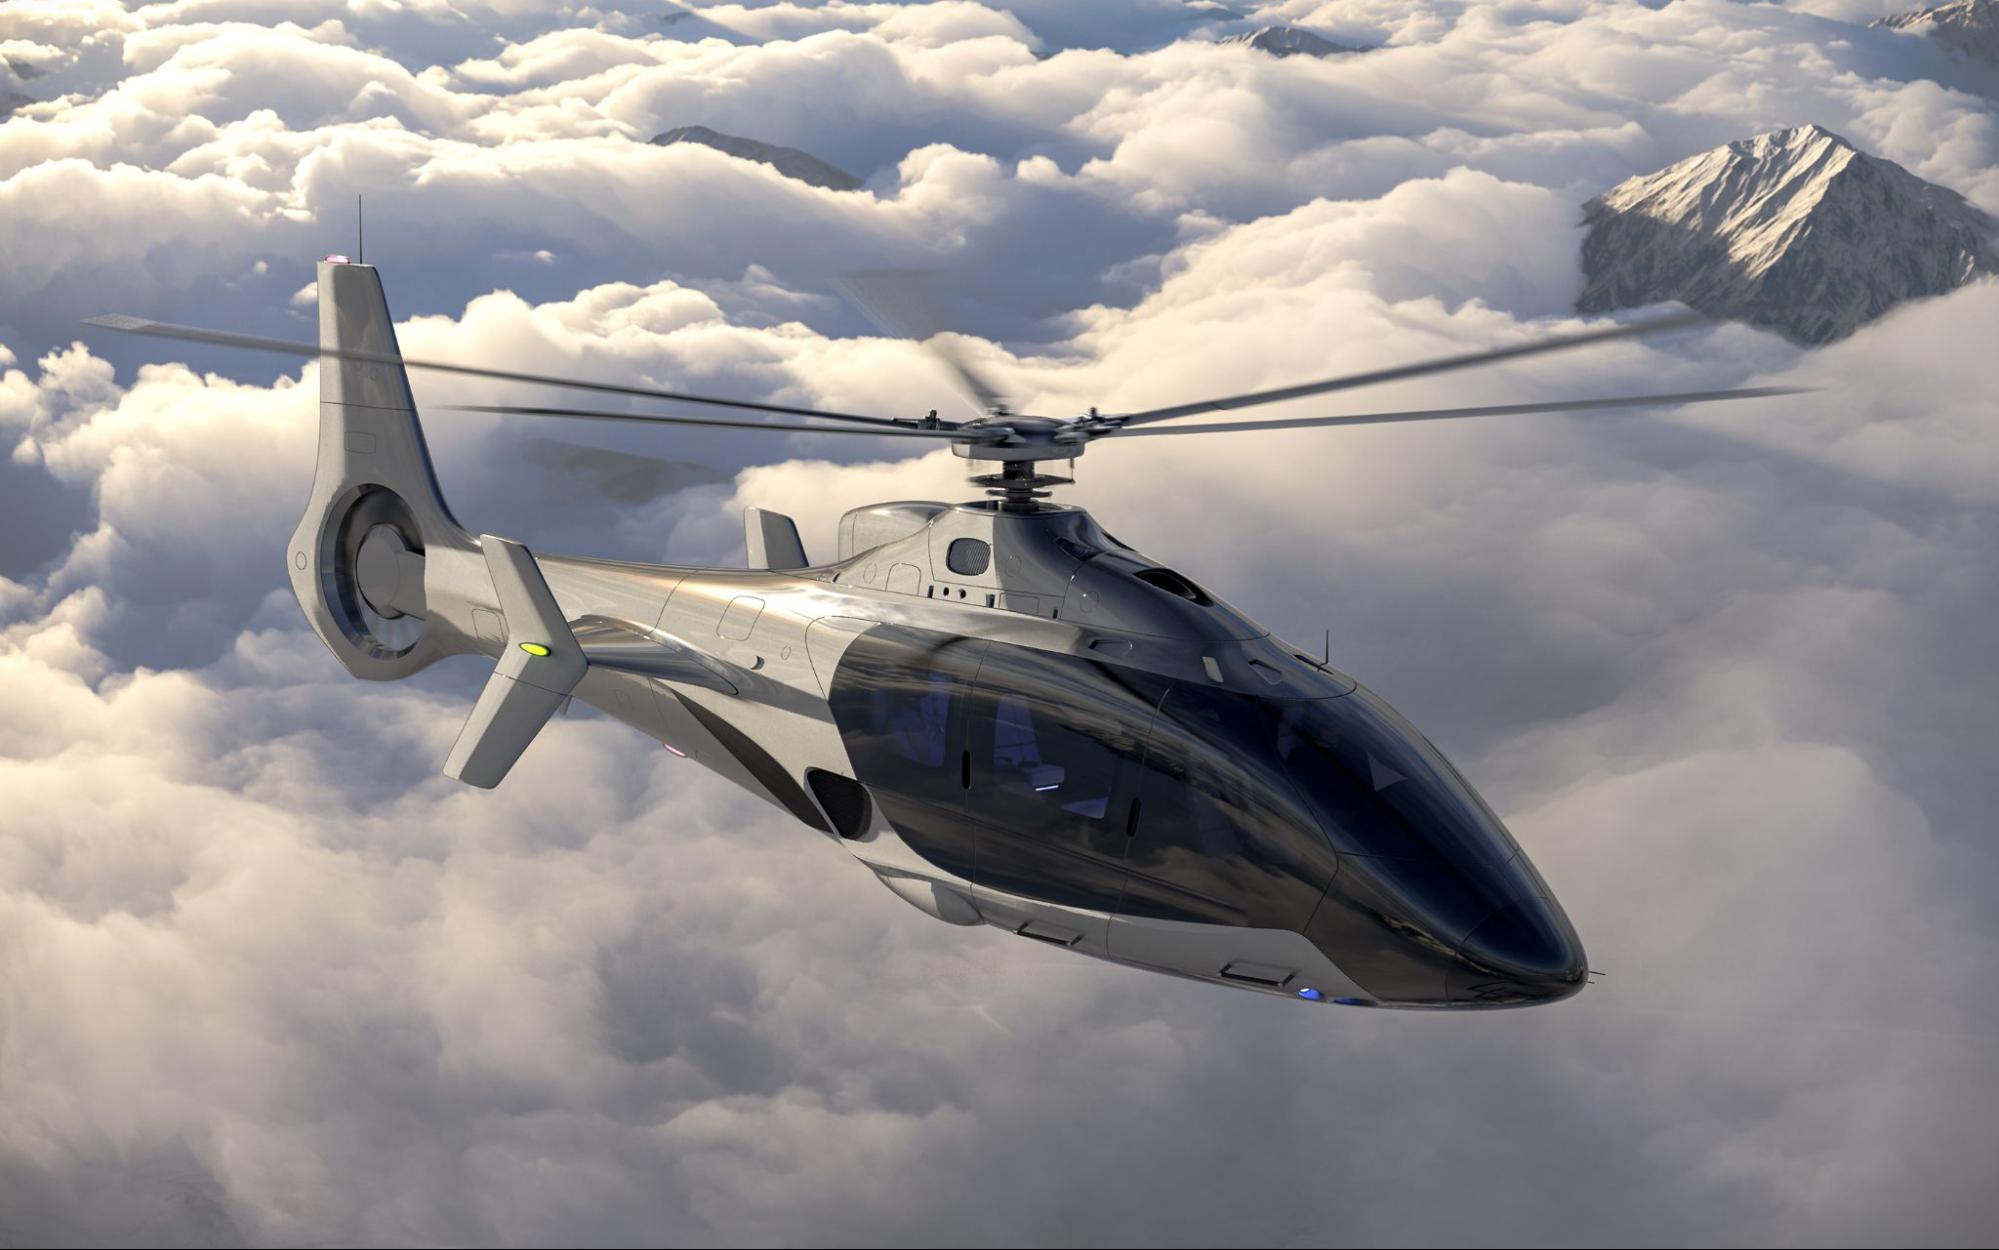
The Sky Wolf hydrogen rotorcraft concept is a reference design commissioned by Viritech, a UK based Hydrogen Energy technology developer founded on the belief that the future can benefit from hydrogen technologies through innovative design and advanced solutions. Having worked on concept airliner and EVTOL designs, I had it in my scope to work on a project involving a sleek, yet practical design for a next gen rotorcraft. Furthermore, being that I grew up in the era of the popular TV show Air Wolf, I wanted to create a play on words, paying homage to the original Bell 222 helicopter featured in the show. That is where the Sky Wolf name was proposed to become symbolic of dominance in the skies.
To me, the Bell 222 was (and still is) one of the coolest helicopters to take the lead in a popular TV show, coming from a time in television when vehicles were as iconic as the actors who piloted them. With that idea in mind, I began to research form factors and designs on the internet that would inspire me to begin design ideation for the Sky Wolf.
In my ideation research and exploration, I eventually landed on a reference design that inspired the beginning foundation for the Sky Wolf. I immediately looked to the HX50, created by British manufacturer Hill Helicopters. It was the perfect platform, modern design and story to base my initial ideation off of. The HX50, incredibly unique, is a great example of modern form, engineering, incredibly fresh design thinking, and innovative design engineering.
Ideation
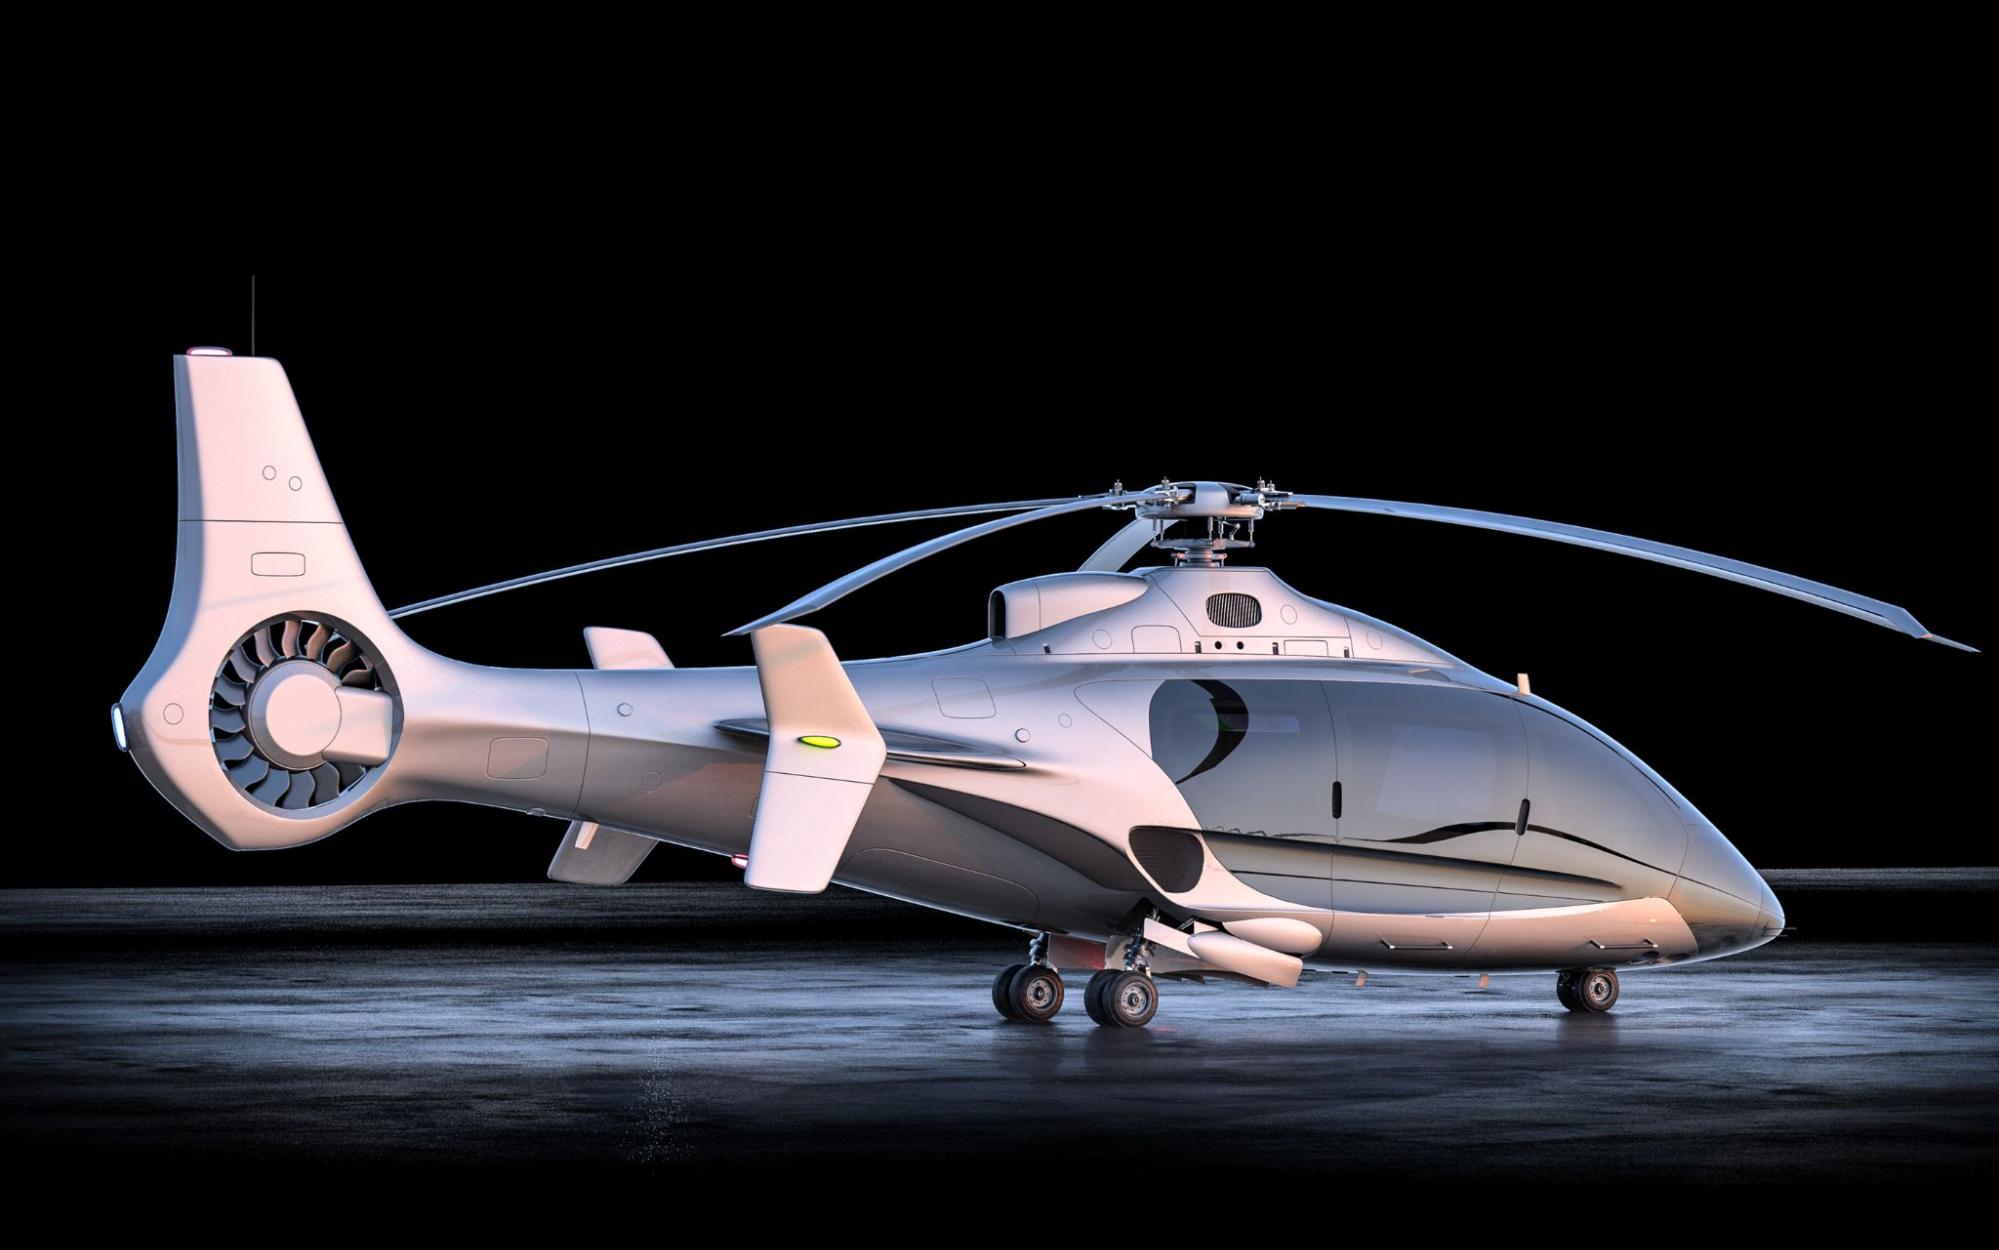
During the ideation process, the most important exercise was to develop a striking and balanced profile for the craft that would follow in the principle of my previous works and extend it to the next level of design execution...essentially refining my design identity.Tear drop shaping and sleek proportions were a strong beginning point, eventually leading to sculpting and integrating the traditional A, B, and C pillars behind a unibody glass structure. Inspired by modern Koenigsegg designs such as the Gemera and Jesko, the idea of hiding structures behind glass to create not only a highly “slippery” surface but also a unique and futuristic design aesthetic is one of the guiding principles in my design execution. Essentially, hide all supporting structures behind the skin, rather than have them exposed on the skin. This approach basically created an exoskeleton around a structural support system.


Modeling (Blender 2.9)
To me, one of the most critical aspects of taking any design from start to finish comes in creating and organizing a logical structure and workflow. I know that a design will have to work through various phases, rejected models, design challenges, and design comparisons, so I try to set up a logical folder system that will cover most of those stages from the start. Since hand sketching is not my forte, I create a curve network using a collection of bezier curves to form rudimentary shapes, proportions, and profiles for ideation. The process of building and then pushing and pulling that curve network is my form of “sketching” from the idea I keep in my head. During this stage, I’ll set parameters such as establishing proportions, general dimensions, ergonomics, clearances, field of view, all built around an anatomically correct posed human model. This is where I begin to flesh out the general outline of my design. In my experience, one of the biggest killers of inspiration and execution is a lack of organization.


Once I had finished the foundation, I began surfacing the curve network to form the overall solid model. In some ways, I think of this process as similar to the clay shaping process, where the goal is to create a final solid body shape with all primary surfaces worked out in physical form. I usually use this solid body as a guide mesh for Blender’s shrinkwrap modifier later on, which helps in creating cutlines and working out general details (beltlines, front and rear fascia, profile, stance, baseline, etc). At this stage, I’ll usually run through different ways of shaping primary surfaces and tension points before settling on the final form that will become the ultimate design. Since Blender doesn't really have a way to build and verify class-A shapes, I put extra attention into the smoothness and continuity of every surface, constantly examining every inch for flaws or defects in the surface geometry. Basically, the point is to follow and adhere to the principles of 3D modeling to ensure a clean final look, much like you would find in Class A surfacing.


Once I’ve committed to the solid body shape, I begin designing and working out all the secondary components to the design. In order to stay true to my workflow, I don’t worry about the details in the design, but rather all the general panel cuts, cockpit windows, compartments, wheels, tires, headlights, and basic framing. I’ll create basic “placeholder” objects, such as dummy wheels, to help get an idea of the concept before working out the details later on.

As the model forms and I slowly work out my design decisions, I begin to transition individual vehicle components and sub-assemblies into the folders I created at the beginning of the project for further detailing. For example, anything related to the cockpit was placed into a “cockpit” folder, allowing me to isolate and focus on the cockpit details later on. In this process, I may add or remove folders as I go on, depending on the project.


Since I know my final design is aiming for a “real world” aesthetic rather than a concept sketch or concept art look, I try to think of as many of the real-life details as possible that this concept would have if I were to see it in person. As a concept design, I try to strike a balance between technical and creative execution. As the model develops, I’ll begin to carve out details such as trim lines and airlock seals, panel fitment, cockpit details, and vents using boolean modifier groups. I essentially “slice” or carve into the model in any way I’d like using primitives that I can recall and reshape later. Towards the end of a project, the boolean groups can get quite extensive, so organization and cataloging the types of cuts that I will create is vital early on.


In the final model, I create a copy to commit the primary surfaces and then I separate doors and panels using the Linked Flat Surfaces.
Texturing, scene building, and rendering
I knew early on that I wanted to use Blender’s Cycles engine and Keyshot 10 as my render platforms. When it came time to create textures and scenes, I knew that I had to mimic identical textures in two completely different programs.
For Blender scene rendering, I turned to some previous node setups that I had learned in CG Master’s Corvette Tutorial. In particular, I used Chris Plush’s amazing tire node setup and automotive paint node setup, which I used in the creation of my previous Hyperlight Icon concept design project. The final challenge, something I was never really happy about in previous designs, was creating a “light strip encased in glass” texture. I knew I wanted the lighting to shine brightest at the core of the strip, always facing the camera, surrounded by a gradually darkening hue around the edges of the strip. After a couple of days of trial and error, I was able to finally create a node setup to reflect the look I was going for. Blender’s EEVEE engine was instrumental in helping me closely gauge my final textures in Cycles.


Touching up and final presentation
As I collect the unedited rendered images, I bring them together with their backgrounds in Adobe Photoshop and then finalize them in Adobe Lightroom. Once I started building a final render “gallery”, the final piece of the puzzle was to figure out how I wanted to present this concept. As a personal preference, I went to the ease and power of Keyshot 10 for exterior renders and used Blender to produce the technical sketch renders that further illustrate the concept.


Black and white sketch rendering
To create a unique, yet simple technical sketch rendering look, I utilized Blender’s various 3D viewport window shading and background settings (shown below). Once I’ve tweaked the shading I like, I print the viewport to edit in Photoshop. The look is close, but not complete. This eventually is processed in Photoshop with an action set that finalizes the look. I call these action scripts “Sketch Makers”. The idea is to “sketchify” the Blender viewport look.
Once the renders and sketches are complete, the project is ready to move into a final presentation format for public viewing.


In finalizing the project, the design is deemed a “reference design”, which in this case means it’s a demonstration concept waiting to be negotiated and licensed. As Viritech has its sights set on licensing and providing hydrogen technology solutions within the automotive, aerospace, marine, and distributed power industries by 2023, Blender has become an invaluable tool in my workflow formalizing abstract ideas into fluid, solid concepts. The “Apricale”, also designed in Blender, will be Viritech’s first proof of concept and is currently in development. It will become a 2.5 million dollar demonstration hypercar that will introduce the company’s Formula 1 engineering and innovation prowess in the evolving hydrogen landscape. The Apricale will debut in 2023.
About the author
 Lee Rosario, Professional 3D and 2D CAD designer based out of New Smyrna, Florida with experience in mainstream music media, engineering, and graphic design industries.
3 Comments
Nice,
You can analyse a class A shape by making a plane or environment with a zebra texture. Then use that reflection in surface.
Appreciate the view into your background and the process for this piece.
Very nice - exactly my cup of tea. Keep it up!