
About me
 Hi, my name is Sonja Christoph and I’m a Lead 3D Generalist, a Matte Painter, and a Schoolism instructor. I currently live and work in Sweden.
I was not always a 3D Artist, quite the opposite actually, I discovered 3D much later in my life and career. I initially studied film and photography at college in the US and I wanted to become a producer one day. With the help of some amazing people I managed to get my foot in the door in Hollywood and I worked my way up from Production Assistant to Trainee to Assistant Director. I worked on a variety of projects like 2Fast 2Furious, ER, Team America, CSI:NY, Timeline and many more.
It wasn’t until 2009 when the Writer’s Guild went on strike that I found myself having way too much free time. I went to a Behind-The-Scenes presentation at the Director’s Guild about the VFX on 2012 and Star Trek. I was completely blown away. It was honestly the first time I had seen a CG breakdown to that extent and I was absolutely fascinated by it. I wanted to learn how this was done. I had nothing better to do at the time so I reached out to some of the VFX Supervisors I knew and they all recommended Gnomon, School of VFX in Hollywood to me. So I went to an open house, signed up for a few introductory classes and before I knew it, I was hooked.
I really felt the movie magic again, which I hadn’t felt for a while because that aspect of filmmaking had gotten replaced with greenscreen shoots for the most part (which is not very exciting, by the way). Realizing that, I made the decision that day to go back to school full-time and change my career.
For two years I did nothing but live and breathe art and CG. I had a lot of catching up to do. I didn’t have an extensive traditional art background and I had zero exposure to 3D before I started at Gnomon. I didn’t even know what a polygon was. Thankfully I had some amazing teachers and I managed to land my dream job before I had even graduated. I got a job as a Matter Painter at Rhythm and Hues.
Rhythm and Hues was an amazing place to work at. The matte painting department was about twenty people strong and it was just a fantastic group of people. Unfortunately, only about 3-4 months after I started, Rhythm and Hues had to file for bankruptcy.
None of us saw it coming and from one day to the next, I think more than half of my friends and colleagues had been let go. It was eerie and strange walking down the corridors and seeing all our friends’ desks as they had always been but our friends were no longer there. It was not a fun time.
Thankfully, I managed to get back on my feet and it was only a few months later that my phone rang and I had Industrial Light and Magic on the other end. They were putting together a Generalist Apprenticeship program and asked if I was interested.
I said yes and off I went to San Francisco. I got known very quickly for my organizational skills among other things and was offered a staff position. I was beyond excited and I spent about four years at ILM. I worked on films like Tomorrowland and Dr. Strange. I also worked on the TV Show Agent Carter and on some theme park rides like Soarin Around the World. I got to try and test new software and I was able to help make improvements to our pipeline.

In my spare time I enjoyed playing video games and I had noticed how fast the technology was improving. I realized that real-time rendering was going to be the future so I took a class and learned Unreal. That knowledge enabled me to work on a very special project with ILMxLab.

That project was Carne Y Arena, a VR experience directed by Alejandro Inarritu. It was an incredible experience and it was the first crossover project for us at the generalist department at ILM with ILMxLab.
My next project was the Millennium Falcon ride: Smuggler’s Run which was also done in Unreal. It was during that project that my mom became seriously ill. My dad had passed away when I was just about to graduate from Gnomon and we didn’t have any other family in the states. All my family was in and around Germany, which is where I’m originally from. We decided it was best for my mom to move back so I started to look for jobs in Europe. Brexit was already looming on the horizon so the UK was out as I did not really want to deal with that much uncertainty. I had also really enjoyed my time working in Unreal so I decided to apply to AAA game studios.
To wrap things up a bit - my mom is doing amazing. It was the best thing we could have done for her and I did manage to get a job in games. I went to Massive Entertainment, a Ubisoft Studio in Sweden. I worked on The Division 2, first on the open world team then the main mission team before I joined IO Interactive and worked on Hitman 3.
Since we moved, I’ve started doing talks at conferences and more recently online with Total Chaos, Gnomon, CG Garage, Pink Programming and 3DS London just to name a few. I am a judge for the Rookie Awards this year which has been an amazing experience and it’s been very inspiring and exciting to see so many talented young artists. I also started teaching, first at CGMA and now I’m working on putting together an Introduction to Blender class for Schoolism. I’m aiming for a fall release, in case you’re curious. :)
That is pretty much my career path and how I ended up where I am now, nowhere near where I saw my career going, by the way, but it’s been an exciting ride. I’ve met so many amazing people along the way that I just want to give back to the community now and see where life will take me next. :)
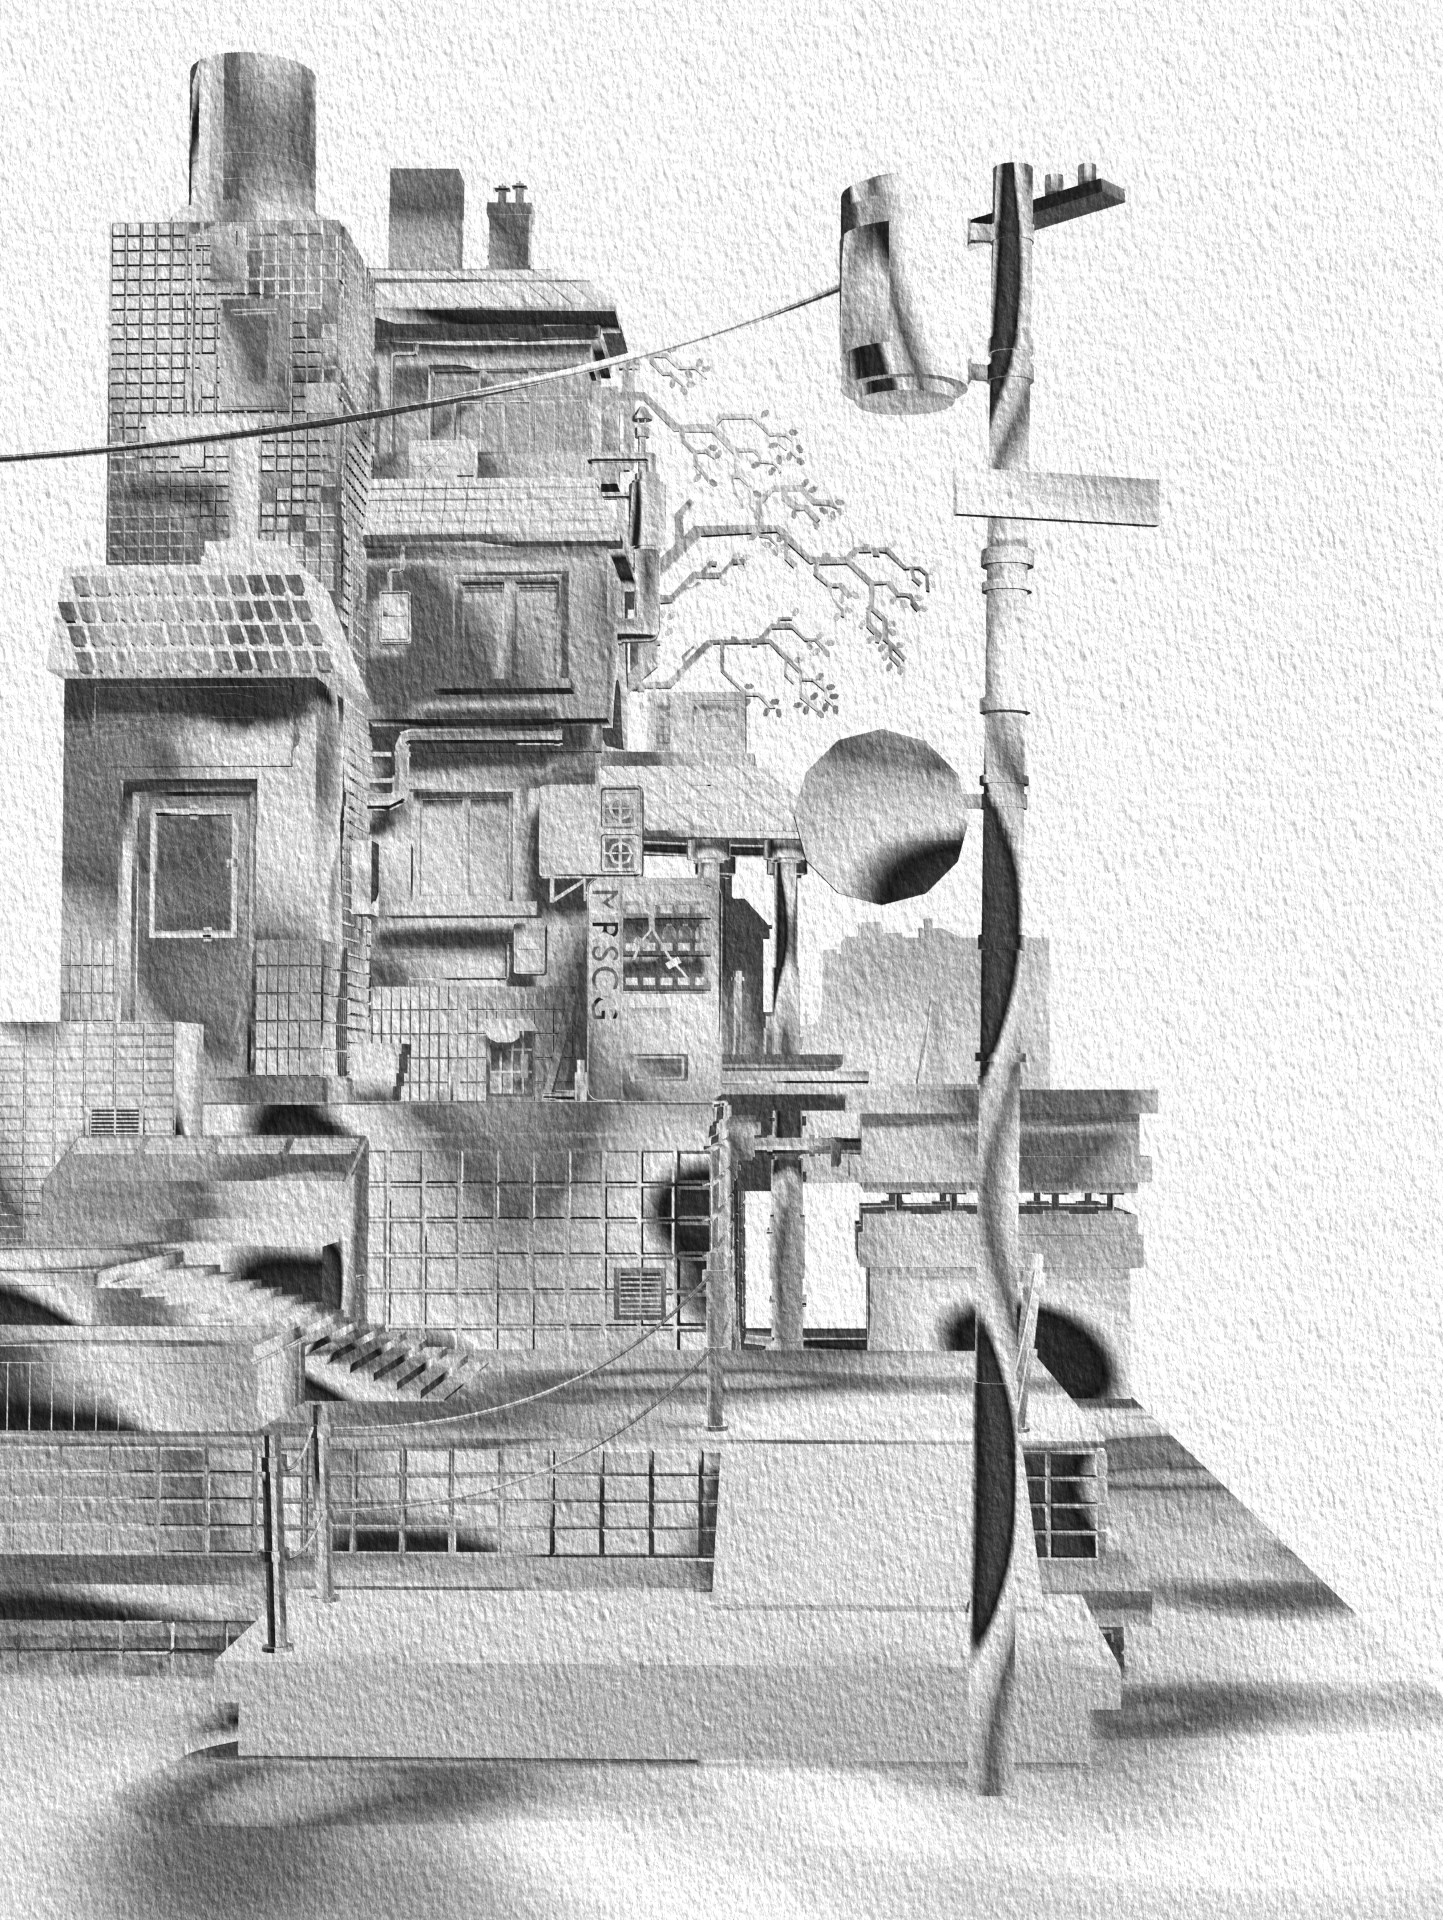
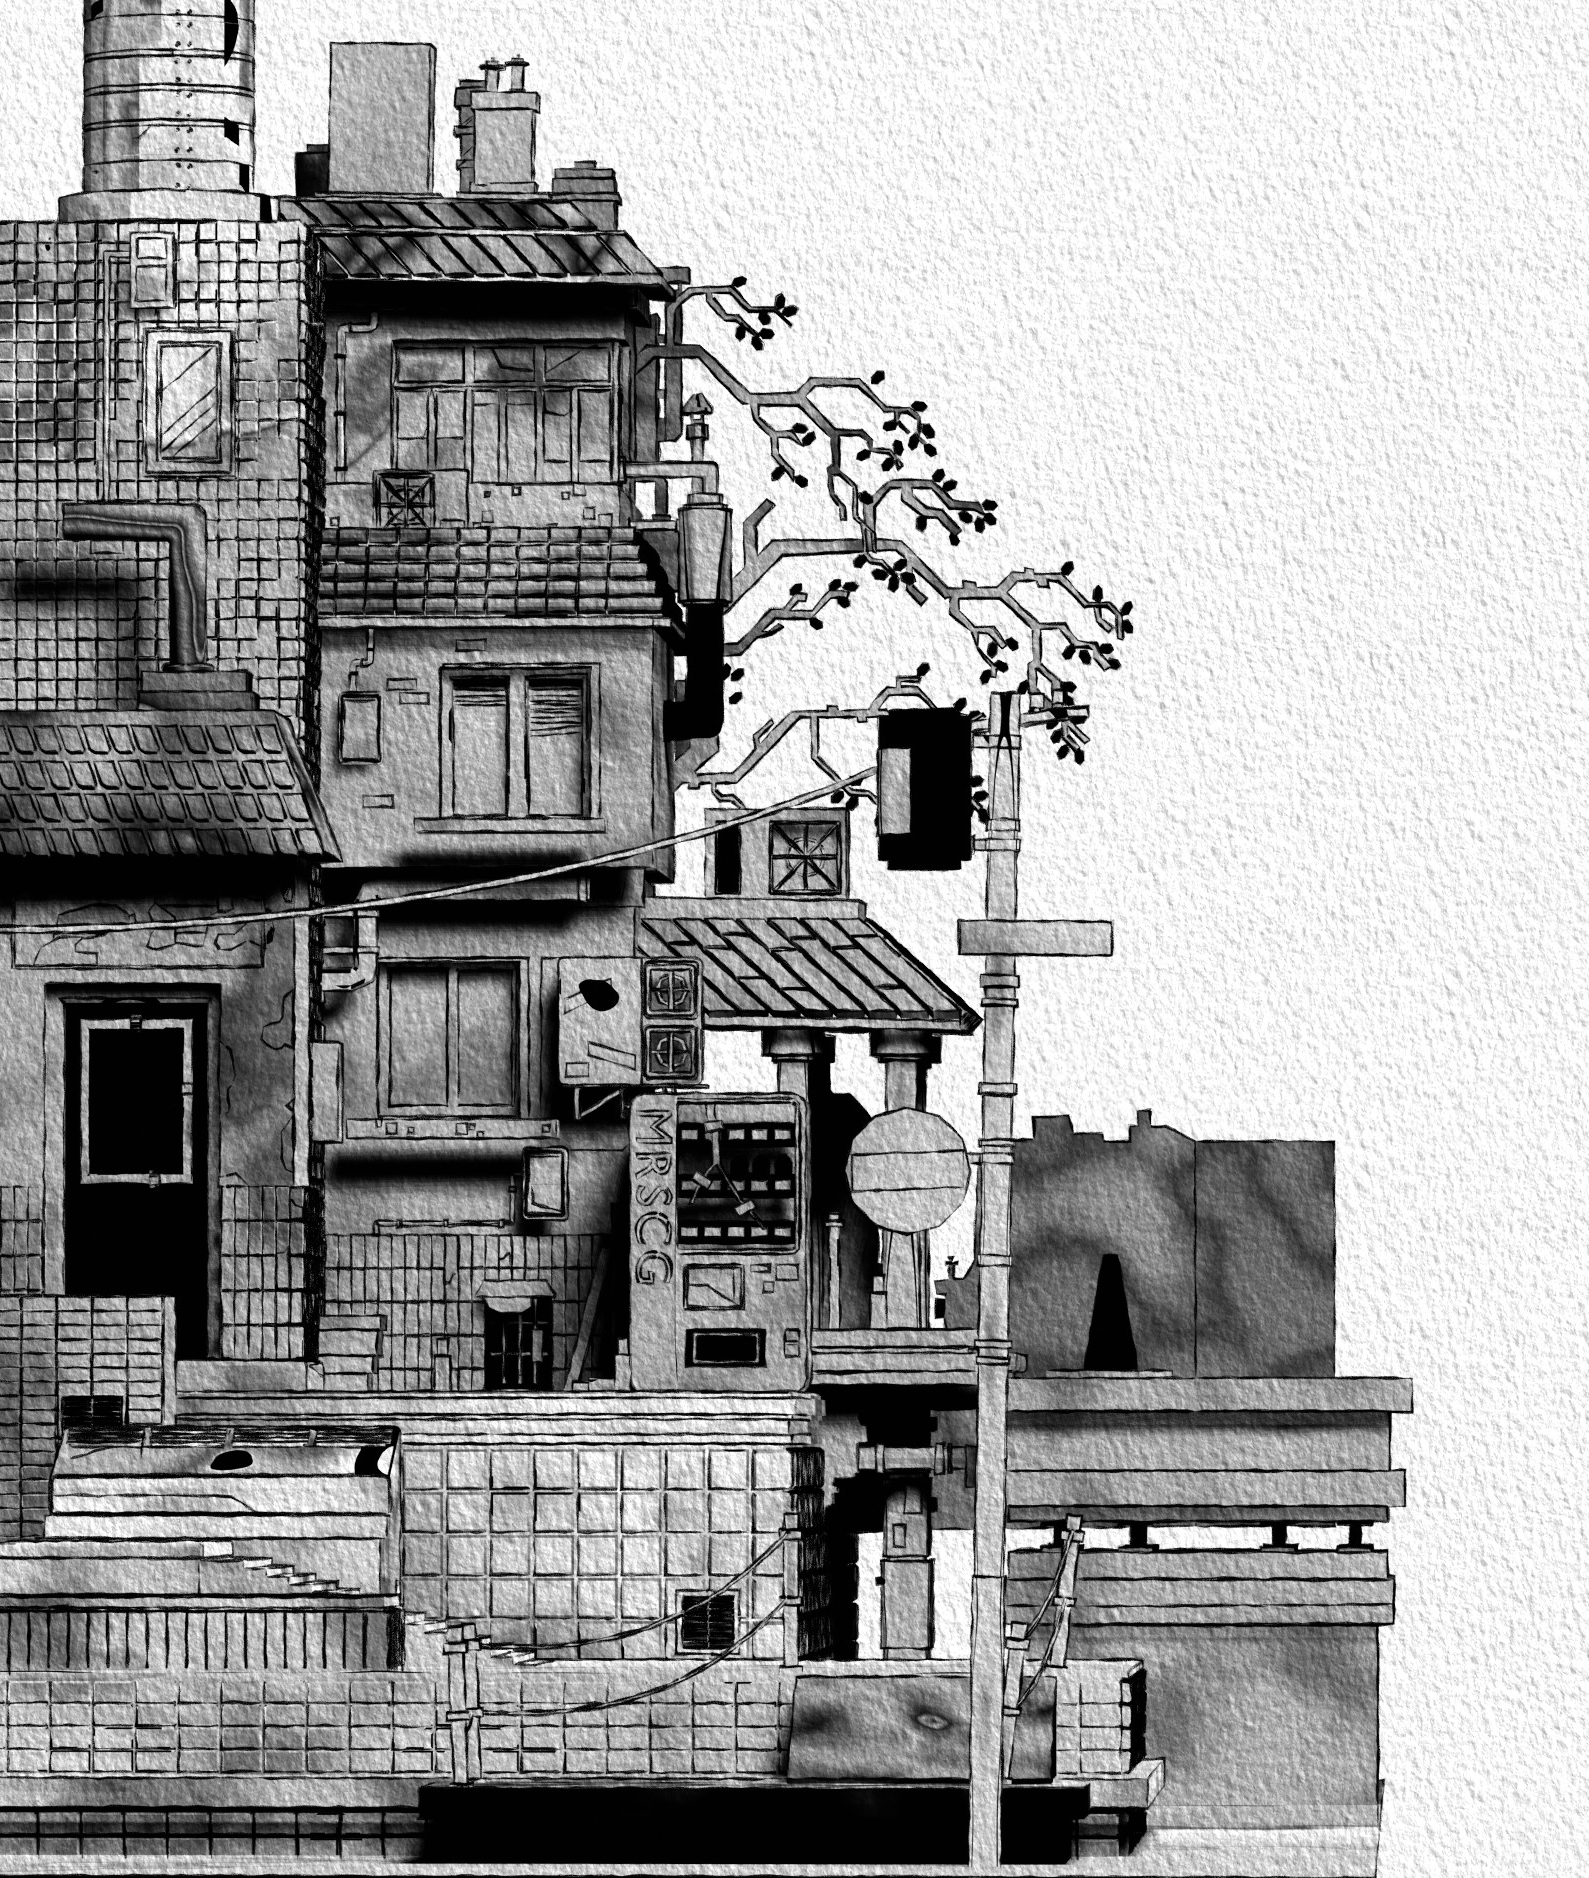
Graphic Pixel Art
Let’s talk about what we’re really here for and that is Blender.
I have to admit I was skeptical when Blender first arrived on the scene and I’m normally pretty good at spotting potential but boy was I wrong when it came to Blender. One of my friends and colleagues at ILM called it though, many years ago so I have to give him credit. He did see the potential right away. It took me a little bit but now I’m completely smitten.
Blender makes 3D easy and fun. The tools are so good, you can really focus on the art without having to worry or getting caught up on the technical aspects. Is it perfect? Ah, nothing is perfect in life but it’s managed to make modeling a task I actually look forward to now and that is quite the miracle in my book. Modeling was always something I had to do but never something I wanted to do. Blender has completely changed that.
For me, Blender also encourages experimentation and the blending (I know, bad pun but bear with me) of 2D and 3D. I have been creating photoreal environments my entire artistic career and I have to admit, after a while, I got a little tired of photo realism and I wanted to try my hand at something more stylized or 2D inspired.
I had just seen a preview or trailer of the indie game Dordogne which looked like a watercolor painting, absolutely gorgeous and I wanted to see if I could achieve a procedural driven watercolor effect in Blender.
I decided to use one of the models I had made a long time ago as my base. I think that as we get older, we tend to take on or pick up more and more responsibilities, so being efficient with how you spend your time becomes infinitely more important, which is why I decided to take an existing model. That way I could focus on creating the shader and not the modeling.


The model or scene I picked was based on a pixel art piece done by the artist Waneella. Pixel art is perfect for when you are just getting started with 3D because you can easily build scenes with basic primitives. It’s a great way to start training your eye and brain to think of real-world objects as primitive shapes. Plus, you usually end up creating an entire scene and not just a single prop, which means you’re getting a lot of mileage and practice on a single project. Working in Blender can be incredibly fast when you take advantage of the hotkeys and pie menus but it takes practice for those hotkeys to become second nature.
Analyzing the material
Now that I had a model, I took a closer look at some watercolor paintings by Alex Hillkurtz and I tried to break it down into some characteristics that I could then try and replicate in 3D.
- First thing I noticed was the paper texture. It plays an active and important role in achieving a watercolor painting look. We can achieve that look quite easily in 3D - all we need to do is use a paper texture and overlay it in our background and material.
- Then I noticed the sketchy ink outline. We can also achieve that quite easily by using Blender’s Freestyle render engine.
- Next, I started to look at the watercolor paint itself. The colors have a very organic way of blending with each other, creating interesting patterns of dark and light areas. I also noticed that watercolor paint has a tendency to create thin dark edges, just like a coffee stain and this is actually known as the coffee stain effect or coffee ring effect. It all comes down to physics: when liquid evaporates from the edge it is then replenished with liquid from the inside, resulting in a larger build-up of liquid on the edges.
Those were some of the basic characteristics of watercolor paint that I wanted to recreate in 3D.
When you break things down like this, something as complex as watercolor paint all of a sudden becomes quite easy to understand and once you understand it, you can then recreate it. I basically just needed a tileable or a procedural noise texture to create an organic looking pattern and then I needed to be able to control the values within that texture, which can be done quite easily with the color ramp node. Then it just comes down to trying out different combinations and settings until you have something that you like.
Eevee
I decided to use Eevee as my renderer for this scene. I like to use Eevee instead of a path or ray tracing render engine whenever I can because you just can’t beat the speed of real-time rendering and you can still get some very good-looking results.
World settings
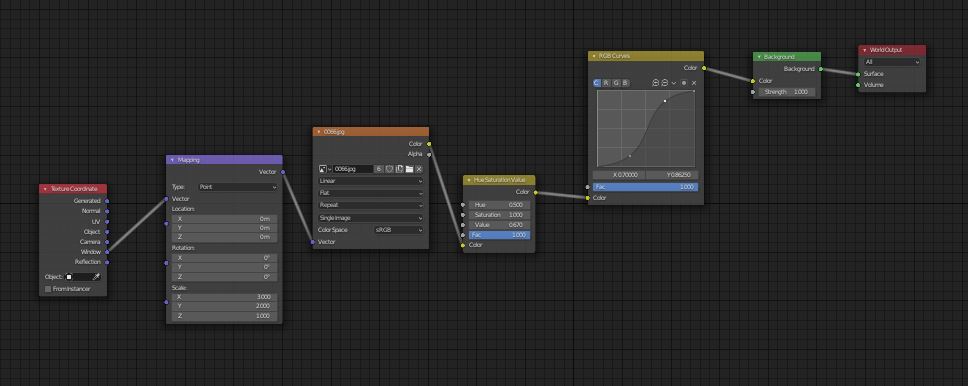
The first thing I did in my scene was go into my world settings and set up my background. I brought in a paper texture I liked and connected that to the background color. I set the texture coordinates to window since I wanted the texture to have the same scale across the entire rendered image. The texture effect was too subtle so I added a Hue/Saturation/Value node followed by an RGB Curve node to increase the contrast and lower the brightness.
Lighting
Before I could start working on the shader, I needed to add a light to my scene and I just used an area light and set the intensity to 2500W. This value is very much dependent on your scene scale so this value may not work for you but it worked well for my scene.
Material
I started off simple: I just added a Musgrave noise texture to my scene, set the texture coordinate to object and connected the noise to the base color of my principled BSDF shader. I then connected the BSDF output and connected it to a shader to RGB node and followed that up with a color ramp. I used the color ramp to create the coffee stain effect and then I copied the paper texture from the world settings into my material and multiplied the paper texture on top of my watercolor shader.
 I then took a step back and realized that this was not working. The edges were much too harsh and it was lacking an overall softness and it also lacked dimension. It felt very flat.
 Ok, so the base color was not going to work, what if I used the noise as a bump or normal map instead? I quickly tried that out and that looked a lot more promising. I got some dimension back, the noise looked a lot softer...I was definitely heading in the right direction but the noise was a bit too simple for my liking. Time to add more.
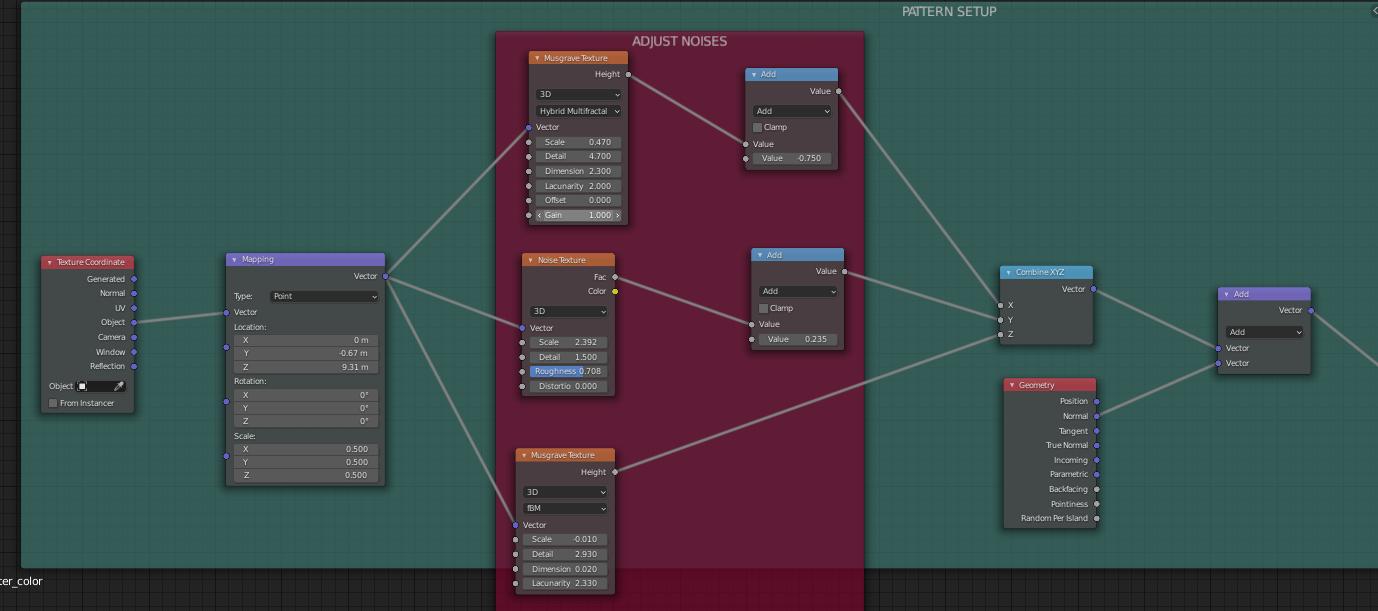
This time I added a regular noise and another musgrave texture with different scale settings. I combined all three noises with a combined XYZ node. I then took the output of the combined XYZ node and added it to the normal channel of a geometry node. I then took the output of the add node and connected it to the normal input of my material.
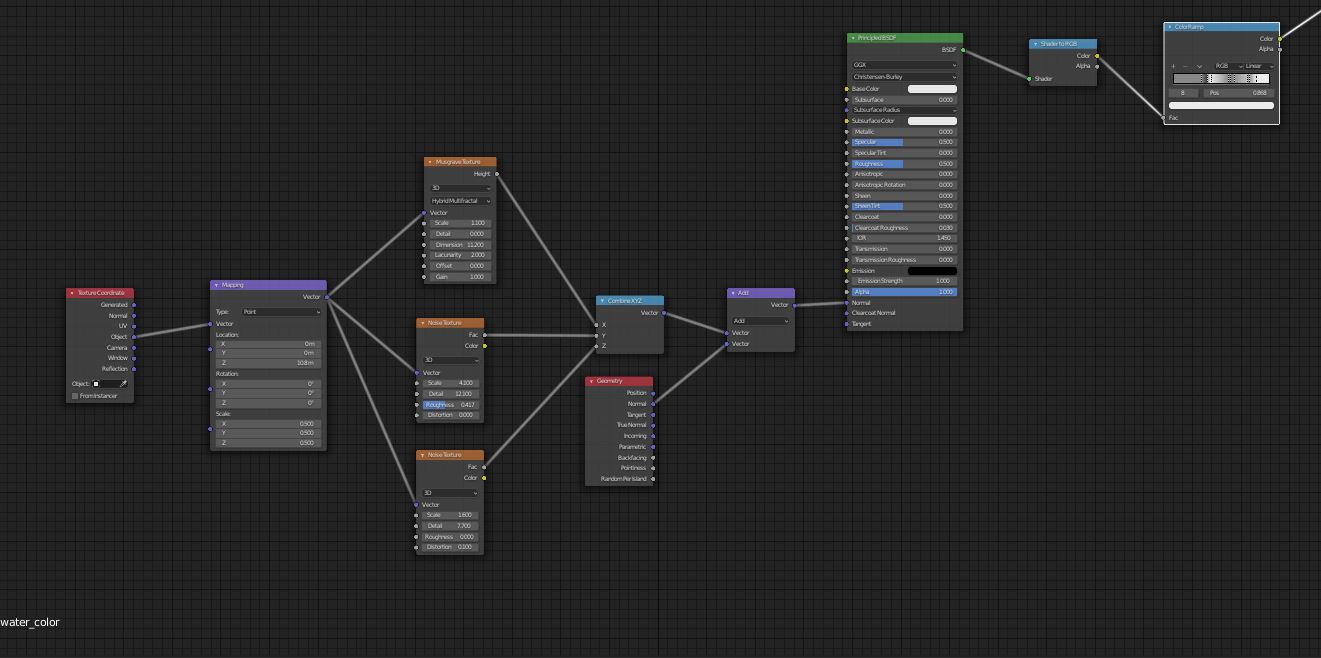
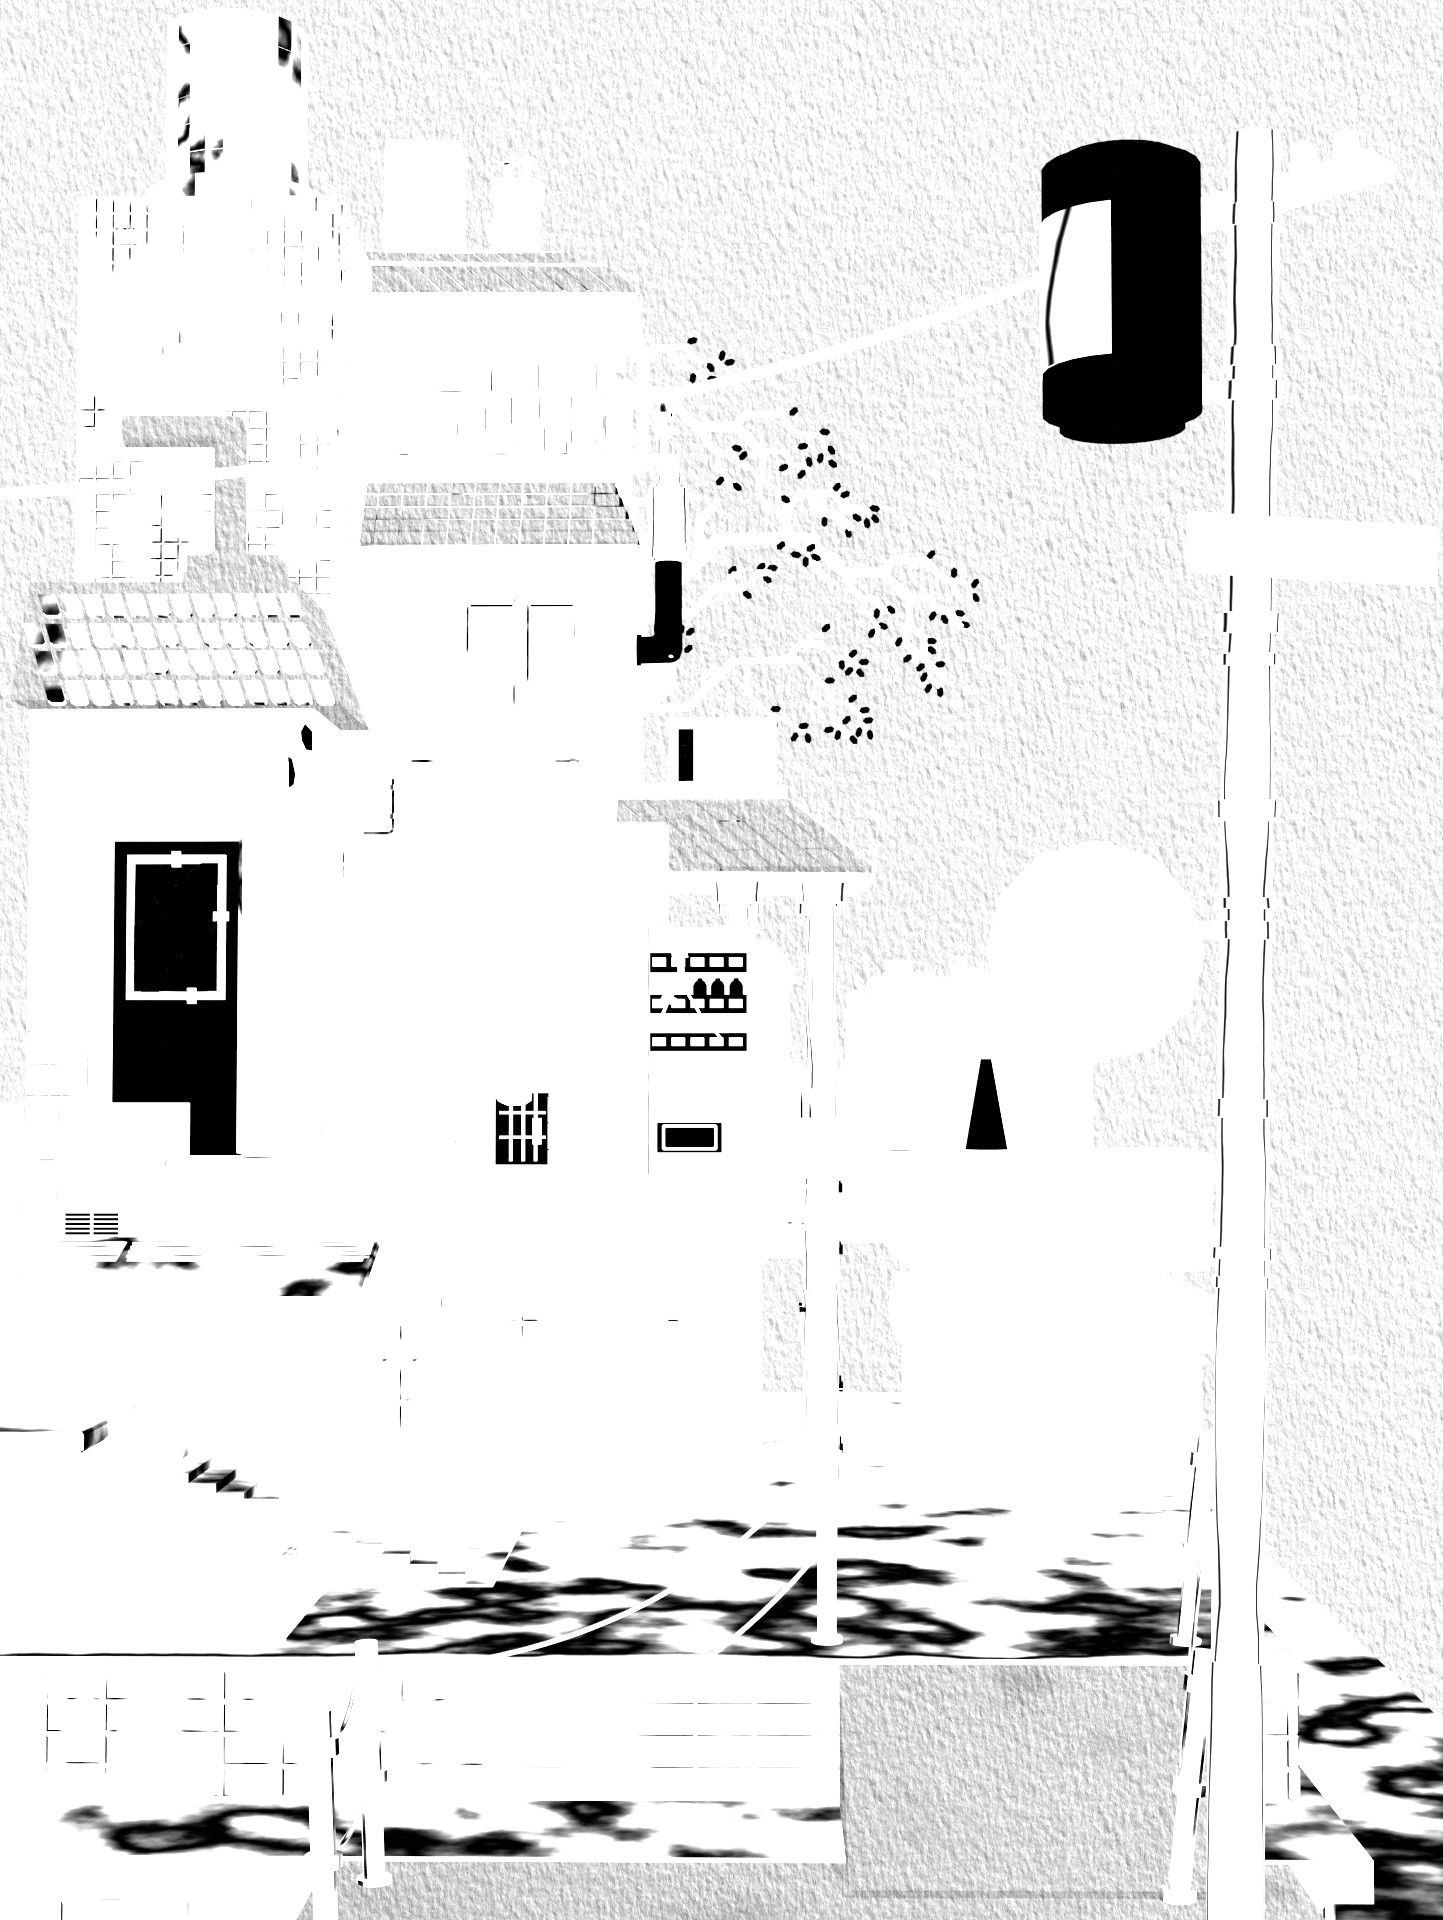
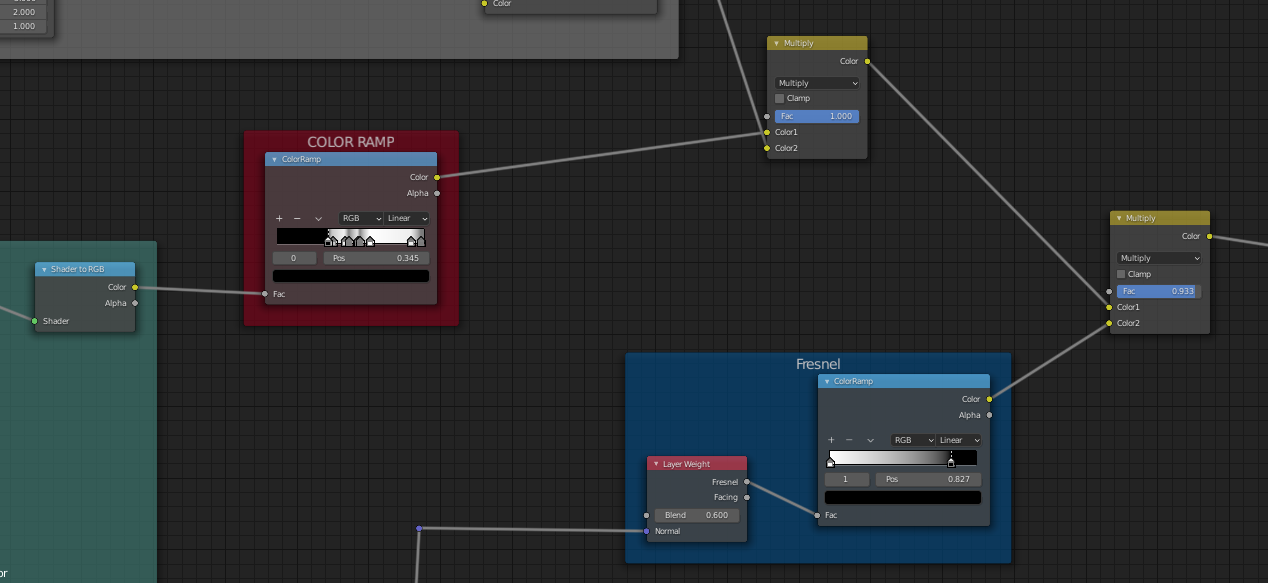
 Now I was getting some very nice complexity, the edges started to feel like watercolor and to be honest, I probably could have left it at that but I wanted to try using fresnel as a way to add a darker outline, so I connected my normal map into a layer weight node and then I used the fresnel output of the layer weight node and connected that into a color ramp. Now I just had to adjust the blend value in the layer weight node and the color ramp until I arrived at something that I liked.
Using the Fresnel actually gave me a nice separation of the door and some other elements, as well, which I quite liked so I decided to add this as a multiply on top of my previous shader setup.
You can see the fresnel effect in the screenshot:
As a final step, I connected my shader tree to an emission shader and that was pretty much my shader setup. At this point, I just continued to play around with my noise settings and my color ramp settings until I got something I was happy with.
The shader in itself was not very difficult to set up but it did take some time to arrive at the right settings that gave me the desired result. If you’re trying to create this material for one of your scenes, don’t be discouraged if perhaps the values I used are not working for your scene. It does take some tweaking and experimenting. I recommend starting with the noises first and dialing those in and then going into your color ramp and adjusting the sliders there.
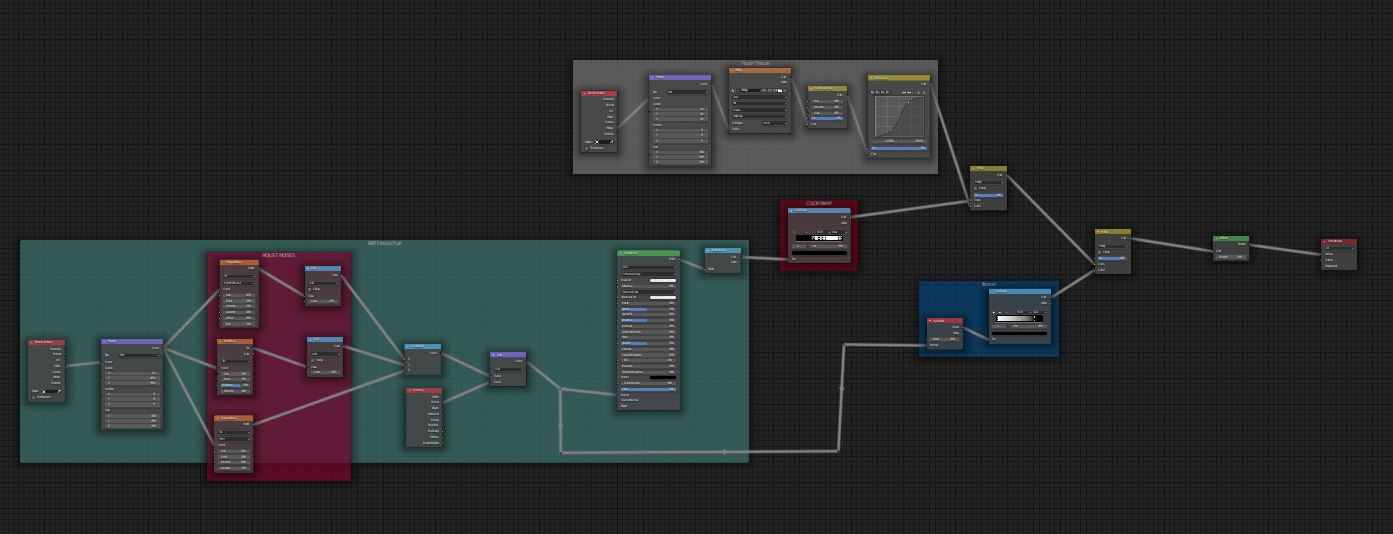
Freestyle
The last thing I had to do was add the outline and I used Blender’s freestyle render engine for that. Freestyle is an edge/line-based non-photorealistic render engine. It relies on mesh data and Z-Depth information to create or draw lines on mesh edges. We can then further define the look of those lines to achieve a more artistic or technical look.
First I needed to enable Freestyle by checking the Freestyle checkbox in the Render Properties Tab. I set the Line Thickness Mode to Absolute and the line thickness to 1 px.
Then I went into the View Layer Properties Tab and further defined the look of my lines. I wanted a more hand-drawn, sketch-like look for my scene. To achieve that I needed to make a few changes to the alpha and thickness of my lines.
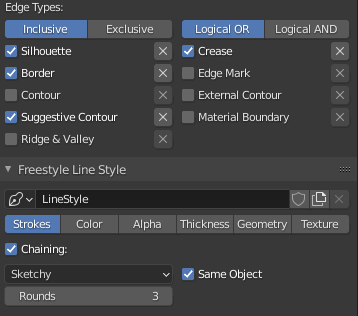
First, I specified which edge types I wanted to create. The Edge Types I used were Silhouette, Border and Suggestive Contour. In the Line Style settings I chose sketchy as my chaining method.
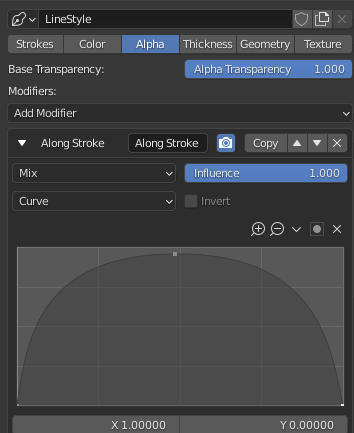
Then I switched to the Alpha settings in my line style. I added an Along Stroke modifier and I used a curve as my mapping type.

The other changes I made were to the thickness of my Line Style. I added a calligraphy modifier first and then a noise modifier. Then it really just came down to trying out different values until I was happy with the final look.
At this point my scene was set up and it was time to hit F12 and check out the final result.
Thank you so much for reading!
I hope you enjoyed my little shader experimentation and if you are curious about my Introduction to Blender class, you can find out more about it on schoolism.com.
I hope to see you there :)
About the author
 Sonja Christoph, 3D Generalist
5 Comments
Love the walk through your history. Good for people to see how their paths can change.
Love the tutorial. Detailed enough someone can go off and try.
Thank you so much Karl!! That's very kind of you and yes, I'm a big believer in changing paths. It's not easy mind you but it can be incredibly rewarding.
What an incredible Journey, working at so many amazing places and with so many talented people. I will look out for your course, even though Im not a beginner in blender. I hope youll drop some gems of knowledge!
Wonderful detail Sonja! What a gift you have and it's unique to be creative and super organised. Both characteristics came through in your article. Thank you.
Ok, im eaging to try it, i love love the lines look. Right now i was painting them with the grease pencil modifier, and thats where i couldnt find how to link it with a noise, but this time ill try use the after render lines. What im afraid is the time of rendering, with grease pencil or this if there are many poligons i think i would take long and not bee suitable for animation (i tried with a city, 5min 1 frame rendered…out of 600). Anyway, i hope you dont delete this gold mine please. Ill be there in lbx following you