Behind the Scenes: Spy Spider Bot

About
Hi, my name is Pascal Deraed and even though I was born in France, a very long time ago it seems, I chose to move to Sweden with my Swedish wife.
I have been a computer graphics teacher for the past 16 years at an advanced secondary school in the computer games educational program, here in the south of Sweden. Before that, I had the privilege to work alongside and learn from amazing people at several Swedish studios, which I keep doing today when I get the opportunity—but this time as a freelancer. :)
Otherwise, I studied computer graphics and graphic design at several universities.
My first model was a flower I created years ago in the 1990s, using 3D Studio. Since then, my passion for 3D has only grown considerably stronger and I was fortunate enough to turn it into my daily occupation. Procedural texturing is today what I spend most of my time practicing. I love modeling but I have always thought that texturing is where the magic really happens. Especially when combined with beautiful lighting that illuminates every part of it.
I am a very dedicated person and very critical of my work. I can spend lots of time questioning my decisions as an artist and love sharing this passion with others. The more advanced the project is, the more I want to get involved. I love to be challenged and the projects I am involved in usually require a lot of research into how to create this and that—learning all these new things really excites me. I cannot express it in other words LOL.
Surprisingly enough, my work was published a couple of times in the 3D Artist magazine, issues 103 and 127.
Project background
I teach students from the first and second year in three different courses: media production, and digital creation and animation. These courses are taught at two different levels depending on which year we are talking about. Media production level 1 involves the students from the first year and level 2, year 2, and so on, to give you an example!
Now, everyone knows that the best way to learn is to practice, practice, and practice even more! It really helps develop skills and, with that in mind, I always try as much as possible to involve my students in different challenging projects. They really appreciate it and often end up producing really amazing stuff. Let’s not forget that it is a secondary school and the students are between 15 and 18 years old.
But I never ask them to work on a project without having myself produced an example that clearly shows what I want them to achieve. This is especially important for me as a teacher and, in that way, the students really get to know what is expected of them in terms of design, shading, and everything else the project would require.
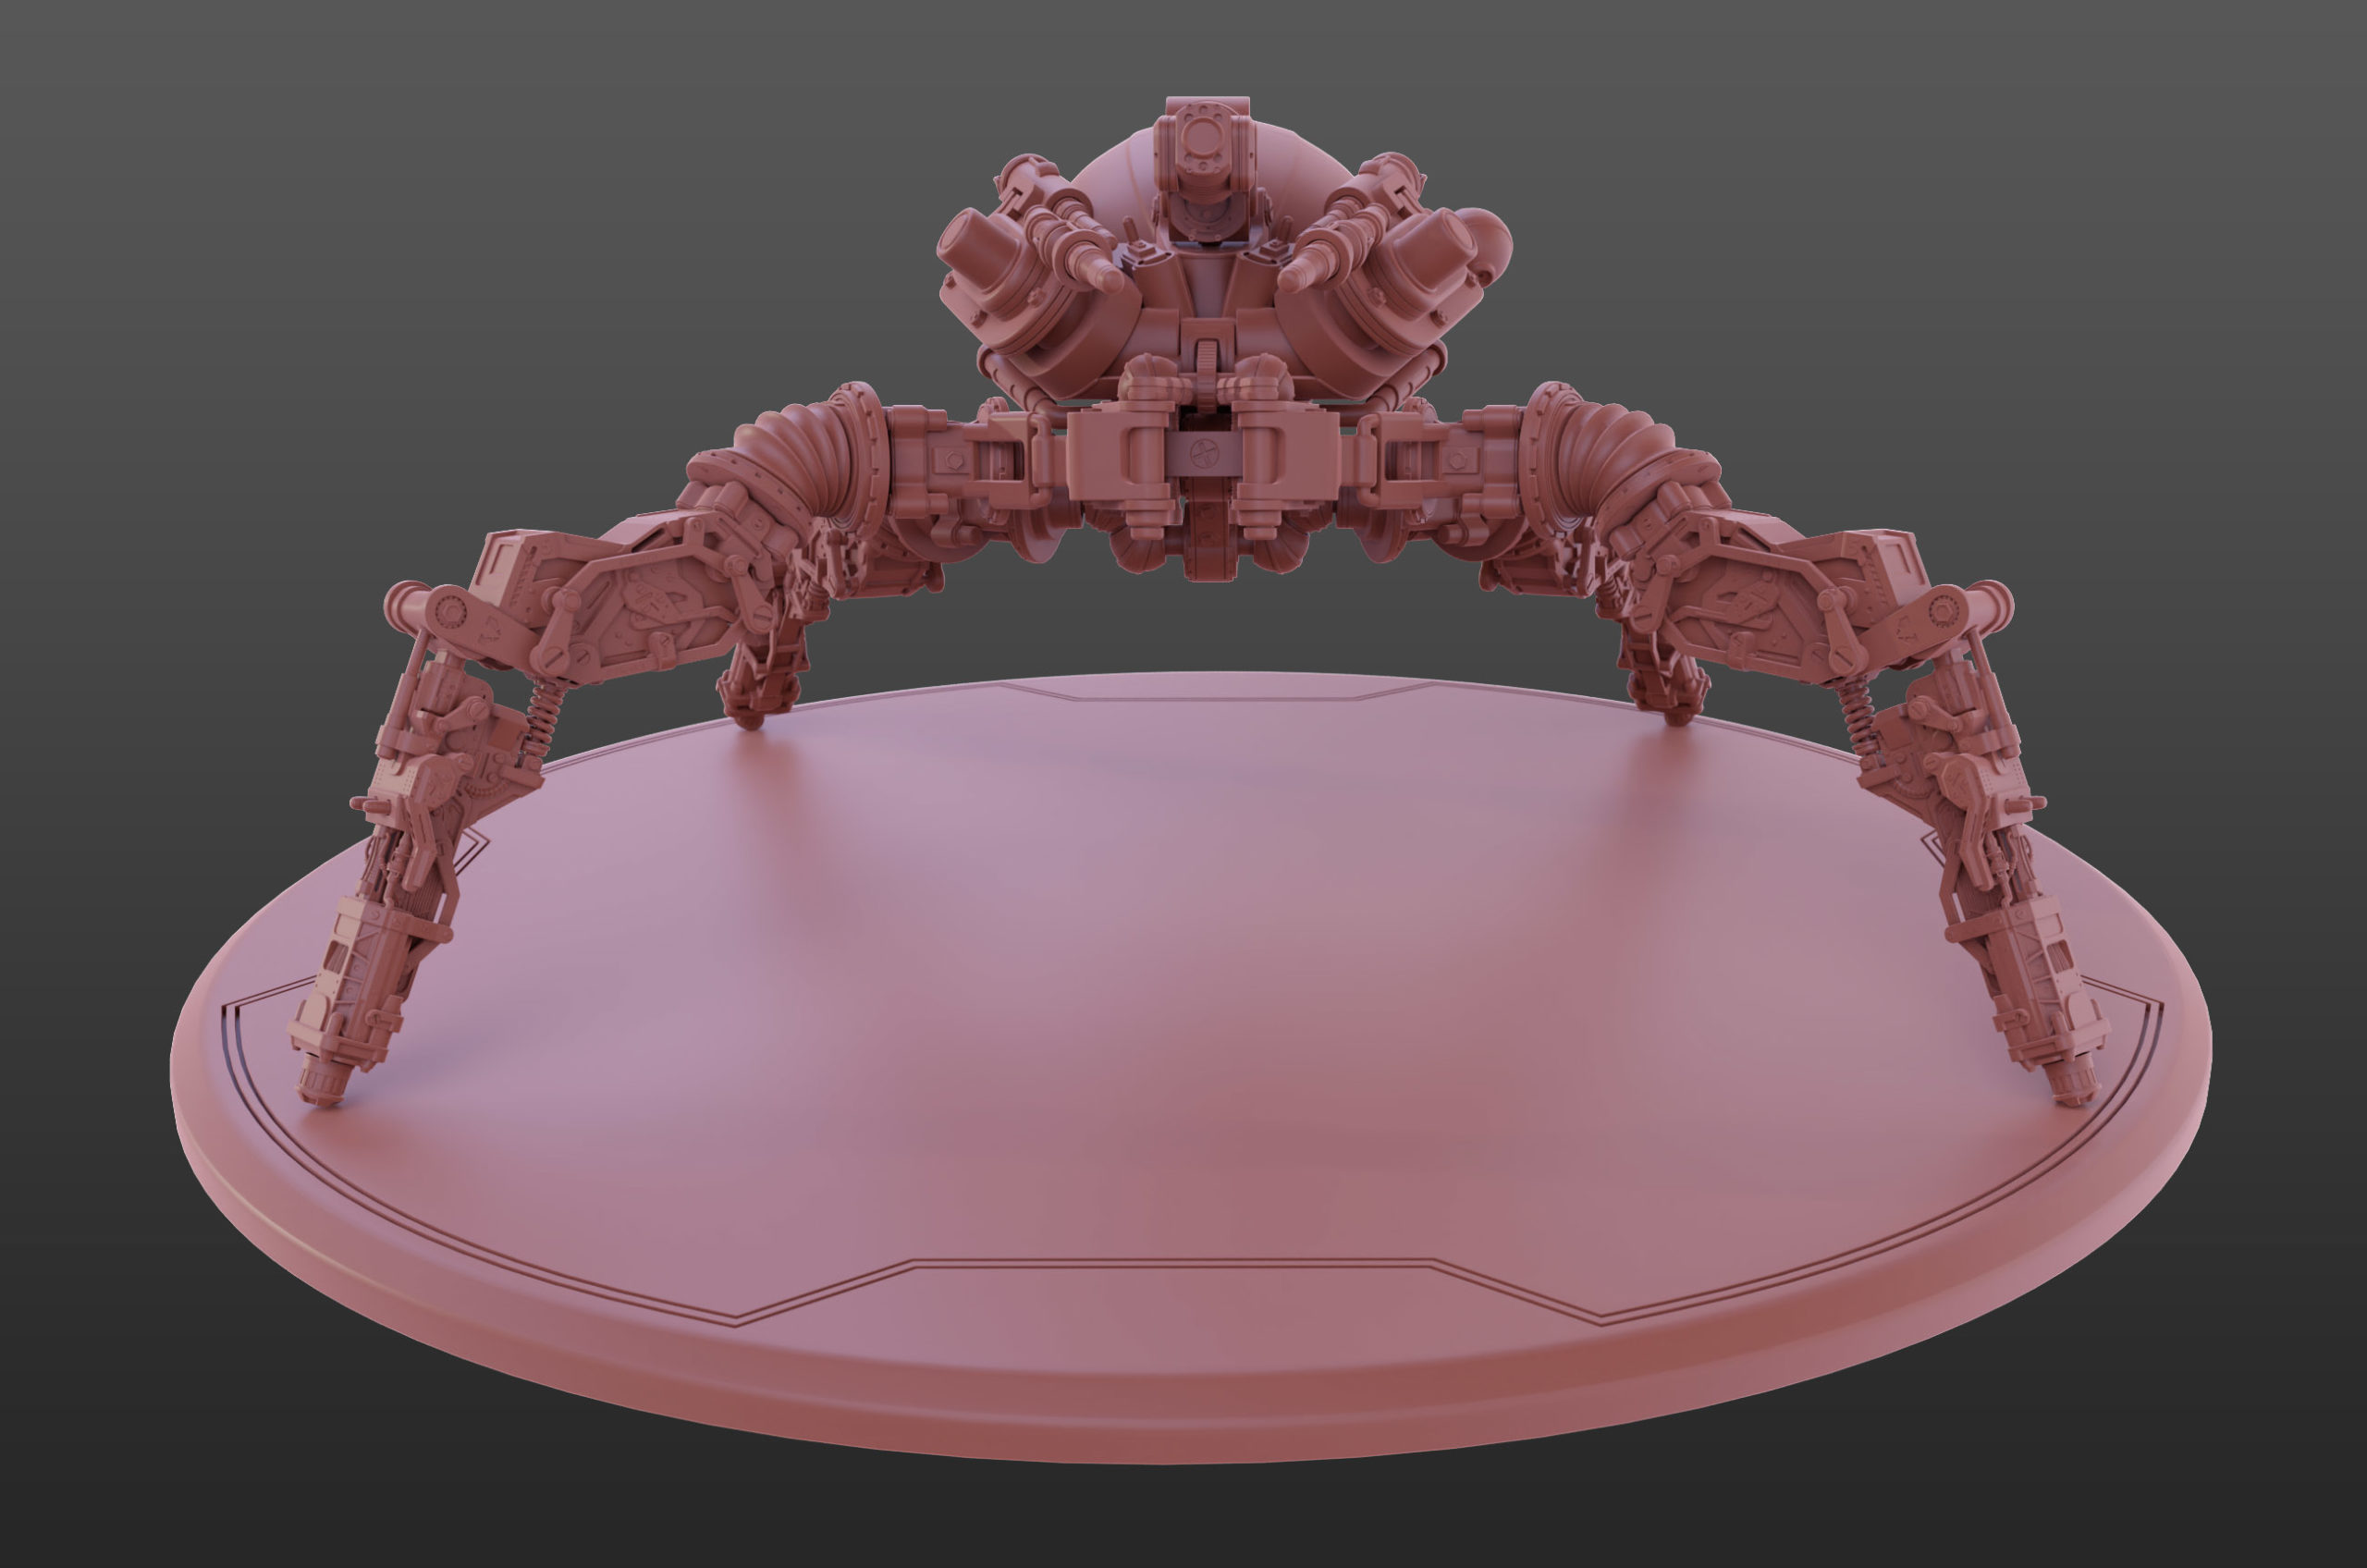
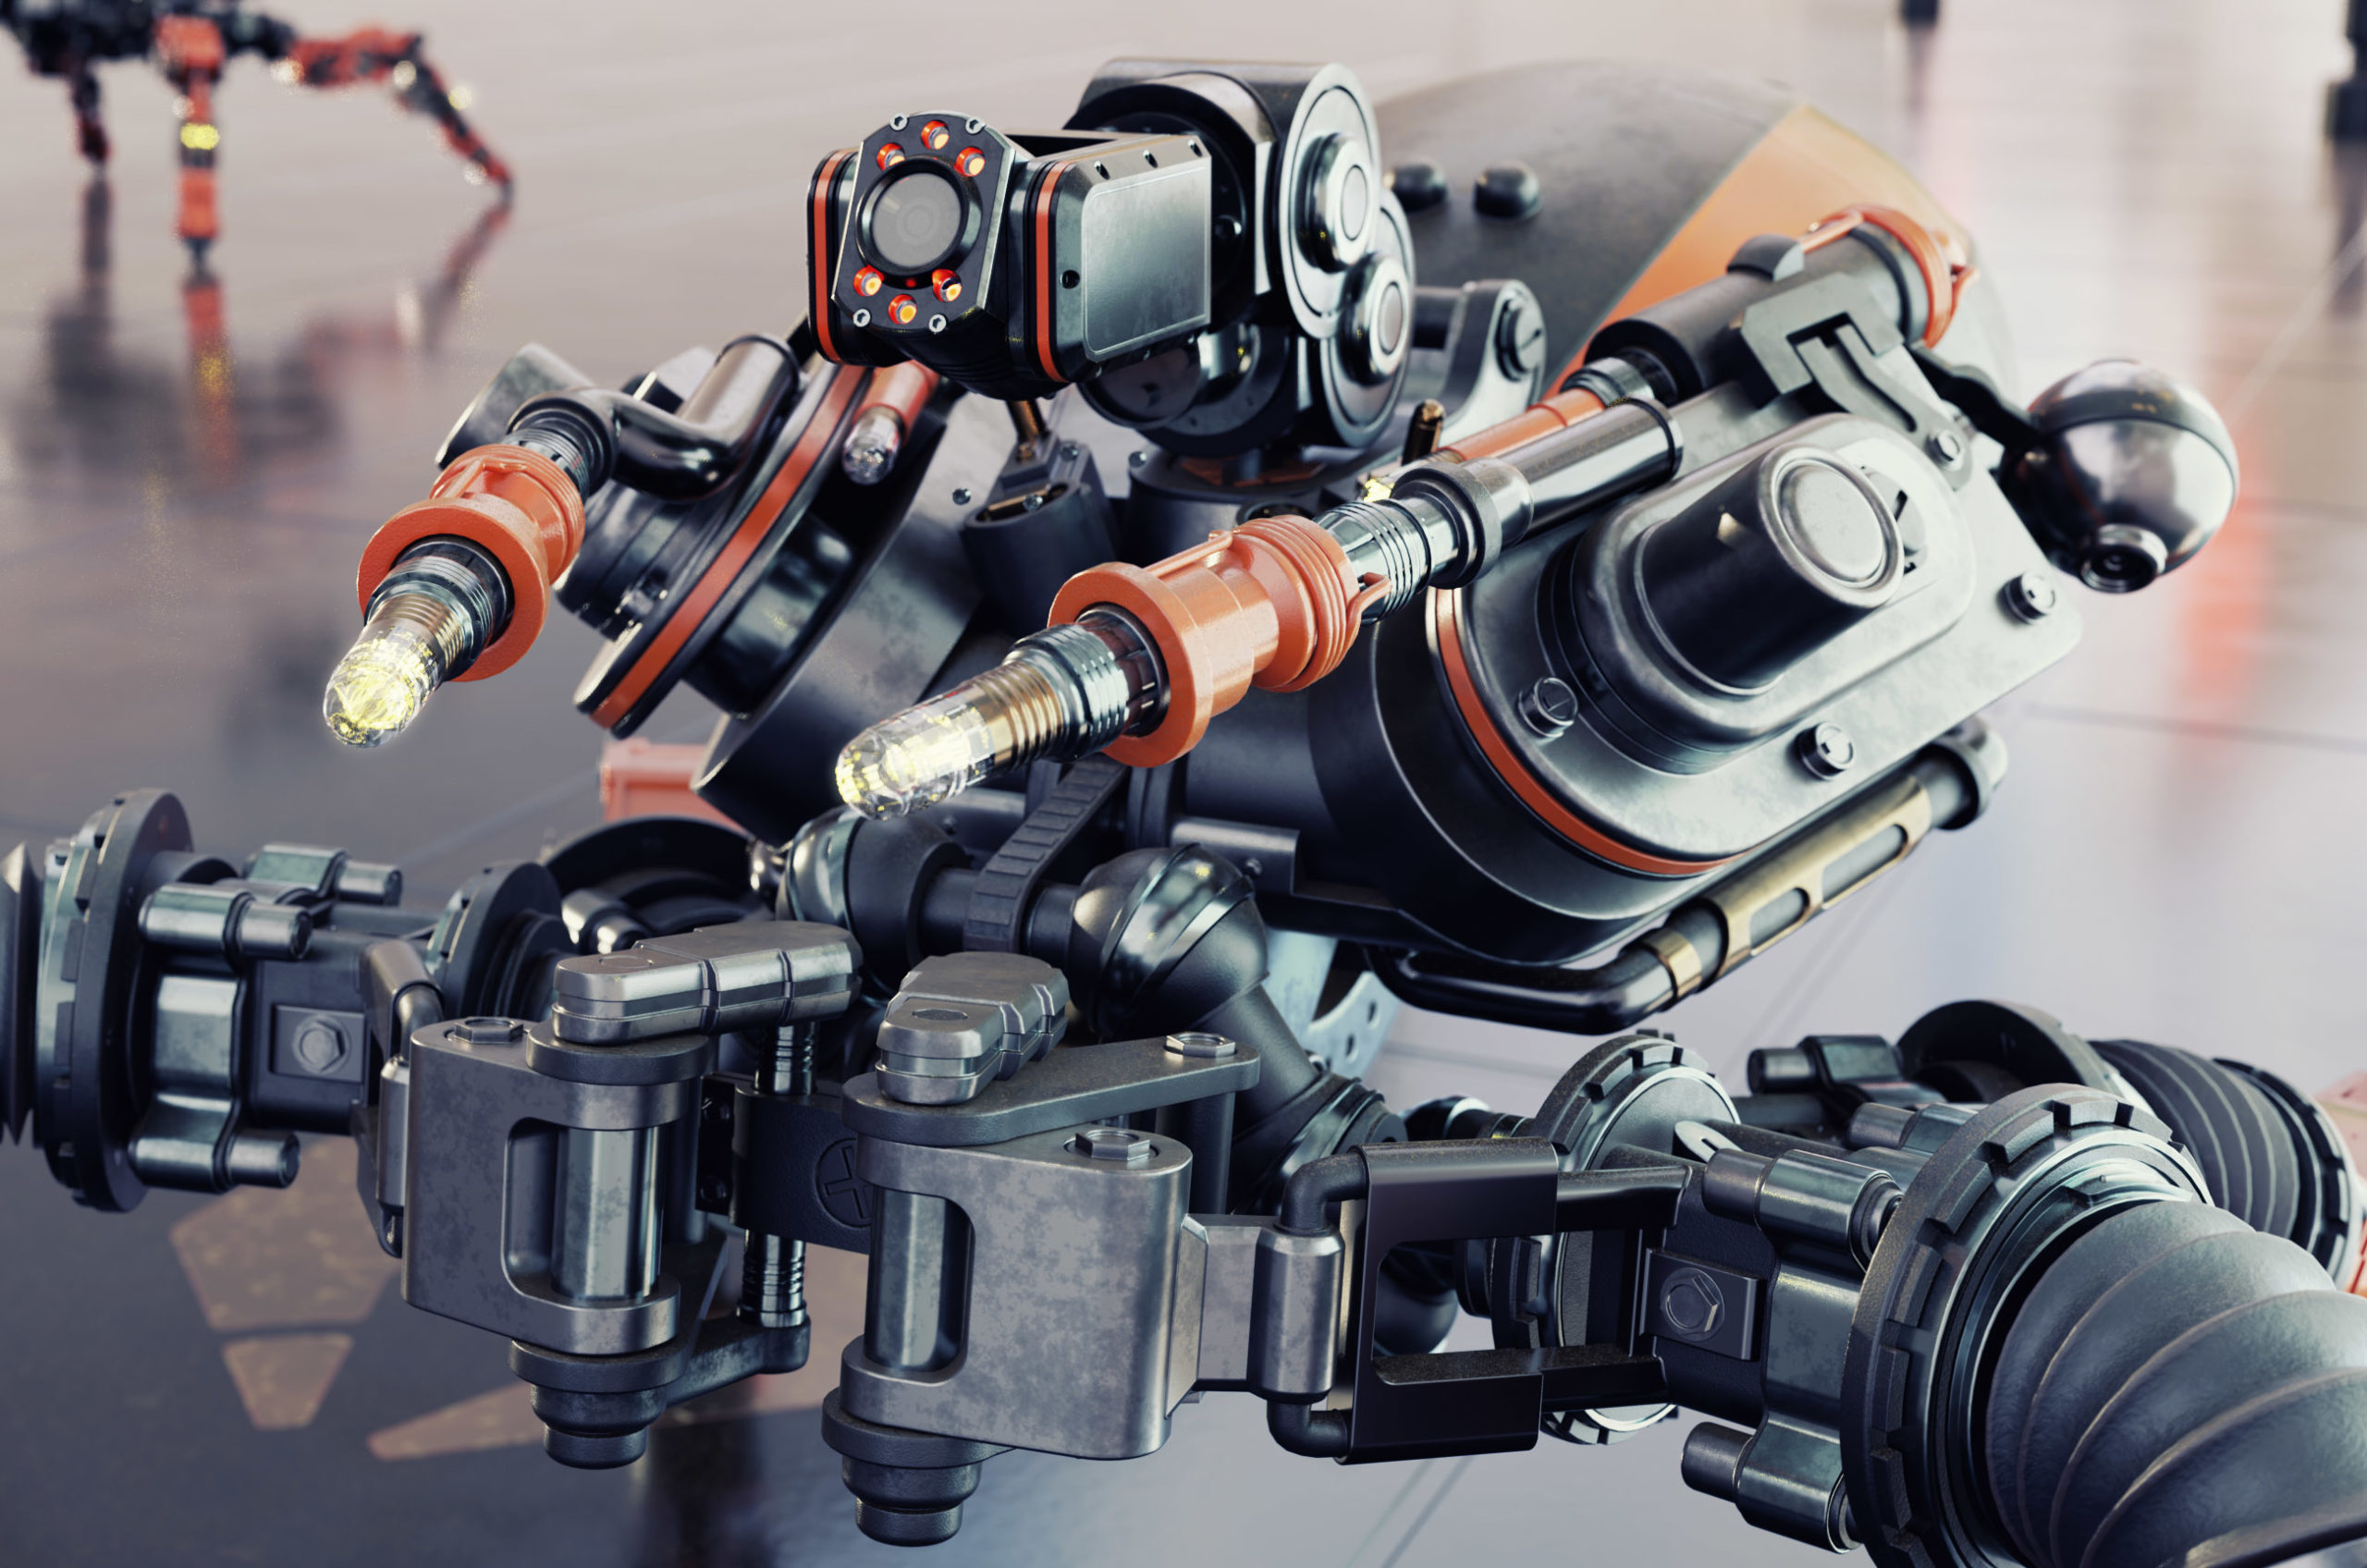
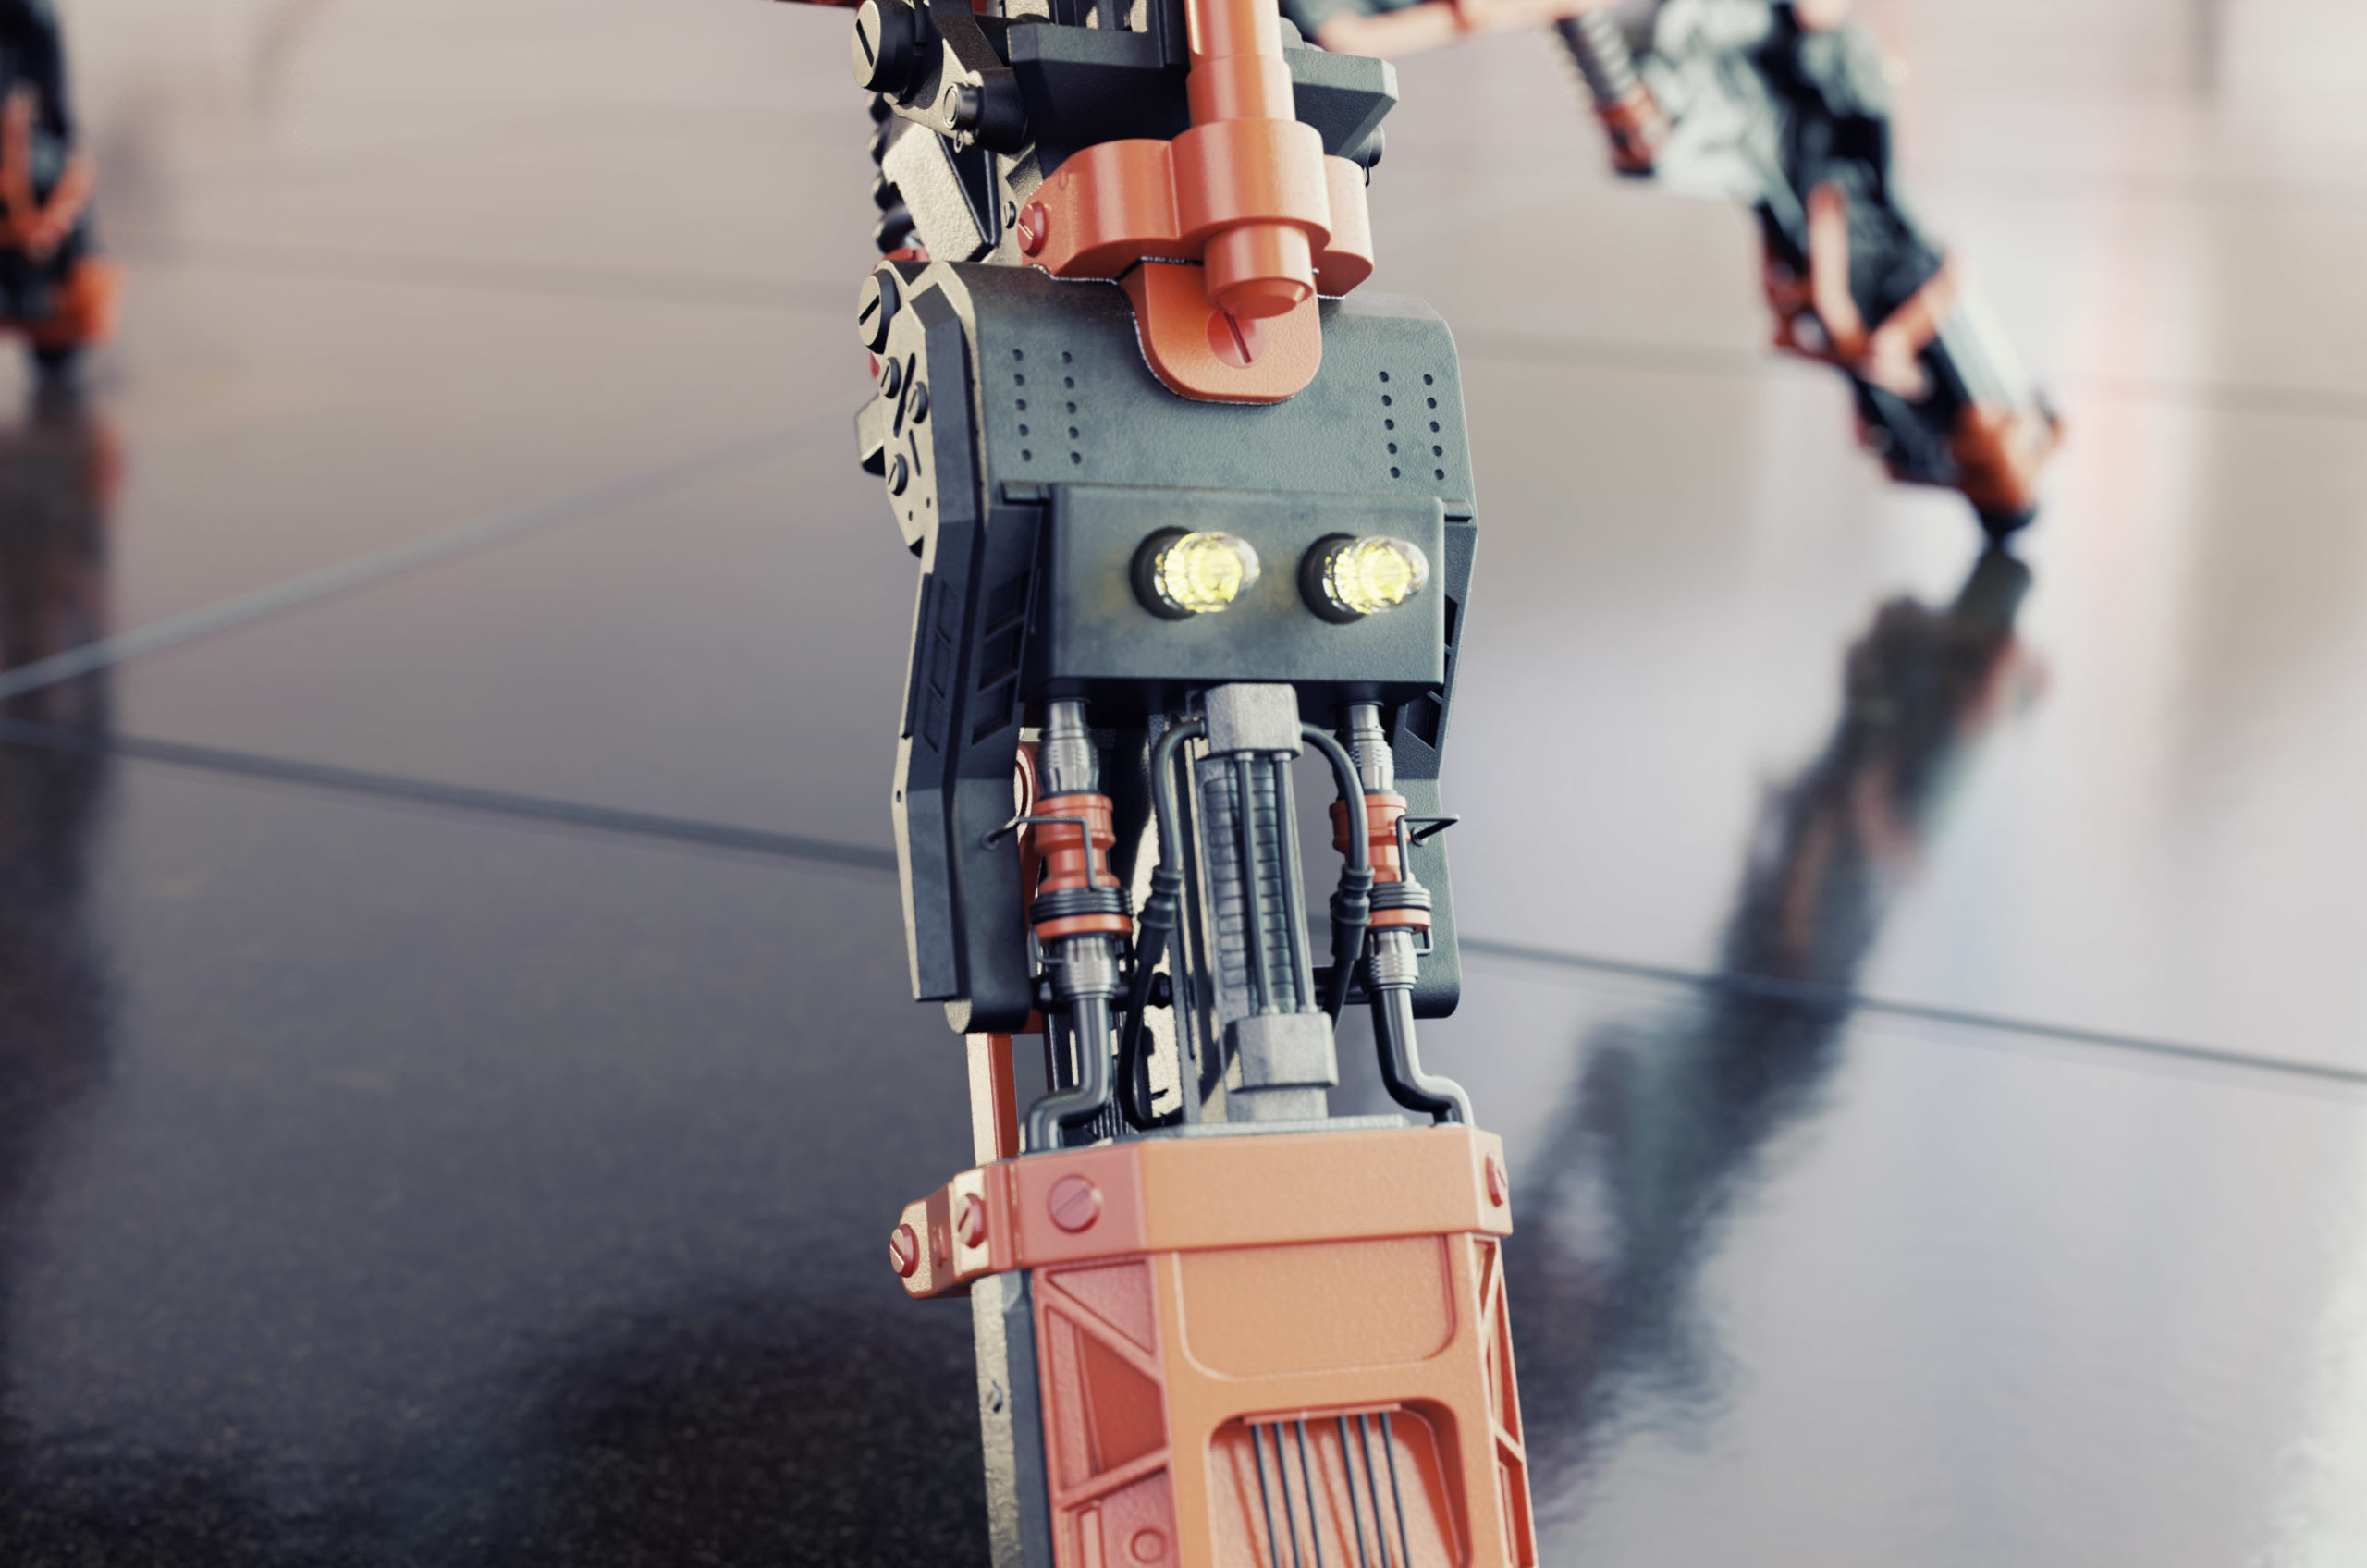
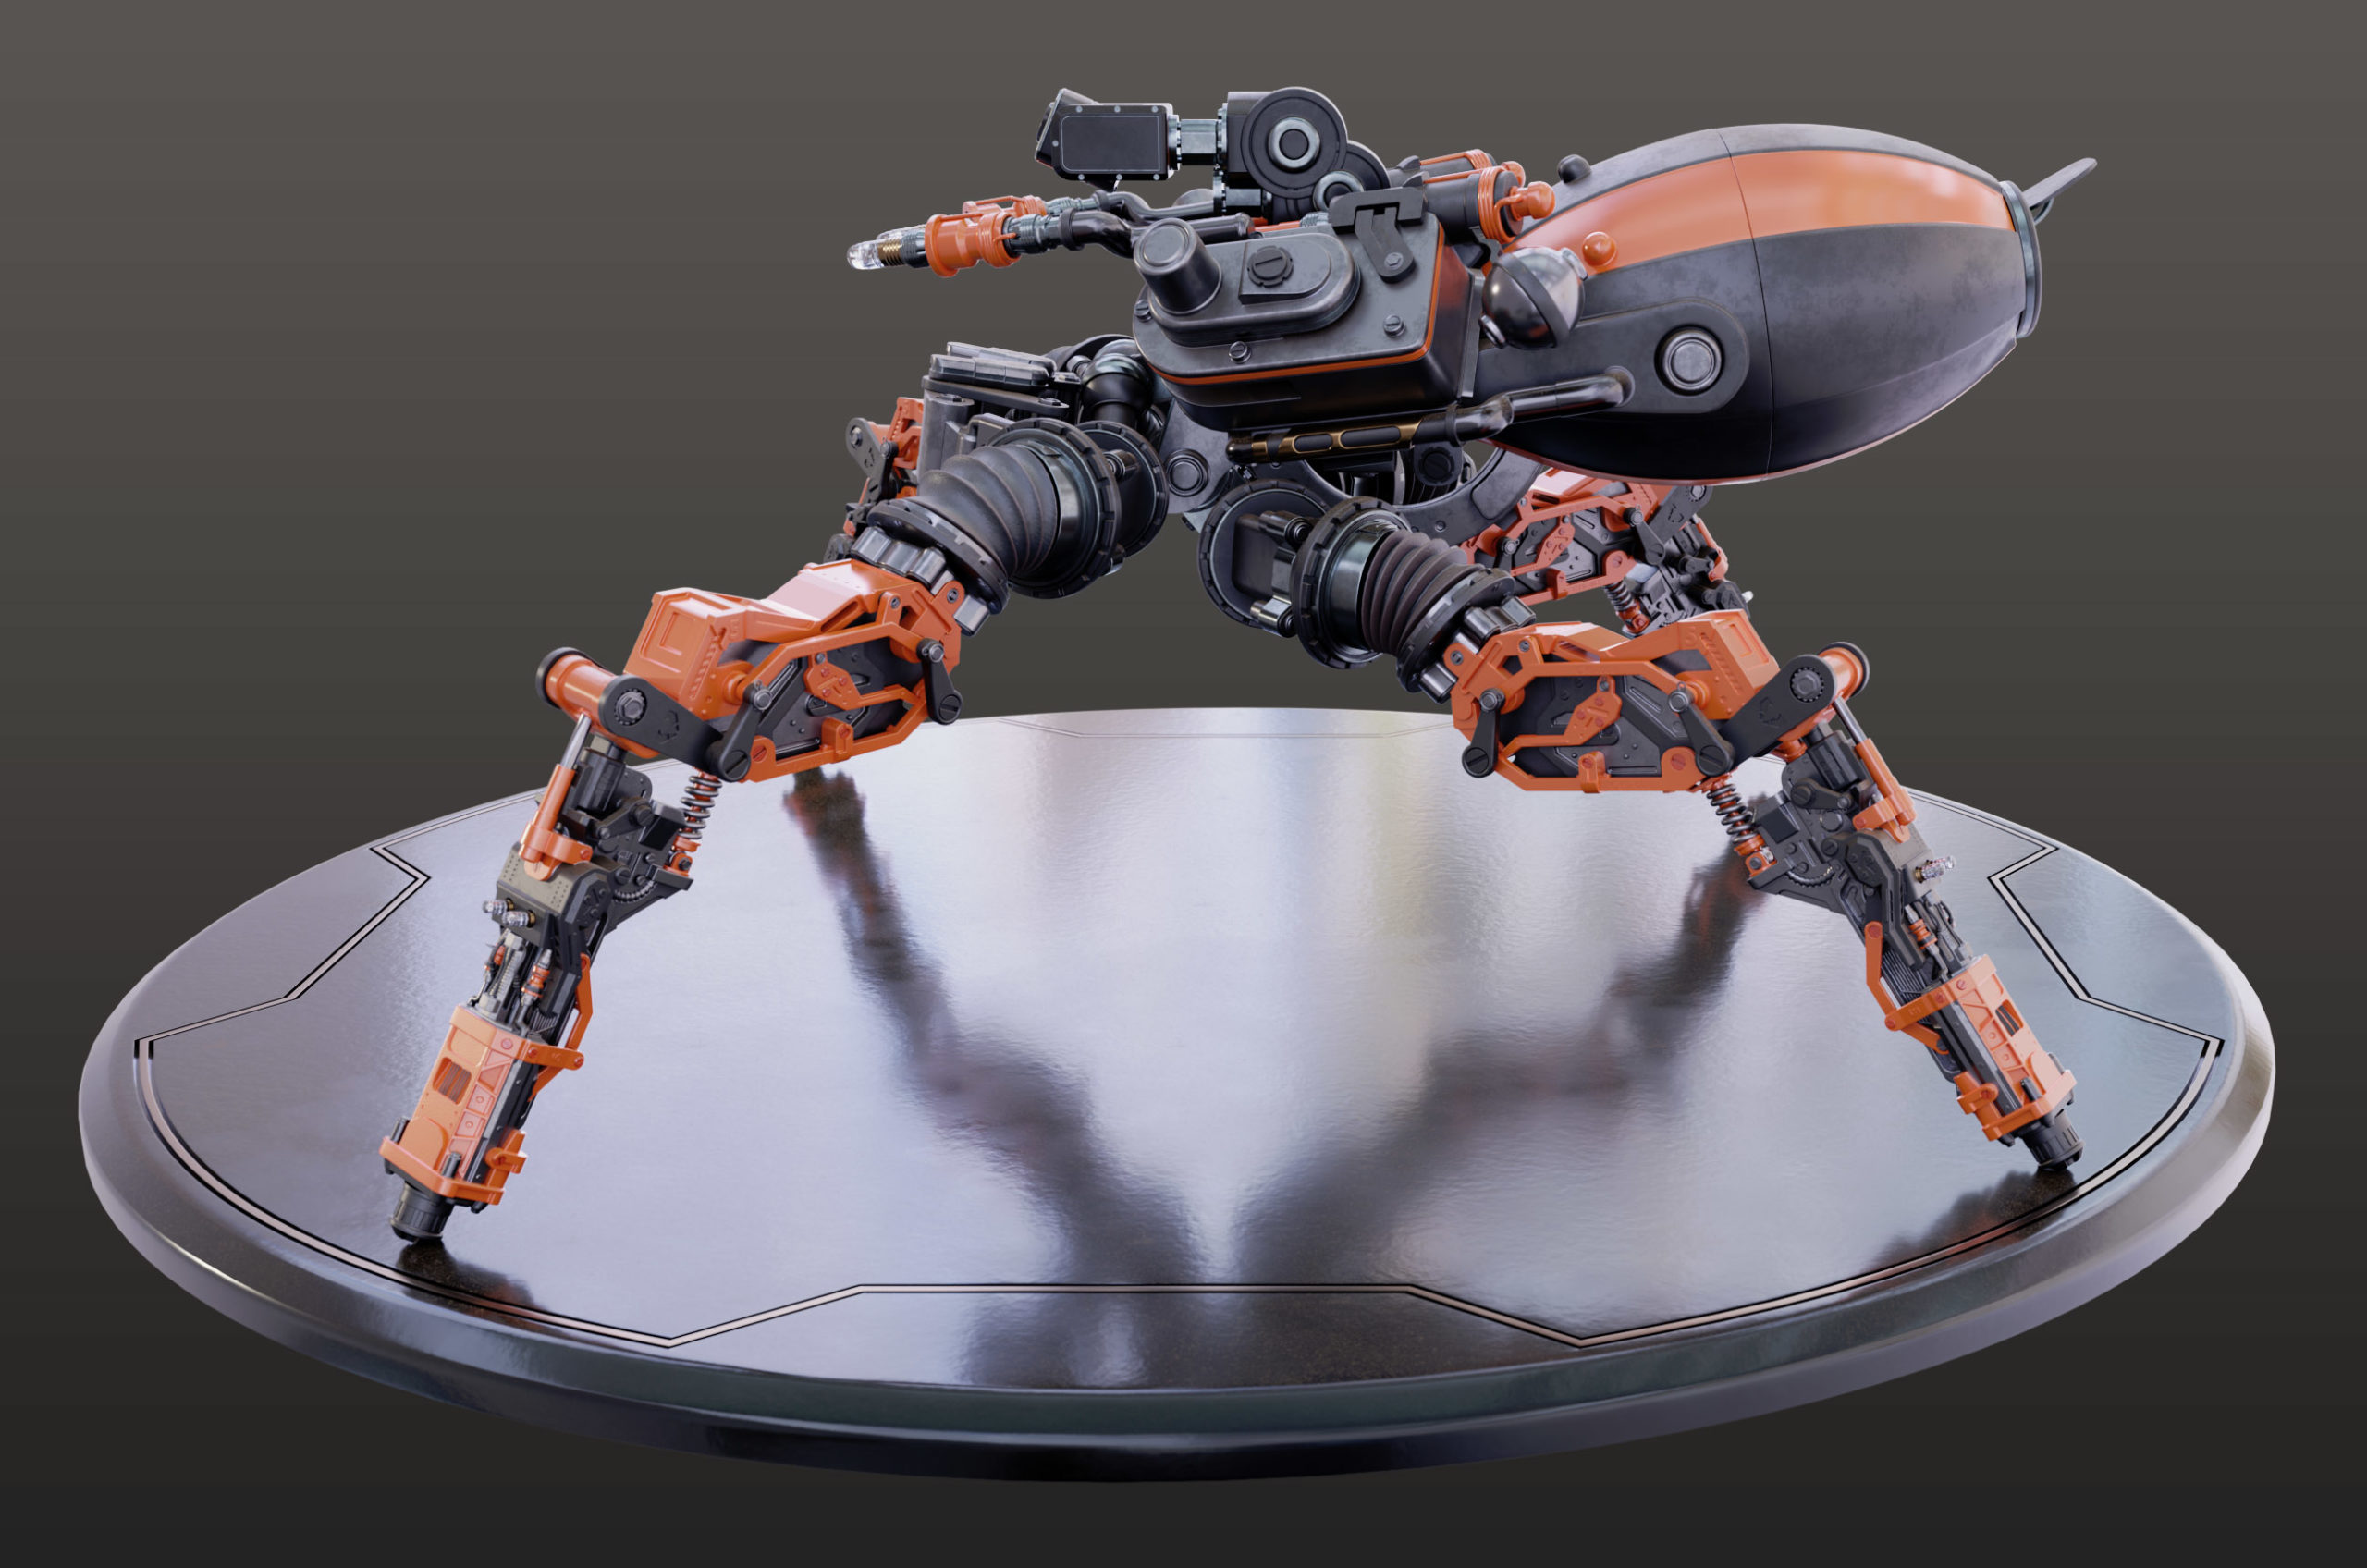
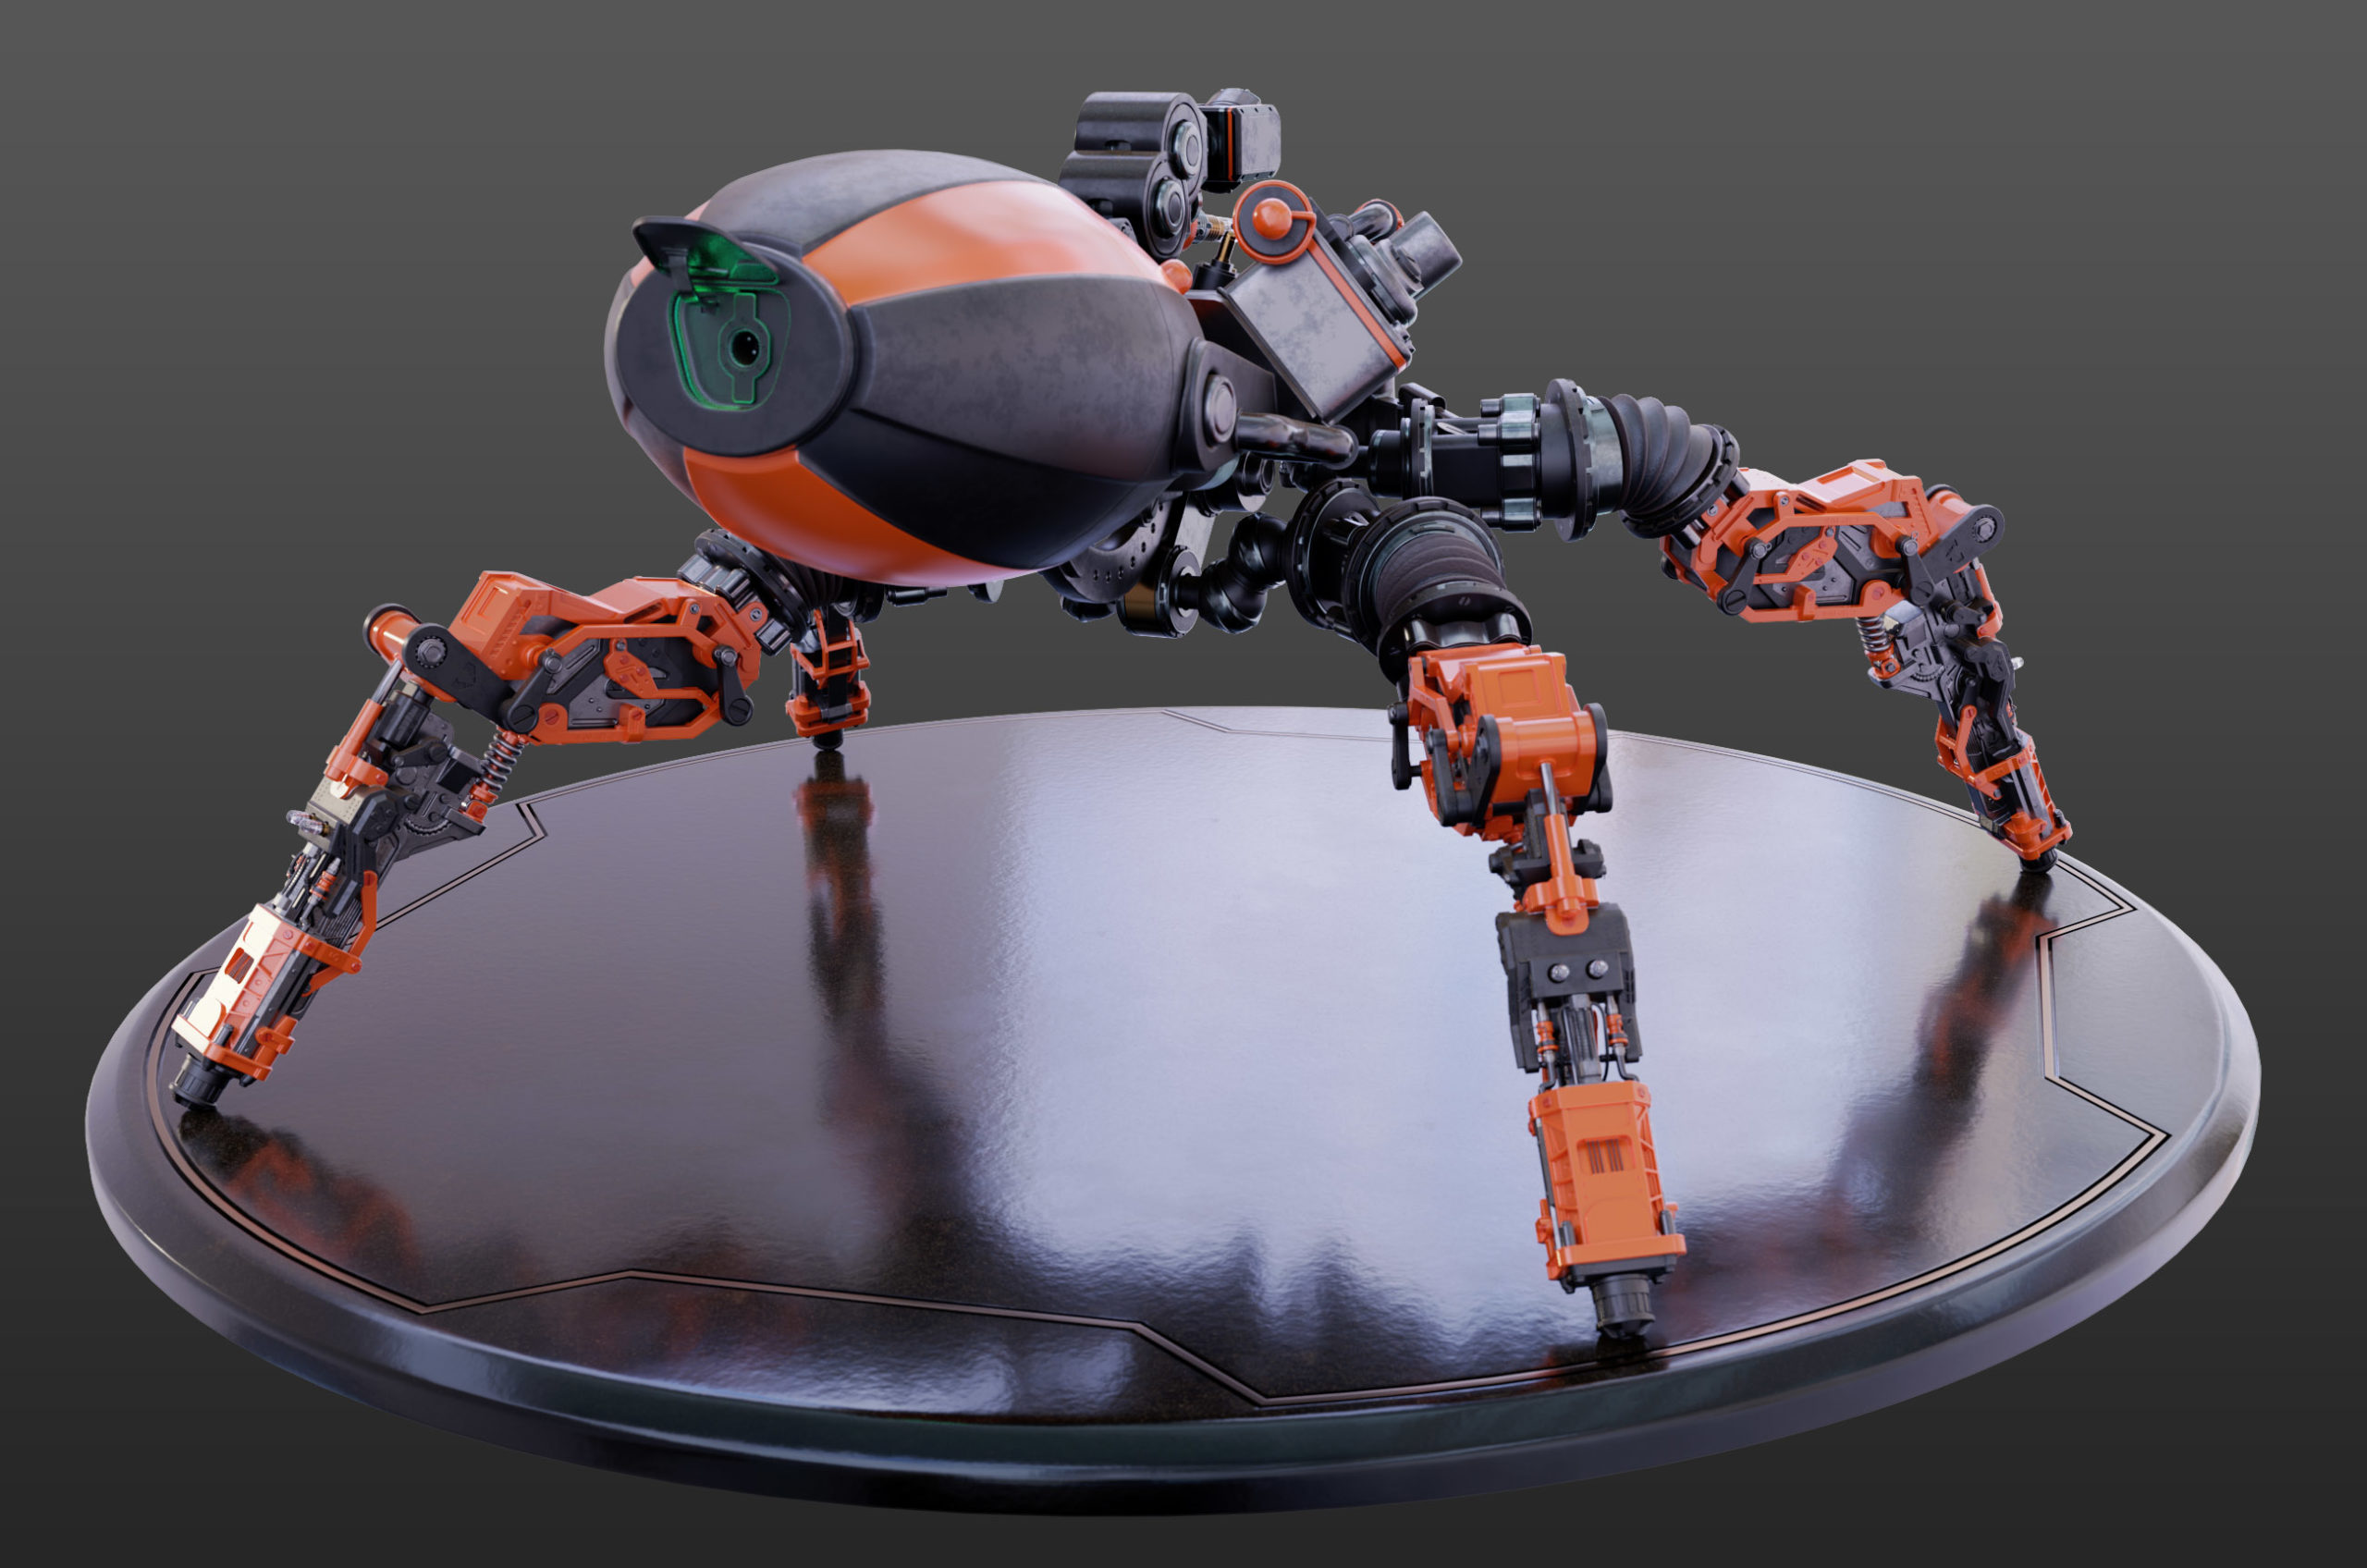
The Spy Spider Bot
The Spy Spider Bot was one of those “example” projects that would put the students on the right track!
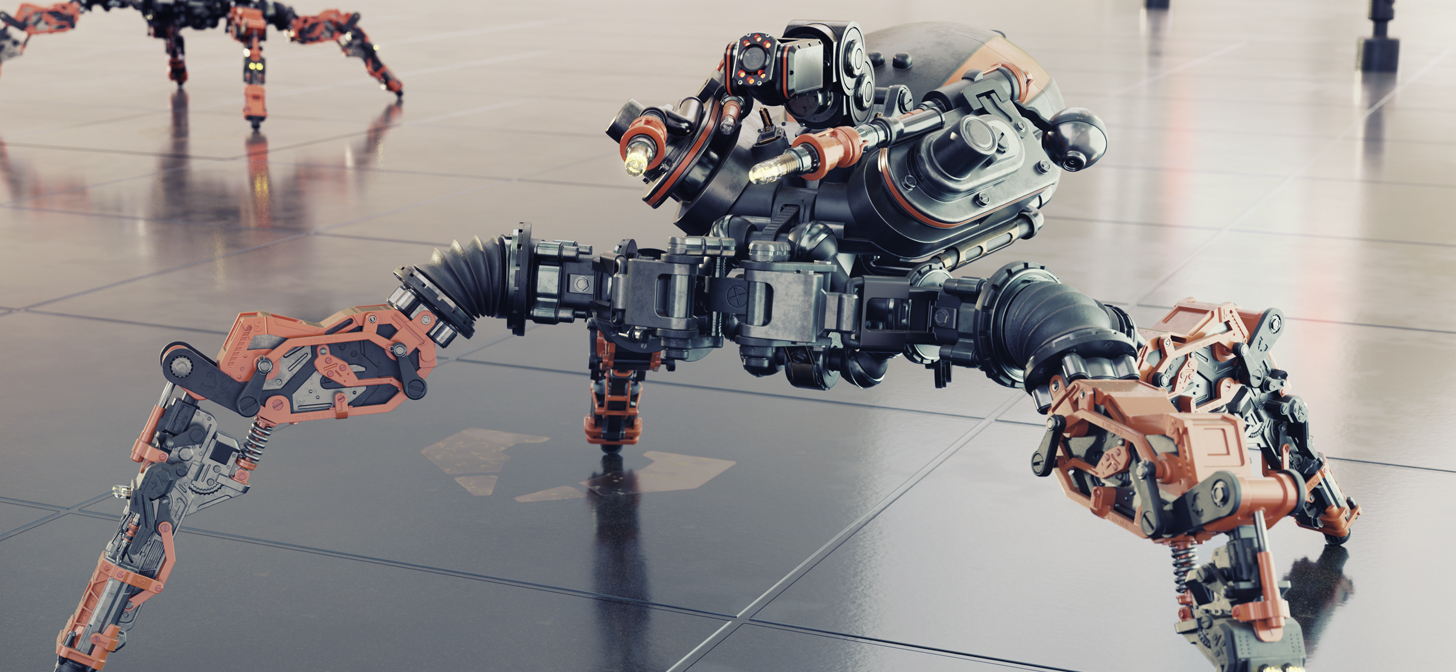
The task was given to the first-years, and they were asked to produce a scene containing mechanical objects. Just anything mechanical really, and the main goal was then to create an illusion of fairly advanced mechanical accuracy/correctness. More specifically, unlike other projects, shading would only be secondary. The final result would be animated with the help of bones, constraints, drivers, shape keys, and more. Of course, they had to take care of the design, the aspect of the mechanical process, and its animation.
A little bit about the making of the Spy Spider Bot model
Regardless of the project, during the brainstorming phase, I always study all the reference images I have found and then narrow them down to the few that are interesting.
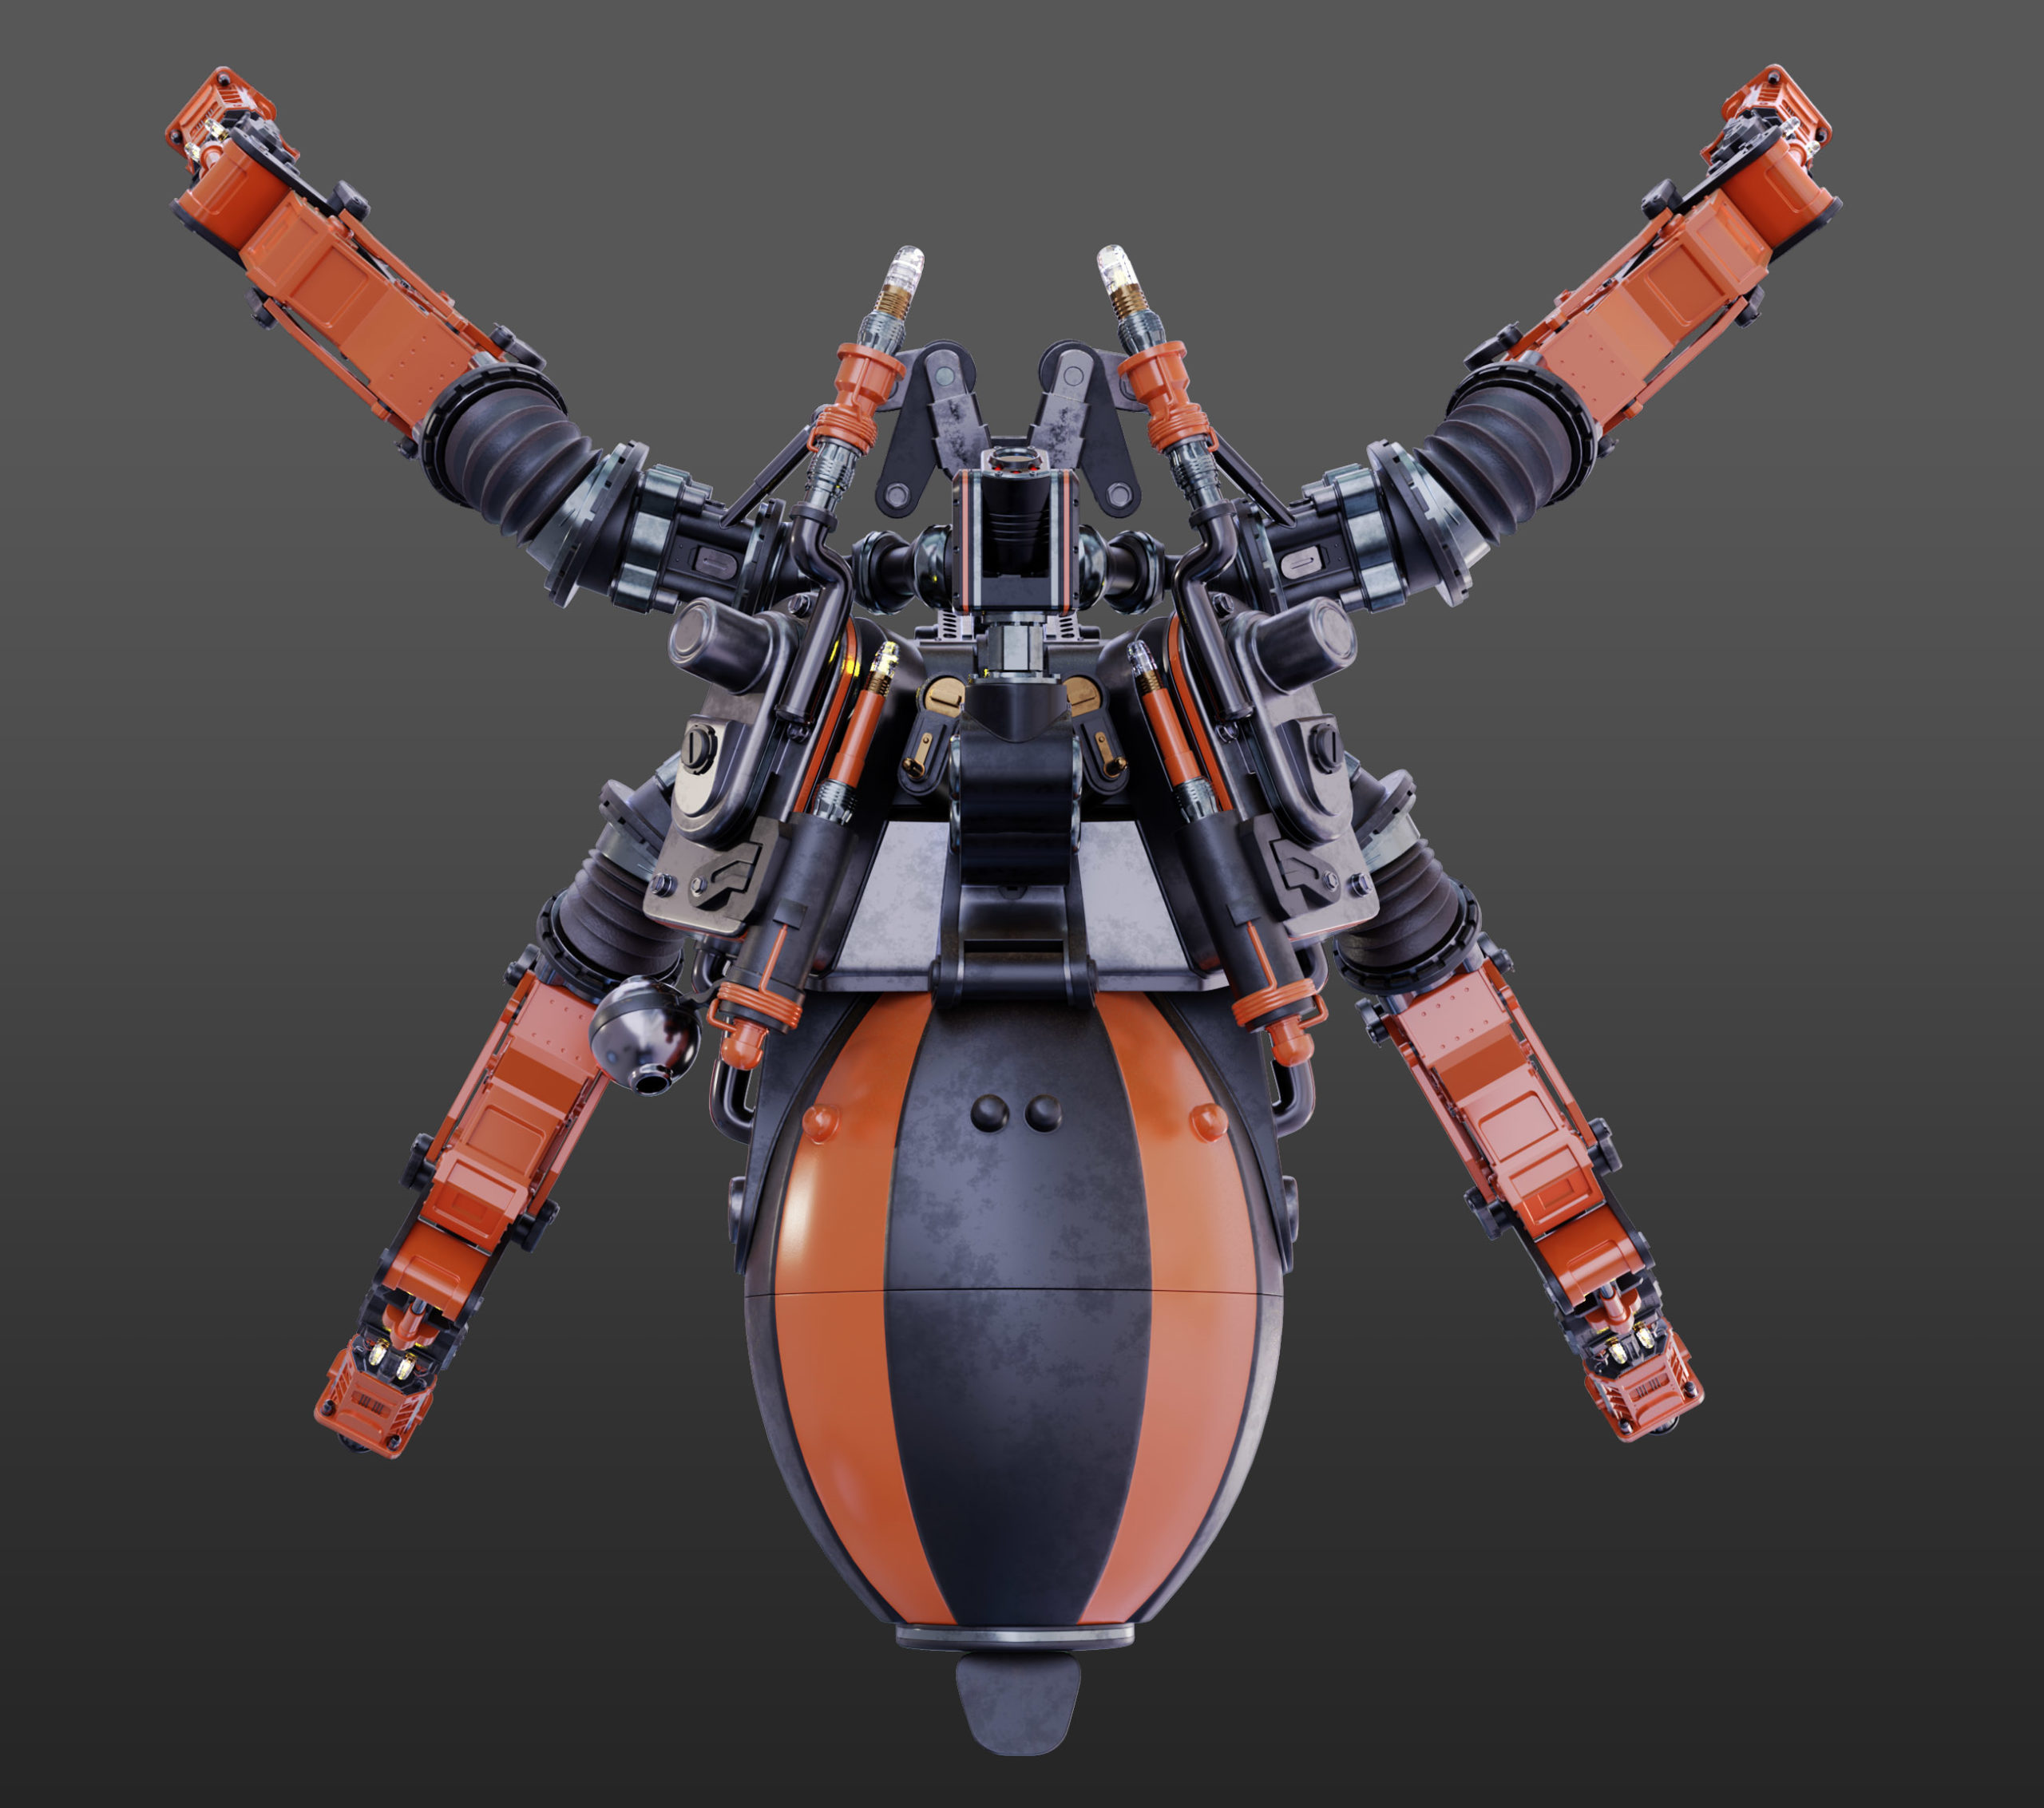
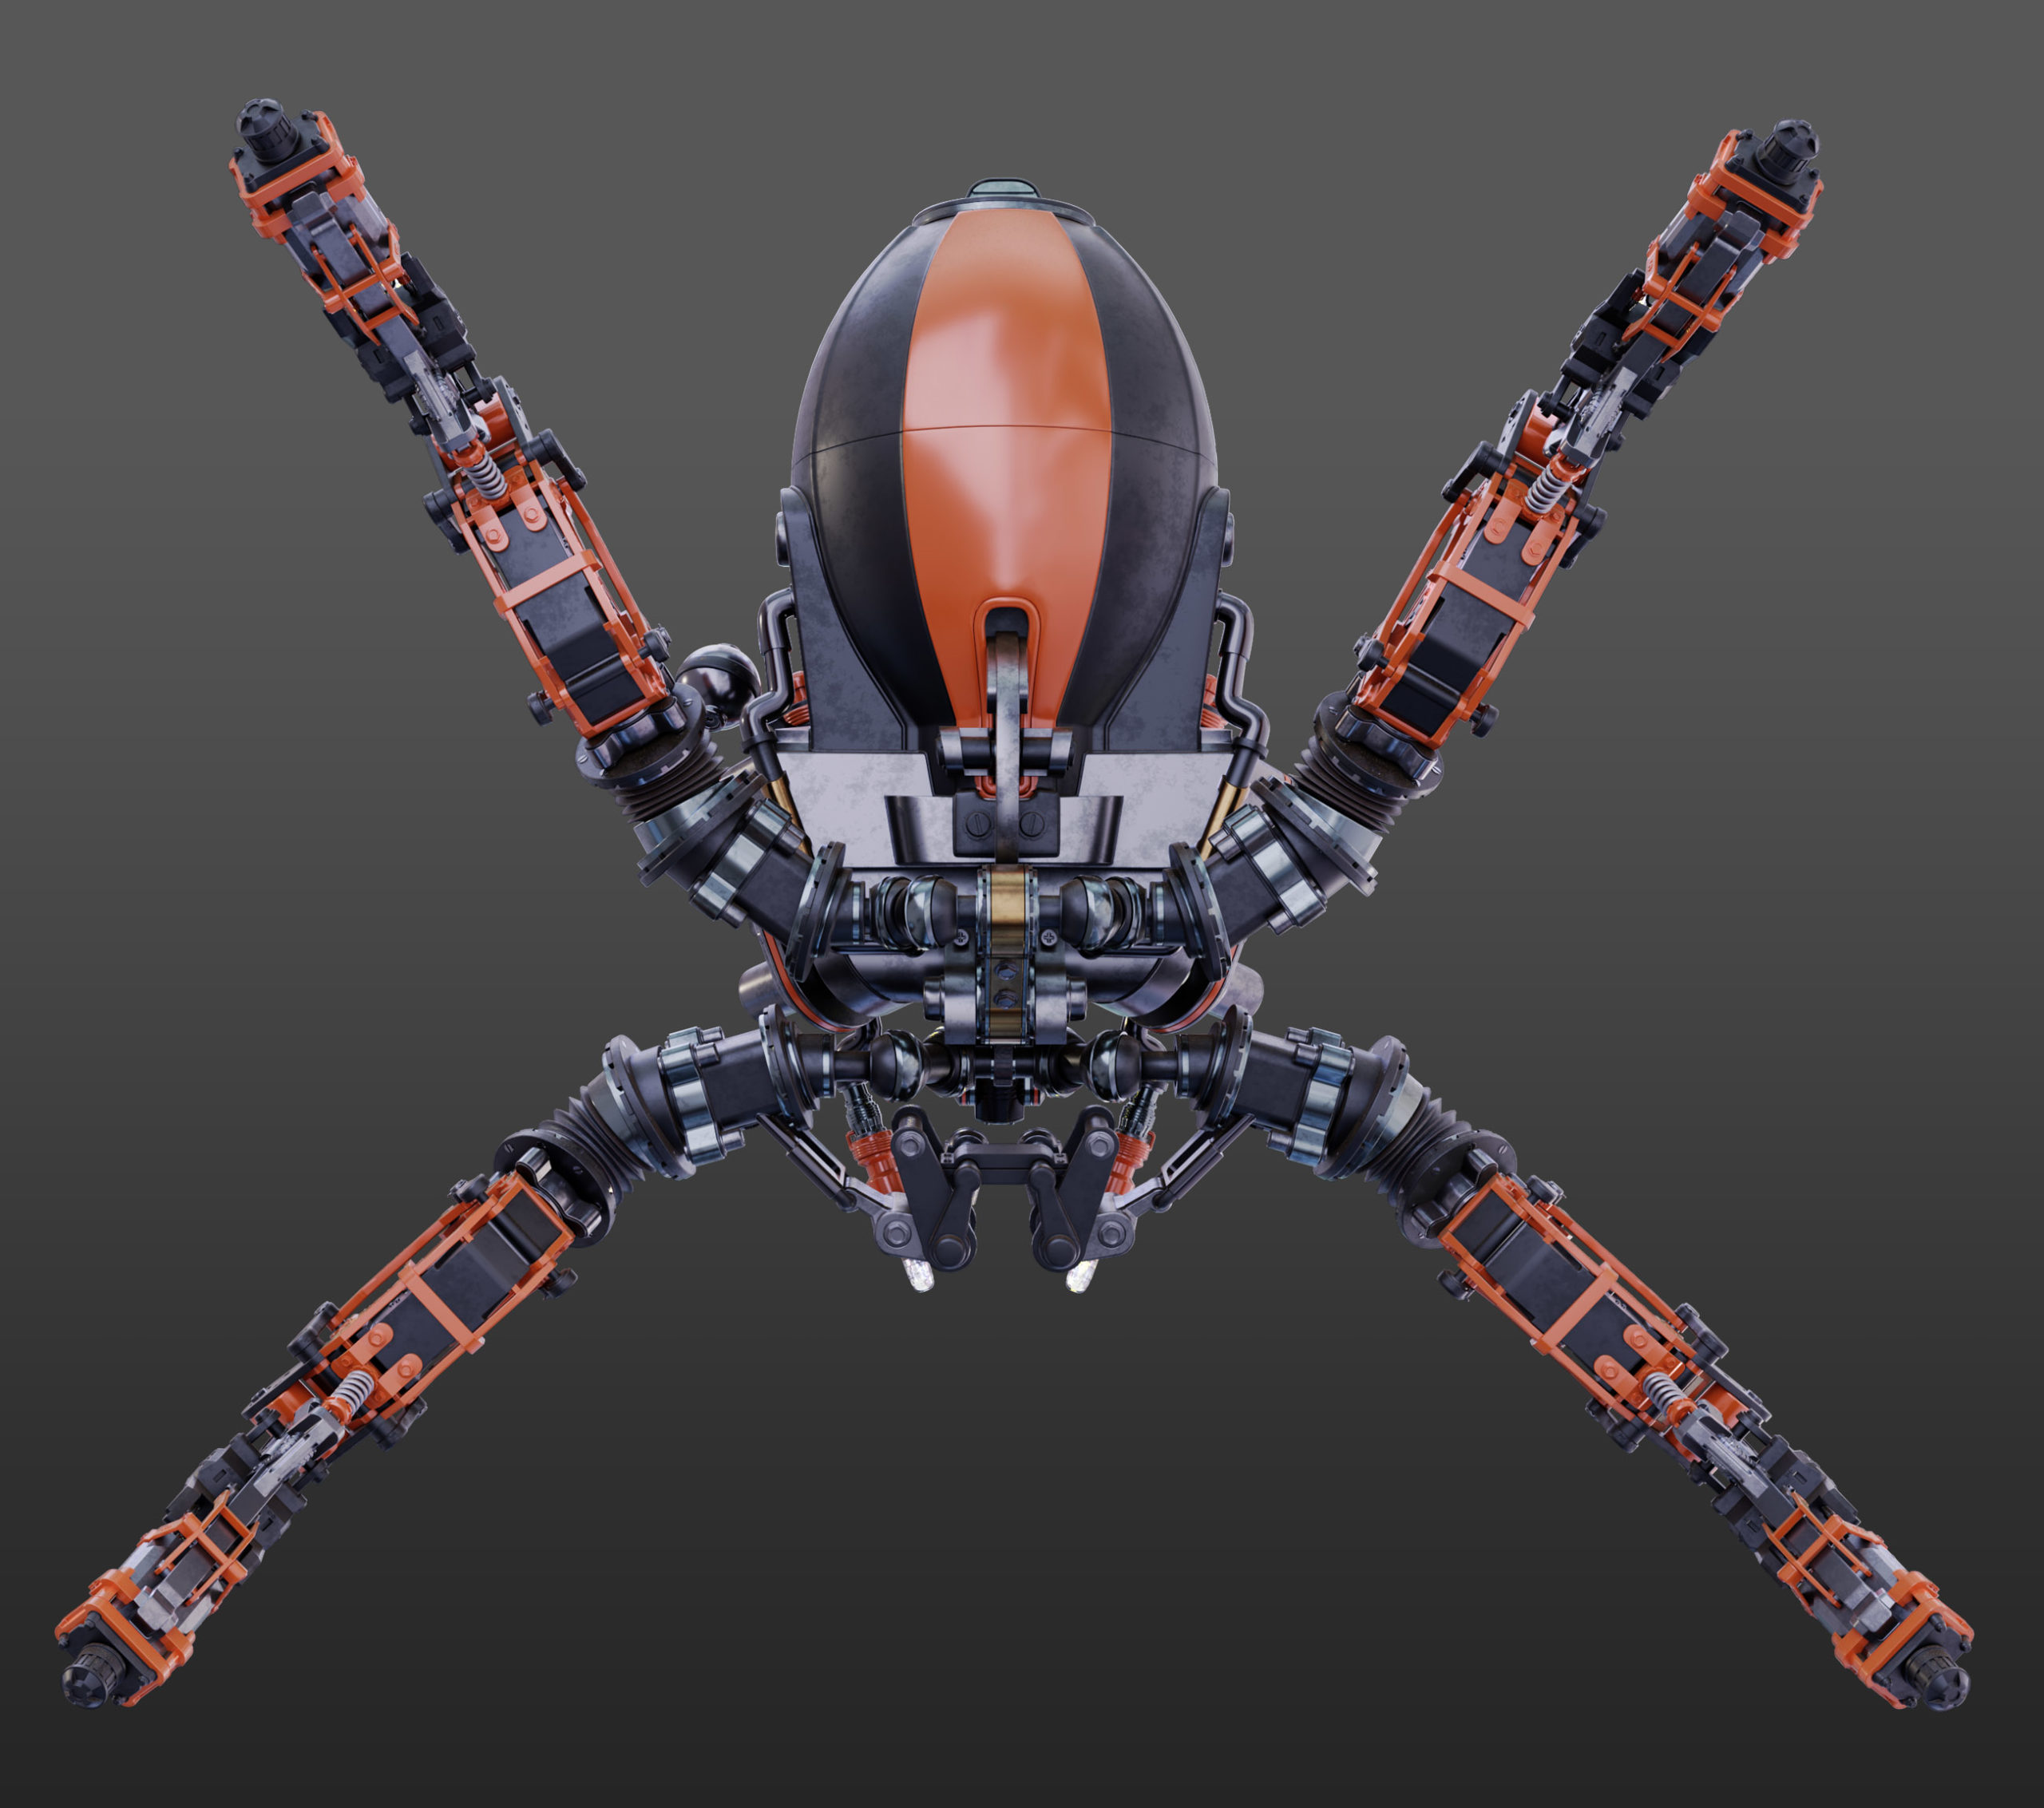
Since the model would be animated, I needed to come up with mechanical solutions that would easily be animated and at the same time that would be appealing to the eyes. Not easy to do at all—and creating articulated parts that would fit in each other in a very natural way and that would not raise too many questions from others about its functionality is even harder to achieve. That is a risk with mechanical art but I am always willing to take it. :) :)
To come up with mechanical solutions I decided then to study images of existing machinery like digging machines, car engines, and things like that. I wanted my designs to be based on machinery that is used in the real world.
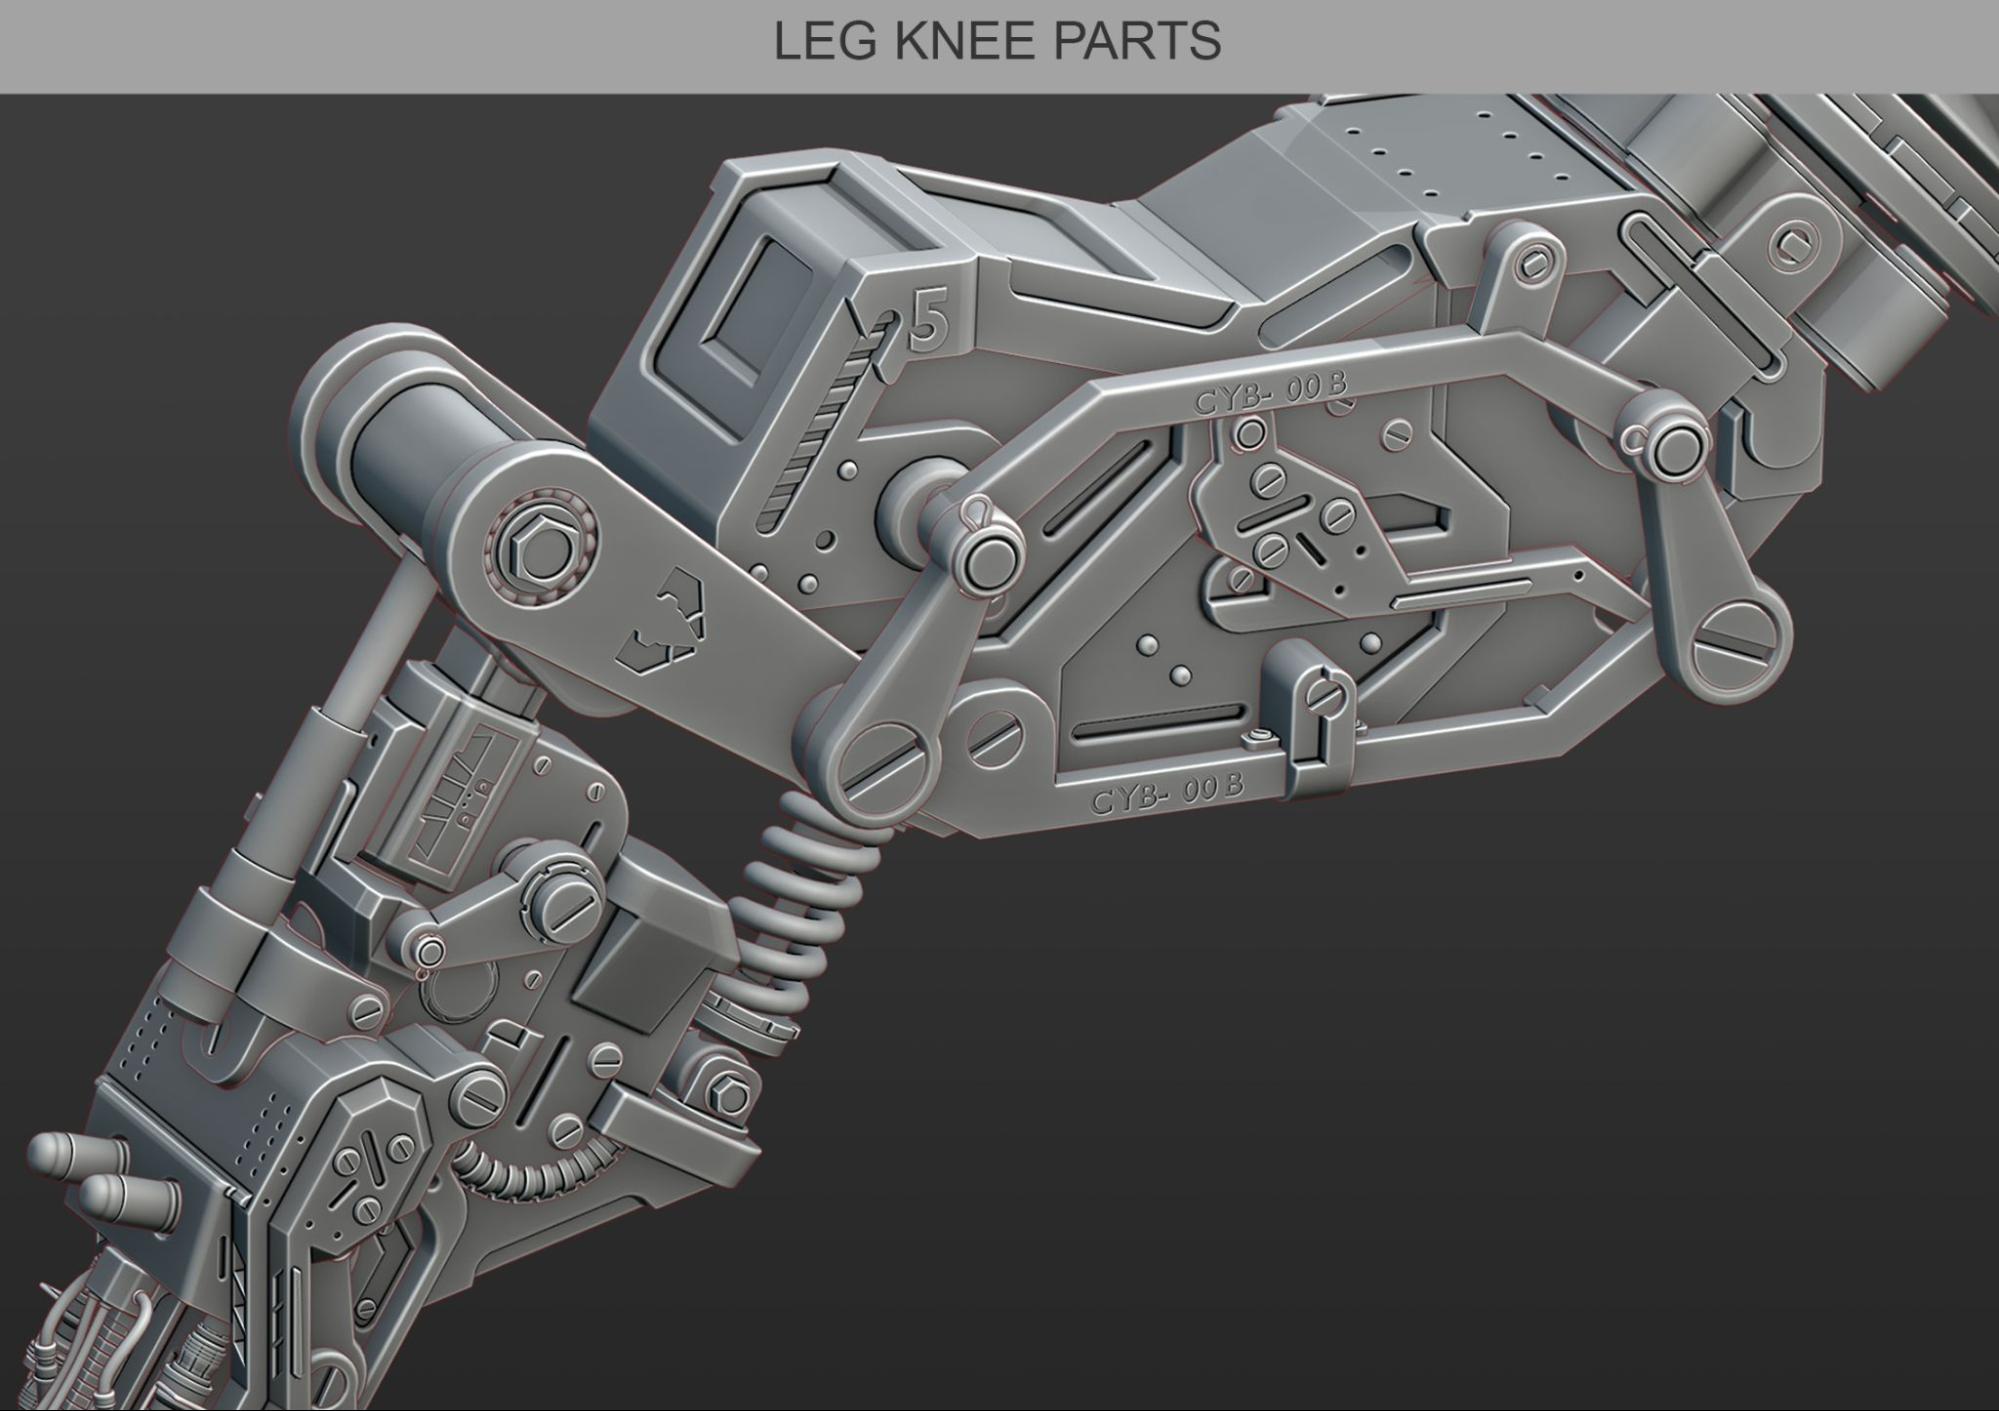
With this particular project, I used primitive shapes to find out several different mechanical solutions and then narrow them down to what I thought would work best. The pic above shows the final result.
Different artists have different approaches to the way of doing things but I believe that using primitive forms to come up with solutions is always the best. On the other hand, I had not made any sketches and had no idea whatsoever about the different parts’ final shapes. I let them come to me while I was creating them. No problem there! :)
I mostly used Loop Tool and Bool Tool and I like being able to use different Bevel values on the same object. For that, I affected all the edges with “Edge Bevel Weight” and added a Bevel modifier, set to Width and Weight. And when I had done that, I just needed to set up different bevel weight values depending on the angle (“N” transform meny in the 3D view => Bevel Weight).
Awesome simple tools and very easy-to-learn things can go really fast if you have a good grasp on them.
My inspiration
It was really the Wild Wild West movie with Will Smith and Kevin Kline (1999)—but also my love for complexity—that triggered the idea of this project.
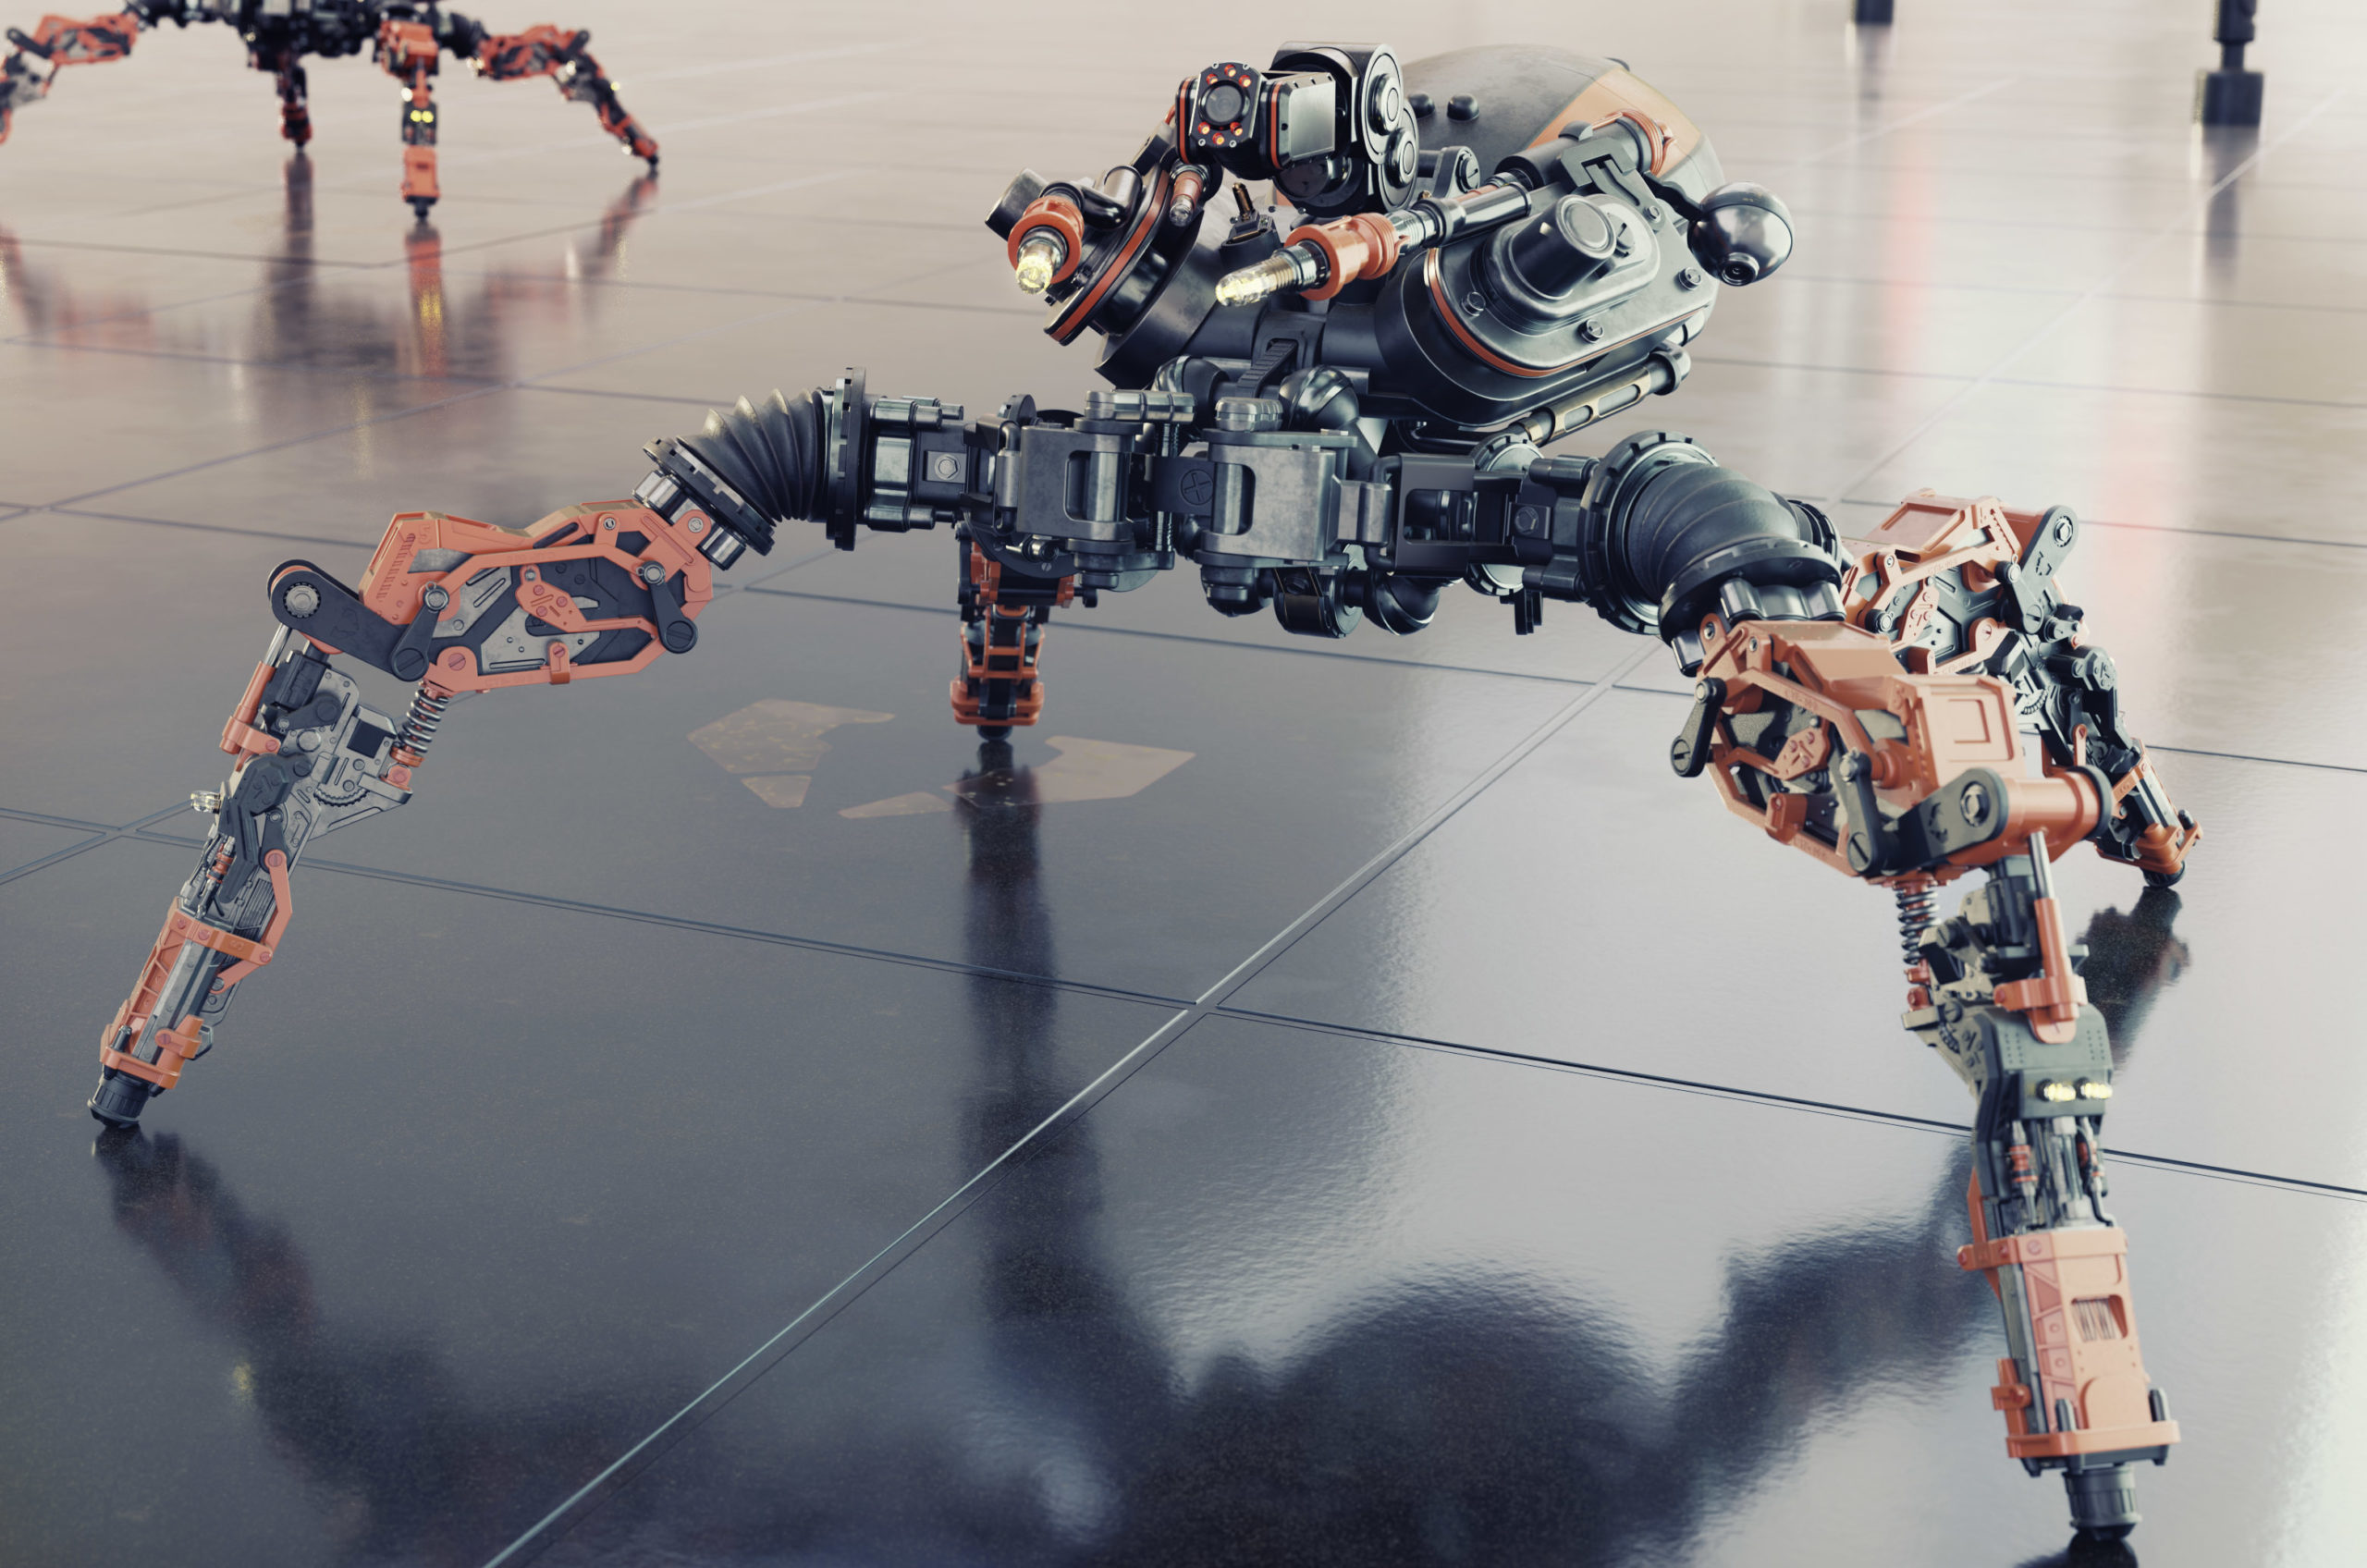
Just like in the movie, the original idea was to create a steampunk (which, by the way, is my number one style) mechanical spider. But, you know, things can happen and the results are not always as you had originally thought.
I mean that I had also done some research on ArtStation and came across this mechanical spider (which I totally fell in love with) by Oleg Ushenok and immediately felt that I should create something in that style and with my own “savoir faire”.
Detailing is really my motto and I love to create art pieces that contain lots of details and that I hope will attract others’ attention.
What fascinates me is creating details that are compatible with each other in terms of visualization but also in terms of mechanical precision, or at the very least, illusion of mechanical accuracy/correctness according to what could be expected. It is extremely challenging and the complexity of this Spy Spider Bot project would really put me in that challenging position. Talking about complexity and mechanical precision, I would have loved being part of the teams that have worked on the American Sci-Fi Transformers movies. Learning from them would have been a dream come true! :)
Anyway, some of the 3D parts I used on the mechanical Spider are from another scene I created three years ago (GITS cyberpunk robot). I often reuse parts from other 3D projects if I feel they would fit right in!
Tools
The entire Spy Spider Bot scene was produced inside Blender 2.92 and rendered using Cycles (branched path tracing). To finish, I did some color correction work in Photoshop.
Modeling
To cut a long story short, I had not, to begin with, decided how the mechanical parts or the overall shape or even the shading would be. That was really a “peu à peu” production.
And although I usually focus most of the production time on the texturing, I chose this time to focus mostly on modeling the thousand of 3D parts this Spider Bot is made of.
For that I didn’t use any external toolkits or anything of that sort to produce the different parts but mostly preferred to create everything from scratch, using the tools that are already included in Blender. As a teacher, teaching from the ground up is always my number one priority. Never make it easy on yourself! You have to learn how to build from scratch before you start using plugins or things like that.
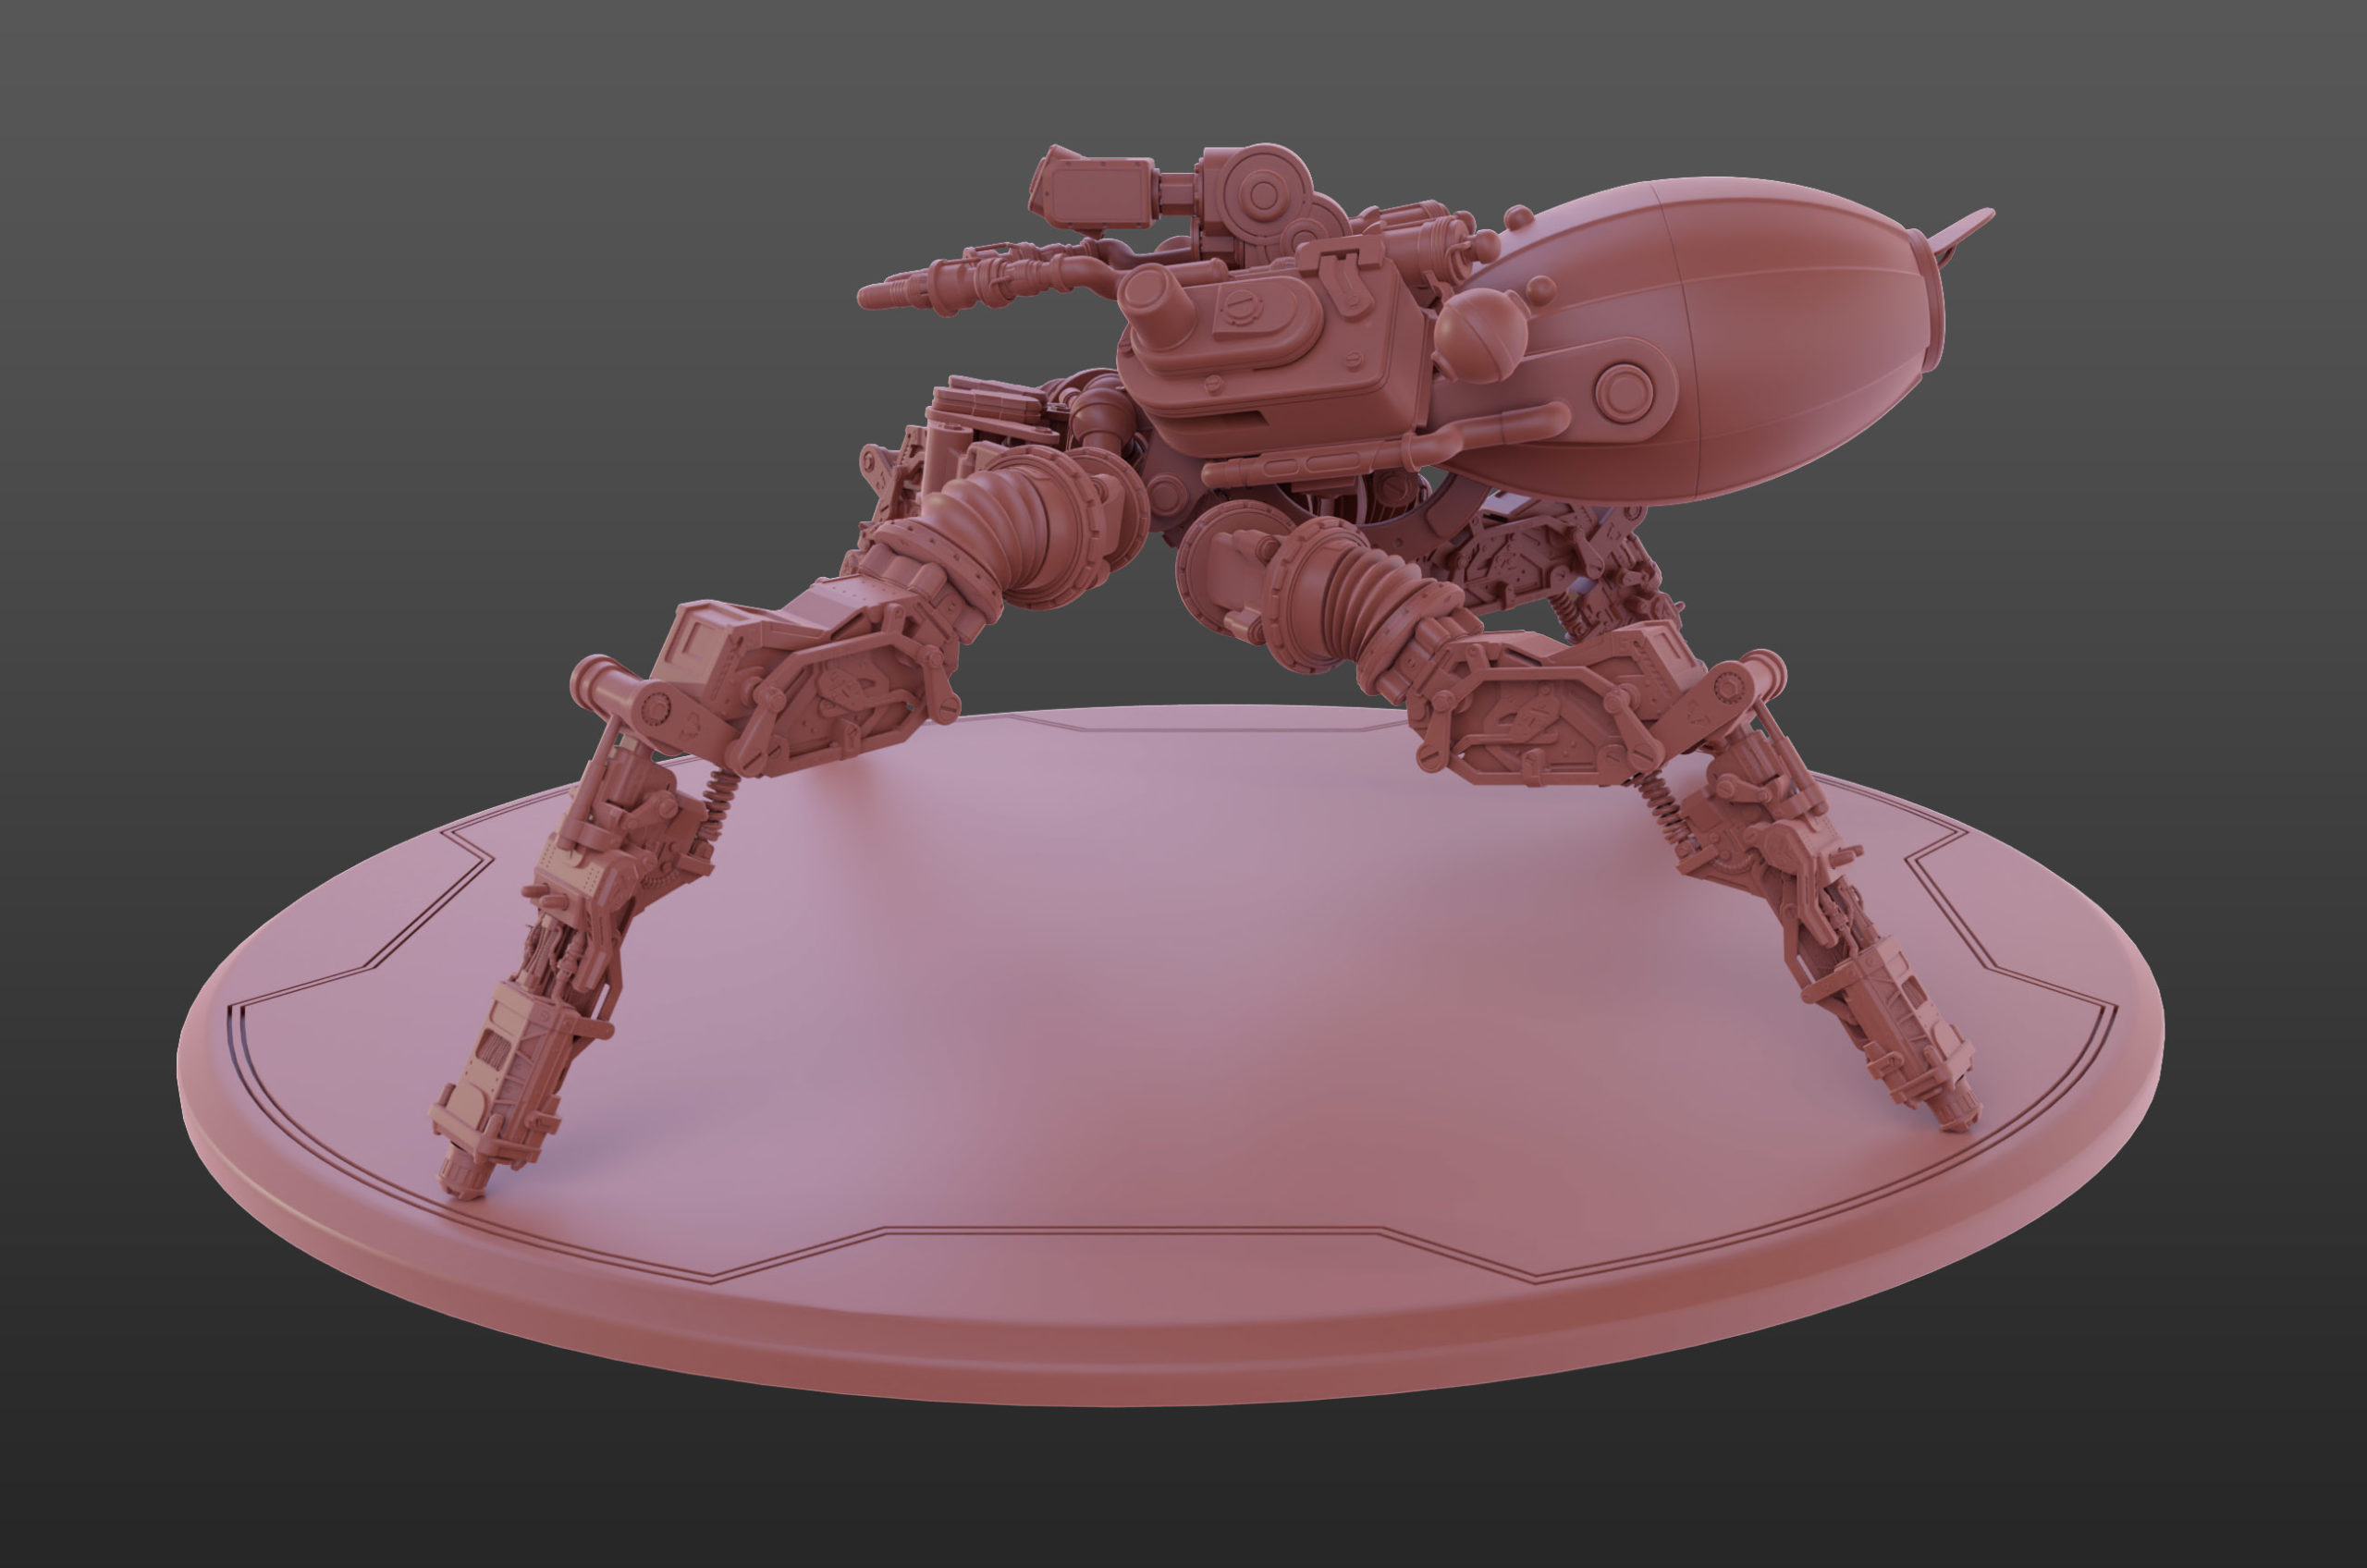


For this particular project my workflow was pretty straightforward, nothing fancy, really. I mostly used the Loop Tool and Bool Tool, but some of the parts I created without even using those. Call me crazy! LOL
I have different workflows depending on what kind of project I am involved in but my primary goal is always to make the modeling as clean as possible and the final product animation-ready!
Oh, by the way, I am very much into hard-surface modeling and I have always felt that the use of n-gons in certain modeling situations can be very practical and I use them even though the general idea is to not do it.
Shading
It’s absolutely amazing what you can do in terms of shading and color management in Blender and it does not always need to be complicated. I have spent many hours watching videos from brilliant artists on CG Cookie, BlenderNation, Blender Guru, etc. to find out what could be done. I then started without really knowing what I was doing, implementing many different node combinations. Just mixing and seeing what works! This is how I learned to understand the basics of the node system and therefore how to mix them.
Moreover, years ago I was asked to try out a Cycles material vault (CMV) developed by Reynante M. Martinez and his team, and that gave me a better understanding of how the Blender node system really works.
That being said, I am still far from being an expert and every time I learn something new, I realize how little I know! Frustrating! :)
Anyway, the entire texturing of the Spy Spider Bot is, of course, procedural. I usually really enjoy creating dirty surfaces but with this particular project I tried not to make it too dirty! You know, a bit of dust here and there, something in between. :)
The Math, Vector Maths and ColorRamp nodes are my all-time favorites. I basically use them in every project.
See below some of the node setups I used on the Spy Spider Bot. I kept it as simple as I could and practically used those very same node setups throughout the entire project. All I did was change the values for colors, bump, roughness, metallic, dust, and discoloration.
Keep in mind that the project was not about shading!
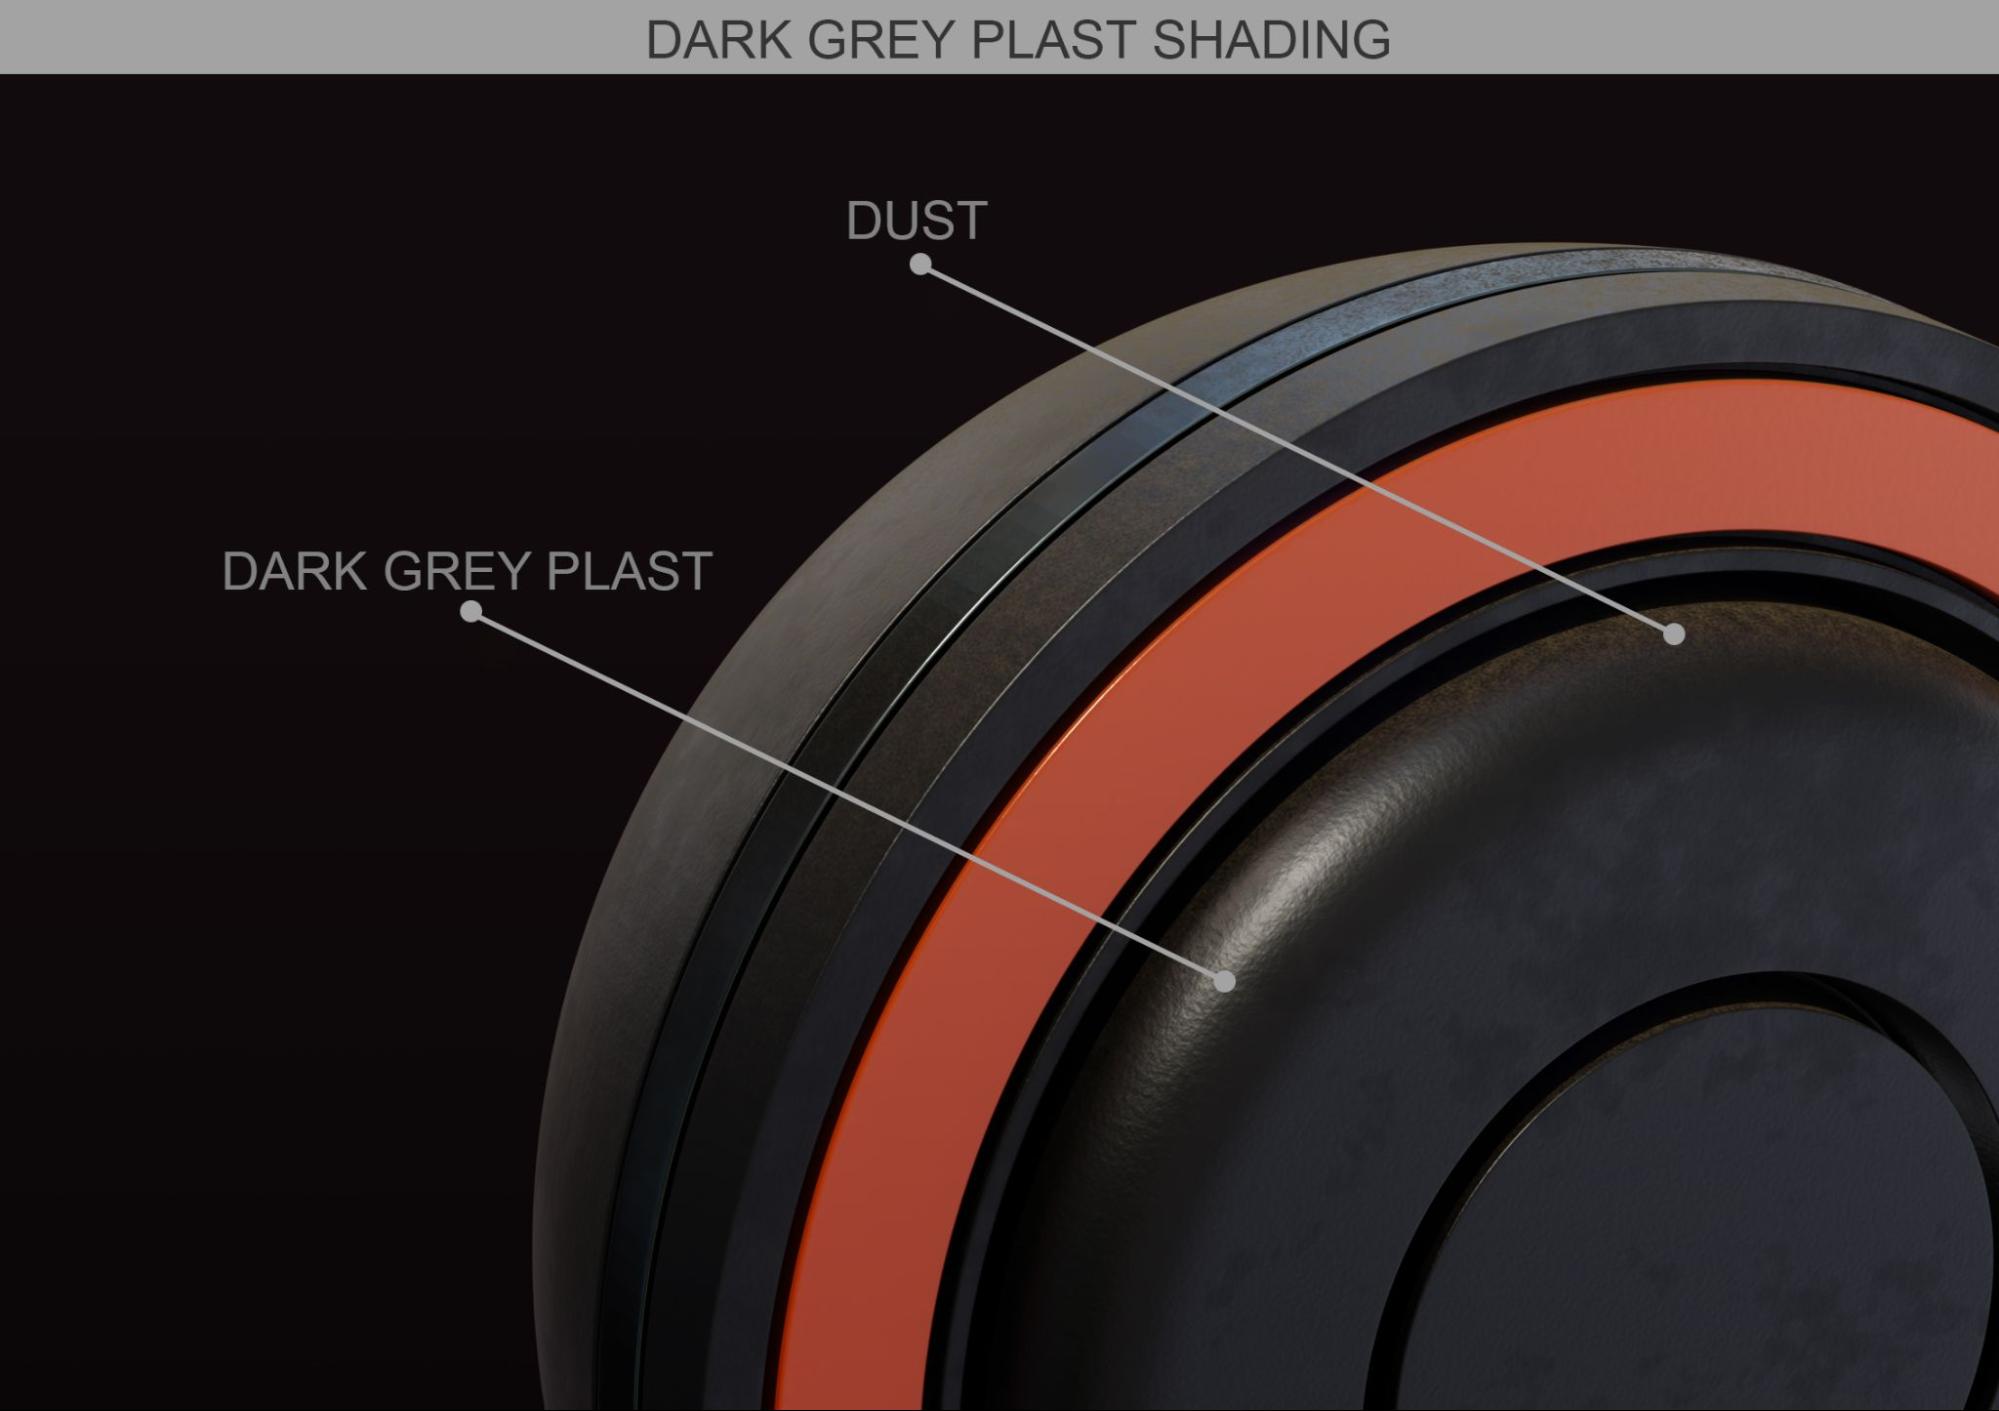
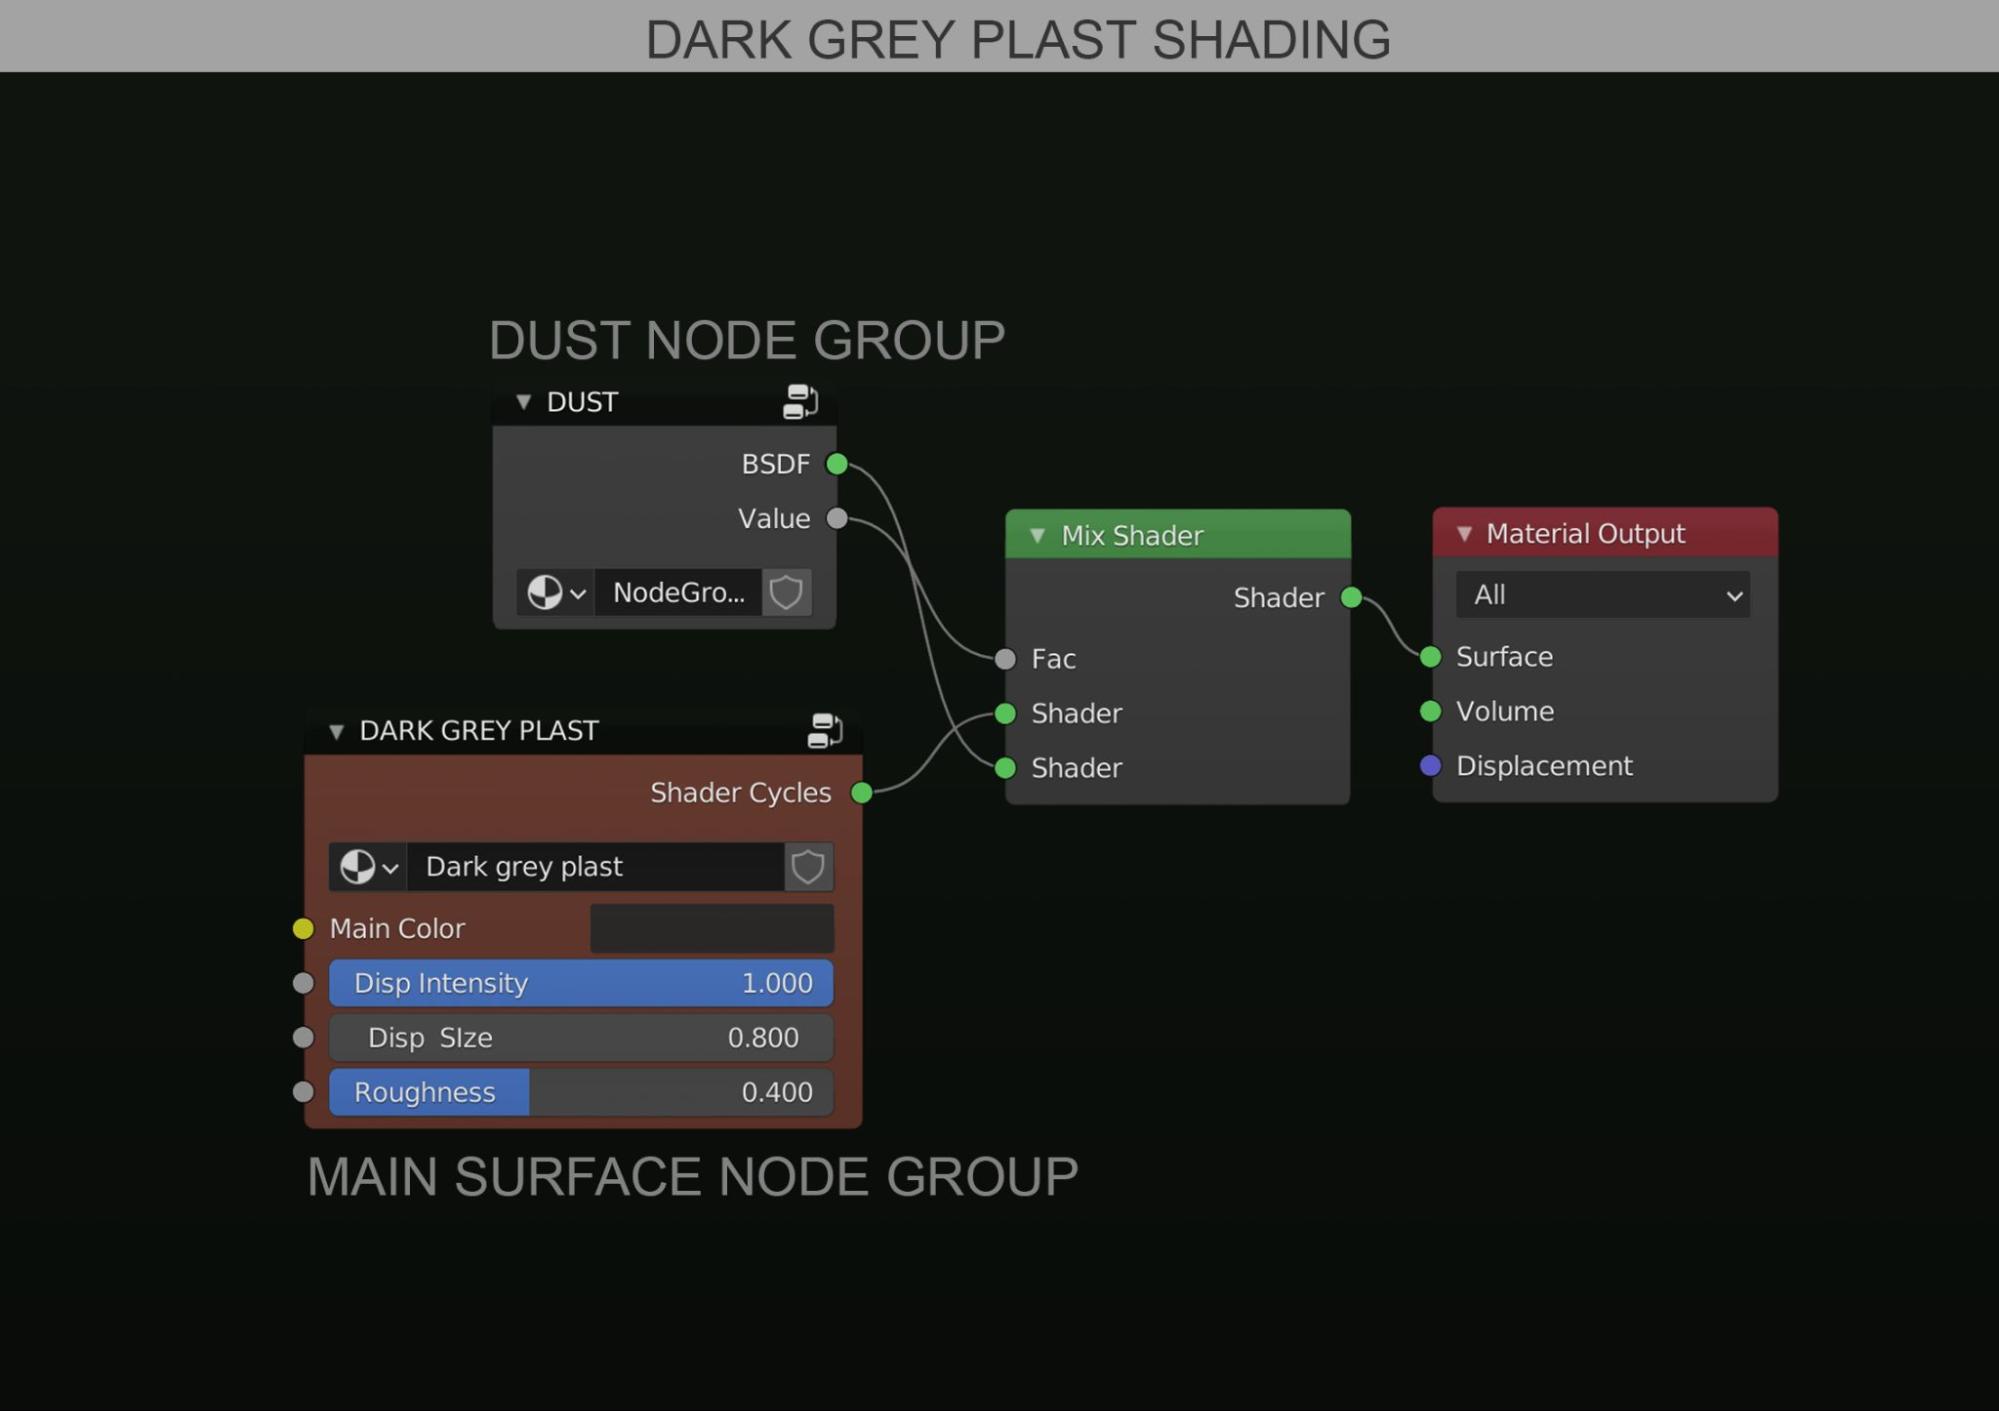
Simple! Simple…but effective. The shading is mainly surface color, bump, dust, and discoloration. Nothing fancy really but it does make it look good. :)
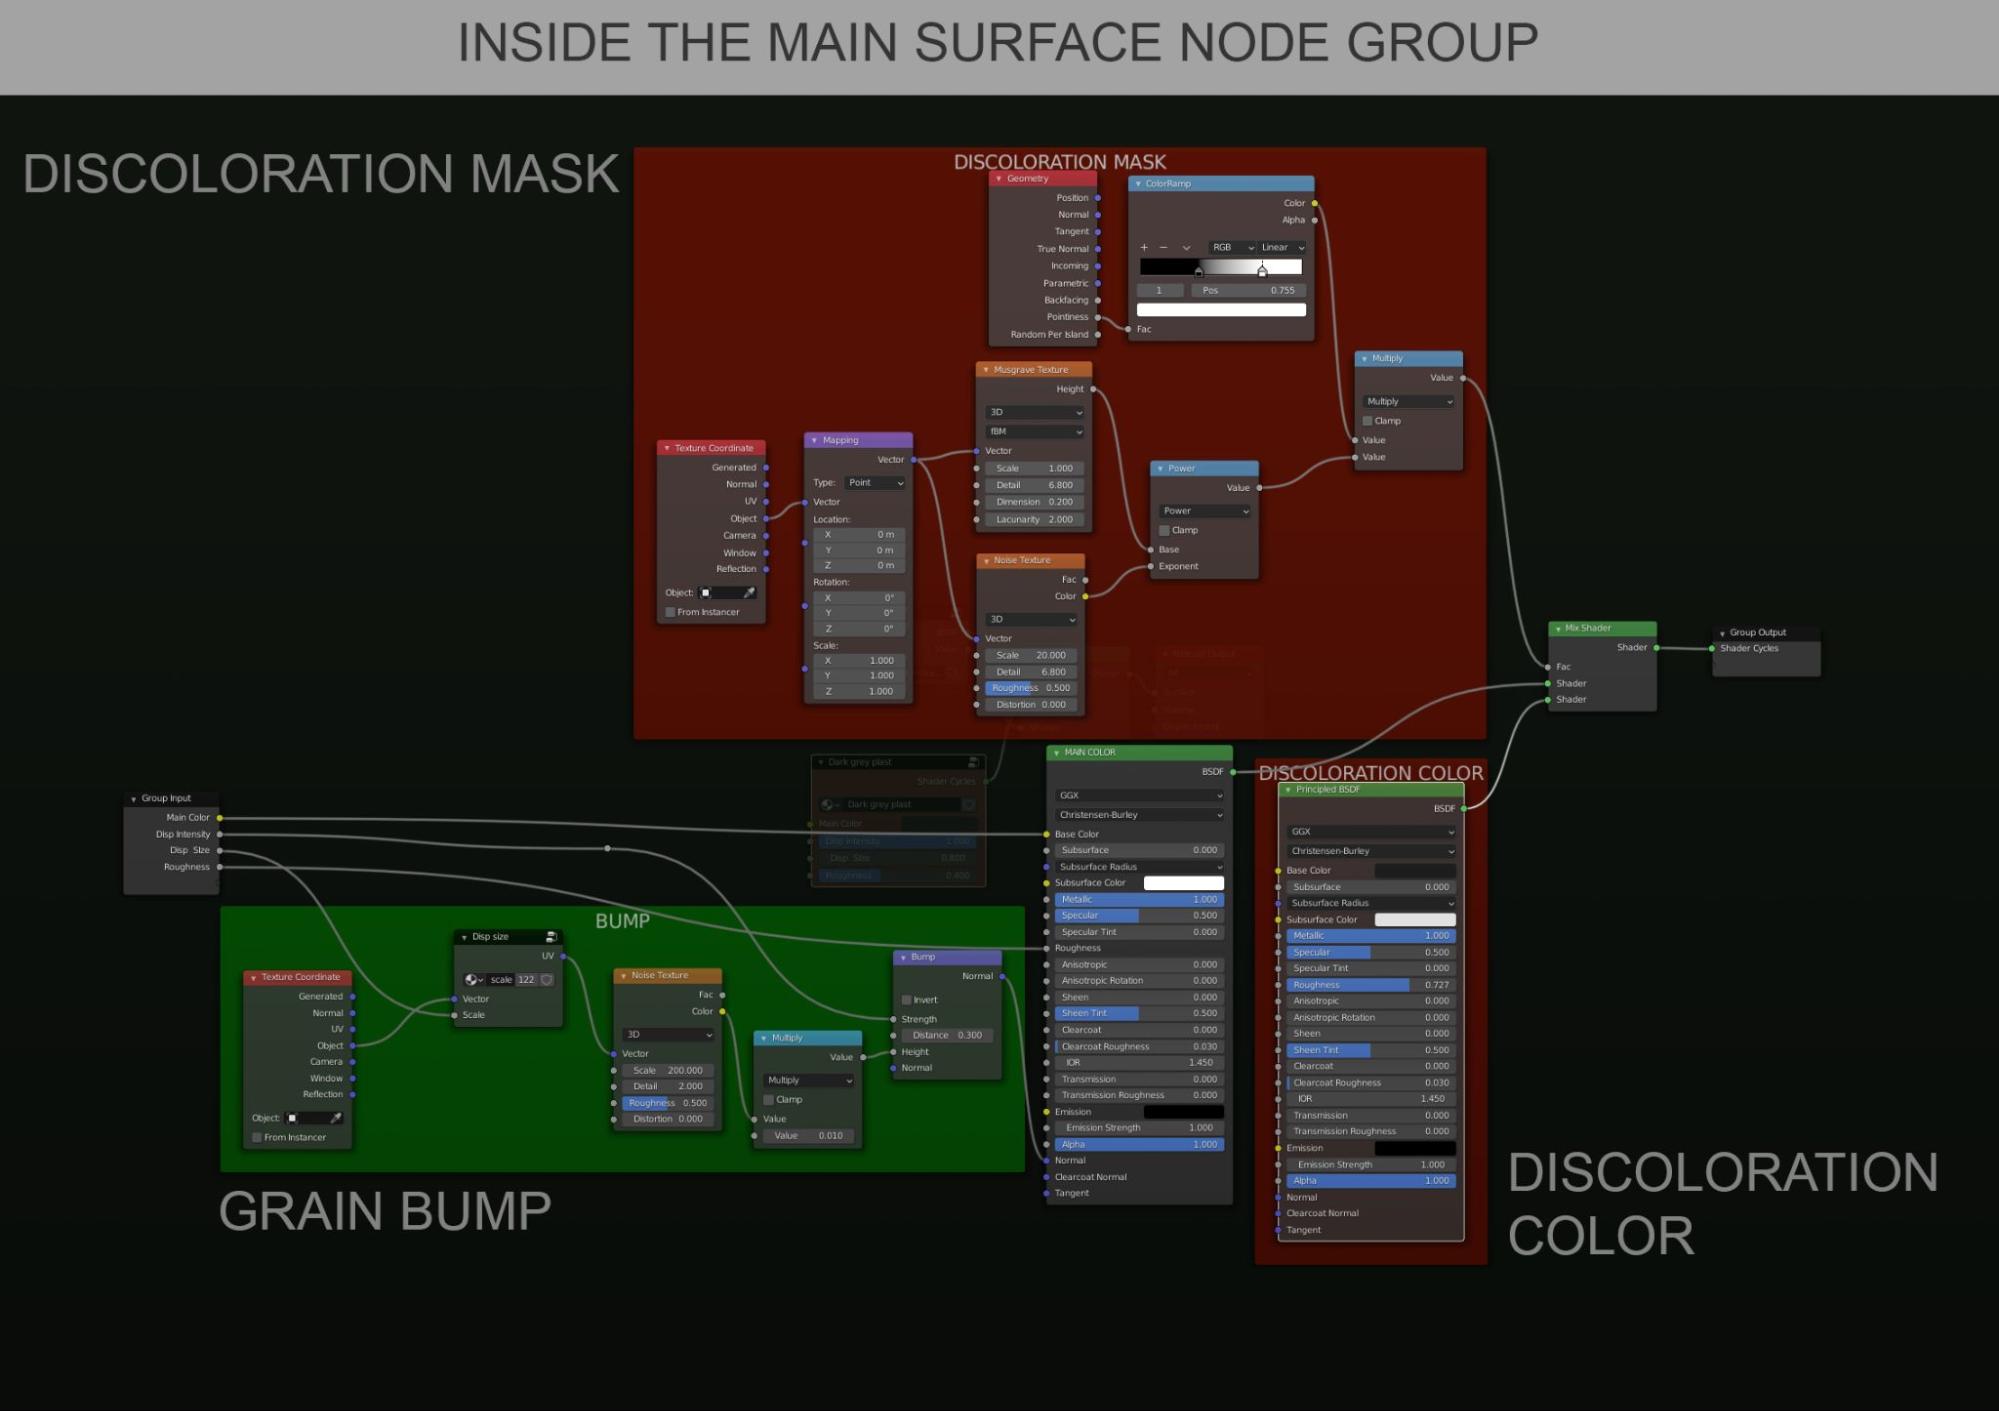
Coming up later, how to create the “Disp size” setup.
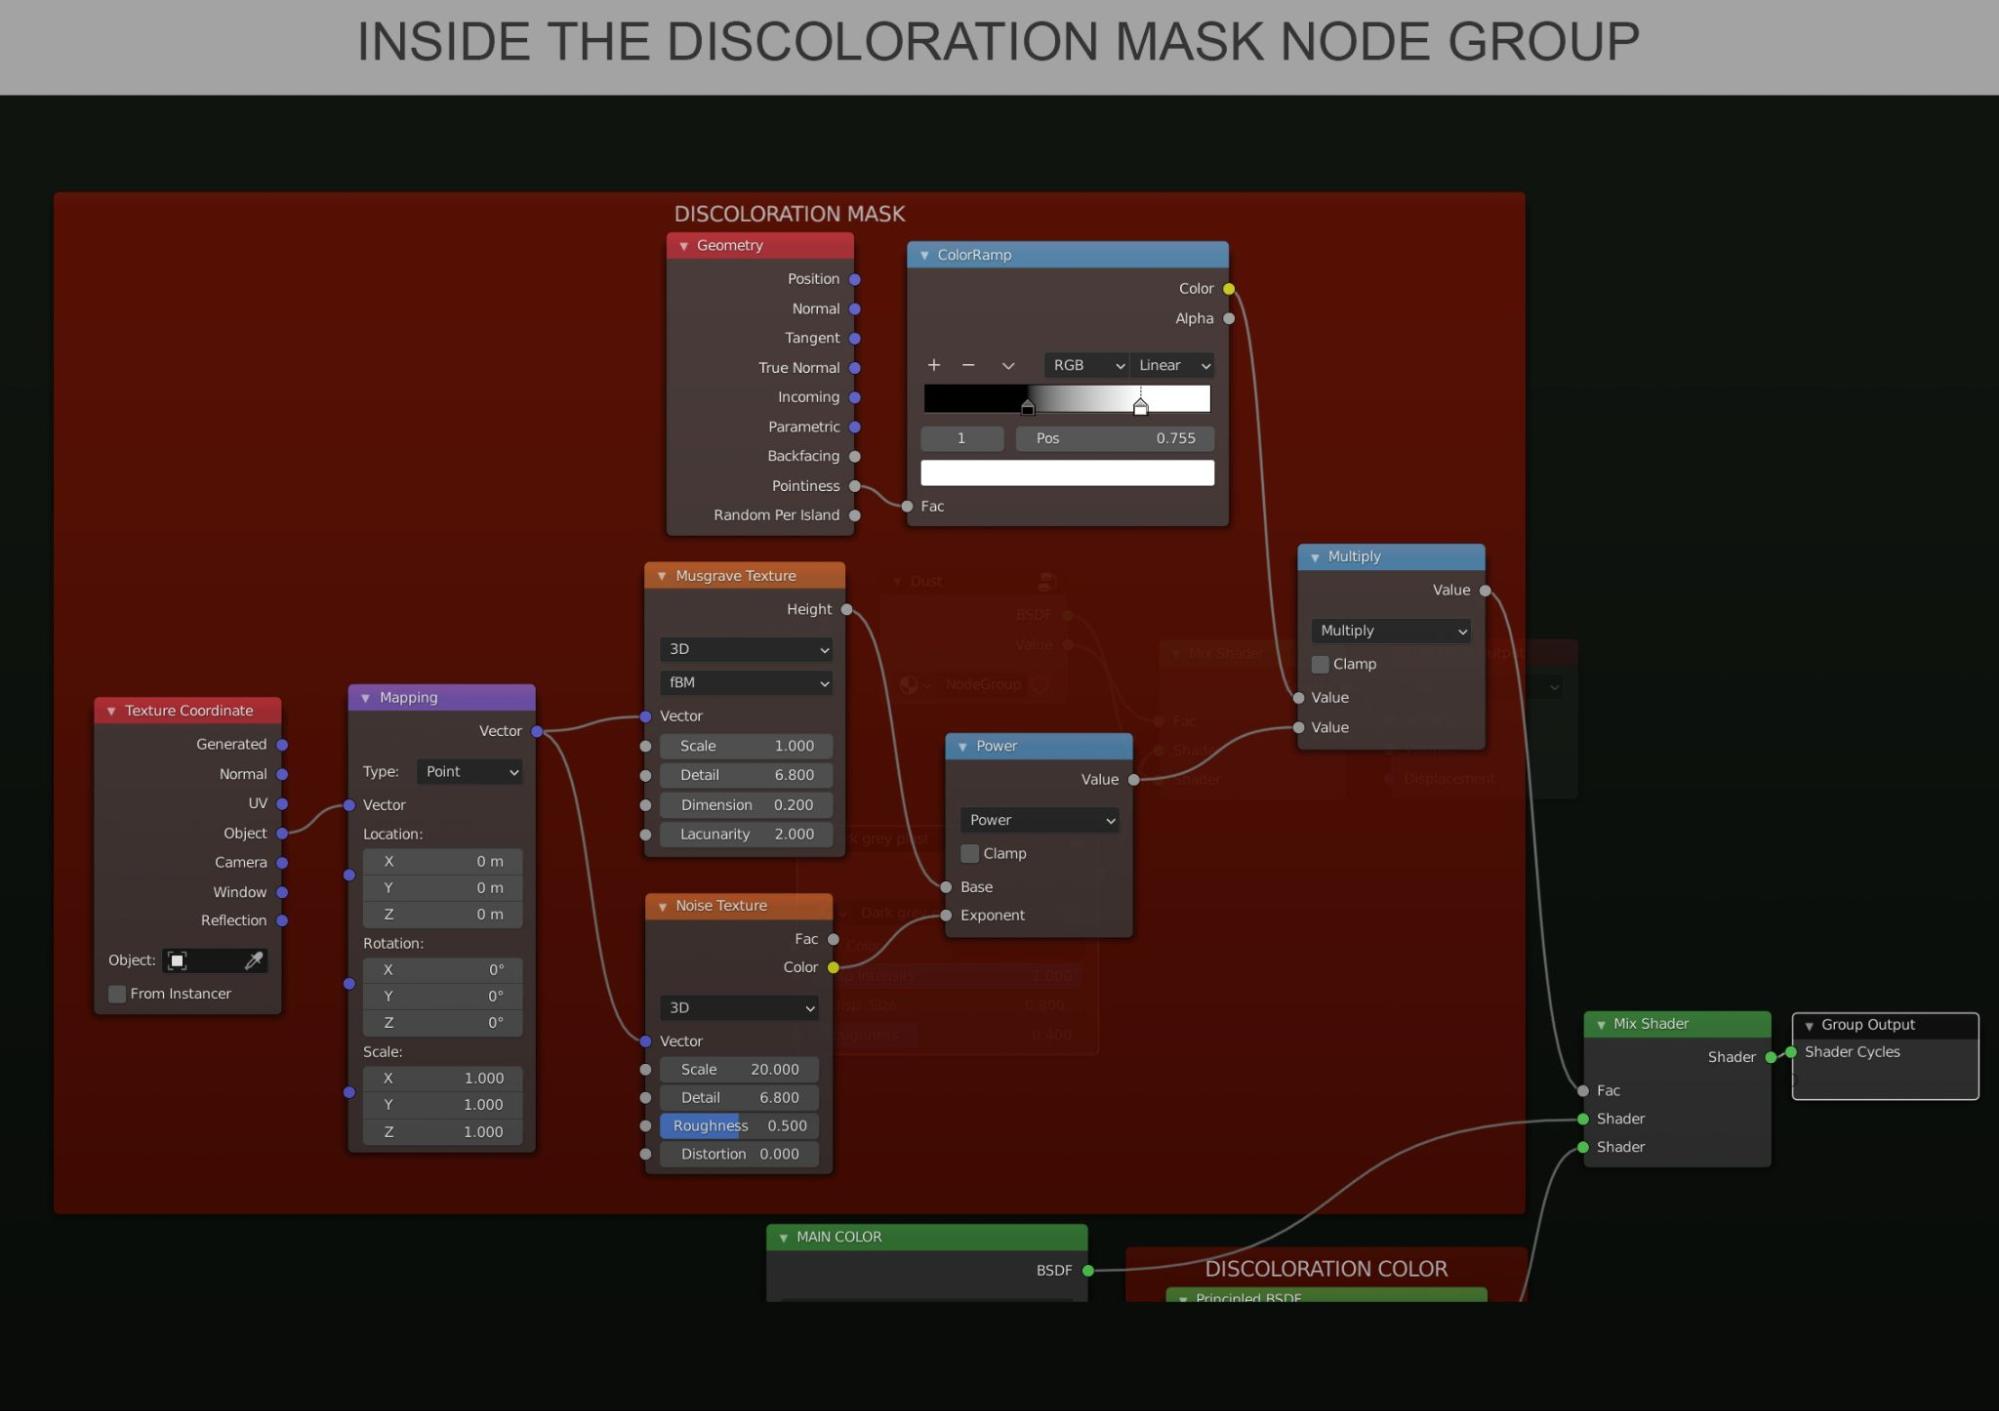
The ColorRamp decides the visibility of the discoloration. You can also use a Voronoi instead of the Musgrave Texture node.
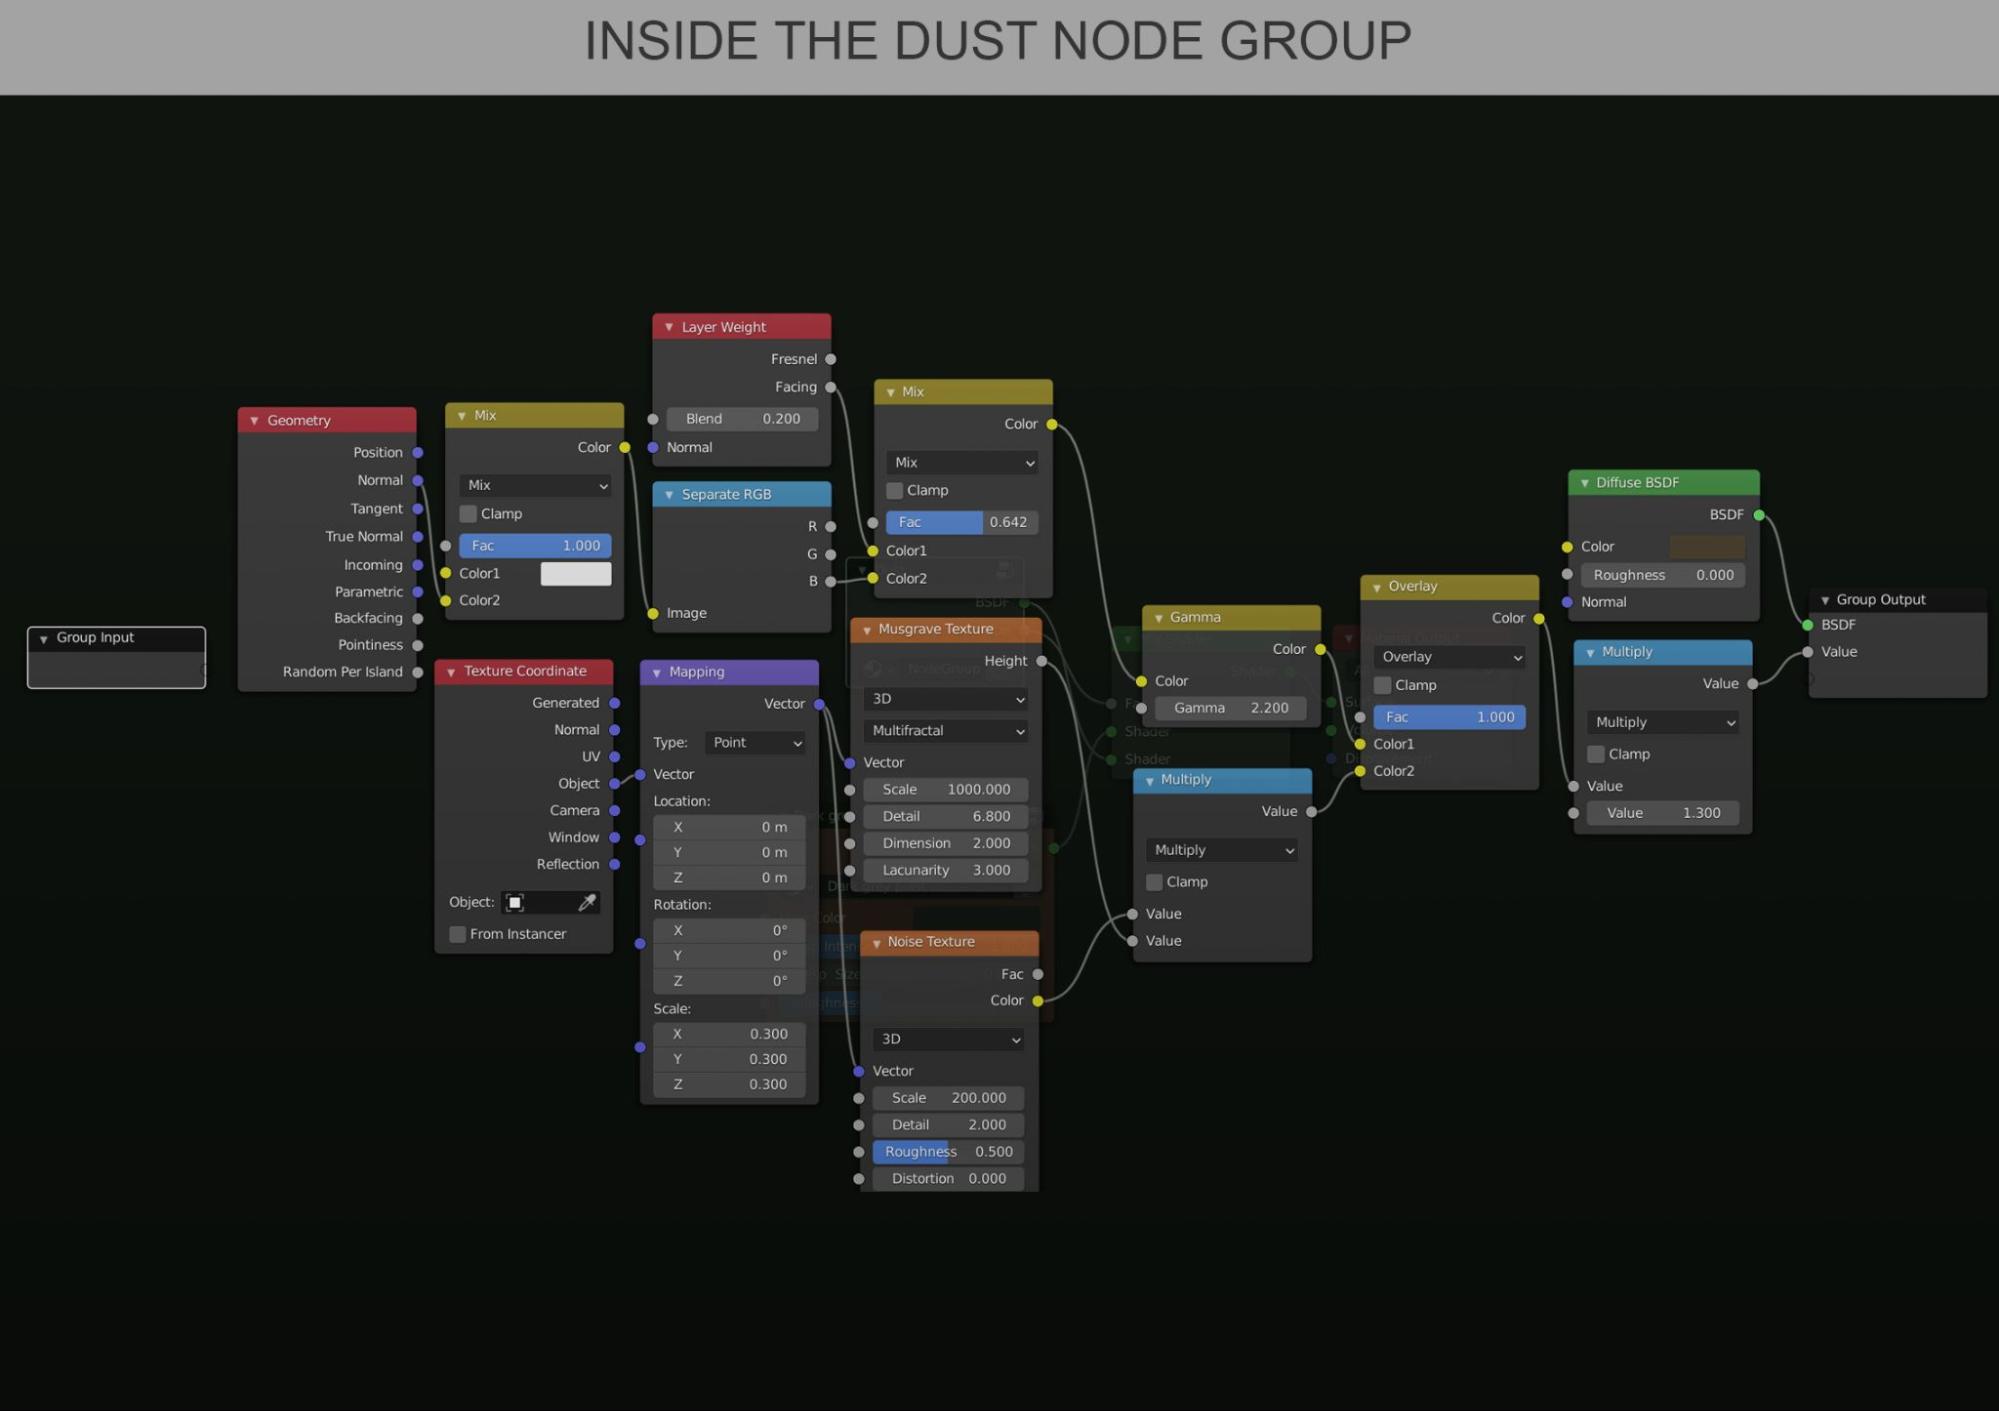
Instead of the Dust texture as it is shown in the tutorial above, I used a Noise texture node mixed with a Musgrave texture node both connected to a Math Node (multiply).
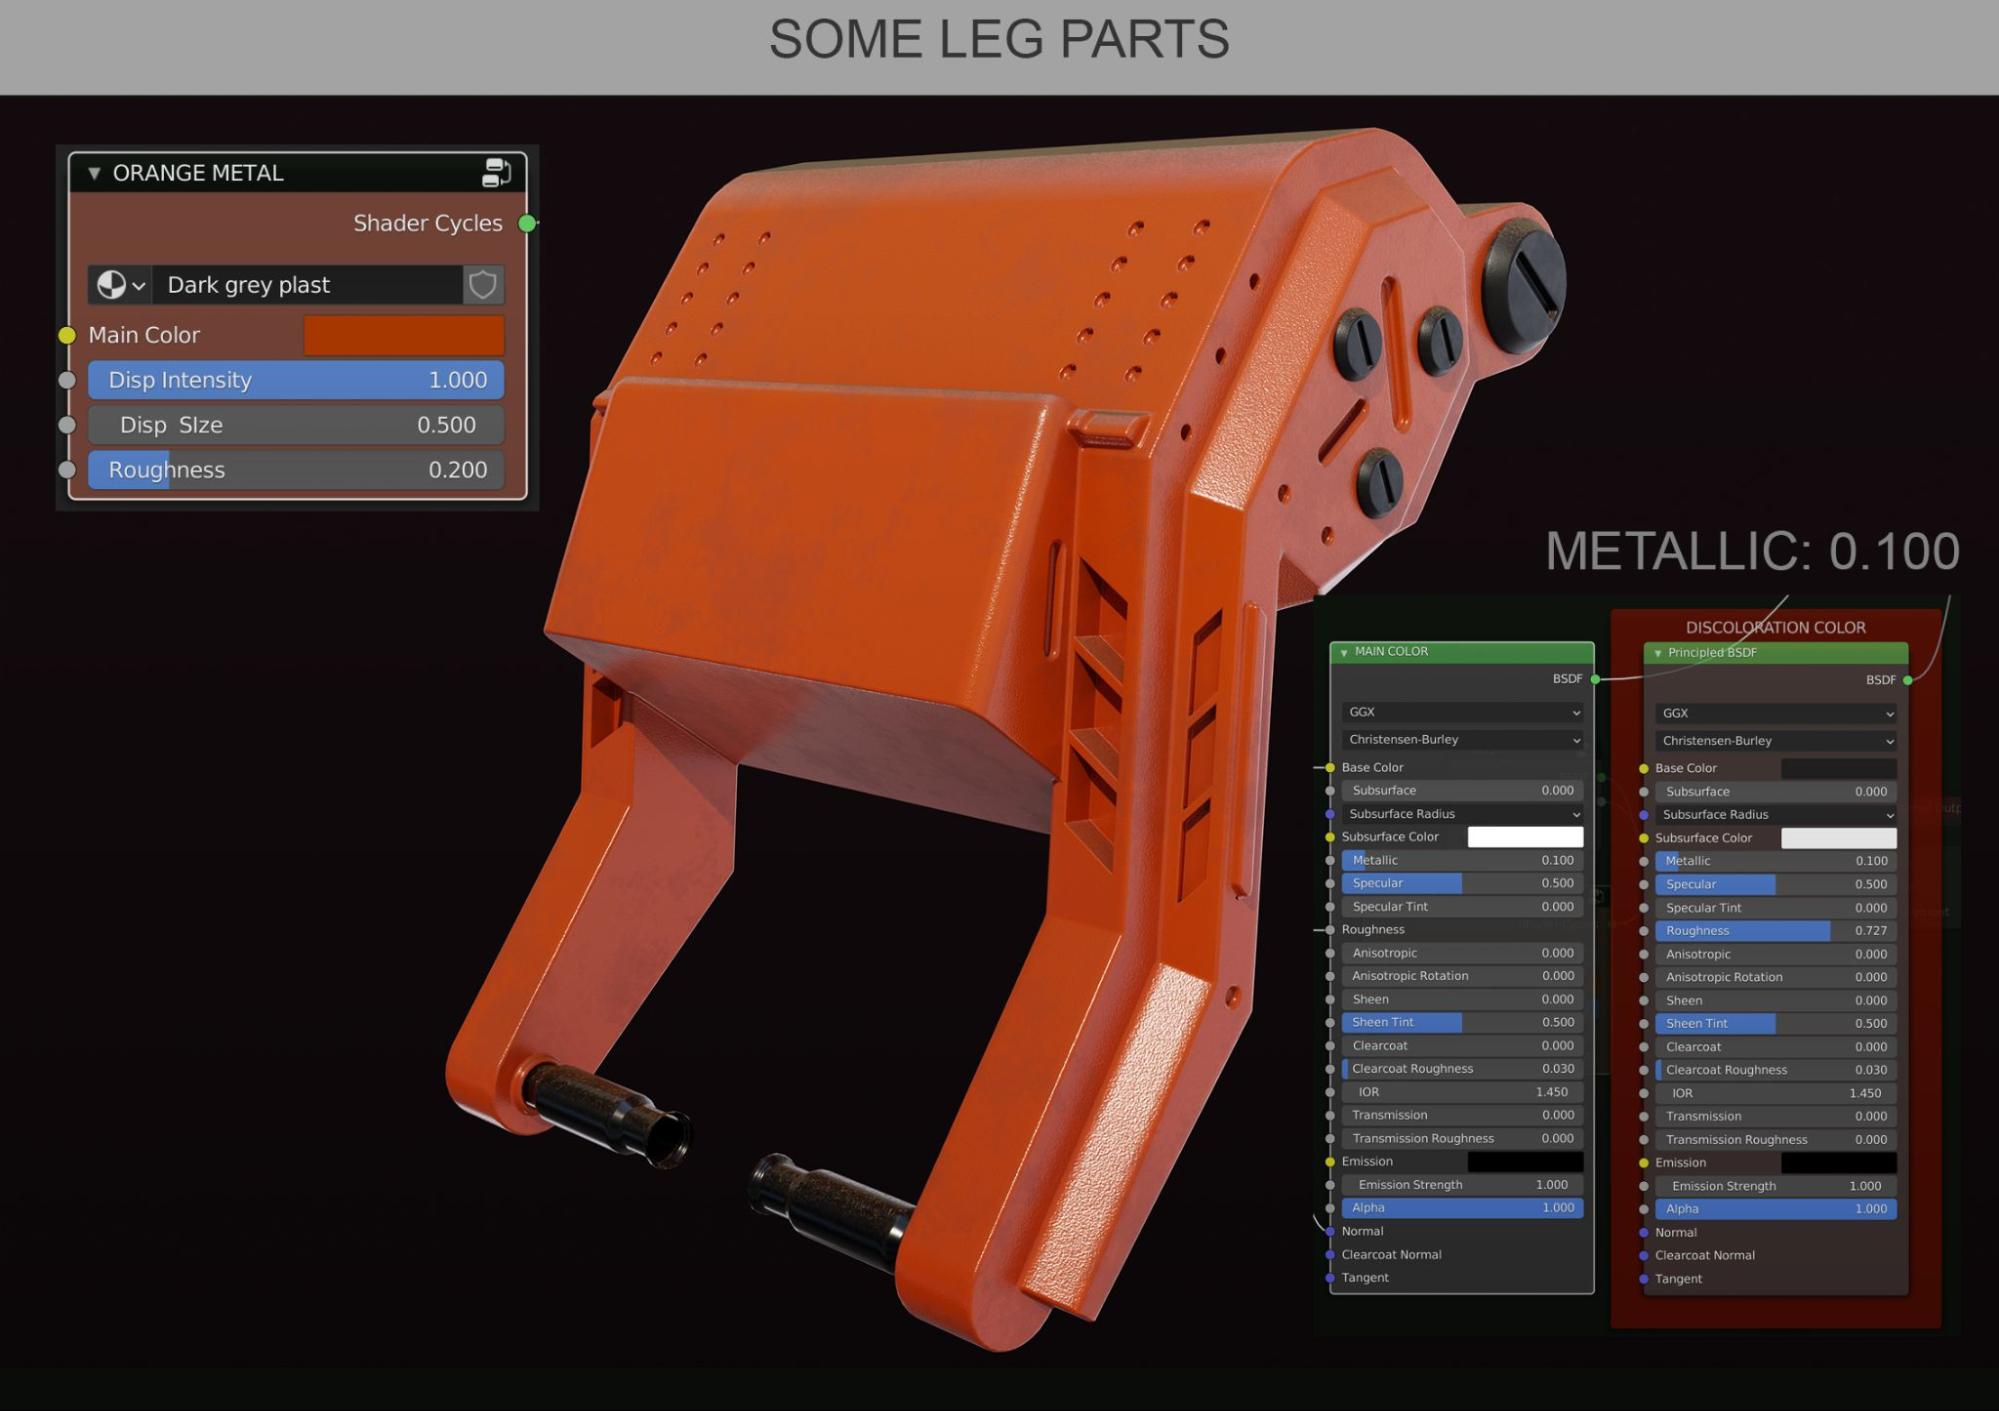
Same node setup but with a different color and values.
Next steps
The scene is not yet animated but I have planned to do so as soon as I have more free time.
I have been thinking for a long time about starting a YouTube training channel to help people to understand basic procedural texturing. Creating the tutorials takes a lot of time and I am very busy but it will eventually happen.
Much more to come :) :)
Best regards
Pascal
About the Author
 Pascal Deraed, Always better to focus on the root cause of problems, instead of just the consequences! Keep it simple but nice :)


