

About
Hey there, my name is Will Crespo and I live in Los Angeles, California. Currently, I work as a post-production generalist for YouTuber Philip DeFranco and in my free time I’m a mixed media digital artist and filmmaker.
I have no formal education in 3D and it absolutely eats at my soul. I found Blender about 3 years ago while working as a motion graphics editor. I mostly just worked with After Effects, Photoshop, and Premiere Pro at the time—with the very light occasional dip into Cinema 4D. None of what I do now (software-wise) existed when I went to college and I'm only 36. So instead I studied film theory and traditional 2D animation. I’m mostly self-taught when it comes to everything else. Whenever I make enough money to spare, I usually spend it on classes, software, and equipment to keep myself updated and always exploring new techniques.
I was looking for something new that could help me get more into the world of 3D. Blender was at version 2.79 at the time, and the first time I opened it I couldn’t figure out how to even select the cube and immediately closed it. Right-click was a foreign concept to me at that time. So I bought a class on Udemy from a guy with a REALLY thick French accent and he was honestly one of the best teachers I could have asked for. He showed me almost everything Blender had to offer at the time and I fell in love almost instantly. Very soon after they released version 2.8 with EEVEE and I was hooked. Soon after that I signed up with CG Cookie and have been learning how to better hone my skills within Blender. I’m also a member of the cult of Ian Hubert. I just love exploring all aspects of the software and how to marry them together with the other programs I know. I love making everything from VFX to animations to paper cutouts to what have you. I have a serious addiction when it comes to art projects and learning new things.
My Lil Totoro
This particular image was a challenge to myself to create a piece of work that was personal. A lot of my work up until that moment had been from classes or were more experiments and sculpting practice than a completed, thought-out piece.


My cat Kairi turned 11 this year, and she had just recovered from some liver problems. I’ve had this cat since she was about 6 weeks old and could fit in the palm of my hand. She was an abandoned runt with tiny back legs, but is an absolute ball of love. My girlfriend recently got us (the cat and I) a scrapbook to keep memories of us in. A particular quirk we have is watching anime together; she actually comes running to join me when I start up a show or film. She especially loves anything with cats in it, go figure. So I thought it’d be fun if the two of us tried to remake some of the scenes from the shows we watch. This first one mimics the bus scene from the Studio Ghibli film My Neighbor Totoro. I’ve seen lots of people mimic Ghibli in Blender, but never styled as realism, just as either 2D or 3D anime. So I thought that would be a fun challenge as well.
The process

I started the piece with the bus scene screencap and studied the hell out of it. I knew first I needed an image of the two of us looking forward. Kairi hates cameras and phones, she knows when you are trying to take a picture of her, and she almost never sits up and still for long enough. Then one day I'm at my desk and look over my shoulder and there she is.
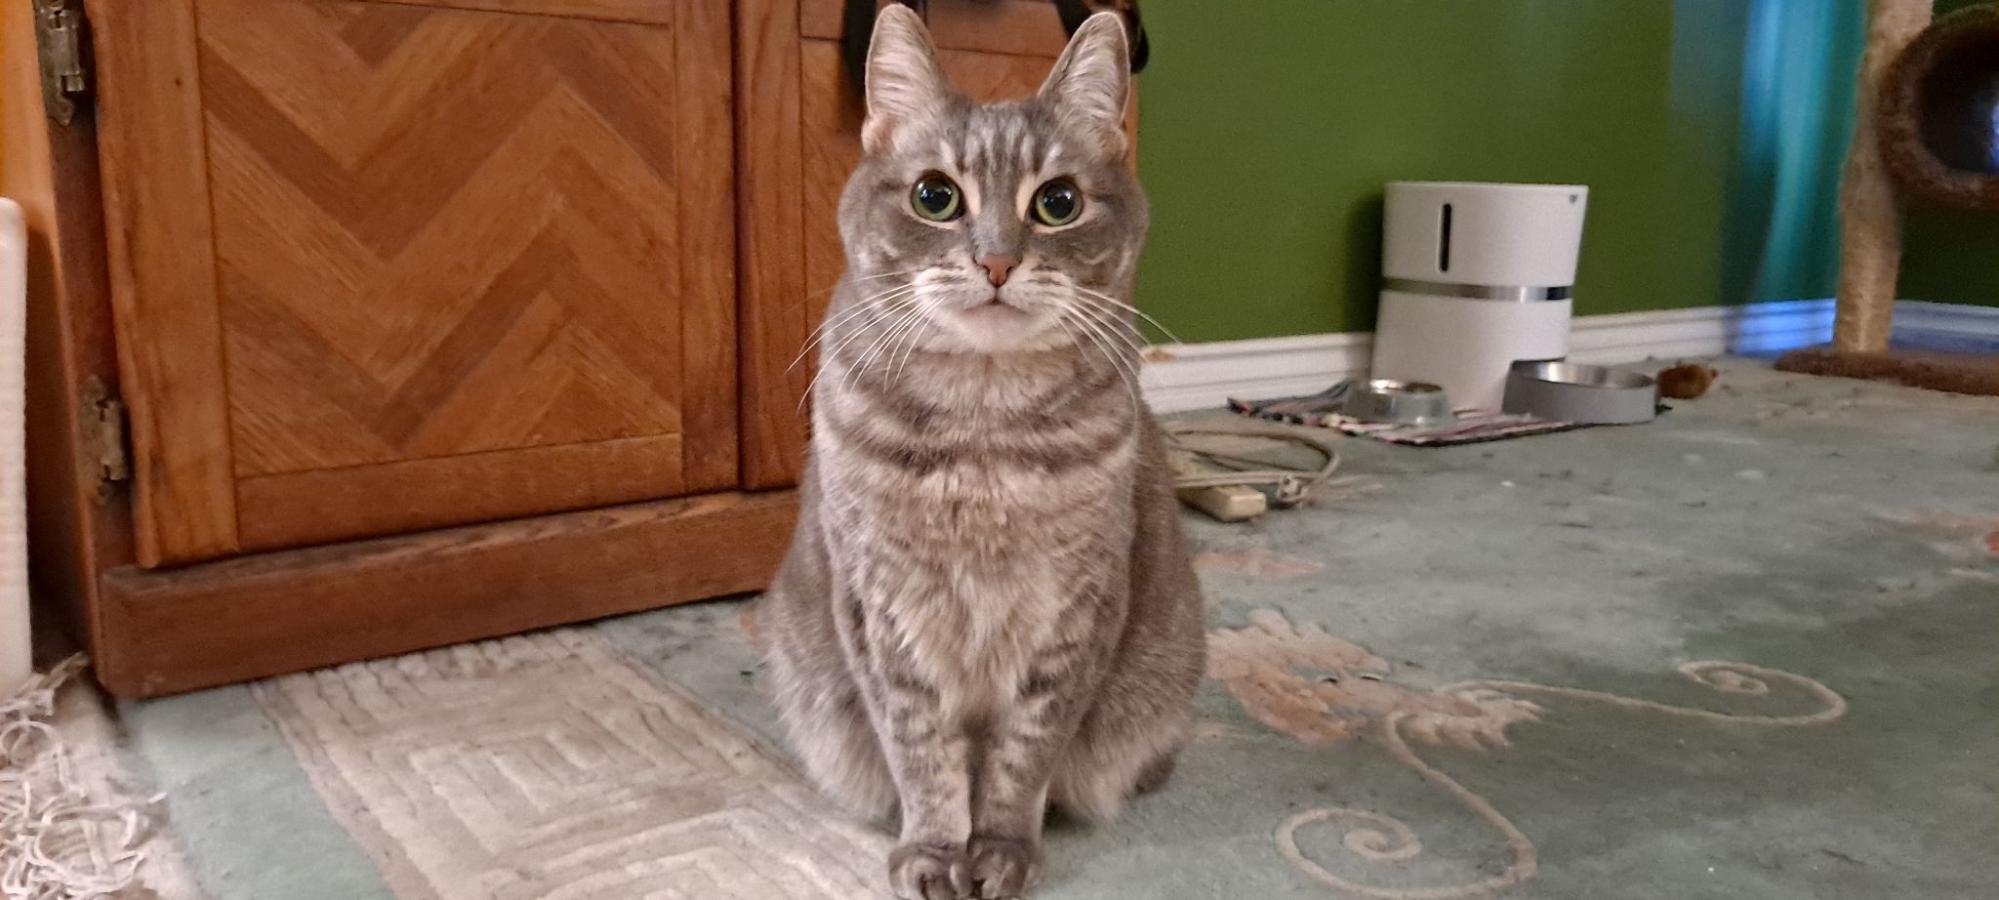
Sitting pretty and staring at me. I’ve never snapped so many photos with a phone so fast. There was no heavy glare or shadow. It was the perfect storm. After that, I took a proper photo of myself. I own a Canon 70D and set it up with a 50mm lens on a tripod with a timer.
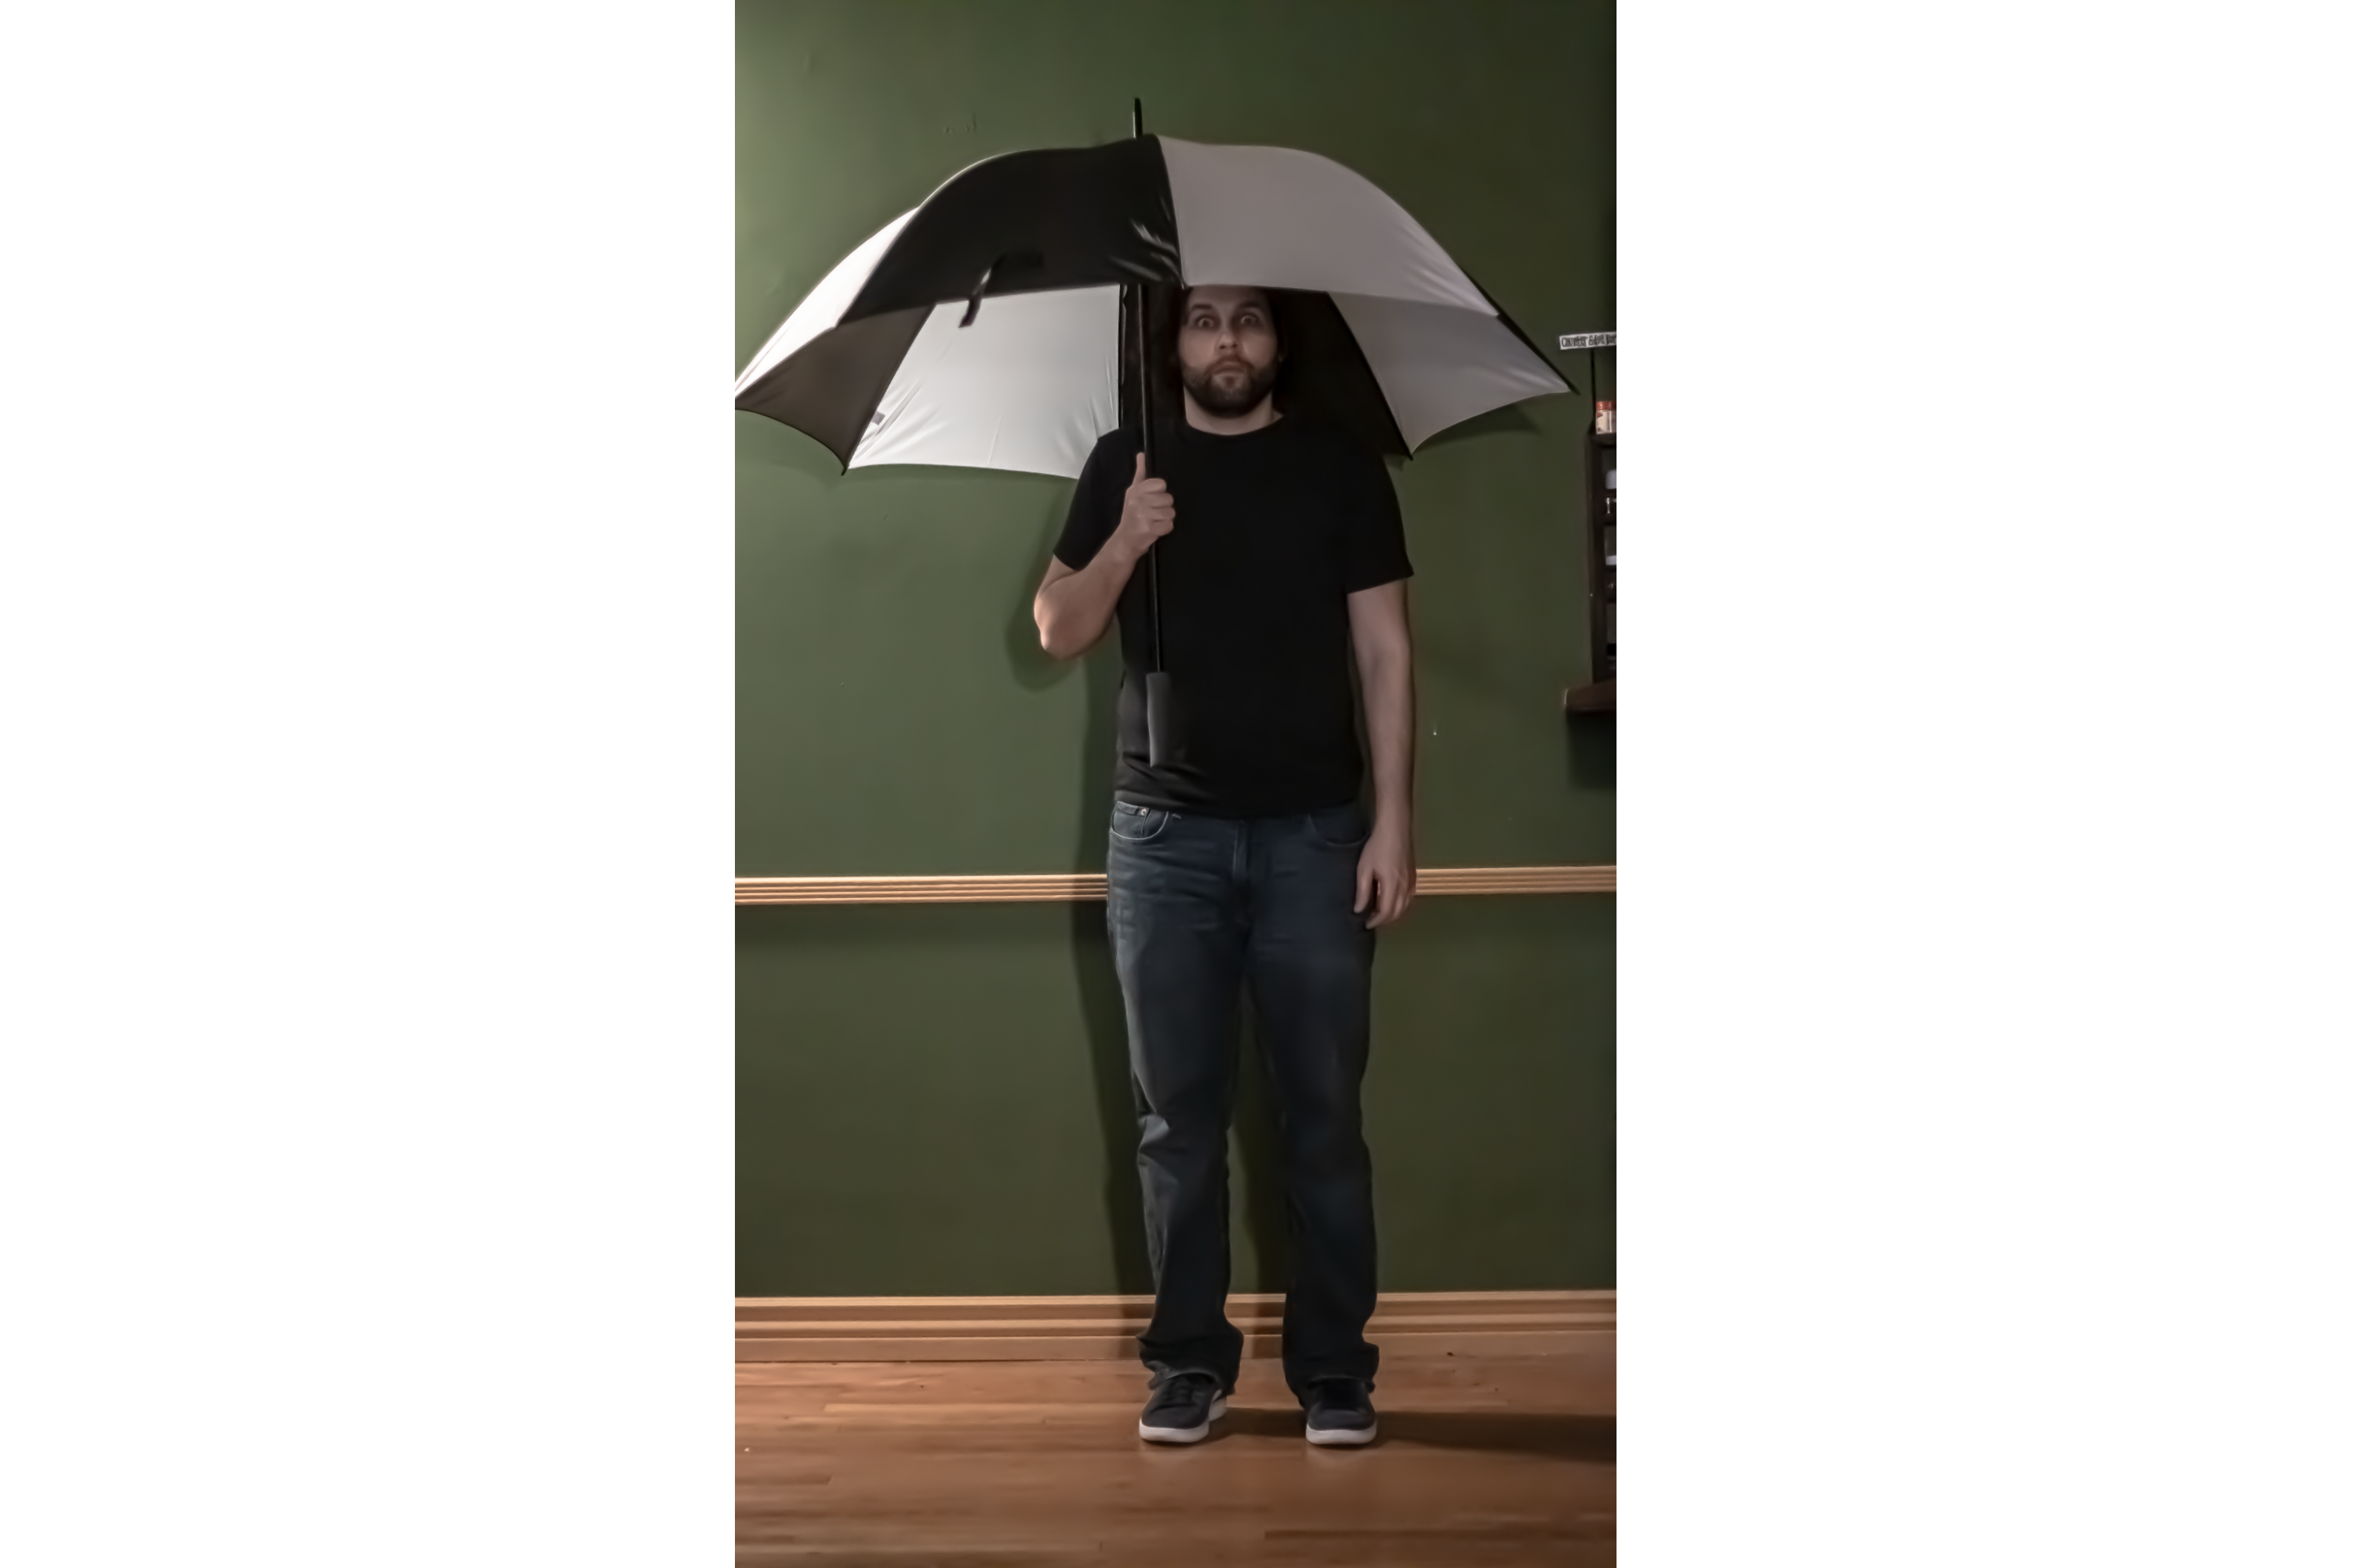
Then I cleaned out part of my kitchen and set up lights to mimic the street lamp that's casting light into the scene. While holding an umbrella open in the house I would take a photo, then look at it, then take another, etc. I then took both of the photos into After Effects and rotoscoped them into PNGs with transparent backgrounds. After Effects was the first software I learned when I started doing animations, motion graphics, and compositing so I move the fastest with it for stuff like this.


Scene preparation
Once I had the base images ready, I moved into Blender and set the film’s screencap as a background in my camera. I used “lock camera to view” to set up the world space to better fit the background image, using the grid as the floor. Once I was happy, I added in the PNGs as image textures. I was also using EEVEE at this time to get the base down for the scene. So I set up the two of us in the proper spots, her as Totoro and me as Satsuki. I tried to set it “somewhat” to scale and set myself up at about 1.75 (cough cough) 1.83 meters to make sure the lighting I added would react in a more proper way that I could understand. I then set down 3 main cylinders to be the 3 trunks that you can see in the background. I knew that the majority of the bushes would be set down by using both instancing and particles. Though, as I write this, I have now used both the object scattering and some geometry nodes and I think I would have used those instead.
I know how to use photographs and some modeling elbow grease to make leaves and flowers and vending machines that walk, but I was treating this piece as if it were due for a client in a few days. So on top of modeling a few of my own plants, I decided to use some kits I bought a while back, namely the Realistic Nature Asset Pack by CG Geek. I love the thing and I love that I can easily take them apart and mish-mash them into other plants.
I set up a background ground plane and subdivided it, then added a bump texture with a cloud map and played with it till I felt like I had a terrain I liked. I then made some vertex groups and began laying the plants down as particles. I knew I wouldn't get the plants 1:1 like in the scene, but I tried to follow the bigger silhouette-like plant shapes and mimic them with the shape of my plants. Also, the cel-shaded plants in the original had what felt like a blue-ish tint to them, so I went through the kit and customized the textures to have a slight blue tint to them. While trying to set that up I also set up the lights. I could tell from the original scene that there must have been a street lamp they were near, so I wanted to recreate that and started testing out different areas and spot lights.
Lighting, textures, projection mapping
I should mention here that I always hate my own work till it's about 85% done. So I try things that don't work and switch them out as I go. I build a scene by doing multiple things at once that I keep updating like a quick pencil sketch. I keep just adding and taking things away at different times to paint out the scene till, eventually, I see it as acceptable. This is also the stage where I start adding in textures and base colors. I was working in EEVEE still in the material shader but as I started finalizing my lighting and textures I switched over to Cycles for more control over them.
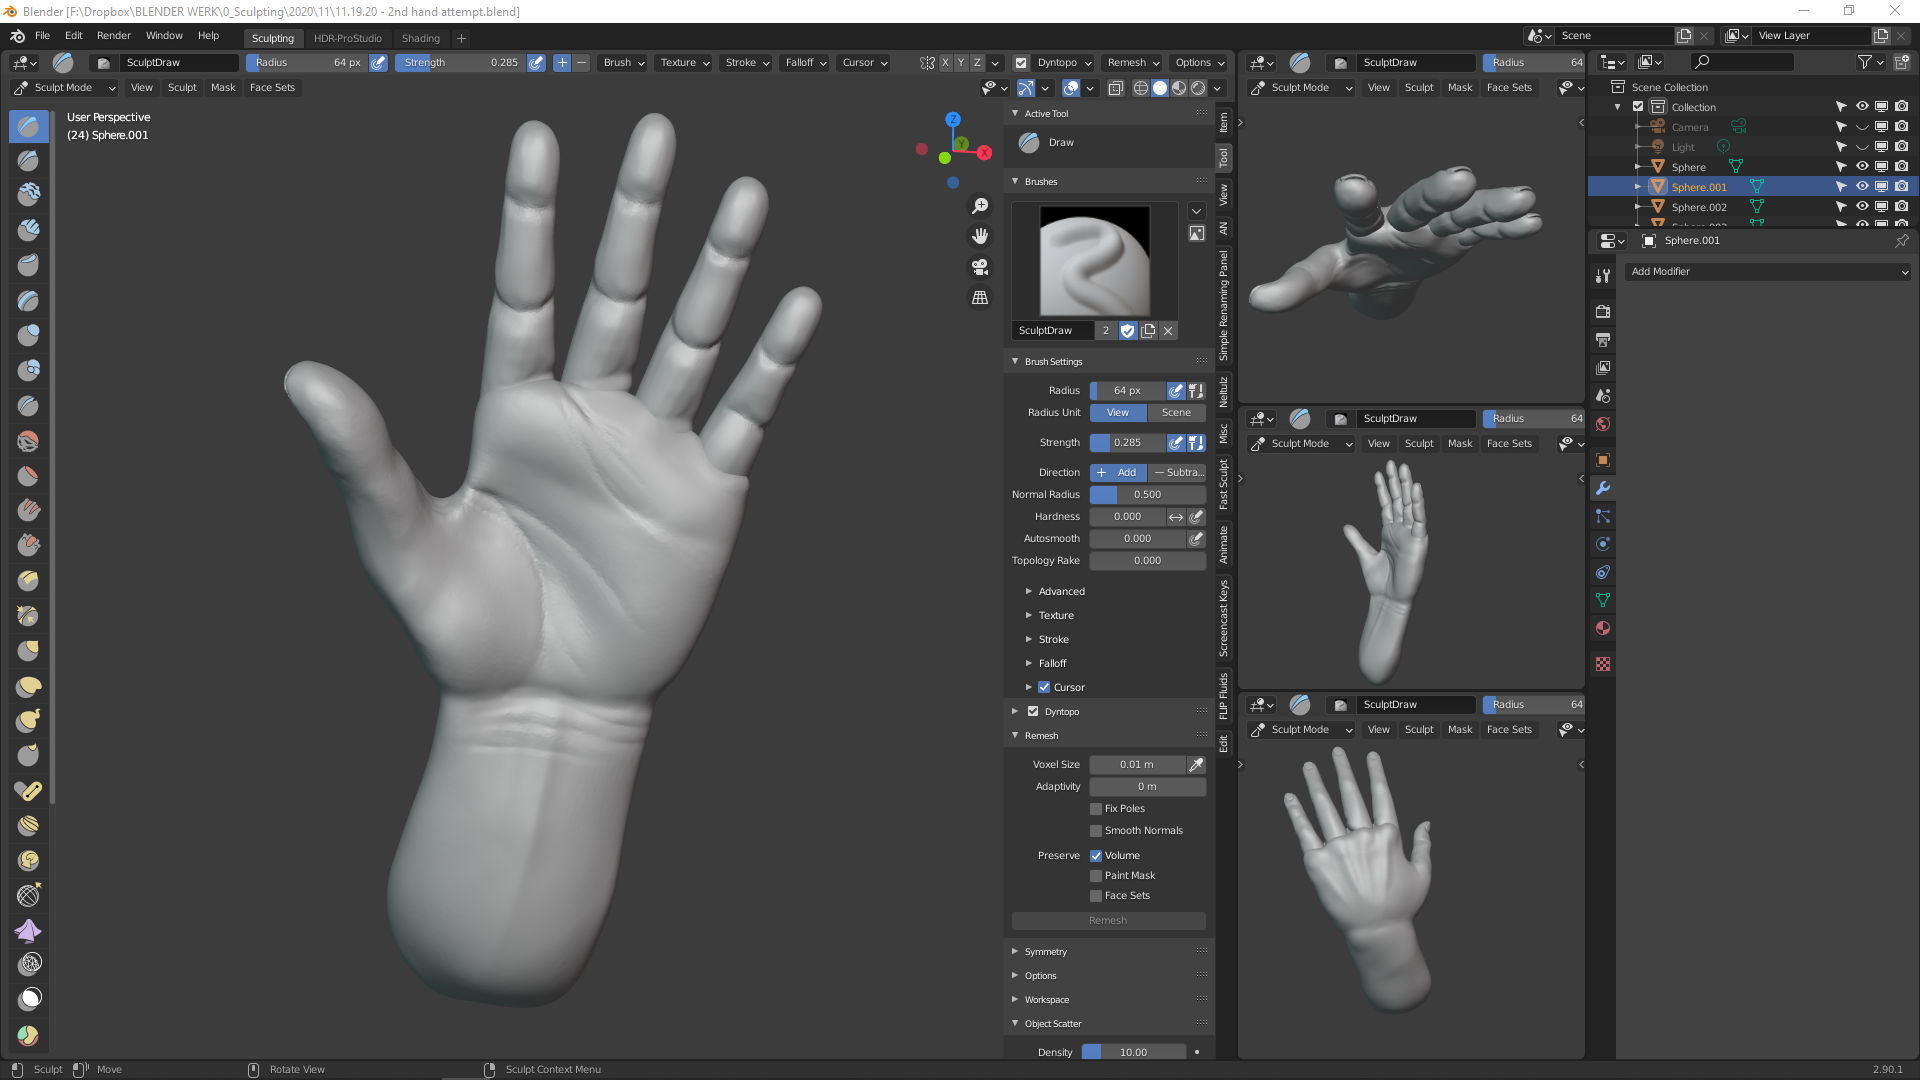
Now, when I took the photo of myself, I could control the lighting. But with Kairi, I just got what I got. So I tried out an idea I had been mulling around while lurking on Ian Hubert’s Patreon. I wanted to make a REALLY basic sculpt with some REALLY simple geometry on it, and then just projection map Kairi’s Image onto it. This way the scene lighting hitting the sculpt would cast shadows onto the image texture to make it look natural. Not great for an animated scene with a lot of movement, but perfect for a 2D scene. To do that I had to clean her up in Photoshop and make her look like her back paws were on the same plane as her front. And this gave me time to do other things like adding her fur back to her edges in a way that made it look matted and wet with the smudge tool. I projected this image onto the sculpt but also kept a version of it as an image texture inside the sculpt in order to add back the edges of the fur. I really didn't want to have to add hair to this thing if I didn't have to.
Modeling
I then modeled out the top of an umbrella and added it in place of the one I had in the photo. The easily avoidable issue I ran into here was that my hair is a dark curly brown (actually my last name Crespo, means “one with curly hair”) and it got lost in the black parts of my umbrella. Thankfully I took lots of photos and was able to stitch some of my hair back together in Photoshop.
Once that was done I moved on to modeling the bus stop. I found a really clean image of a toy of the bus stop sign and used that as the base for my model and then just projection-mapped that same photo onto it as I went. I made the base of it with a concrete texture from textures.com and added the wear and tear chips in it with cubes and booleans.
By this point, it was almost done. I was finalizing lighting, colors, and adding small details like the pebbles on the ground. I used the tree generator built into Blender to make the foliage between the main trunks and to add more randomness to the background. I used a particle system to add custom leaves and branches to the trees. In the original screencap, you can’t really see much back there, so I just wanted to give a basic idea of there being “more” in the distance.
Adding in the rain was where something strange happened. I had added the rain texture in as an image texture with an alpha matte, but instead of using a transparency to take out the black, I tried using a translucent node which caused this kind of “atmospheric bounce” to my lighting and colors that you do sometimes see with mist and rain. I liked how it made my lighting look so I kept it in, but then added another one with a transparency layer for the matte behind both Kairi and me.
Post-processing
This is where I then did a render as an EXR file and dropped the project back into After Effects for some final tweaking. I added in more rain in front of us so that I could have better control over it for some slight depth-of-field work and then tweaked the colors a little to better match the original film screengrab. After that, I tossed it into Photoshop to fix things like Kairi’s fur or clean up any artifacting, after which I added it to Lightroom to perfect the tone and add back a little bit of texture and noise.
I was really happy with the product when I was finished, and was honestly surprised it got any attention. I always see so many 3D artists do such amazing things on your platform that I kind of see myself as a bit less than. So it felt nice to kind of find my own way into something with the software. I have a timelapse video up on YouTube for those interested in seeing the process in detail. You can also see more of my work on my portfolio site WillCrespo.com or on Instagram.
About the Author
 Will Crespo, Digital Artist and Filmmaker from Chicago, but that’s just till being a Pokemon master takes off. You can follow more of his work at WillCrespo.com or on Instagram.