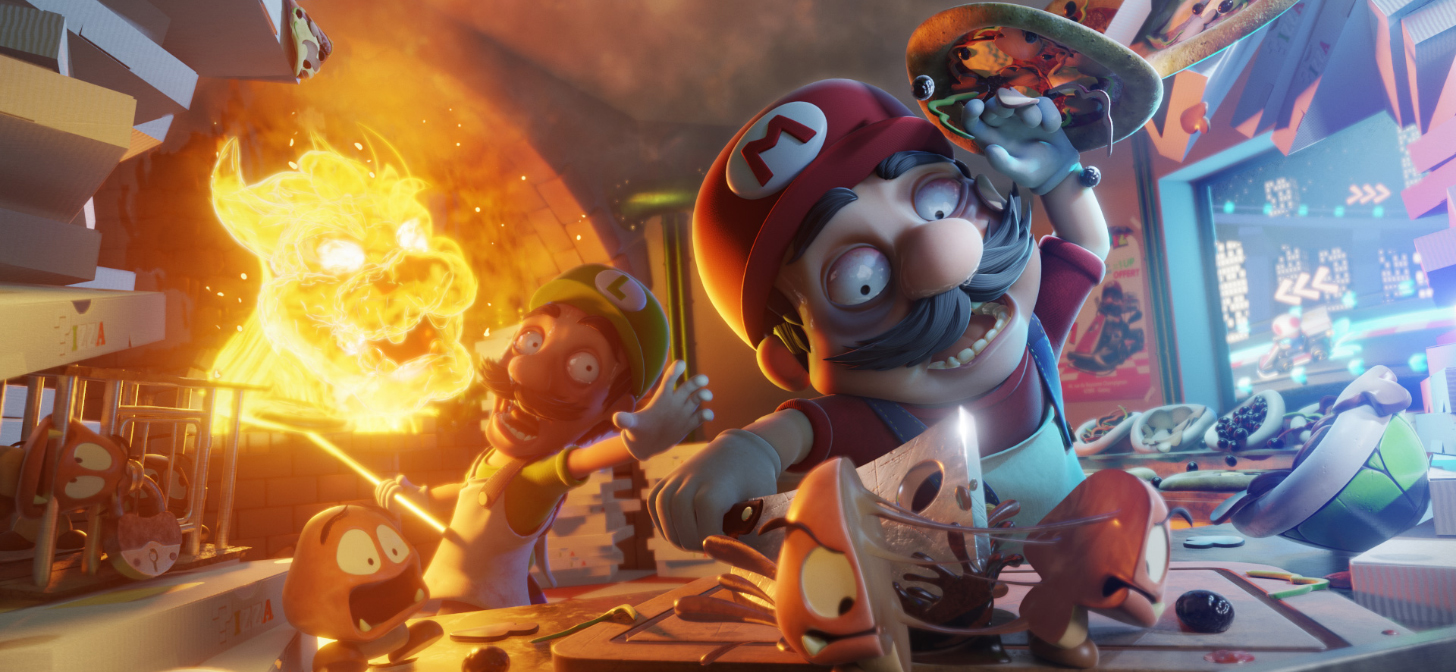
Behind the Scenes: Mario Pizza
About
This artwork was realized by ‘LRM’ which is a team of 3 eastern French 3D artists, and it was done for a Blender contest on the theme of Mario Bros.
The team is composed of Franck Imhoff, Jordan Masserann, and myself (Antoine Heckmann).
We used to work together in a VR studio and as a team we are relatively complementary.
Franck is actually working as a 3D character animator at Illumination Mac Guff in Paris. He just started to learn Blender for this contest and is already seduced by its possibilities. Usually, he is working with Maya. As an animator, he brought his help finding good compositions for the image and was in charge of the character rigs and posing.
Jordan used to work in a VR and architectural studio and is now working as a freelancer. He has been using Blender for 2 years now and was previously using 3ds Max. For this artwork, he focused more on the pre-production and the early stage of the production, but he is a multi-talented artist.
Speaking for myself, I am a 3D artist doing mostly freelancing for the past 10 years. I also used to work with 3ds Max but completely switched to Blender in 2014. In addition to my freelance activity, I also worked for 2 years in a company that was making VR content. I’m also teaching 3D at a college, mostly about rendering and helping the students with technical issues on their projects. I have a particular interest in modeling, sculpting, shading, texturing, lighting, and rendering.
We all studied 3D in school and Franck did a specialization in animation but most of our knowledge has been gathered over the years with professional experiences and self-education.
This 3D contest was the opportunity to work on a project together again.
[sponsor id=’qarnot’]
Intentions and framing (Franck/Jordan/Antoine)
As we were doing this contest in our spare time and as we only had 3 weeks to achieve it, we decided right away to use EEVEE to save as much render time as possible.
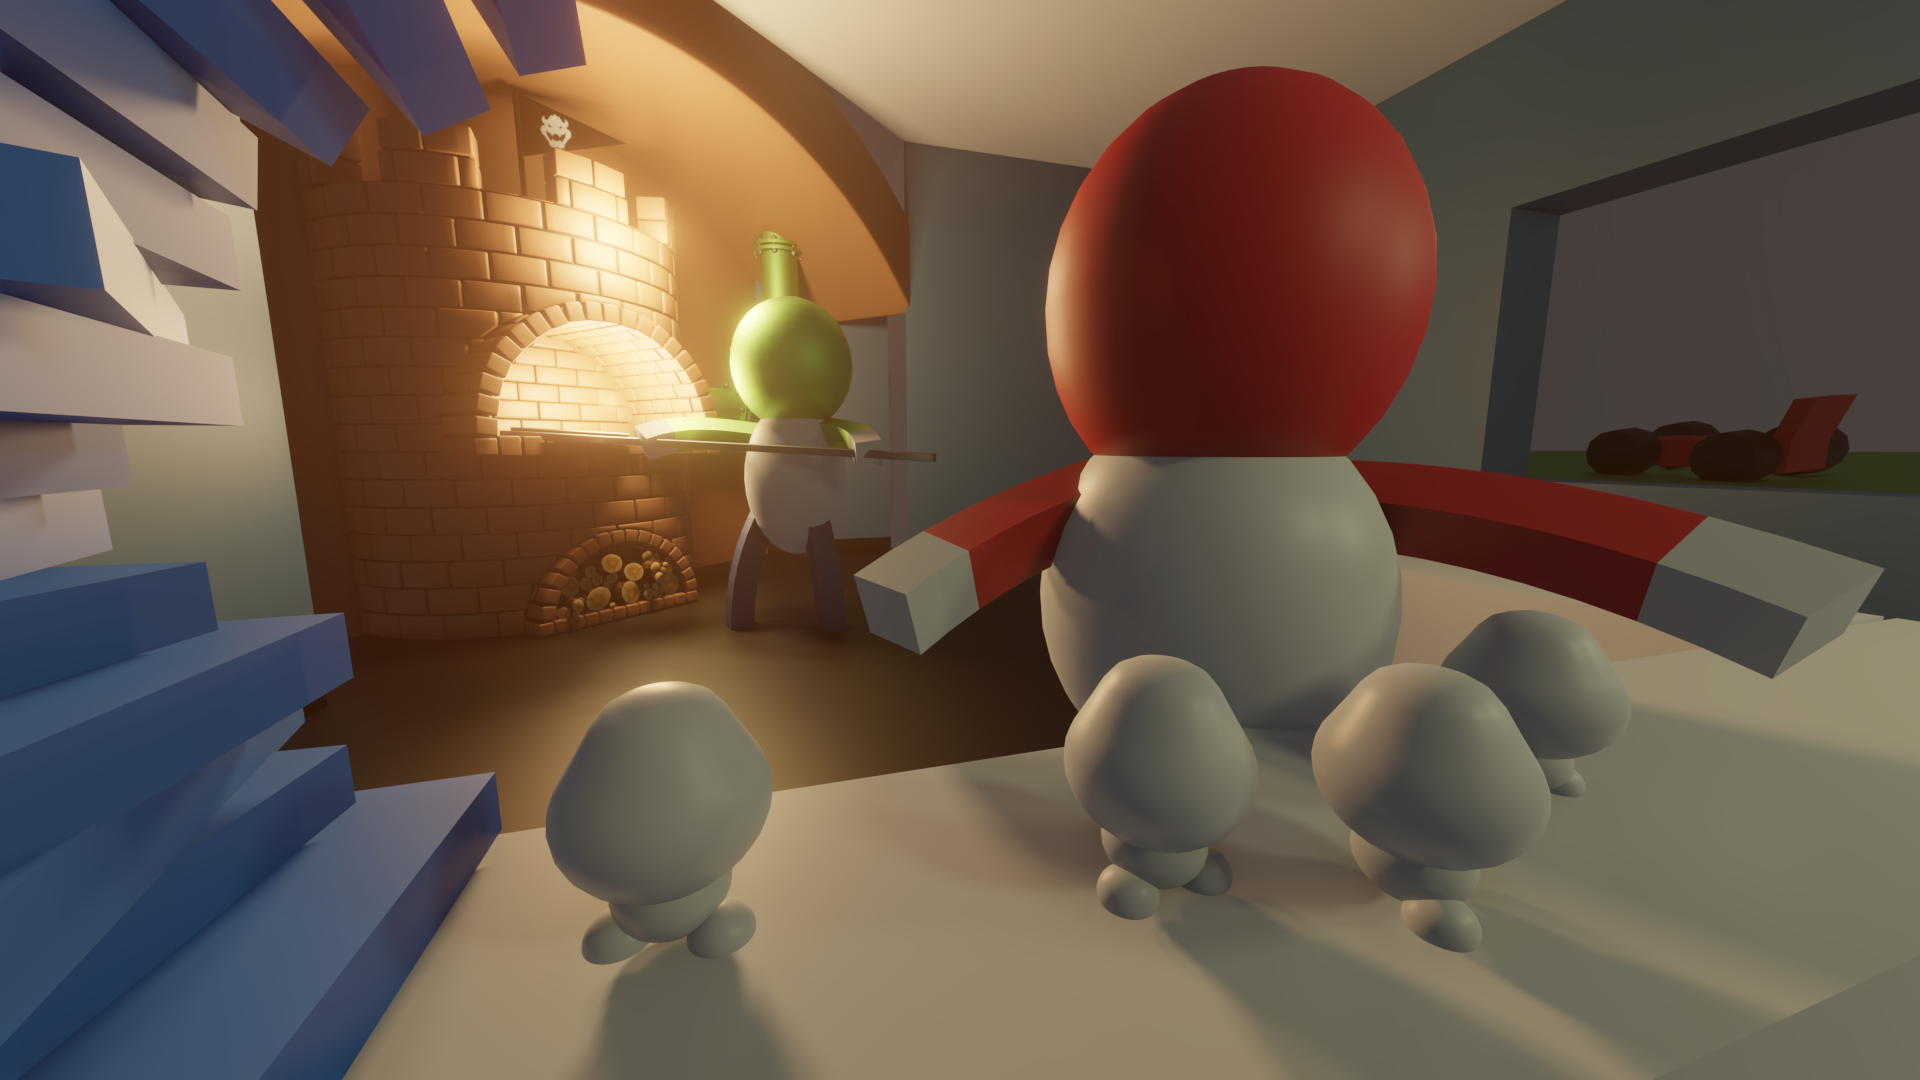
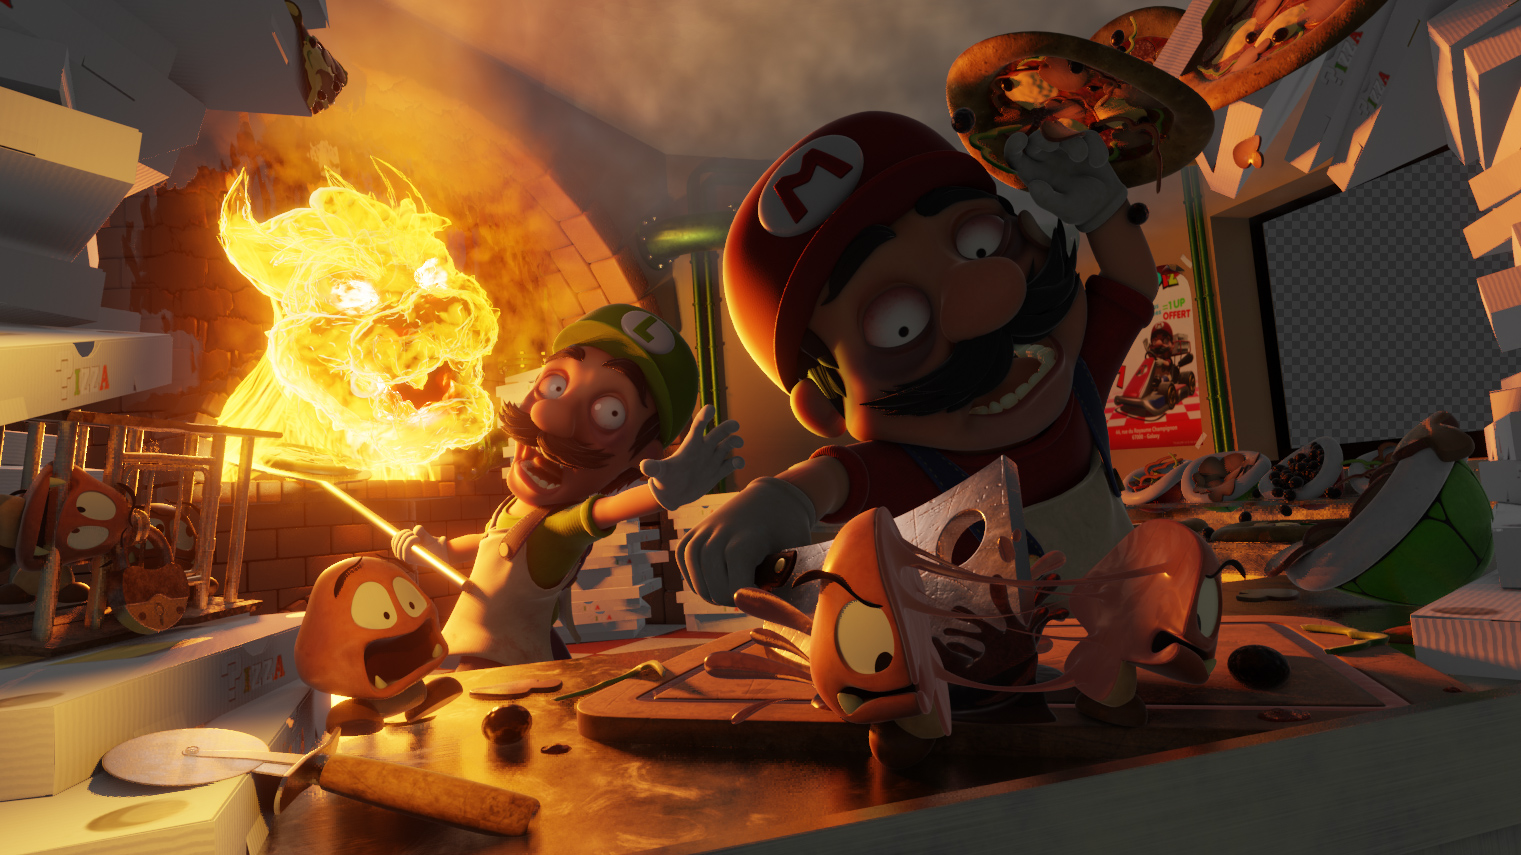
Early on we agreed that it would be fun to put the characters in an environment where we’re not used to seeing them but to also keep the codes of their universe. After a short period of reflection, we agreed on the idea of the pizzeria kitchen scene.
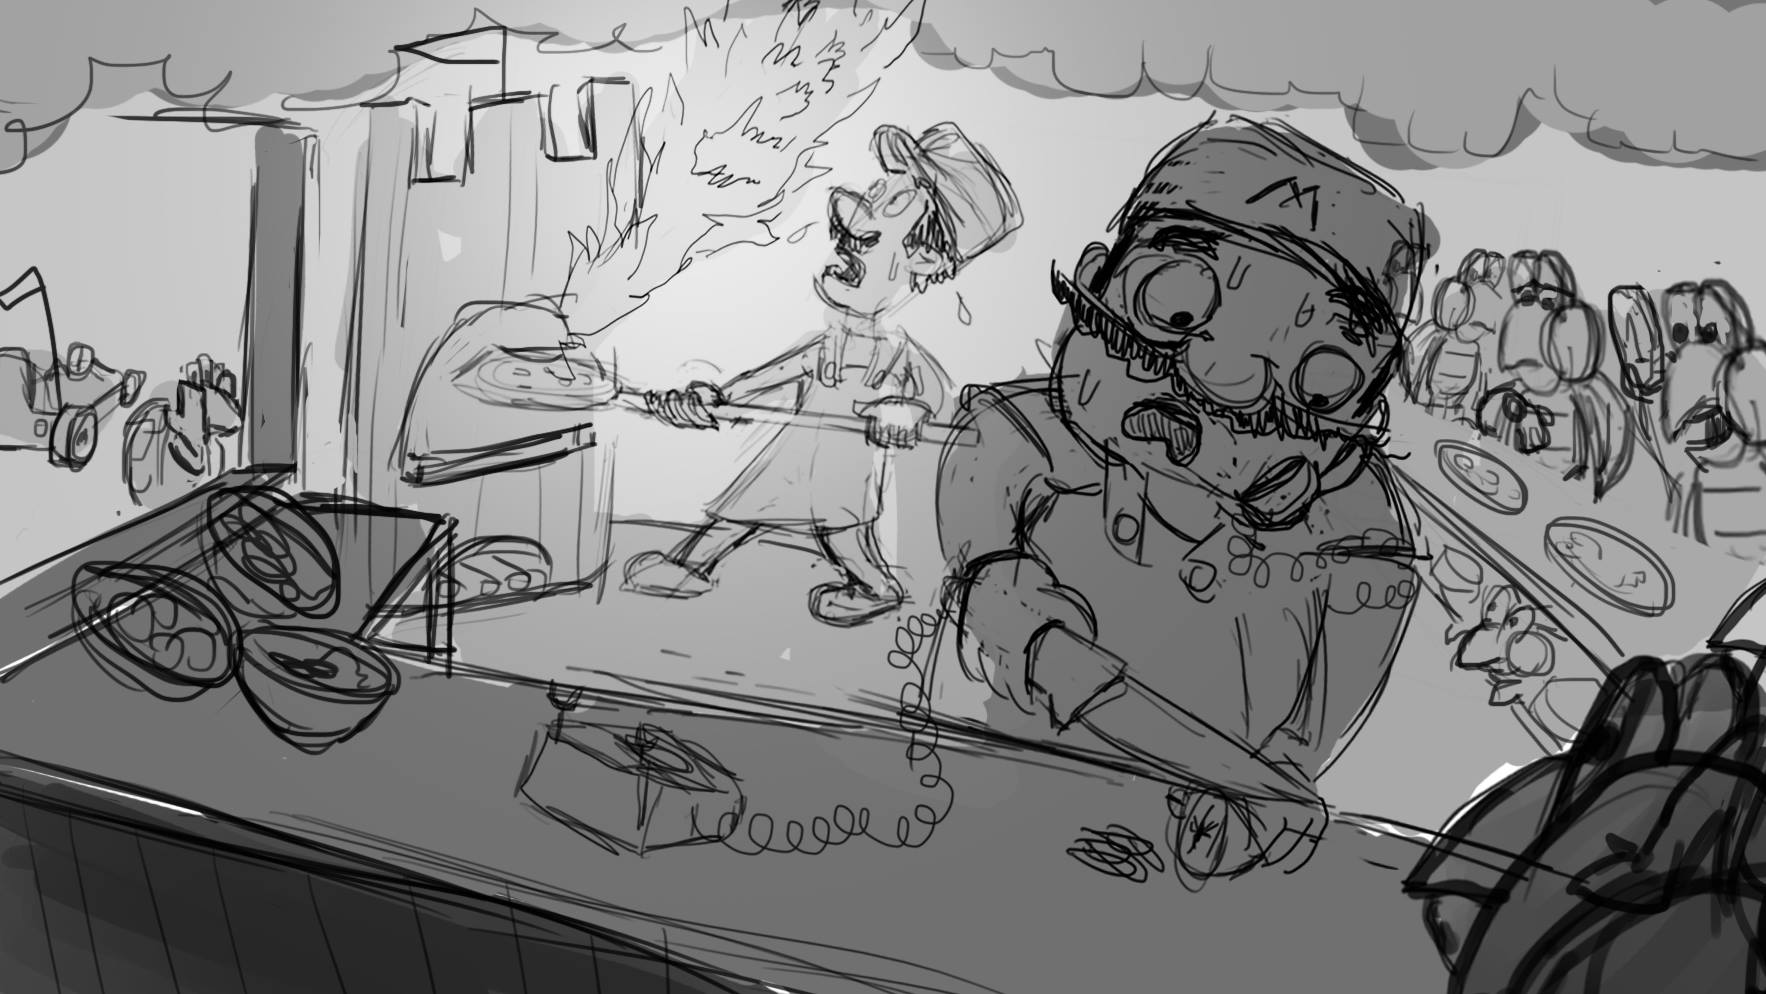
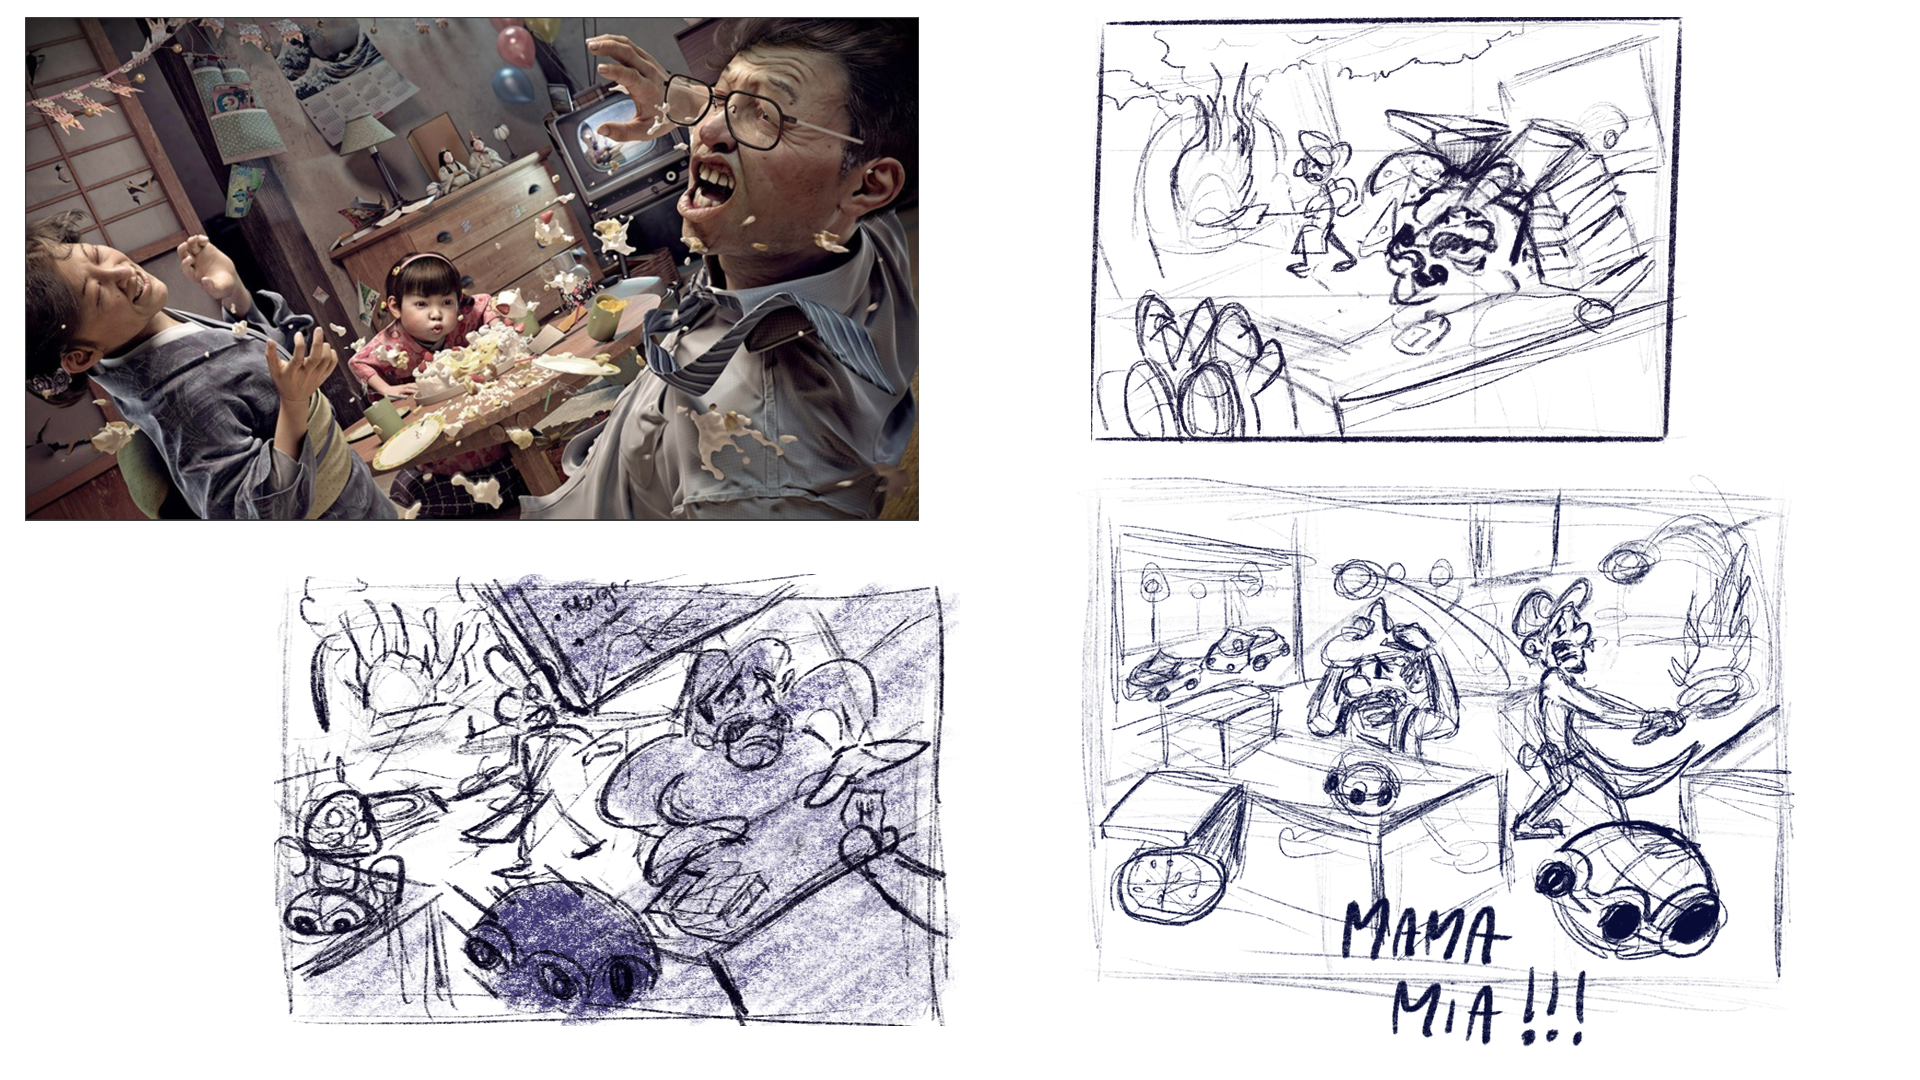
Our intention was to show that Mario and Luigi were overworked and close to the breaking point because of the number of orders they had to manage. At this point, as we were brainstorming, Jordan was sketching the ideas that we had of the ambience of the scene and the elements that would be part of it.
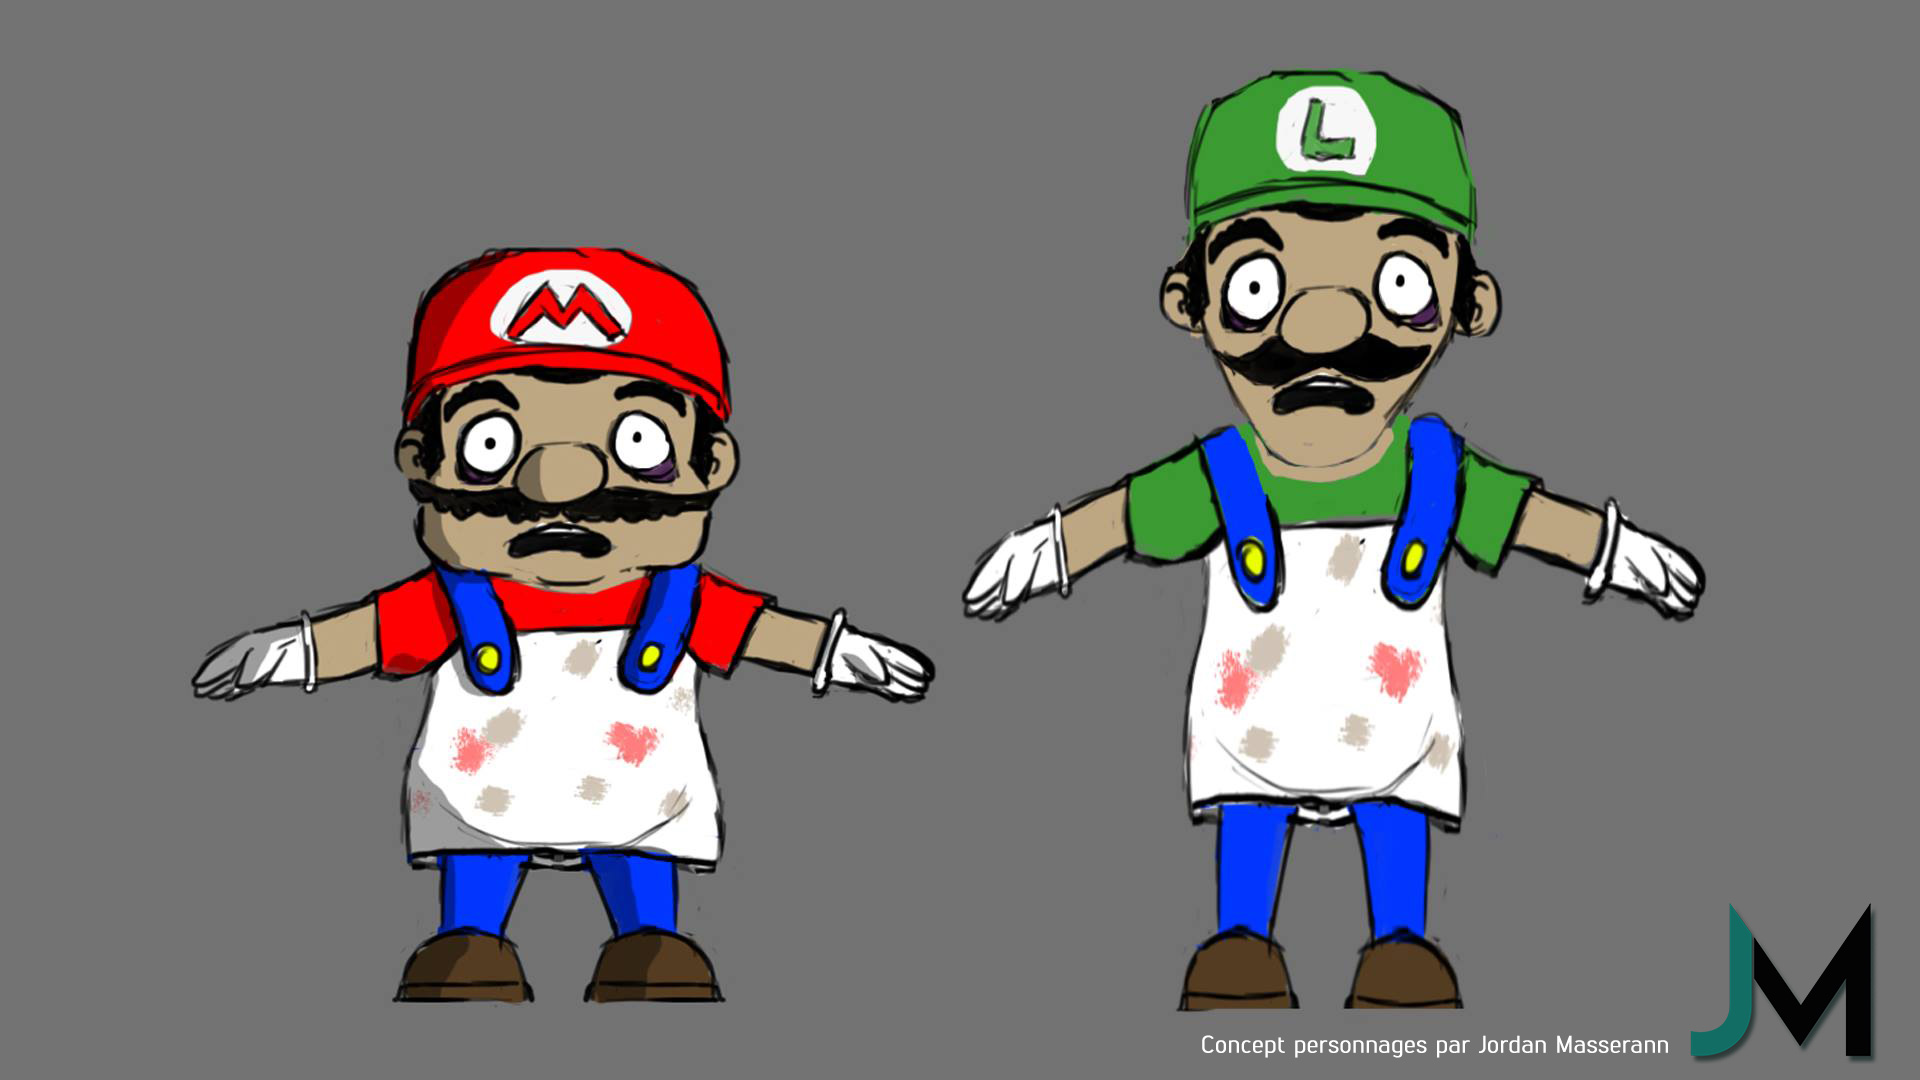
Once it was clear enough, Jordan also made the characters’ model sheets.
Franck as an animator brought his help finding a good composition for our image and defining more the camera angle by sketching some thumbnails.
He wanted something very expressive and dynamic, and Happy Birthday! by Lin Zhang (below, top left) was very inspiring to him.
As we were moving forward in the creation process, we were constantly giving feedback to each other.
While Franck was working on the image structure, Jordan and I started the modeling part.
Modeling (Jordan/Antoine)
Jordan and I shared the modeling work. He started to block out the scene to work on the kitchen parts and the environment props, he also modeled the final kart and the goombas. Meanwhile, I focused on the main characters.
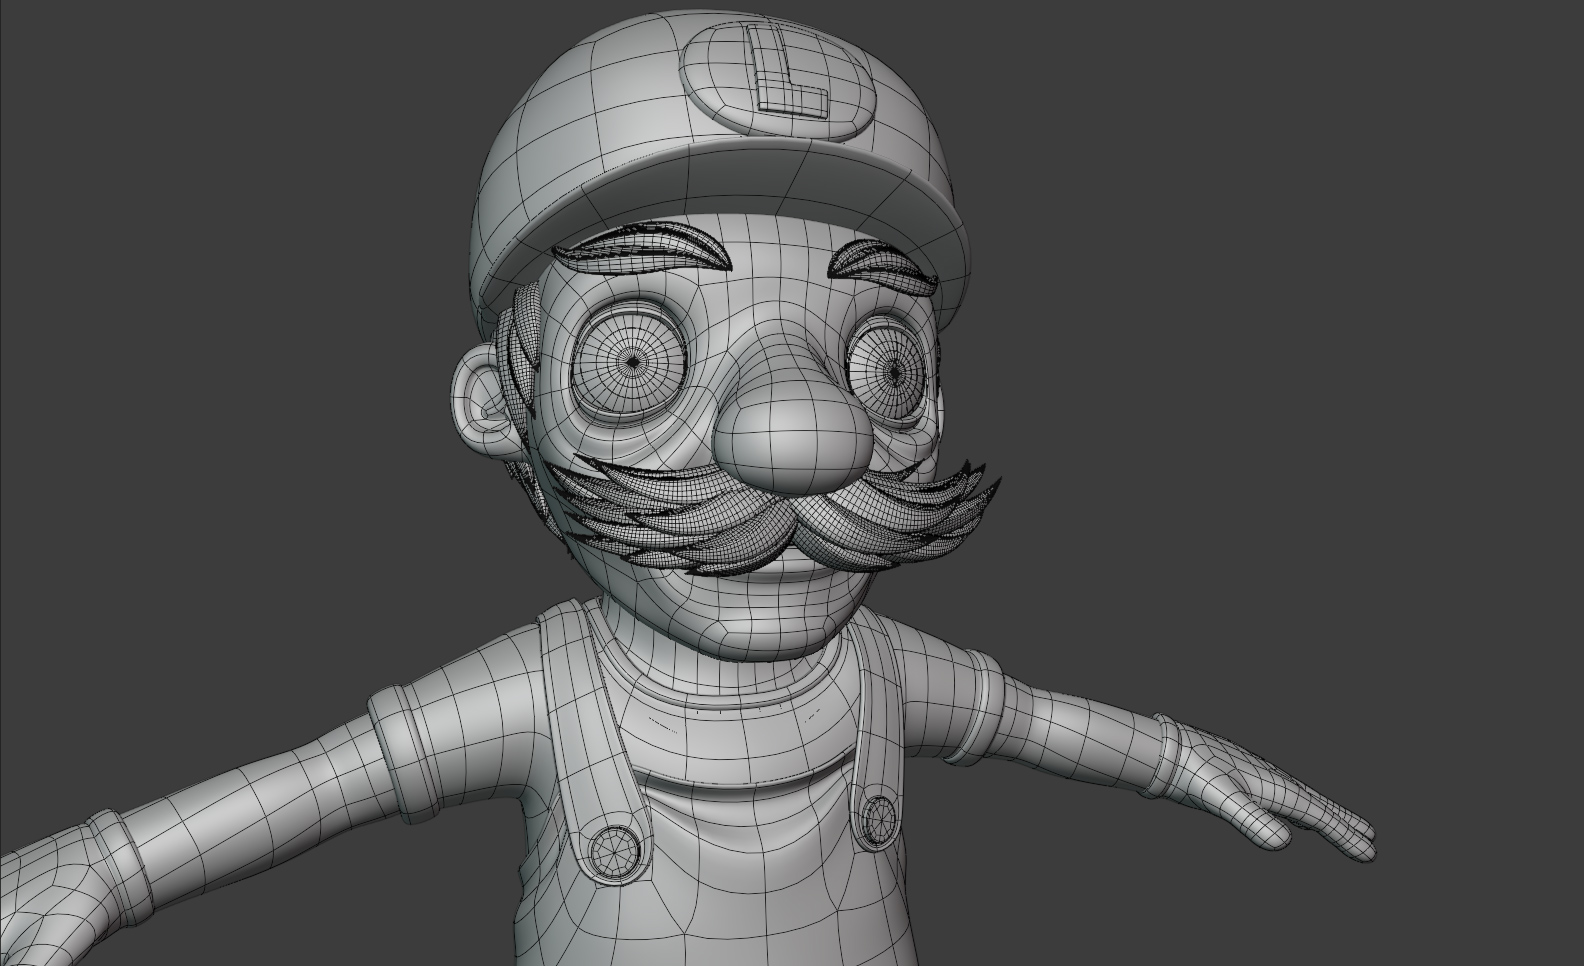
As they were not too complicated, I decided not to use a sculpt and retopology workflow—instead I directly modeled Mario in symmetry from a subdivided cube.
I had the model sheets as reference in the scene, and as I was modeling I was also paying attention to the topology to keep it good and clean for the character deformations Franck was planning to do.
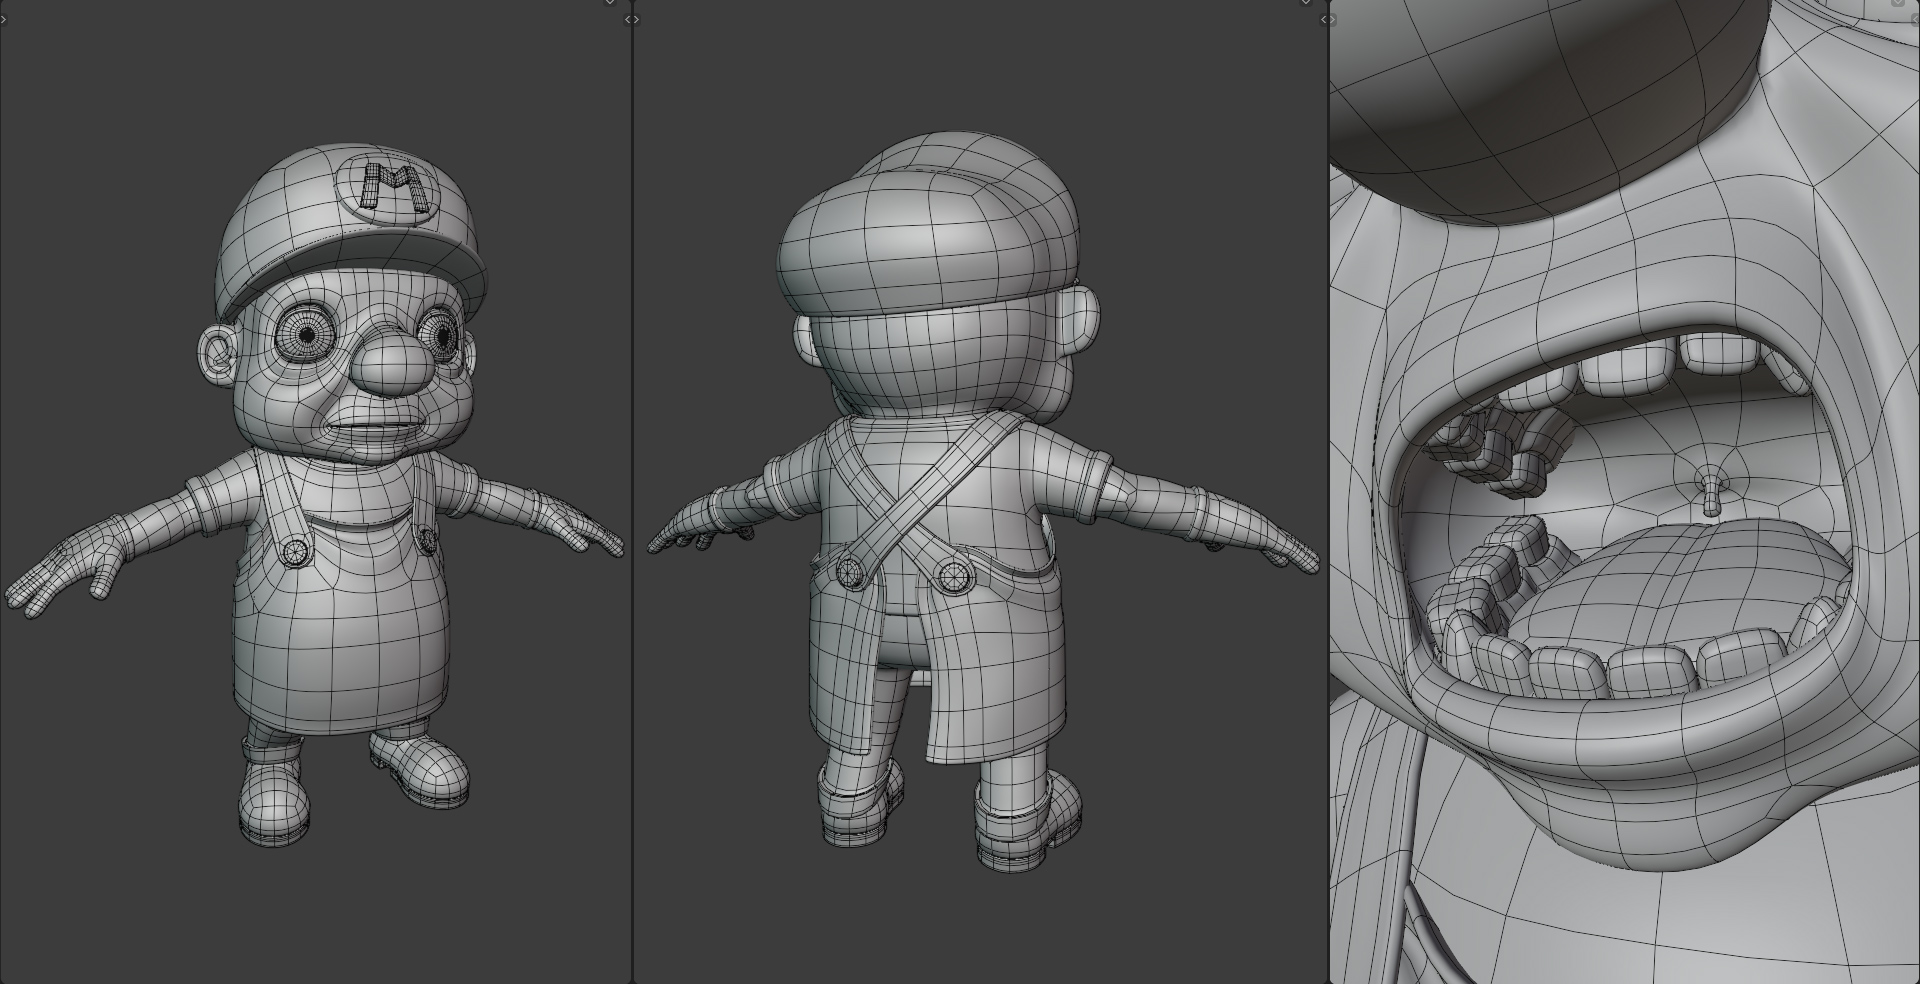
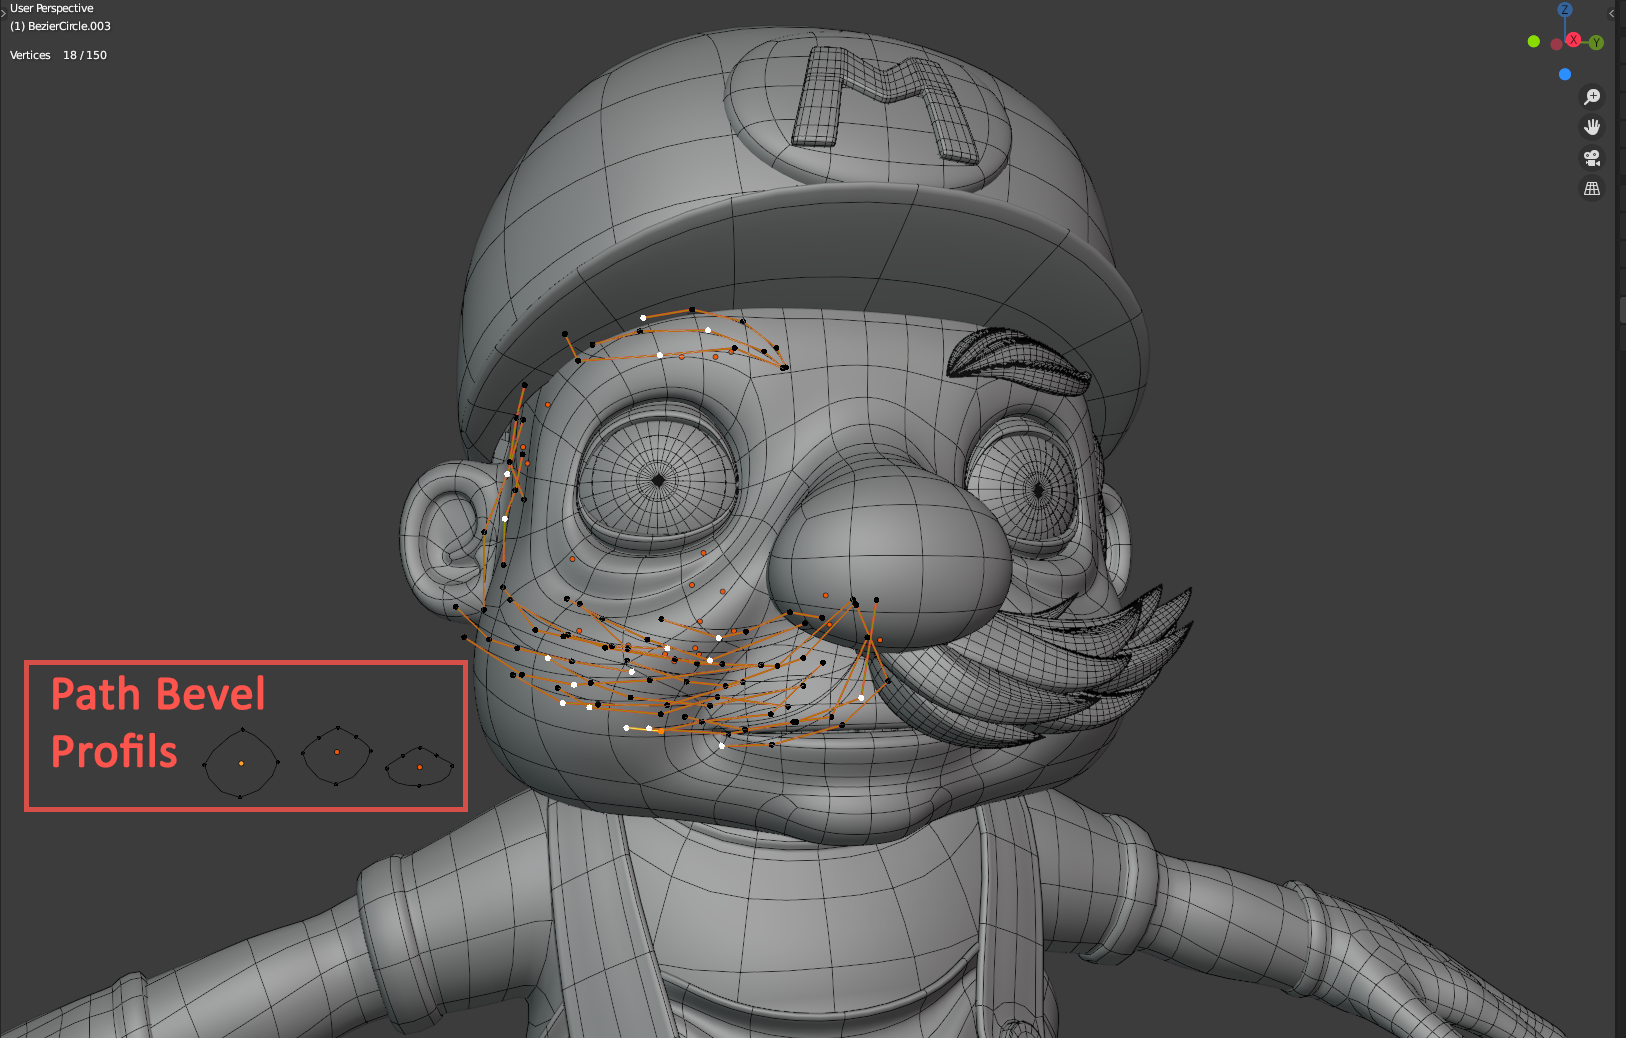
For the hairs, the eyebrows and the mustache I used paths and different bevel profiles to add some variations. I really like this technique because it allows you to twist and shape the hair strands as you want.
Luigi is an adaptation of Mario’s model, I just reworked the character proportions and face to fit the model sheet.
For Bowser, I was planning to do some fire effect so I didn’t spend too much time on the modeling.
I quickly sculpted the head, I added teeth, horns, and some hair strands, joined them all together into one object and then I used voxel remesh in sculpt mode to lighten the model polycount and get rid of most of the intersecting parts.
As there was a time limit to do the artwork, we decided to focus first on the main elements of the image, and then we worked by iteration to add as many secondary references as possible with the time we had left.
Fire Bowser (Antoine)
For Bowser, I used layering of mesh and shaders to build the fire effect.
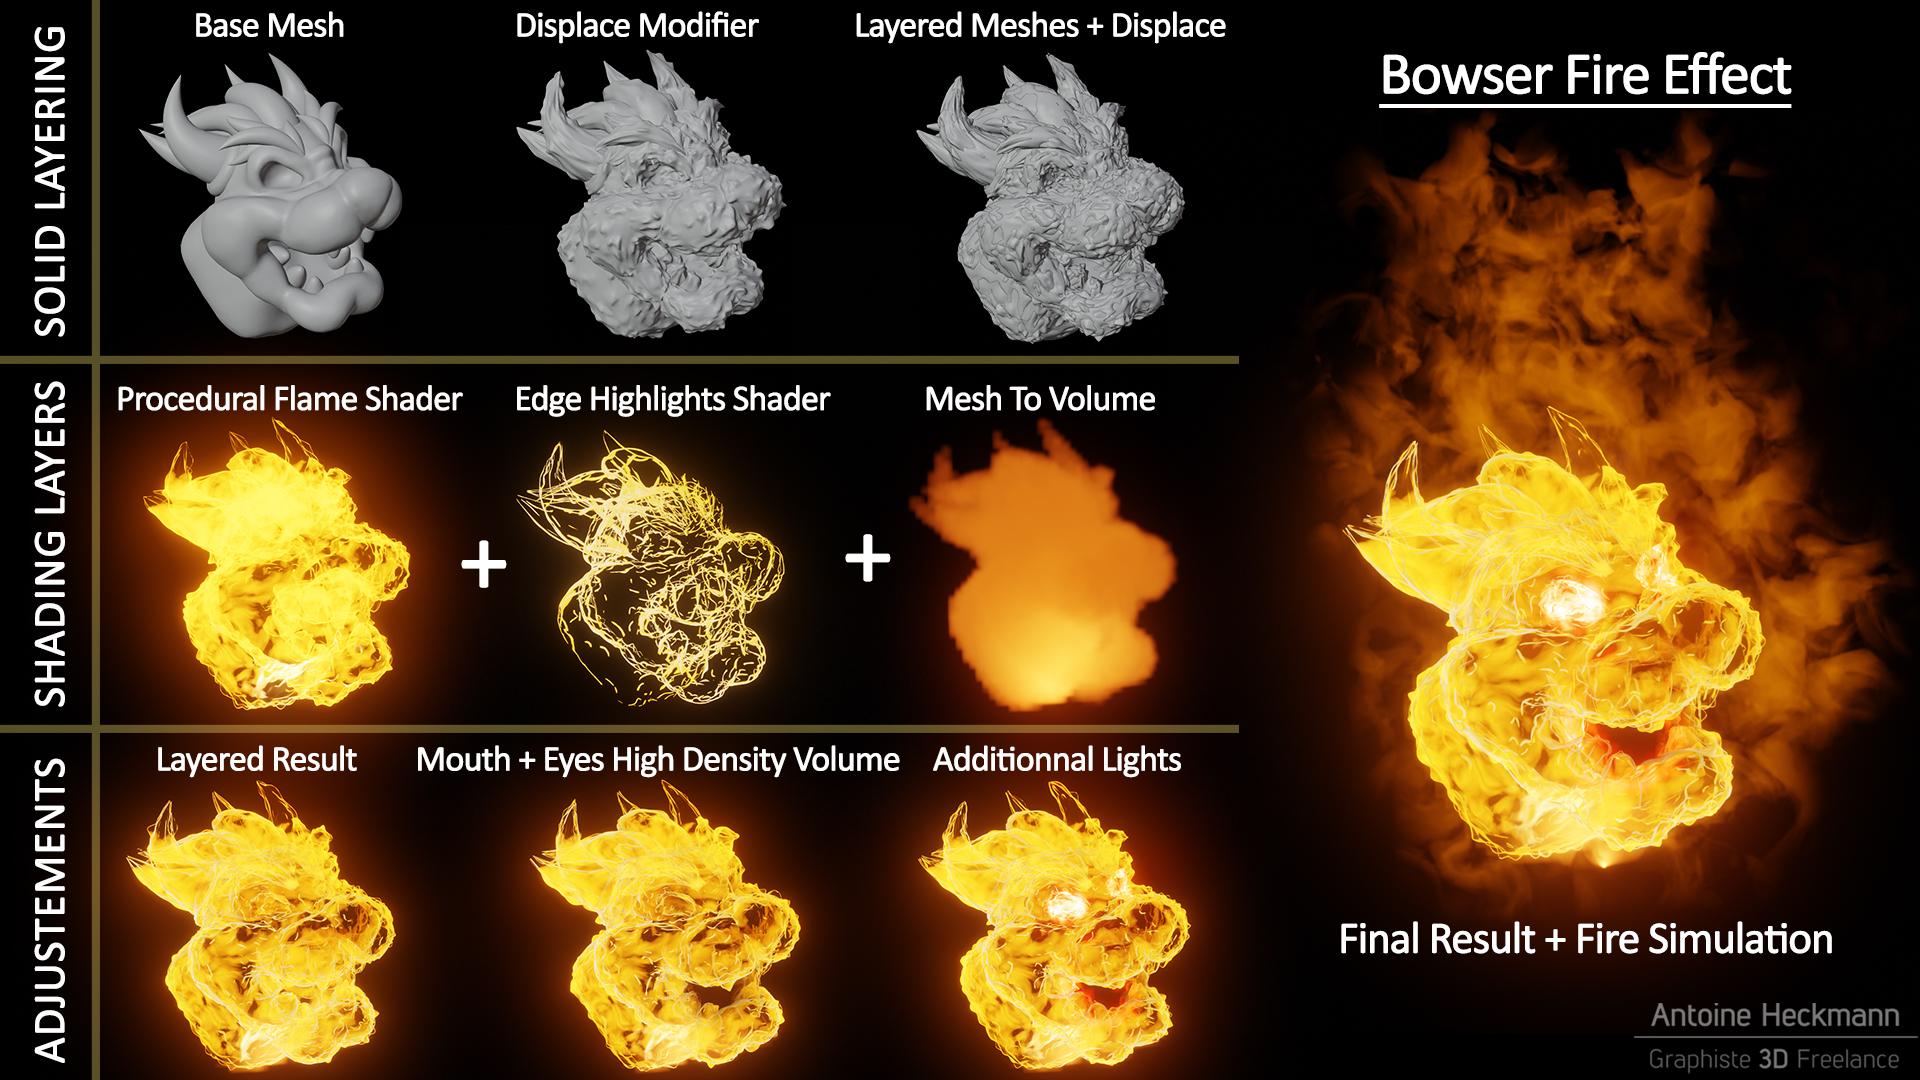
- To begin with, I added a displace modifier on my base mesh with a simple noise texture and a subdivision modifier. Then I duplicated it and slightly changed the value of the displacement to create geometry variations and to avoid coplanar faces overlapping.
- Then on my first head, I added a procedural fire shader, and on the second one another shader that put the emphasis on the edges of my model. This step allowed me to create some highlights and variations.
- After that I used the new ‘mesh to volume’ modifier to give a bit of density to my layered effect and to give a better understanding of the overall volume.
From there I had my working base. I adjusted it by adding some volumes with very high density to give more depth to the effect. Then I added some lights with a limited distance in the areas that I wanted to highlight, like the eyes sockets and the mouth. Finally, I made a fire simulation to have some interesting flames effects, and EEVEE’s magical bloom did the rest.
To complete the effect, I also added into the scene a smoke simulation for the ceiling and a heat distortion around Bowser’s head with a procedural shader.
UV, Textures and Shading (Antoine)
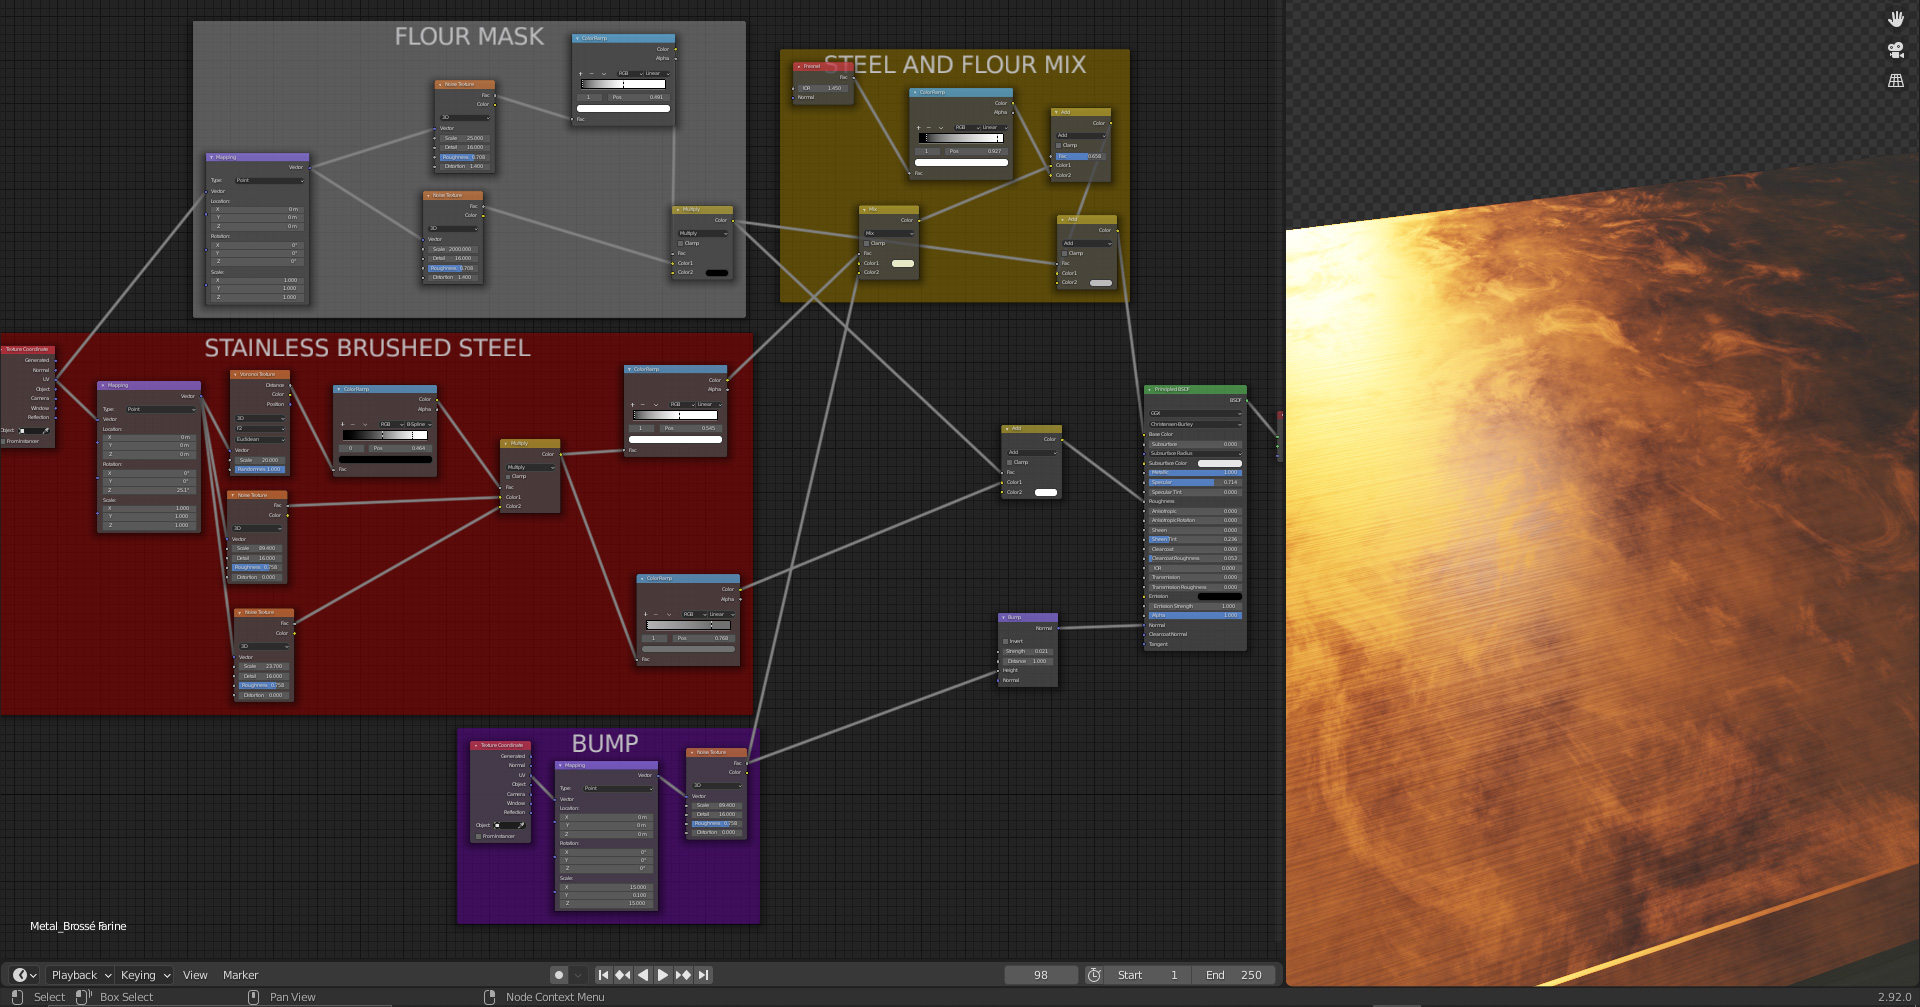
For the shading and texture creation, I used either Blender’s procedural texturing or Substance Painter.
For example, I used Blender procedural texturing for surfaces that needed only one shader and no external texture map creation like the stainless steel worktop. I started to create the base color, the roughness, and the normal from the base material that is a brushed stainless steel, and then I created a procedural mask for the flour smudges.
To finish, I combined both of them in the base color and the roughness socket.
For the characters, I used Substance Painter, which allowed me to do more advanced stuff, to be more efficient and to have more interesting results without having to think about EEVEE’s eventual limitations.
Regarding the UVs, Mario and Luigi both have 3 UDIMs and an equal number of shaders. I organized the UDIMs to have one for the clothes, one for the skin and the teeth, and one for the eyes. I used UDIMs to have a better texture definition to work with, and also to be able to combine part of the character having different material properties (fabric, leather, metal, rubber…) on the same texture map.
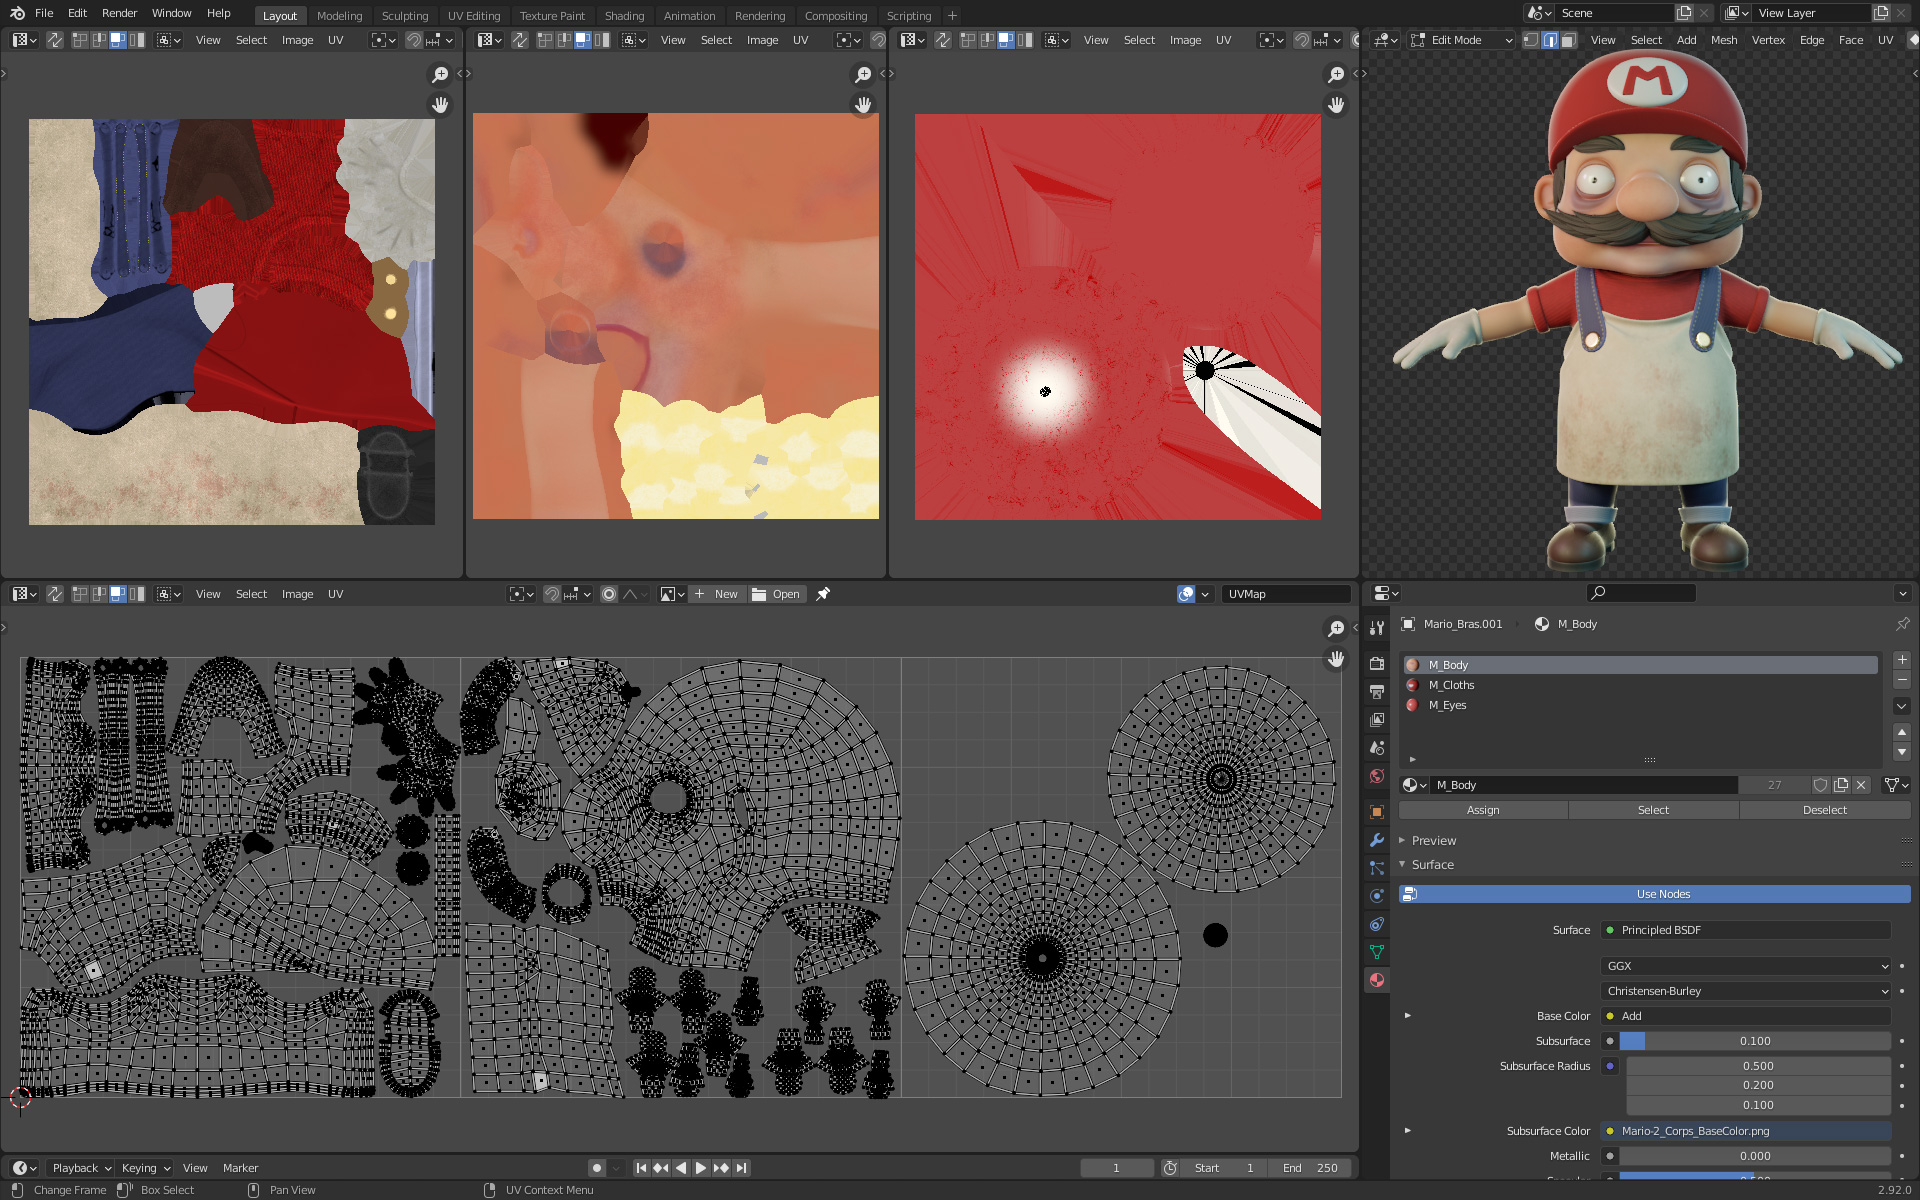
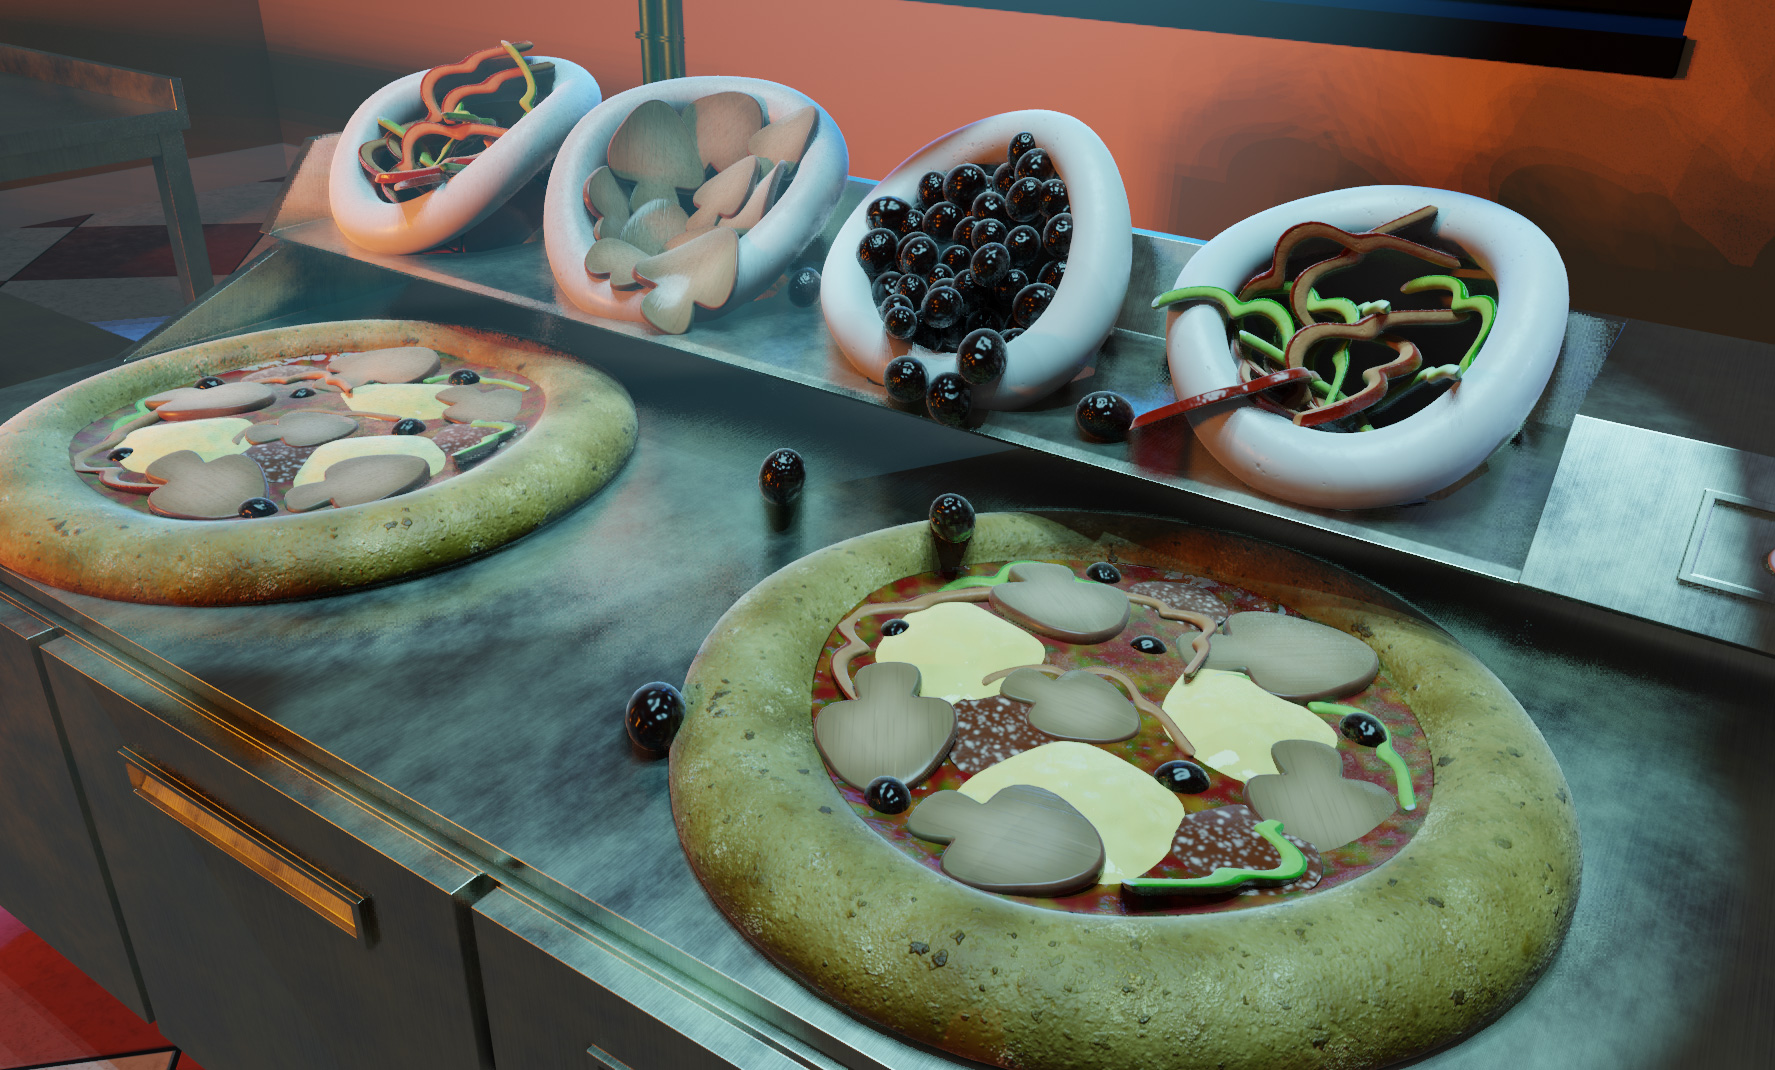
I used the same technique for the pizza. To avoid having to manage too many shaders in the scene, the pizza and its ingredients are sharing the same maps and the same shader.
I imported all the elements into Substance as one object but with all the ingredients separated from each other to avoid having baking artifacts on my final maps because of meshes intersecting.
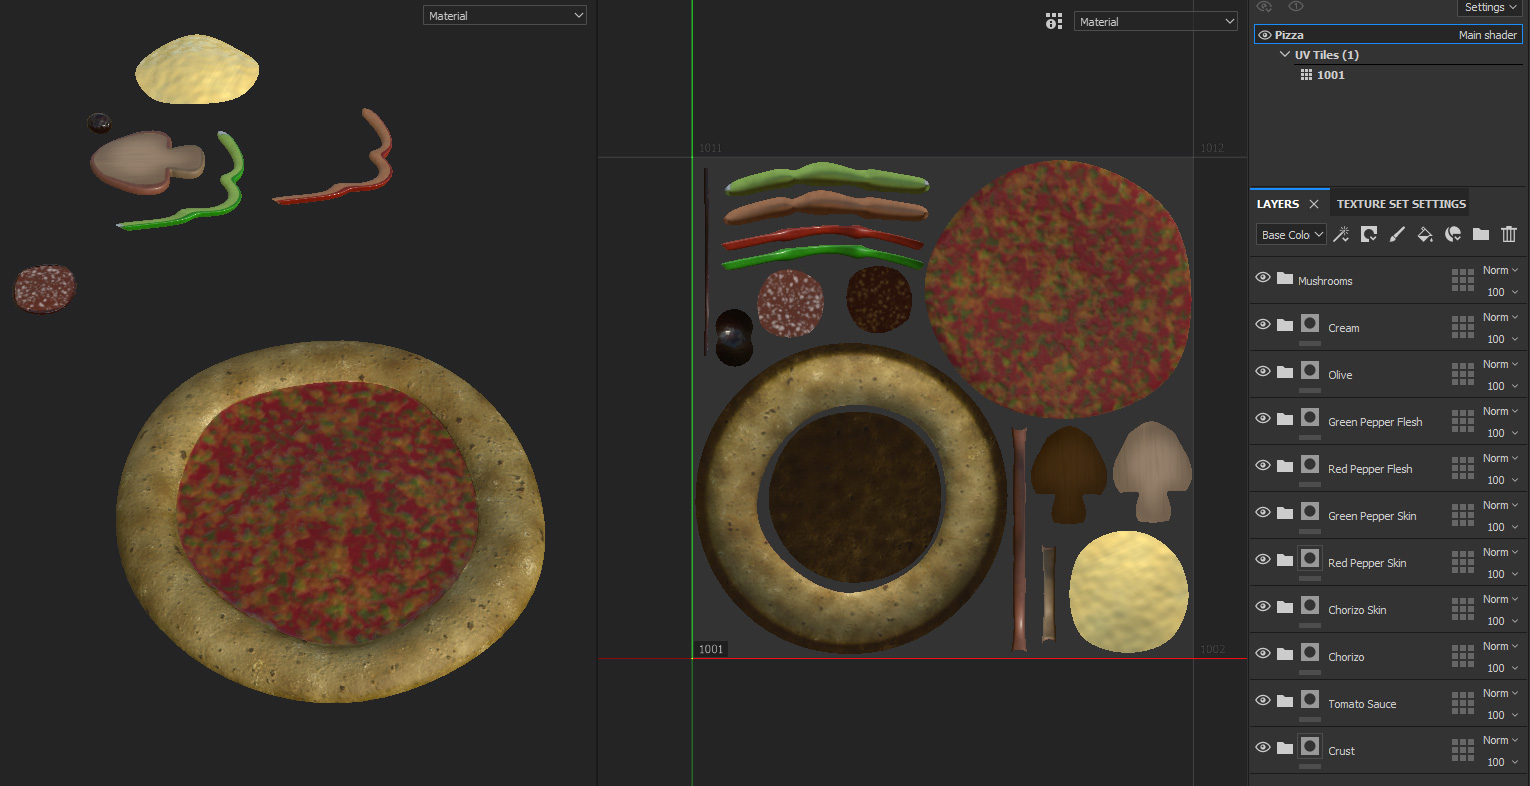
This technique allowed me to set up and use the ingredients in an isolated way in the bowls in the final scene. I built the pizza back in Blender and merged the ingredients with the dough to have only one object to manage.
I often apply the subdivision modifier when exporting models to Substance so that I have more information to bake, and to avoid texture stretching when I use my maps back in Blender on the models that kept the subdivision modifier.
Rigging (Franck)
For the rig, Franck discovered Rigify, which is a powerful tool when you have to rig a character fast. First, he created a Metarig armature and took the time to put face bones correctly in order to have less skinning to do after using the rigify button.
Since it was a limited time contest, he didn’t spend too much time on the skinning of their aprons, gloves or shoes.
As it was only for posing, it would be better to tweak the geometry with the proportional editing tool at the end if needed.
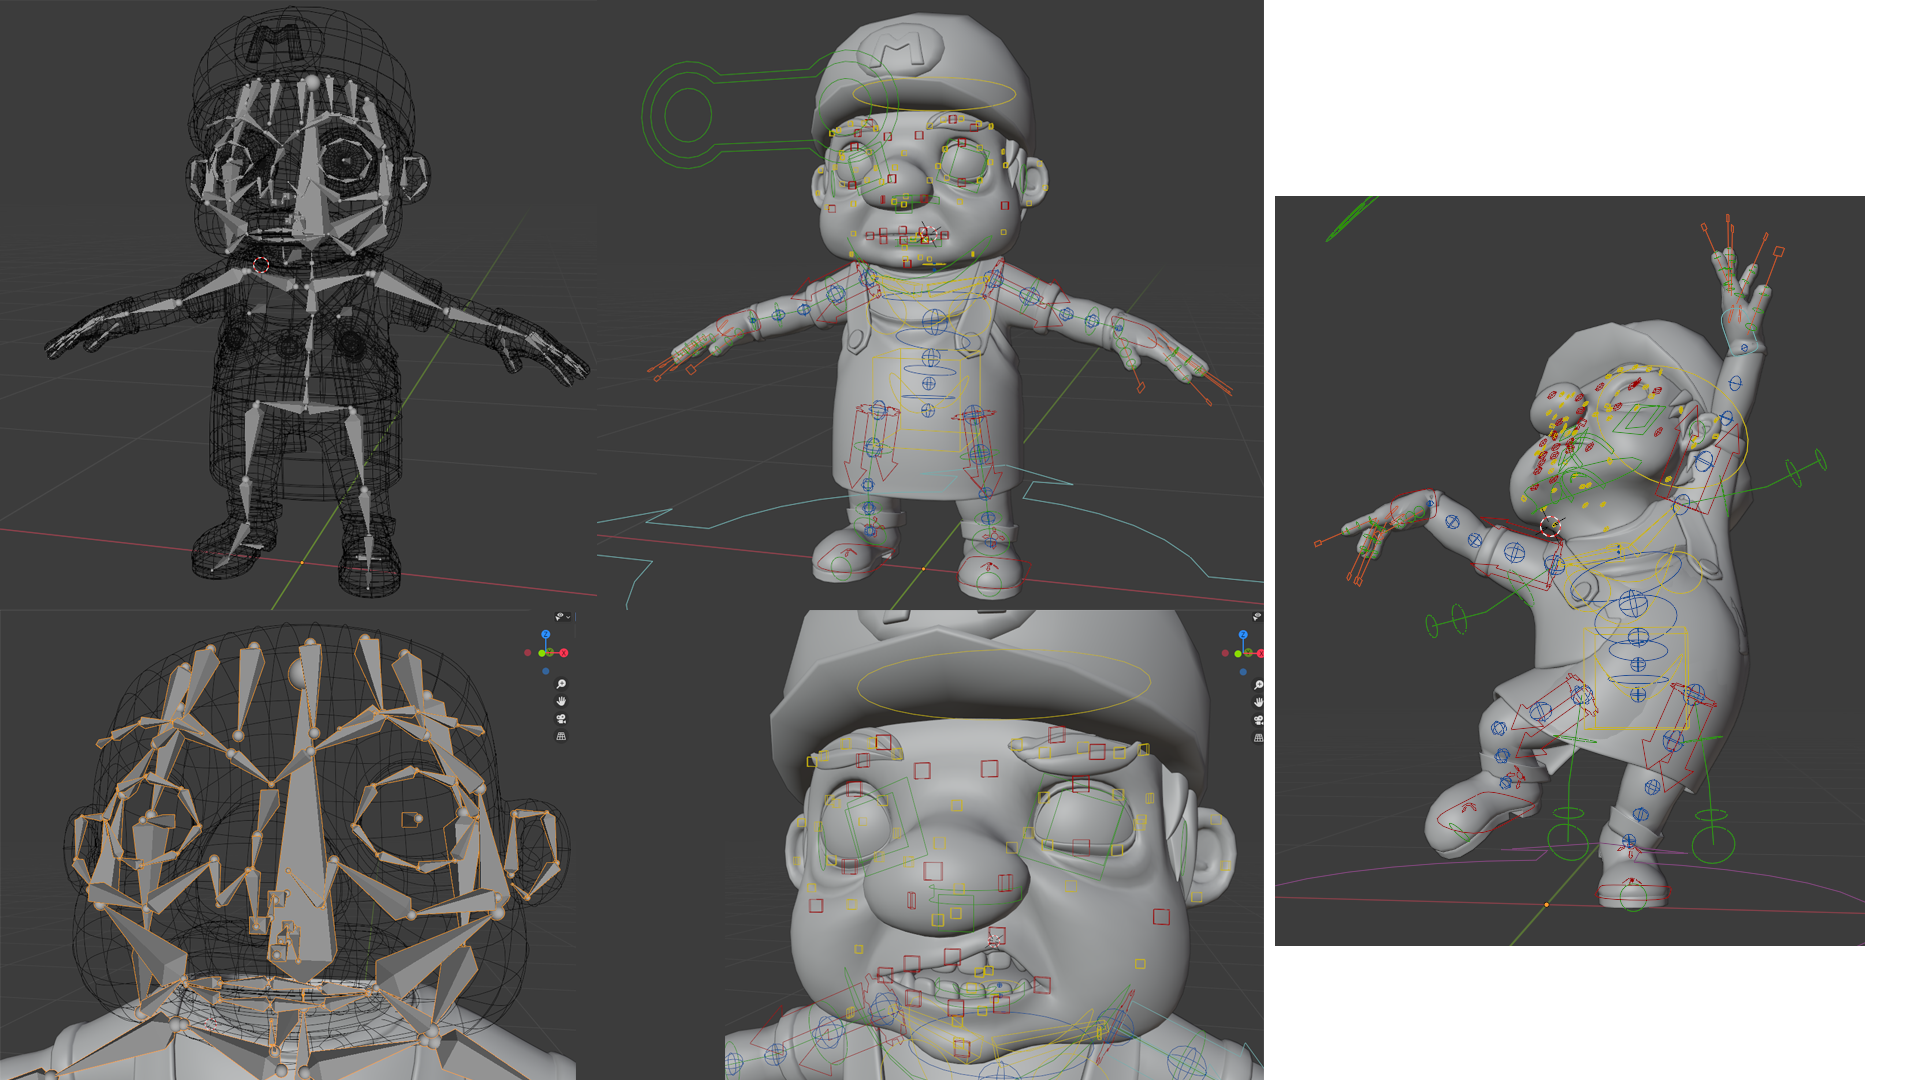
Posing (Franck)
It was time to give life to our fresh rigged characters. Franck quickly found a pose that worked for Luigi. However, Mario’s first facial expression was a bit creepy and gave the viewer the impression that Mario was in pain. Franck changed it to a more surprised expression, and it worked better with the idea of the panic in the kitchen.
After some tweaking, when the poses were working for both characters, he started to polish them, using the proportional editing tool and deforming the geometry to make them a little more appealing, to clean the interpenetrations between clothes, and the minor flaws when the rig was not enough.
Lighting (Antoine)
For the lighting, we wanted to create an image with high contrasts that would support our initial idea to show that our characters are in the rush.
So I played with light and dark tones, but also with color contrasts.
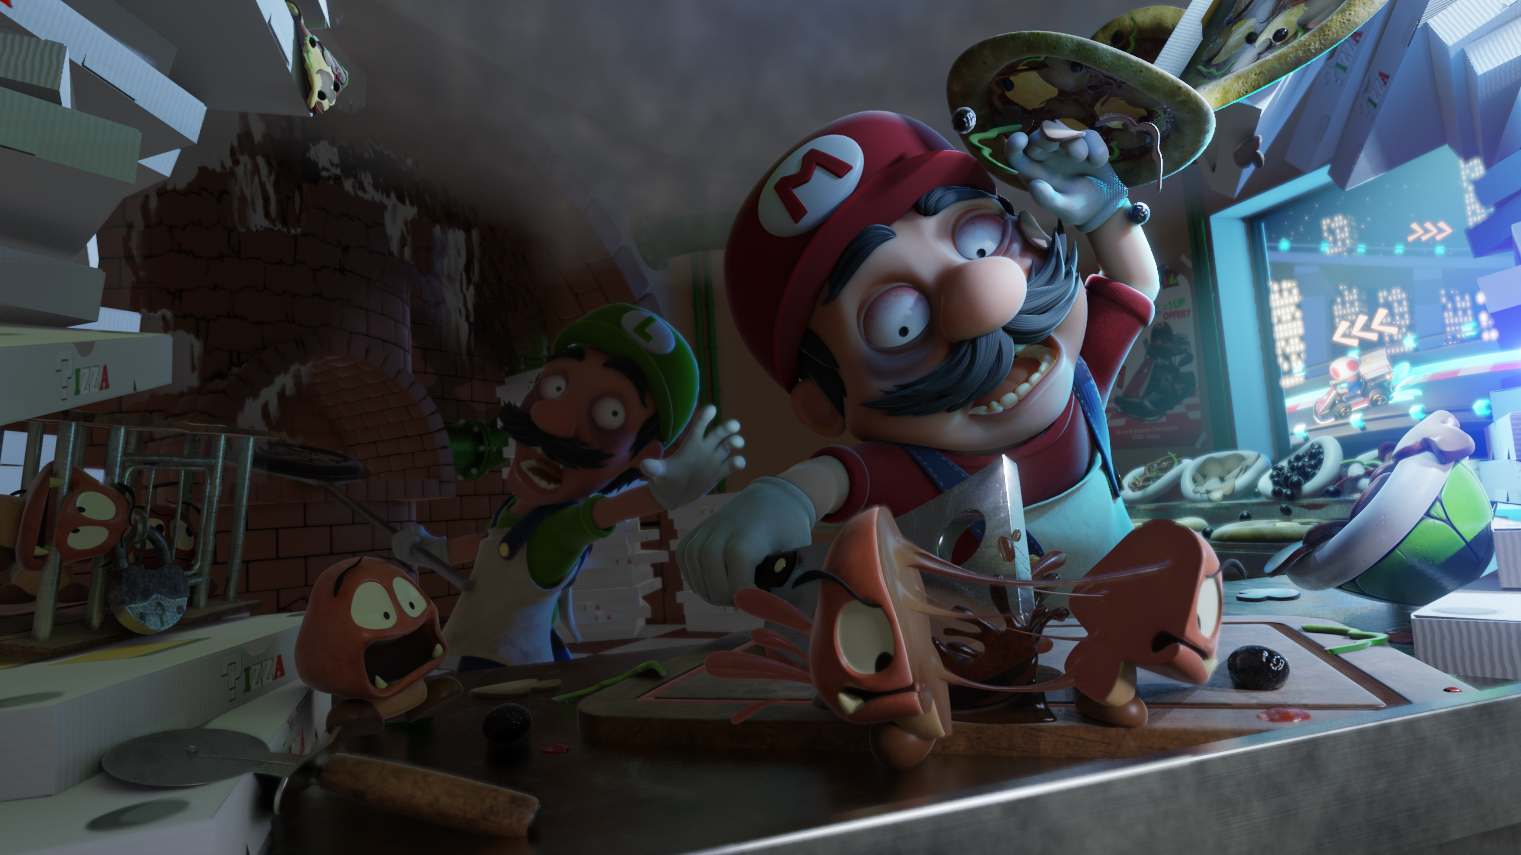
On the left there are warm colors with the oven and the fire Bowser to put the accent on the fact that the characters are completely overworked, and on the right are cool colors from the artificial lighting of the town, giving a more peaceful mood.
I used a sun for the exterior lighting of the city, but aside from that I mostly used area lights with soft shadows to cover large regions of the image, and a mix of area lights and point lights to enhance the areas that we wanted to highlight.
For more precision and control, most of the lights have a custom distance value to avoid too much color mixing and to keep a strong contrast between warm and cool colors.
I didn’t bake indirect lighting, so I created some additional lights to mimic global illumination. For example, there is a light under Mario’s chin to fake the worktop light bounces.
There are a total of 25 lights in the scene, and some of them are only there to create interesting reflections, for example the specular effect on the top of the knife.
This kind of effect can be done in post-production, but we wanted to almost have our final image straight out of Blender.
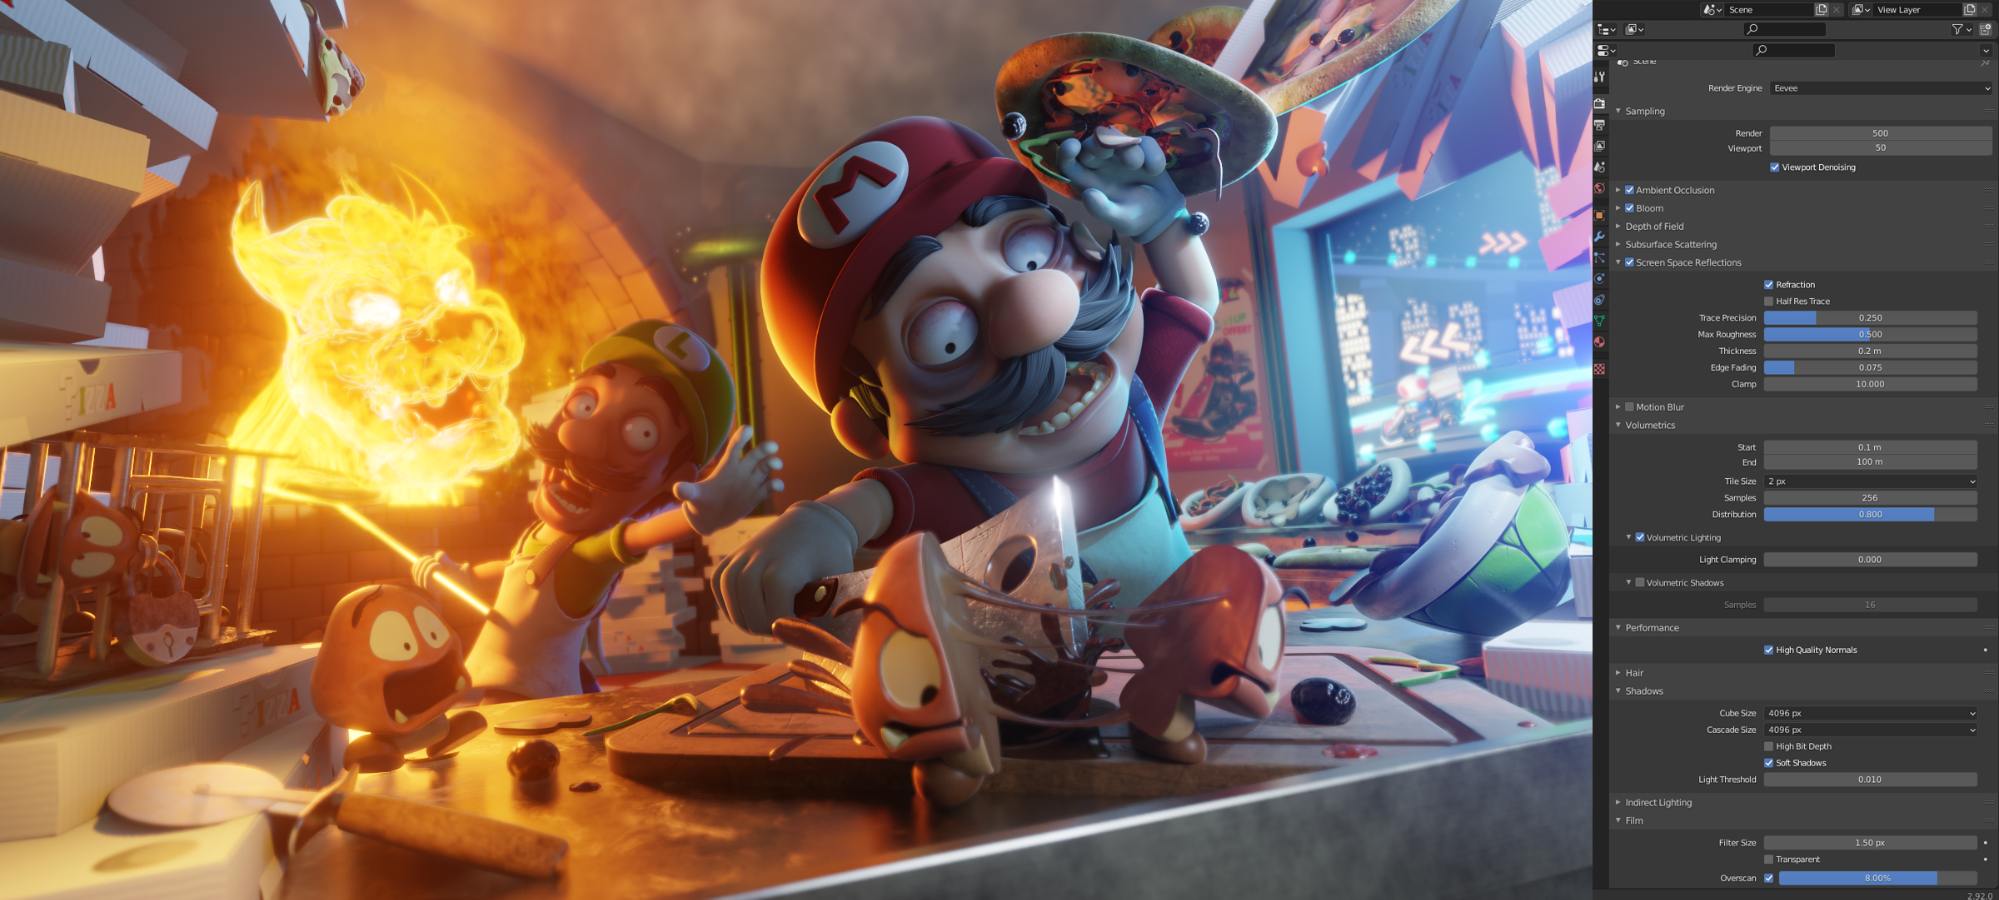
Rendering (Antoine)
For the rendering, I didn’t do anything in particular besides pushing some of the settings as high as I could, particularly for the reflections, the shadows, and the volumetrics.
There is a small depth of field on the camera to put Mario a bit more in focus, and I pushed the overscan to 8% to have a bit more glow on my final image from emissive shader lightings that are outside of the frame.
Mostly because of the high volumetric settings, the final render took almost 6 minutes to render on my system (GTX 1080Ti / i7 8700K / 32GB Ram).
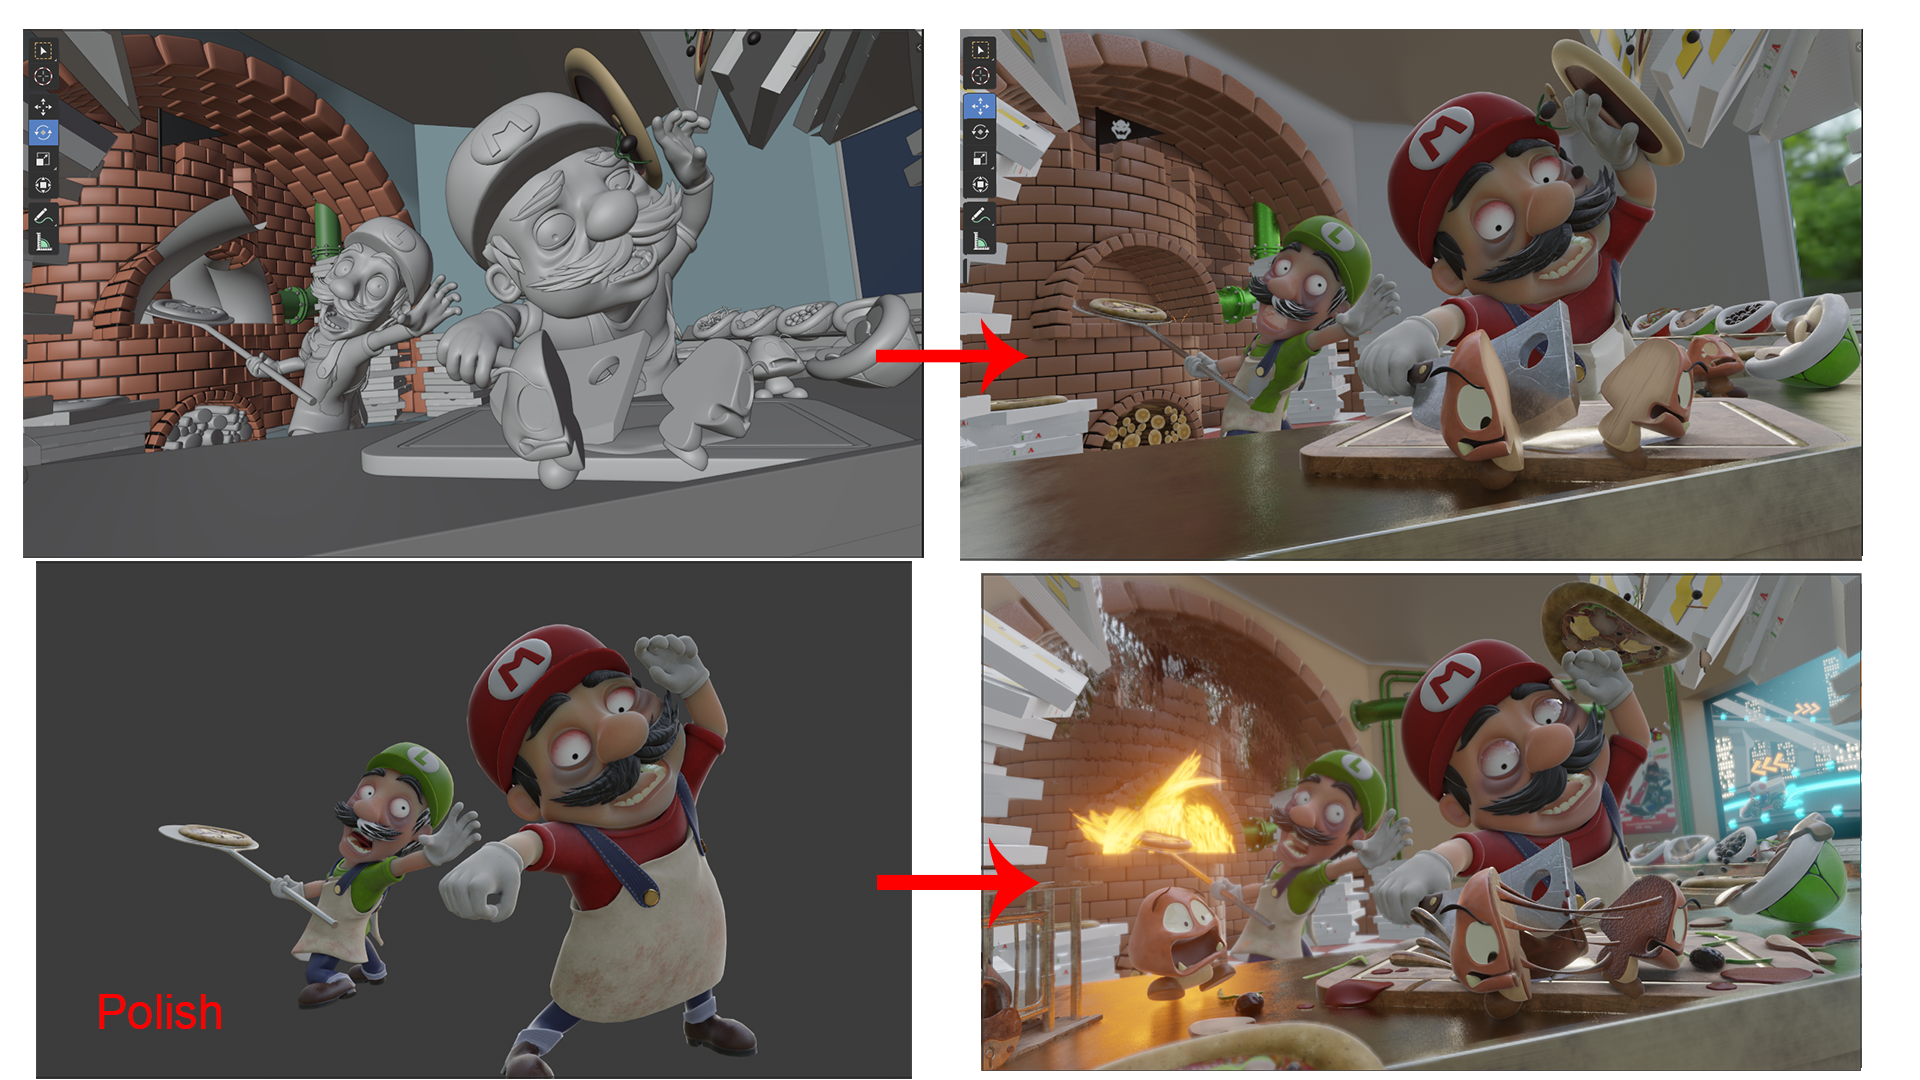
Post-production (Franck/Jordan/Antoine)
We did the post-production live on Discord all together.
As we didn’t have enough time to do a 3D sweat effect, Franck sent me some sweat drops he drew on Mario and Luigi’s faces. He also drew some more reflections on the eyes, some fire particles, and additional smoke.
For the rest, I did some color tweaking, drew some subsurface scattering on Mario’s ear, added some glow, and also a vignette with an overlaid texture effect.

About the Team
 Antoine Heckmann (Author), Freelance 3D Artist | 3D Teacher
 Franck Imhoff, 3D Character Animator
 Jordan Masserann, Freelance 3D Artist


