Behind the Scenes: Paddington Girl
About
My name is Flauberth de Carvalho, I’m a 41-year-old Brazilian, living in Ireland for the last 3 years. I worked as a graphic designer and an art director for nearly 20 years, where my passion for 3D started. Characters have been in my life since I was a kid watching TV cartoons such as He-man and Dungeons & Dragons. They inspired me to draw them myself. But that passion was put on hold when at home we got our first personal computer in 1989. After that, I ended up working in graphic design. CG showed up in my life in 2012 when I started using the 3D software Modo to help me in my work as Art Director. And then I figured out how powerful the 3D tools were and an old passion came back stronger than ever, giving new life to characters that I previously only imagined in 2D. So in 2016, I decided to dedicate myself completely to learning and becoming a 3D character artist. In my spare time, I have been working to improve my 3D art skills. Most of my knowledge comes from self-teaching, but I had great opportunities in Brazil to learn with talented artists such as Rafa Souza and Bruno Camara.
[sponsor id=”qarnot”]
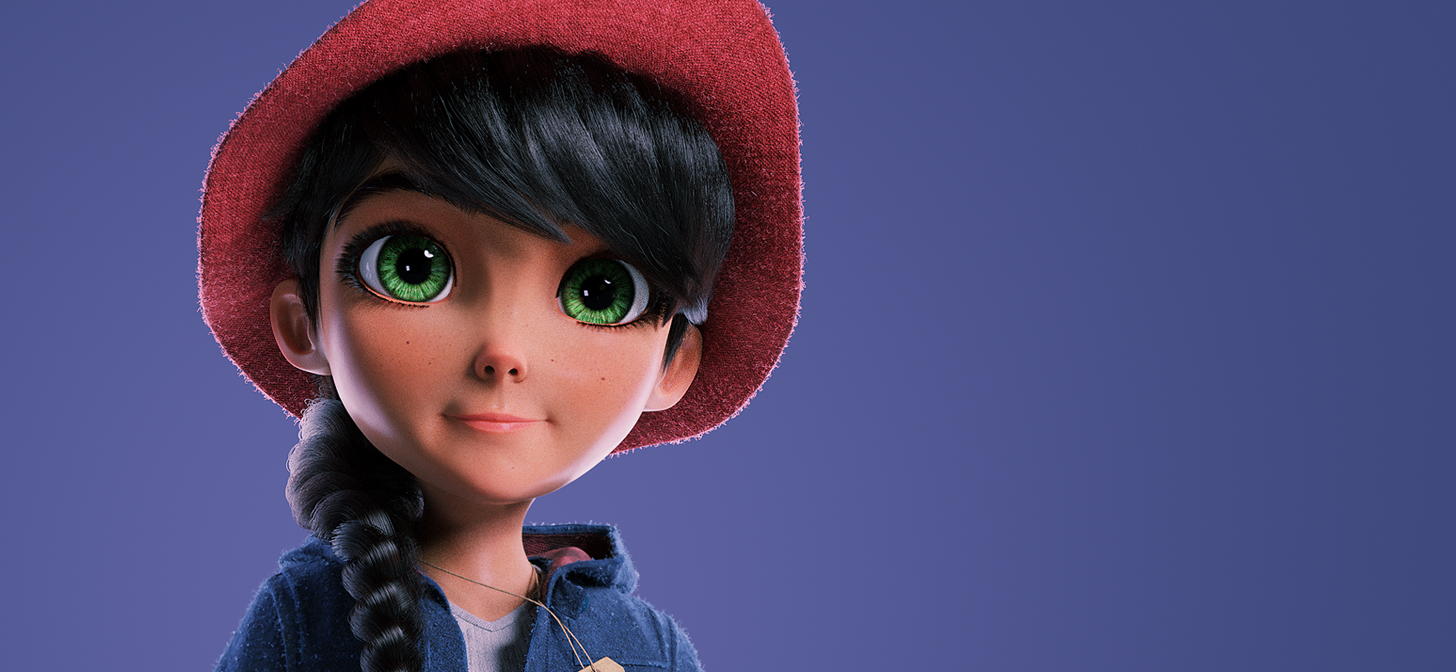
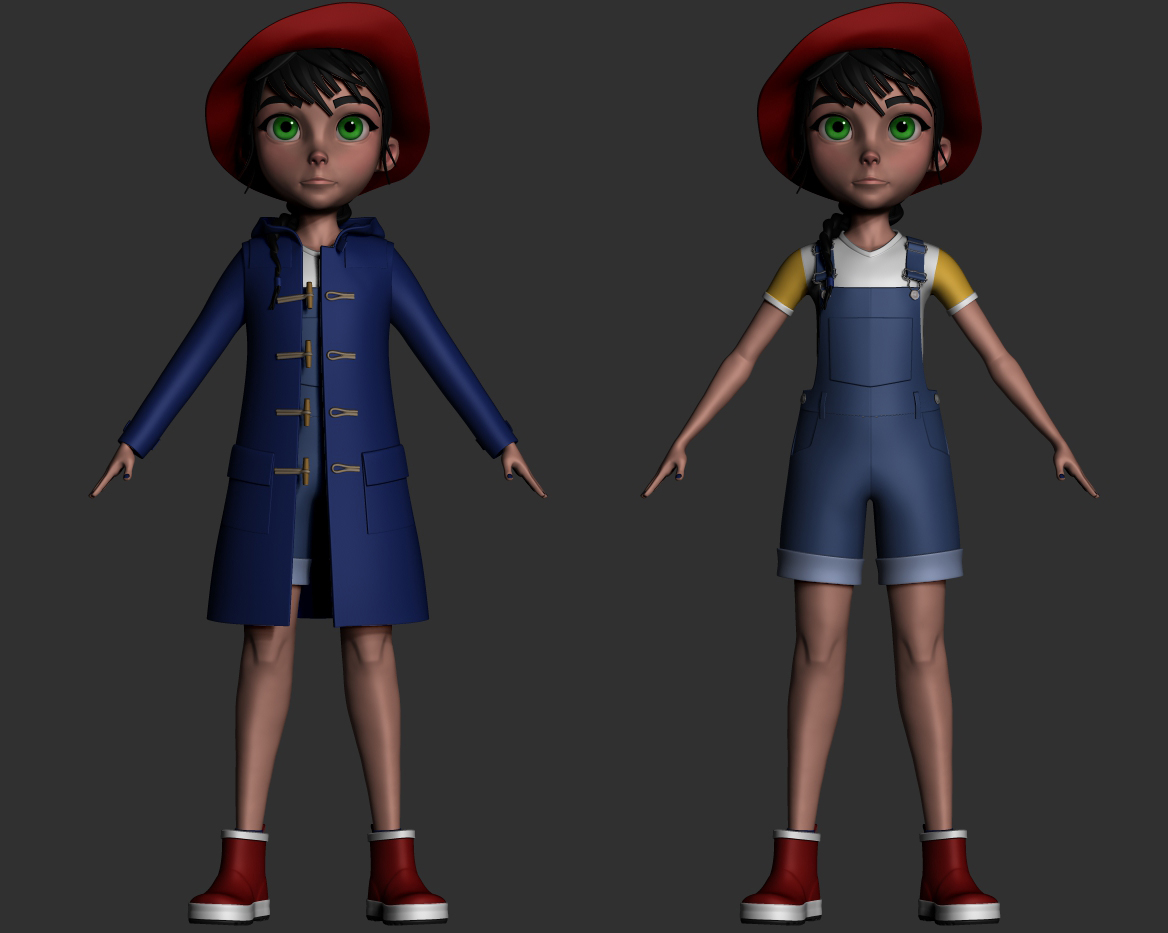
Paddington Girl
At the moment I’m exploring my passion for comics, stylized illustration, and Japanese animations to find my own approach. The idea for this specific piece was my wife. We love Paddington Bear, so I decided to create her as a little girl playing dress-up.
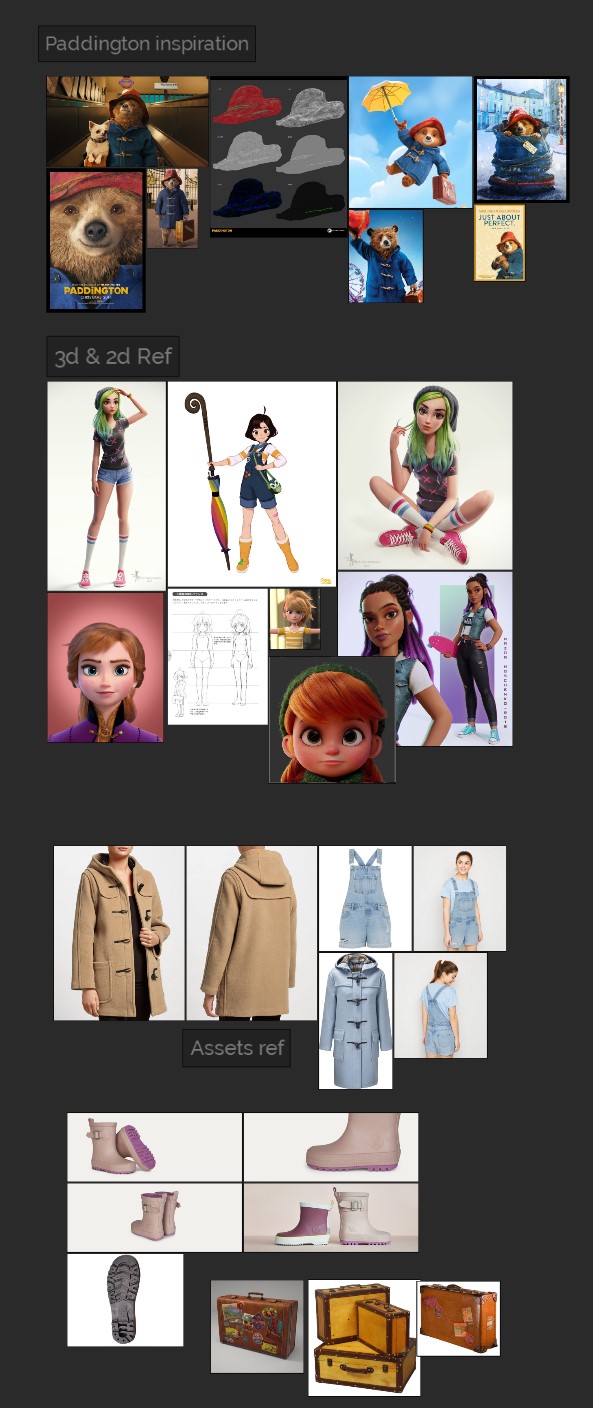
References
I gathered a few references that could help me to achieve what I had in mind for this project. The concept was super clear in my mind at the beginning, but I was open to seeing where the process could take me. I had the freedom to try out and change what I thought could give me better results.
Tools
When modelling this character I used mainly ZBrush and Blender 2.9. Apart from the Wellington boots and the luggage bag done in Blender, the rest was done in ZBrush. Retopology and UV was done in Maya (because I’m learning to add in my pipeline) and Blender. All the texturing was done in Substance Painter. Shaders, hair, and final render were done in Blender.
My current hardware is: Core I7-6800K, 64 GB RAM, GeForce GTX 980 Ti 6GB, running Windows 10. I’ve also got a Huion Kamvas 22 plus and a monitor Beng 25 inch.
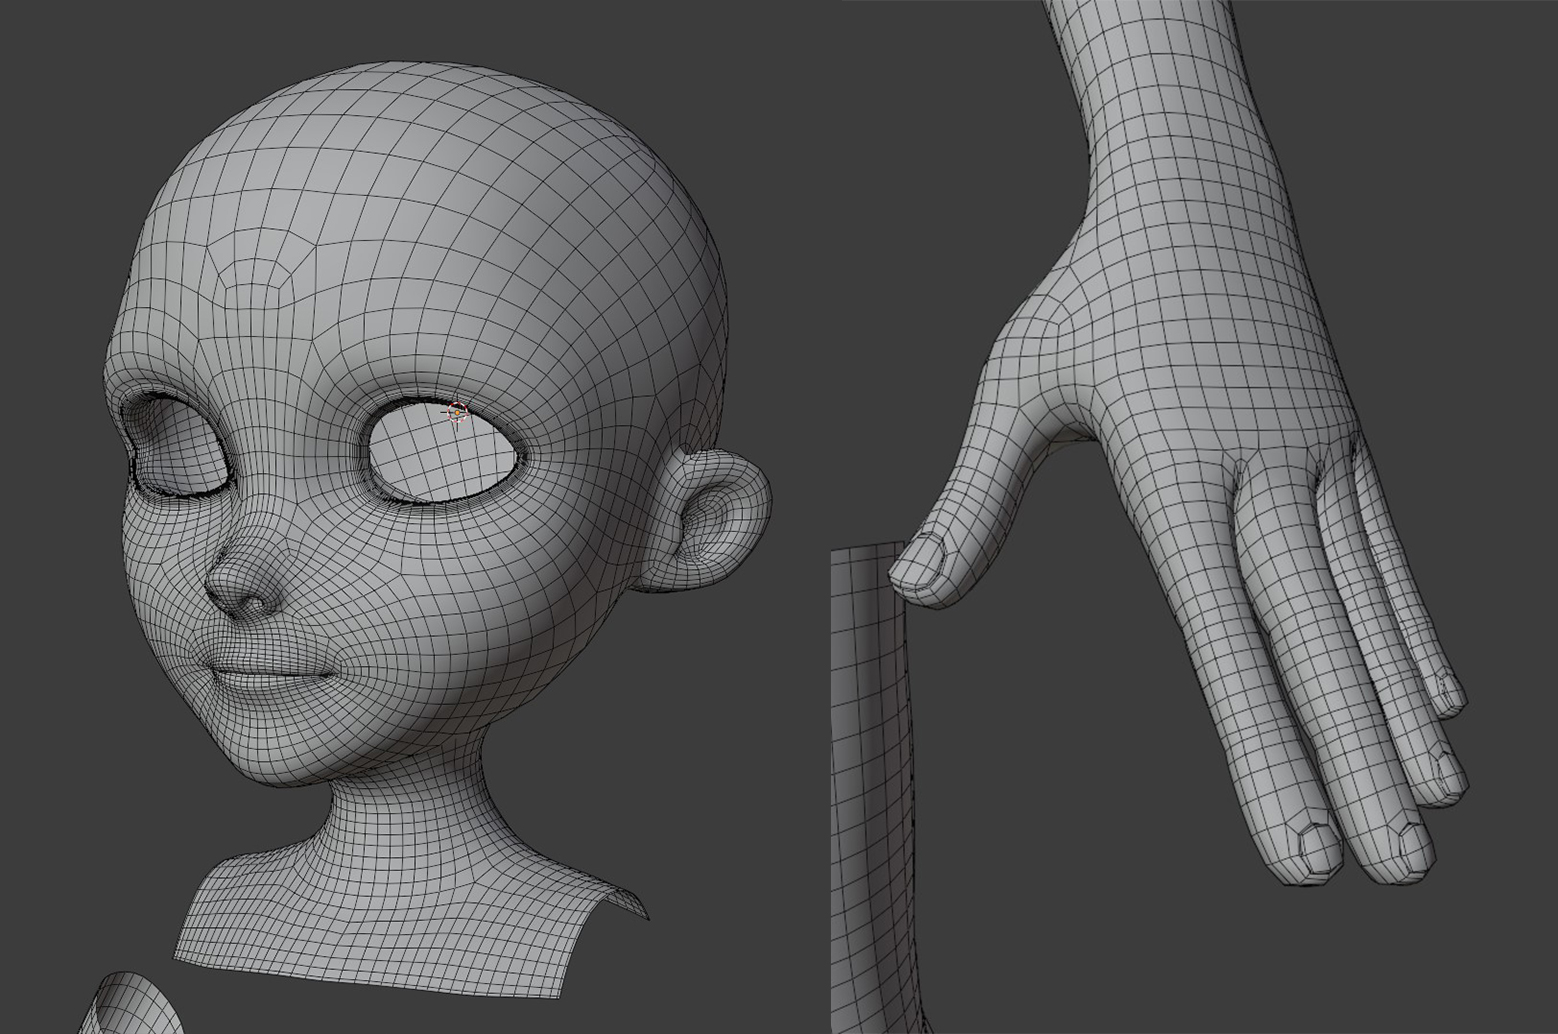
Modelling the body
I usually do the blocking with spheres and cylinders, trying to keep this the most simple with lower polygon counts. Then when I’m happy with the main shapes, I join it all into one dynamesh to start adding more details on it. Even though I knew that most of her body was going to be covered by clothes I think that this part is the most important of all. Even with simple anatomy, it has to be solid.
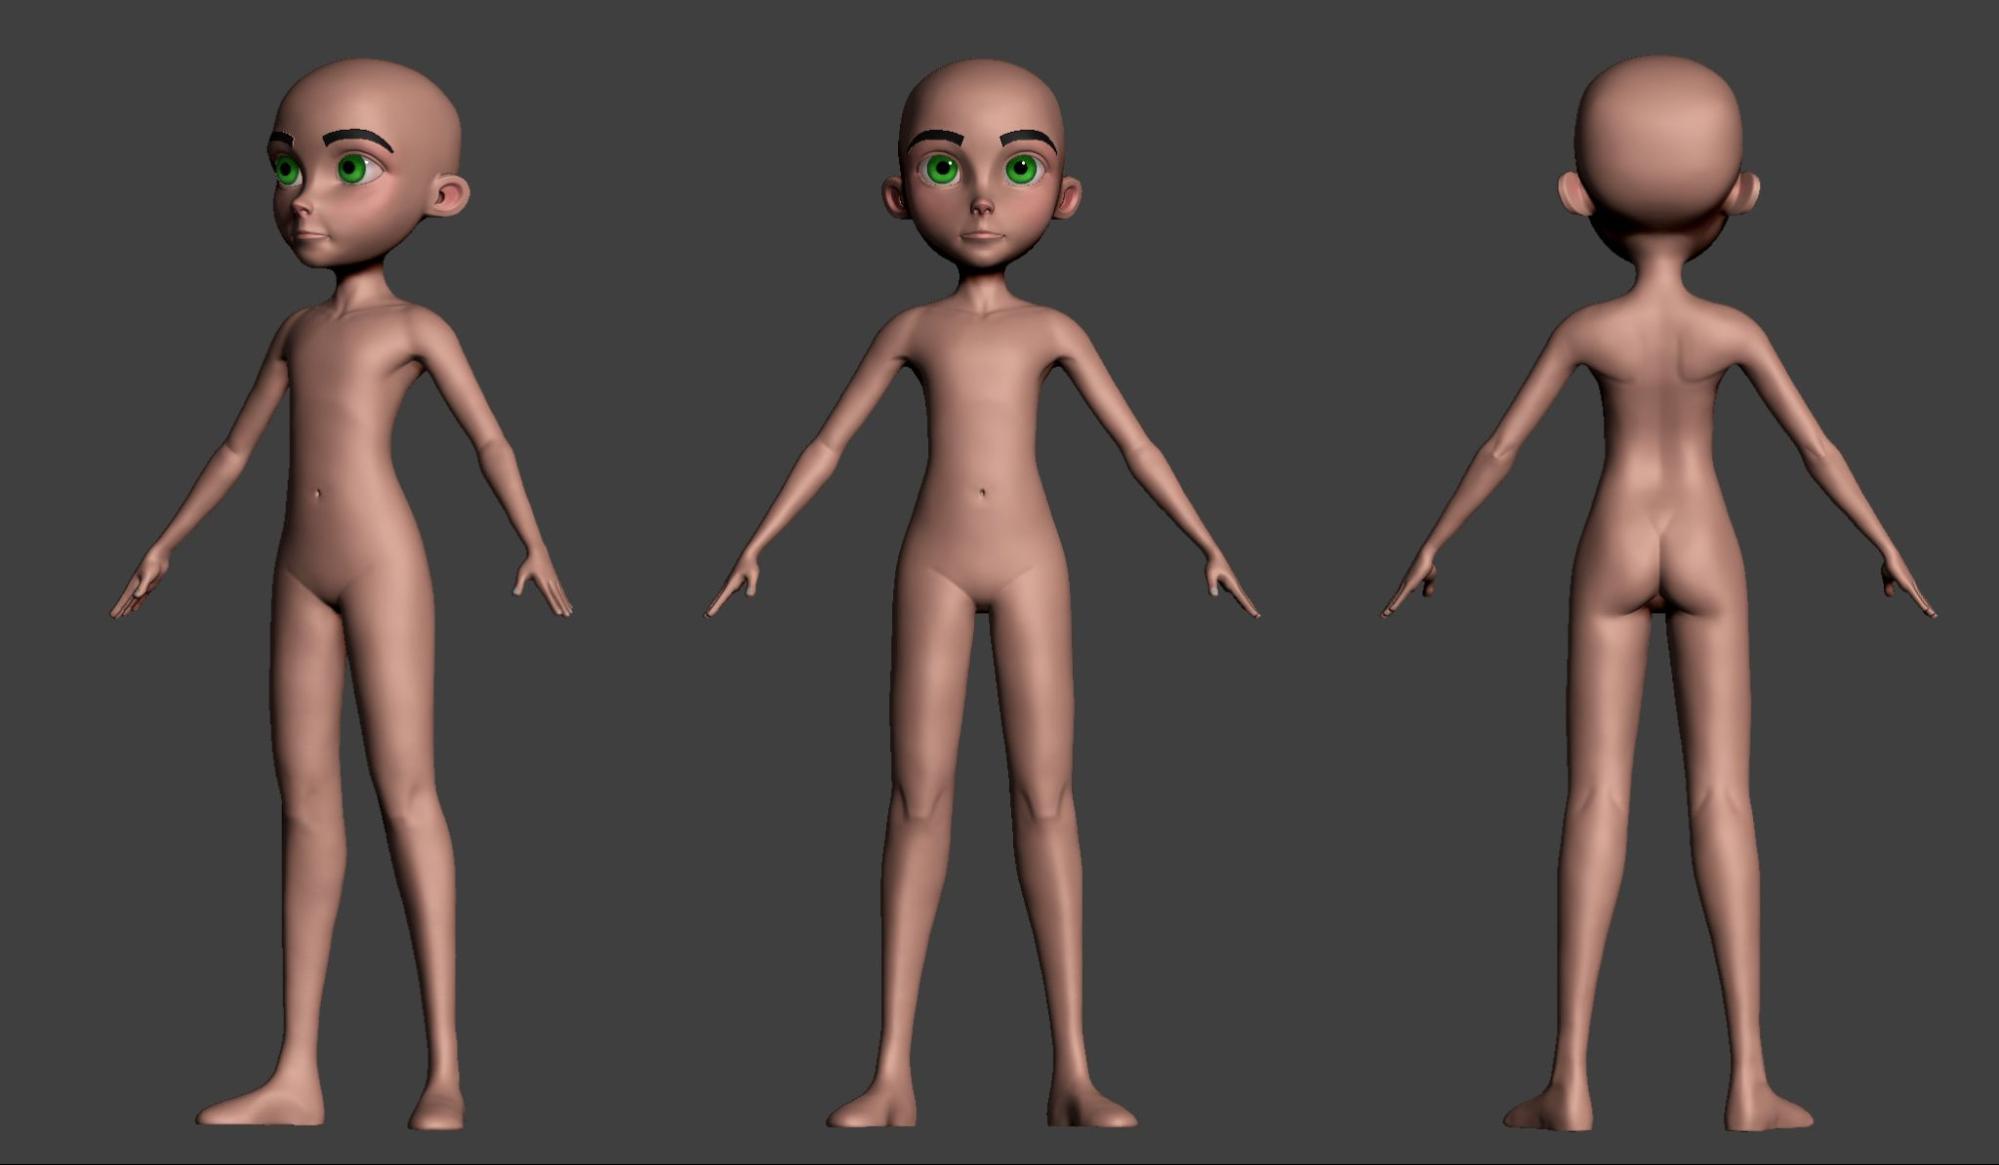
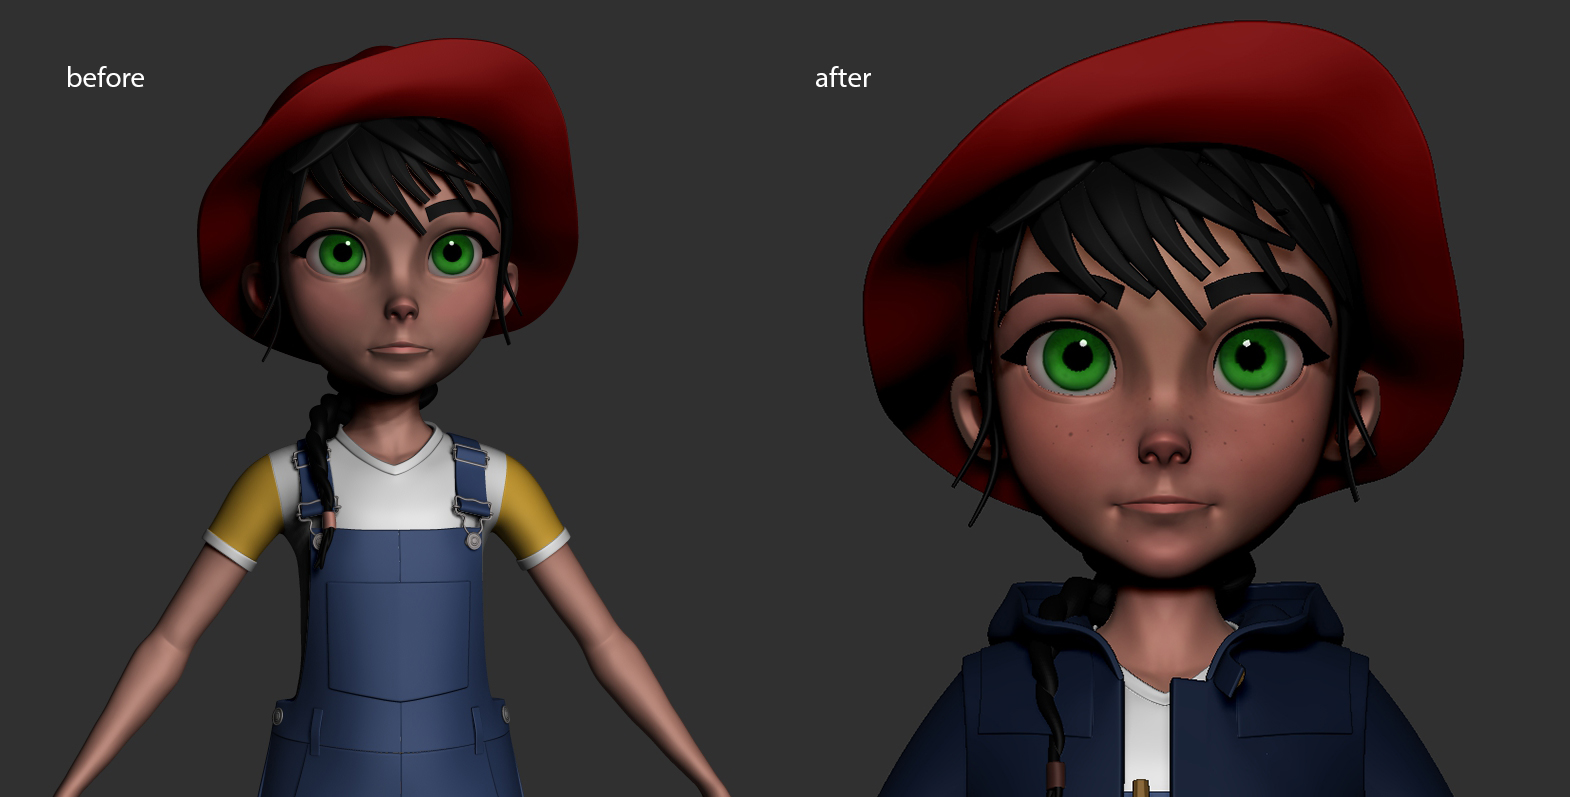
At this stage, I knew I was going to make more changes, specifically in the head shape, but I was happy to proceed to the next stage.
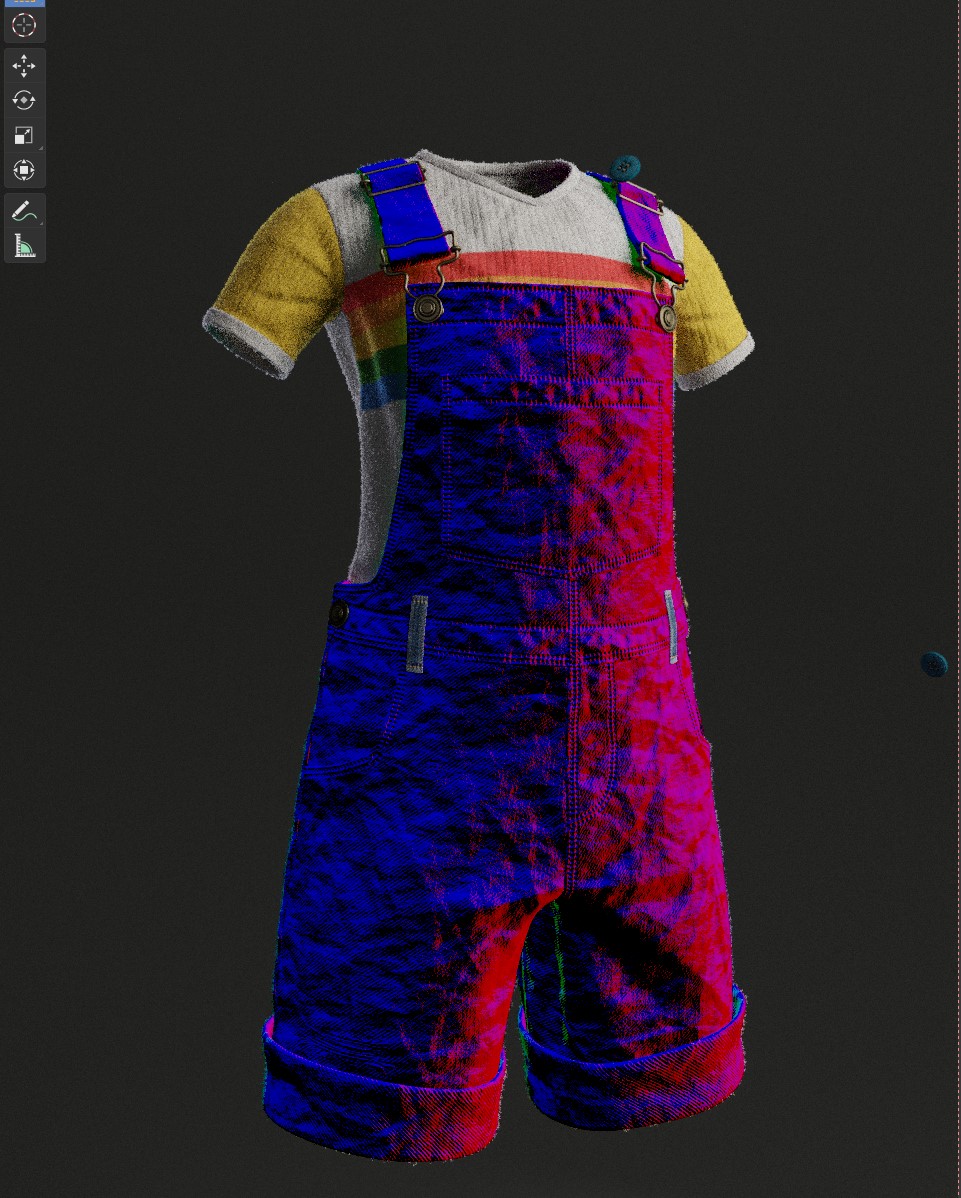
Modelling the clothes
When modelling the clothes, I used a process that I consider really fast to get the results I want and a good topology to work with. On every single piece of clothing I did this process:
- Copy the basemesh;
- ZRemesher the first time;
- Use the slice brushes to create polygroups;
- Crease in between all the desired polygroups to keep the loops (in some cases it isn’t necessary);
- ZRemesher a second time with the options on: keep groups, detect edges, keep creases, smooth groups at (0), deleting polygons that you don’t need to. (Repeat this process however many times you need to achieve the desired shape, loops and polygon count);
- Use ZModeler to add detail.
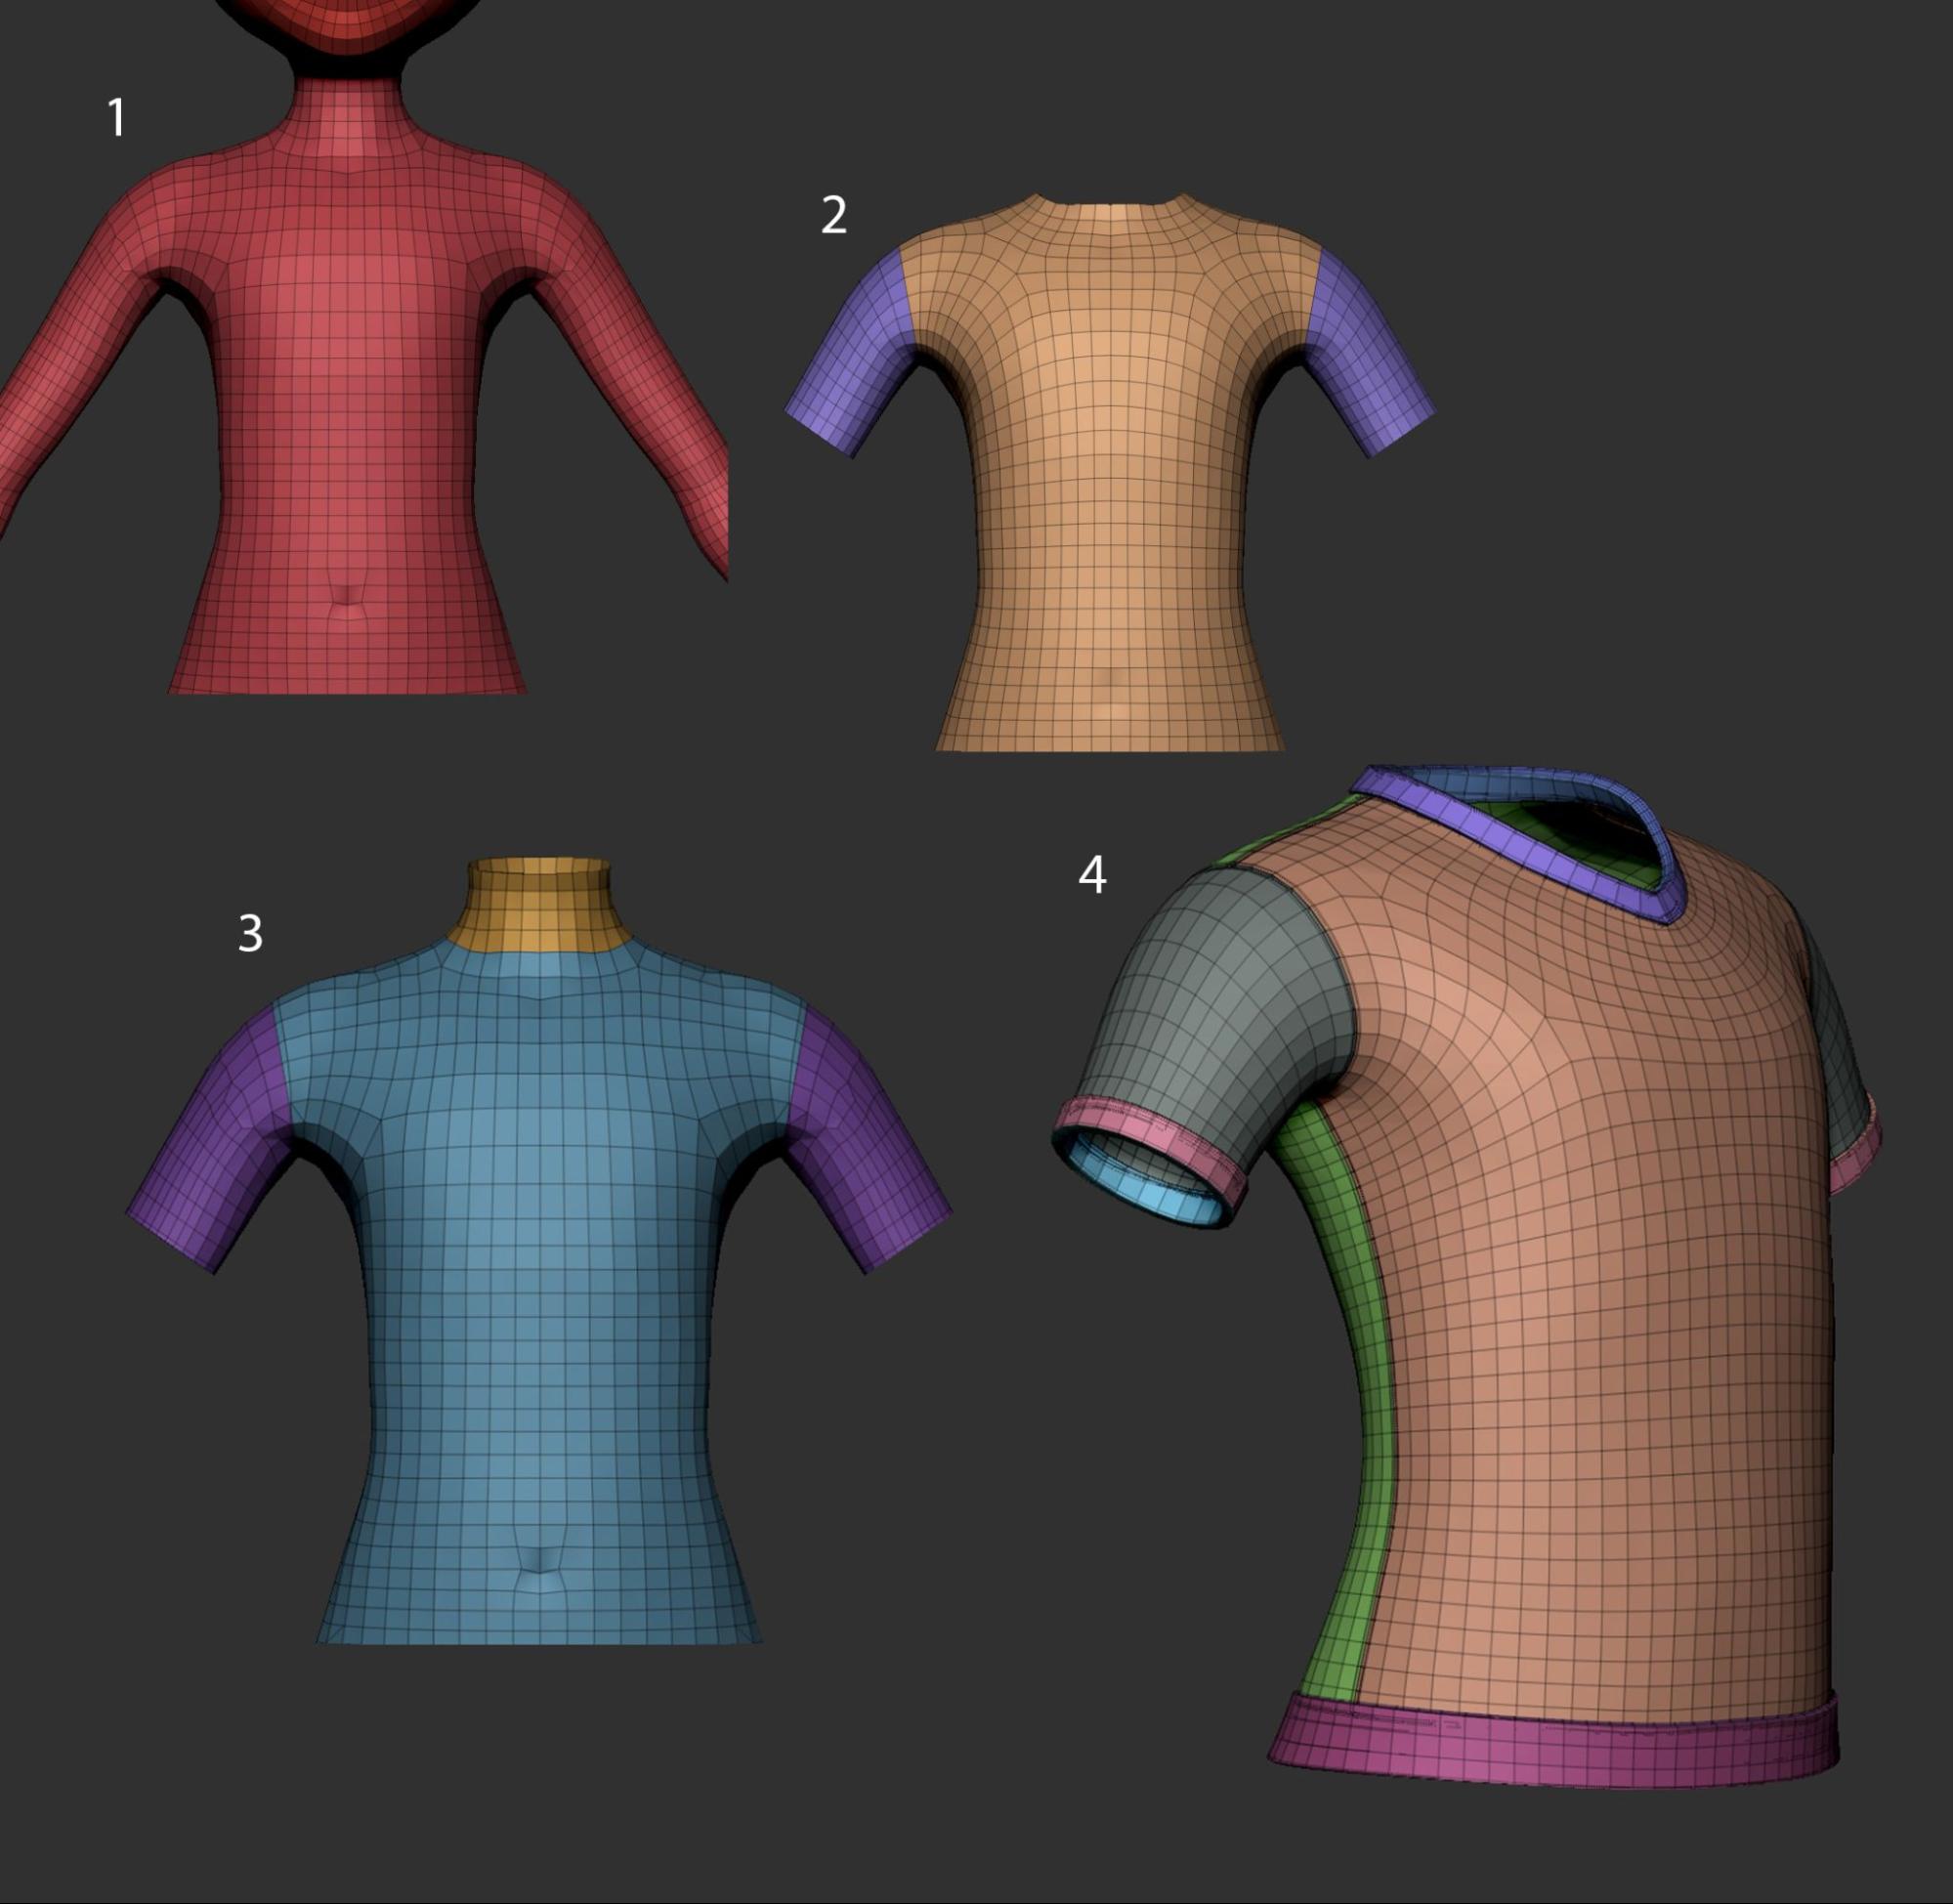
The result of this process:
After this stage, I came back to her head to do some tweaks that I thought would improve her look.
Retopology and UV mapping
I didn’t have to do retopology on a lot of assets because my process of modelling as explained above gave me a good topology to work on. My only work at this stage was with the body. For the body retopology, I used Maya. For UV mapping I used Blender, but I used Maya to organize UDIMs as I felt a bit uncomfortable managing it in Blender. In Blender, I used the Texel Density Checker add-on to rescale my UVs and get a better resolution on my textures.
Detailing
I like to work a bit on the details that I won’t get to in the next stage of texturing. Mostly this stage focuses on consistency in details such as volume and folds in clothing and fabrics.

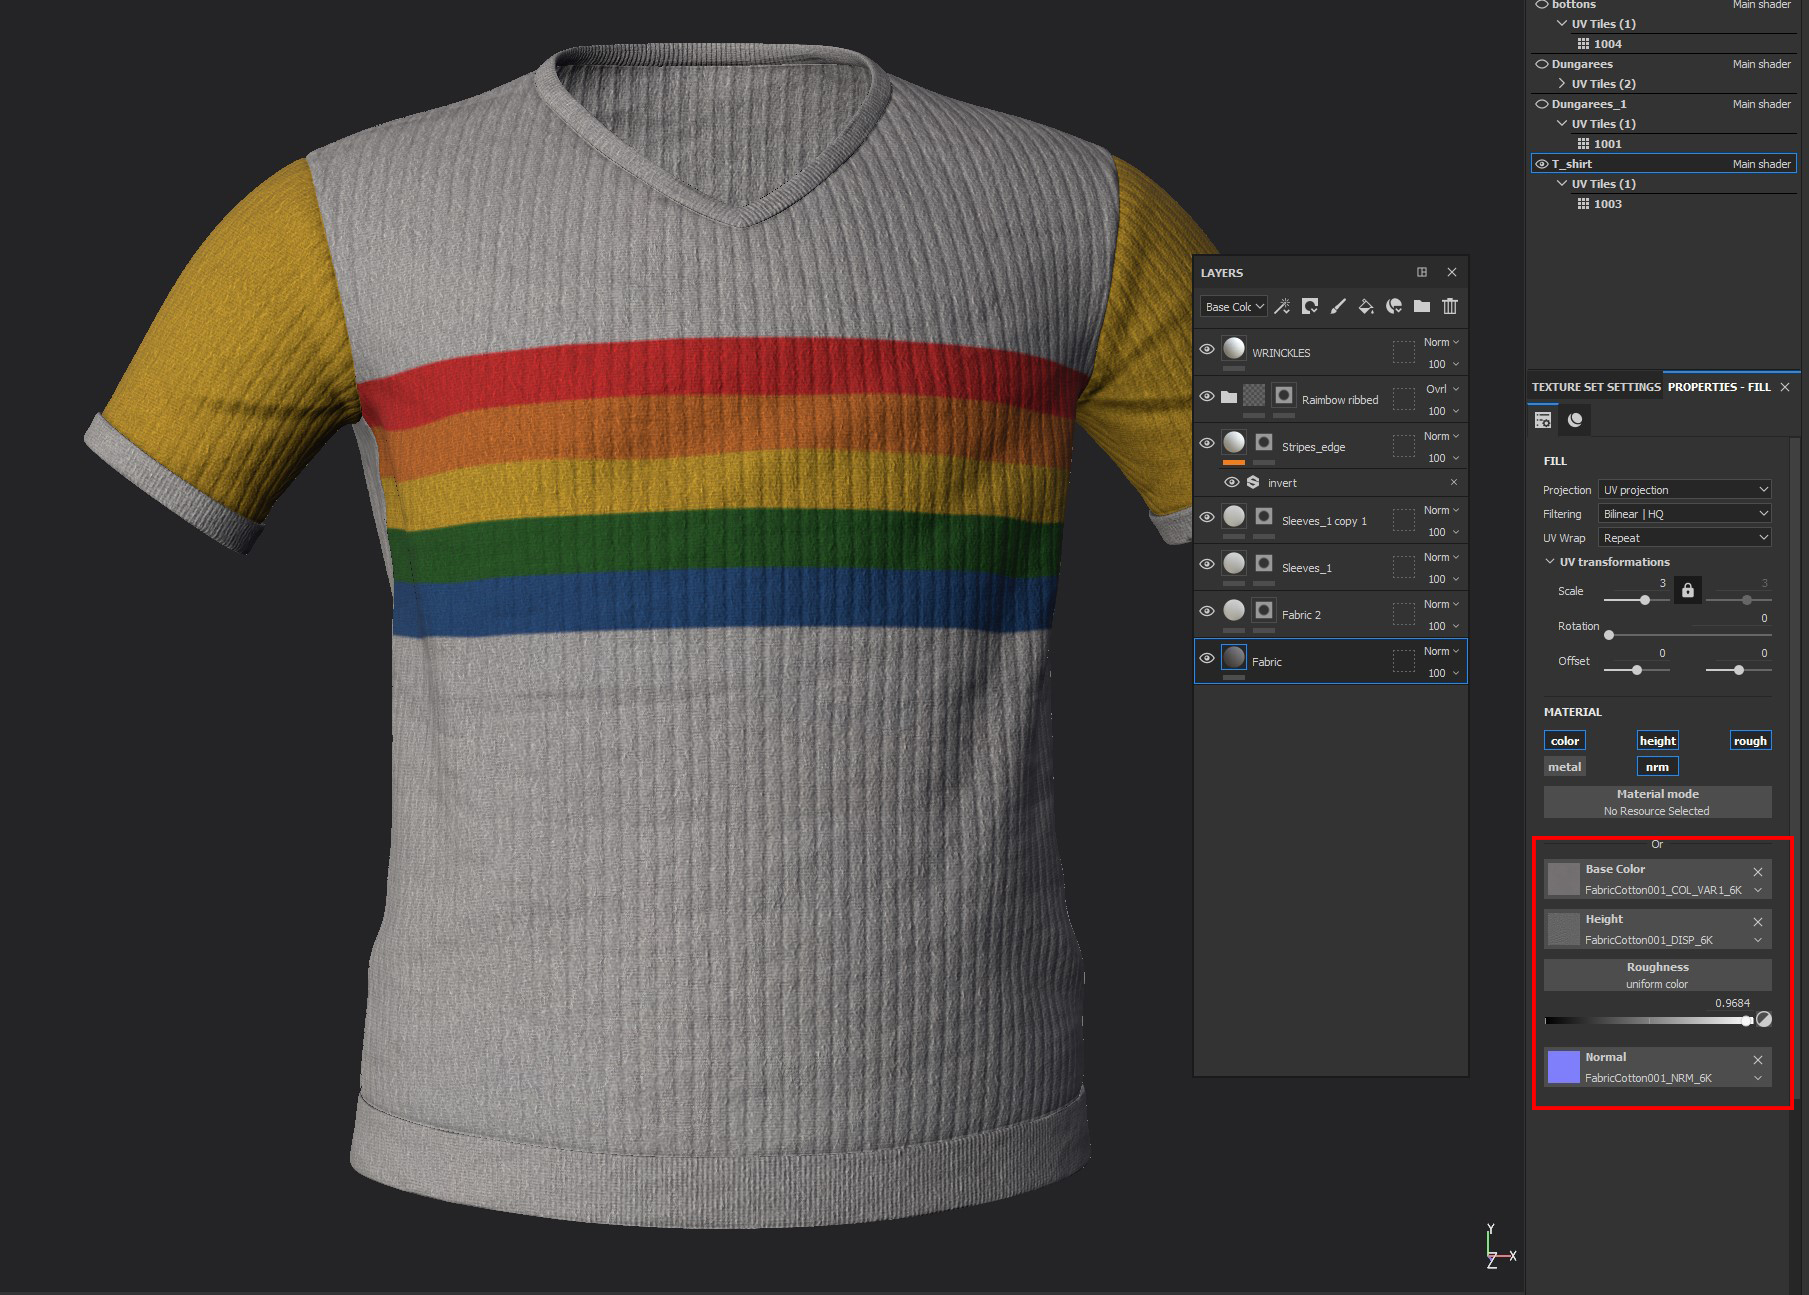
Texturing
All the textures were done in Substance Painter. I like to separate the character into small pieces to work on it in Substance Painter. It is just a personal preference. I exported an FBX file from Blender with the parts I want to work on. With high and low poly files, I did the baking in Substance Painter and then I started the texturing process.
I like to add two layers on top of all other layers in my textures. One layer is my normal map and the other is my ambient occlusion map (this one in Overlay 30%). These maps bring forward the details that I worked on in the detailing stage.

I generally create my materials from scratch, bringing my own tiled textures, such as color, normal map, and height, to Substance Painter, even though Substance Painter has a bunch of materials ready to use. In some cases, I use the Substance material as a base for my own material. A good website to get great tiled textures is Poliigon—I used a few of its textures on my clothes.
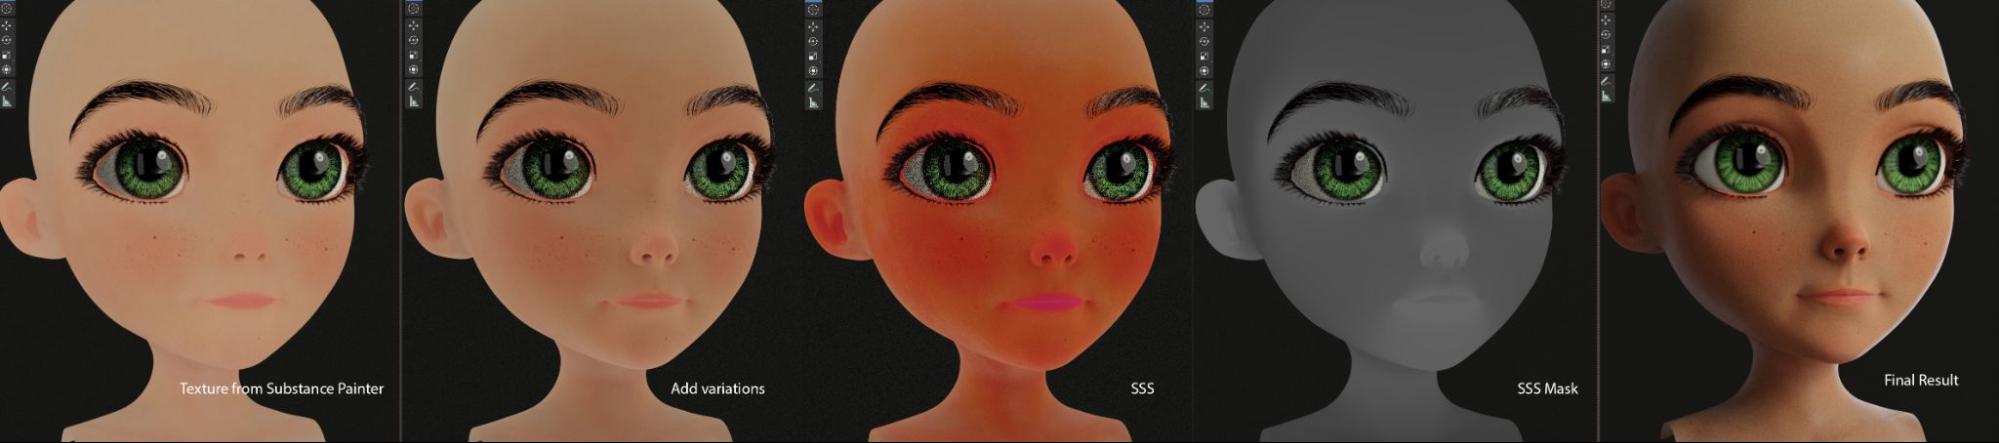
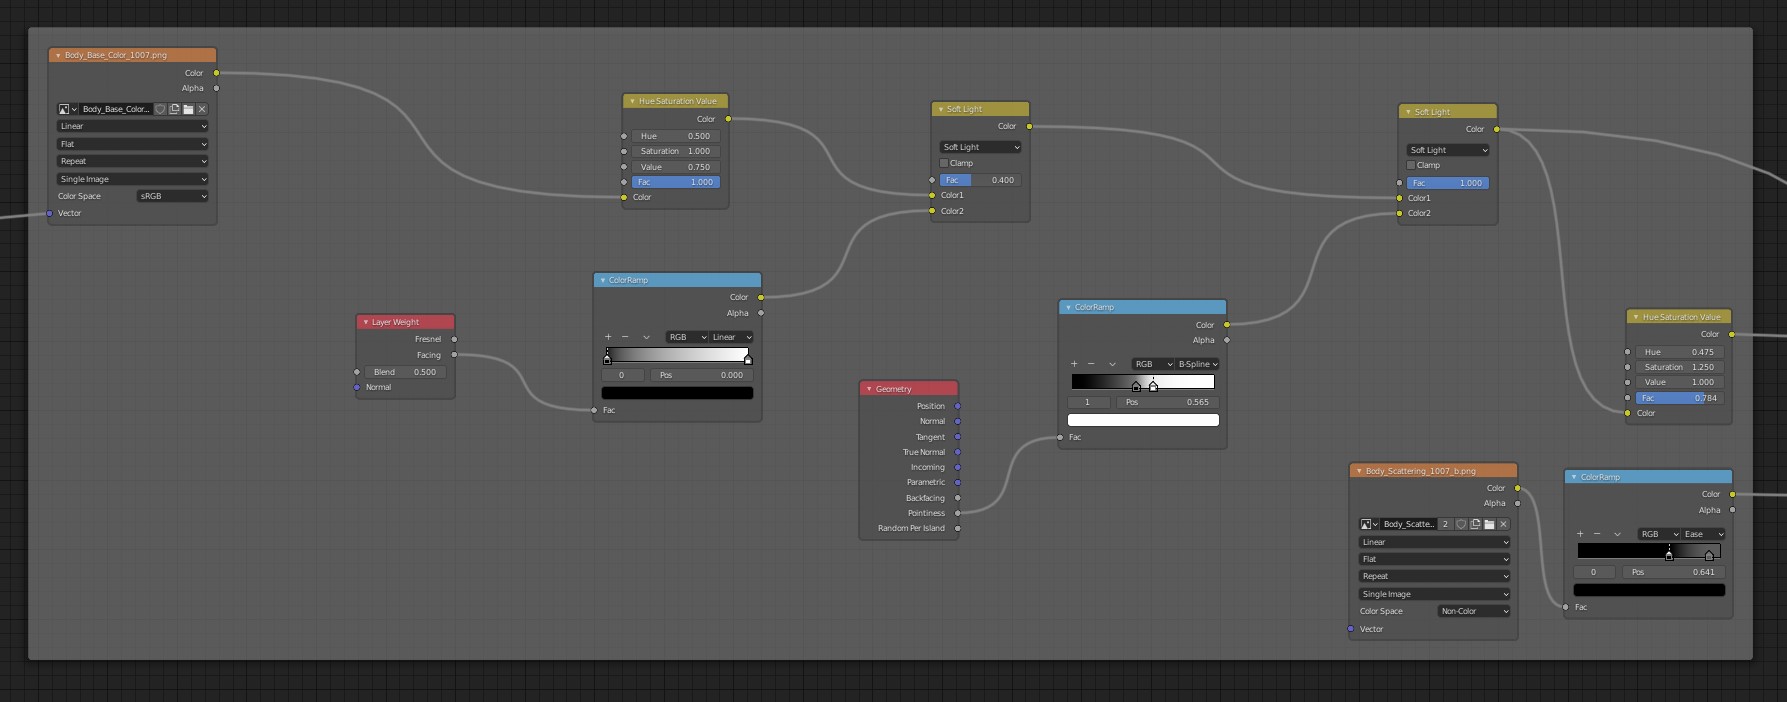
Shading
Back in Blender, I started doing the shaders. I decided to use Cycles as my Render Engine and try out the option OptiX to GeForce graphic cards. Unfortunately, the project was too heavy for my graphic card to add displacement maps. Instead, I added a bump map to my normal map to get more details of shadows and volume and break the lights.
Specifically for clothes, I use the Sheen option on the Principal BSDF at 1 and Sheen Tint at 0.75. It gives me more spread of the light on the surface, mimicking fabric in real life.

As in the texture stage, I worked to achieve the result I wanted for my textures. At this stage I didn’t need to do any changes, that was pretty straightforward. Although, on the head, I added a few extra nodes to get a better result.
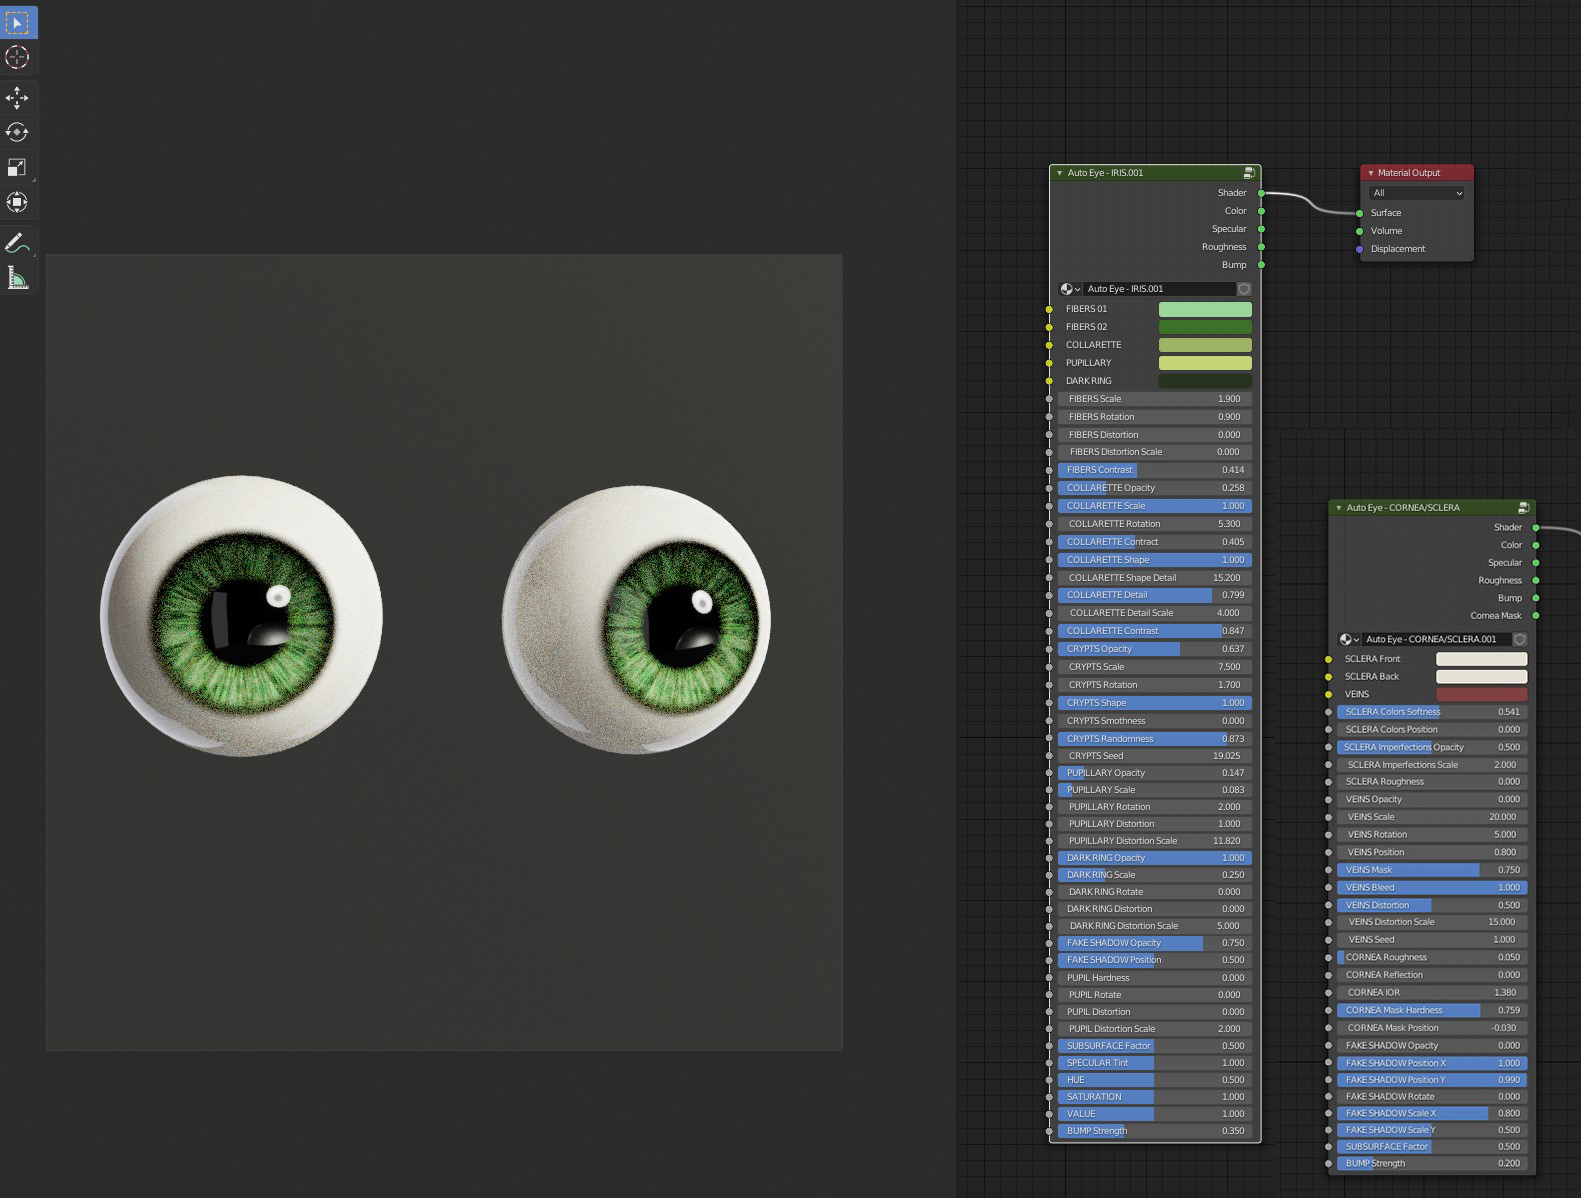
For the eyebrows, I used the Eyebrow Pack from Nazar Noschenko. And for the eyes, I used Lucas Falcao’s Add-on, Auto Eye. It’s so far my favourite add-on for Blender because it is fully customizable and gives an easy way to create a wide variety of styles.
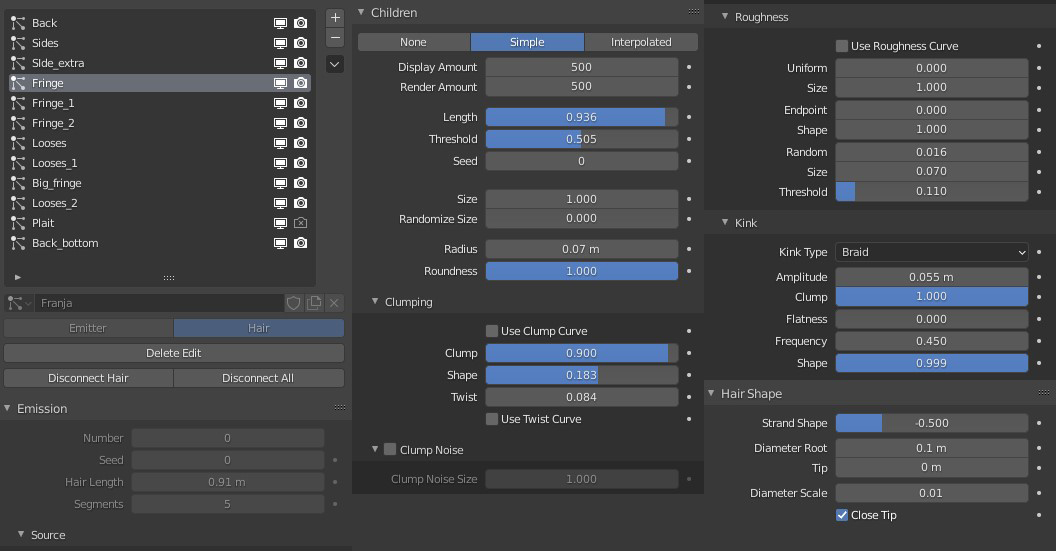
Hair
I decided to place the hair strand-by-strand in the Simple Mode of the particle system because I wanted a stylized effect such as in Japanese animation. But in the end, I realized that I could get a better result using Interpolated Mode, specifically getting a wider variety of clumps with the virtual parents. I was running out of time though, specifically with painting weight maps to control the influence of the parent guides and its children. But I’m really happy with the result.

The set up of my hair is below:
At the beginning, the plait was my big challenge, but it ended up being one of the most simple parts of the whole project. I used the Addon HairNet that creates a particle system from curves. What I did was create 3 curves to be my plait, and I used a curve to control the plait and place it where I wanted it. In the process, the most important thing is to keep the first vertex of each of the curves where you want the hair to start. It will give you the right control of the parameters in the particle system.

Then I made minor changes to get a better volume for the hair.
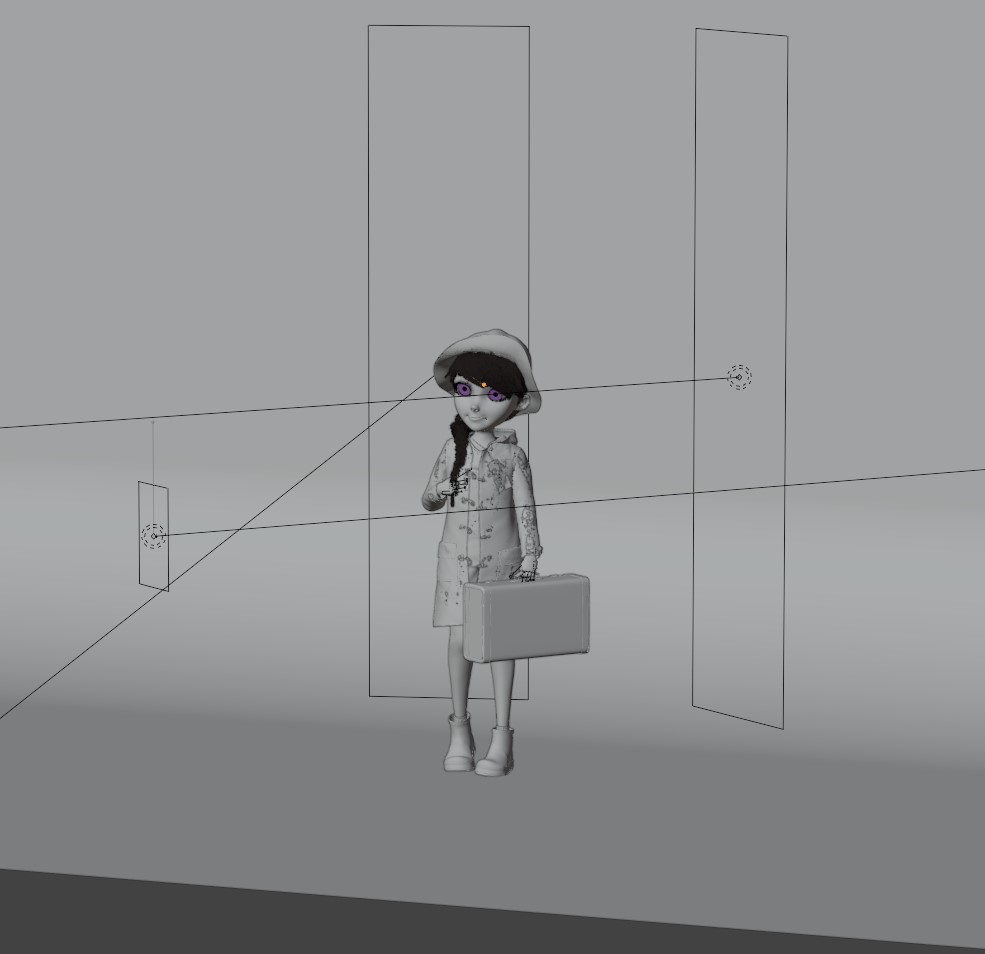
Posing and lighting
After all this was done, I used Rigify in Blender to pose her. Nothing too crazy, just the basics to pose and get the result I wanted. For her facial expression, I decided to use just Shape Keys and Sculpt Mode in Blender.
For the lighting, I used an HDRI (HDRI Haven) for my main light, and 2 area lights to be my back and rim light. And to fill in the shadows made by the HDRI, I added a small area light at the front.
Rendering and post-production
For my final render, I used the basic setup to do it. The Color Management I used was Filmic – Medium Contrast, a render of 4096 x 3000 pixels, 2048 Sampling, and 64 for my Max Bounces. I got a really good result with this setup. Render without post-production below:
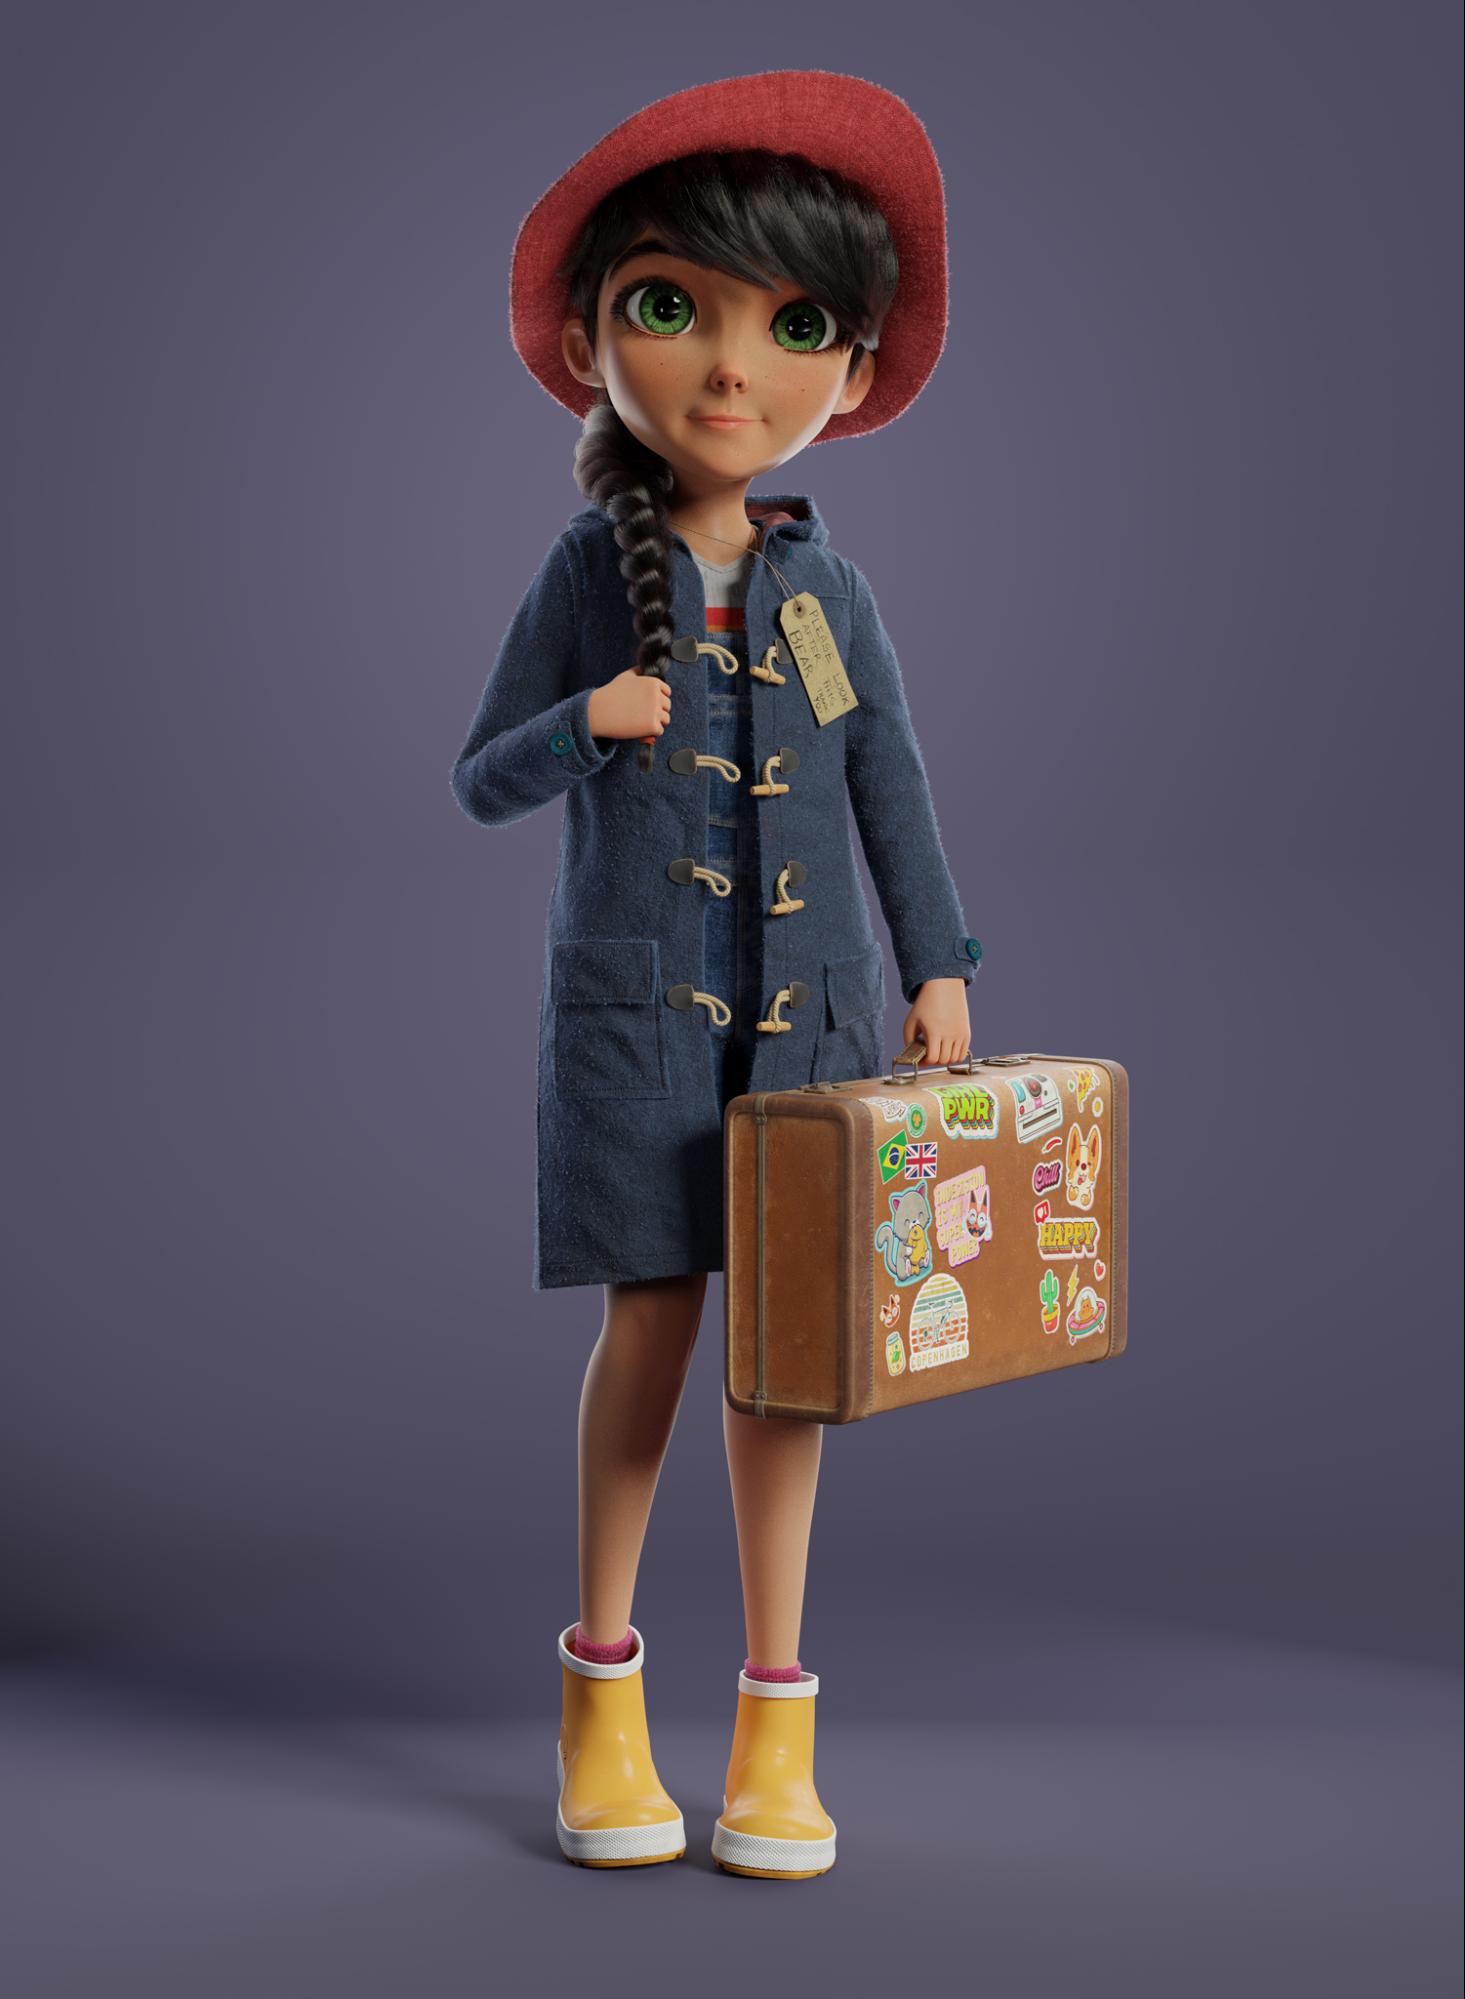
I always aim for a good result without any post-production. This way I don’t need to lose much time trying to get this right in Photoshop, just tweaking lights and color correction.
Final render

About the Author
 Flauberth de Carvalho, 3d Character Artist


