
Hello, my name is Carol Fiorito (@art.fiorito) and I am an art lover. I have been studying 3D since the end of 2018/beginning of 2019. But if you think my first decision was to work with art, you are quite wrong, haha.
I finished high school and decided to go to college, and because I like animals a lot, I thought that going to a veterinary school would be the right choice to take—but that's where the problem lies, it wasn't! Within a few classes, of course, I saw that it was not for me, but I still hadn't made any decision to cancel my registration. I thought that the feeling of it not being right could be due to something I was going through...as I had just left school, I thought it might be because I'm used to one teaching method and in college, as we know, it's another teaching method. Well, some months passed and I saw that becoming a veterinarian was not for me. So I decided to talk to my parents to explain what was happening. It was not easy, but they understood and supported me in looking for a course that I could identify with.
I began looking for courses on the internet—I watched videos of people who did architecture, photography, design, and so on. Finally, I talked to my cousin about what was going on, and he told me he was studying design. So I had a chat with him and realized that the field of design would be the right area for me. I got deeper and deeper into the subject and even decided to study Graphic Design! I studied to be a graphic design technologist but I didn't graduate. I left college because I finally discovered the area of 3D. I studied, modeling in Cinema 4D and, after a while, I made friends with people who worked in the field. One of them, my great friend Gabriel Reis, spoke to me about Blender, and I went on to learn as much as possible about the software. Since then it has been my main software for everything from blocking to the final result!
Of course, I use other software to be able to develop my projects, like Substance Painter and sometimes, when necessary, ZBrush. Well, this is a summary of how I discovered this fantastic world that is working with 3D.
Learn more on qarnot.com.
Inspiration and Motivation
Once I started studying 3D, I began making lots and lots of pieces (which I believe are not necessary to show here, but if you want to see them, just send me a DM). One day I was browsing on ArtStation and discovered the portfolio of artist Charlène Le Scanff and the concept art for The House on the Roc. I thought that recreating it would be a great way to start learning more about other software, such as Substance Painter, but mostly to study more deeply the issue of UDIMS.
References
After choosing the concept, I started looking for more references to be able to develop the piece. I always use PureRef to be able to organize the references, which I almost always separate into topics such as modeling, textures, sculpting (to get references for wood, silhouette breaks, and so on), and lighting. Generally, I always try to find 3D art similar to the concept that I am working on in order to have a good reference and see if something that someone else did or used could be useful to me too!

Modeling
Right after making my reference choices, I started making the initial block to identify the main shapes and proportions of the little house.
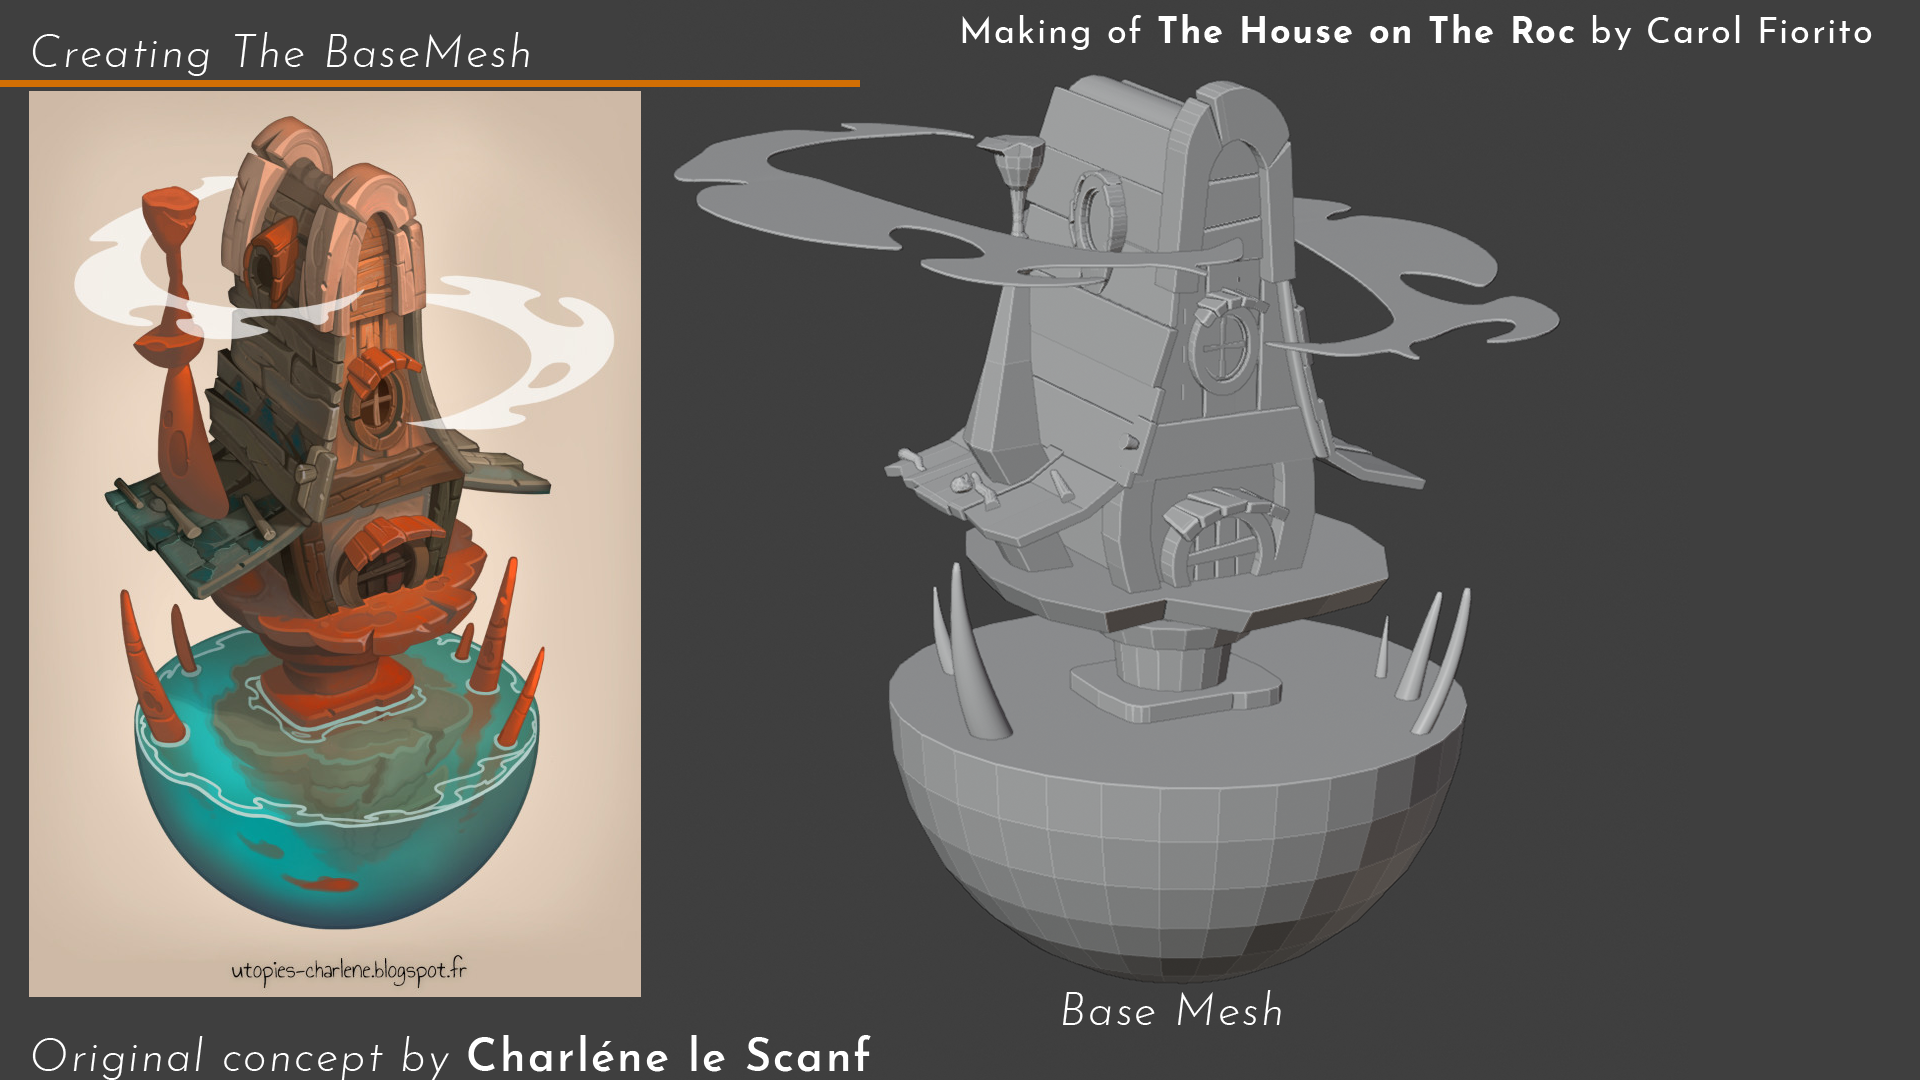
I consider blocking out the identification of shapes and proportions the most important step so that you do not have to rework things later!
I always pay close attention to the original concept, leaving the shapes as close as possible to the original. I don’t particularly like using background images, but this is a very personal preference. I prefer to force my eyes to identify the shapes as much as possible.
UV unwrap
After blocking, I move on to UV unwrapping everything. When that’s done, I go on to sculpt in ZBrush. I duplicate the low-poly mesh and subdivide it in Blender a few times so that when it goes to ZBrush the mesh has a good level of subdivision.


In ZBrush, I use very few brushes to do my details; almost 95% of the time I use the same brush! I’m always looking at my references of wood and stones to make everything look as natural as possible.
Texturing and shading
After sculpting the high-poly, I decimate it a little to be able to take this mesh into Substance Painter, and bake from high to low, getting as many details as possible. Then I start the stage that I personally think is the most fun...the lookdev!
Initially, I add the base colors of each mesh in order to have a better visualization of the model. Then, I take ready-made smart materials from Substance Painter and adapt them to look more stylized. Sometimes I also create my own materials with what I have available within Substance Painter.
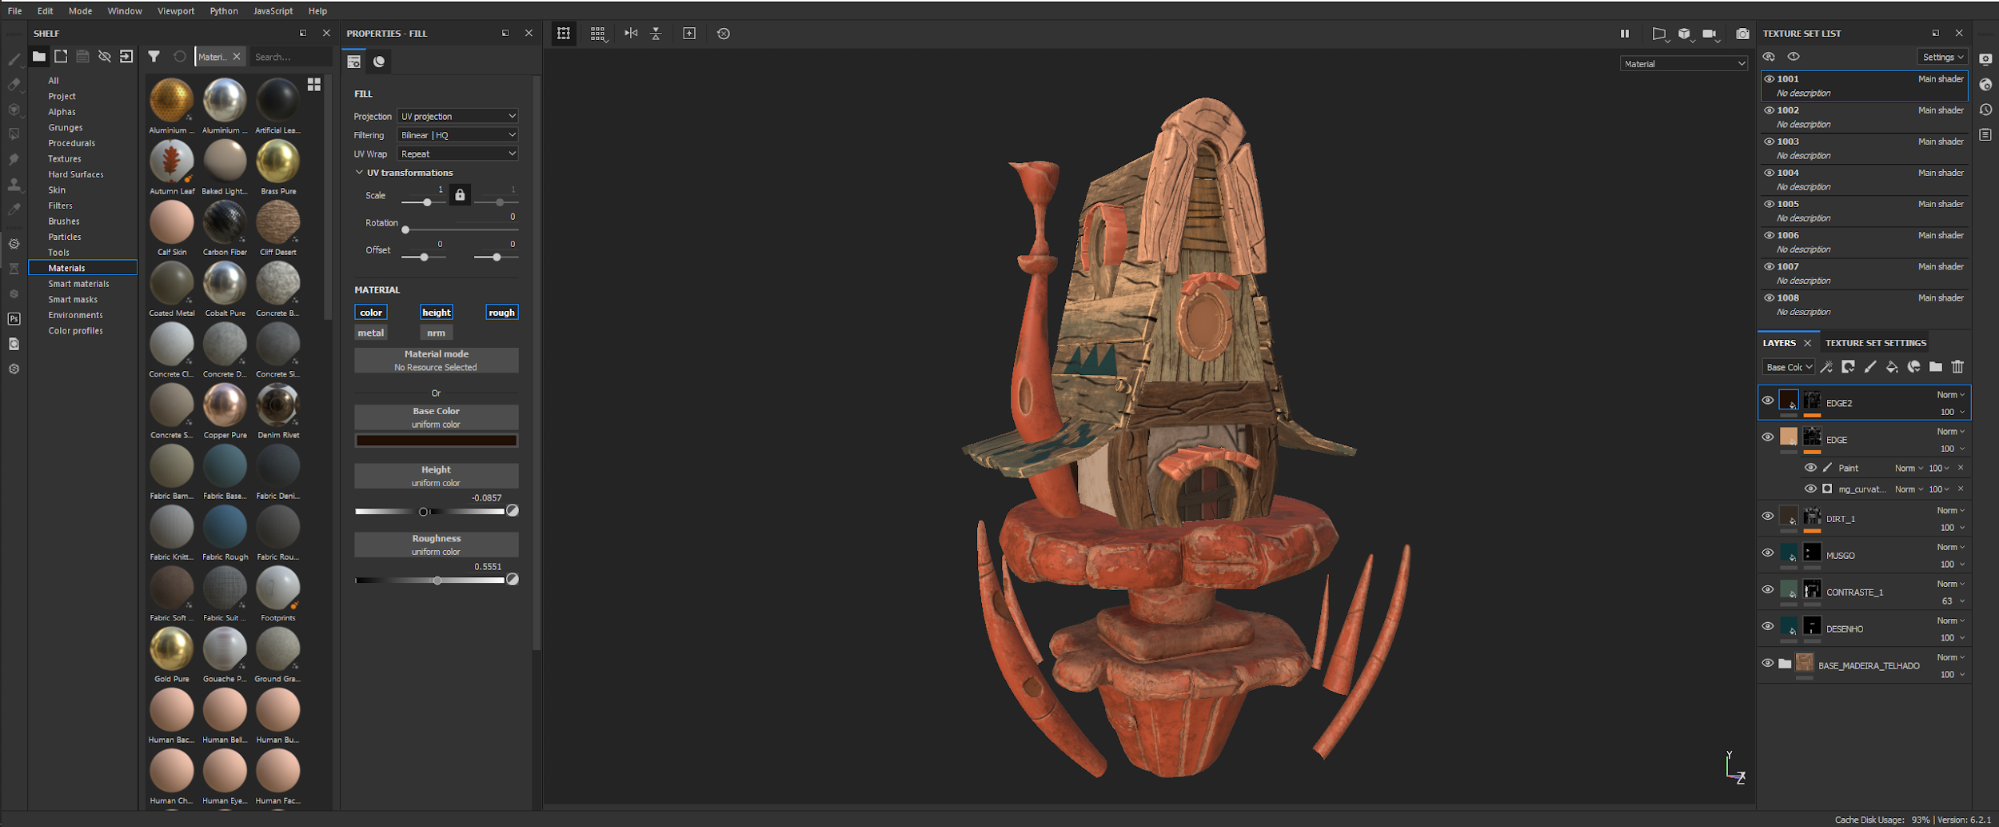
As the idea of this project was to study both Substance Painter and UDIMS, I went deeper and researched a lot to understand how each thing worked. Substance uses a system very similar to the Photoshop layer hierarchy. It wasn't too confusing for me because I had already been messing around with Photoshop a lot, and I got the idea fast.
After creating the textures, I exported everything in 4K and went back into Blender, and started to set my shaders. I adjusted the lights and the scene until I came up with something that I was satisfied with.

Post-processing
After everything was set correctly, the lighting was done, and I was satisfied with the position of the camera and shaders, I simply pressed F12 and waited for the render to finish. Once the render was done, I could carry out my post-production in Affinity Photo, and publish the project in my portfolio.
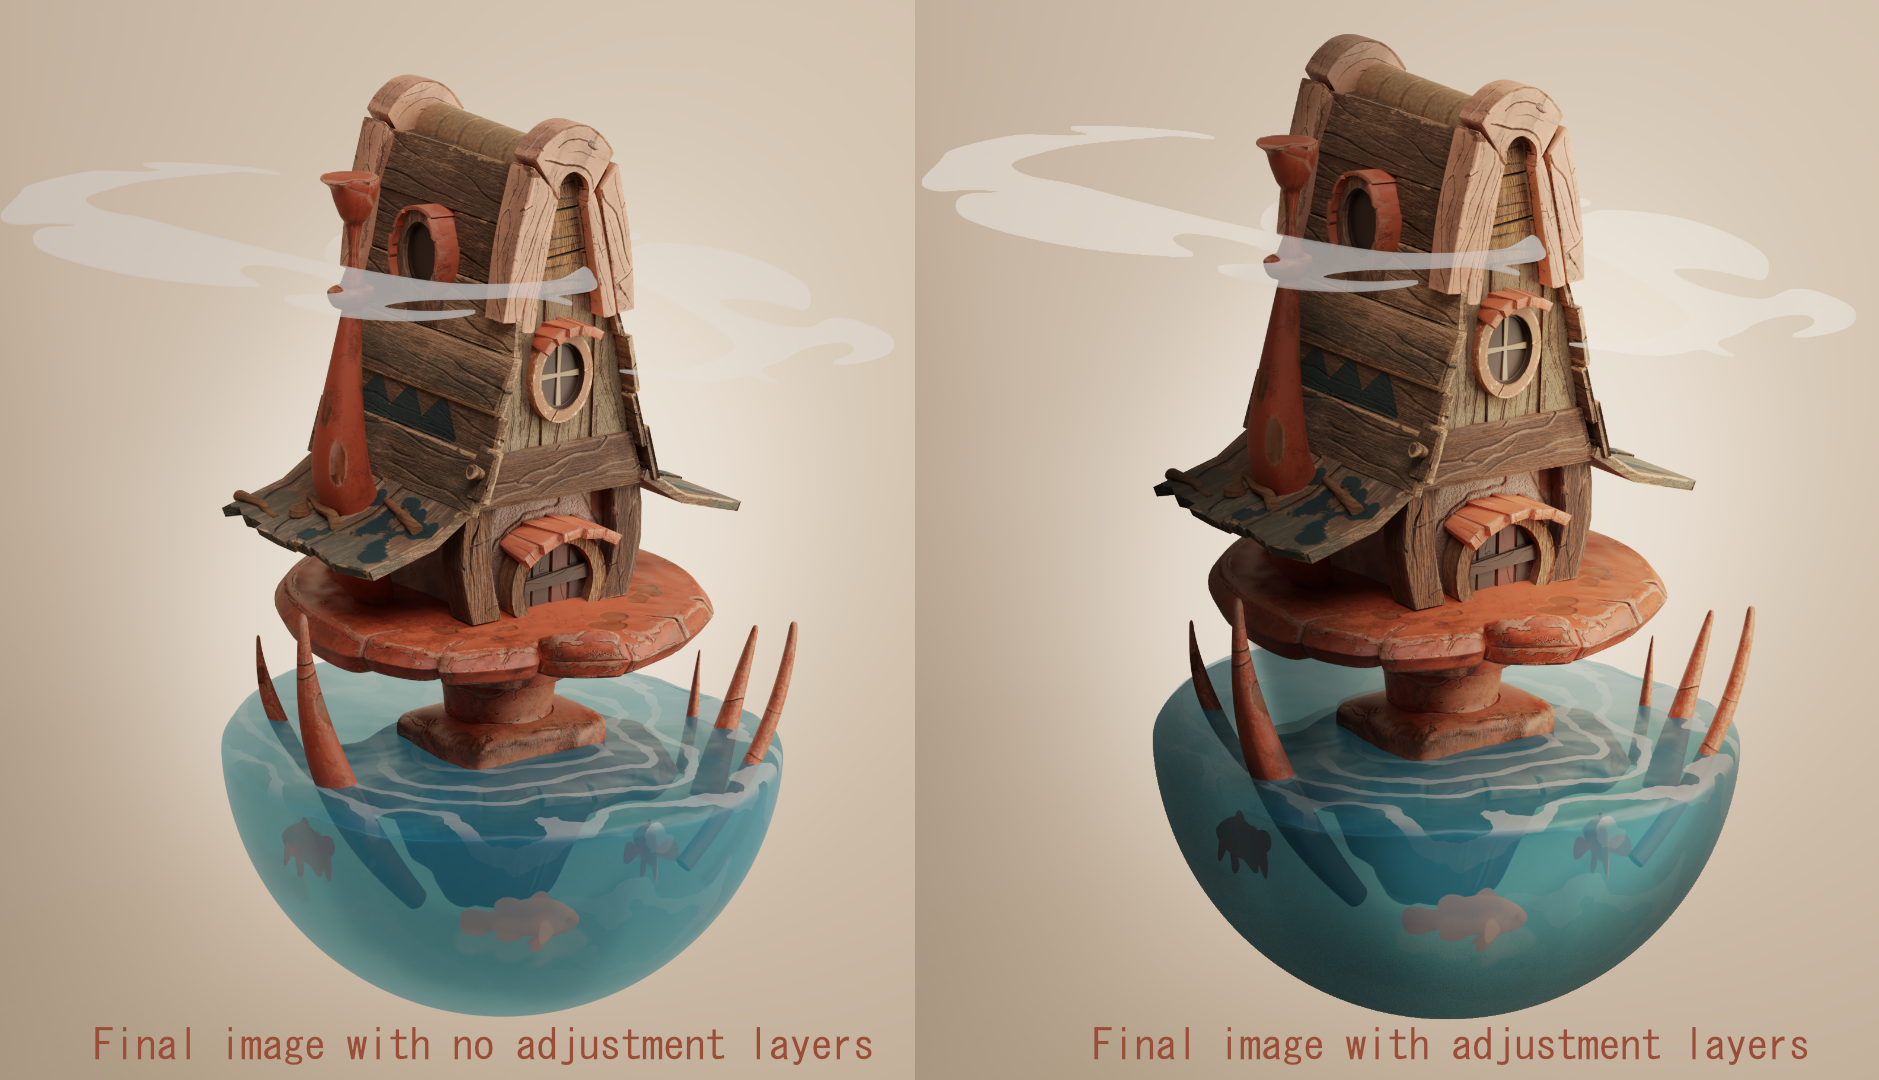
Previously I didn't believe it was necessary to do post-production on projects, but seeing how it helps the project to become more alive, and much more beautiful than the initial render result, I now always, in all my projects, do post-production. Of course, I try to get my render as perfect as possible in Blender so that I only have to improve one or two small things in post-production.

And the end result was like this! I hope you enjoyed it and if you have any questions you can message me on Instagram or my ArtStation. :) :)
Thank you and see you next time! * - *
About the Author
 Carol Fiorito, 3D artist specializing in environments and lookdev
1 Comment
Wow, what an incredible article, well-defined steps, very enlightening