

Hello, my name is Kevin House. I am an illustrator and designer living in Victoria, BC on beautiful Vancouver Island. Thanks to BlenderNation for the request to share a bit of a Behind the Scenes for this piece.
My background is primarily in Graphic Design. I worked for a few years in design studios in Vancouver and Victoria before starting my freelance illustration business in 2006. Since then my focus has been on logo and illustration work exclusively.
Around 10 years ago I started to slowly introduce 3D as a complement to my 2D illustration work as I got more comfortable with Blender and now it accounts for roughly half of my illustration work. I’d say there is an aspect of my 3D work that is similar in look and feel to the 2D work.

Learn more on qarnot.com.
As an illustrator, one of the huge bonuses of working in 3D coming from a 2D background, in my opinion, is the flexibility 3D offers. The ability to make client changes without having to completely recreate everything is a big timesaver—plus, being able to tumble around the view, rotate objects, and work with lighting to create the right atmosphere or mood allows for a different level of creative options. Depicting highlight and shadow is a time-consuming part of 2D work with not a lot of room for flexibility. With 3D, shading and lighting almost happen automatically, allowing me to spend more time creating the scene, experimenting with options, or even exploring alternate compositions. I really enjoy getting lost in the modeling stage, building all of the bits and pieces, creating little worlds.


I am completely self-taught when it comes to 3D. I dabbled a bit with Cinema 4D years ago but eventually went with Blender for a variety of reasons, but mostly because of the incredible community and resources out there for learning and connecting with others. I picked up most of my Blender knowledge from YouTube and websites like Blender Artists and BlenderNation.
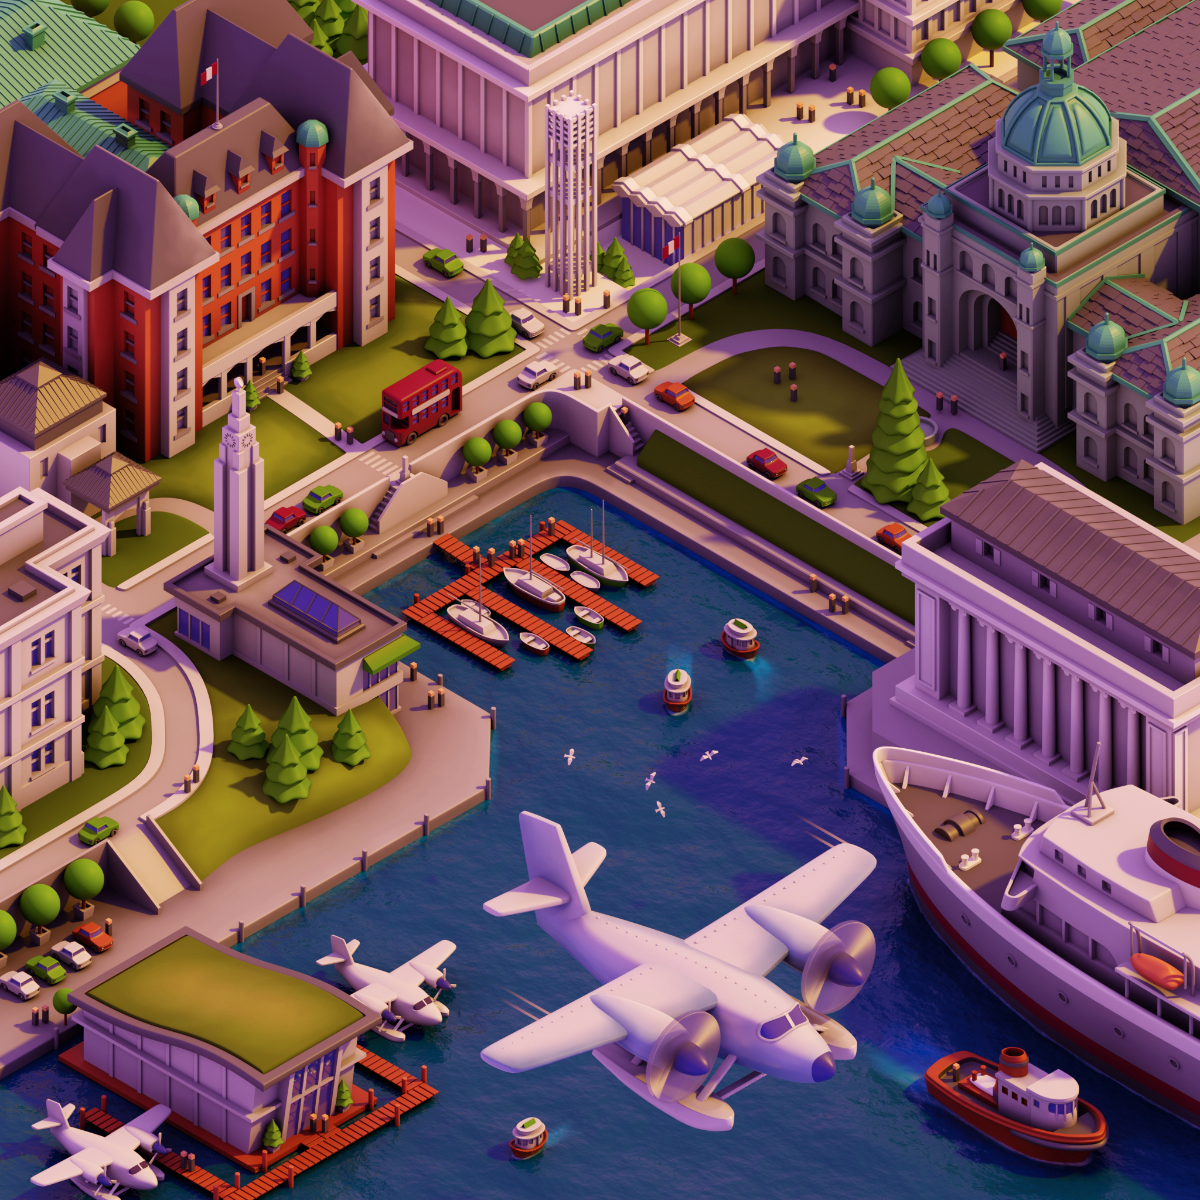
The piece we are looking at here is entitled Victoria, BC Inner Harbour. It’s a stylized isometric view of part of the city I live in. I had started it a few years ago in 2D and set it aside for a while before recently deciding to tackle it again—but this time in Blender.
Planning and refining the scene
The process starts out with a sketch. I usually start every job with pencil-on-paper sketches. I then pick a direction to refine, scan it in, and either drop it into Blender as a background image or put it into an image editor window as a guide.

Blockout
Then I set about creating all of the buildings, objects, roads, etc... as basic blocked-in shapes. As I build I make sure to keep everything organized in collections. The new collections system is great, it really makes organizing your file much easier.


Lighting and camera
I usually establish the lighting and render camera viewpoint fairly early on in the process before I get into any detail work. I find it integral to the piece as I’m building it up, to have a good idea of the light and shadow direction; also, at this point it’s easier to move around the simpler shapes. The lighting and shadows can guide the placement of important elements. There is a lot of give and take, moving things around. The sketch is a guide and generally the final piece will have some deviations from it.
Colours
I like to establish a limited colour scheme early on as well. I find a limited colour palette more illustrative in feel and carefully placing the colour around the scene unifies the composition. To keep things simple, I generally don’t use many fancy materials or procedural textures, except for the water, in this case. Generally, I’ll use it in places to add a little something extra depending on the look I’m going for. I also use texture painting to exaggerate the shading in certain areas and to add an illustrative feel to the piece. I add hand-painted shadows, highlights, or colour for interest. In this piece I used texture painting for the boat wakes in the water, for a few of the rooftops and grassy areas and for the closer plane.
Basically, the whole process is sort of like a slow-moving, organic, controlled buildup of form, lighting, colour and placement of objects until, little by little, the details are added, elements are tweaked, and final adjustments are made.
Rendering
I render with Cycles because it’s gorgeous and just so easy to set up. With my style of cartoony, medium-poly, stylized realism, I’m not usually going for photorealism, but I do like the fact that Cycles can achieve it if a project calls for it. As EEVEE develops and as I get into motion or animation work, I will start playing around with it, but for the illustration work I do now, Cycles is more than up to the task.
Any post-render requirements I do in Affinity Photo, usually for tonal or contrast adjustments or bumping up the colour, if needed. For this piece, the rich pinks, purples, and oranges are all done in Blender; I just adjusted the contrast a bit.
If you got this far, thanks for reading this. If you’re interested in seeing more, check out the links below.
Cheers, Kevin
For larger views of this project and more 2D and 3D work please visit my Behance portfolio.
About the Author
 Kevin House, illustrator and logo designer living and running a small studio called Kevin Creative in Victoria, British Columbia.
2 Comments
Hey Kevin,
Very nice to see you featured here, great work!
Your work is awesome! I live in Port Angeles and can't wait to come visit your beautiful city again!
Is there a Victoria Blender User Group? I'd love to participate.