I was a professional footwear designer with more than 20 years of experience before jumping into the 3D world. I wanted to learn a bit more and 3D gave me the freedom to explore my own ideas more in-depth. That was how I started learning Rhinoceros three years ago on my own; after a year using it I left it for Blender and I discovered a whole universe. Now I am a professional 3D footwear designer working for Zara-Inditex.
I took several Blender courses at Blendtuts.es that focused on hard-surface modeling and organic modeling. I also took a Substance Painter course for texturing.
Learn more on qarnot.com.
Inspiration
For this specific project, I was playing around, searching for new ideas for personal projects to work on in my spare time. I like to keep myself busy with my own stuff, even though my profession is also my hobby. I had a couple of ideas for this one; I wanted to pick 4 or 5 Adidas styles, mixing them all together, sculpting them to see what I could create. I have been influenced by Maison Margiela sneakers combining materials and the sort of handcrafted pieces for the upper. I have also been influenced by Jordan’s for my final rendering colourway.
Sculpting
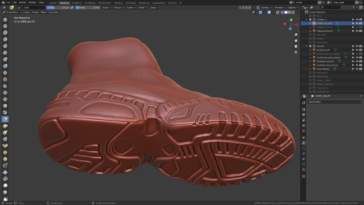
I always use Blender and Substance Painter for texturing. I start by deleting the cube and making a simple low-poly mesh of the outsole, applying a couple of subdivisions, and jumping into sculpting until I have something pretty decent on which to start doing retopology.
Before sculpting, I usually have all the displacement maps ready, having used Illustrator and Photoshop to create them in black and white, just in case I need them to add guides to the sculpt. I don’t like to spend much time sculpting. Sculpting in Blender is awesome but it is just a tool in the process.
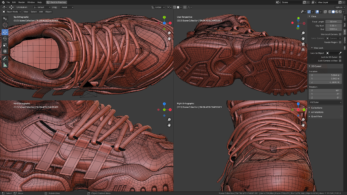
Once the outsole is ok, I start with the last step. From the top of the outsole, I extrude that geometry upwards and sculpt it out, making two final surfaces, one more organic than the other. I love to deform the shoe just like a foot would wear it. After those sculpts, I do retopology to use as few polys as possible.
UVs and Textures
Then, after modeling is complete, I unwrap the UVs and jump into Substance Painter, painting all the textures and bringing them back to Blender to proceed with rendering.
Lighting
I set three lights on top of the scene and add an HDRI environment texture in 2K resolution. I render in Cycles and, for post-production, I use Photoshop.
Final renders
About the Author
 Francisco Planelles Pérez, I was born in Spain 43 years ago where I live with my wife and son. Since I was a little kid I've been pretty fascinated about footwear and always wanted to become a footwear designer. After all my 20 years of design experience, I still have the same passion that that little kid had.








7 Comments
Wow amazing to see what you can create after learning 3d just 3 years ago. Since the shapes of shoes are not simple forms. I imagen its very diffecult get form, but also topology correct. These images look stunning!
Excellent job here, congratulations!
Awesome work always! good job!
Amazing Paco...i am proud that we qorked together for many years...and also am very proud of what u do...simply amazing...congratulations...really a hard worker and creative person
PS very curious how you made those displacements maps. I mean making a flat unwrapped displacment for a shoe form sounds complicated?
Very inspiring Francisco! Thanks for the breakdown. Great work!!
Not so complicated man...Unwrap and export Uv layout as .png to Photoshop or Illustrator...make your vector work and adapt it to the Uv layout...then export to Blender as a texture and use the Displace modifier with that texture.