
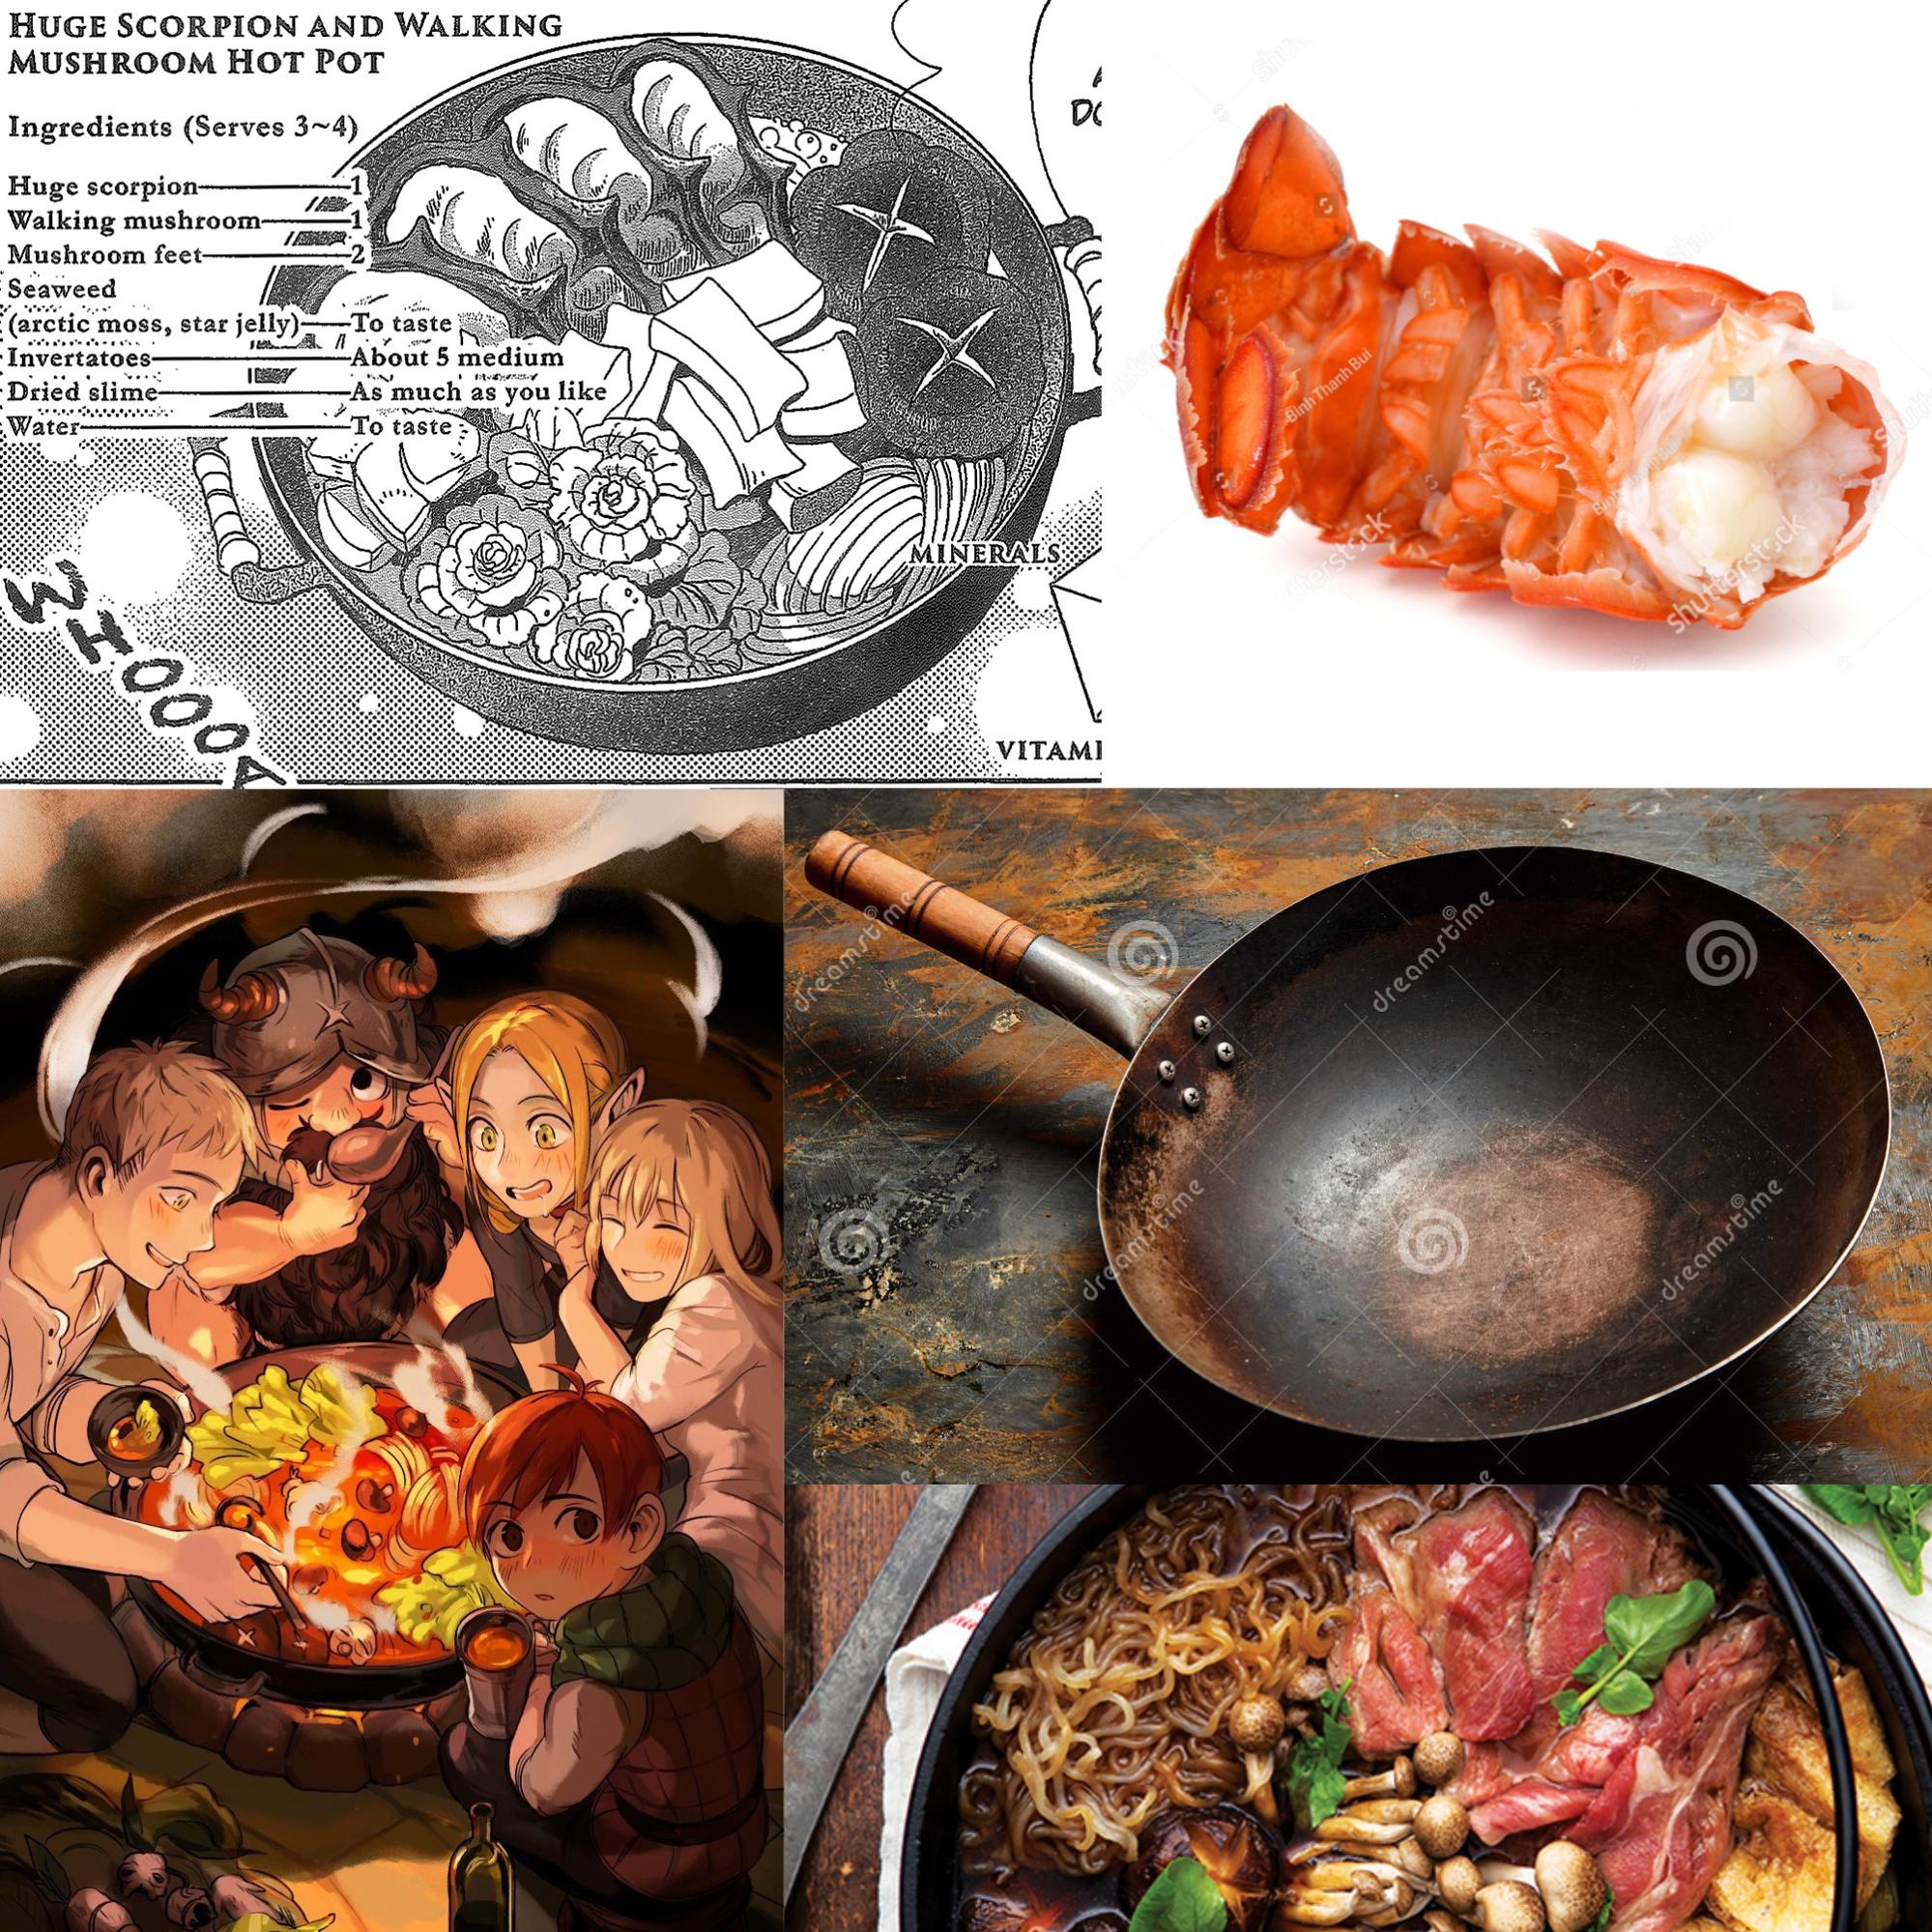
Behind the Scenes: Giant Scorpion and Walking Mushroom Hot Pot
About Me
Hi there! My name is Caetano Silva and I’m a freelance 3D artist from Sao Paulo, Brazil. Most of my career was built by working in the advertising illustration industry for both national and international clients. I’ve had experiences working both in and for 3D studios, image manipulation bureaus as well as advertising agencies.
Although I’ve been pushing polygons for more than 10 years now, I’m very new to Blender and this is my first full-fledged experience with the software. It has been a delightful experience to work with Blender coming from other 3D softwares and it will definitely have a permanent place in my workflow.
Inspiration
It had been a while since I last dedicated myself to creating a new personal 3D project and I felt like challenging myself again. I had been learning Blender for a couple of months by then, mainly doing tutorials and adapting what I already knew from my past 3D modeling experience. It felt like the right time to put my new skills to the test and try to do a complete scene, from scratch, using Blender as the main 3D software.
I always try to incorporate specific challenges for myself when choosing a theme for the personal project I will tackle. This time I wanted to try a bit of everything: character creation, scenery, hair, shading, and lighting.
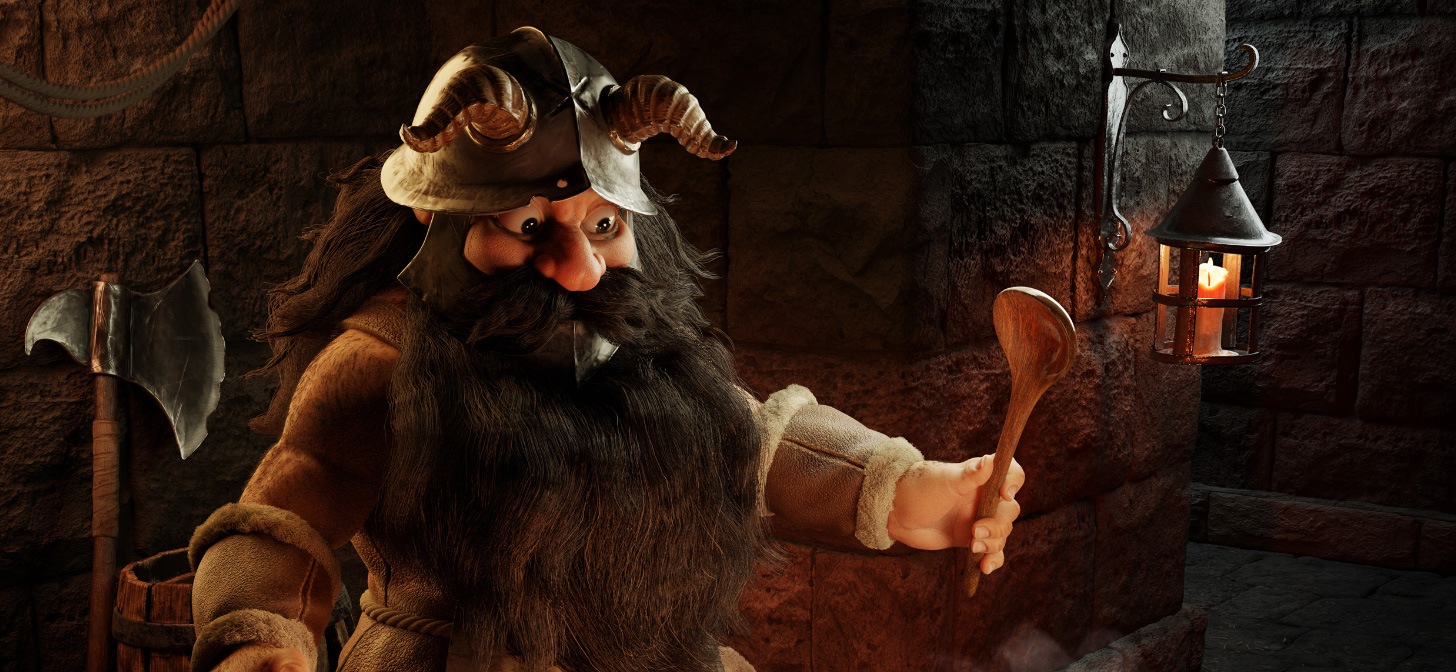
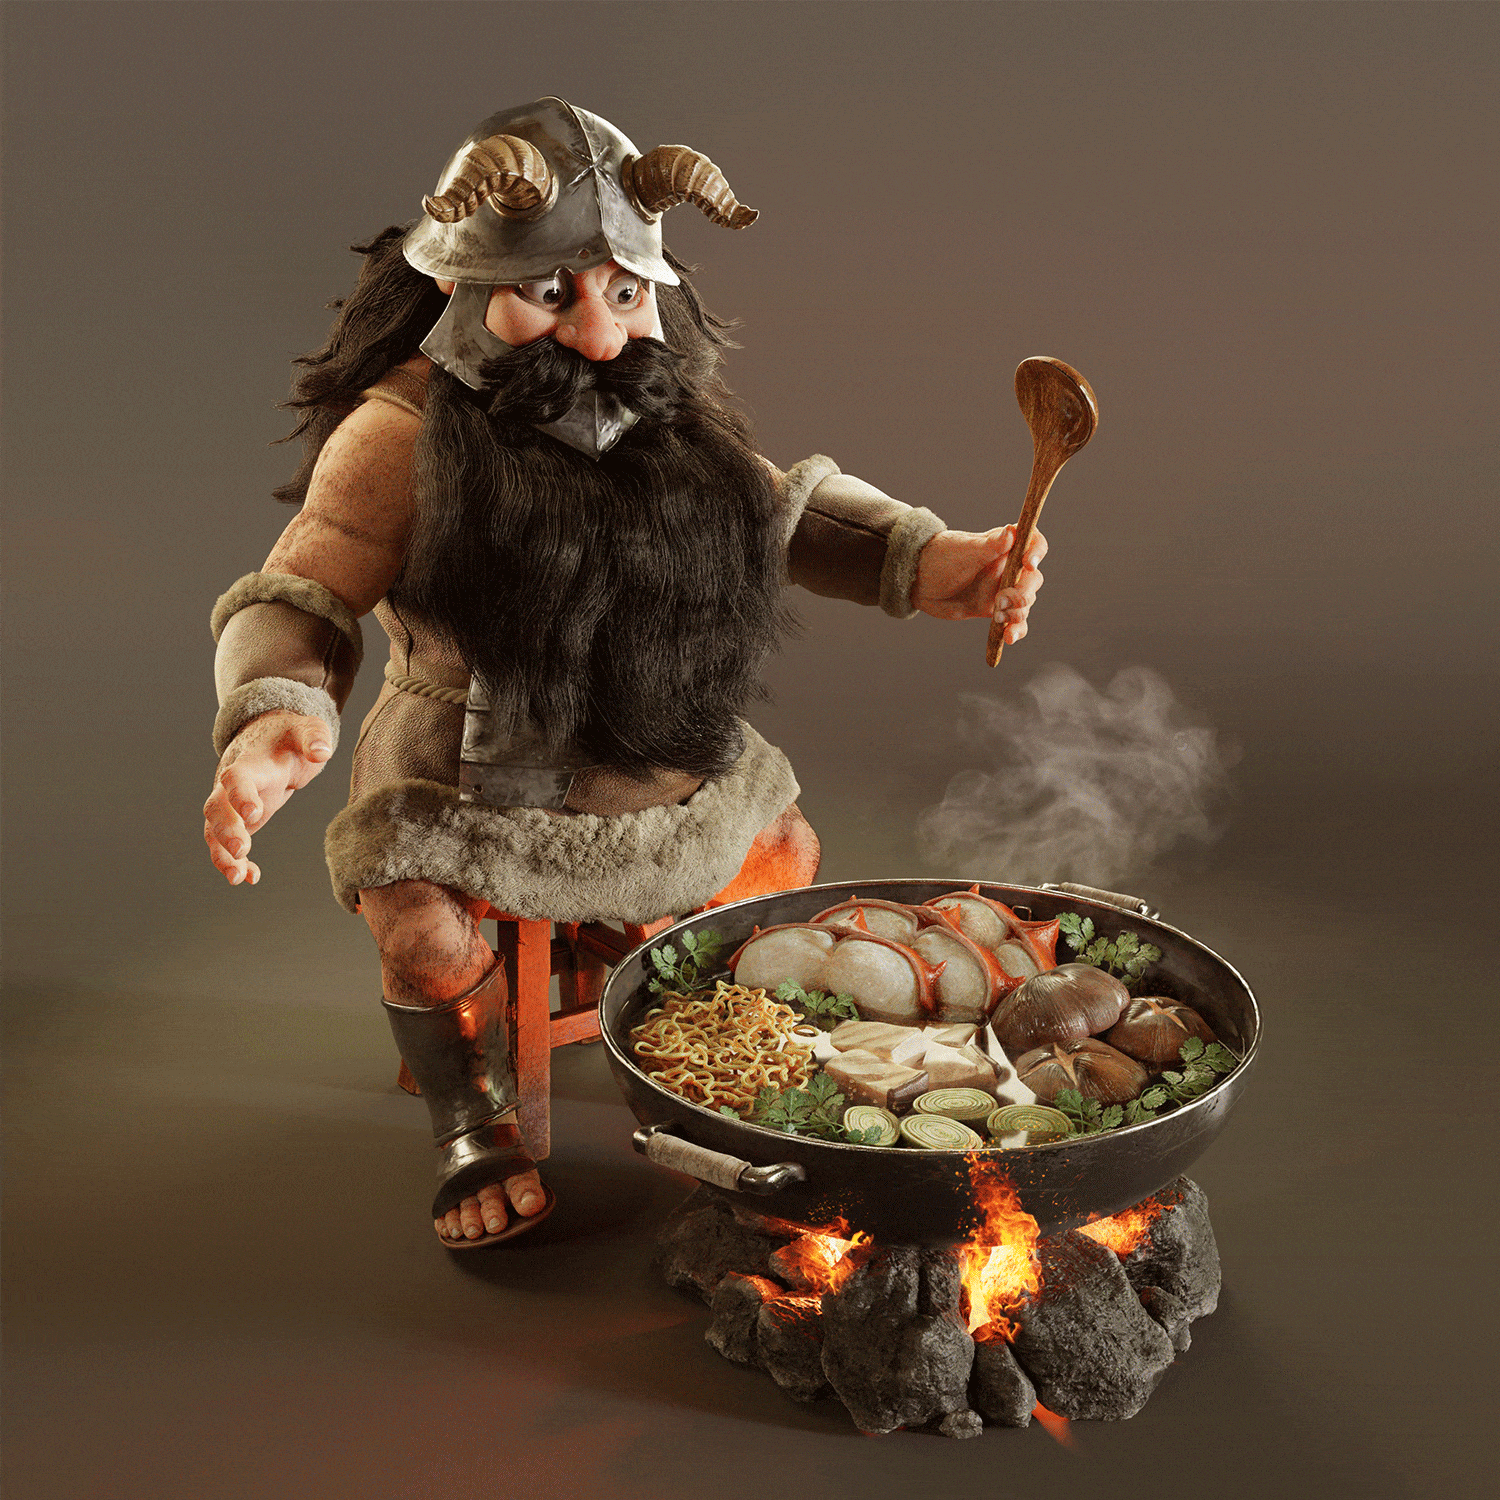
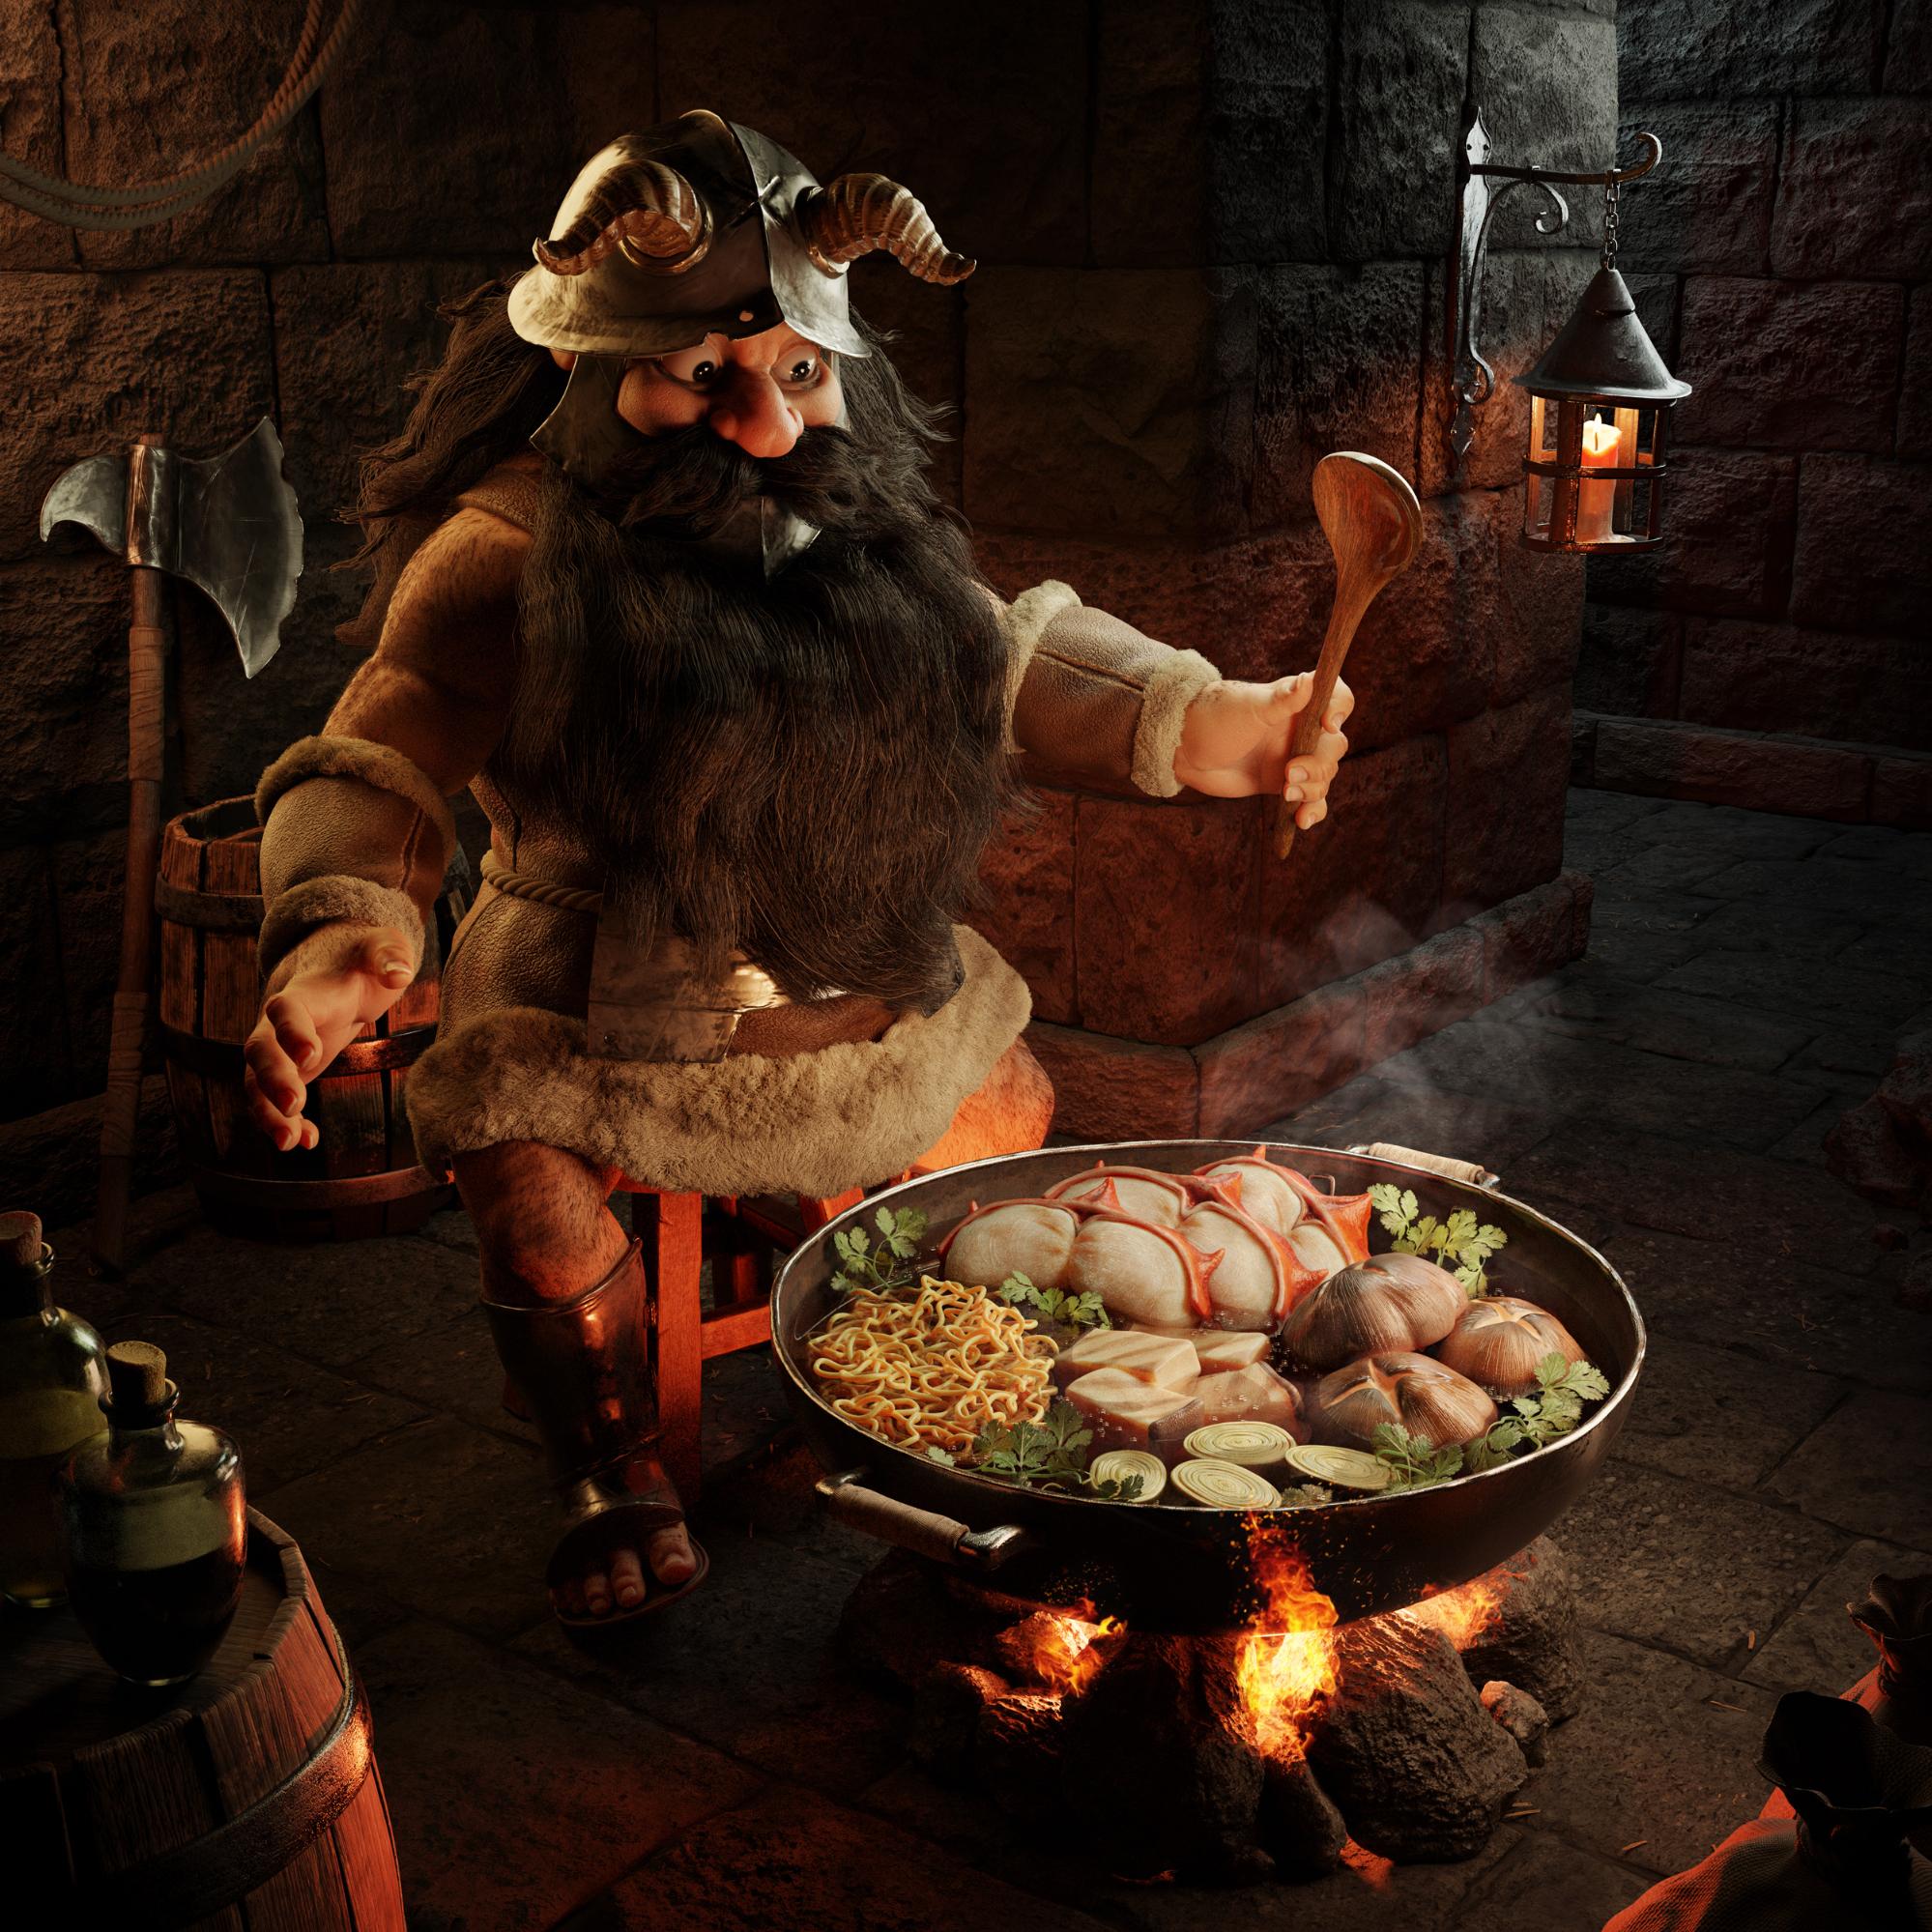
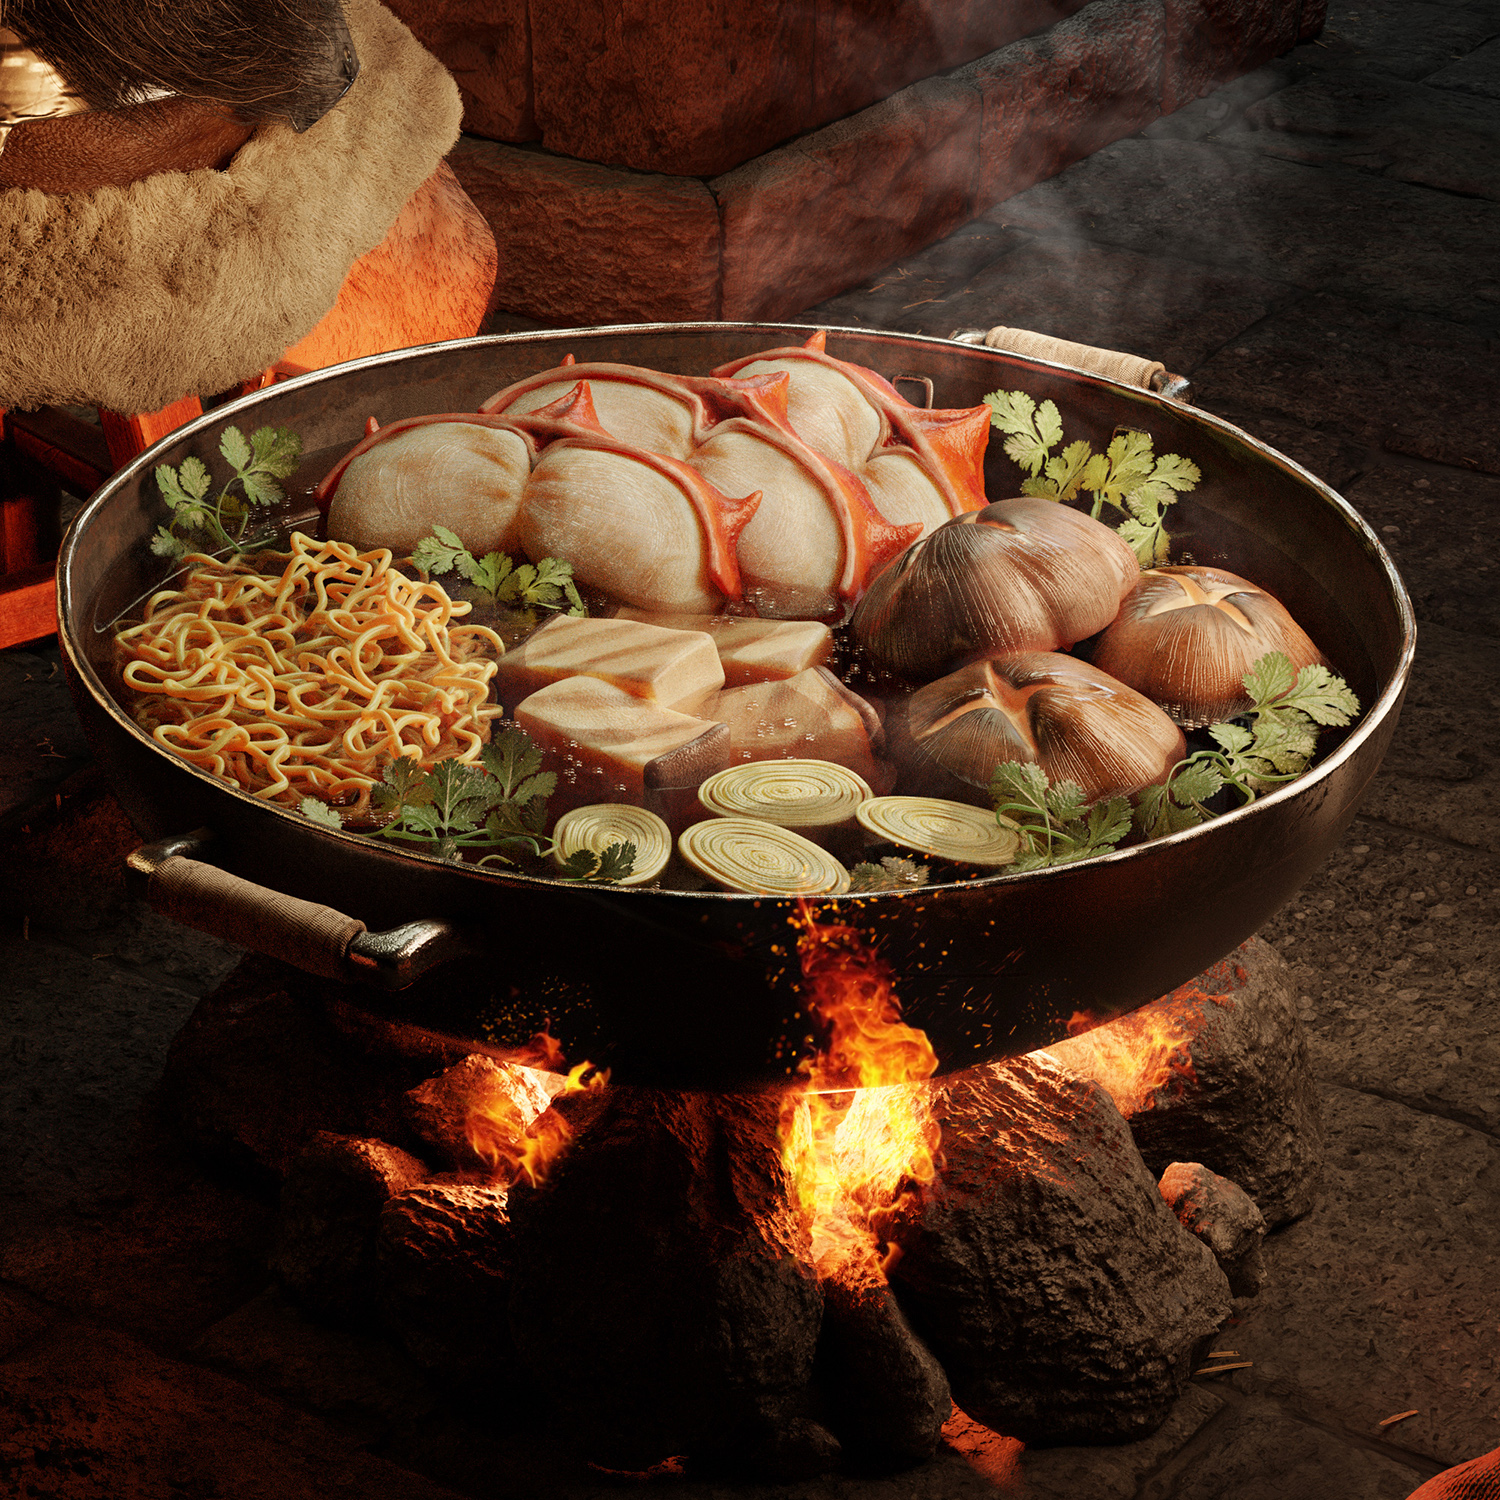
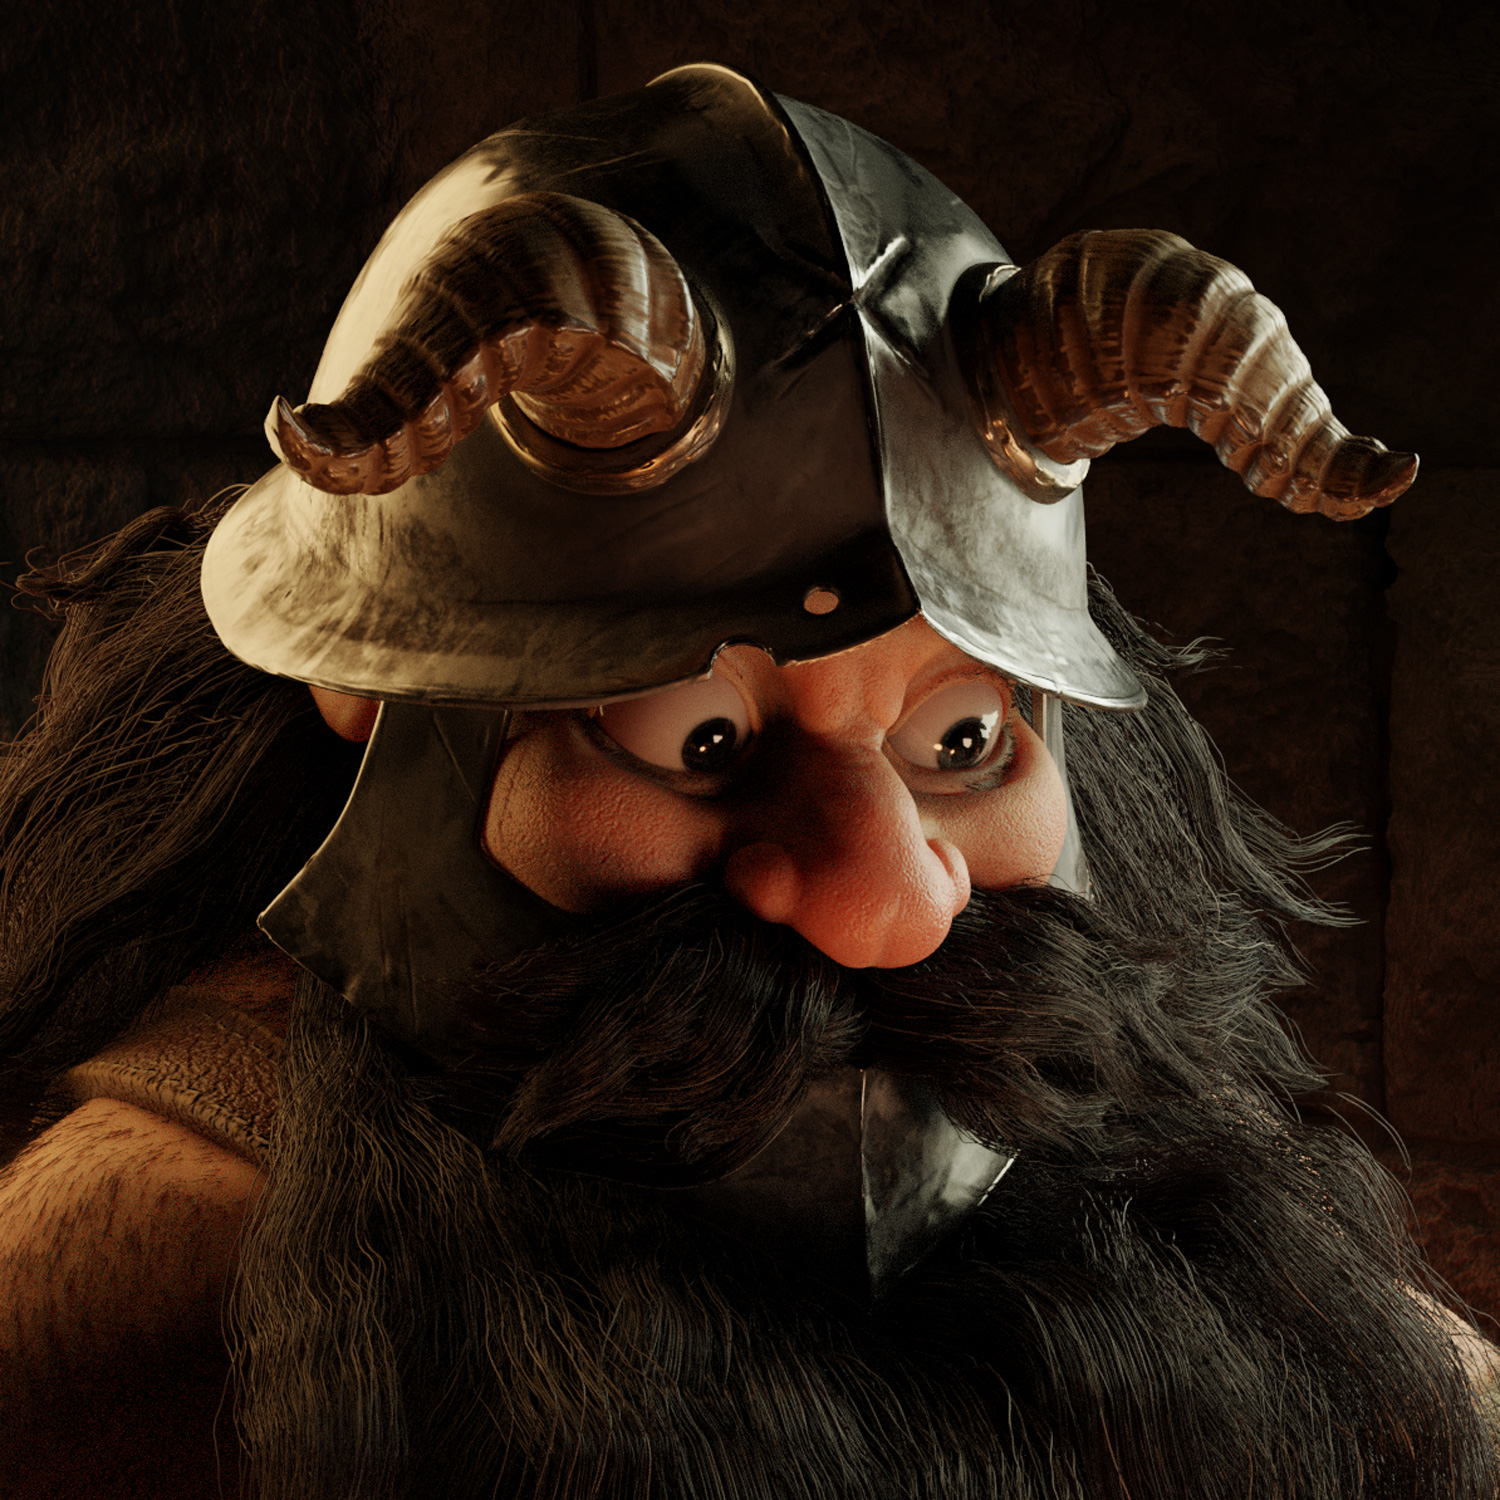
I had the idea to create a small scene with a character from a manga series I’ve been reading for a while called “Dungeon Meshi”, which translates to “Delicious in Dungeon”, a story about a medieval fantasy group of adventurers who explore a dungeon and have to resort to cooking and eating monsters for survival. Since I am a fan of the series, I wanted to pay homage to one of the first scenes in the story, where Senshi cooks a “Huge Scorpion and Walking Mushroom Hot Pot”. My idea was to create the best piece of fan art I could. The character Senshi, the dwarf, was chosen because of his unique look and the interesting hair and beard that proved a challenge for me. I really strived to capture the cozy, whimsical and rustic feel of the manga in my 3D render.
References
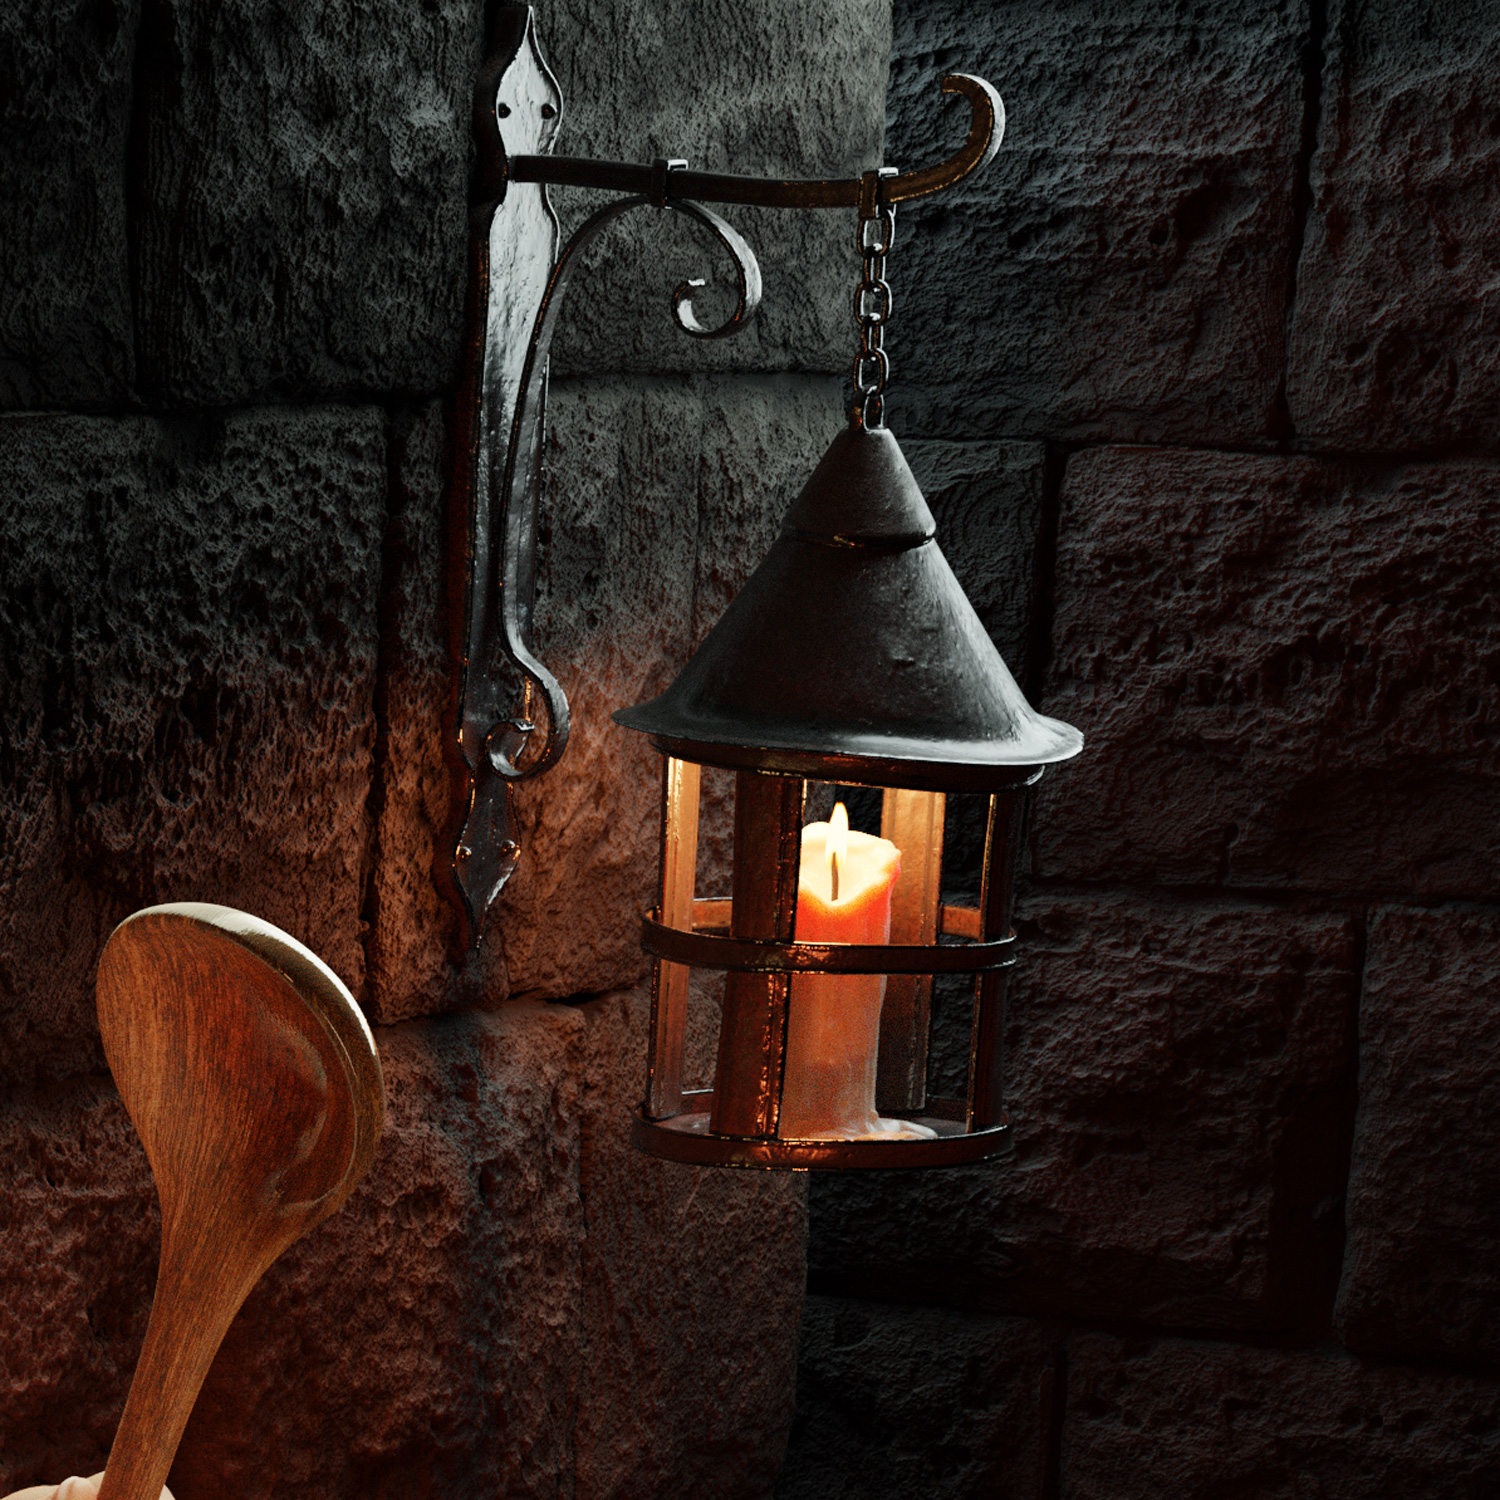
The first step was to gather as much useful reference as I could to create the scene I had in my mind. I didn’t follow specific concept art, but rather composed a new scene based on different references I found while researching. I saved them all in my reference folder and would look at them a lot through the process, which helped me with getting the armor design right, the monster food feeling tasty, the candle lamp texture, etc.
 From there, I quickly bashed together a mockup of the scene I wanted to create in Photoshop using some pre-existing drawings and some paint overs of my own. This helped me a lot throughout the rest of the process.
It was good to look at the official artwork but also to fanart and see the different approaches people went through to create the same character. This all helped me create my own version of Senshi.
Modeling
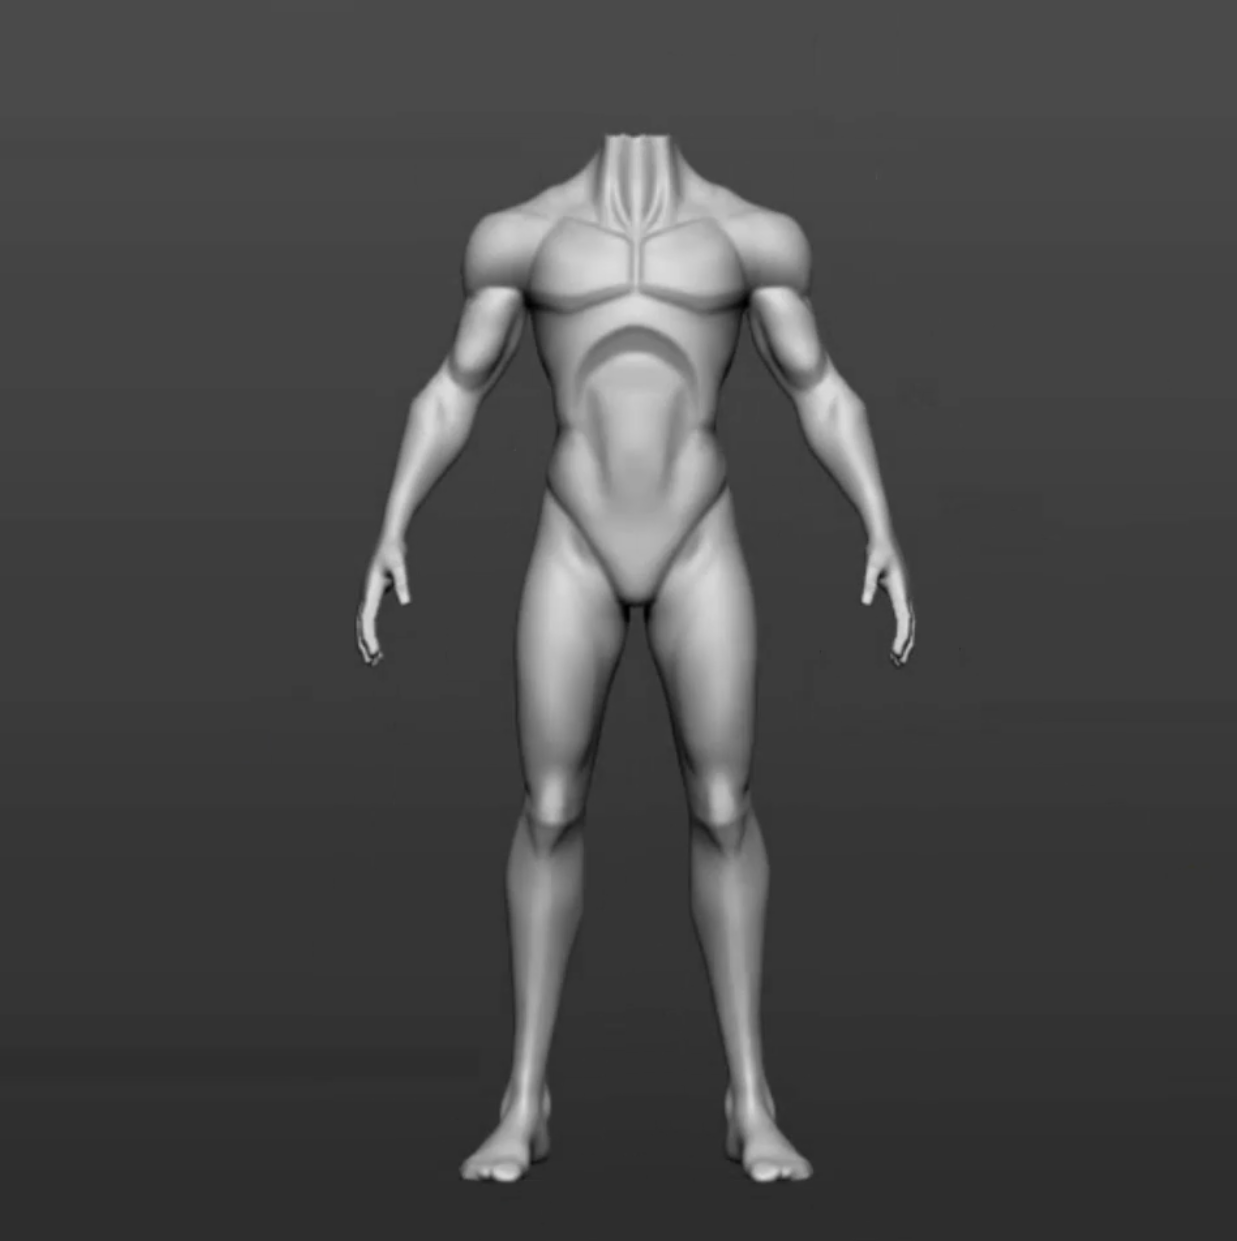
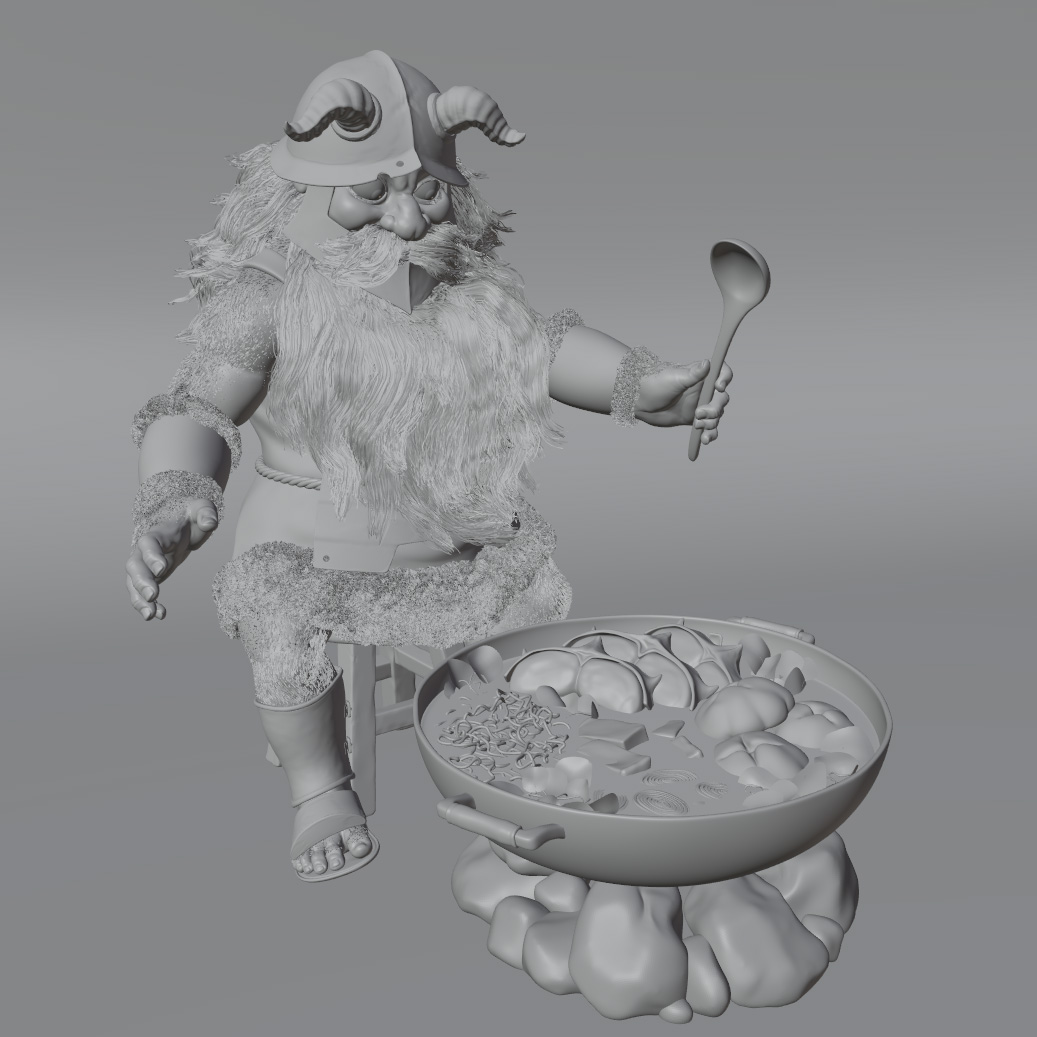
The first thing I started doing was sketching the character in ZBrush. I started with a basemesh I had created earlier for another project. It was very far off from what I wanted for Senshi’s body but it had a good stylized anatomy that served as a layout.
Sketched Character Turntable:
I sketched out the whole character in ZBrush, his armor, clothes and a sculpted version of his hair and beard. With this sketch made I had a good base to start doing retopology on the separate parts. The retopology yielded a good mesh that I used for the following steps.
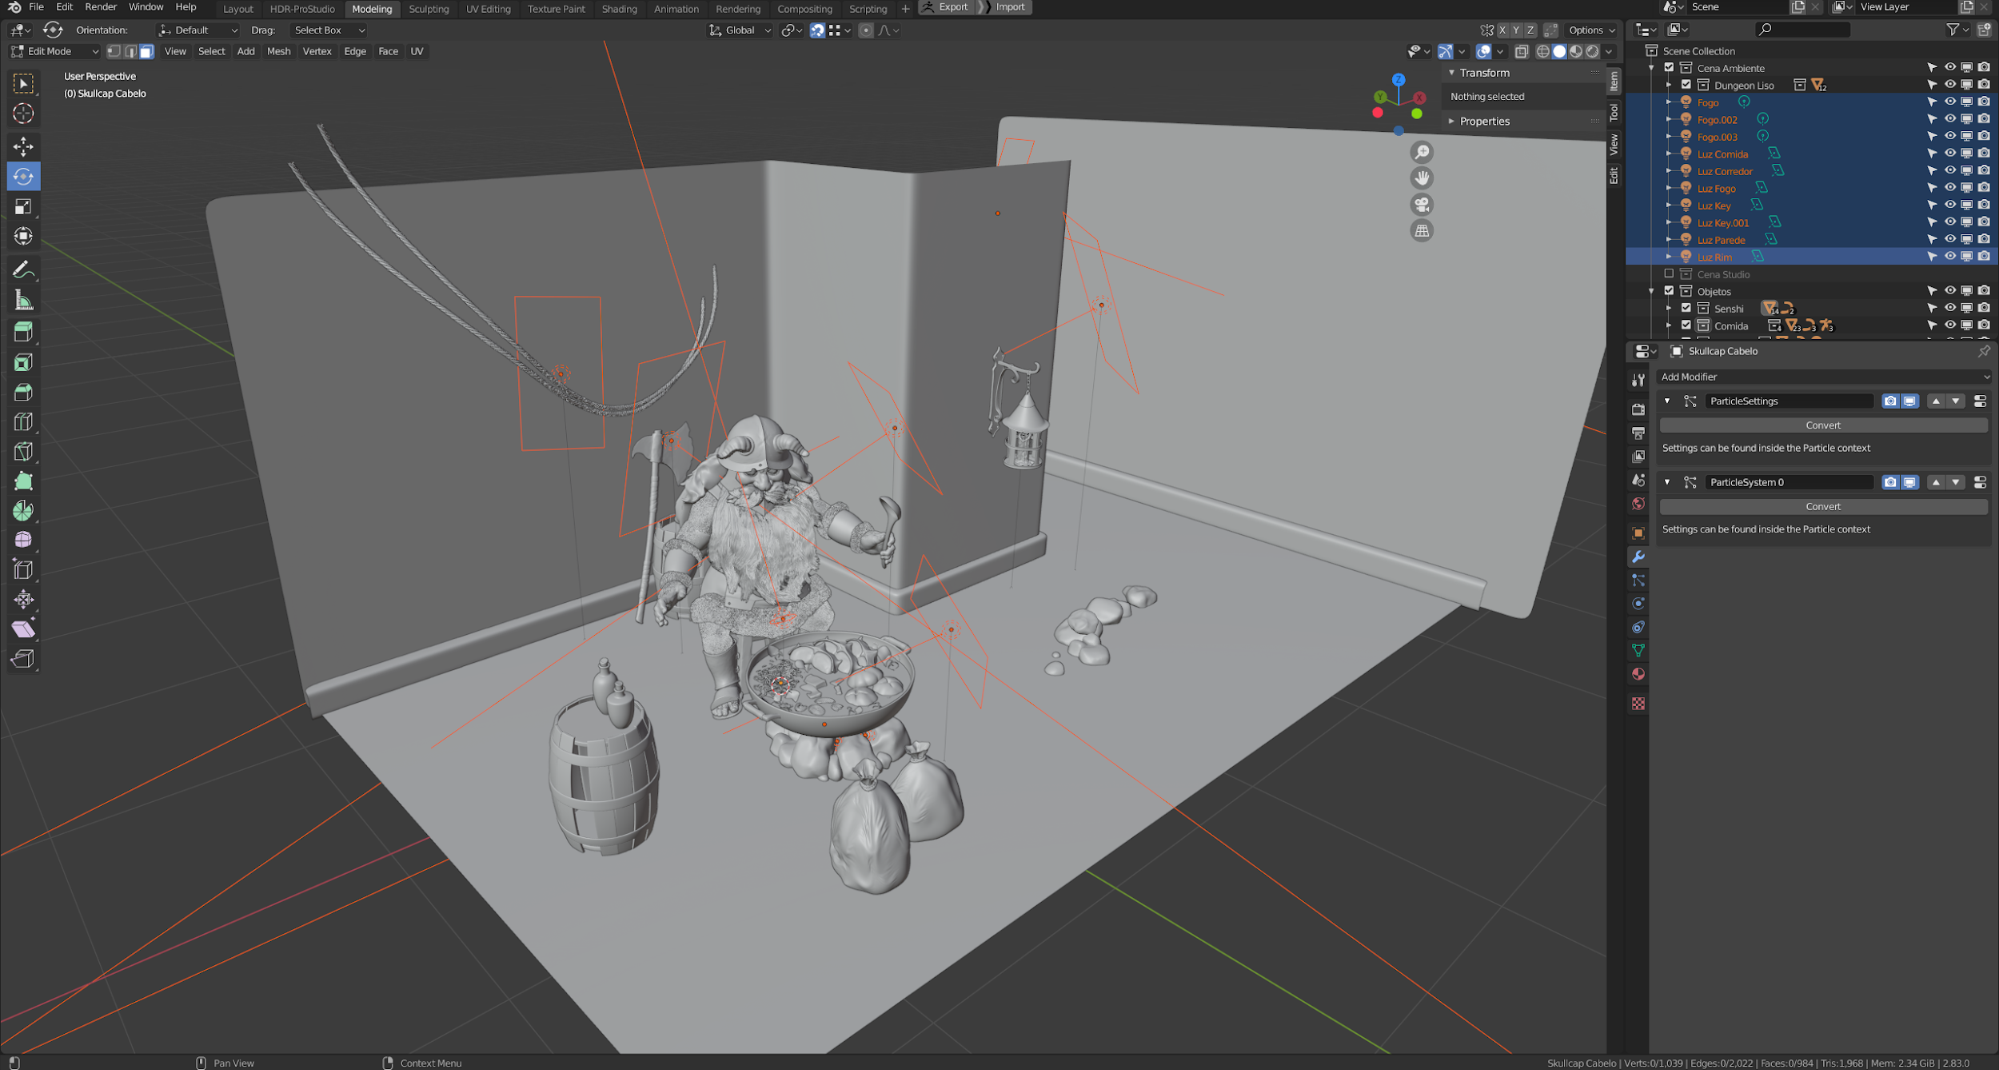
Most of the props and scenery were modeled in Blender using basic polygon modeling techniques, like extruding, scaling and rotating. I also used Blender’s great UV mapping tools to create all the UV maps I needed in the scene.
The character posing was done in ZBrush using transpose master. I’m not very used to rigging my characters, so I always end up using Transpose Master to have absolute control of each piece of clothing, accessory and body part. Once the character and his equipment were posed, I used the GoB add-on to export all the subtools from ZBrush to Blender.
Texturing
I used Substance Painter to create realistic materials and textures for the armor, cooking pot, clothes, and weapons. For the skin, I used polypaint in ZBrush for color and manually sculpted details like pores, wrinkles and veins using a mix of brushes and alphas. For the walls and floors, I used free PBR Maps from Texture Haven and CC0 Textures, which gave me great results after some minor tweaks in Photoshop. There is a displacement node in the wall and floor shaders that creates a more realistic surface and breaks the flat look.

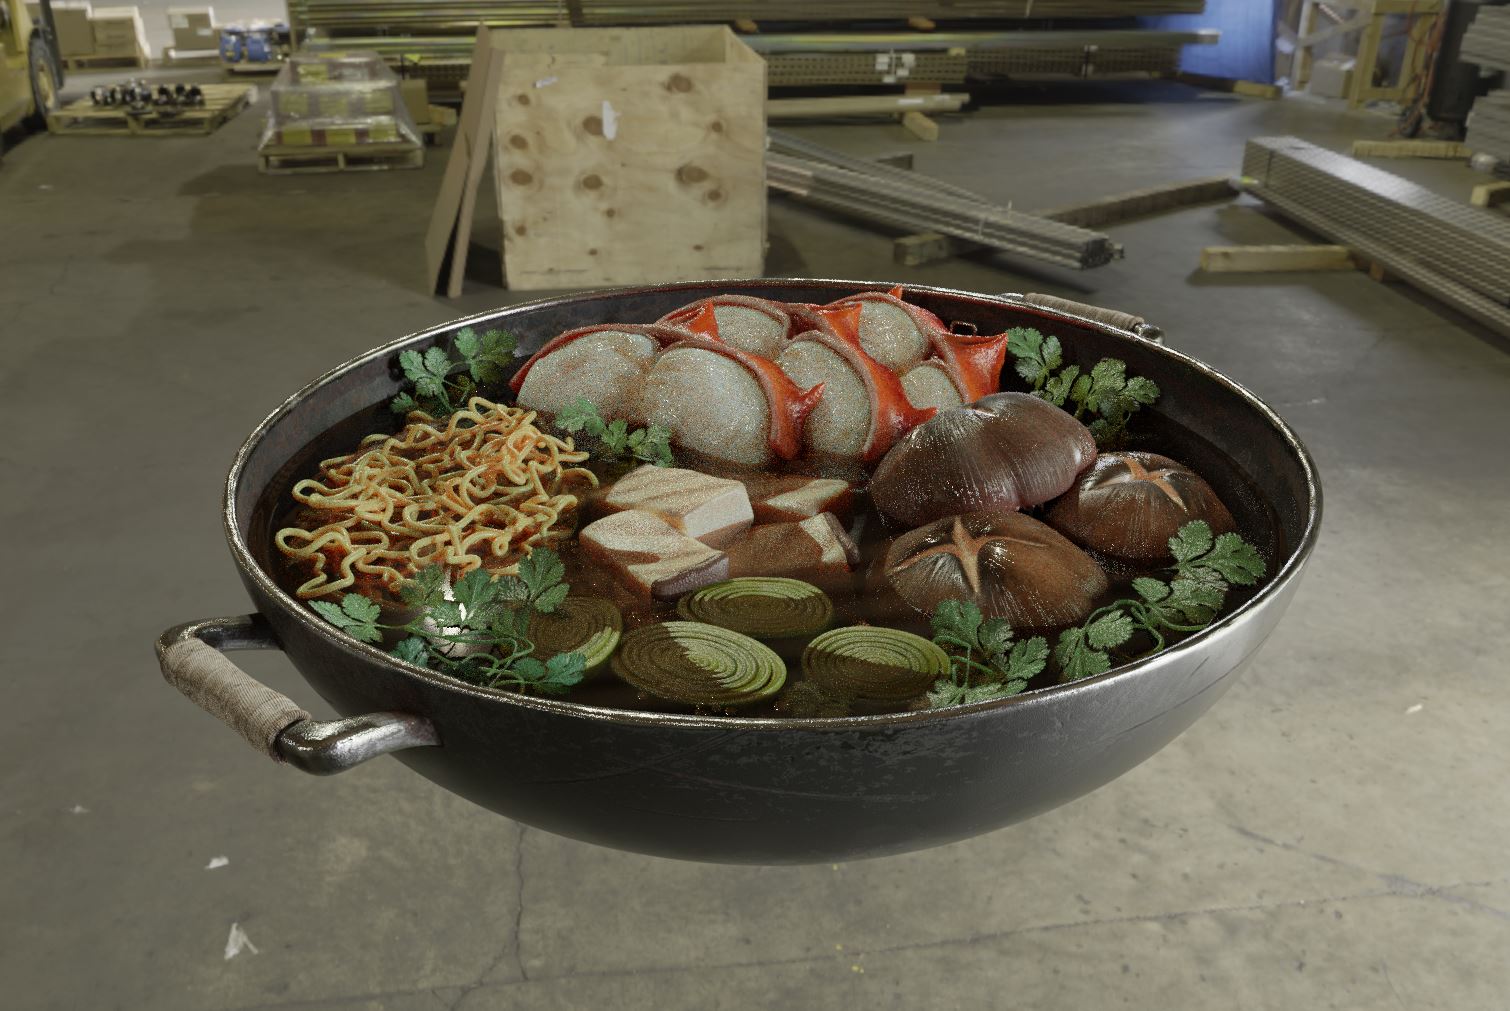
Creating the Food
Then it was time to create the food, one of the main parts of the scene for both visual and thematic reasons. I spent a lot of time making sure each ingredient looked tasty and appealing. The noodles were created using bezier curves in Blender. For the herbs, I modeled a simple leaf shape and added a png transparent leaf texture, I then added a simple armature to pose the different herbs around the cooking pot.
Shading and Lighting
I then started testing out all my shaders, using a combination of area lights and an HDRI environment to create a quick realistic light setup with nice reflections. The use of HDRIs helps tremendously in testing out shaders because you can easily switch the image map and see how the material behaves in a completely different environment.

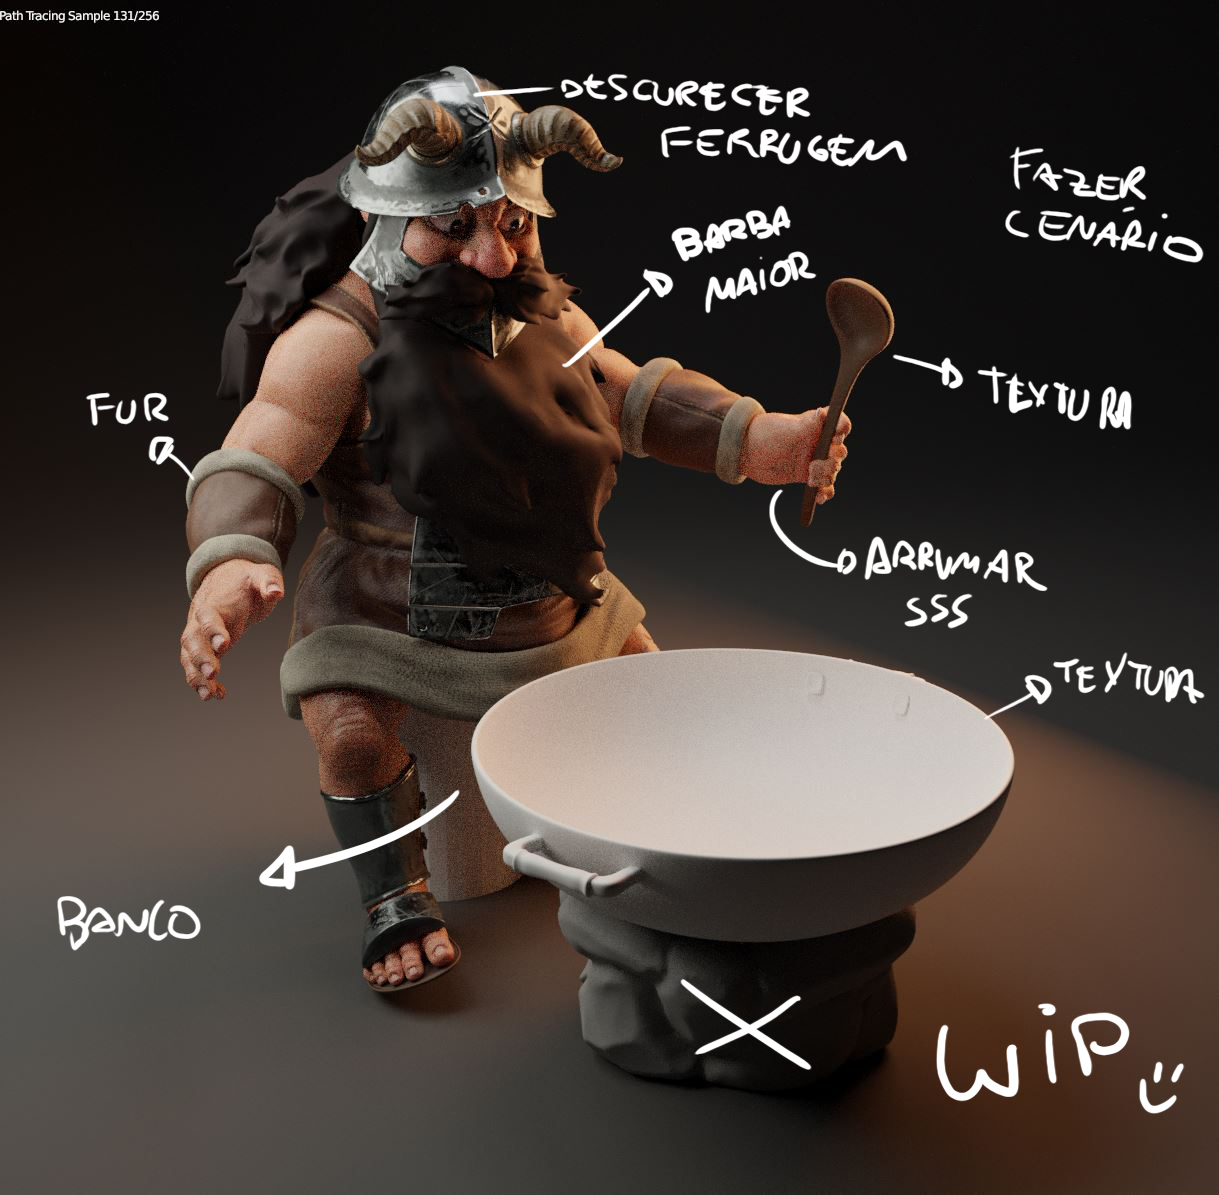
This was also the time when I tweaked my skin shader, using the random walk SSS calculation method for much more precise results.
For the final lighting of the scene, I used 10 different lights, of which 5 were area lights used to enhance specific parts of the scene, like the food, the back corridor, and back wall. 2 of them were also area lights focused on the character himself, aimed at bringing as much volume as possible and highlighting his silhouette. The 3 remaining lights were point lights positioned inside the campfire to create the illusion of fire coming out. The final fire was made with photographs in Photoshop, but the orange lights in 3D really help to make them look convincing.

No HDRI environment was used in the final render. The skybox was 100% black. I wanted to preserve the dark and gloomy atmosphere of the dungeon.
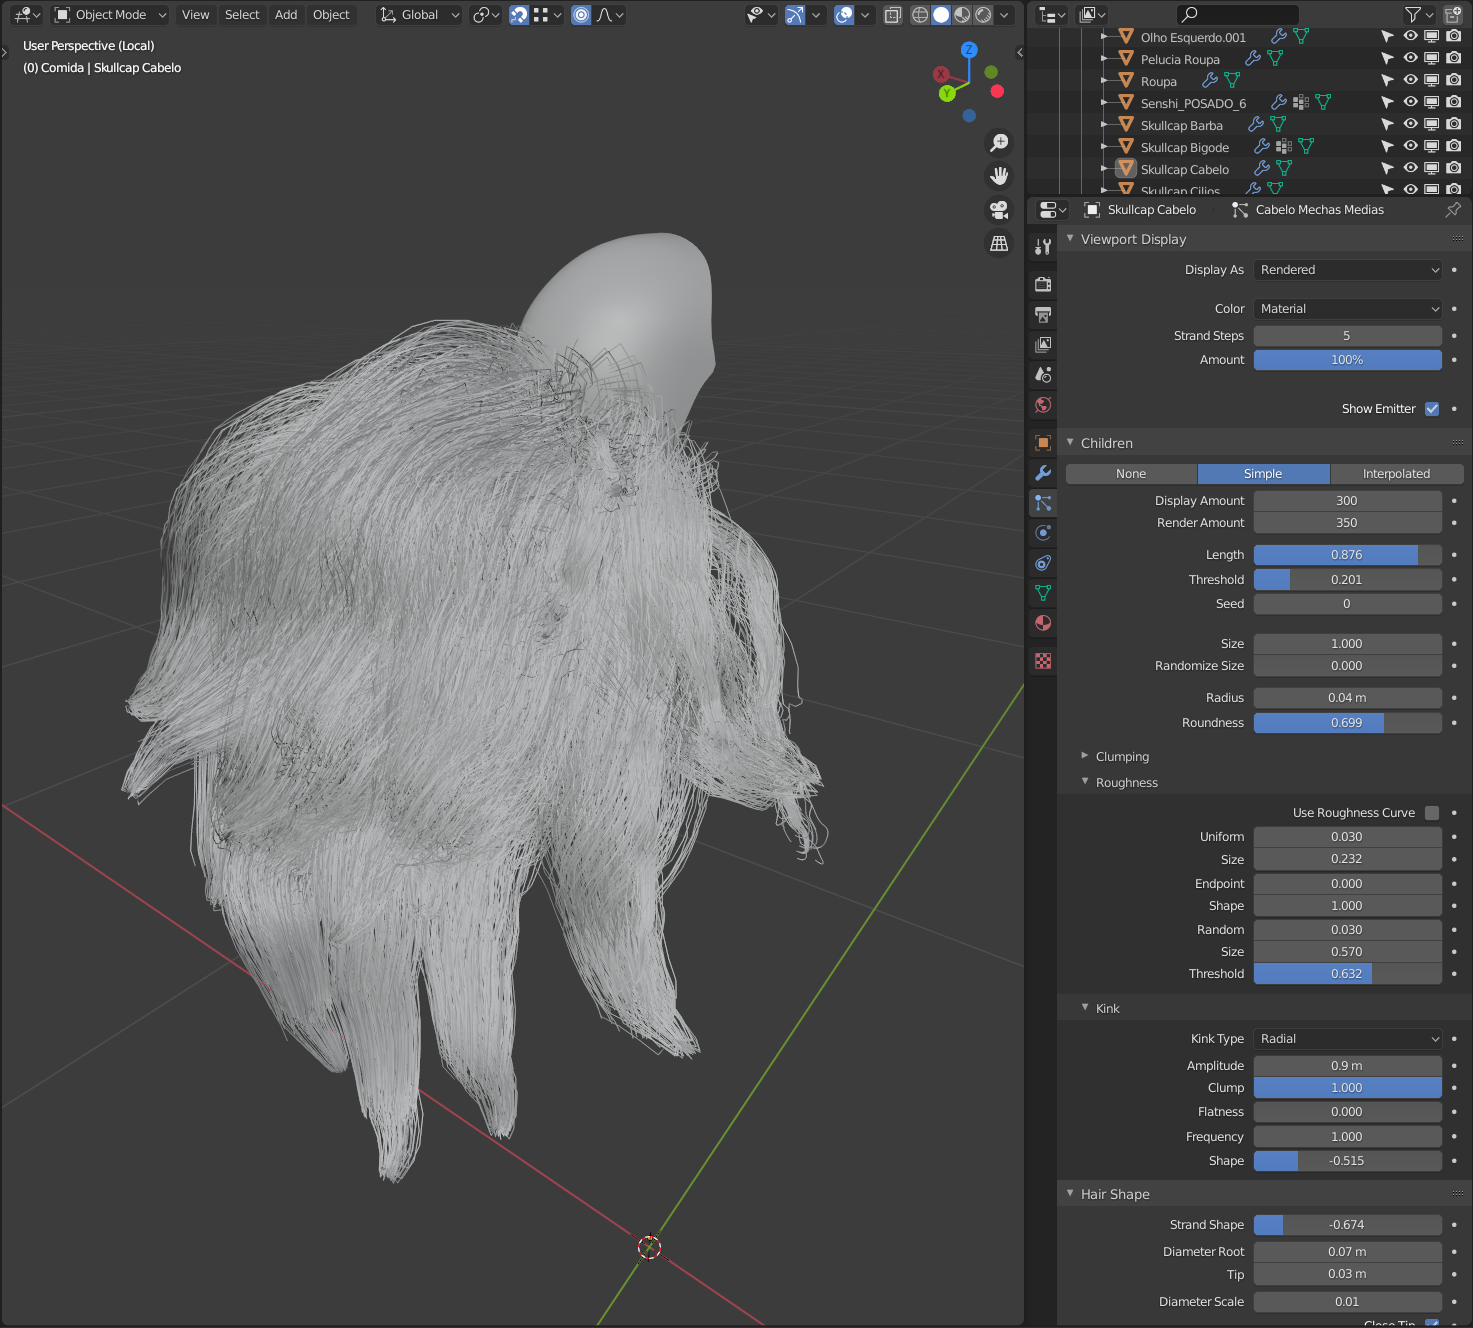
Hair and Grooming
I’ve come to love the simplicity and interactivity of Blender’s native hair tools. This was the first time I managed to pull off a more complex hair setup in any 3D software and the ease of use surprised me! I created skullcaps (duplicated parts of the skin mesh) to apply the hair particles and started adding guides manually, one by one. Each guide turned into one clump of hair or beard. Then, after grooming it to fit the shape I wanted, I started tweaking the hair settings for clumping, kink, shape and roughness. I also added fur to his arms and legs with a density map to control the hair growth. Senshi is a very hairy guy!
Rendering
The final renders were made in Cycles and had 2500×2500 pixels. I used 2048 samples with adaptive sampling turned on. Bucket size was at 128x128px. It took me around 4 hours to render using my Ryzen 1800x. The GPU render was faster but my 1080ti was having a hard time caching the entire scene in its 11GB of VRAM.
My typical 3D workflow is not 100% linear—sometimes I like to skip some steps to see how an asset is going to look when it’s done. This preview helps me get a better idea if I’m on the right track or if I should try a different route. It also keeps me excited with how the project is looking. A little morale boost is always welcome in a long project like this. It might not be the most efficient workflow for everyone, but over the years I’ve come to learn that it’s what works best for me. All in all, the whole scene took me about a month to finish.
For more details and full resolution images please check here.
And please feel free to follow me on Instagram.
I hope that this in-depth view into my creation process was useful for you and inspires you to create even more art that you love. Thank you and until next time!
About the Author
 Caetano Silva, freelance 3D artist working in the advertising and editorial industry. A D&D player, anime and videogame aficionado, he loves creating funny characters, epic creatures and colorful scenes.


