Behind the Scenes: Butterflies
About
Hello there! My name is Olya Deeva. I am a graphic designer based in Moscow. I started with 3D about two years ago to expand my skills as an artist and totally fell in love with it.
April is the time when everything starts to bloom and wake up from the cold winter. It’s also time for the first butterflies and grass, which is how the idea behind this concept was born.
Process
References
First of all, I found the background I would be using for the scene. I also looked for references such as butterfly wings and greenery. I use PureRef to combine them all together in one place.

Modeling
Then I modeled butterflies—I like to do modeling in Random mode, as it is comfortable for me to see all the elements separately—and paid special attention to wings, sculpting them a little so they looked more natural.

Developing the Scene
I used the Graswald add-on for the grass stems—it’s the most perfect in terms of realistic greenery. For the butterflies’ material, I used one of the pictures I found on the Internet. If you’d like to find high-quality pictures, go to Unsplash.com or Pixabay. You can also use Google search with extended settings, so it shows you only big images with transparent backgrounds, for example. As some parts of the butterflies are really small, I used simple colors, but UV unwrapped the wings to locate the image texture properly.

To understand how the future composition would look, I used the background image as a Camera background image—this way it was easier to work with lighting. You can also turn on Composition Guides in the camera to follow the rule of thirds or the golden triangle rule. In this particular case, the background image was not part of the final render.

Rendering and Post-Processing
There are a lot of ways to render and then do post-editing—one can use Cycles or EEVEE and then go to Composing mode. In this particular case, I used EEVEE and saved my .png image with a transparent background. To do this, I went to Scene settings, opened the Film tab, and checked Transparent.
Having worked with Photoshop for many years, it’s much easier for me to do all post-editing there. I played around with Hue/Saturation of the png elements, so they matched the original background even more. I also like to use Color Lookup and add noise in Soft Light mode to make the overall picture look more even.
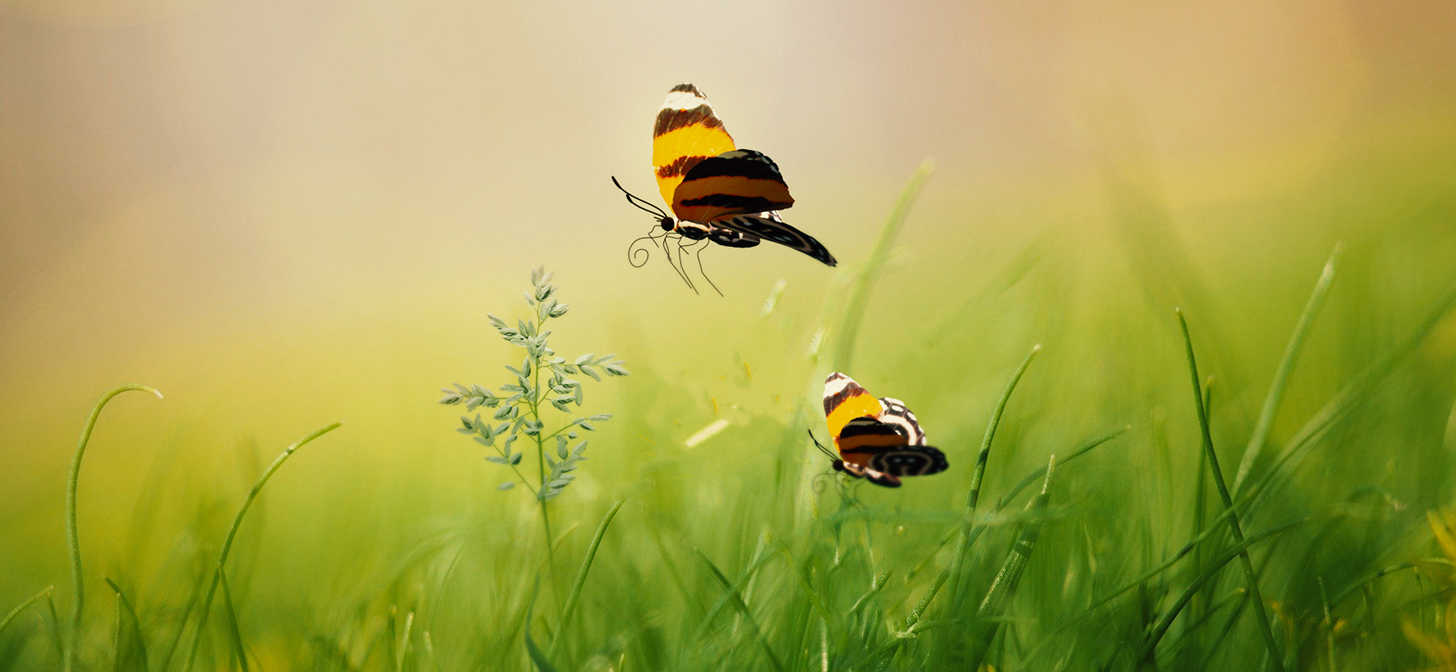
So, here is the final result:

All in all, Butterflies is a small project that took me a couple of hours to welcome the Springtime.
You can find more of my works on Instagram or Dribbble.
About the Author
 Olya Deeva, Graphic Designer and 3D artist always on a creative search.


Quite cute ! I love that dreamy style the final result is having.