Behind the Scenes: Sony Sound Recorder
Introduction
My name is Mobolaji Dele-Adelodun. I am based in Lagos State, Nigeria. I studied law at Lancaster University, United Kingdom but later transitioned into visual arts, which is my passion. My interest in 3D art started from playing video games and watching animations. I am a self-taught artist and I have taken several online courses to take my skill to the next level.
My Mission
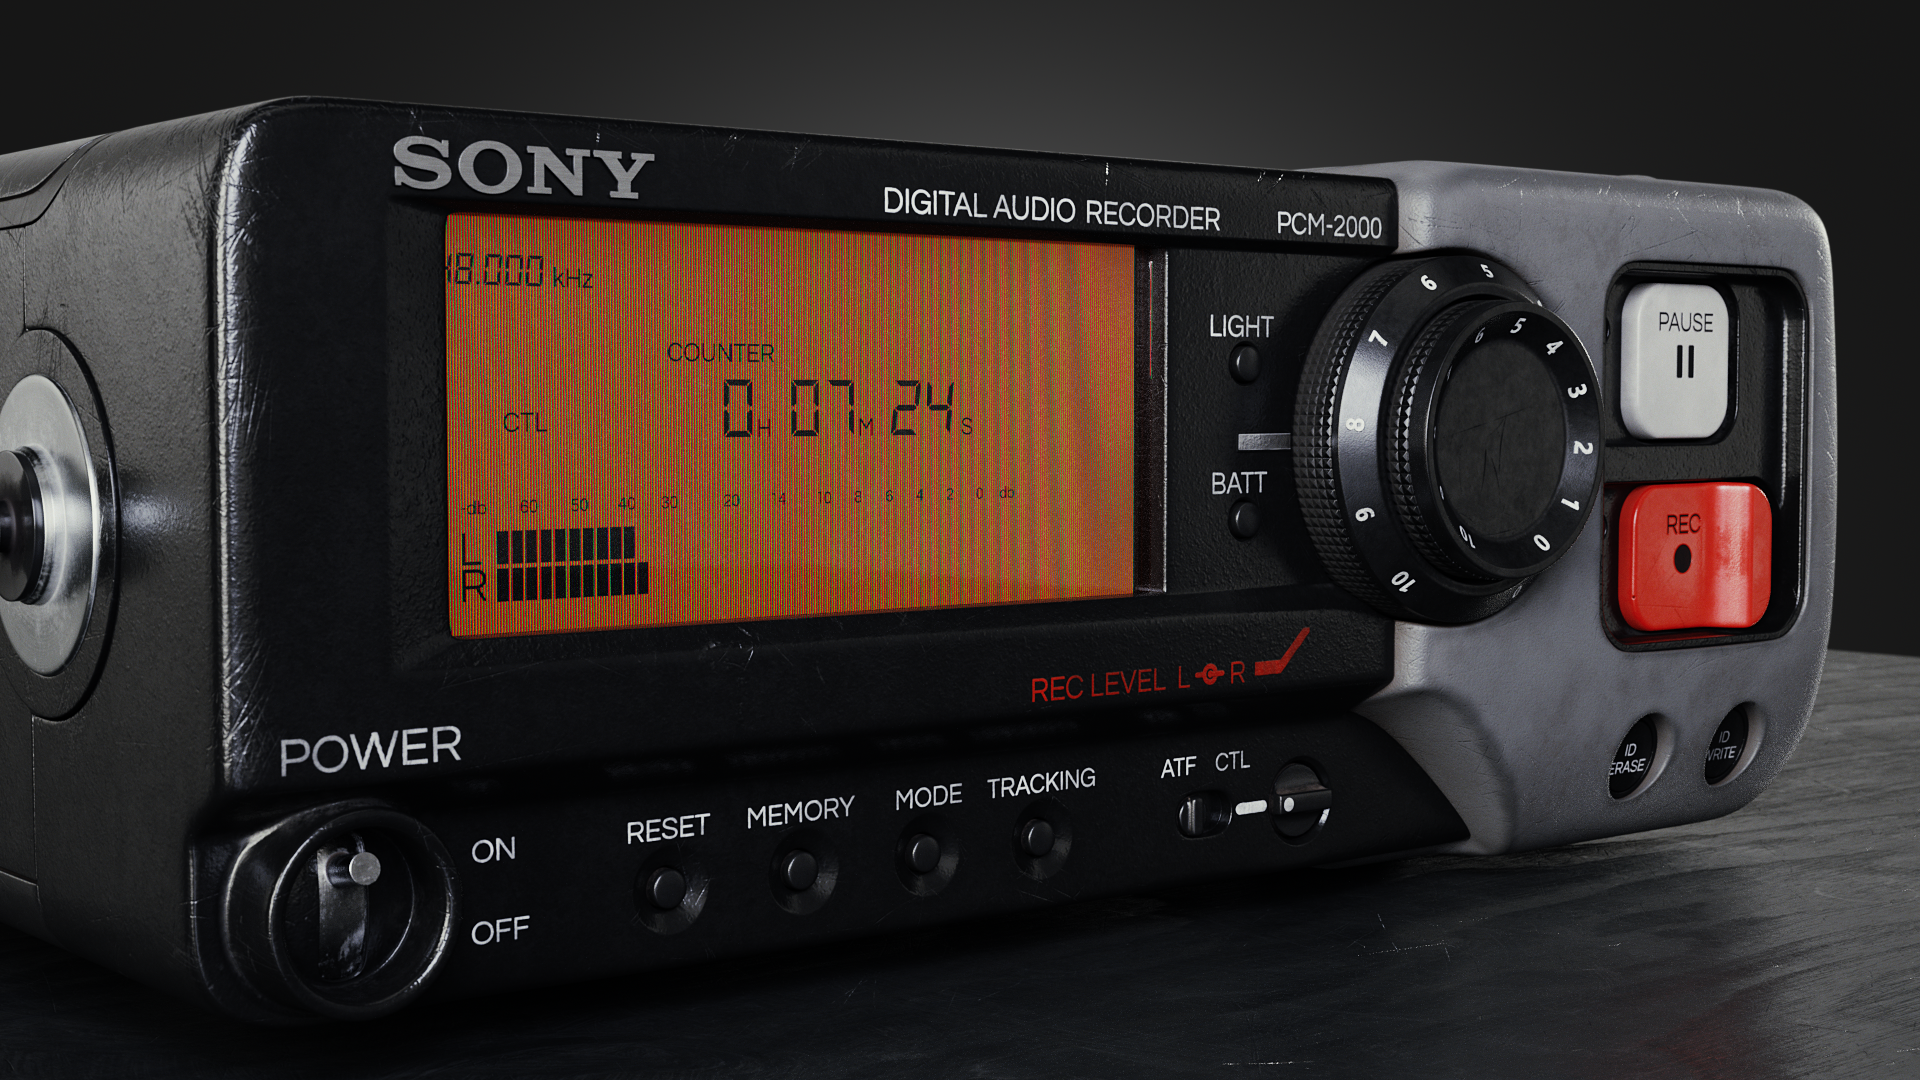
My mission in this project was to improve my texturing and lighting of a realistic 3D asset and to add a piece to my portfolio. I found the image of the Sony Sound Recorder on Pinterest and I thought it was a good subject for study.
I was inspired by the works Paul Paulino and Alex Trevino. These two artists give a lot of information about their texturing process on their Artstation blog and personal websites.
References
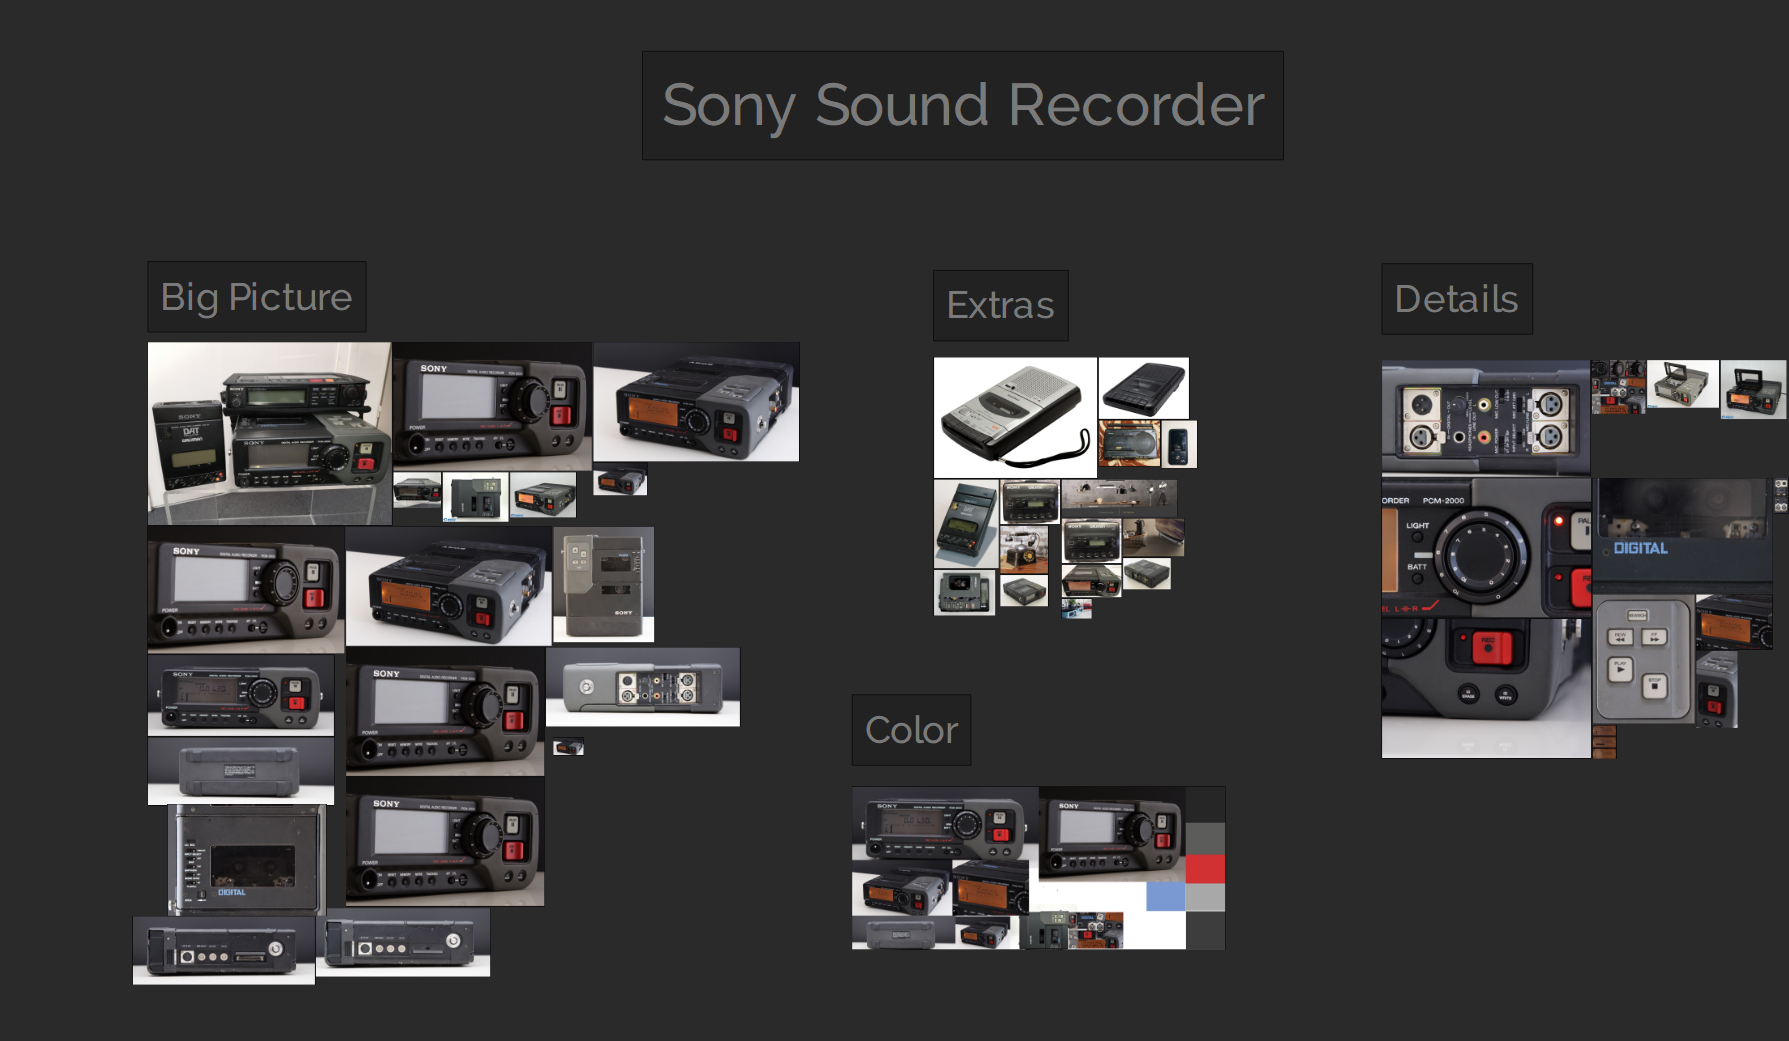
Before starting any project, collecting high quality reference images is very important. It helps me to have a clear vision of what I want to achieve. Very often, reference images do not represent exactly what I want, but I take certain pieces out of them and put it all together.
I get most of my reference images from Google Images, Pinterest, and shopping websites because they usually have very high quality images with dimensions. You will get the best results, however, if you take your own reference images. I use PureRef software to organize my reference images.
Modeling
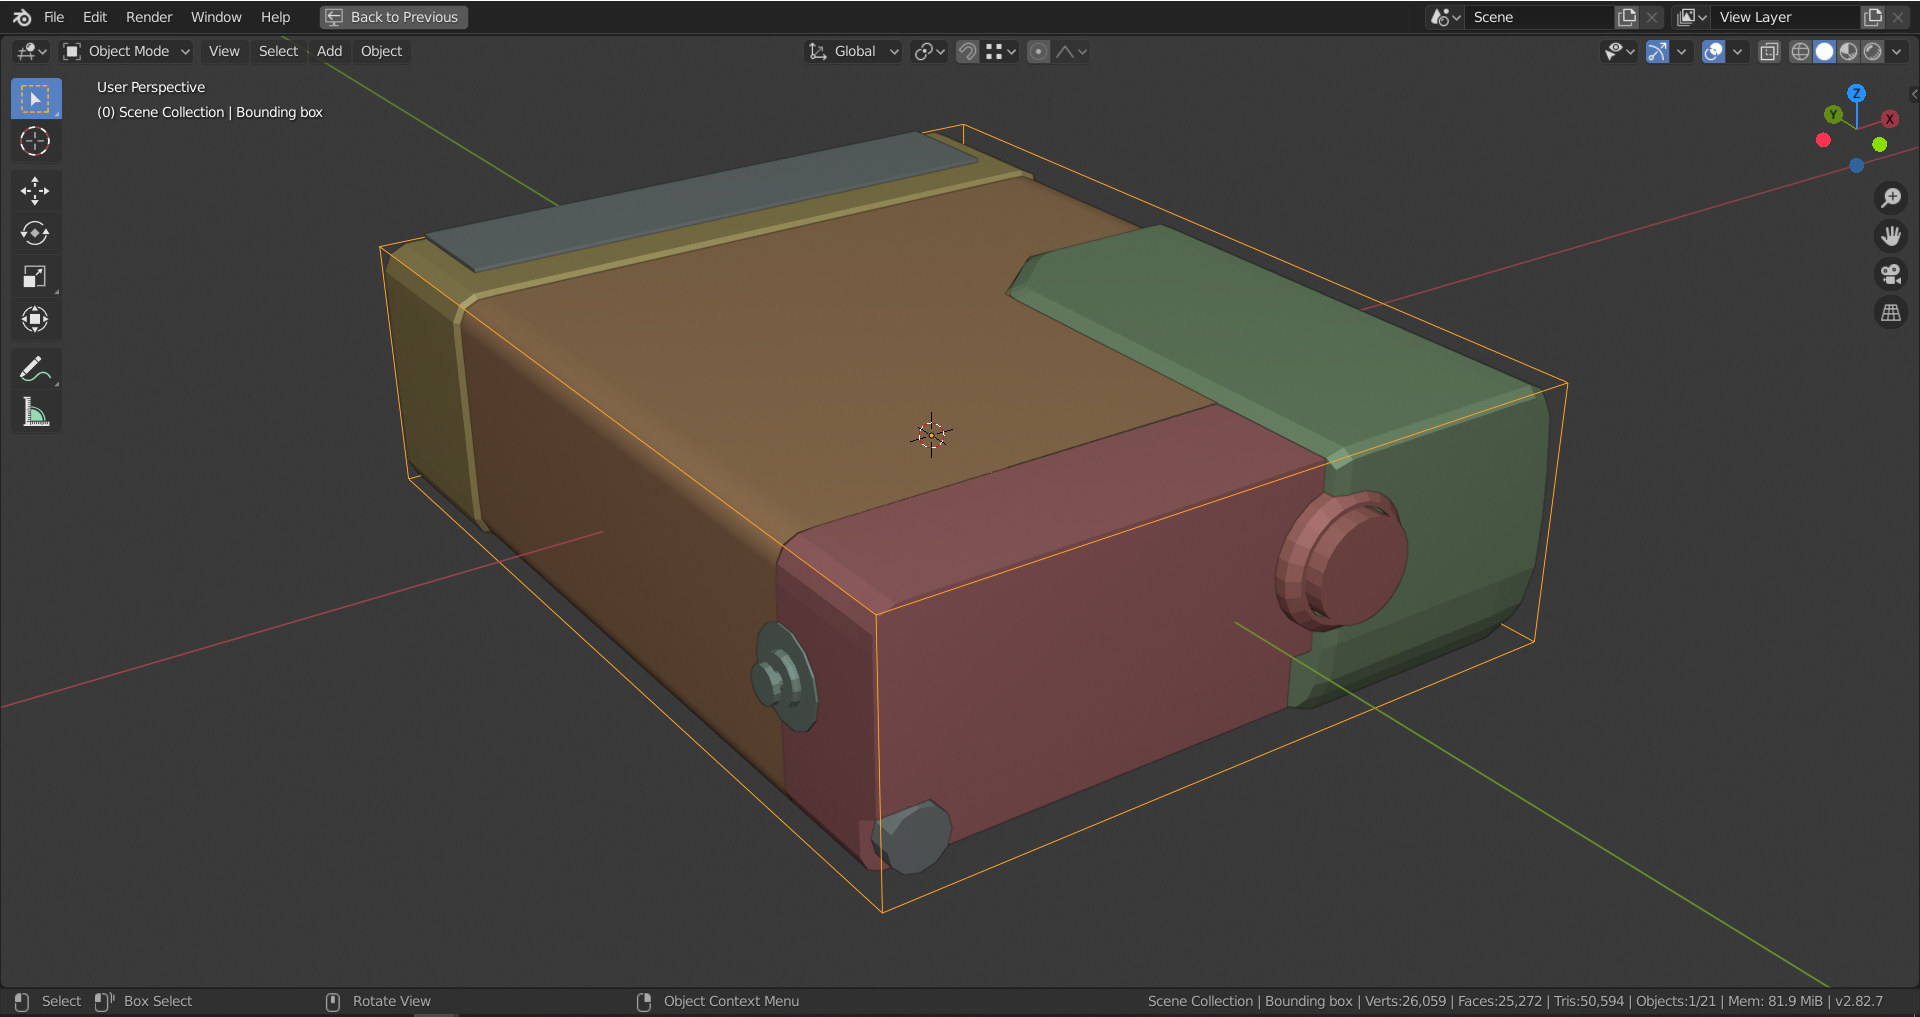
Blockout
Once I collected enough reference images, I started to blockout the object with primitive shapes. The dimensions, proportions and real-world scale are taken care of in this stage. Most objects consist of primary, secondary, and tertiary details. This stage is where all primary details are set down.
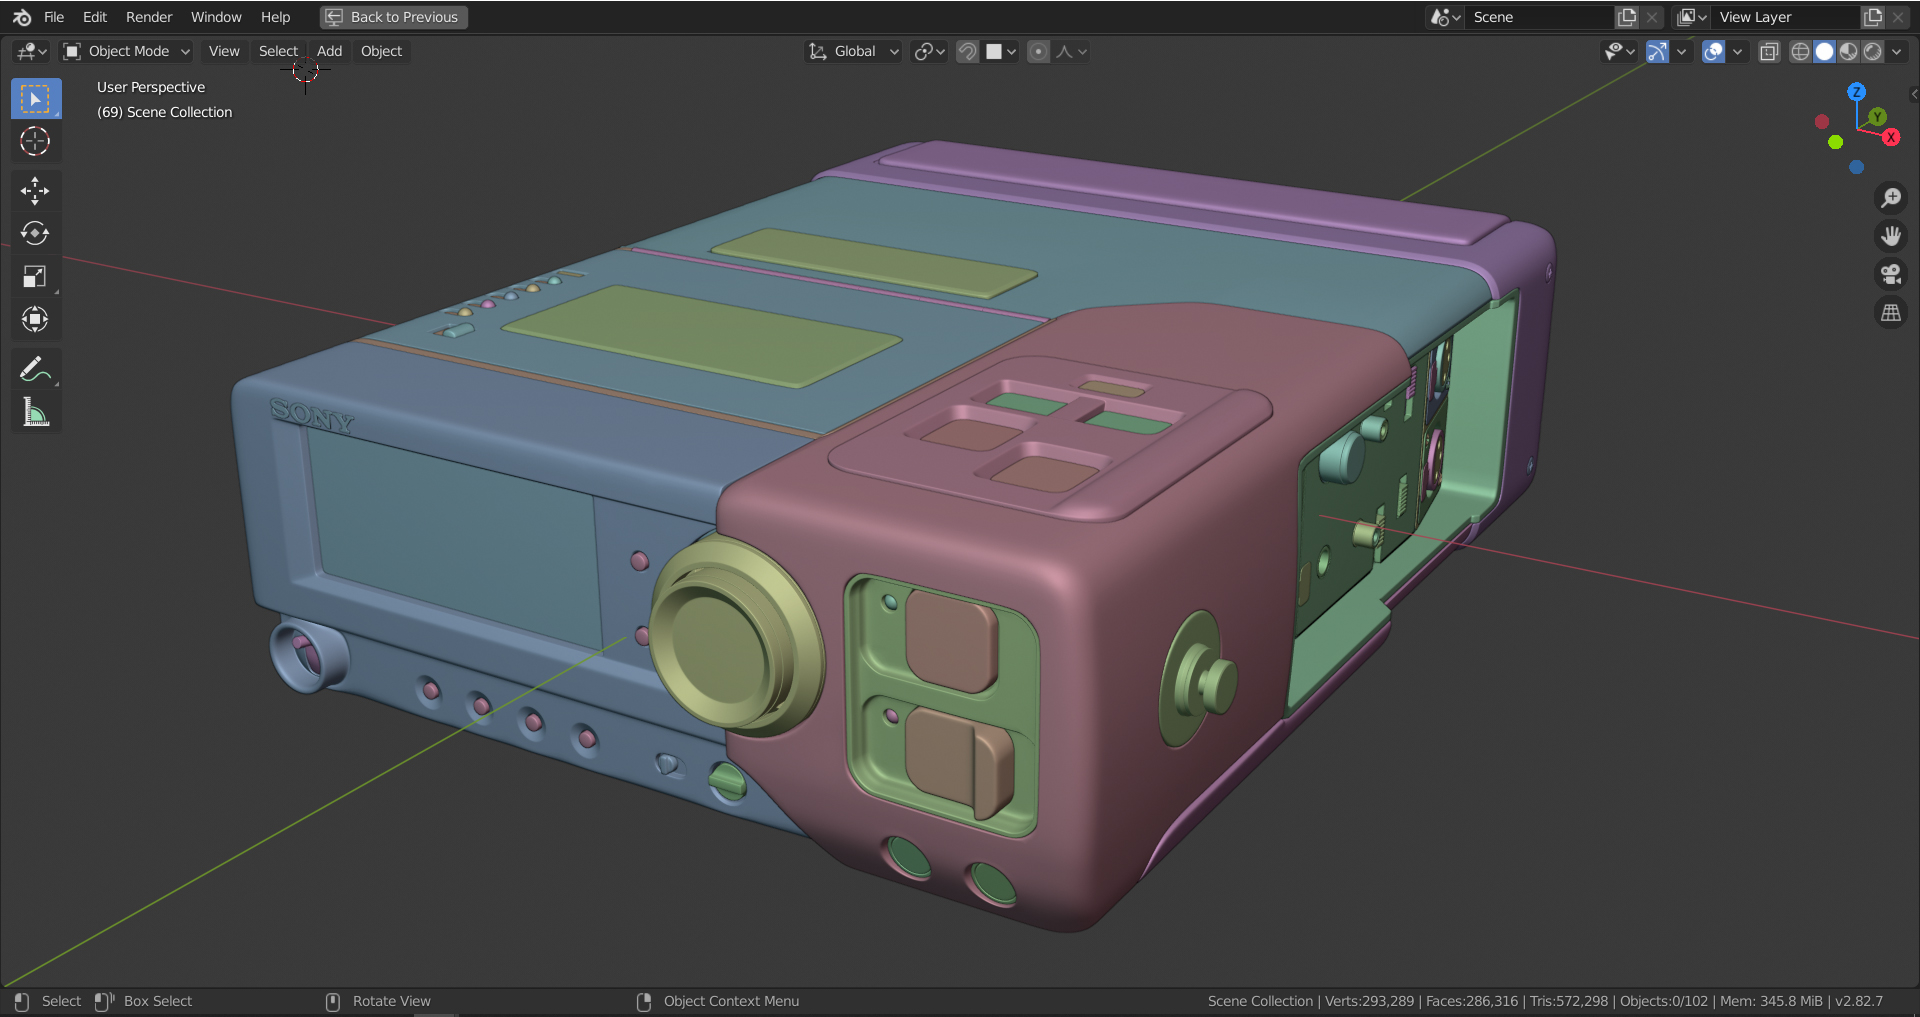
High-poly
After the blockout phase has been done, I move on to isolating each piece, cutting out panel lines with the knife tool and adding the smaller details to them. In this project, I had no polycount limitation but it is always a good idea to keep it as low as possible for the sake of viewport performance. I like to make the topology of objects as neat as possible, I use a collection of topology guides, which can be found here, as reference.
There are certain tools I used in the modeling phase of this project like:
- Knife, Knife Project Tool or Boolean modifier: for cutting out shapes
- Loop tools: I enabled the loop tools addon to have access to the space tool for spacing vertices out evenly in edit mode.
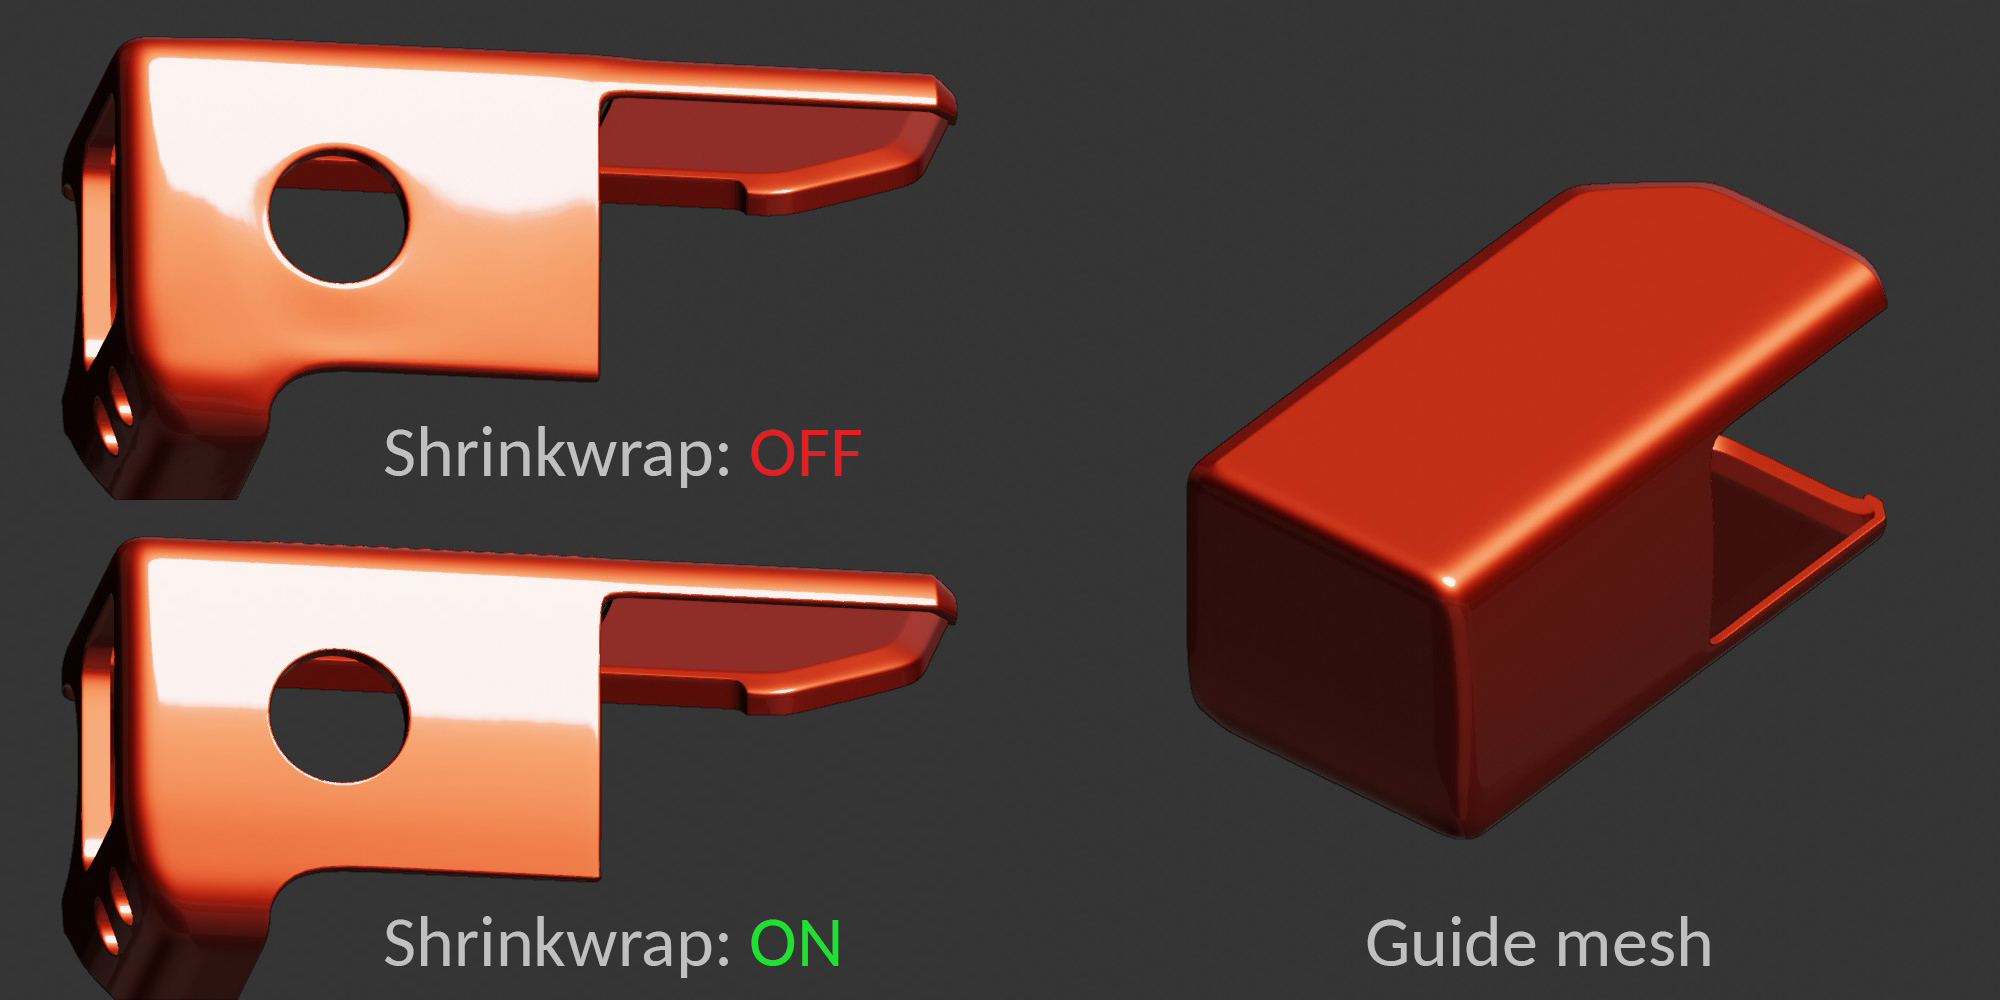
- Shrinkwrap modifier: I created a guide mesh for objects that will be cut and I use the shrinkwrap modifier to wrap the cut mesh to the guide mesh. This helps to keep the surface of the object as smooth as possible.
UVs
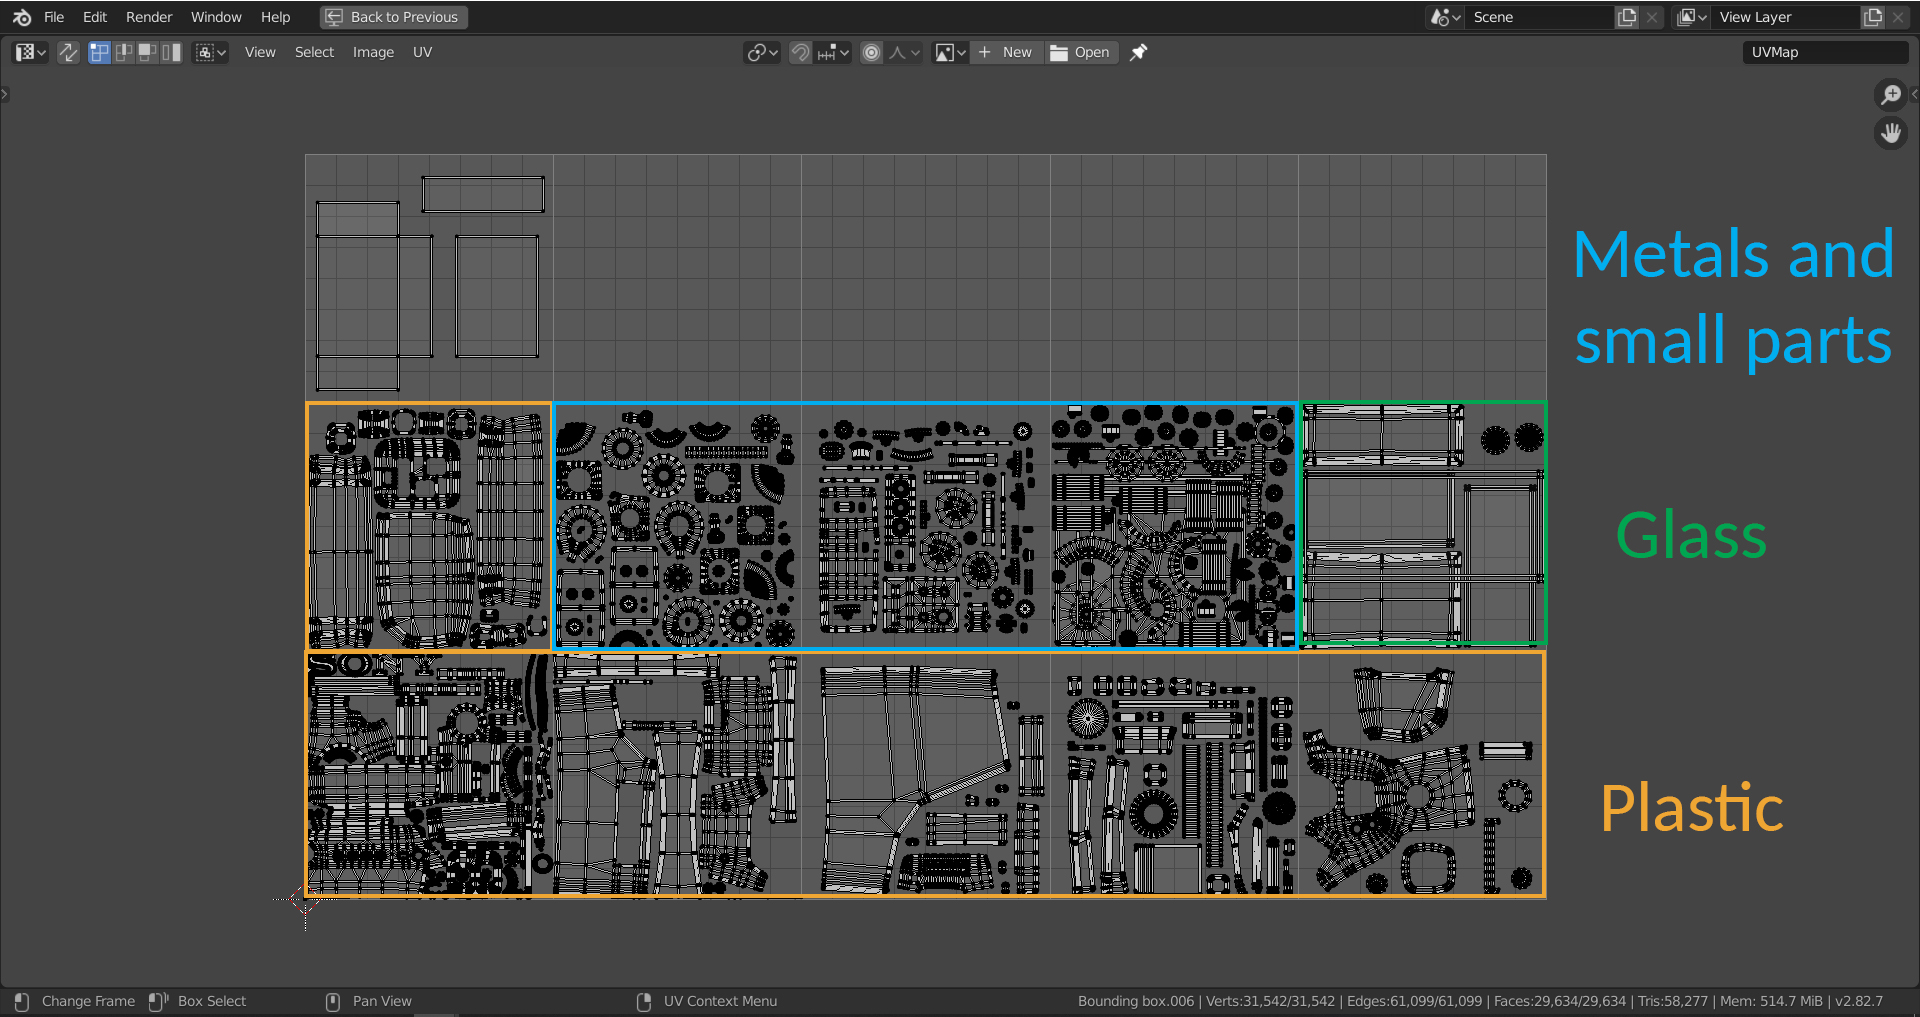
The UVs are really important when working on a hero asset or objects that the camera gets really close to. The UVs have to be laid out properly to avoid stretching and having a uniform texture resolution across the model is very important. I scaled up UVs of the small pieces to get more resolution.
I usually separate my UVs based on the materials because it makes it easy to assign materials in Substance Painter. For example, plastics, glass, and rubber will have separate UV sets.
Textures and Decals
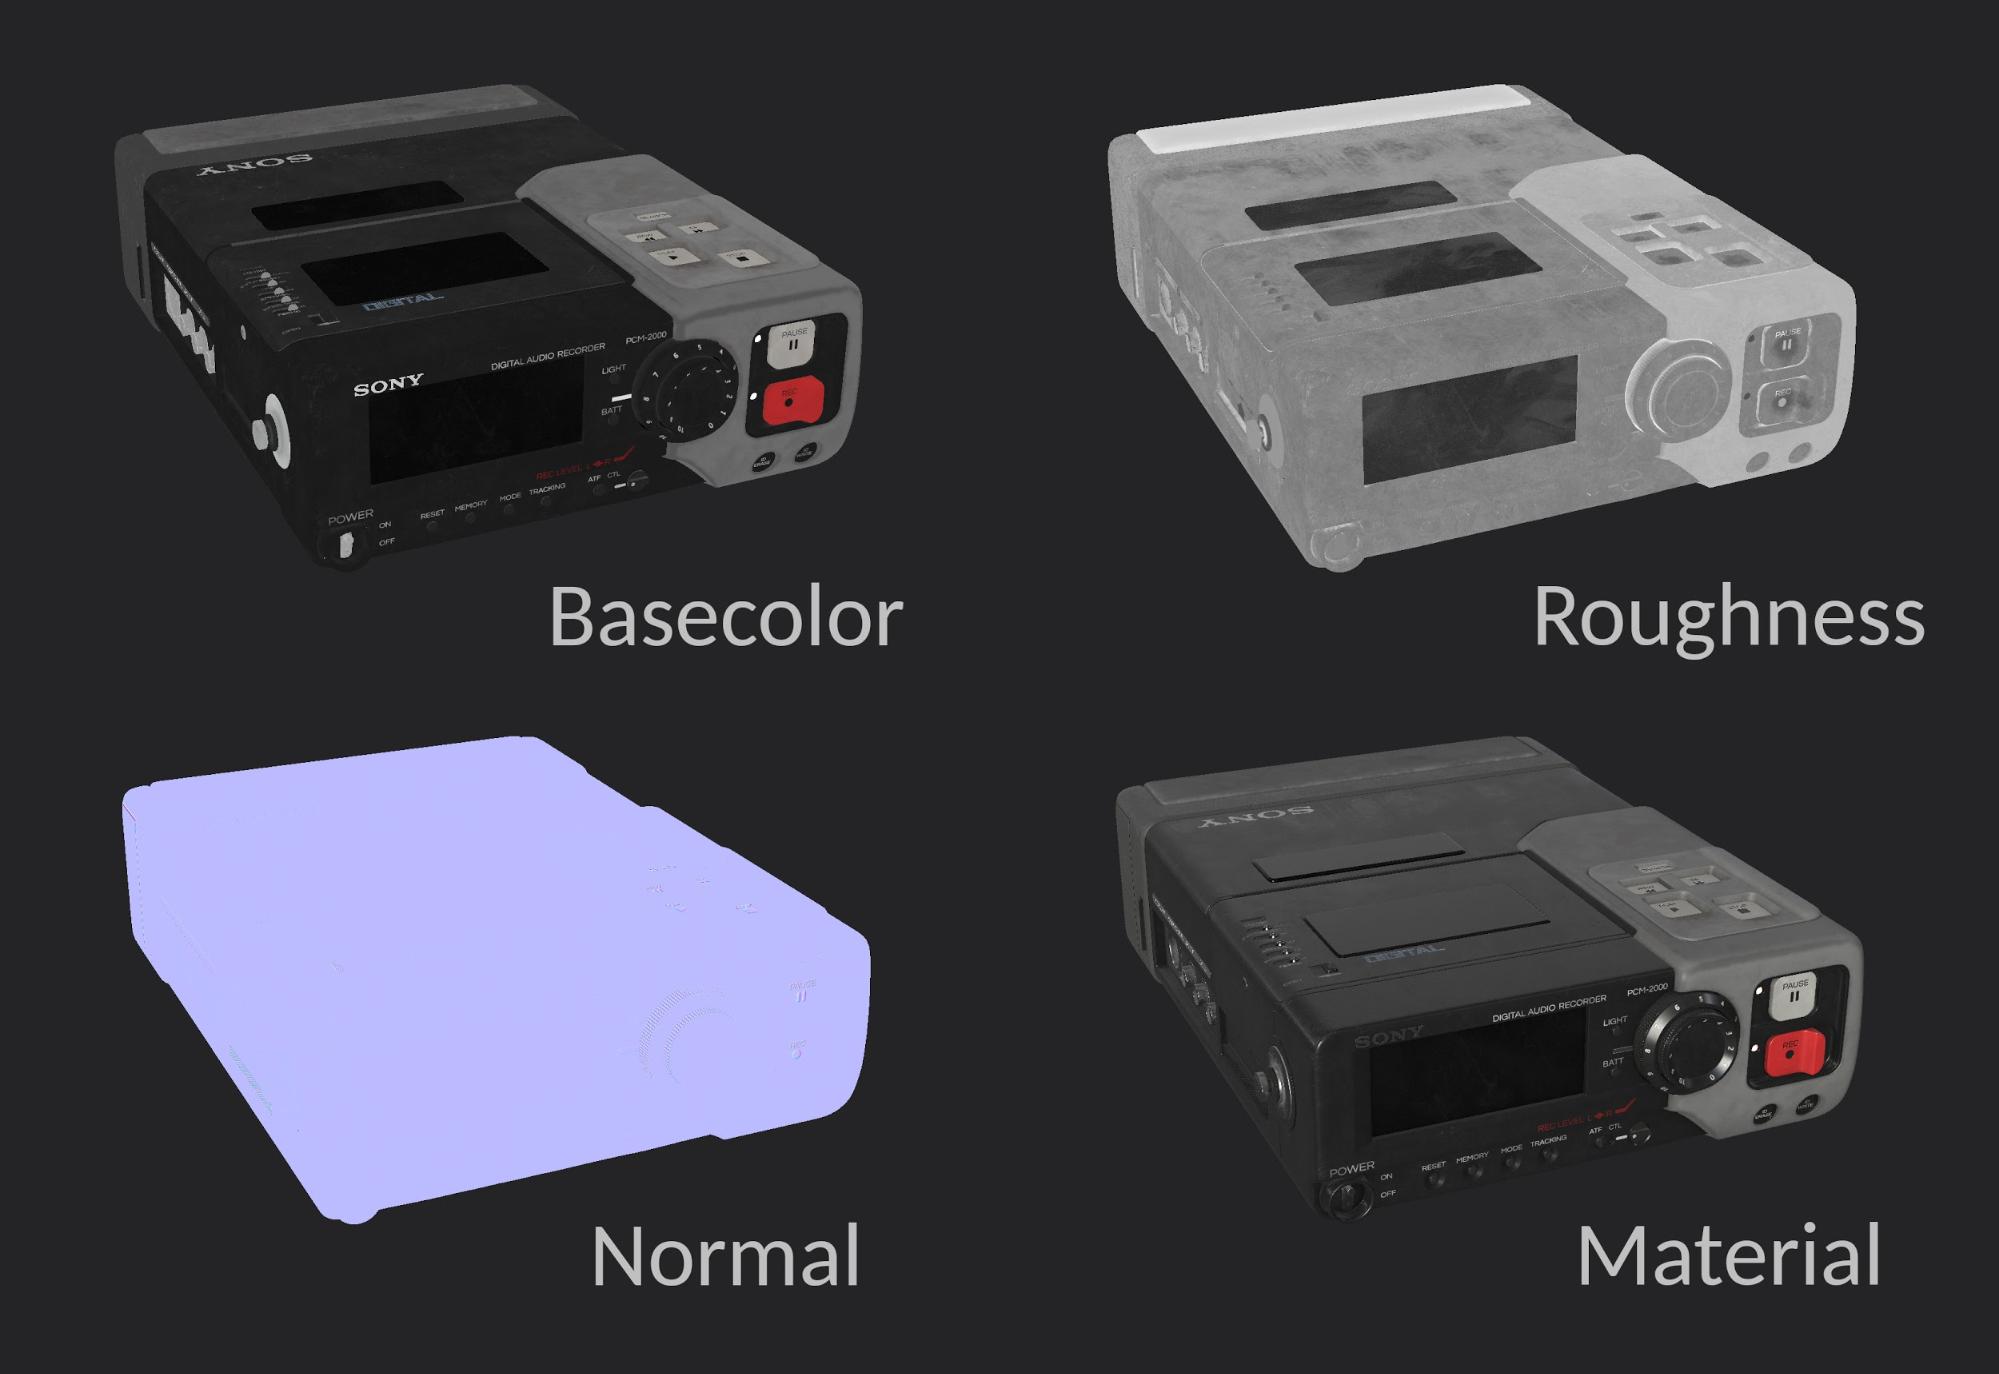
All of the texturing was done in Substance Painter. My approach to texturing is simple, I build the layers in Substance Painter to mimic how the material is in the real world. For example, if the material is a painted metal, I start with the bare metal at the base and then add the layer of paint.
The key thing I try to implement in my textures is variation: variation in colour, roughness and the height map. I started by using Substance Painter preset materials before adding other layers to the material to make it more complex.
I usually overlay a tiling cloud/noise texture with low opacity over my Basecolor for variation in colour and I use multiple tiling textures to influence my roughness map. For my height map, I usually add a layer of large bumps and another layer of small bumps, then I adjust the strength to suit the type of material.
I also try to add a story to the object by adding scratches, dust and surface imperfections. It gives the viewer an idea of its condition, how frequently it has been used, etc.
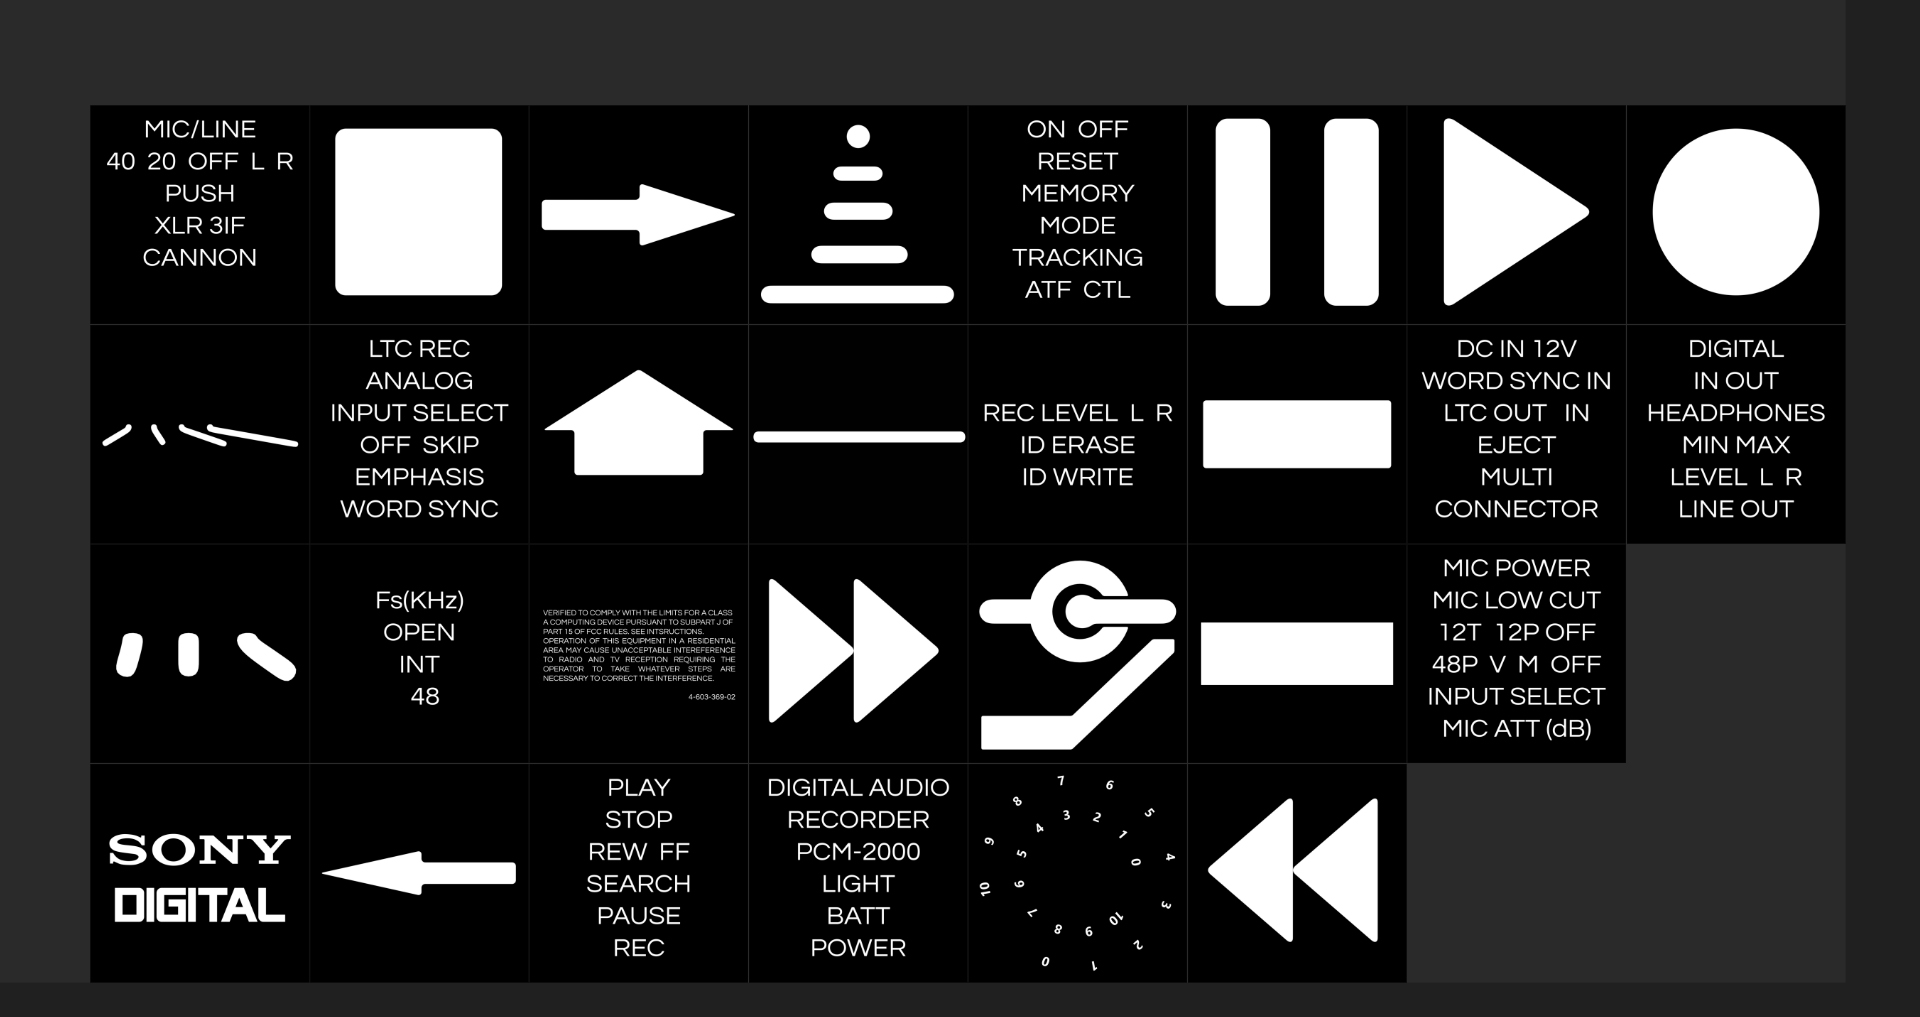
After working on my textures, I begin to add more details in the form of decals, numbers, etc. The decals were created in Blender and Photoshop at 4096 x4096 resolution.
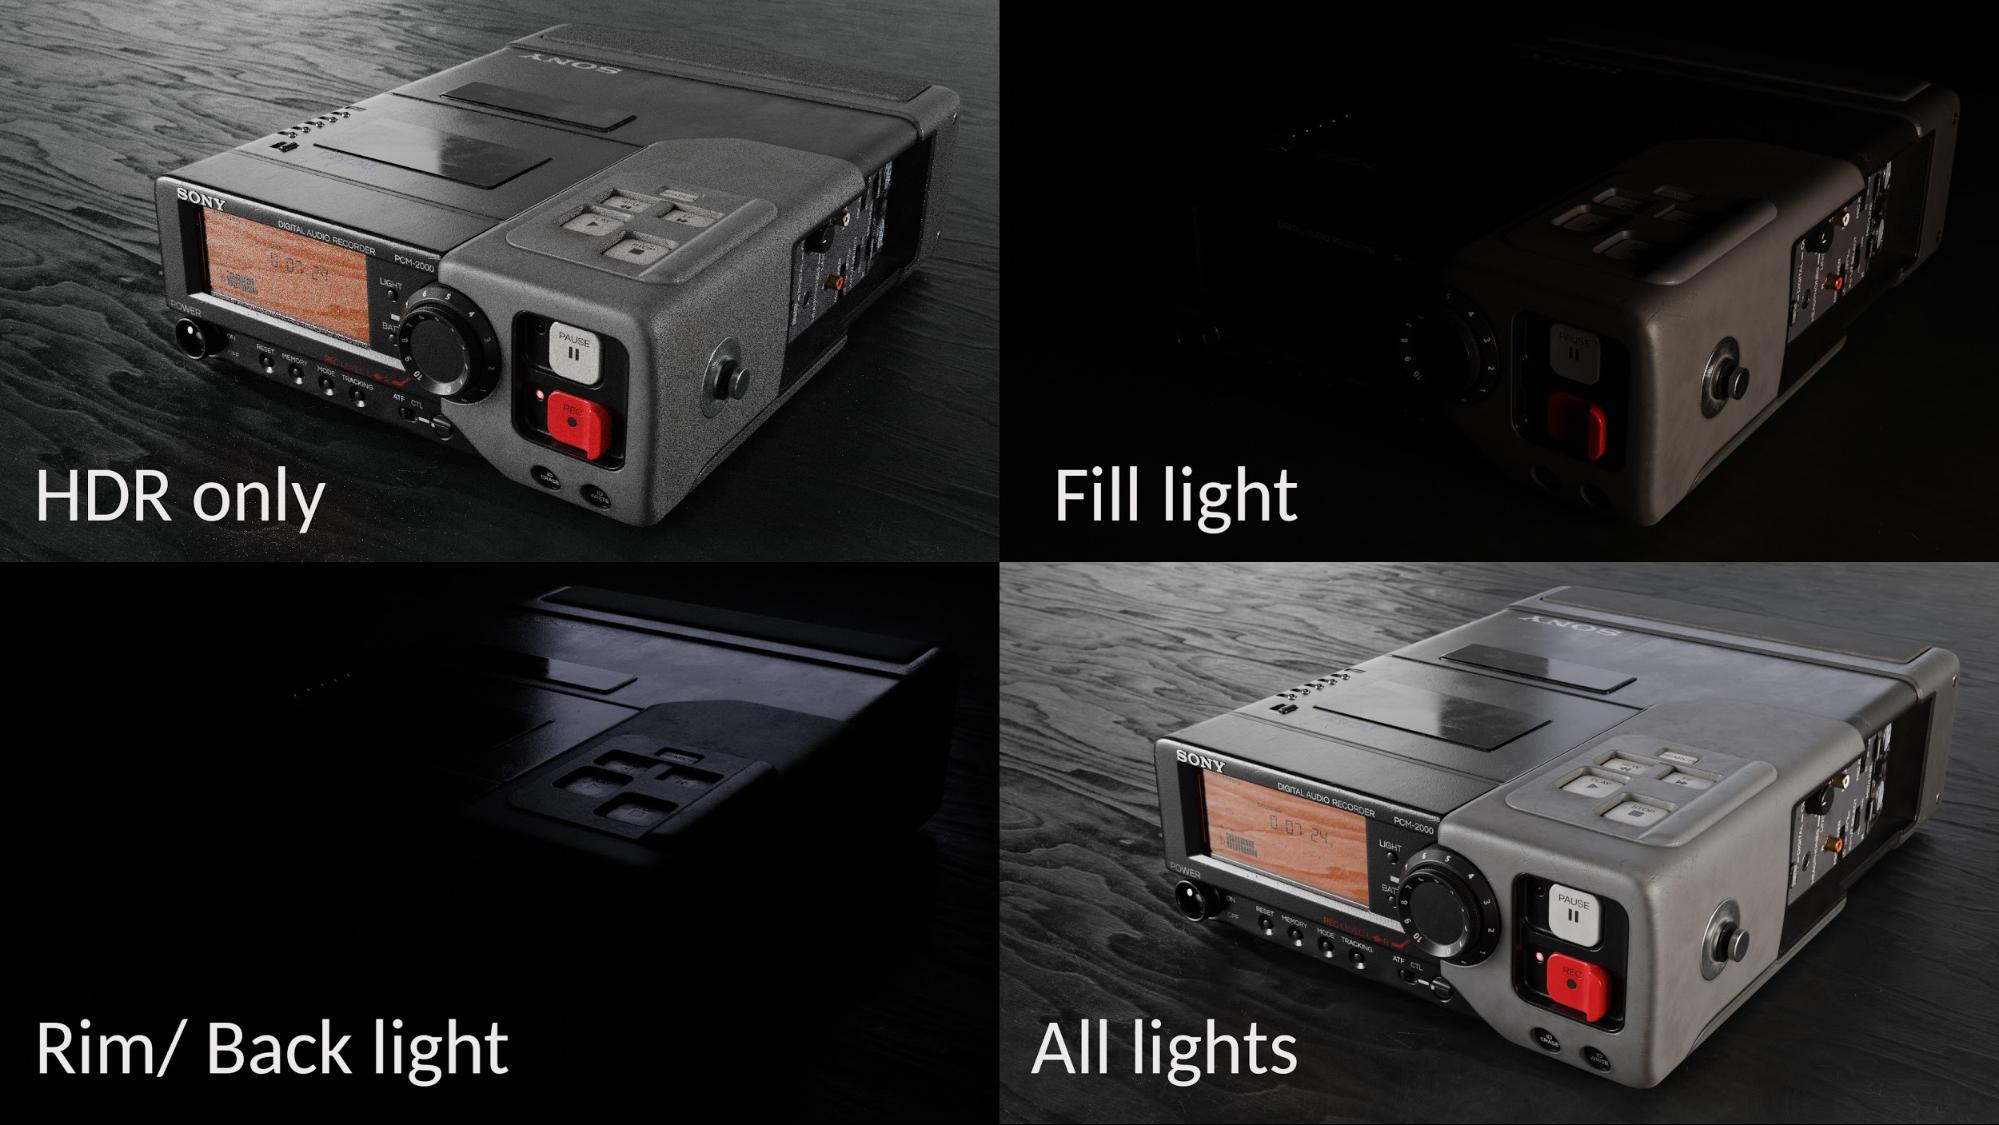
Lighting
The first light source was an HDR studio map. This HDR map lit up the scene accurately, as expected, but some areas where still dark and needed more light. Sometimes an HDR map is all that is needed.
The second light source is an area light with a warm colour; it was added to lighten up the areas that were too dark.
The third light source is an area light with a cool colour that serves as a backlight; in this case it was used to reveal the surface properties and the surface imperfections.
Rendering and Post-Processing
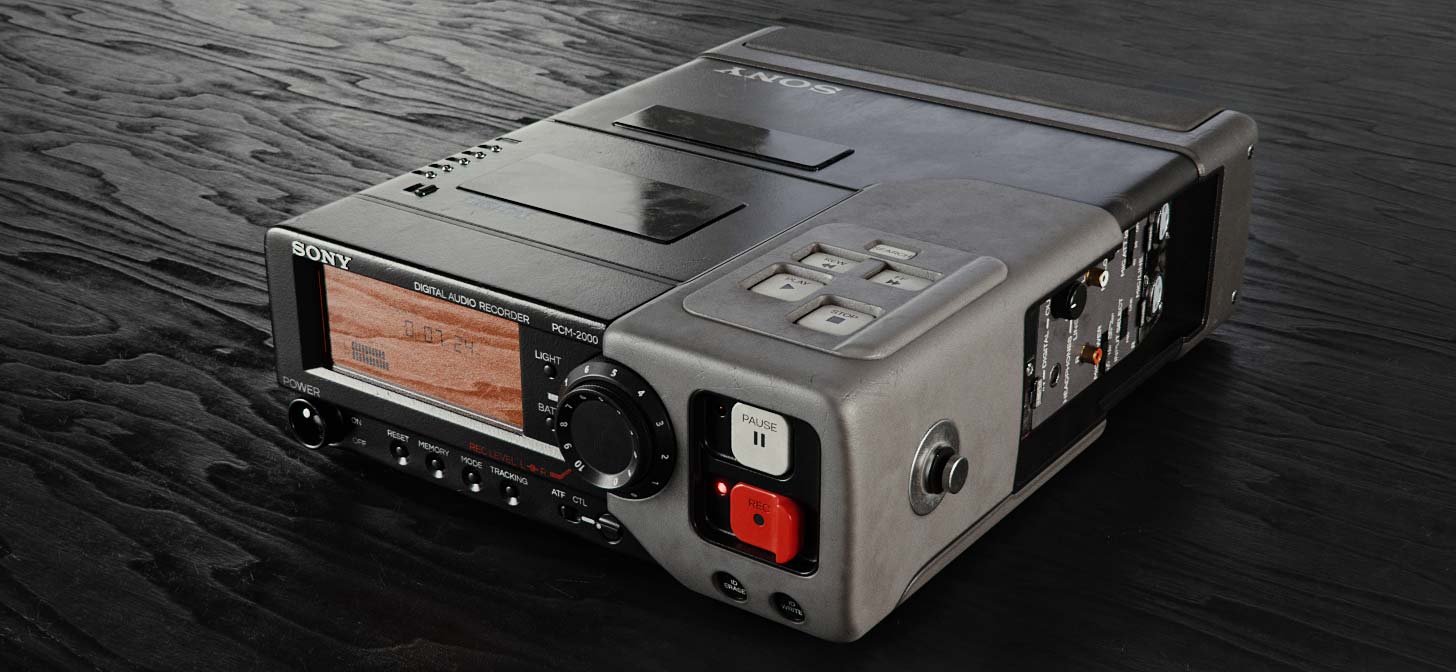
The Sony Sound Recorder was rendered in Cycles with an image size of 1920px x 1080px at 1500 samples. In the View layer properties > Passes, I enabled the Emit render pass which was used to add the glow effect.
The post-processing was done in Adobe After Effects. I used an add-on called Magic Bullet Looks to cycle through a large collection of colour grading presets. These presets have multiple effects within them like a vignette, sharpen, chromatic aberration, color grading, etc. After I applied the preset, I reduced the strength of the effect to about 40–50%.
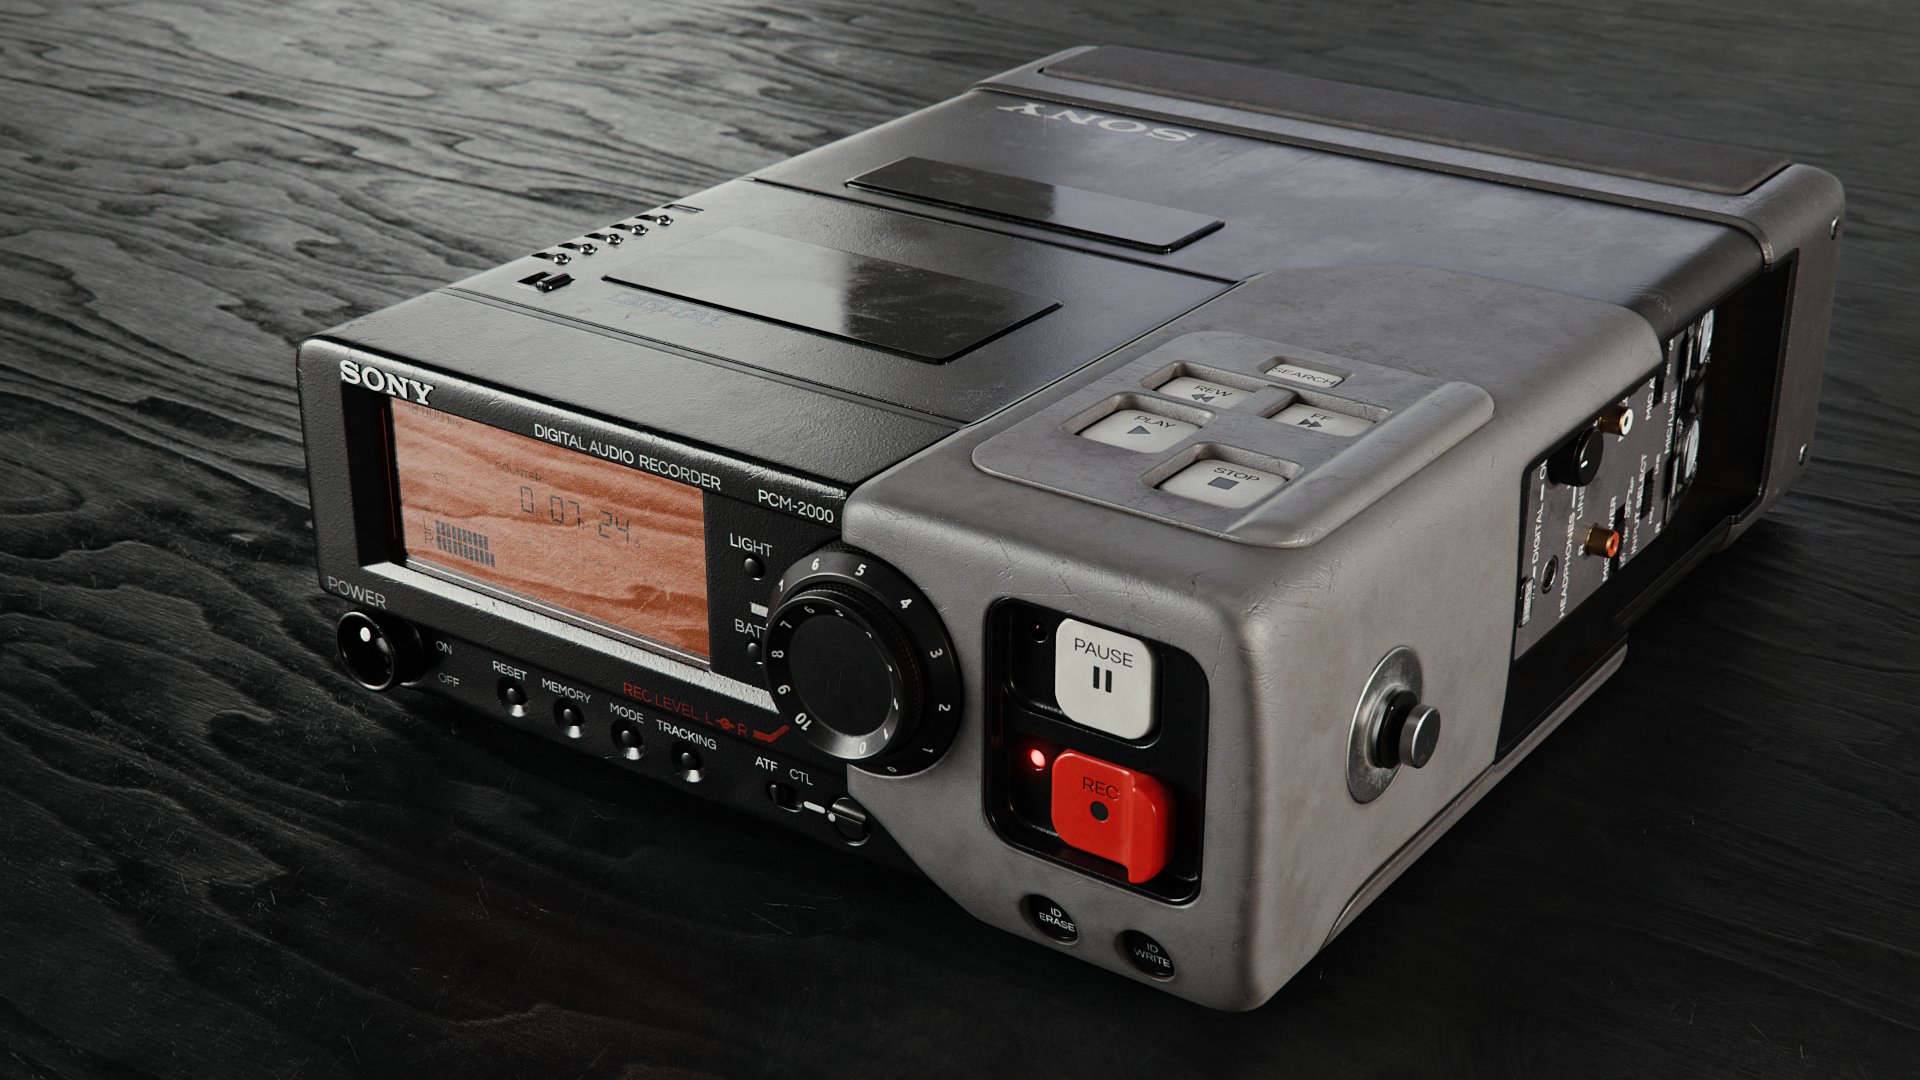
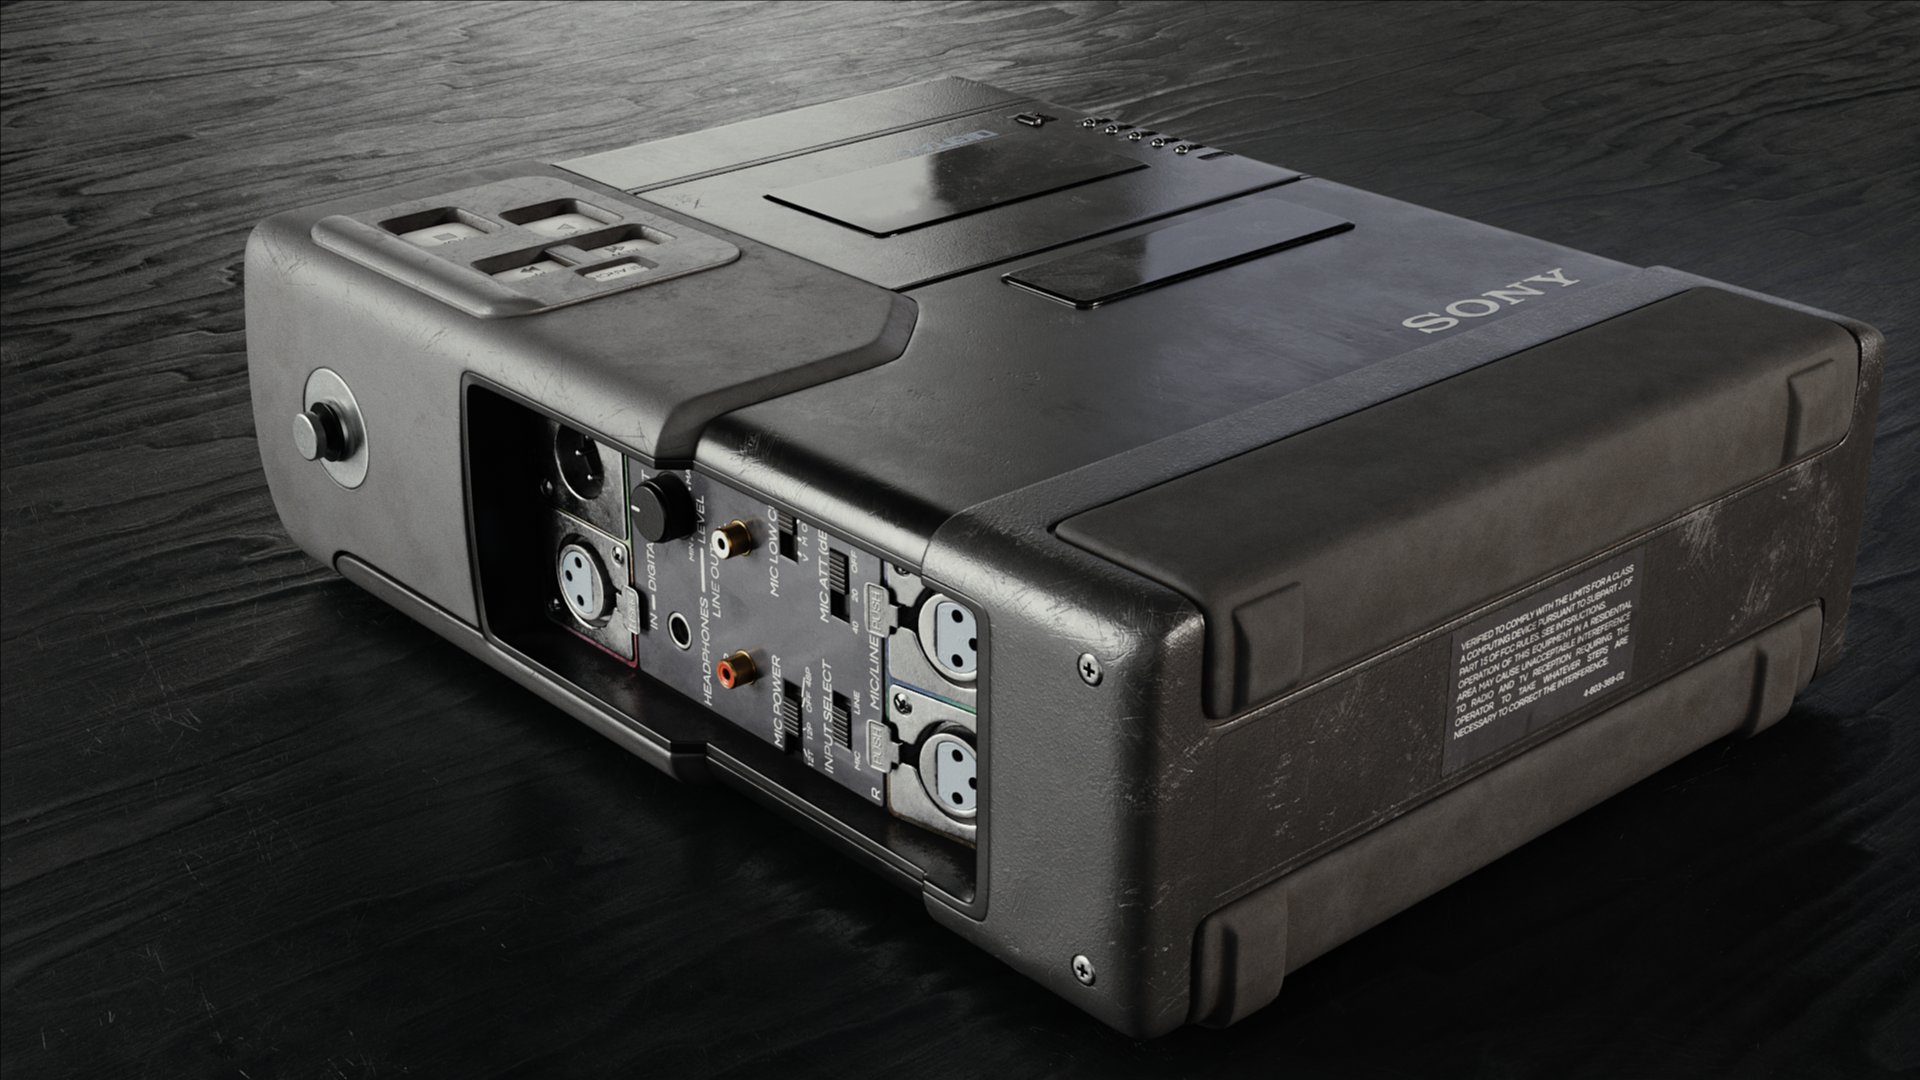
Final Renders
These are the final renders.
Tools
- Blender 2.81
- Substance Painter
- Adobe Photoshop CC
- Adobe After Effects
Blender Addons
Conclusion
I really enjoyed working on this project and I learned a lot from it. It turned out well but there are certain things that can be improved. The texture could have been more detailed and the polycount could have been lower. I recently joined several Discord communities which have been very helpful, they gave me feedback and helped me improve on this.
About the Author
 Mobolaji Dele-Adelodun, Self-taught 3D Modeler and Environment Artist


Looks amazing. Thanks for the insights.
Did you use UDIMs for the model?
Your UV Layout looks so clean. How did you manage the UVs?
Thanks
No i didn’t use UDIMs for this model (it was an easier way to show all the UVs at the same time.) but i will use UDIMS for future models.
I used UV packmaster to pack the UVs and I did some by hand.