
Behind the Scenes: Cyberpunk Speeder
About me
I’m Pablo Daniel Ruggeri Acción, I’m a 27 years old Industrial Designer from Argentina and a 3D lover. Even though I’ve learned a lot from studying Industrial Design, I learned most of what I know (especially everything related to the 3D universe) in an autodidact way. My constant curiosity about everything is the spark that always keeps me motivated to do so. I love to be always observing and thinking about how to improve everything that surrounds us.
Aside from this, I love science, art, and philosophy. That is why I’m really a sci-fi fan. I believe it’s a great fuel for our minds to stay creative, it is a great passion booster and, in my opinion, the best boundary pusher we have nowadays, which is something crucial/vital for us. For me, creating utopian and dystopian versions of our future by mixing science facts and philosophical issues in creative ways, lets us better understand our present and, consequently, project/build a nicer future. Doing this in 3D is something that I really love. The expressive and communicative power that 3D software has is immense and that is why I was attracted to it.
Last but not least, I’m currently working as a Teaching Assistant (in subjects like Innovative 3D Design) at the university I graduated from and I am working as a remote freelance artist occasionally.
Project Introduction
Ok, so this is a project that I did around a year ago in my spare time. It took me about 2 months to finish it, and it was the very first big project I did in Blender in order to learn this great software (and Substance Painter) in-depth. Previously, I had been using 3ds Max for 10 years. That being said, I have decided to focus this article more on what it feels like to make that switch and, primarily due to my background, to focus on the conceptual rather than technical way that I approached this project.
When I started with it, there was buzzing news about the upcoming 2.80 alpha release. So I decided to try Blender again and I have to say that it is a one-way ticket. It has been a great experience since then!
I must confess that I had tried Blender before (waaay before) and I bounced off of it like a light ray. The moment I tried to select something and all I managed to do was to move “that thing” (3D cursor), was extremely frustrating. I couldn’t do one of the most elemental actions without looking up how to do it. I know that many purist Blenderians will accuse me of being a heretic, but for me, Blender devs have done an outstanding job with the 2.8x versions not only because it is a lot easier to make the switch, but also because of the constant push and development that Blender is undergoing. Tools that feel antiquated in other softwares not only work like a charm in Blender but also are constantly evolving and pushing the limits to create new ways to achieve results. I really feel the fresh air! No more excuses to not learn Blender!
Aside from the technical motivational aspect, in this project I also tried to put into practice everything that I had learned but been unable to use, to explore areas that I always loved like concept art, and to polish my knowledge in certain areas like unwrapping, texturing and everything that is necessary to create an asset “fully”.
Inspiration and Conceptualization
Starting with a new program requires a good excuse. Therefore, I decided to bring to life one of my sketches. It was quite a relaxed sketch I did just for the sake of fun in the summer. Also, it is a vehicle, which is something that I love, too. I have some other drawings but this one, in particular, let me play a bit more with the sci-fi concept art world, and its complexity was balanced. I didn’t want something either too easy or too difficult. I wanted something challenging but achievable, not only to challenge myself but also Blender to see how well it could handle certain “heavy projects”.

So there it was the first 2 steps. I determined my goal and I got the general idea of what I wanted to do. But before starting modeling, I started with research to get references. Something you should do, not only at the beginning but throughout the entire process. This is really good advice that I’ve learned from my experience as a designer and from many great 3D artists. Basically, the more you see, the more material your mind has to play with and be creative.
However, I still defend the idea of starting with a naive concept sketch and then doing research. For me, it is better to let your mind be free at the very beginning rather than to start by constraining it with boundaries. Your mind is loose, free, vague and imprecise at that point. But that is something that is ok for the first steps, and I have tried to do it this way since I was a kid because I believe that is the key component that makes kids’ drawings so creative. Also, when you do research, look for direct /similar elements but also be disruptive. If you always look for boxes, it will be extremely difficult for you to imagine a sphere. There are lots of different approaches and there is not a unique golden rule or method anyway!
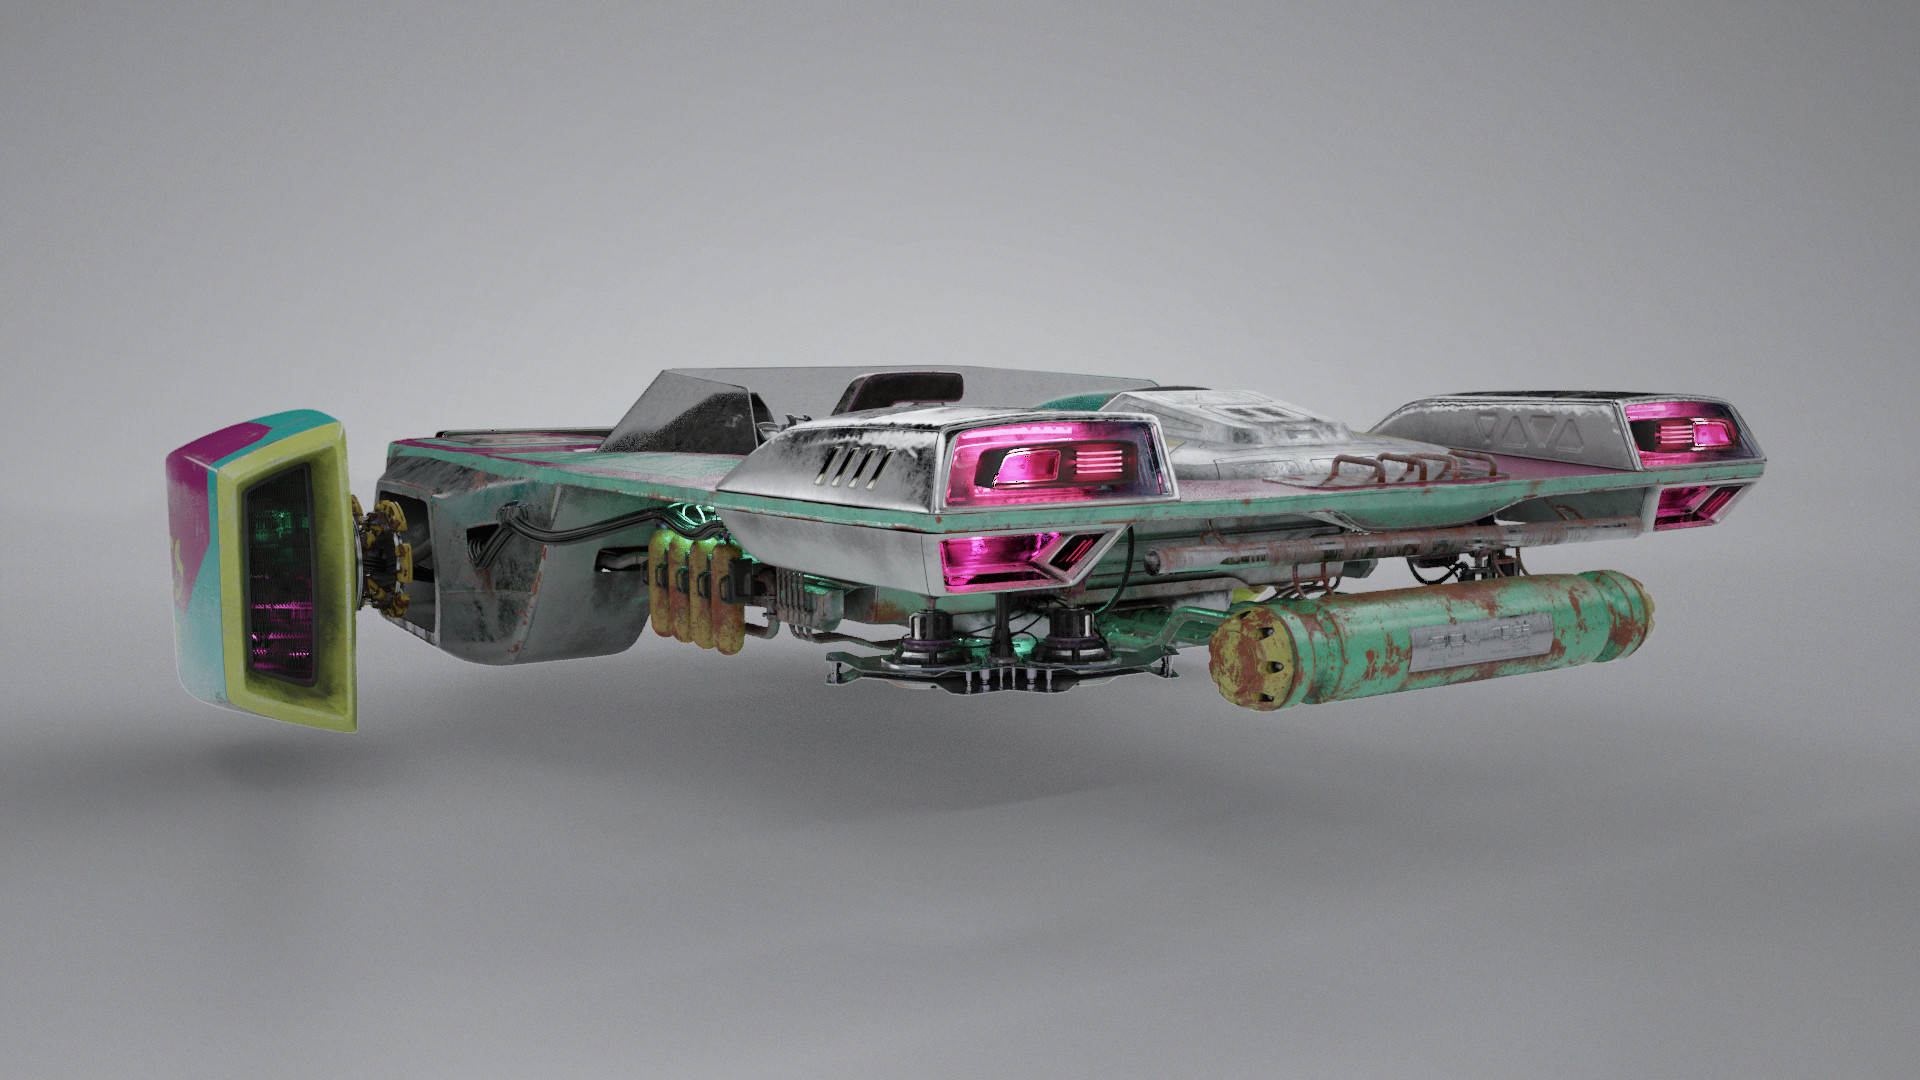
Various references from the cyberpunk genre and other similar branches were the base and main source of my inspiration. Definitely, Luke’s Skywalker Land-speeder and the DeLorean time machine from Back to the Future had a great influence on this design project. It also has some touches of Wall-E!

After this reference research phase, I started to imagine and philosophize about this vehicle. That is how one of the main concepts behind this vehicle appeared. The idea of that personal belonging and the customization that you do, according to your taste preferences and your ideals, to make that thing you have recognized as “yours” in a dystopian “futuristic” world, where there is almost no personal private space. Something that is yours, that makes you feel somehow unique. Also, I saw this vehicle as something that was a kind of a DIY with different found parts. That is why I opted to give that incompatible parts look rather than a model out of the fabric. As it was going to be a DIY, imperfections were crucial, especially in a very tough environment where acquiring the best tools and parts, and the time you can spend on what you like, is not an easy thing. The car tuning universe also had an impact, with their exaggerated and redundant parts. Therefore, the idea of a speeder with a custom-built main body, recycled thrusters/turbines from a different high-end model with other high spec mecha parts to add that racing spirit vibe started to establish the communicative tone of the project.
Once I imagined that story and got the references, I started to feel the personality of this project and, consequently, I was able to visualize in greater detail what I wanted to achieve. Still a bit blurry, but now it was time to start creating it!
Modeling
So after all this, the modeling phase started!
The first modeling steps weren’t that easy. You know, stepping from making an anvil from Blender Guru (yes, I’m from the anvil clan) to this model was quite a big leap. Starting from scratch with a new project in a new program is quite frustrating. There was a lot of googling and video tutorials in the middle of the process. It is, of course, absolutely more easy than starting with a new program without any 3D knowledge, but still, you have to overcome certain obstacles. Different shortcuts (I didn’t want to preserve Max’s shortcuts because many tutorials don’t consider that), different names (a chamfer in Blender is called bevel, who would know!), and some different methods. Even so, I don’t regret it at all!! All of it was absolutely worth it.
That said, the “Block-out” phase started. To start with this phase, I used the drawing that I had, I placed a camera in a similar perspective and I created an overall block, considering the general measurements that the speeder should have. I imagined it as a two-seated vehicle, so I decided that the width of it should be very similar to a car. The length of it was a bit more confusing, but it had to be at least double its width, and its height around its half. It is really good advice to set up a certain measurement unit and decide the project’s overall measurements before starting with primitive mesh blocks. It will help you a lot in later phases, especially when determining visual levels of detail to better communicate the scale of the project. At any time, you can refer to a real-world object size to see if your project still preserves a correct scale sensation. Also, it is a really good habit to have at least a box that represents a person or character in order to compare the scale of it. Much, if not all, of what we humans create is based on our proportions.

Aside from this, the way I approach and like to start developing a concept is to create a simple drawing and start experimenting in 3D. I tend to do many simple 3D iterations and variations (with backup copies of course) of the original base idea. I find this a very plastic method and very helpful during the conceptualization process. The 3D software will “lie” to you less than beauty sketches. The sketch is a vital starting point when creating a concept, but you shouldn’t be afraid to be explorative. Iterating, experimenting, rethinking, seeing it from a new perspective, comparing your results and so on, lets you obtain much richer projects in the end.
Once I started to feel that the overall project was going ok, the more details started to appear. It is crucial to always start from big blocks and then move on to the details! If not, it is highly probable that you won’t be using certain details that you have made, which will make you feel that you have “wasted your time” on that project, which leads to motivation.
A good example from this project was the mechanical elements that I made. I was quite sure that I wanted to add some very exposed mechanisms, but not very sure of how much and in which places. The one that I was very sure about was the connection between the turbines and the main body. I did it relatively early in the project without hesitation and it helped me to determine the final level of detail resolution that I wanted. That helped me to decide that I would focus just on the most exposed and visible parts. The smallest details were going to be the custom screw heads and some geometry to represent the weldings of the pipes, but only as low poly versions. Meanwhile, for the back part, when I tried what I had drawn previously, it didn’t quite convince me. That block part was hiding a lot of that space, so I decided to remove it and start 3D sketching some possible exposed mechanisms for that area, based on the level of detail I had decided on previously. The more I worked in that area, the better it felt. And it was ok because, even though it is not identical to the drawing, it still preserves the essence of the project. The idea kept evolving throughout the process, I kept searching for references, rethinking the concept, and that was ok as it helped me make decisions and achieve my primary goal!

Below you will find some videos of different angles of the process:
Progress from 3/4 upper front view.
Progress from 3/4 lower back view.
Progress from 3/4 upper back view.
Series of images of the final model in solid mode with random colors.
No Kitbash Challenge!
A good point to highlight is that I decided not to use the kitbash technique for this project in order to force me to learn the most I could. So basically everything started from a plane. Don’t get me wrong, I don’t mean to diminish the kitbash technique. It is an amazing method to achieve results faster, and I use it! But, starting a new program and kitbashing your first project is not a very pedagogic start. So I used a mix of Subdivs + Classic Booleans (with no extra add-ons) to model it.
The final touches were to pay more attention to certain subtleties. I enhanced some aspects such as imperfections and overall messiness to reinforce the idea of the dystopian DIY, and to indirectly tell the story of that battled racing speeder. Visual asymmetry and elements’ proportions were important points. The position and scale of the turbines make them pop up and be an important element. I wanted to communicate the exaggerated power that this speeder has. For his owner, power is an important thing—everything else can fail but not its soul. Also, I tried to avoid repetition, which is why I played with badly positioned headlights, different seats, and certain missing parts. For the interior parts, I decided to add lots of switches (I don’t know why, but I love them) and many ‘80s displays making you feel that this ship requires certain dexterity to be driven and connoting the usual redundant parts of tuning. When everything was nearly done, I decided to sculpt certain zones in order to add bumps, scratches and panel deformations due to welding, to name a few.


One last, and very important, thing to mention, is to try to keep your project organized. At least create some collections where you classify the elements. It is a good habit to do this, even with simple projects. Batch rename was an incredibly useful tool for this task.
Texturing and Shaders
After the modeling was done. It was time for the unwrapping and texturing. I unwrapped most of it (like 95%) manually. The rest of the parts were textured using cube projection and some tileable textures.
It was quite challenging for a few reasons. Substance Painter doesn’t give you that many map resolutions, working with the UDIMs method wasn’t possible at that moment, and my hardware setup characteristics were a considerable limitation.
Consequently, I decided that the best way to approach this was to divide and group the pieces into materials to increase “the final possible resolution”. For instance, the tanks were grouped into a material, the main body was divided into 3 different materials, each seat with its own material, and so on. By doing so, this project ended up having 21 materials at 4k resolution.
As this model wasn’t intended to be in a game, I didn’t create a low poly version of it to bake its details on it. I just used the high poly version of it directly in Substance Painter.
In terms of texturing, what I tried to do was to keep it aligned with the concept. Due to my industrial design background, the selection of the materials wasn’t random. The main body parts are from standard steel, while the vital ones are from more durable materials (less susceptible to corrosion) such as aluminum for the turbines and a high endurance material alloy of two metals yet undiscovered for the hovering disk thrusters of the back part.
Lots of details were added with normal maps such as the small indentations and the panel weldings.
For the worn look, the texturing was done in order to make the speeder look as if it had battled—you know, we can discern the story of things through their signs, scars. I wanted it to look dirty and scratched but not too much. Like the owner still tries to preserve it by fixing it. Also, vital components that make the speeder function had to be clean and intact, or brand new, if possible. Otherwise, it wouldn’t win a race with its components in deplorable conditions.
Regarding the color palette, as you can see, in the cyberpunk genre magenta and light blue are predominant. That said, I wanted to show that the owner of the car—even though he understands the concept of the “beauty” of its surroundings—wanted to make his speeder stand out and therefore keep a distance with the rest. That is why I chose pink, and aquamarine tones as main colors, and a very strident yellow to highlight some parts. Certain parts are a pure color because in real life they are easier to paint, and for other parts I imitated a kind of stencil/color paneling work. Finally, I added some text to give the vehicle more character. I took the opportunity to use Japanese glyphs as the style is very related, and to give a name to the project. Every racing car has a number, the cyberpunk genre is very abstract and related to codes, I was starting with Blender 2.8, and my brother’s birthday is on the 28th, and my next project will be related to justice, which is associated with the number 28. So the planets aligned and that is why “28” is the name of the project!

Composition and Lighting
In order to show the project, I decided to try some concept art compositions and, additionally, create some studio renders (in clay mode and with the final textures) to better show the details of the project. For both compositions, I wanted to explore the power of mood lighting and emphasize the context that I had imagined for this project. I did the night shot very close to the new year period and I tried to replicate how that mood would look in that dystopian world. Appreciating a fireworks spectacle from a distance, where nobody will bother you, in a very calm place was the main idea. I also wanted to test how I would approach a cyberpunk shot with a morning or sunset lighting. There are not so many shots like this for this genre so I found that kind of challenging. I kind of imagined that shot as someone who recognizes that racing speeder model and decides to take a picture of it from a landing platform above. With this shot, you can fill the rest of the context with your imagination. Not only because under the main platform you see a quite crowded street with people crossing, but also because of the subtle information of the long cast shadows shading the vehicle.
For both images, I created a very simple scene and used some backplates/photos from “Unsplash” to make the final compositions. First, I got the idea, then I looked for different photos and once I found the one I believed would be useful, I created the scene. For the environment, I placed some abstract mechanical models, a simple plane for the ground with some bumps, and some “guardrails”. Above all this, I used the “Ivy generator” for the bushes, to simulate a distant abandoned place where there are still some remnants of nature, a place where you can feel the roots and feel comfortable. Also, I added some very low poly papers flying around with the particle system and some others manually near the camera.
In both main shots, I guided the composition through certain grids (a grid of thirds and some diagonals) to direct the eye to the center of the story. However, I made it a little twisted to create an unstable sensation and add some tension.
In terms of shaders and render settings, I didn’t use anything that fancy worth mentioning. I used Cycles as the main render engine and Principled BSDF shaders for every piece in the project. A good thing to point out is to always try to find an add-on before doing something. After I had exported each map from Substance, I added them one-by-one manually… Later I found the option “Add principled setup” from the Node wrangler add-on. But I believe (at least I want to believe) it wasn’t available for 2.8 since it was in alpha.
I divided the lighting into 2 sections. One group for the lights of the speeder, and another for the context. For the first group, I used area lights placed in different sections. As for the context ones, I aligned the emitters (areas and some spotlights) according to the source lights of the backplate and to simulate it being in a city.
After the raw renders were done, I retouched them in Photoshop to enhance the mood, correct some tones, retouch some brightness and contrast, and add some effects to simulate the hovering effect.

Final Renders


Gif of the post-production:

Conclusions
To sum up, starting with new software is quite a big decision. This particular case (going from Max to Blender) is something I really loved and I encourage Max users to do it! I encountered certain obstacles but, balancing the cons with the pros, switching to Blender definitely is a positive change.
To do it, the best way I found is to set a more specific goal rather than “I want to learn Blender”. Define a project, determine what you want to learn, and set a realistic (according to your level of knowledge) main objective and subsequent goals to keep yourself motivated. Also, do something that will make you have fun while doing it! You will suck at the beginning, but the final result is worth doing, and, most importantly, dare yourself to say “I finished it!” and move on with another project!
I hope some other 3D artists that may be using 3ds max, C4D, Maya or any other software find this encouraging. Never stop your curiosity and keep learning!
Lastly, I want to thank the community, to everyone who posts a question in a forum and to the ones who answer it, to everyone that makes tutorials, and to the Blender devs! Also, thank you for this opportunity and for featuring my work!
Thanks to my family for keeping me motivated with every project I have.
It is a project that I really enjoyed doing and I hope you have liked it! Please feel free to check out my portfolio to learn more about my other works and follow me to know my next projects! You will also find more images of the project there.
About the Author
 Pablo Ruggeri, Teaching assistant, Industrial designer and 3D artist working as a remote freelancer open for opportunities!


Cool model, first thought it was a graphics card or so without reading the title :)
Nice expanded workflow! One thing I’m not so sure of, is the presentation of the claymodel. Normally these images show very clear how the model is constructed, this colored version is kinda hard to read. But that’s my look at it, this looks more of an artistic approach. Thanks for the article!
PS wouldnt that clay model look nice with that pink/green backdrop if the model was like black with soft reflective surface. That would POP!
Hi!
Thank you for your kind comment! I’m glad you find it useful :)
Regarding the clay shots, the ones that have random colors were created in order to better differentiate the parts that the vehicle is made of. The pink clay ones with that gradient color as background are the “real clay” shots of it. However, they were done in a more artistic way as you said :) I wanted to experiment with them a bit.
I recommend you to check my Artstation project! There you will see those pictures in a higher resolution. I didn’t want to add too many images here because it would have ended in a longer post than the one that already is. Also, check the videos attached! There you will find many more technical shots of the project.
All the best, saludos!
Pablo