
Behind the Scenes: Sharing a Dream
My name is Daniel Bystedt and I’m working as head of modeling and lead creature artist at Goodbye Kansas Studios in Stockholm, Sweden. At work, we do VFX for film & TV. We also do a lot of game cinematics for clients in the game industry. I have been in contact with the Blender Institute for some time now and helped out with some demos for Blender 2.8 and EEVEE in my spare time.
I studied CG here in Stockholm back in 2007-2009 and after that, I was working a lot with commercial related CG for a lot of years until I ended up at Goodbye Kansas Studios. I have also been helping Pixologic with beta testing of new ZBrush releases since ZBrush4R5, doing a bit of tutorial work for 3D World, 3D Artist, and some other publishers. After working a long time with Maya I started learning Blender back in 2015 since the render engine Cycles looked very easy to work with. I ended up falling in love with Blender and now I use it a lot both at work and when doing personal art.
Since the real-time render engine EEVEE was starting to be developed in Blender, I have been really interested in implementing it in my projects as much as possible. This time around I was interested in trying to get a lot more movement and animation in my projects than I had in my earlier projects. Since my personal focus is more on concepting and sculpting characters and creatures, I tried to figure out ways of working with animation from a procedural standpoint as much as possible. I was also interested in developing the story of my earlier short movie “Goodnight Claire”, so this project became a sequel to that earlier project.
Inspiration
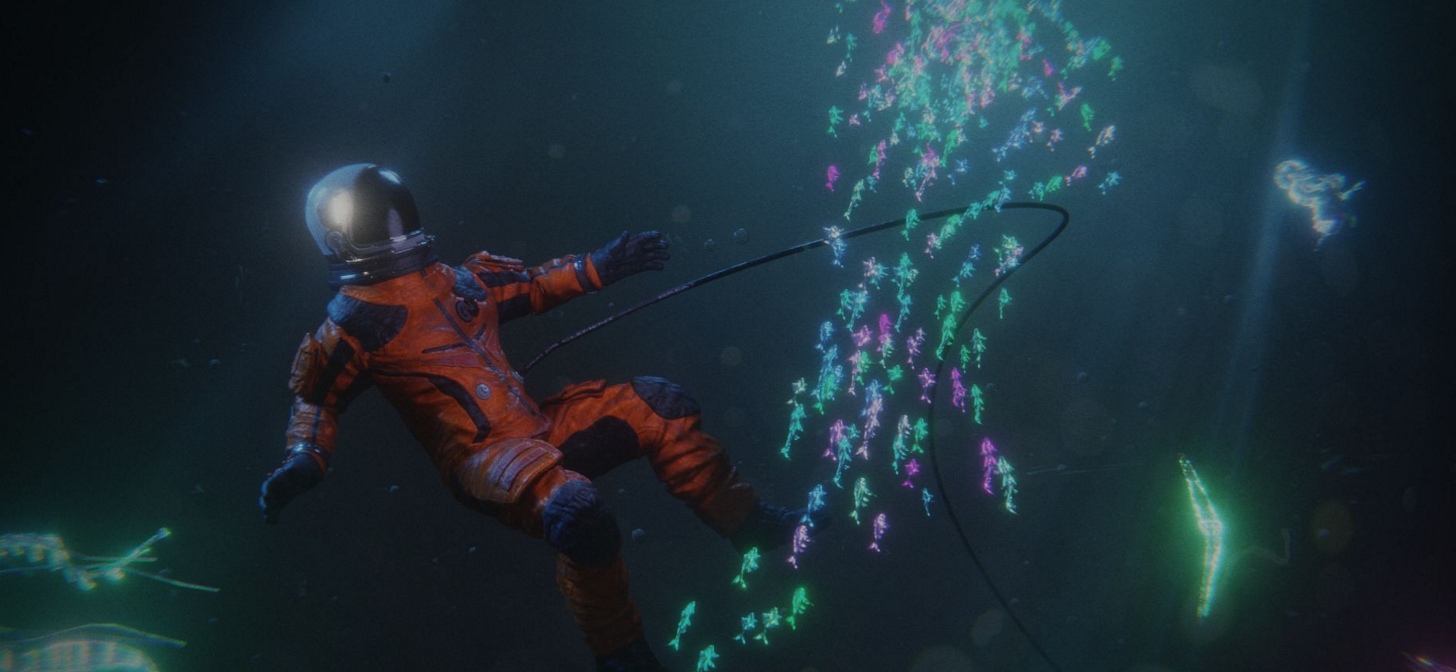
During the development process, I looked at a lot of underwater creatures and thought about how I could incorporate that sort of luminescent look to the creatures that I created. I did, however, want the look to be a bit stylized and “otherworldly” since the story is taking place inside the dream of a computer A.I.
Tools
The entire project was created in Blender.
Computer setup
- CPU: i7-8700, 3.8 GHz
- RAM: 16 GB
- GPU: NVIDIA GeForce GTX 1080
Sharing a Dream – Final Project and Breakdown
Multiple Shots And Video Editing
One thing that I tried a bit more in this project was to work with multiple shots with different layouts and animations. I recorded a tutorial that specifically explores multiple shots and video editing in Blender. I really recommend you watch it until the end because Blender’s video editor in combination with multiple scenes is amazing.
Octopus Animation Setup
In the following section, I will do a deep dive into the animation/rig setup of the octopus. The idea was to make the Octopus move procedurally as much as possible so that I did not have to focus on hand animating all that much.
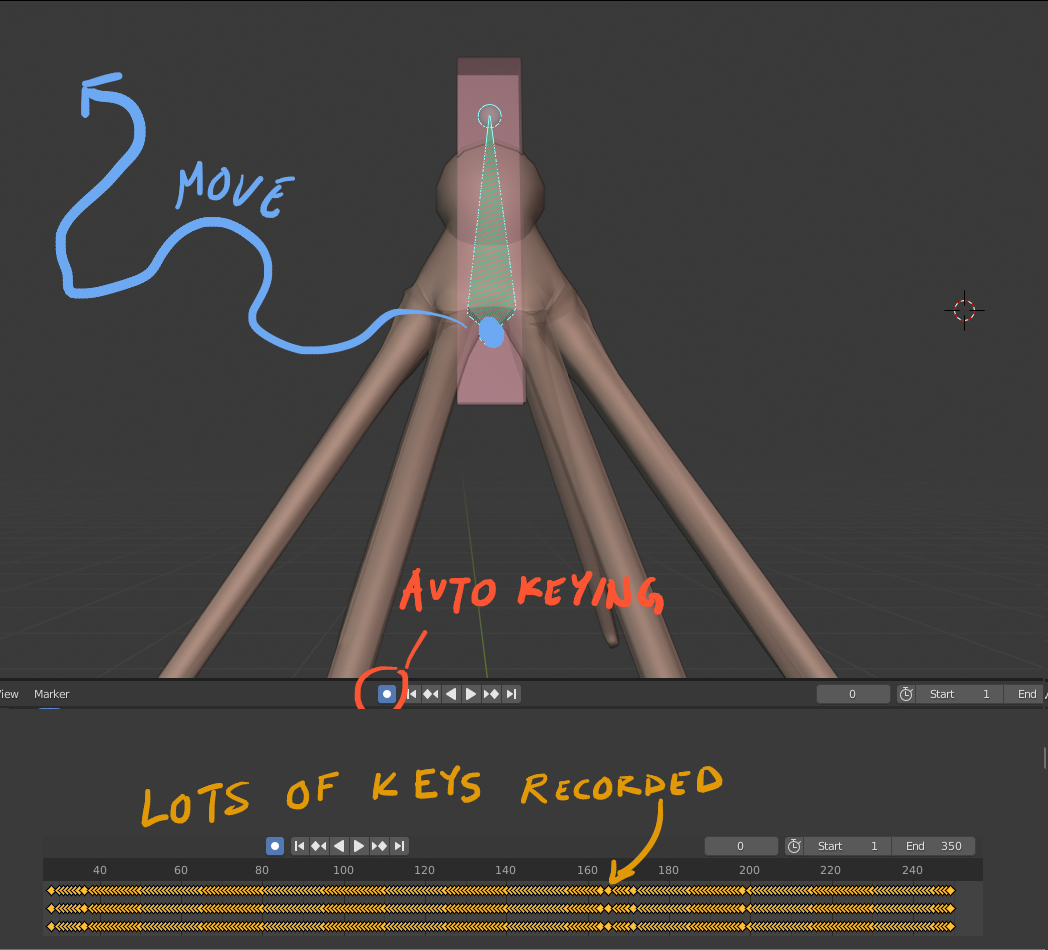
Octopus Animation Setup: Auto Keying
The sim mesh of the octopus is skinned to a main armature. I animated the root bone of that armature by using auto key. This feature records the animation channels when you move around objects and the timeline is also playing. The animation keys can be smoothed in the graph editor with key>smooth keys. You can also clean up the amount of keys with key>Decimate (ratio).
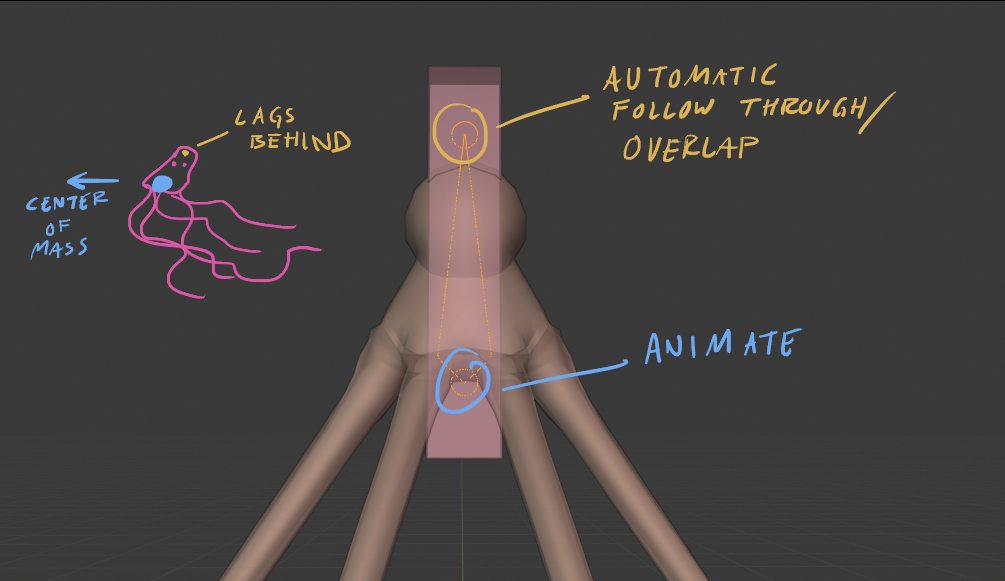
Octopus Animation Setup: Desired Overlap & Follow Through Behaviour
I wanted to create a rig so that when I move the center of mass of the octopus, the top of the head has an automatic follow through & overlap animation behaviour (see the left side of the sketch).
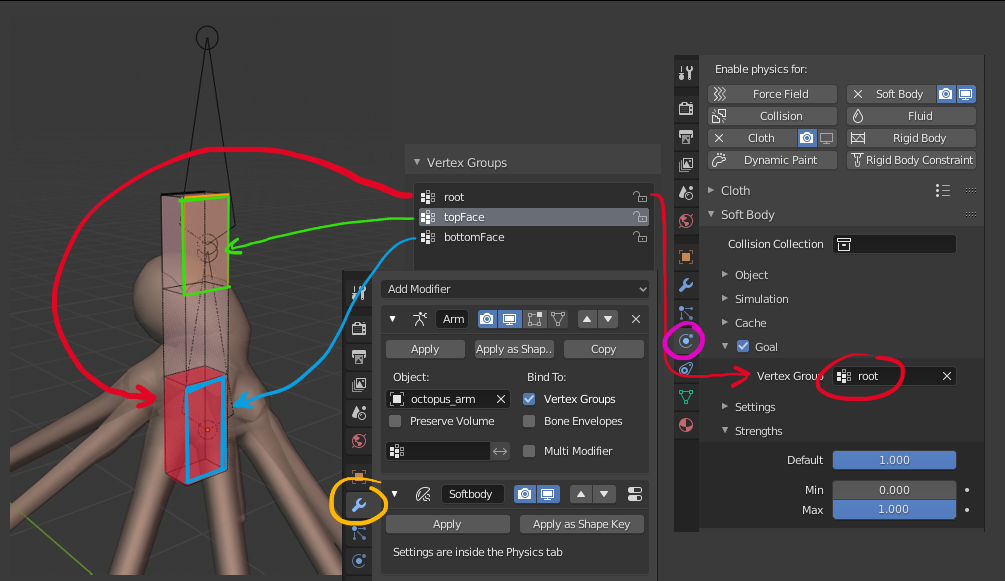
Octopus Animation Setup: Setting Up Vertex Groups and Soft Body to SimRibbon Geo
I created a sim ribbon with the the following vertex groups: Root, topFace and bottomFace. The sim ribbon is skinned to the main armature of the octopus. I also have a soft body where the vertex group root is used as goal. This means that this vertex group is not affected by the soft body. Soft body is useful for extremely simple “jiggly” behaviour. When simulating more complex surfaces, I usually use cloth.
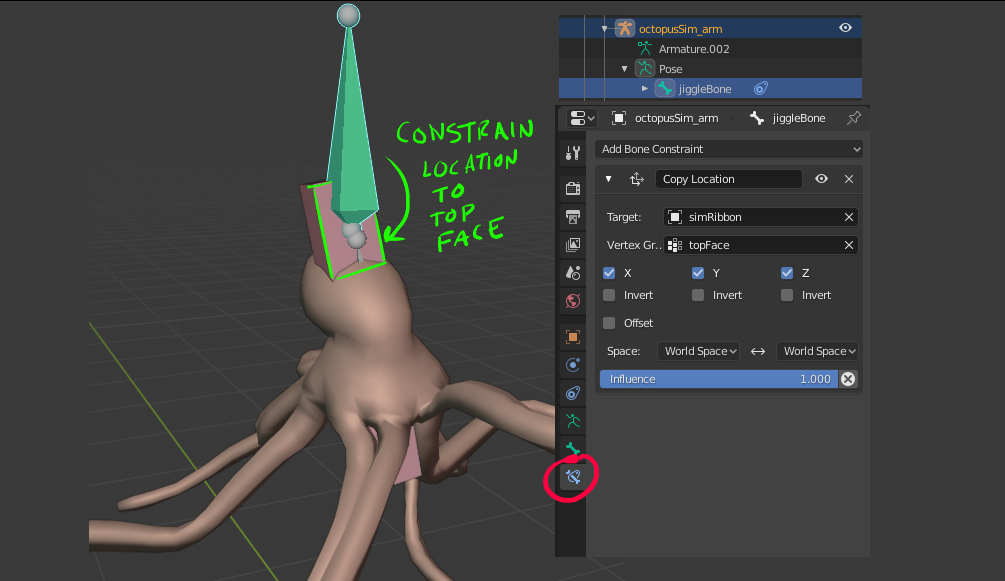
Octopus Animation Setup: jiggleBone Constraints
I have a secondary armature for my jiggleBone, where the bone is constrained to the vertexGroup topFace of the simRibbon geo.
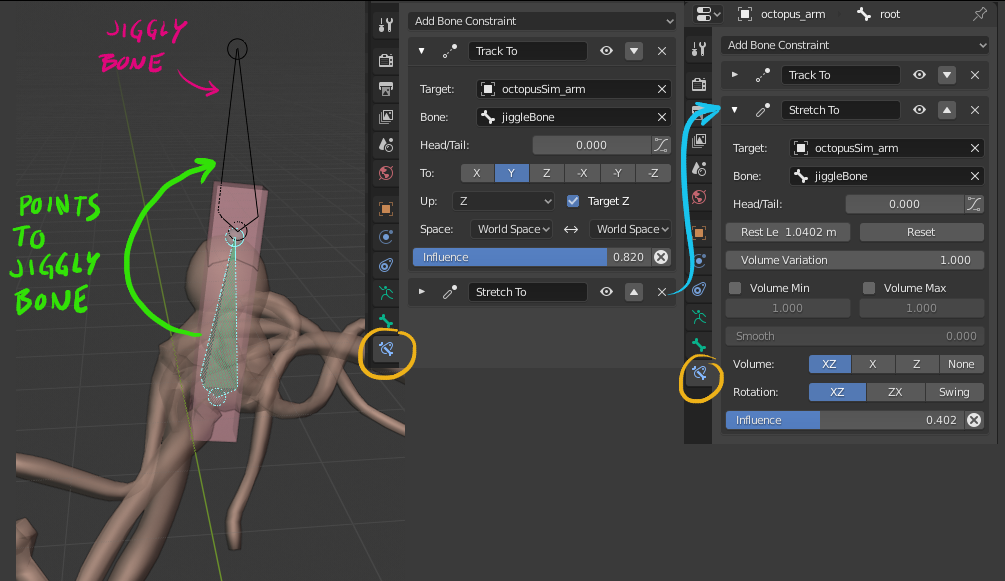
Octopus Animation Setup: Main Armature Root Bone Constraints To Jiggly Bone
The root bone of the main armature points to the jiggly bone with a Track To constraint. It also stretches to the jiggly bone for some squash/stretch effect. It is actually possible to constrain bones directly to the vertex groups, but this results in a bit more stable behaviour since it would otherwise create a sort of feedback loop.
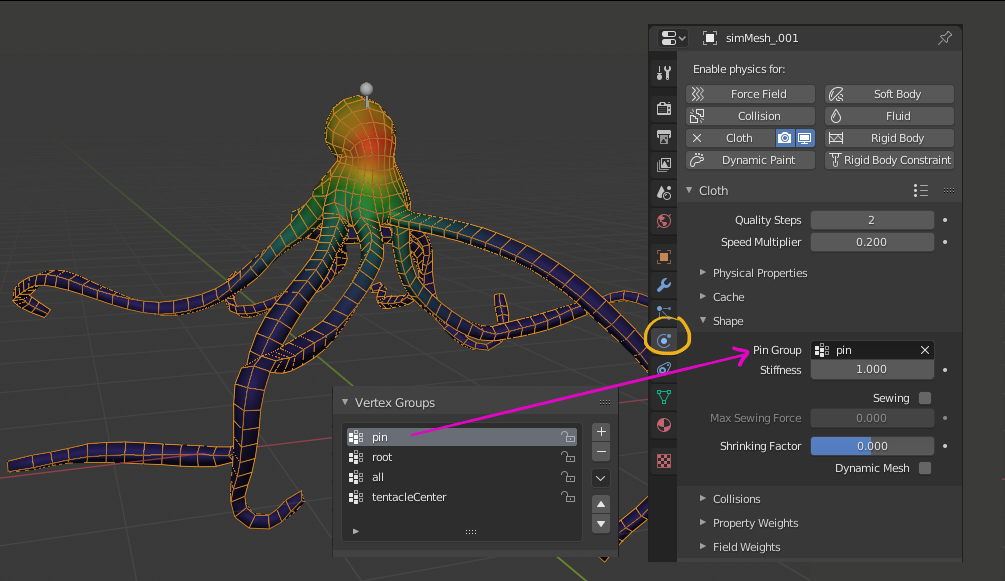
Octopus Animation Setup: Cloth Modifier
I created a cloth modifier and also created a vertex group called pin. This vertex group is not affected by the cloth modifier.
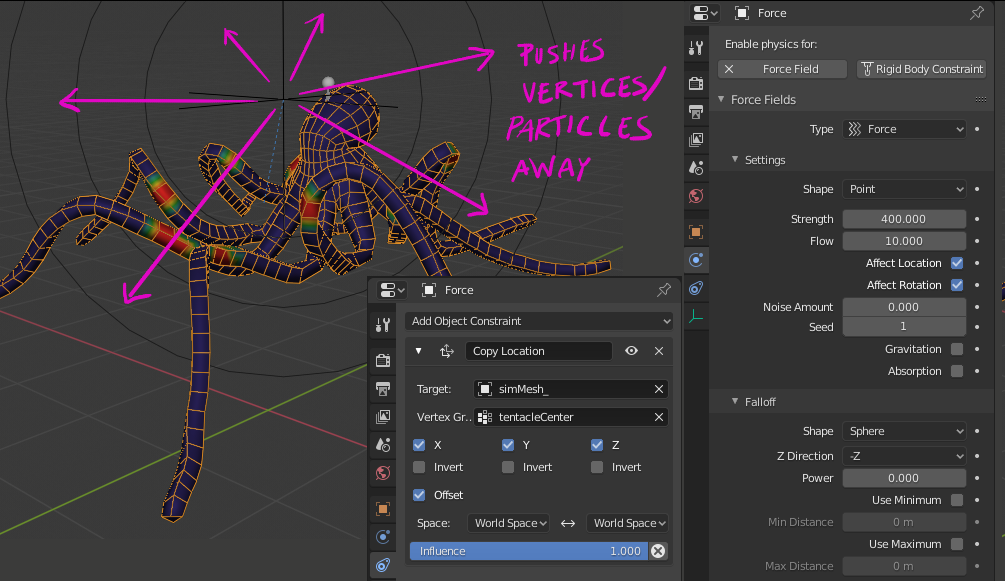
Octopus Animation Setup: Cloth Modifier Force Fields – FORCE
The force field pushes vertices away from its center point. In order to keep it in the center of the tentacles, I created a vertex group and constrained the force field to the vertex group. I also offset the force field a bit higher so that it pushes the tentacles down and away.
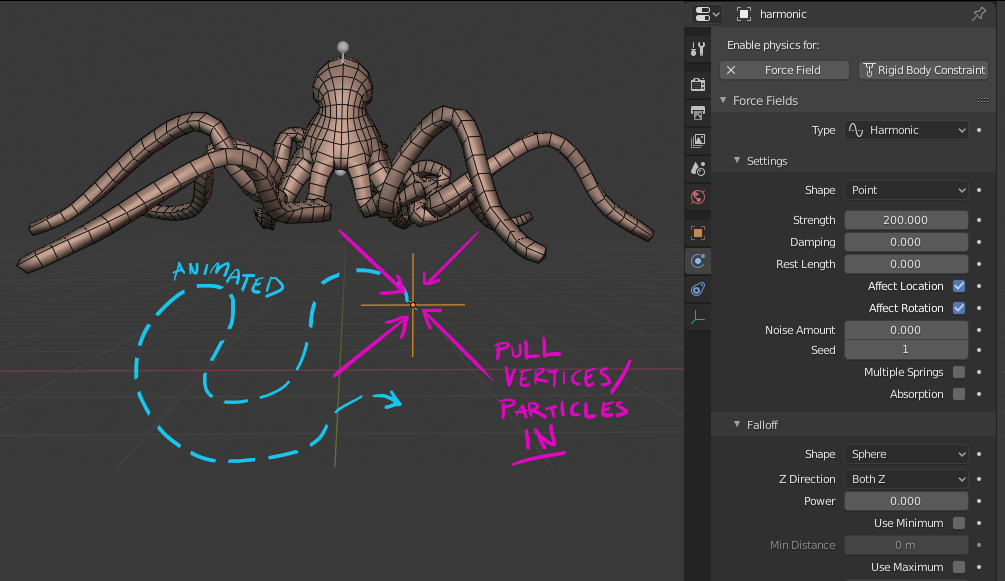
Octopus Animation Setup: Cloth Modifier Force Fields – HARMONIC
The harmonic field pulls vertices in towards its center. This could also be done with a force field with negative strength. The purpose is to make sure the tentacles don’t stray too far away from the body. It’s not an exact science, but rather changing values and seeing what works combined with the force field.
The harmonic field also has a noise animation modifier that moves it around in a random fashion to break up the tentacle movement.
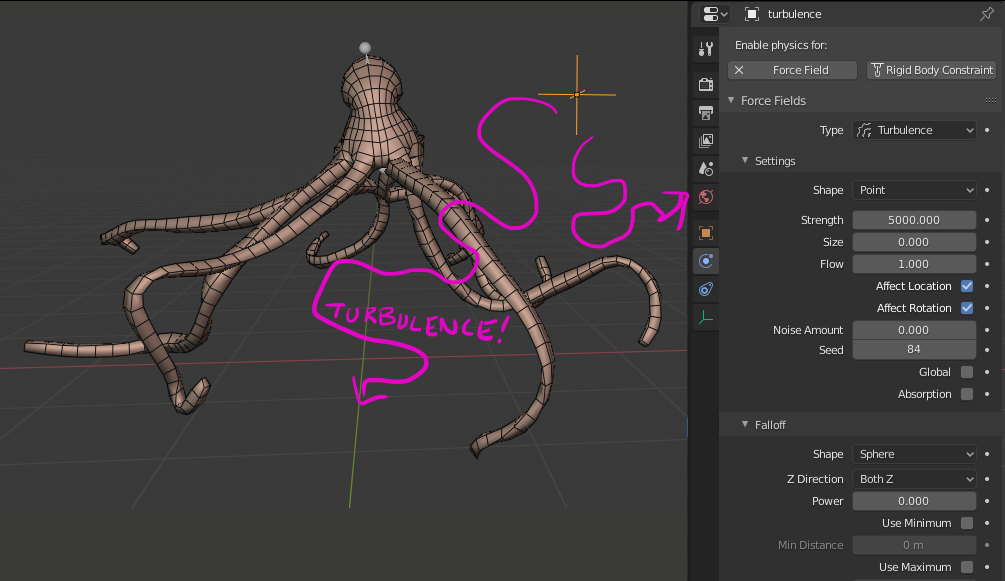
Octopus Animation Setup: Cloth Modifier Force Fields – TURBULENCE
The turbulence modifier makes the arms move a bit more randomly and octopus-like.
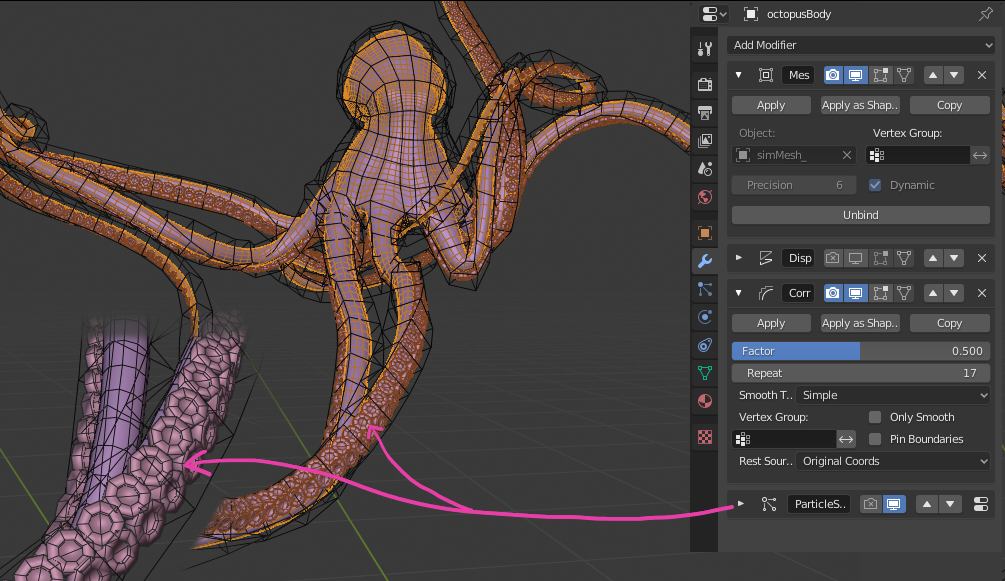
Octopus Animation Setup: Render Geo
The only thing we have looked at until now is the simulation geo. I also have a proper render geo, which is a bit more high res. The render geo is deformed by the simulation geo by using a mesh deformer. It’s important to make sure that the deformed geo is entirely contained in the simulation geo, otherwise, the mesh deformer modifier does not work properly. After that, I added a corrective smooth to the render geo in order to fix deformation kinks. Finally, there is a particle system that scatters a suction cup on each face in a vertex group on the tentacles. In order to realign the scattered objects per frame (since the geo is deforming), I checked regrow = TRUE in the particle system settings.
Sharing a dream – Final project
About the Author
 Daniel Bystedt, Head of modeling at Goodbye Kansas Studios, Stockholm.


Amazing!
Cool BTS, thanks for sharing