About Me
My name is Marco Iacopetti and I am 44 years old. I studied at the Istituto Statale d’Arte and then at the Accademia delle Belle Arti, both fortunately in the city where I have always lived, Florence. Now, and for more than 10 years, I have been working as a graphic designer in typography a few kilometers outside the city and I deal with graphic design and prepress for digital and offset machines. Over the years I continued my artistic activity through freehand drawing, but I started learning Blender and computer graphics only at the beginning of 2017. It then shortly became my greatest passion and I spent endless hours in front of my PC, following tutorials and courses of various types. This time spent learning allowed me, however, to quickly switch from the small objects of the first tutorials to decidedly different and more complex things, to my great satisfaction.
Tools
I only use Blender and I have no experience with other 3D graphics software. For the textures processing I use Adobe Photoshop and, more rarely, Adobe Illustrator for any content of a vector nature.
Hardware Configuration
These are the hardware specifics of the PC I work with: CPU Intel i7 7700k OC, GPU NVIDIA RTX 2070 6GB, 32GB RAM, OS Windows 10.
Inspiration
Orc Warlord represents one of the first attempts to create something absolutely personal, a way to verify what I really learned about Blender and understand how far I can get by using this exceptional tool. This project finally gives vent to my inspiration, to my imagination, or, more generally, to my need to communicate through an approach very similar to that of traditional illustration. Fantasy has always been the area in which I move more easily, and in this context there is the particular charm that the figure of the orc has always aroused. In particular, it is a perfect subject for the opportunity to devote myself to facial modeling with features that are anything but linear, particle effects related to hairs and the study of a shader for the skin that was at least credible.
References
I easily found some good shots from the films "The Hobbit" and "Warcraft" online.

Sculpting
Sculpting in Blender is something impressive. It is a moment free from any pressure for me. It takes the time that it takes. Through the potential of dynamic topology, I assembled the first volumes quite spontaneously, almost immediately overcoming the limits defined by the first sketches, and started to increase the resolution of the brushes to add details. In particular, since it is a rather simple scene composition, I immediately focused attention on the deformation of the somatic traits. The orc must scream and hate. Then the mouth opens wide, deforming and leaving the tongue, gums and teeth in plain sight while the eyelids tighten and the eyes thin.

Retopology and Multiresolution
Optimizing the number of polygons and their flow is something that I find rather boring even if I understand the importance of dealing with them in the most correct way. I still do everything in the traditional way, without the use of any add-ons, and this is partly for practice and partly for pure masochism. The subject in this case is a single mesh, except for the eyeballs, teeth and tongue. Retopology is crystal clear. There are no tris, ngons, nor anything else. Only quads, and this is fundamental since in the next step I apply a multiresolution modifier with some divisions and a shinkwrap modifier in order to recover all the level of detail of the sculpted hi-res mesh. Then I dedicated a few more hours to redefine and improve the details of the new mesh, such as veins.
Camera and Lighting Setup
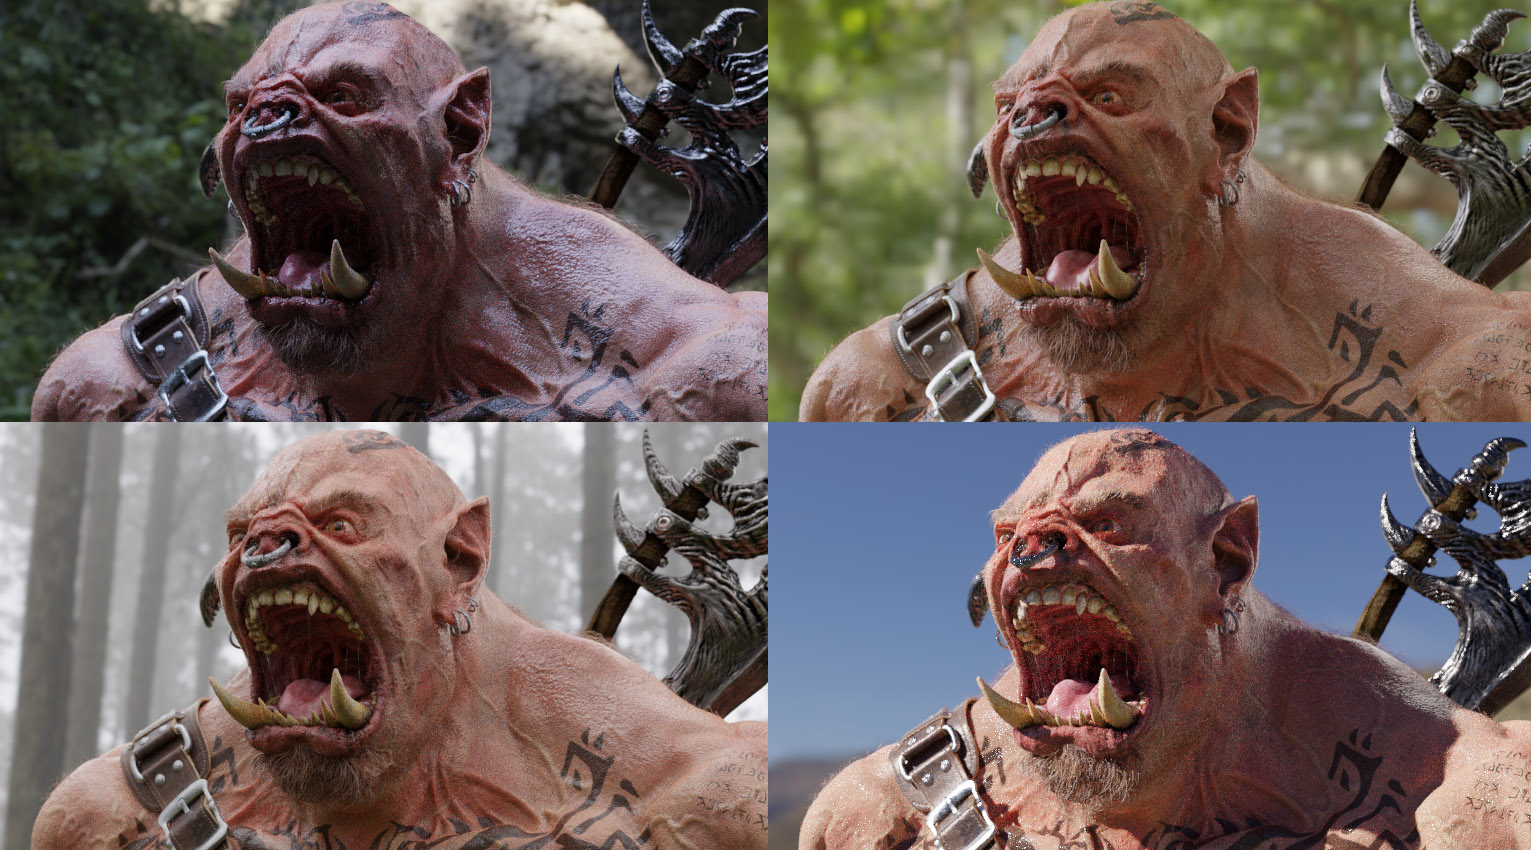
I decided to give up total control of the lighting of the scene by relying on an HDRI, or rather more than one, trying them, letting myself be inspired by them, changing their Z rotation coordinates in the mapping node to experiment with different light effects and shadows on my model and trying to get as close as possible to my idea of the final result. I created a series of nodes in the world section of the shader editor, mixing HDRI images on a neutral background with an IS Camera Ray input of the Light Path node. My goal was then to evaluate the impact of lighting on the objects of the scene. I did not need to display any background, as it would distract me. Finally, having a series of HDRI to switch between quickly and easily during the shader definition phase allowed me to check their performance in different lighting conditions.
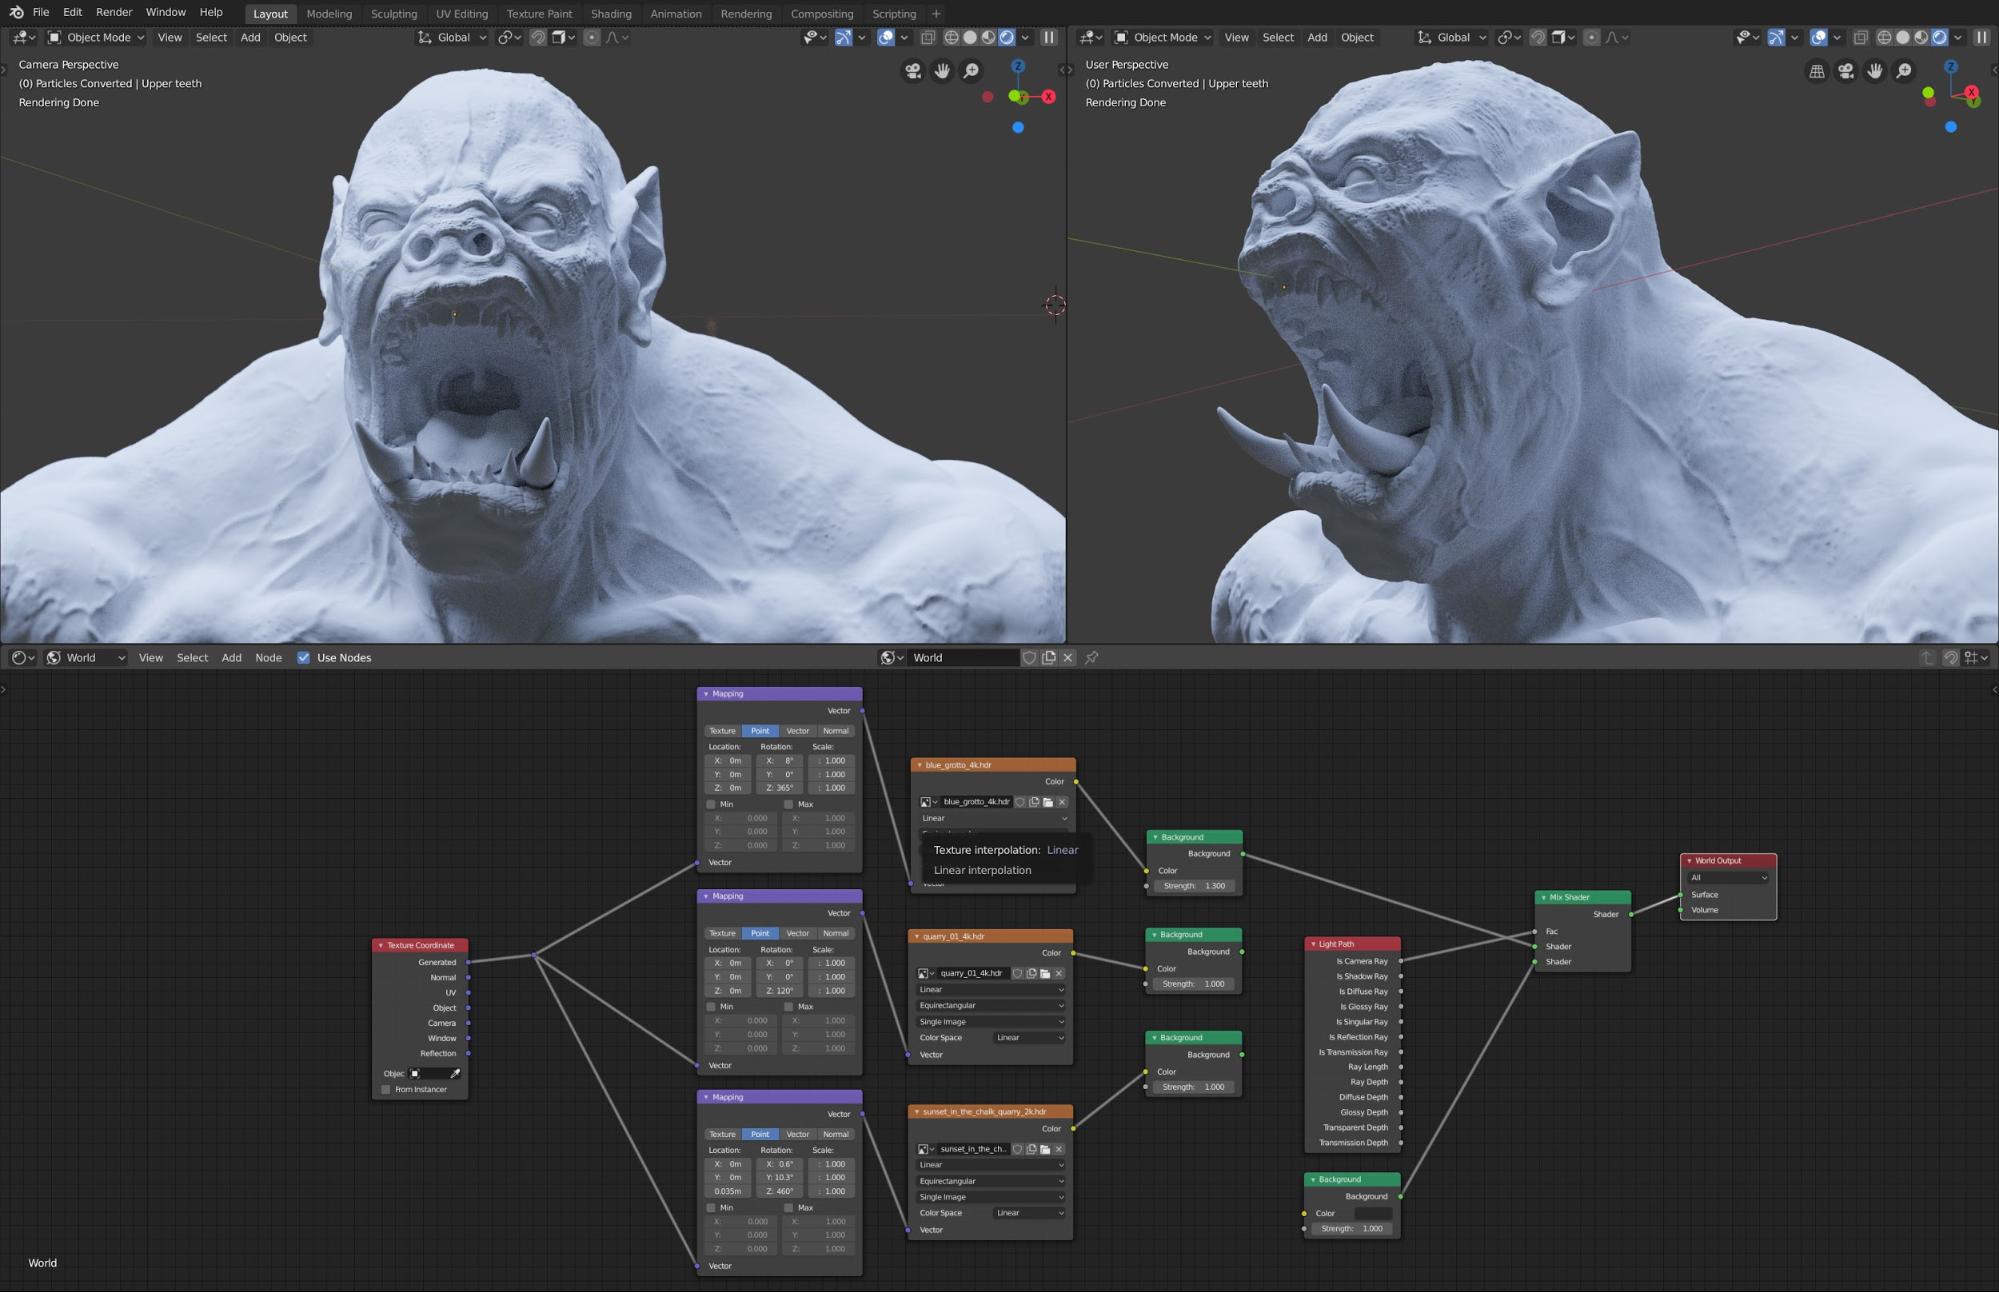
The final lighting setup was very simple. The HDRI I chose for the final render is the key light, it made a good contrast between light and shadow. The shadows remained quite dark, but the effect is excellent; the inside of the mouth remained dark and gave the image a touch of photorealism. For this reason I decided not to insert any fill light. I only added a couple of back lights to help the subject emerge better from the background.
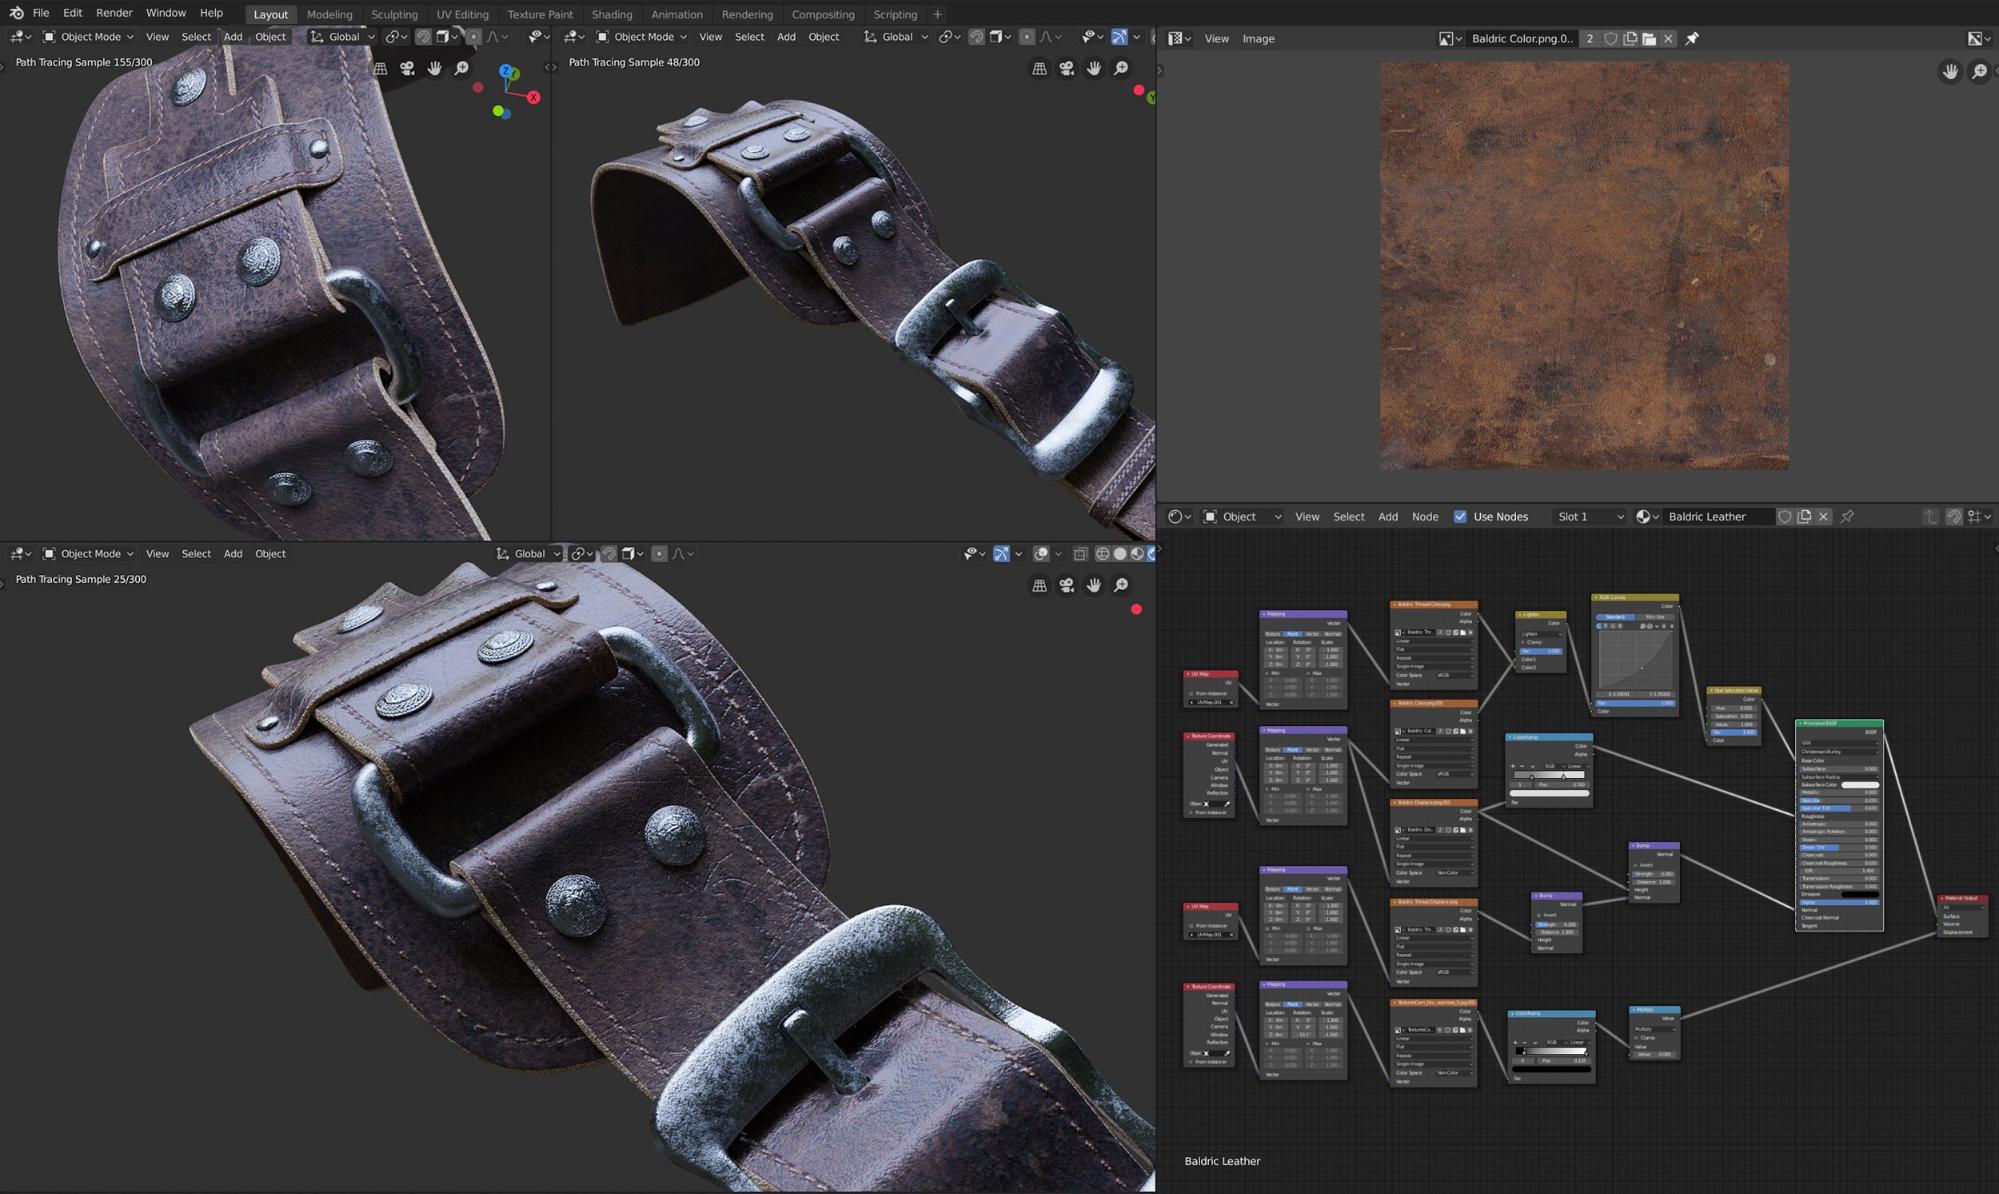
Materials
The rendering engine is Cycles. Every material in the scene is built from scratch and the power of my GPU, despite the consistency of subsurface scattering in almost all the main shaders of the subject, allows me to maintain a responsive viewport.
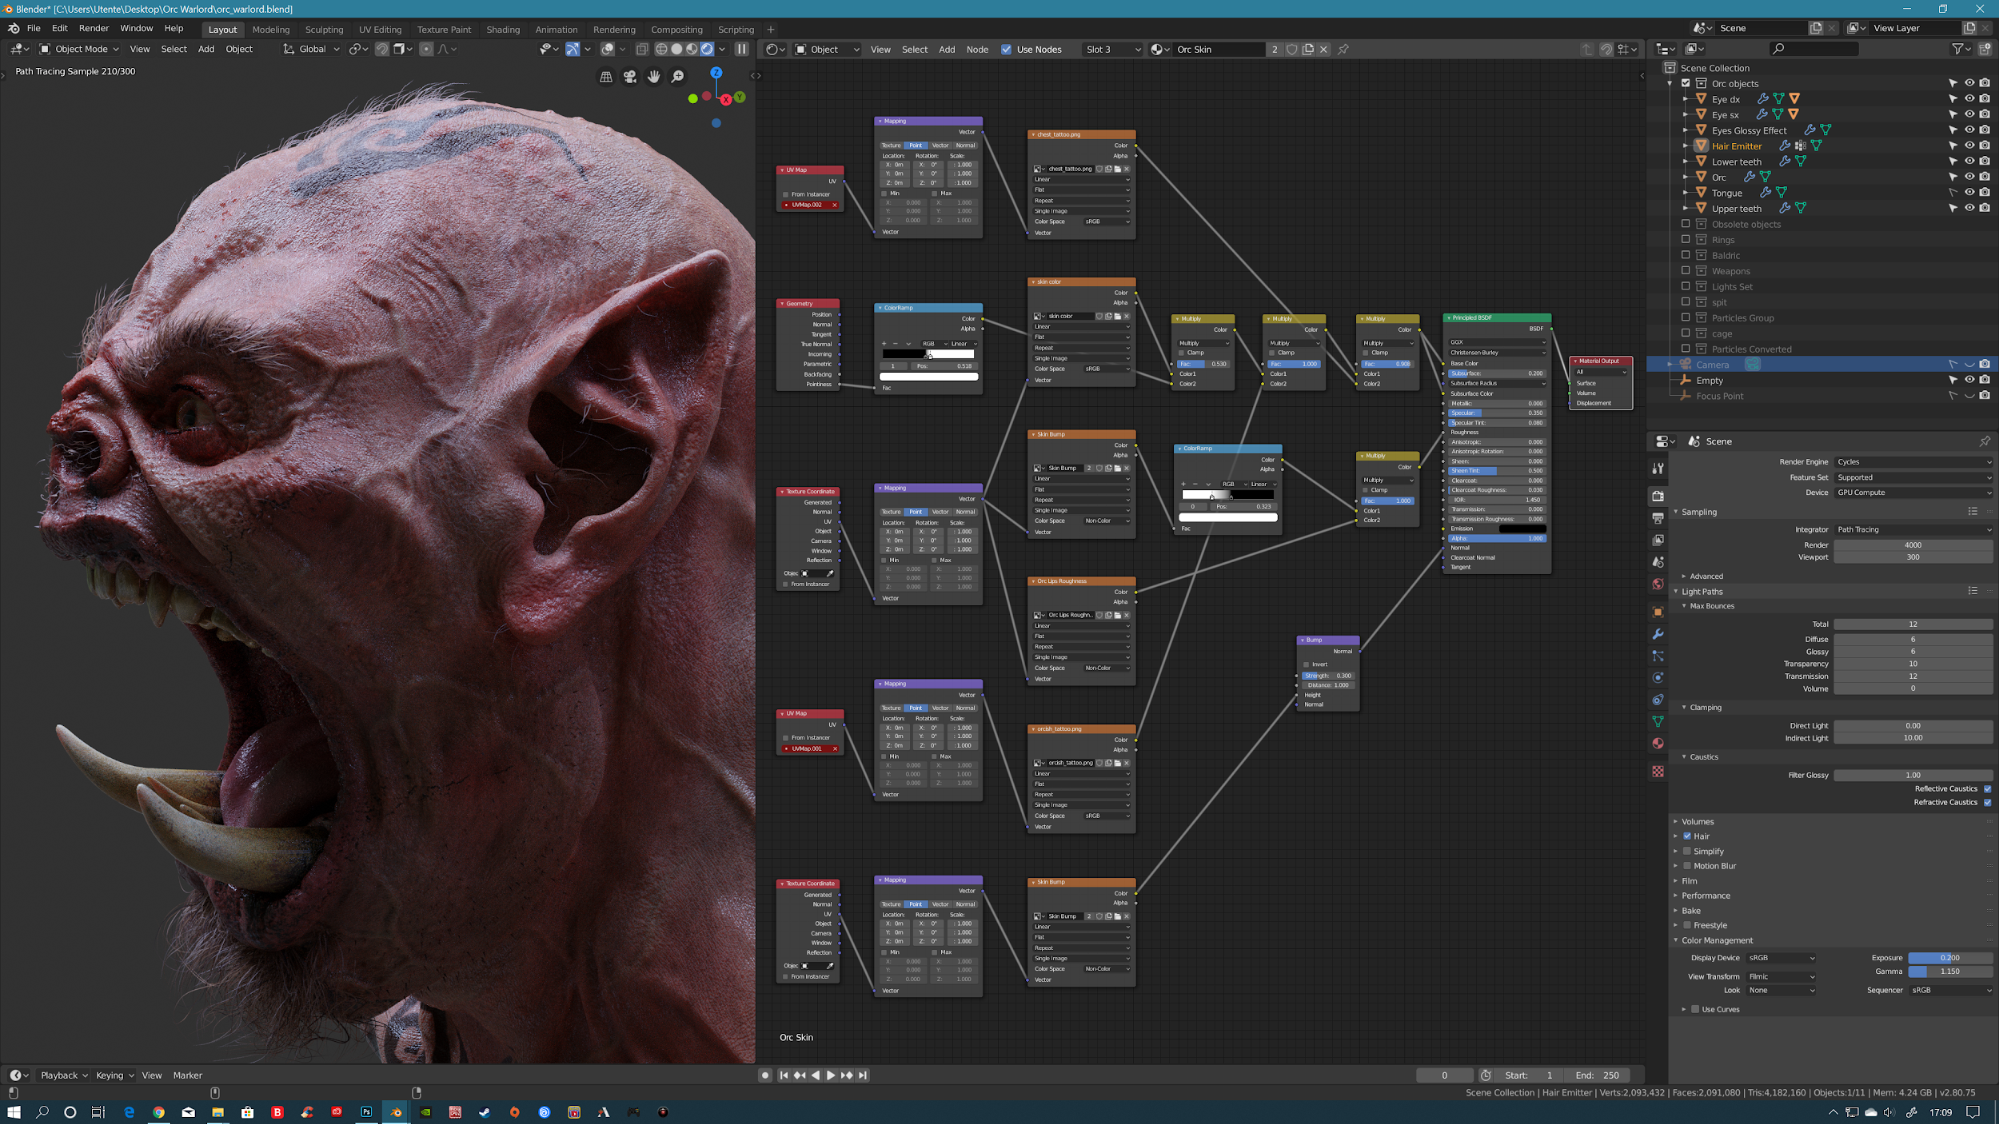
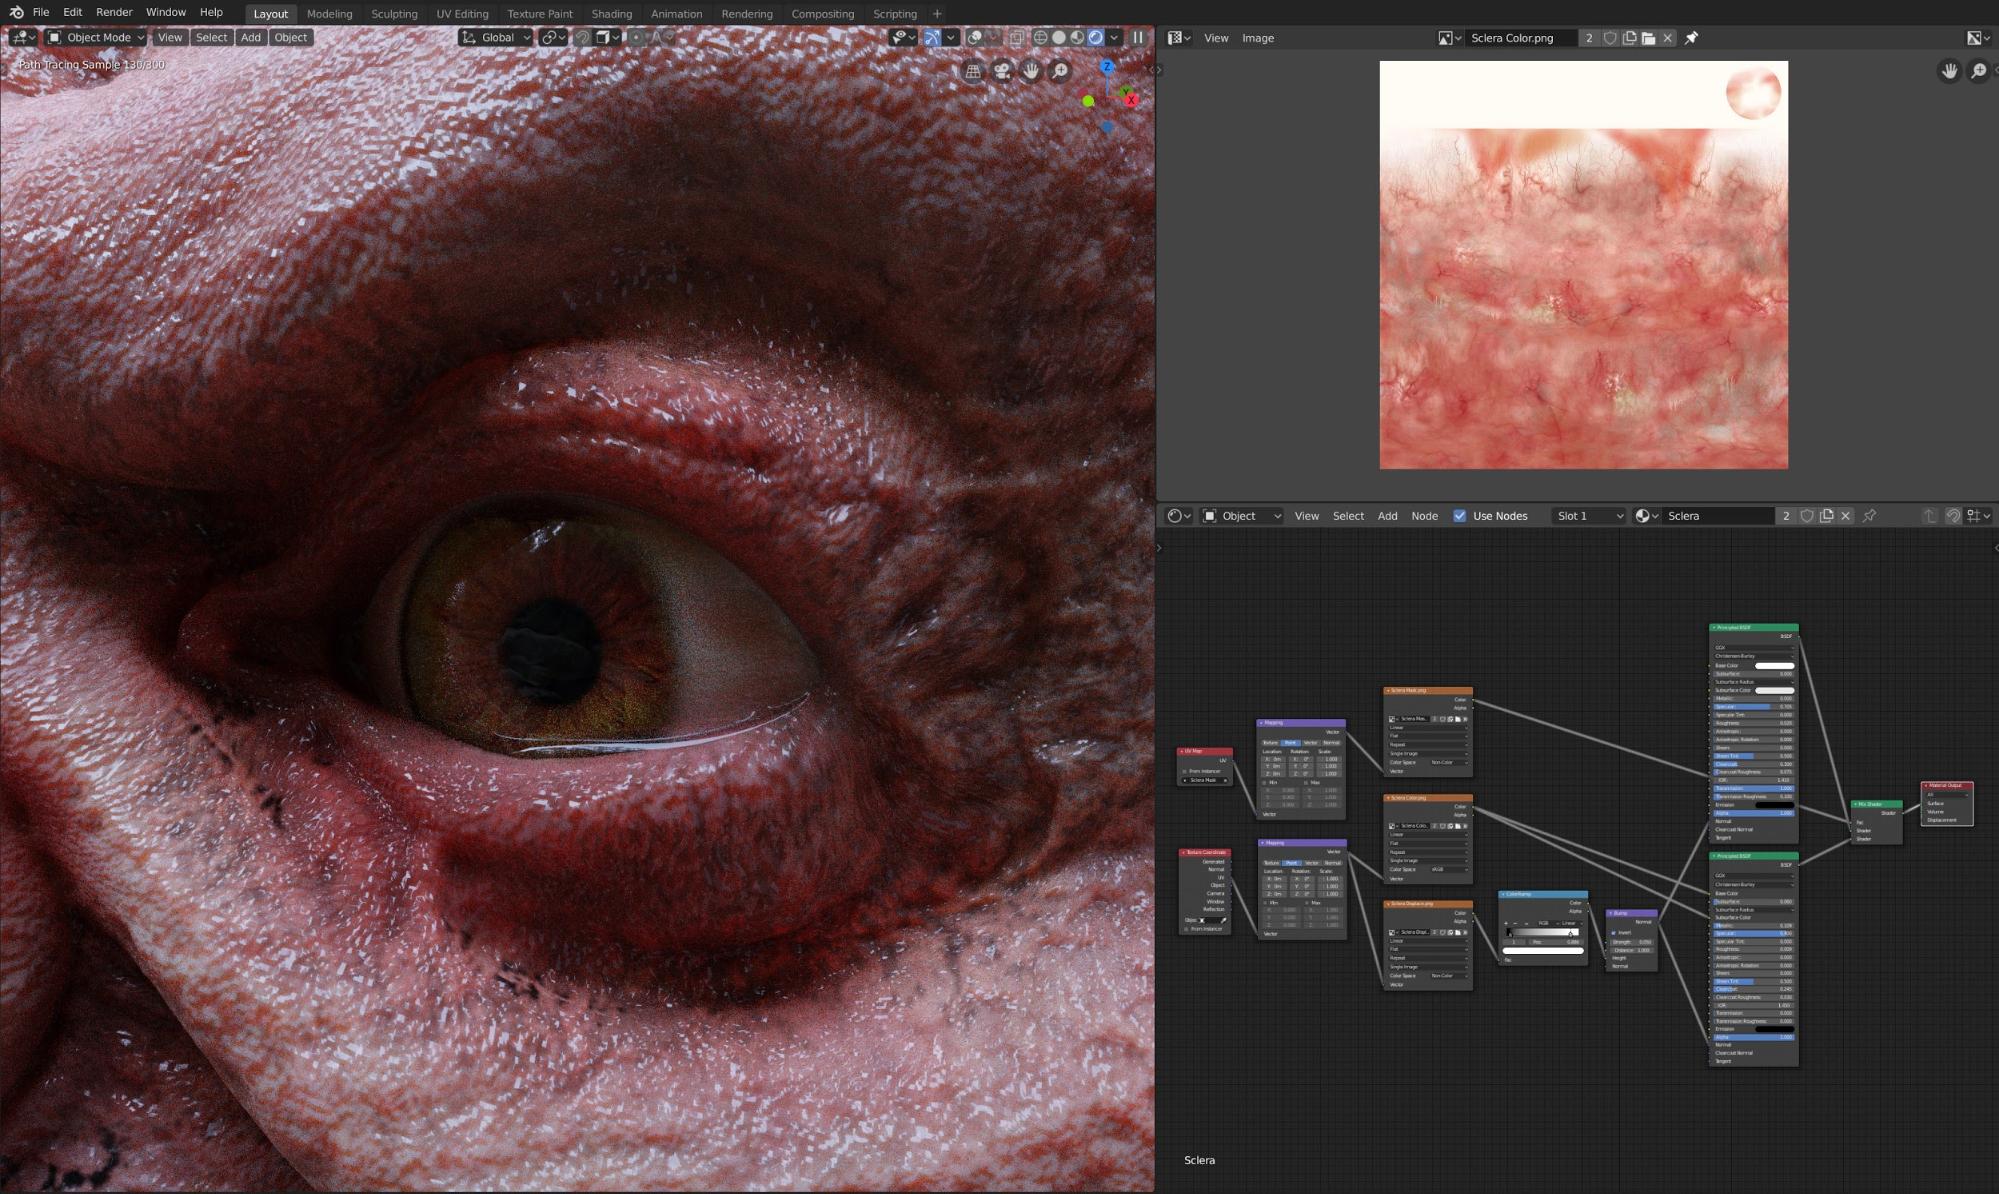
None of the materials in the scene are anything complex. For example, the skin simply consists of a principled BSDF node and two textures: one for color and subsurface scattering, the other for micro-displacement, which I also needed, filtered by a color ramp node, to also regulate roughness. And it is this texture that does the bulk of the effect by itself. I made it in Texture Painting using various resources found online, with a stencil mapping texture and an anchored stroke method, which allowed me to obtain a rather heterogeneous and diversified effect depending on the area.
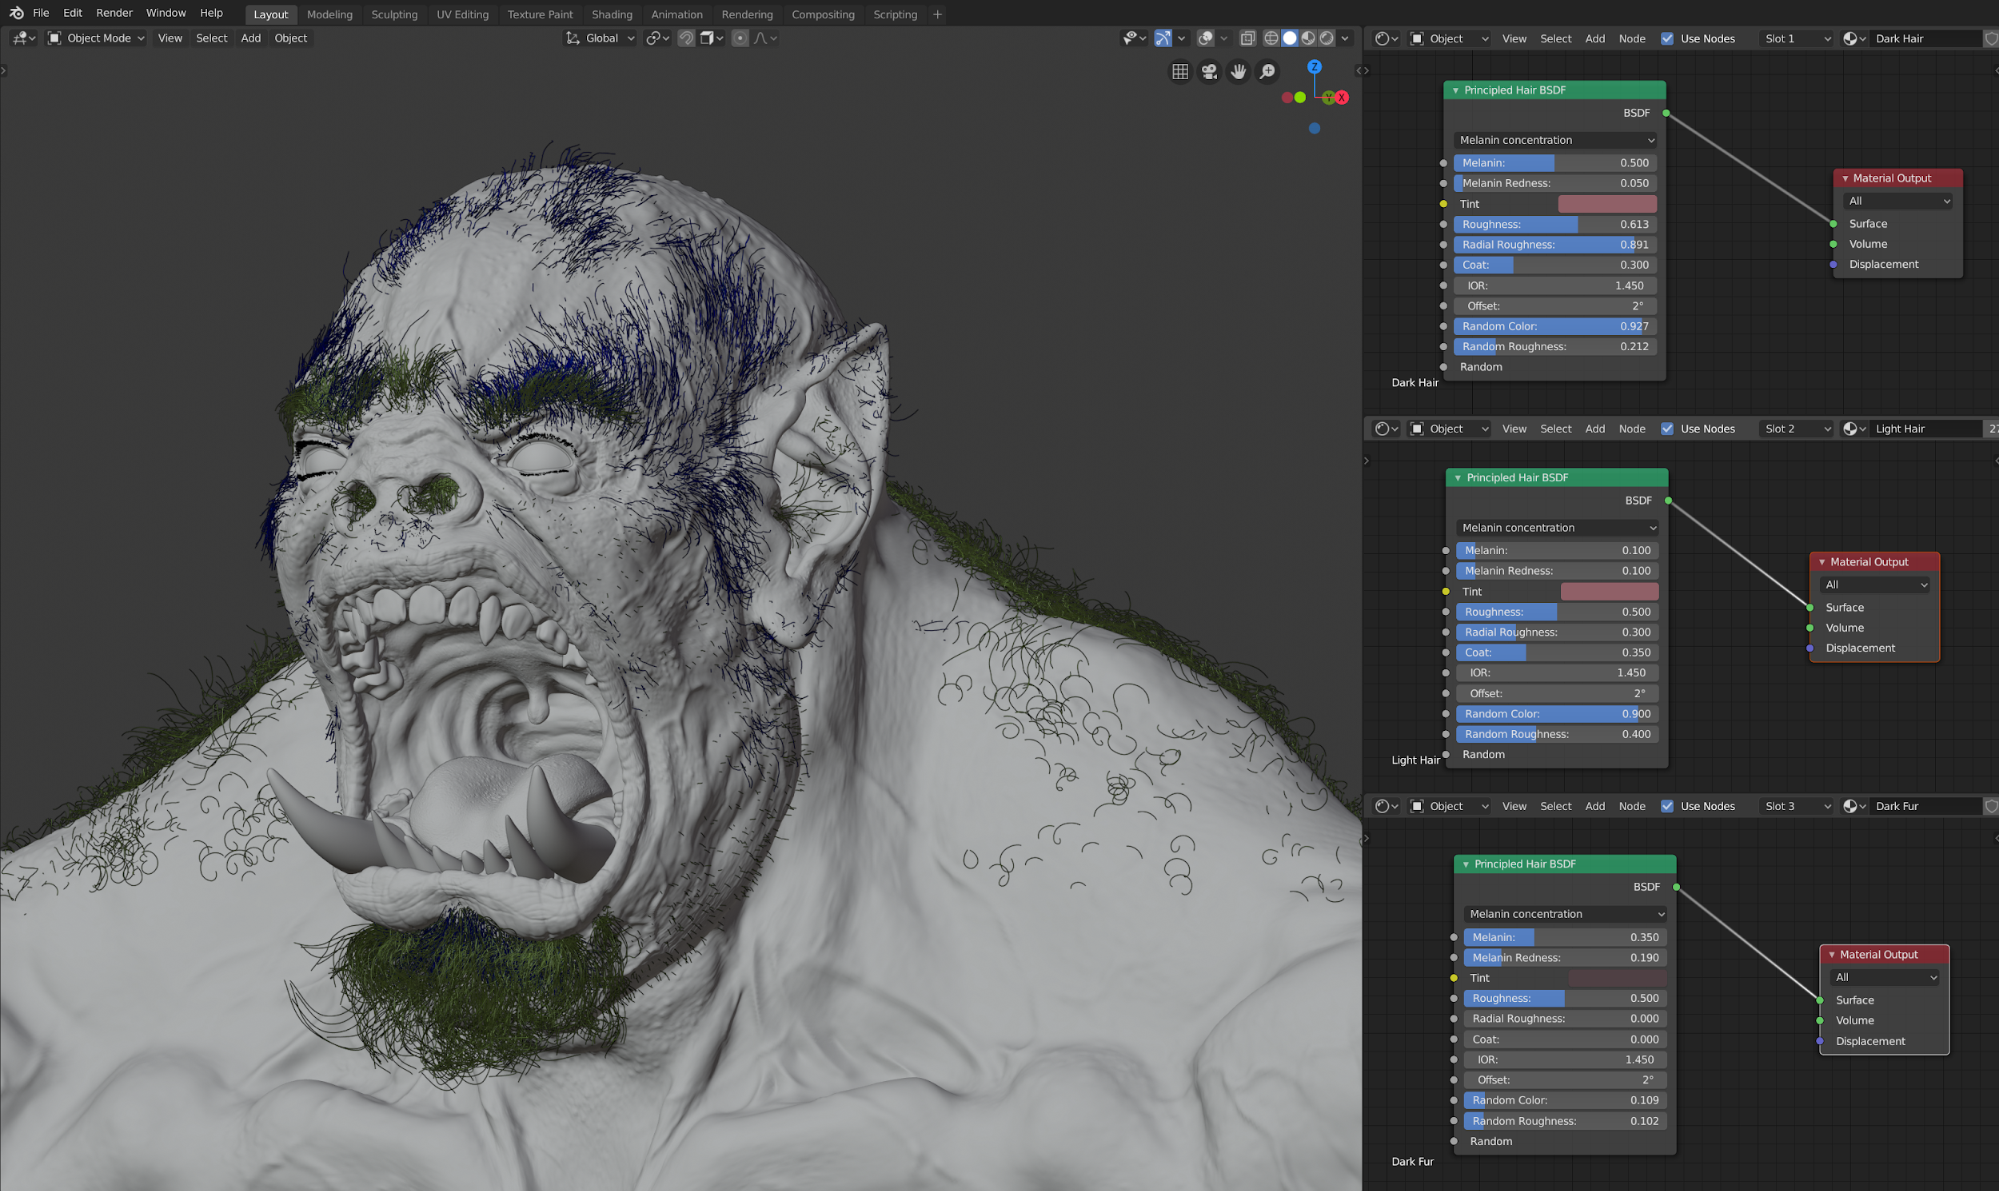
Hairs
The hairs on the body consist of many Particle Systems with different settings depending on the area they cover, and almost all were processed manually in Particle Edit. The materials are essentially three and all consist of a simple Principled Hair node with different melanin and roughness values.
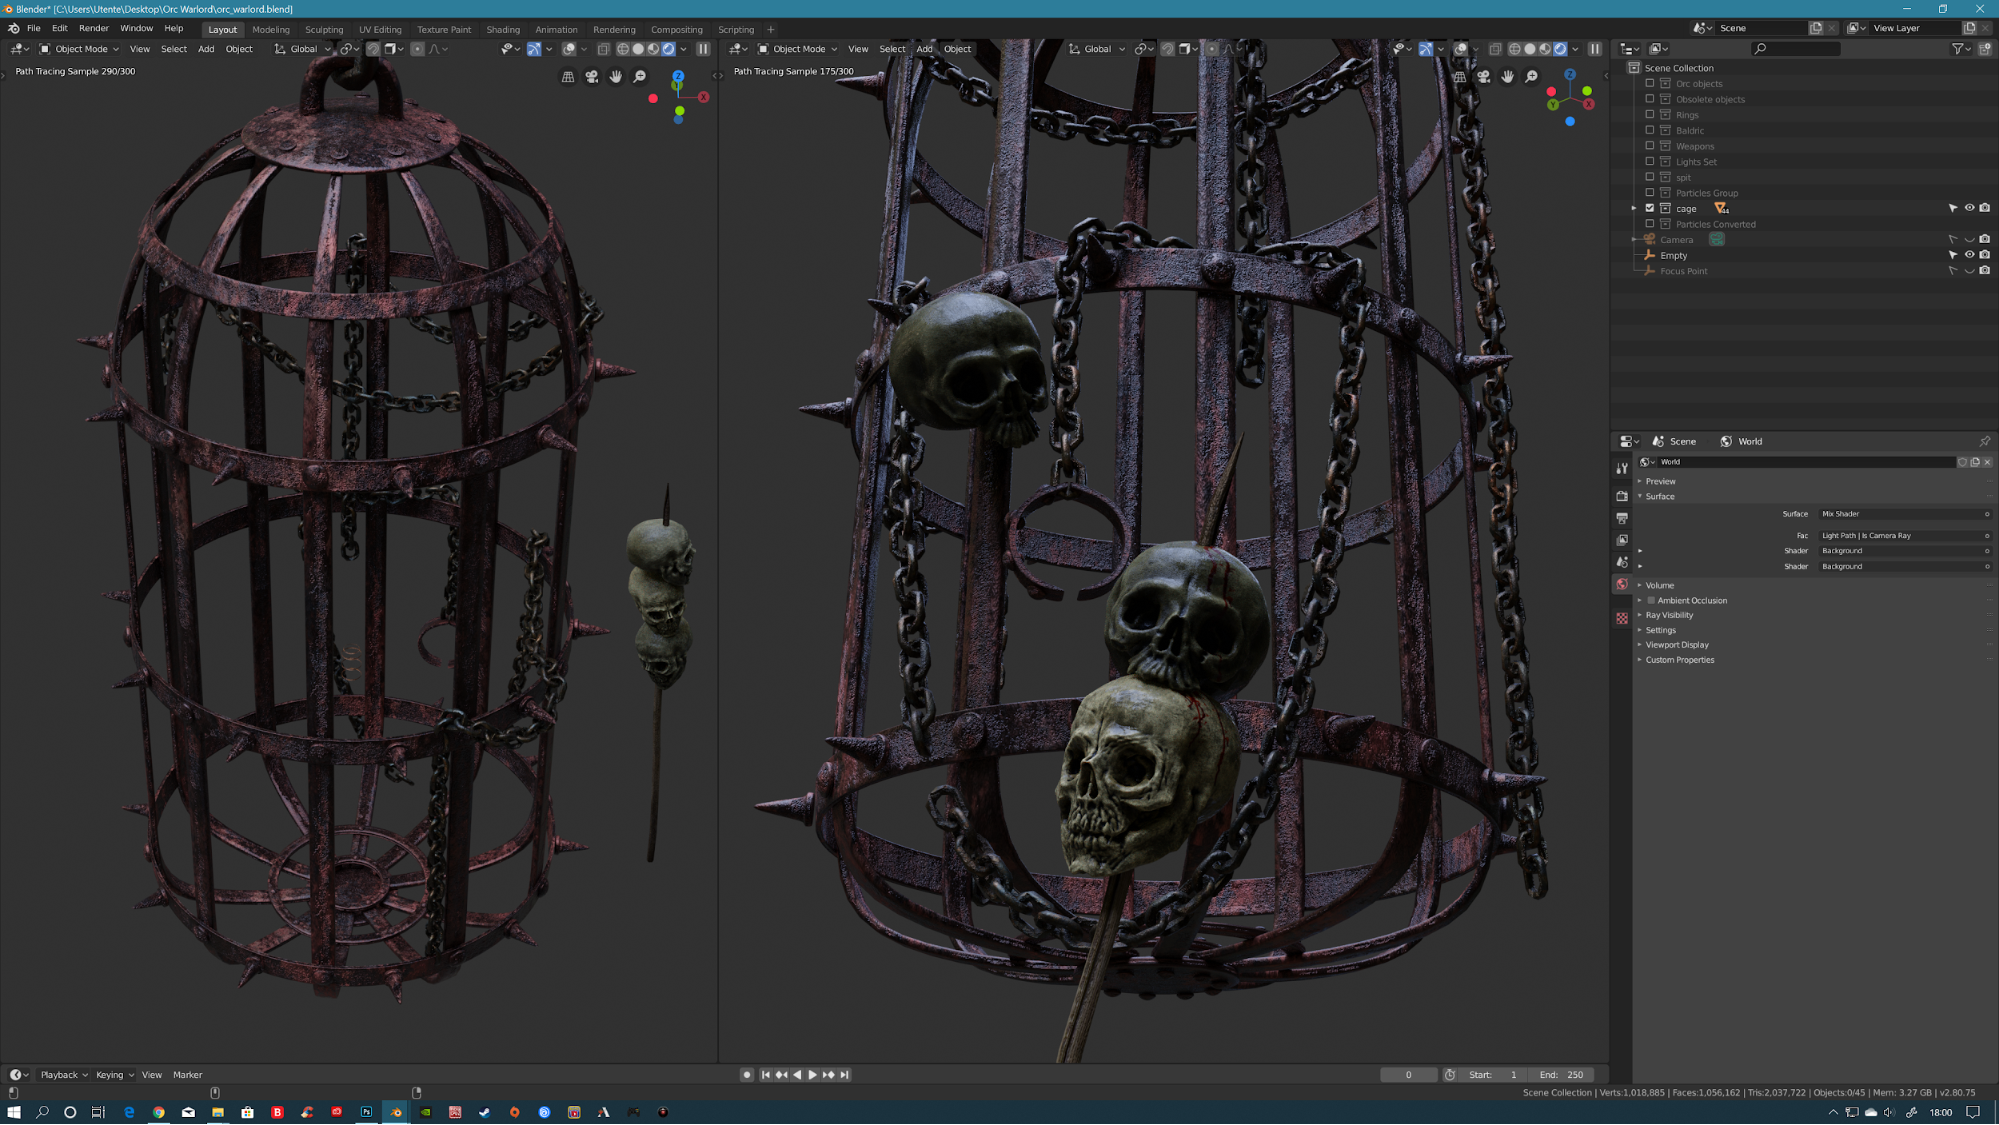
Background
I wanted to create an element that would serve as a filter, something that would enhance the depth of field, sharper than the background but more blurred than the foreground subject. Possibly an element of strong characterization, which could also add something more to the story. Something deeply orcish. That is the cages and the skulls.
Final Render
I have rendered at 1920x1080 resolution with 4000 samples per pixel, and there is no trace of noise. Although through post-processing it is often possible to obtain a significant improvement on a rendering, where it is needed, I did not think I had to improve anything on this final rendering. Everything is exactly how I wished it to be. I, therefore, decided not to intervene further and declared the work finished!

About the Author
 Marco Iacopetti, Graphic Designer, Blender 3D Art Passionate
3 Comments
Great work! I can almost smell his Orc breath through my monitor.
And thank you for sharing your process.
Love this man great work :)
Complimenti per il lavoro, davvero fantastico!! ;)