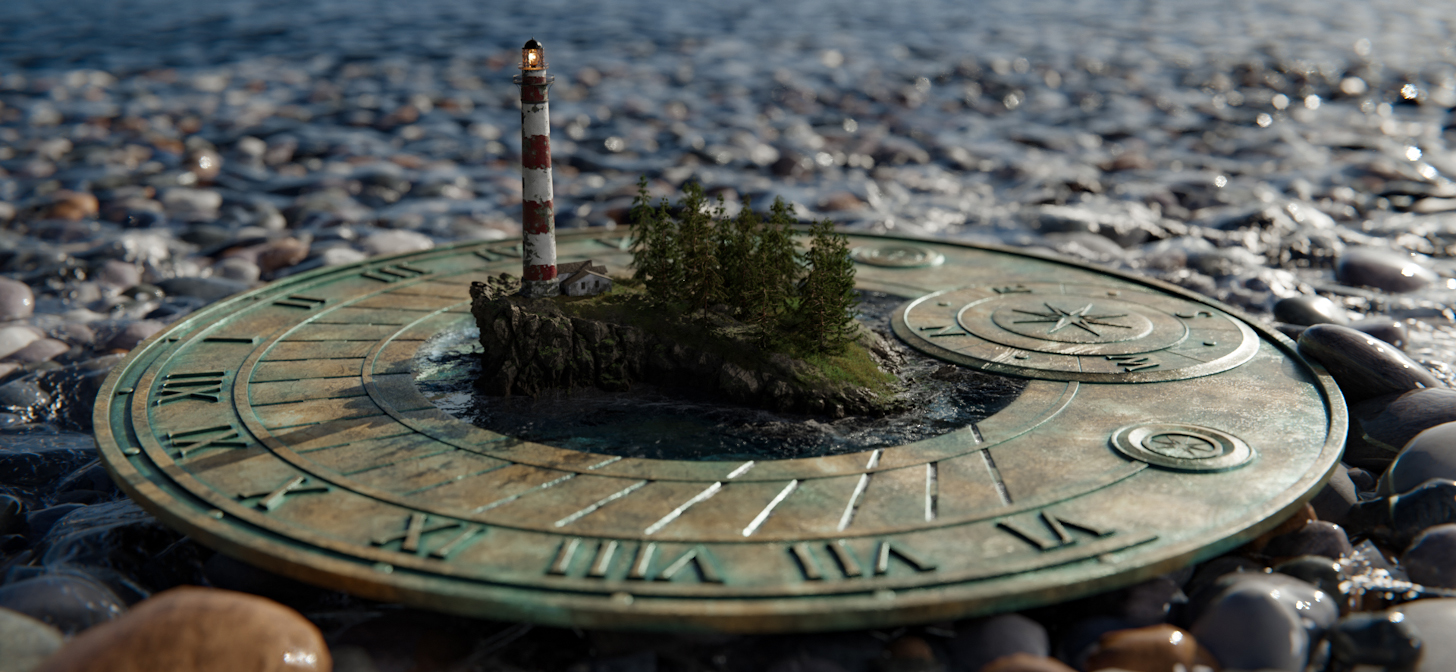
Behind the Scenes: Sundial
Background
Hello everyone! My name is Damian Moroski, I’m from Poland and I’m 18. I started using Blender about 3 years ago as my first 3D program. I learned everything myself, mostly by watching tutorials on YouTube. When I started using Blender I had no idea what I would be doing in the future with it. I tried to do many things, but thanks to Midge Sinnaeve and his great tutorials I fell in love with all the procedural stuff that it is possible to do in Blender.
I always wanted to do something different than just interiors or landscapes. Some time ago I found a picture of some trees in a cup and I tried to create something similar. Since then I have realized that as a CG artist I can actually do anything I want, so why limit myself to reality? I can create anything that comes into my mind. I love the feeling of complete freedom in creation. Now I try to make some realistic objects and see how they work in completely different environments, or combined with other, less obvious things. That’s how I created “Forest in a Cup”, “Lake in Forest” or this one, “Sundial”. I know, very creative names. You can find them on my Twitter, where I’m posting most of my work.
Inspiration and Basic Idea
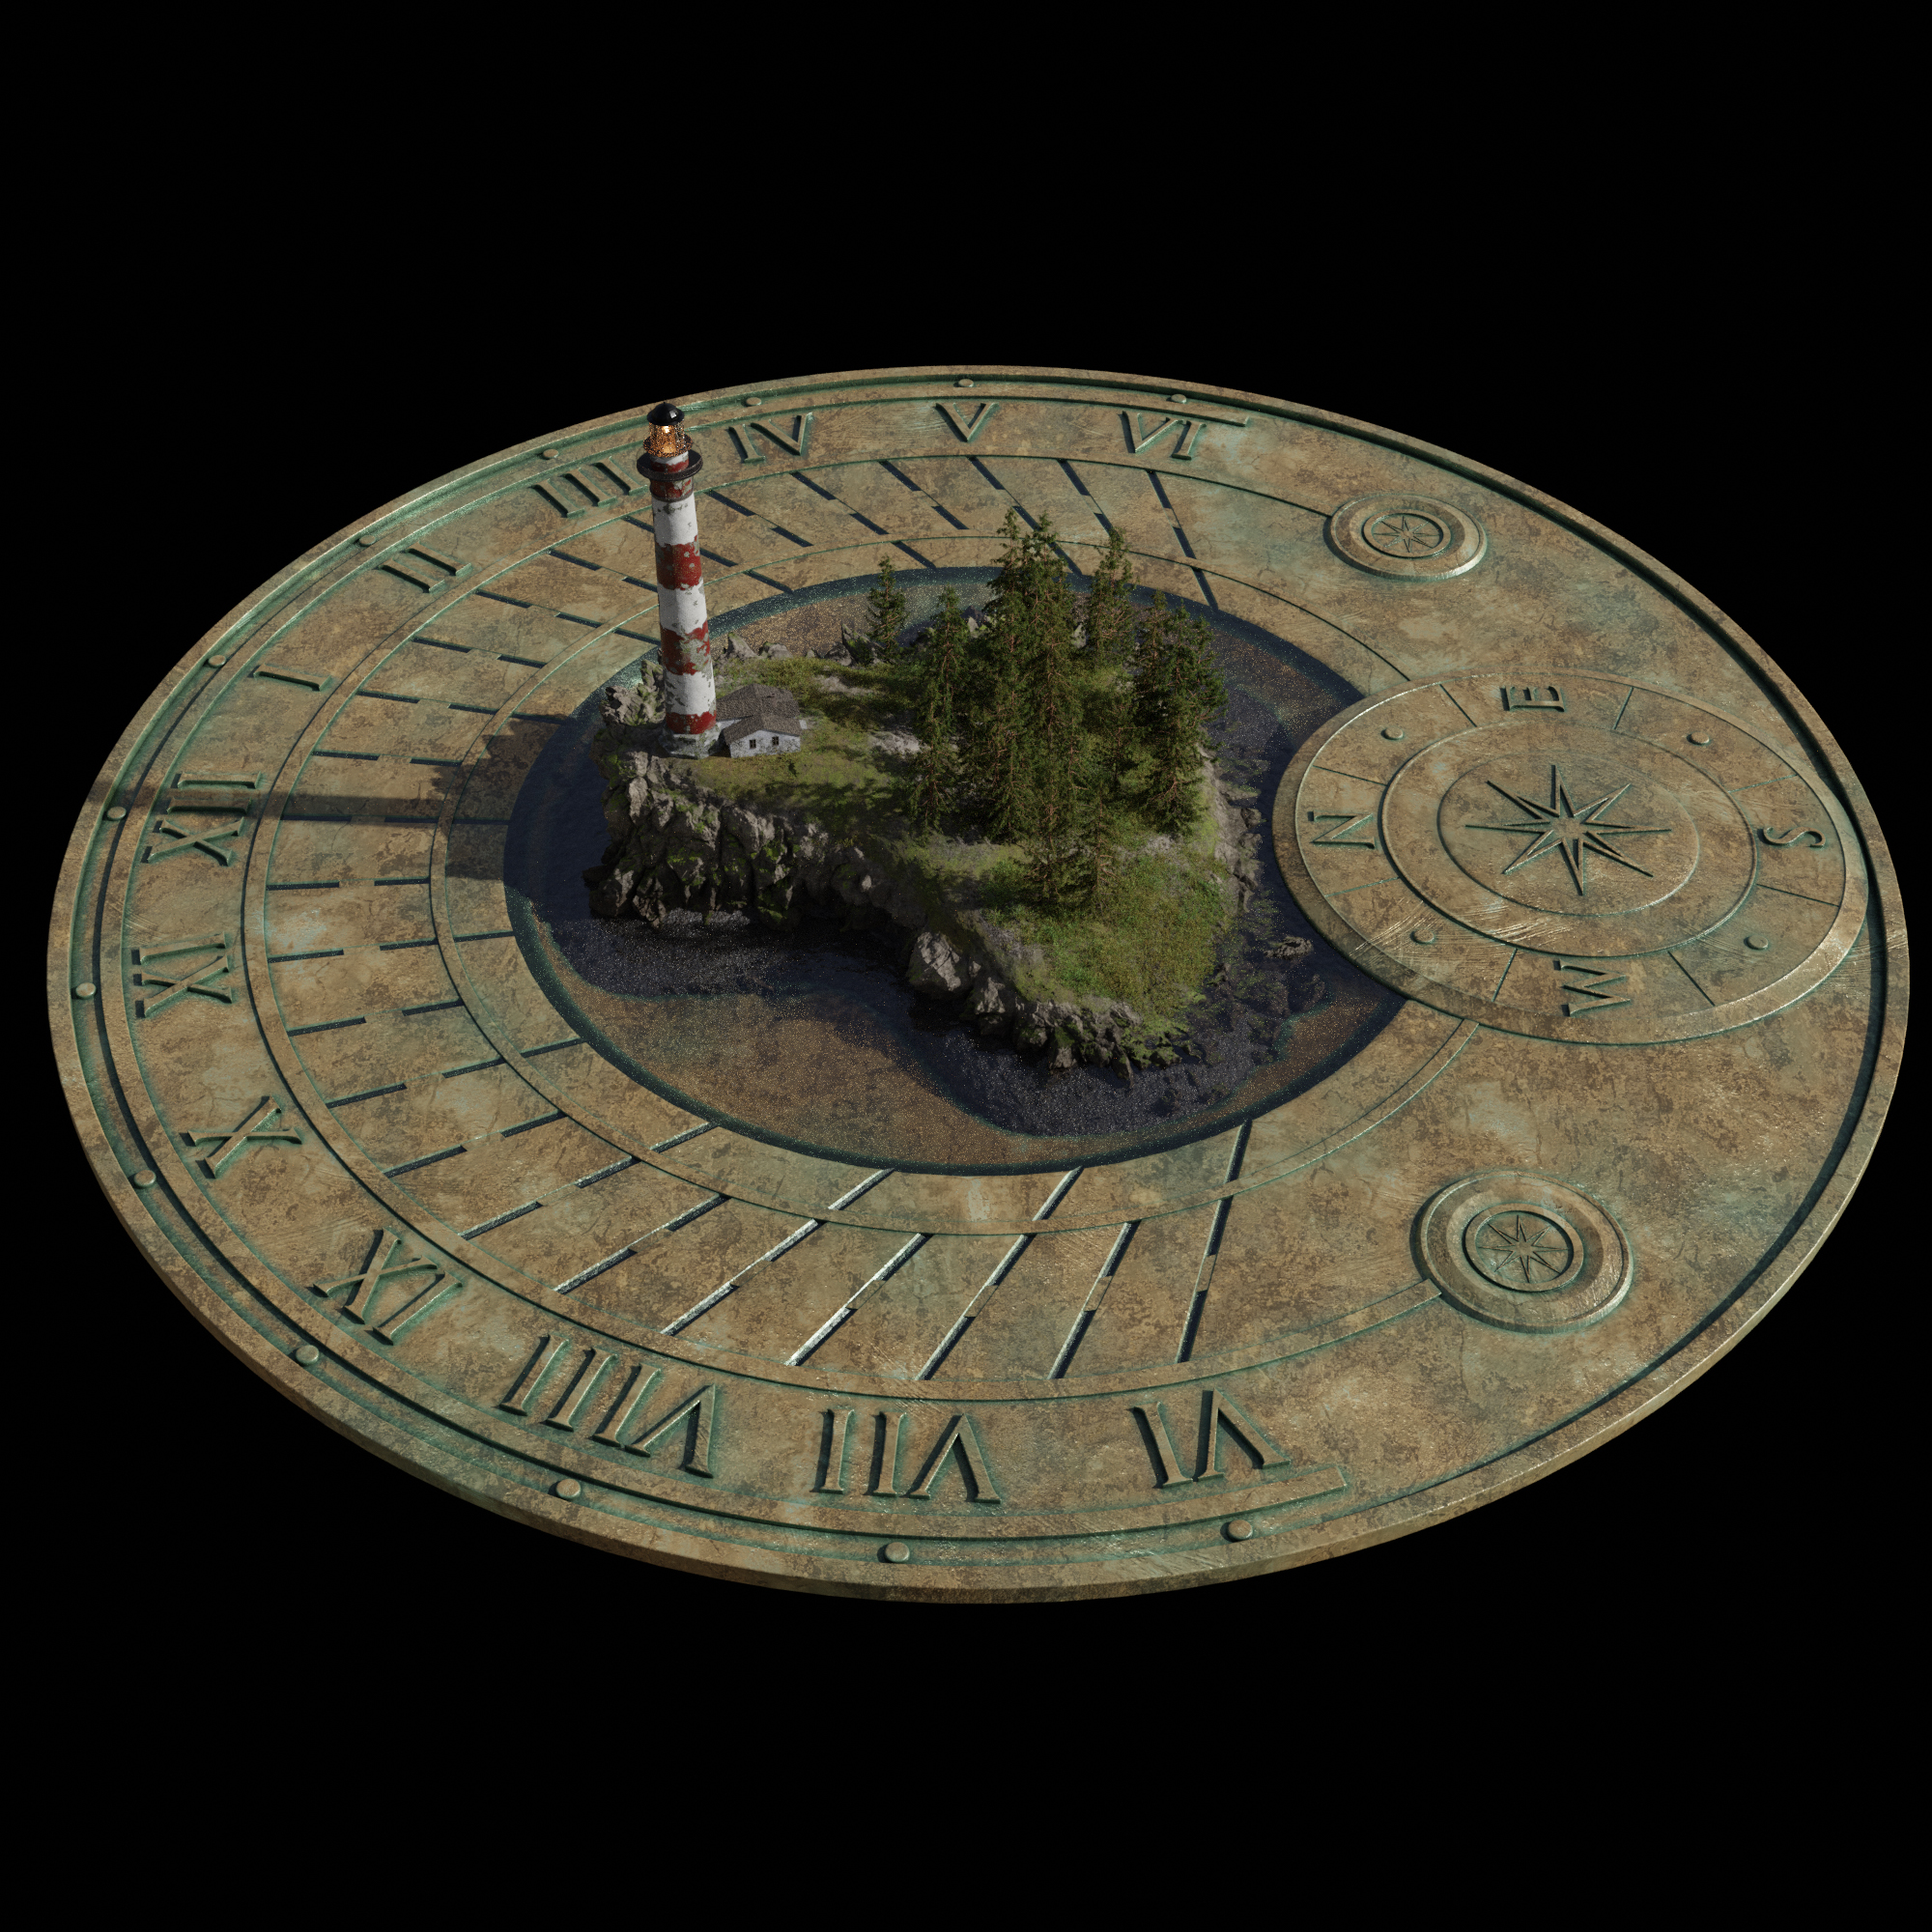
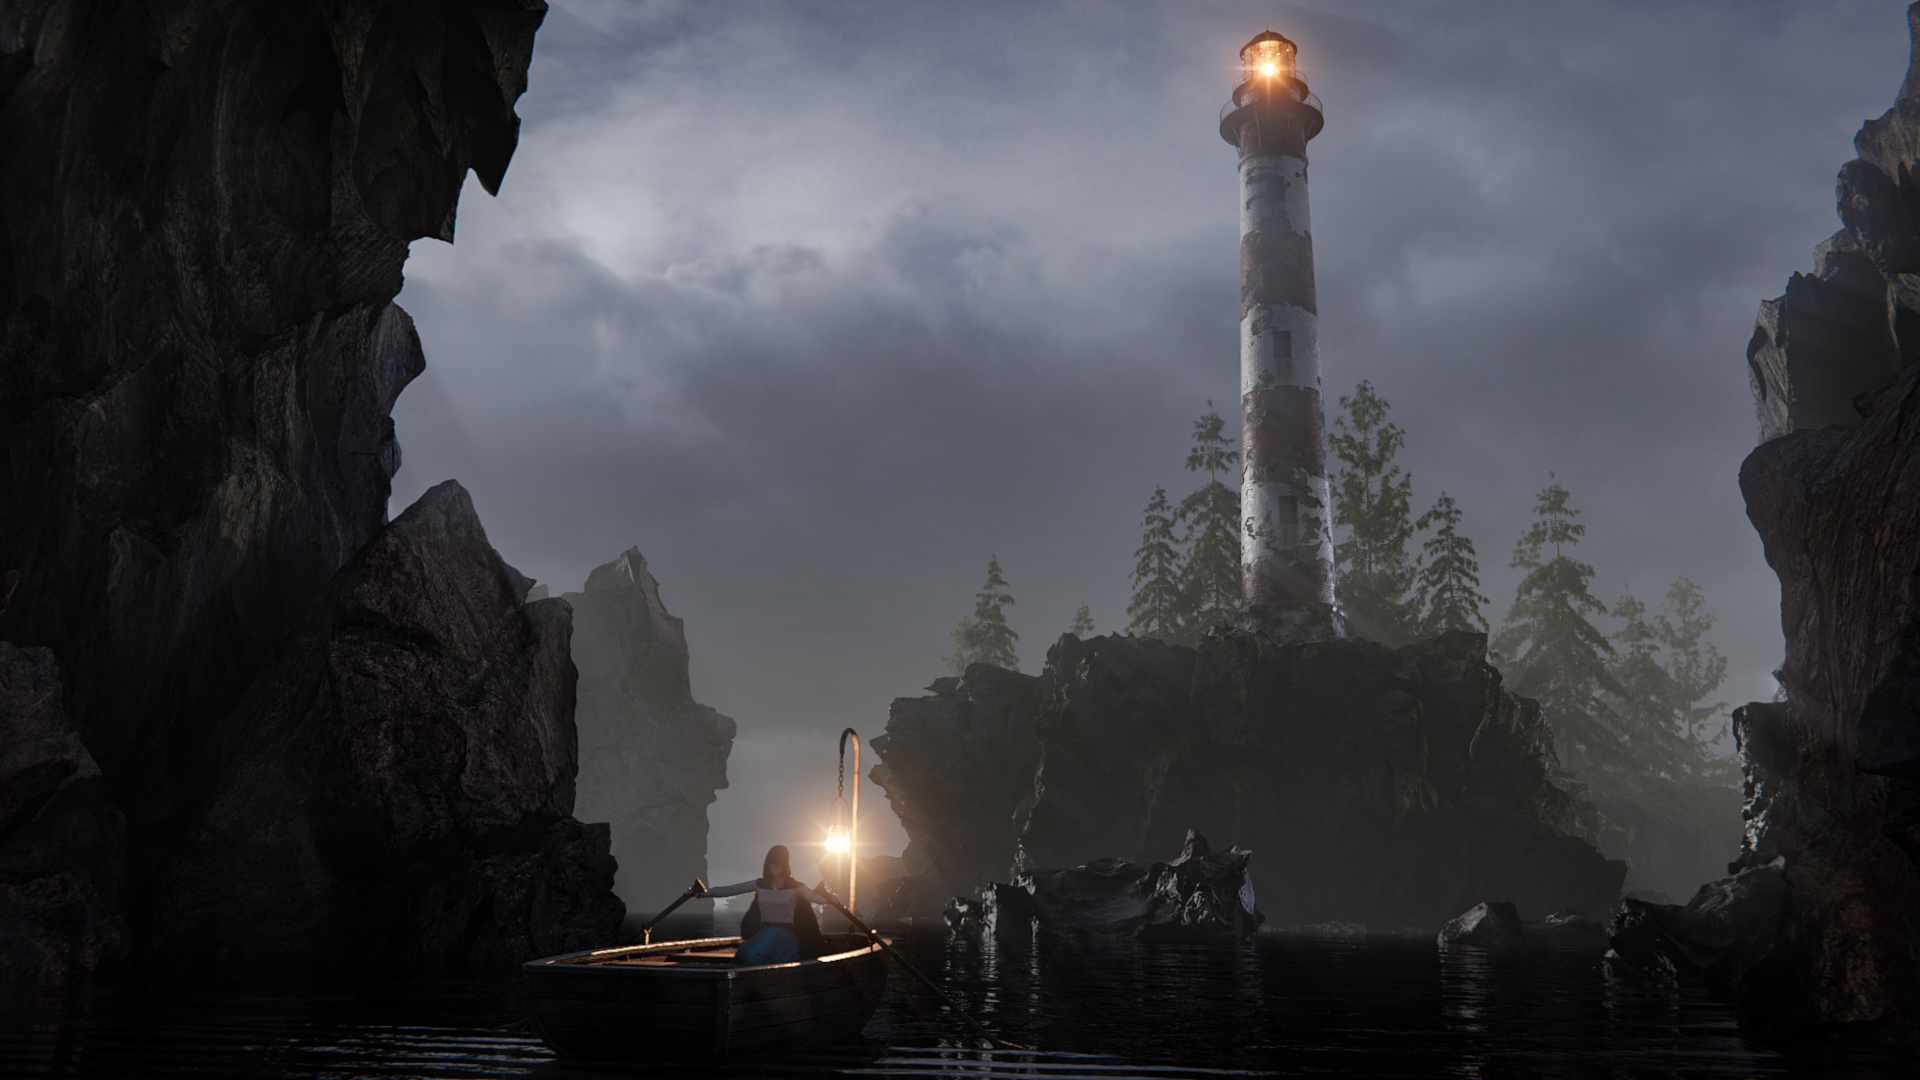
Finding some good ideas is really hard, especially when I want to create something new. Usually I spend time scrolling through Pinterest or other sites with photos to find some basic ideas. Sometimes it takes a moment, but frequently it can take days to find something interesting. With this one it was a bit different—I just really like lighthouses. Bioshock Infinite, or Life is Strange (my favourite games, by the way) were helpful. When I knew I wanted to create a lighthouse, my search became about finding a good reference. Instead of a reference, I found some blueprints on Pinterest, which made modelling the whole building way simpler than I thought. Still, without an idea of what I would do with it, I started to create an island, to have something to put the lighthouse on. There are not many photos of lighthouses on islands, so I had to improvise on this one, which turned out better than I had hoped.
What new thing could I do with a lighthouse? It was hard to think of anything, and then I looked at the clock on the wall, and the idea just came to me. I modeled the sundial and replaced the needle with the island.
About the Lighthouse
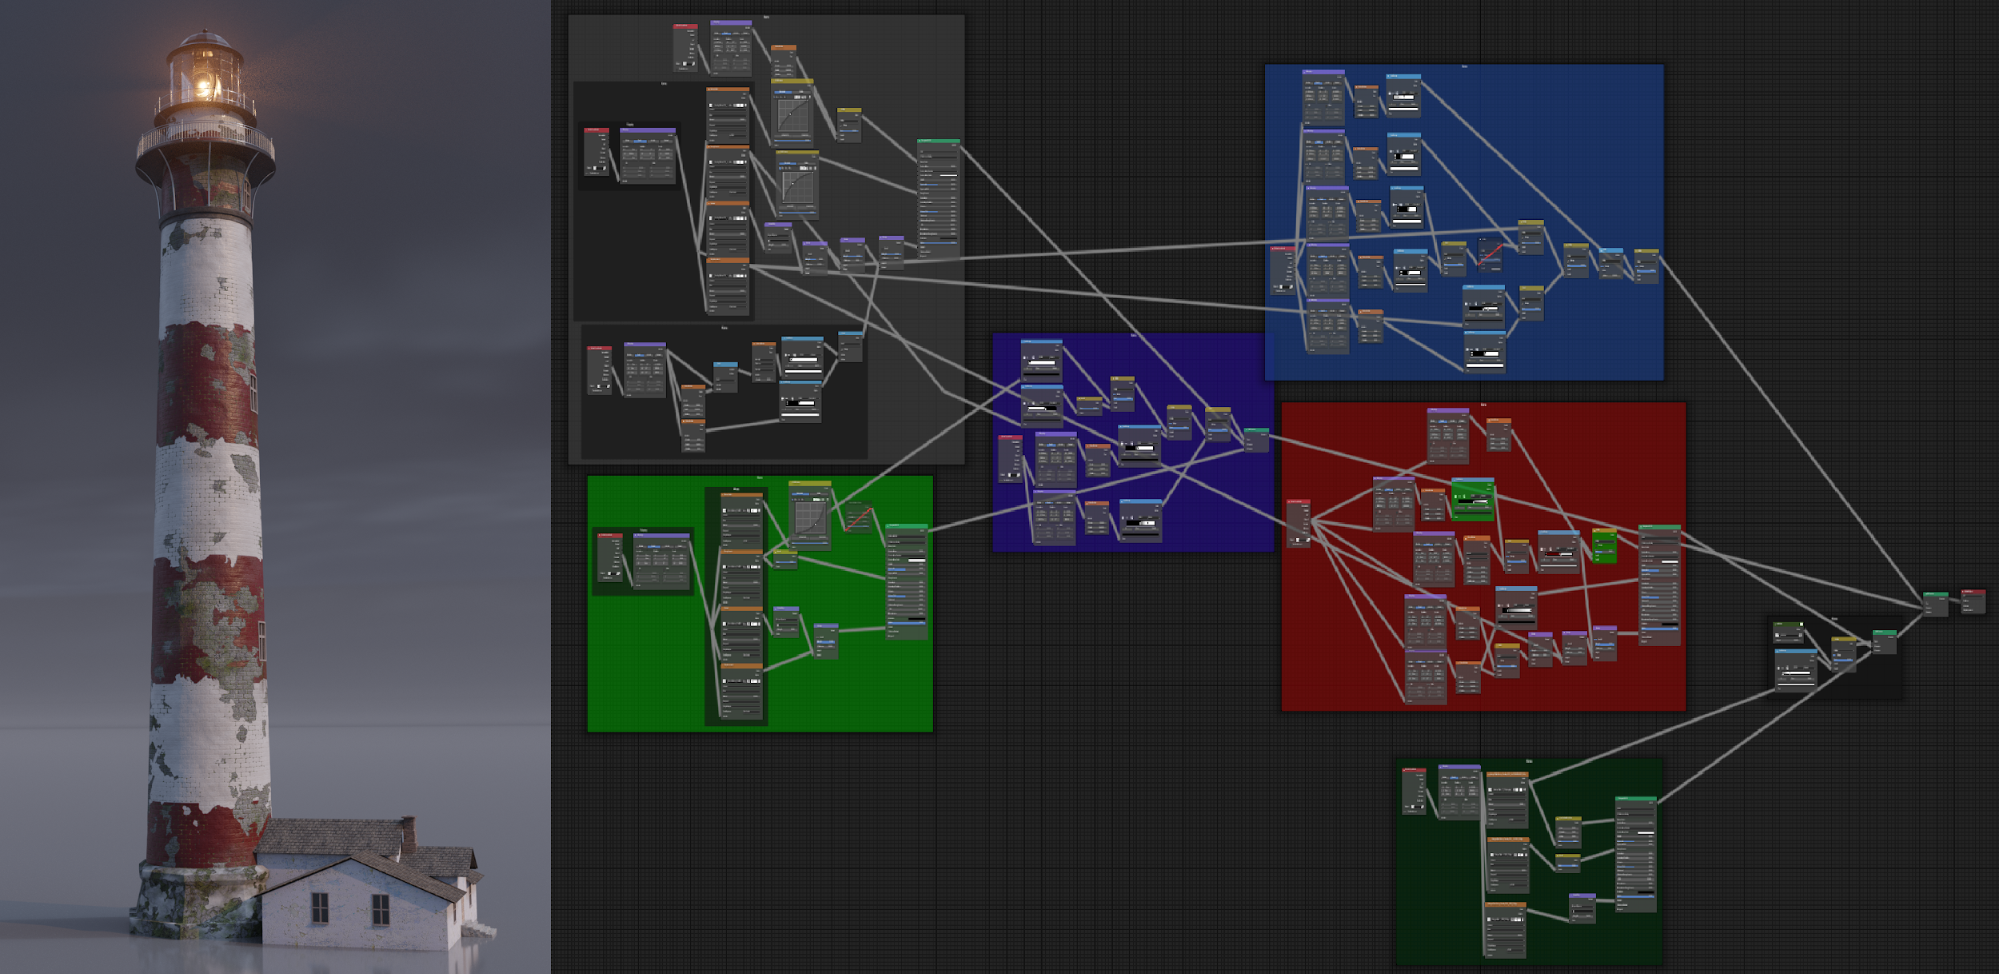
As I said earlier, I love procedural stuff, and creating procedural shaders gives me so much freedom, I can change whatever and whenever I want. This node setup is for the main paint and bricks. There are 2 primary textures, bricks and moss, and, if I remember correctly, they are from CC0 Textures or Texture Haven. Both sites are great and completely free to use. Other than that, everything else is procedural.
In my work I’m mostly trying to focus on shaders, to make them look realistic, and to be able to control as much as I can. Except for the inner “layer” of bricks, everything else is fully changeable, like the size of the worn-off paint or even the size of red paint strips (wave texture).
About the Island
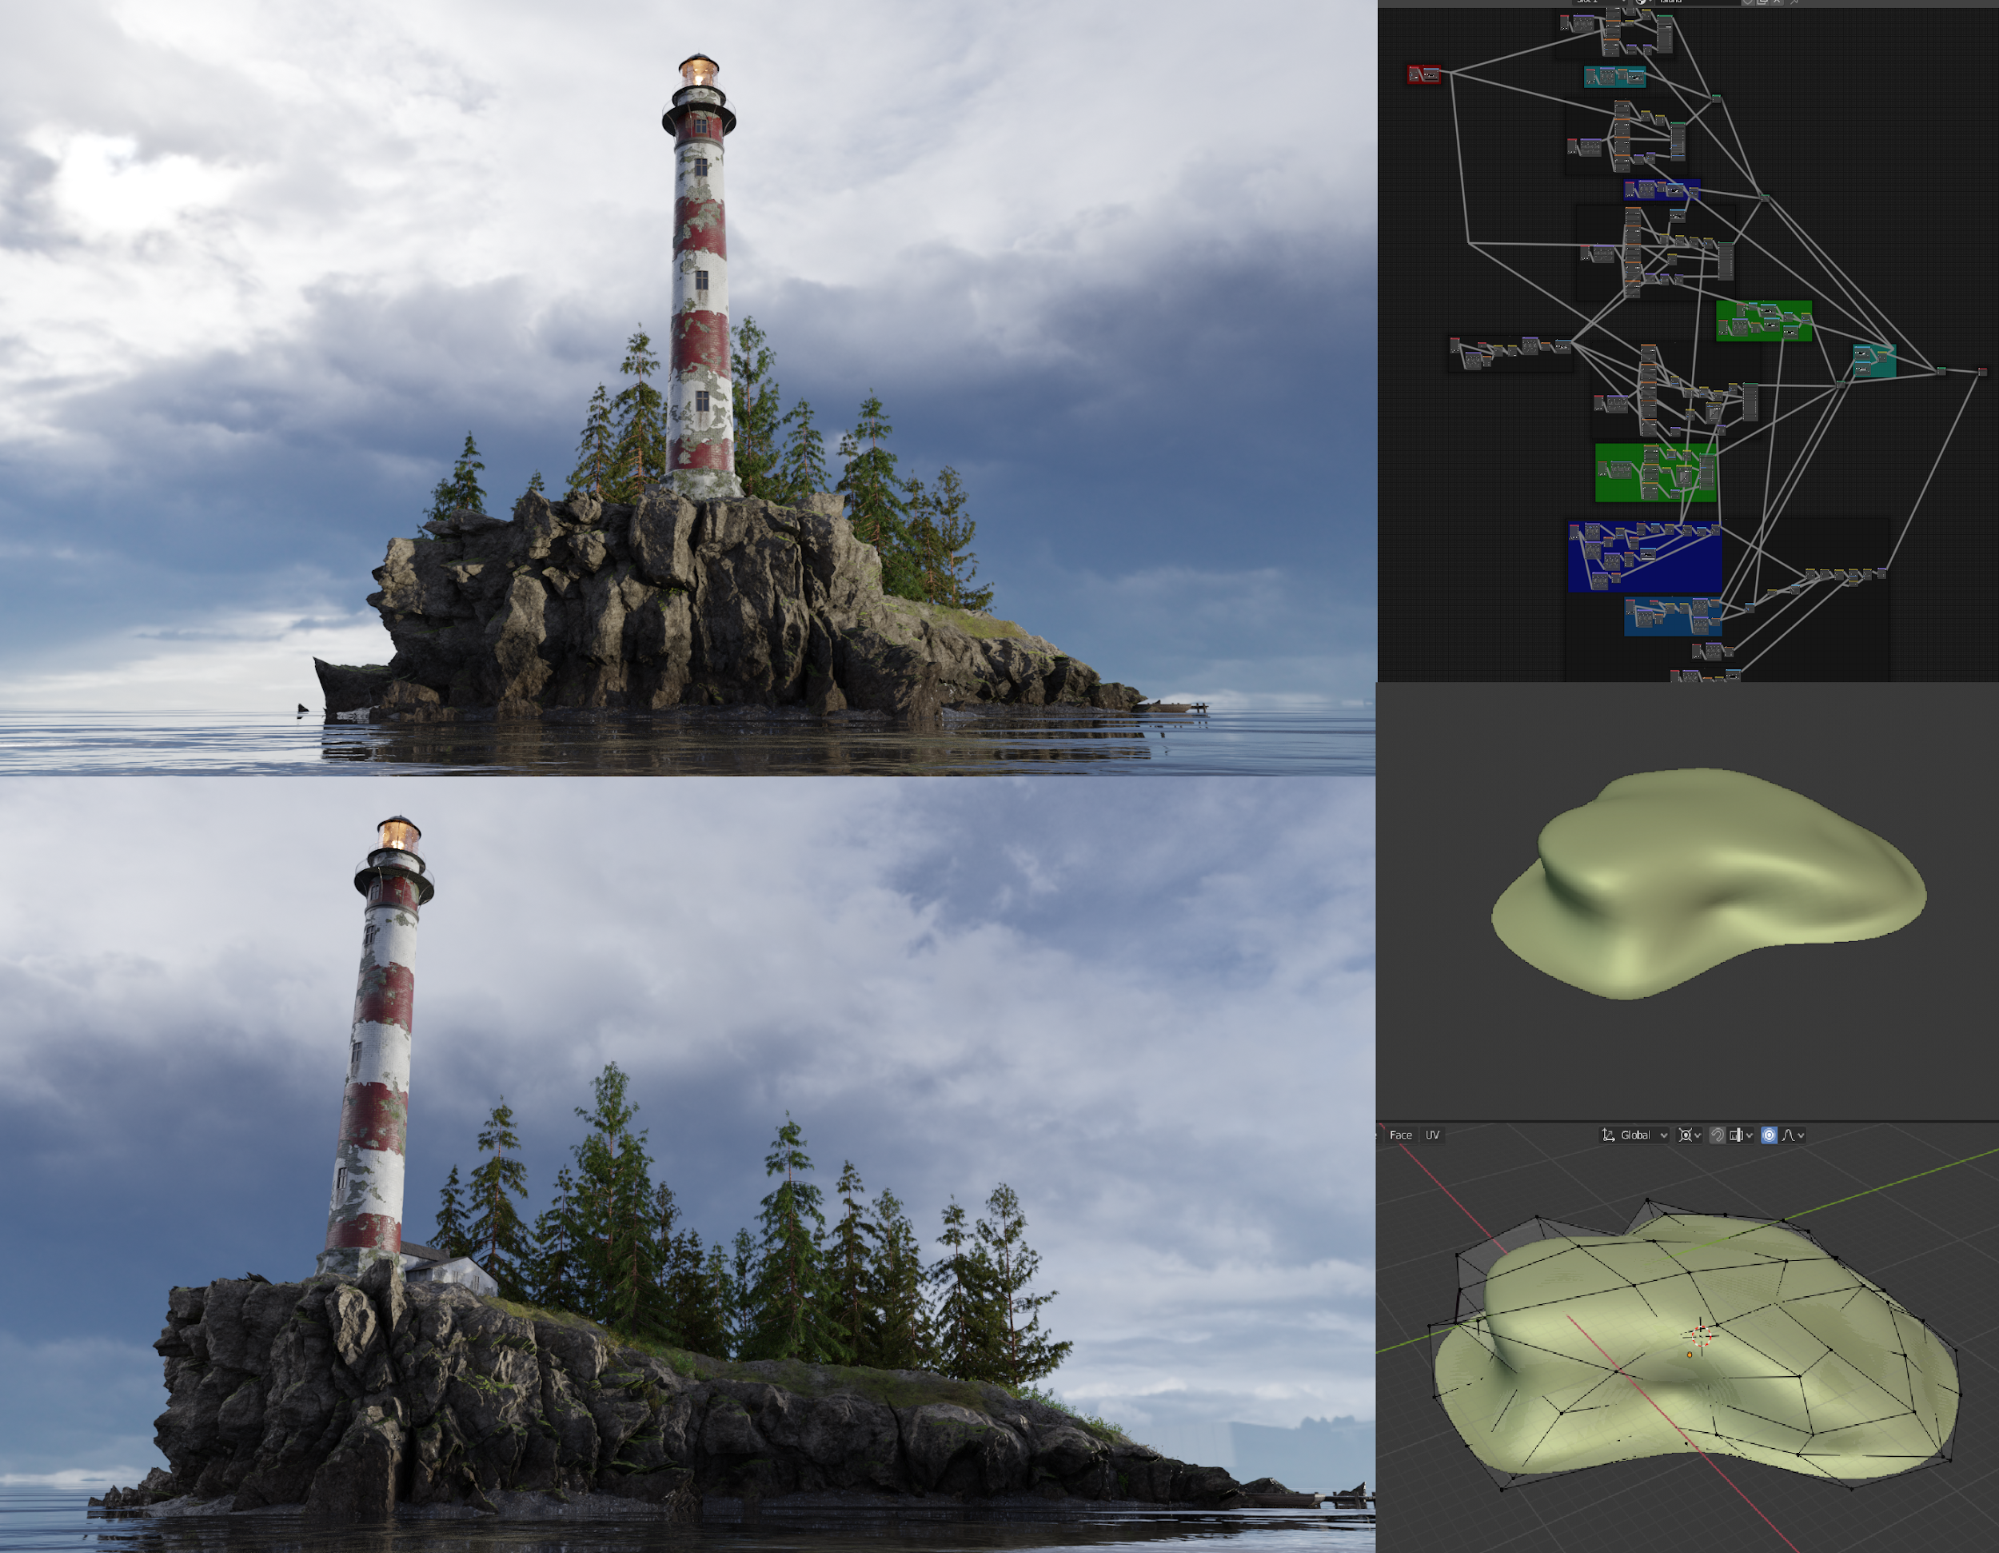
The real fun starts when I want to do the whole object procedurally.
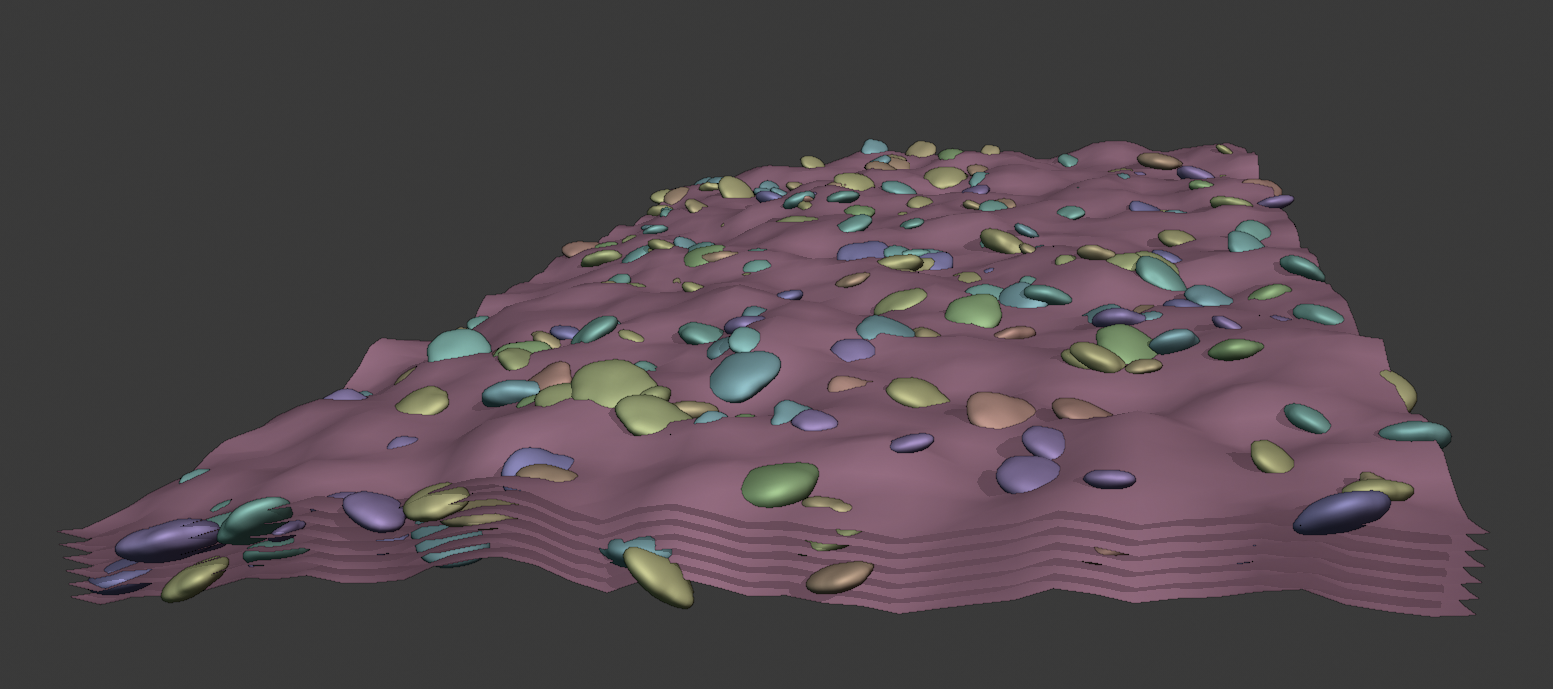
To create the basic island shape I started with an object called a “round cube”, which is in a built-in addon called “Extra Objects.” I removed its bottom half and added the displace modifier with a cloud texture to develop an interesting look. When it was looking good enough, I applied the modifier and moved a few verts manually to make the island look a bit more like it’s falling apart and to add cliffs. And then the fun part: microdisplacement. As you can see on the image, every rock on the island is controlled by nodes. Cliffs on the sides are made of voronoi texture mixed with noise texture. The part where rocks end is controlled by a gradient texture, allowing me to add grass on top without worrying about spiky rocks. A small detail, which is barely visible, is the moss on top of the rocks; it’s controlled by geometry node, position, and separated blue color.
I generated trees a few months ago, using a “modular tree” addon. It’s node-based and easy to use. I know that my trees are not perfect, but I spent some time to optimize them so that they don’t need extreme amounts of power to render.
There are also separate grass models, which are just small bushes, which were made the same way as the trees.
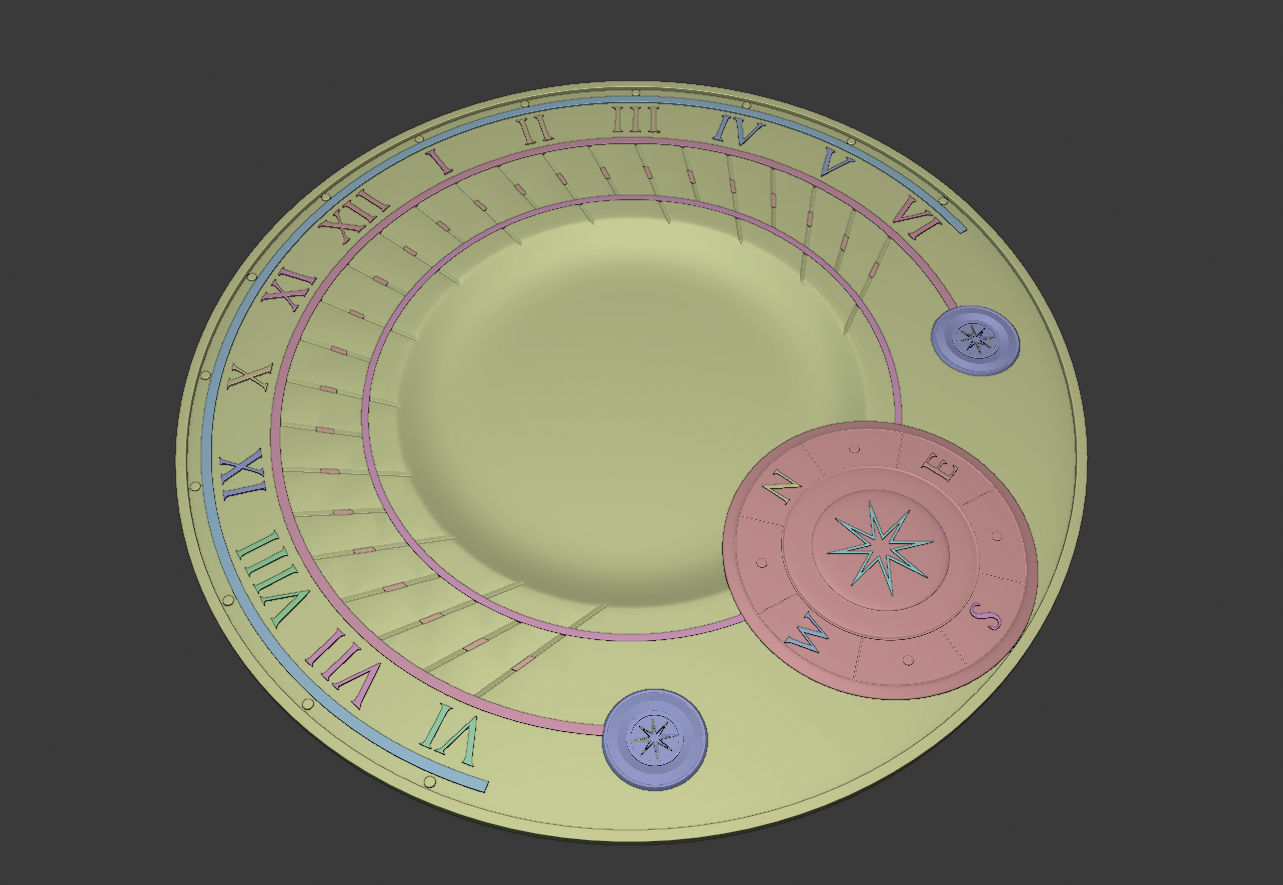
About the Sundial
The sundial is basically just a bunch of circles, some booleans, CC0 font (I had it on my drive for some time so I have no idea where it’s from), and metal texture, with Ambient Occlusion controlling the blue color, to make it look like old bronze.
Rocks
I created rocks from a subdivided cube, scaled down a bit on the z axis, and added a bit of displacement with the cloud texture on global coordinates so that I could duplicate them a few times to have about 10 different objects for the particle system. The shader is simple, just 2 different rock textures, mixed with random object info. They also have random coordinates, hue, saturation, and brightness, so that every rock is different. I have no idea how to clean up this node setup, so I will not add it here.
The rocks are scattered by a particle system, but not on a single plane. The first time I tried to create realistic sea stones I wondered why they were not looking good enough. It was because they are not on a single layer, but often there are at least a few layers of rocks. So I added a plane with displace modifier to create some bumps and then made an array on the z axis a few times. The plane is not visible in rendered mode, so that more layers of rocks are visible. Maybe for some people it would be obvious to do that in the first place, but it’s one of my favourite things in the creation process—finding ways to make something look better by myself; sometimes it can be frustrating, but when it finally works, the feeling is great.
Compositing and Lighting
Here is the part that I am the worst at: lights. I added an HDR map (from HDRI Haven) for general lighting and used a sun lamp 10 times brighter than the HDR to make the lighthouse cast a shadow on the sundial. There’s not much to say about lights. Usually I just look for an HDR that will work with the scene and then rotating it until I like the result. Sometimes I combine HDRs with mix nodes, when I want to add strong light from one side and slightly brighten the scene with the second one.
Small tip: If You are often using HDRs, find one that you like the most (I recommend indoor with soft light), add it to a clear blender file, and save it as a startup file. It really makes workflow much easier.
For camera angle I prefer to use keyframes rather than create new cameras. I have about 20 keyframes with different FOV and focus, and it’s just about pressing the right arrow and looking for the perfect angle. If only there were that one button for perfect composition and lighting….
I spent a few more minutes in the compositor to correct colors and add some lens distortion and that was it.
Final renders

About the Author
 Damian Moroski, 3D artist, abstract art designer, freelancer


Damian, its absolutely wonderful.
I just started to use Blender, and I was wondering if I could come out with anything in the near future… The results you achieved in 3 years, watching tutorials and learning by yourself, left me in awe.
I am only like 3 months in, and yet I can’t do anything else than learning that program. I binge watch tutorials, practice a little less…
There is so much to learn that I don’t know what to learn next. I have no road map for this… I just learn whatever I find interesting.
I wanted to say thank you for your post. I know I can achieve results like that, too. I recognized myself when you described your journey, and you gave me hope.
“If only there were that one button for perfect composition and lighting….” You say.
I personally think, you just hit it.
For me it was the same. At first just following tutorials, everything that I tried to do by myself was so bad, but I tried anyway, and after about a year i was watching and learning from tutorials, but creating things by myself, with the knowledge from tutorials, not following every single step. It takes time, but I think it’s worth it. If You can, learn what You want, experiment with it and have fun.
Yeah I can relate with that… Hey, maybe one day, I will have my pics on Blendernation, too ;)
Thank you for sharing your experience, Damian. I’ll be watching your future creations with pleasure !
Thanks and good luck. If I could do this, I’m sure You can too.
Would love to see a close-up of your node group for that great looking rock island!
I can’t add photo here, and the whole node setup is too big for one screenshot. I can give it to You in parts if You want, but somewhere else.
Thanks! I sent you a message on Blenderartists.