Behind the Scenes: Bee
A version of this article previously appeared in the July 2019 edition of 3D Artist magazine. The article is printed here with permission.
Introduction
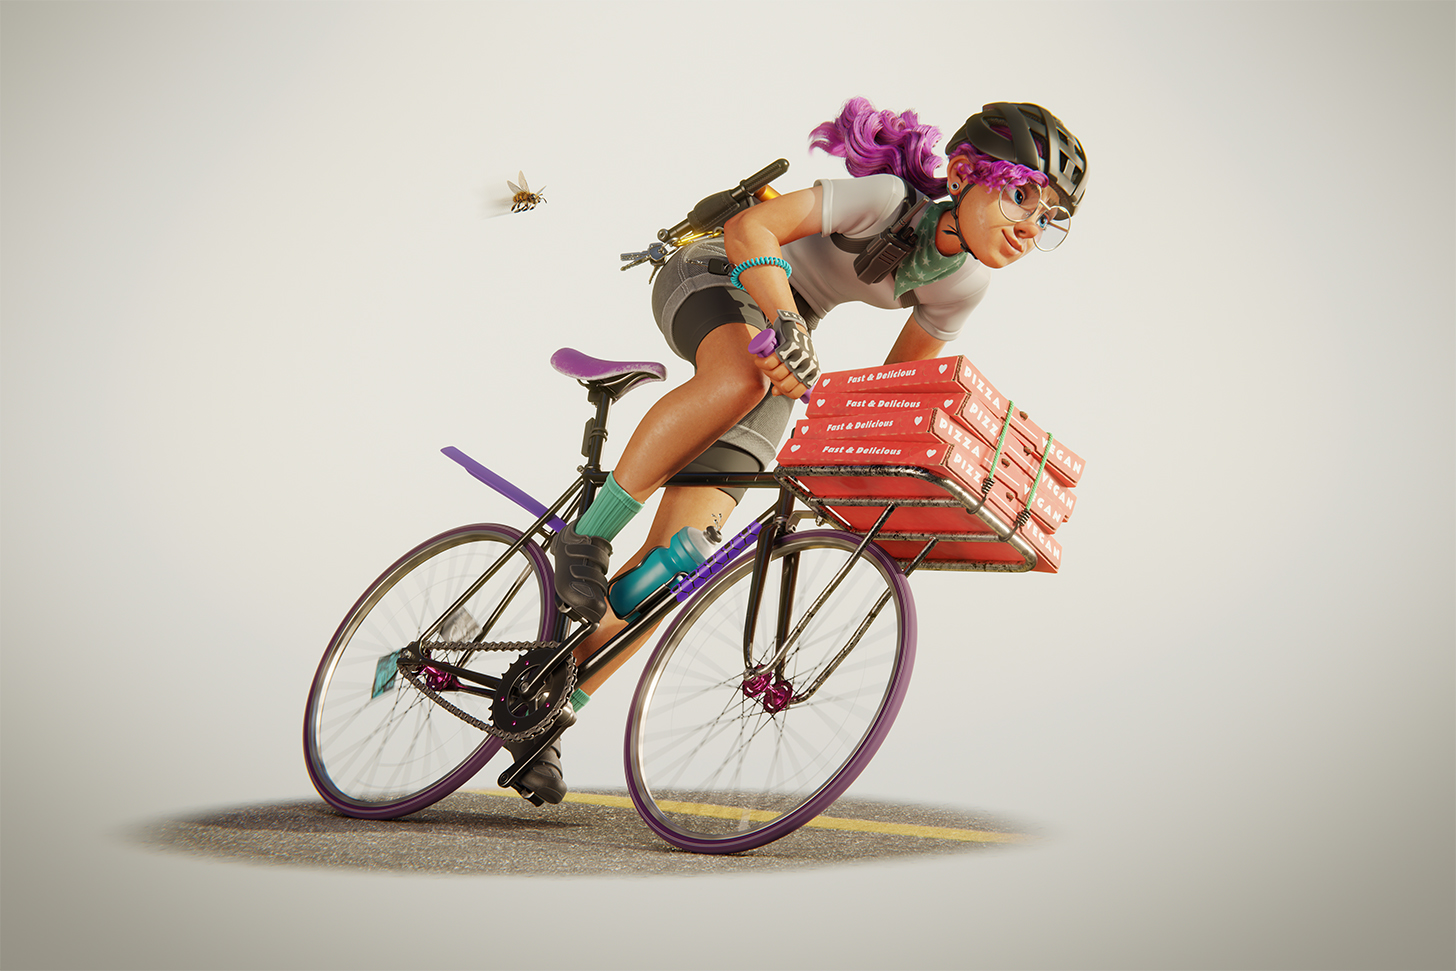
In this tutorial, I will break down the workflow that I used to create my image, Bee. We are going to talk about techniques that I’ve been using in my daily life as a freelance 3D character artist using Blender 2.8 Beta and Substance Painter. “Bee” is a personal work that I created, from idea to 3D production, and its inspiration came from two things that I really like: fixed-gear bicycles and vegan pizza. So in this tutorial, I’m going to talk a little about the process that I used to create this image, step-by-step. I’m going to give you some tips that I learned in this work, as well as others that I have been using for quite some time.
First, we will talk about how to block a character using simple forms and to create a very simple rig to make an interesting pose that expresses something. As we go forward I’m going to talk about how I’ve sculpted the character and what tools I’ve used to help me on the retopology, sharing some tool techniques. Then we are going to take a look at how to prepare the model to import it into Substance Painter, and the workflow setup we should use so that all the exported maps work as expected in Cycles. Lastly, we are going to see what features I used for the skin material, how to use curve guides to control the hair comb, what lighting setup was used, and, finally, how to put all the render layers together.
Software
Blender and Substance Painter
Blocking
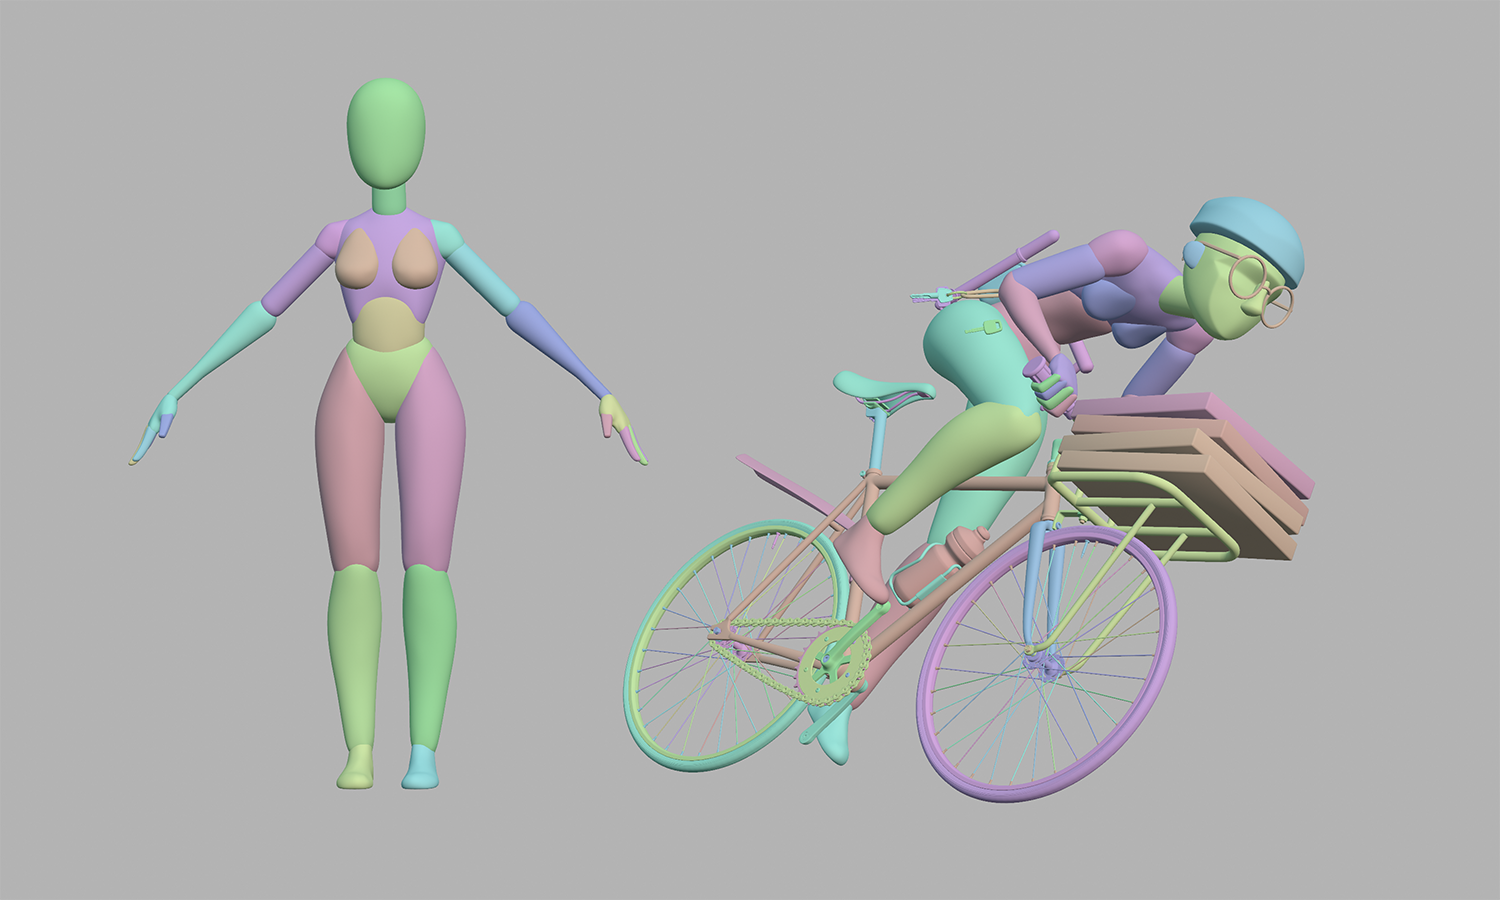
The goal of this first step is to block out the main shapes using primitive meshes (I like to use poly spheres) and make her pose. Keep things low poly for easy tweaking, start building basic anatomy with the primitives to visualize the structure of the character. You can enter into Sculpt Mode and adjust the silhouette with the Grab brush. After we have everything in place we can parent the parts hierarchically and make a “rig”. My goal for the pose was to express speed and motion, so I used diagonal lines, rather than straight, on her body.
Sculpting
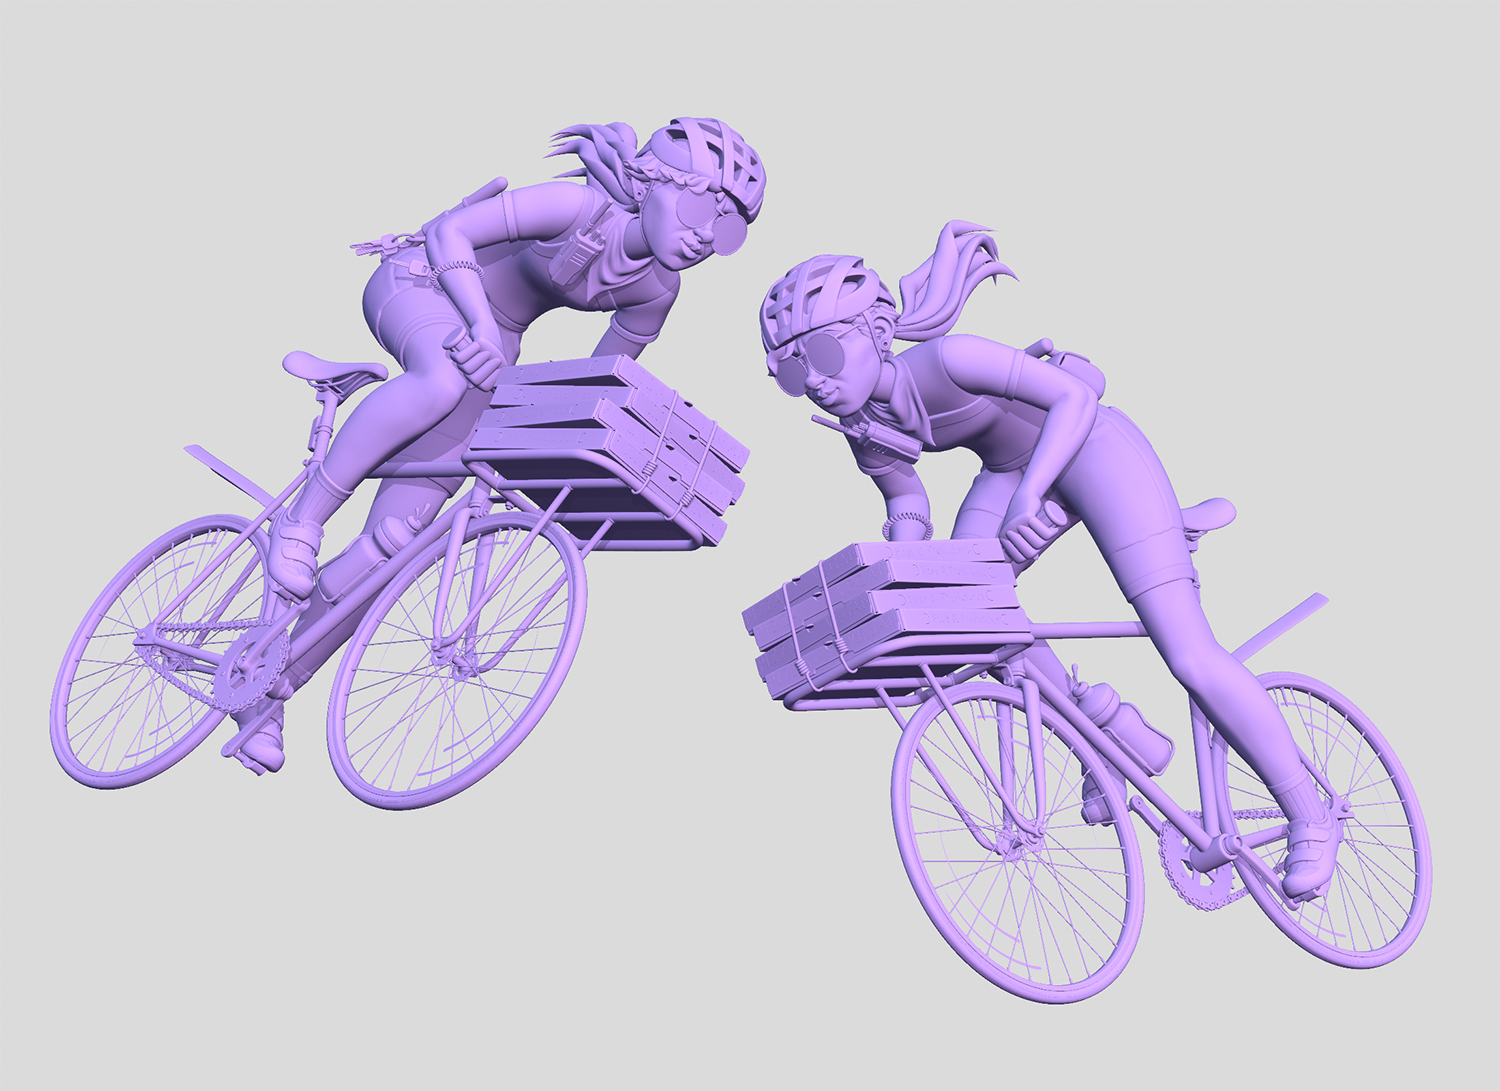
After we are satisfied with the pose we can start to boolean the parts. For that I used the add-on Bool Tool; you just select the parts you want and click union. Now we have booleaned the parts we want, so we can enter the Sculpt mode and start using Dyntopo for sculpting the details. I like to use Constant Detail and Subdivide Collapse options. I prefer to manually set up the brush resolution, but you can also use the picker to pick the resolution from parts of the mesh. The upper parts of the body I did symmetrically and I kept the leg meshes separated.
Retopology
When we have enough details we can start the retopology. A lot of parts I just did with normal poly modeling, but the body and clothes I sculpted using Dyntopo, so the mesh was pretty messy. To help me in this task I always use Retopoflow; it’s a paid add-on for Blender that has a lot of tools that make retopology much more enjoyable. I like to define the main loops with PolyStrips and PolyPen to build more complex parts like nose, ears, and hands. Try to work with big polygons to cover big areas and then add details as needed.

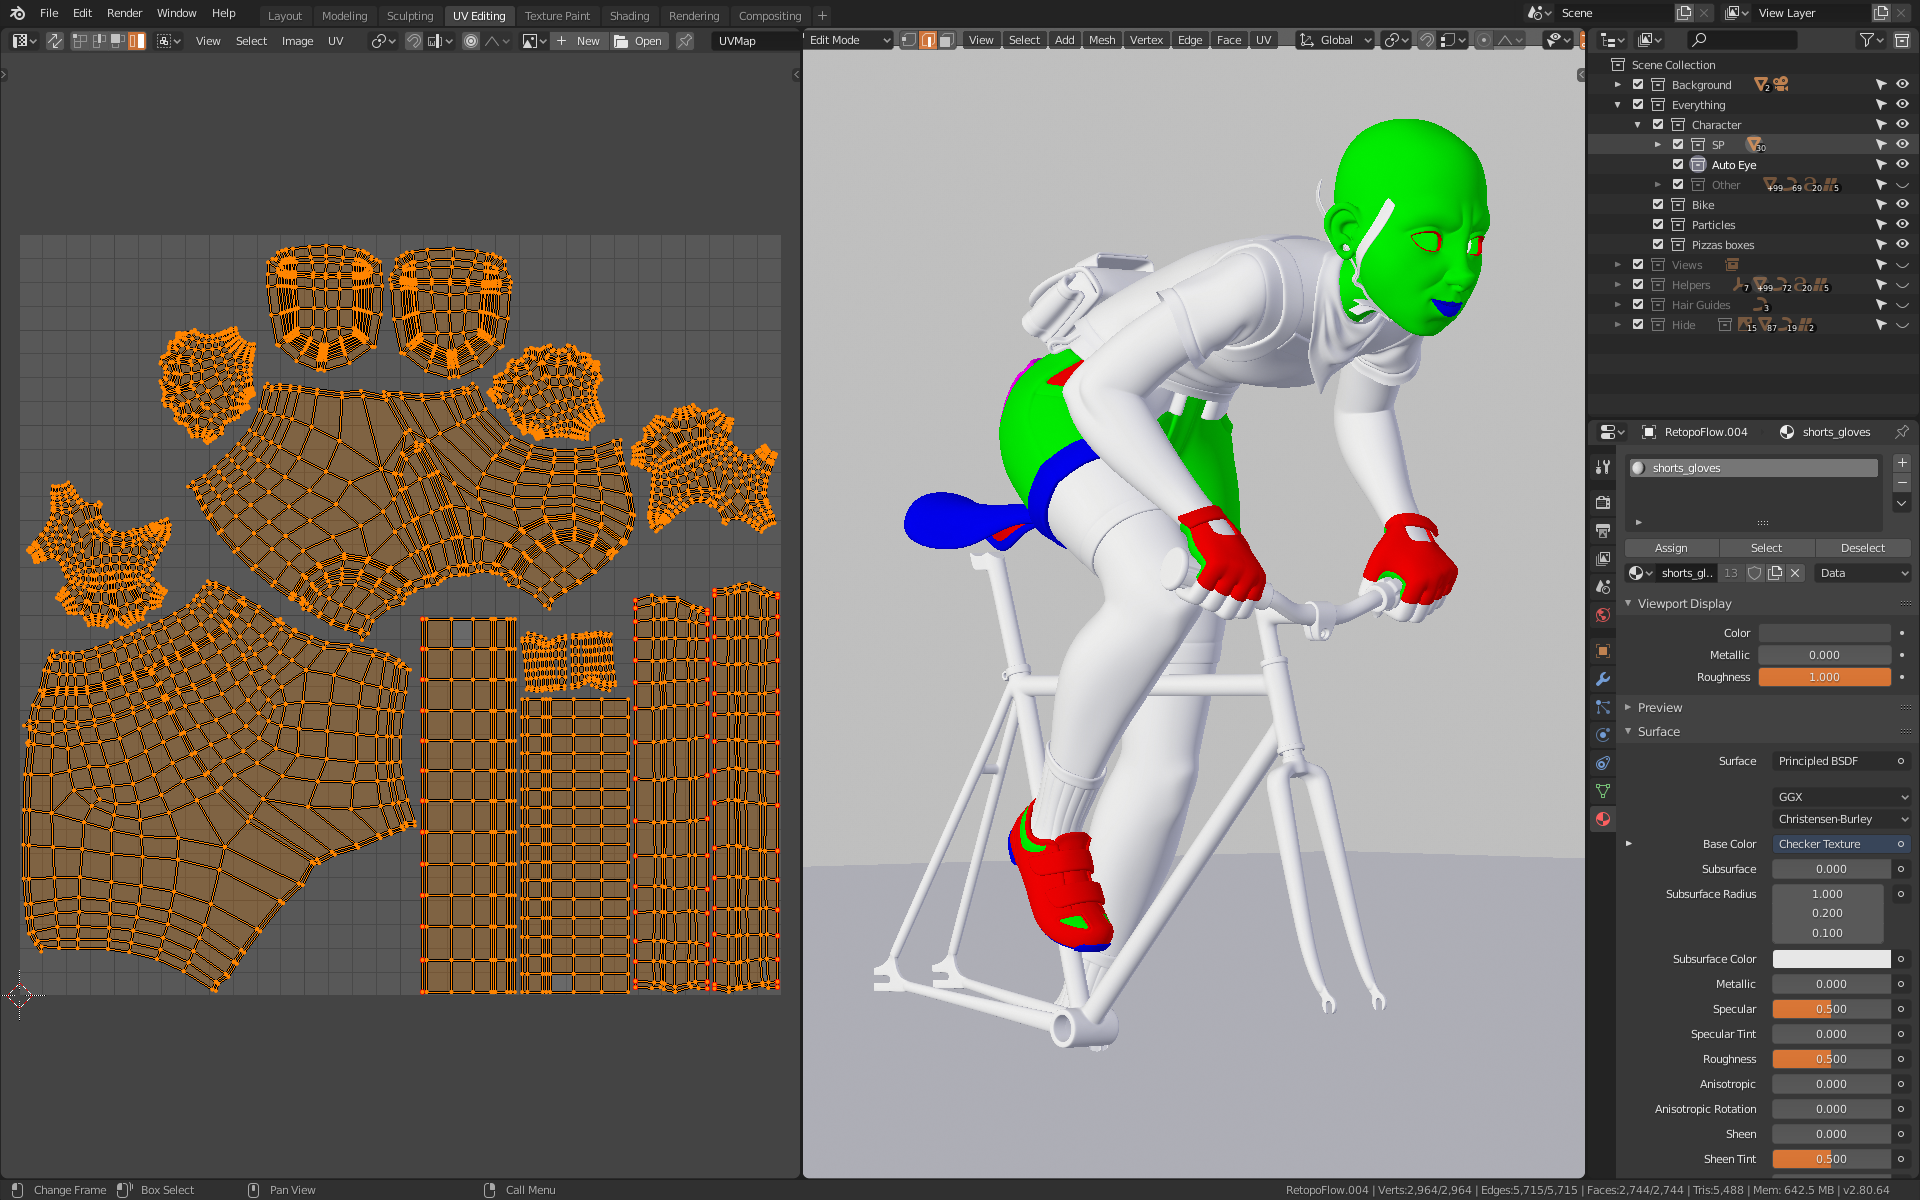
UV’s and ID’s
So it’s time to unwrap everything, and fortunately, UVs in Blender are very simple to do. You basically enter into Edit Mode, select the edges, mark the seams, and hit unwrap. Selection tip: hold Ctrl and go clicking in the direction you want to build the loop selection. I use the add-on UVPackmaster because it’s much more optimized than Blender’s default pack. Before export to Substance Painter, we need to set up some ID masks for easy selection. We can create those masks using Vertex Paint; use full Red, Green, or Blue values and if you need more than 3 ID masks use the combination of two channels.
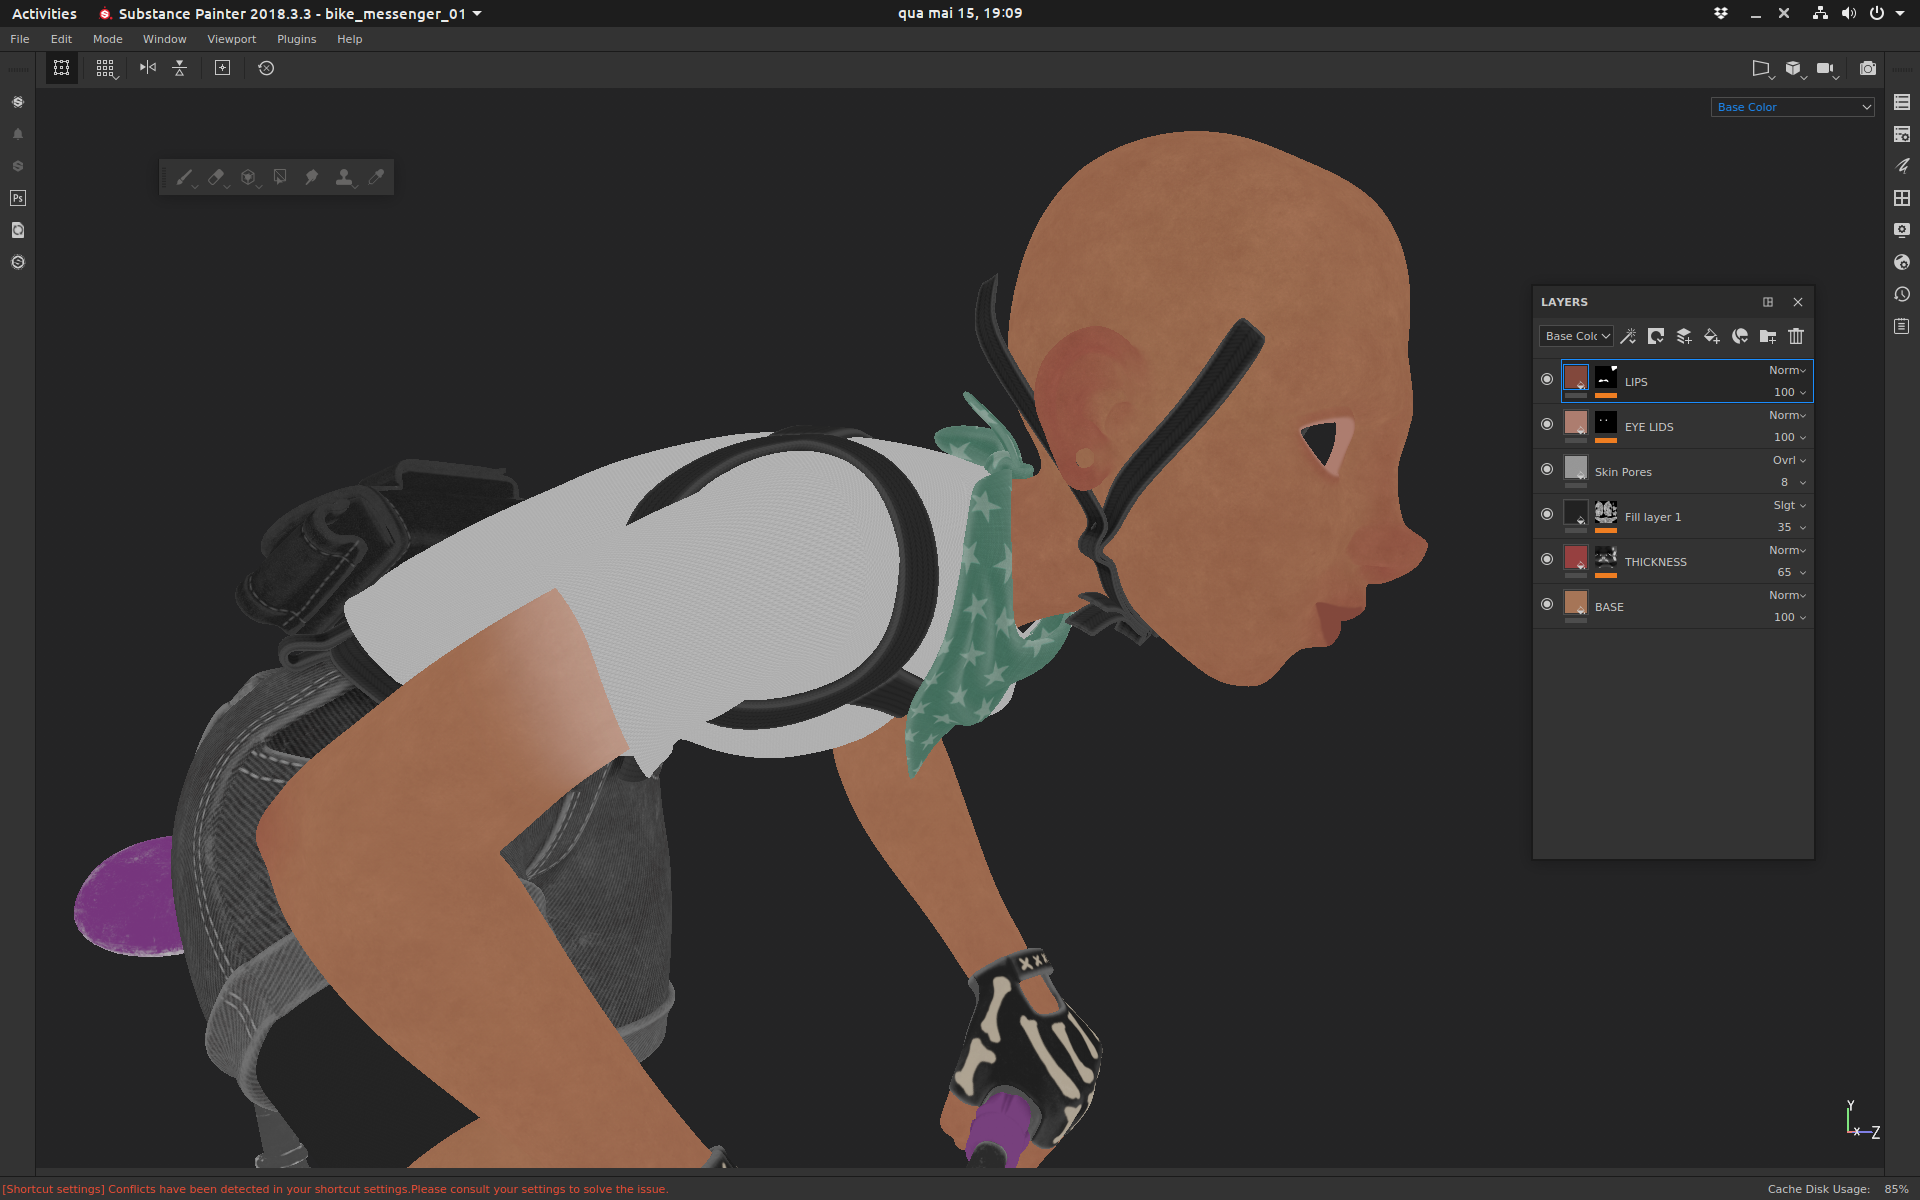
Texturing
The key to texturing, in my opinion, is to think about the weather conditions that a character or an object is exposed to. For example, this girl delivers pizza during the day, so she is exposed to the sun for long periods. That’s why I gave her tan skin and then I painted less tan skin closer to the sleeve, as if the sun doesn’t hit that part too often. Here is a trick for the stitches: paint the color with positive bump, then duplicate the layer, change the color to black, and change the blend mode to multiply with a negative bump and a little bit of blur.
Materials
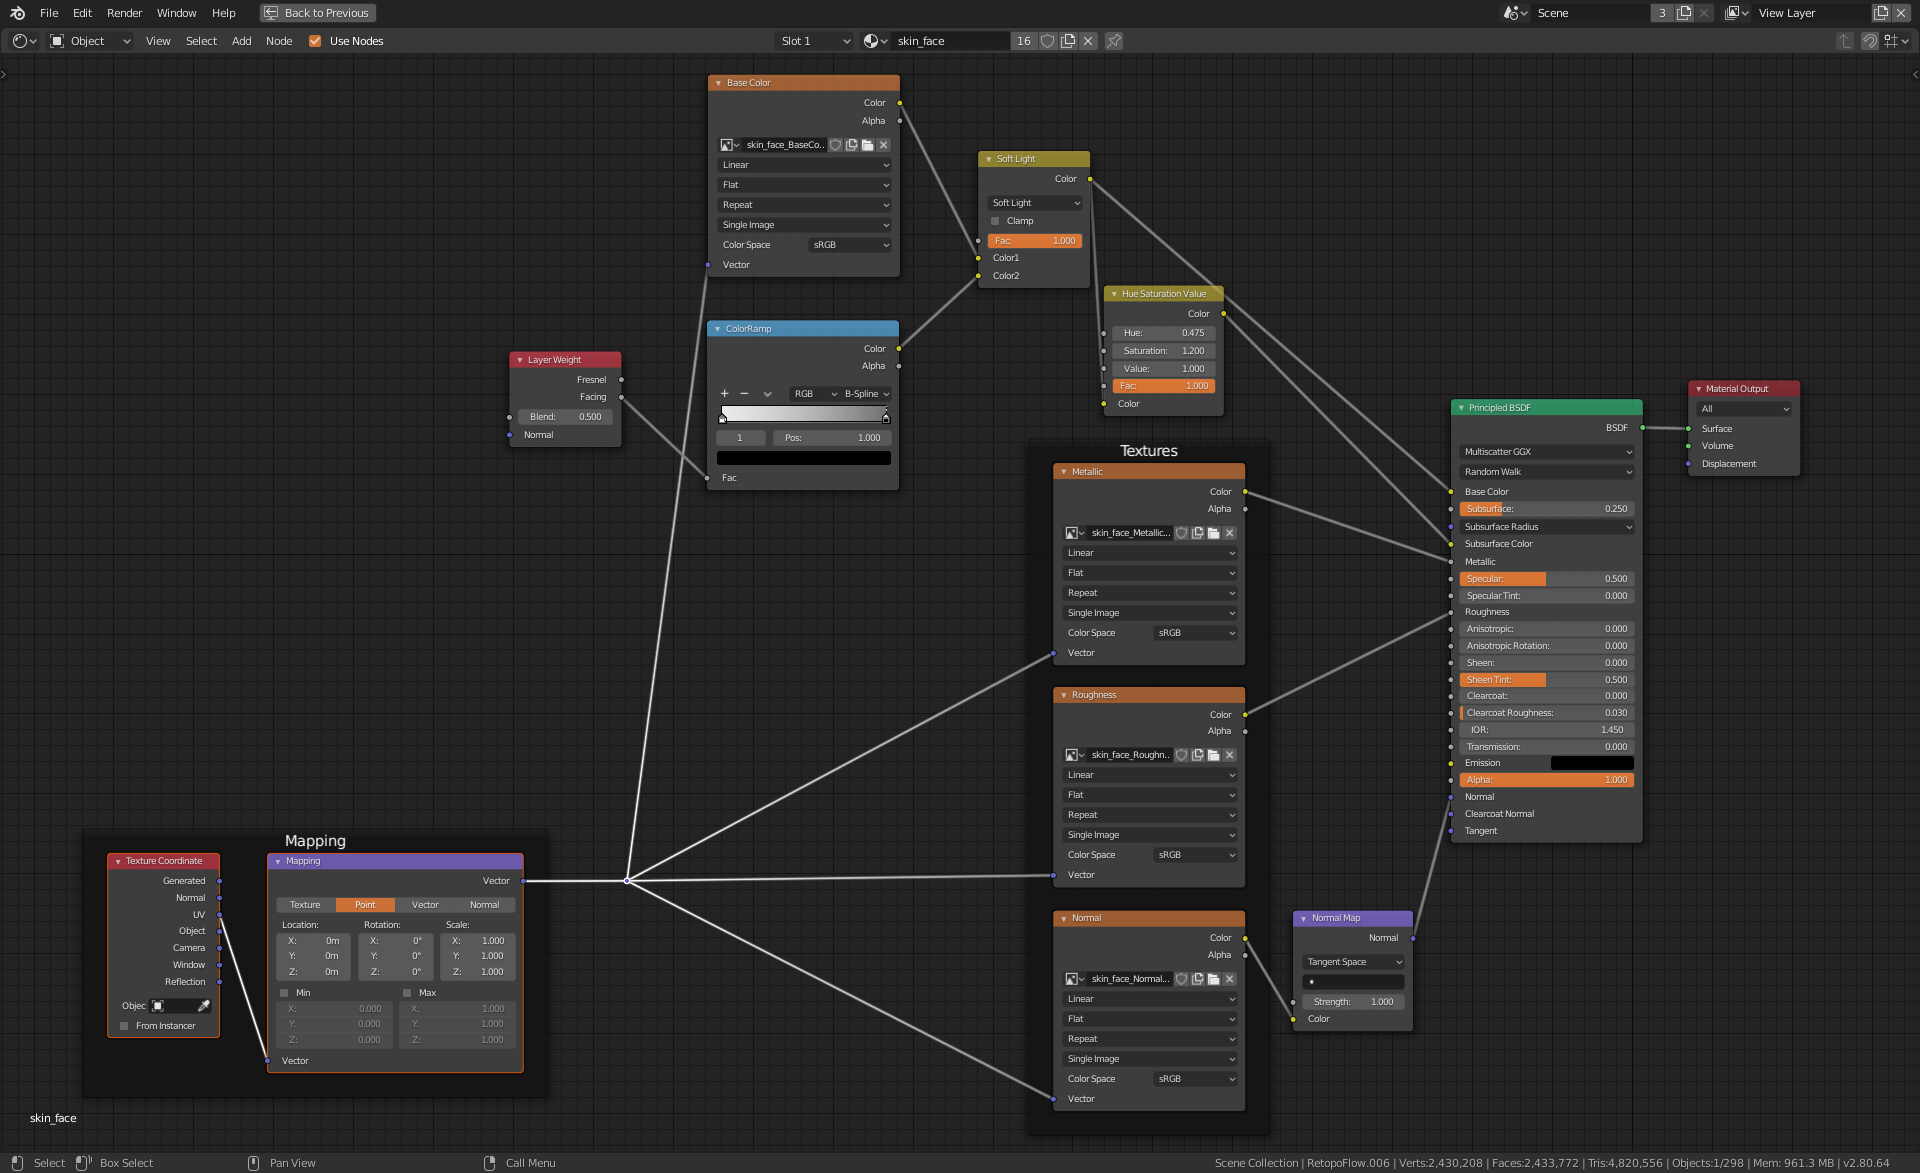
All the materials were done using the Principled BSDF node for Cycles, so it’s important when you create your project in Substance Painter to choose the PBR – Metallic Roughness workflow. This way you just need to plug in your maps and it will work like in the Substance Painter viewport. For the skin shader, I used the new Random Walk distribution method, which is available in Blender 2.8 Beta. I set the Subsurface Factor as 0.25 and for the Subsurface Color, I plugged my color map into an HSV node with the Hue at 0.475 and the Saturation at 1.2, which basically makes the color map more reddish.
The Node Wrangler add-on is an indispensable add-on for me. It’s really hard to think about work without it. For example, to set up a Principled BSDF with all the PBR maps you just hit the hotkey cut Ctrl + Shift + T, select the maps on the file browser, and it’s done. The Node Wrangler will create the Image Texture, Mapping nodes, and even set up the correct Color Space for each map. The most common hotkey that I use for this add-on is the Ctrl + Shift + Click on a node, to have a preview of that node and all the nodes behind it on the node tree.
The hair was done using Blender’s particle system, I like to create a separate mesh for the hair scalp. On the first particle system, I just fill the scalp with 1000 hair strands and 25 simple children. In Particle Edit mode I comb everything to the back of the head in the direction of the ponytail. For hair fringe and ponytail I used Curve Guides, for which we need to add a plane with the hair particle system and a bezier curve. For the hair to follow the curve, we need to select the curve and add a Force Field with Curve Guides.

When using Curve Guides to control the hair particle system, you will need to create one particle system for each curve you want to use. And for each hair system you make using Curve Guides, you will need to create a Collection for each curve and, in the Field Weights tab of the particle settings, choose the corresponding Collection for each curve in the Effector Collection box. Keep things very organized and named correctly, and you won’t have issues. It’s not very intuitive at the beginning, but once you have all the particle systems and curves set up you will have full control.
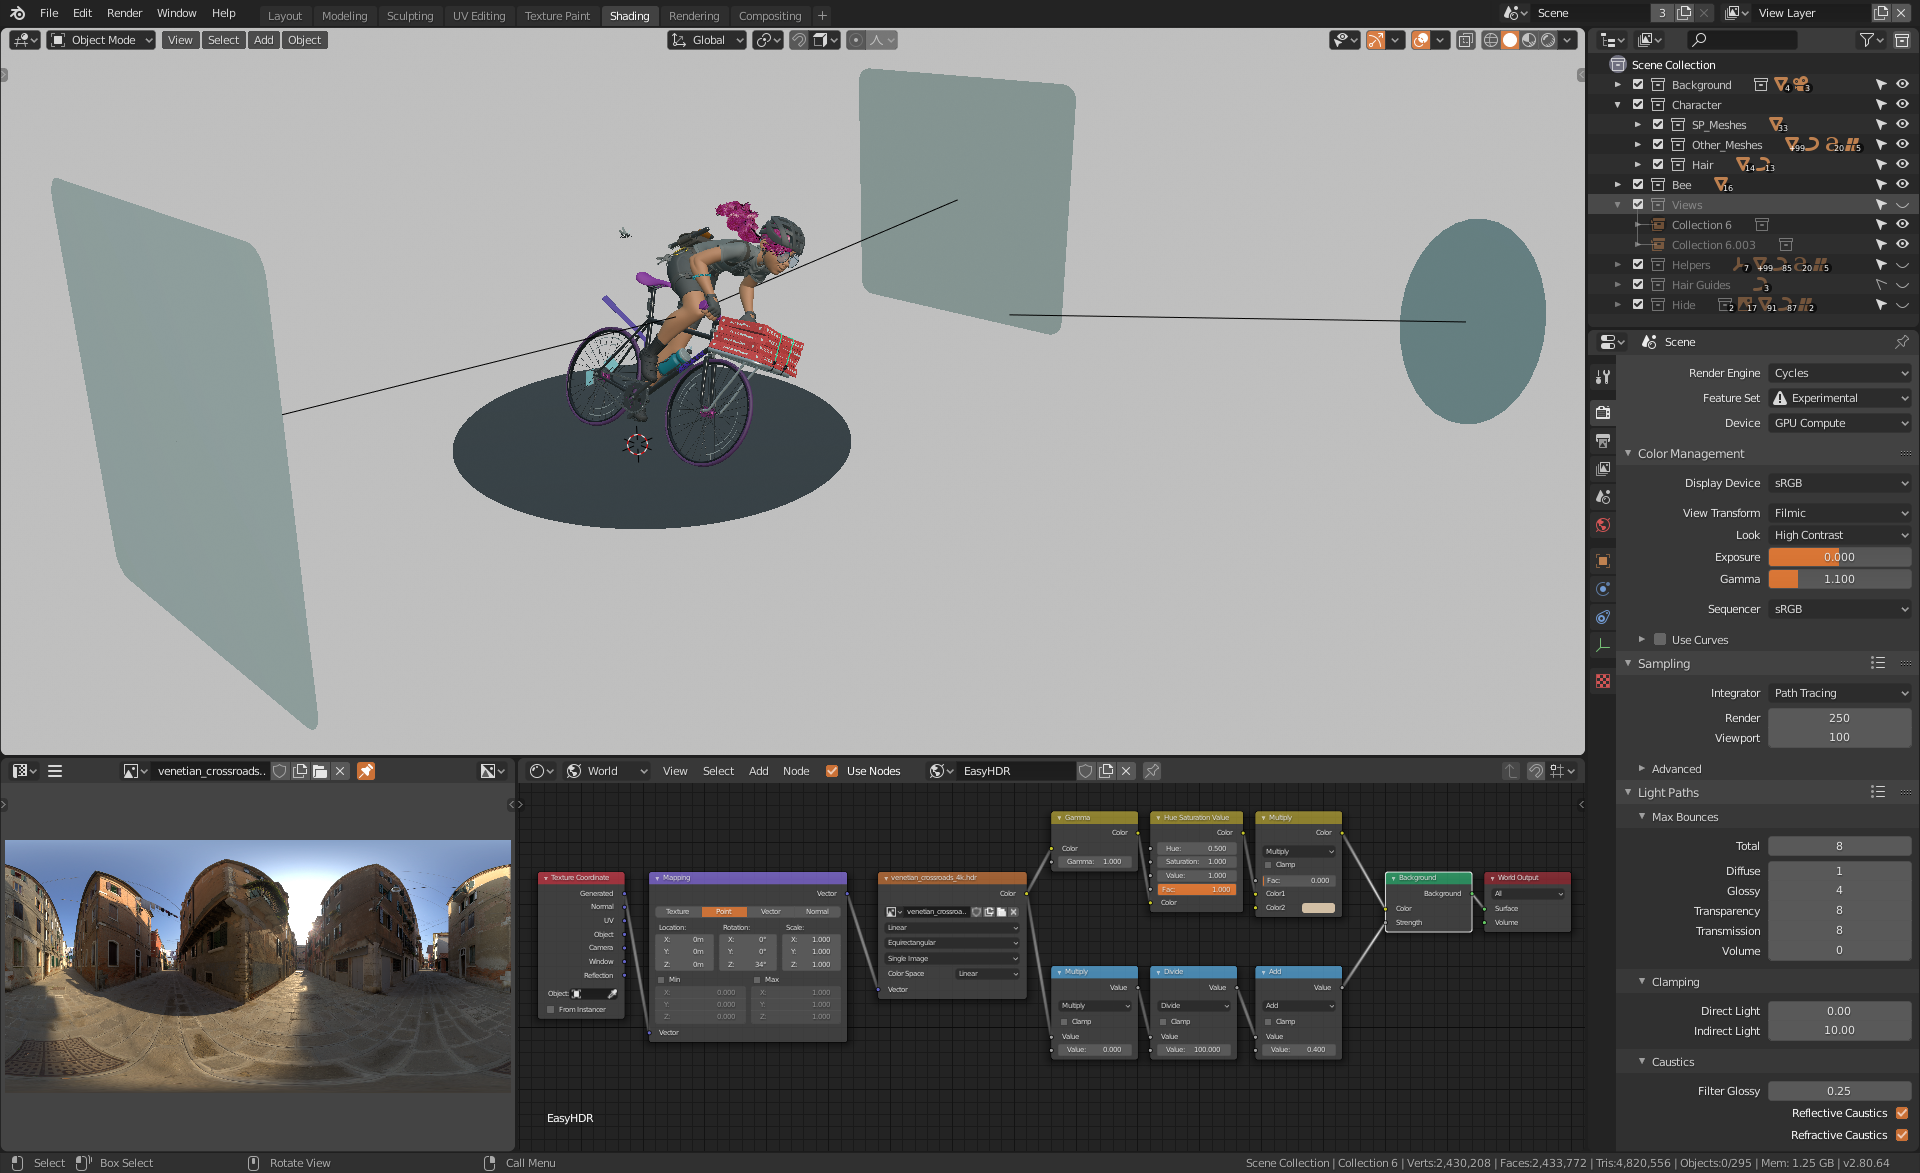
Lighting
To do the lighting I used the Venetian Crossroads HDR from HDRI Haven. I also used three more lights: two area lights from the side to fill in the shadows a little more, and another with circular shape coming from the front to give that white specular circle on the eyes. The sun of the HDRI is positioned something like 45 degrees from the left side of the character, giving us a nice shadow on the opposite side. To quickly test other HDRs, I used an add-on called Easy HDRI, made by Monaime.
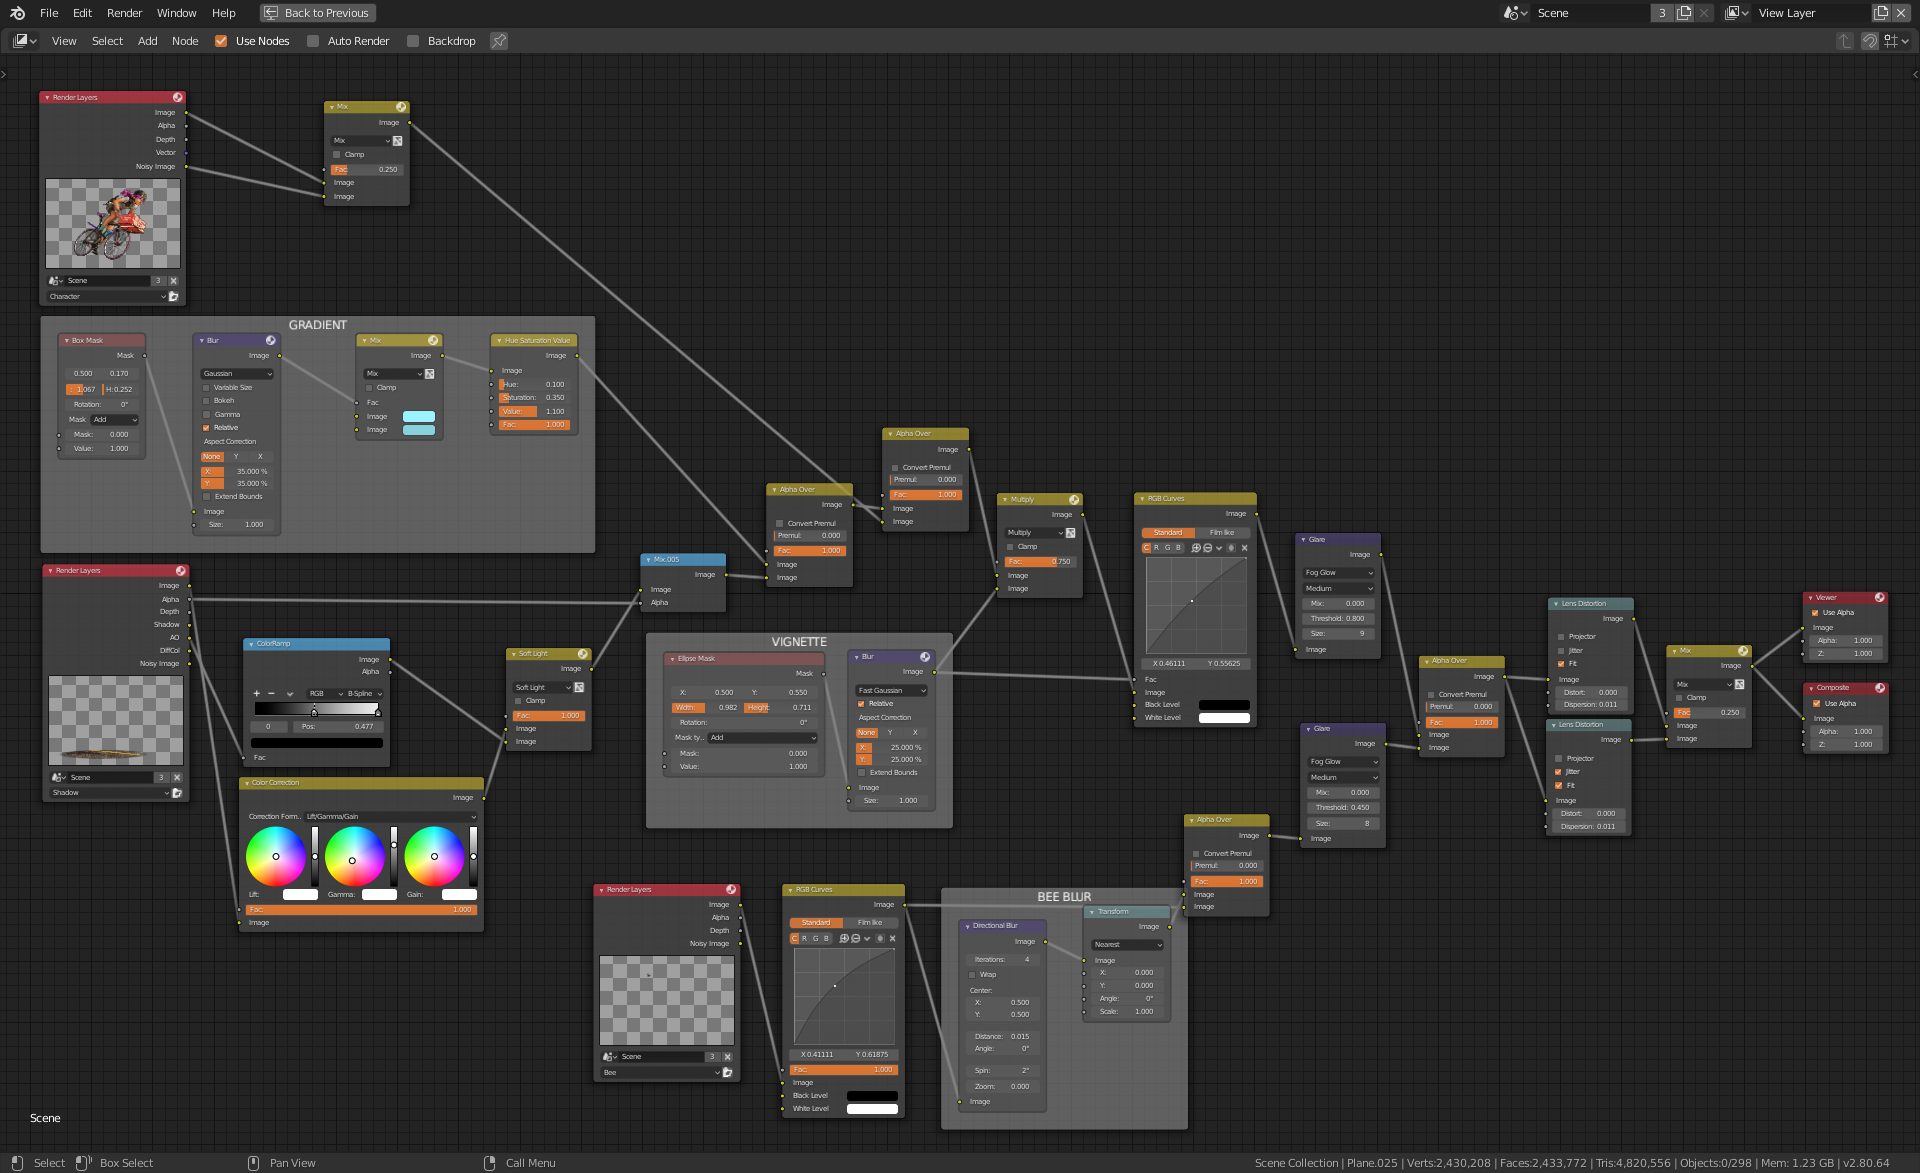
Compositing
The post-production was done in Blender’s Compositor. I separated the elements into three View Layers: girl, bee, and the ground. I combined the View Layers using the Alpha Over node, the background gradient I created using a Box Mask, and a Blur node. I used a Color Correction node to give a warmer color to the ground layer. On top of all view layers I created a vignette using an Ellipse Mask and Blur node, blended using Multiply 0.75 and, after that, I added a Glare node. On the bee layer I added a Direction Blur node to create a speed effect.
About the Author
 Lucas Falcão, 3D character artist based in Porto Alegre, Brazil. Working as a full-time freelancer doing character modeling, UVs and blend shapes for 3D animations.


Awesome work and very good explanation.
Gold mine
Thanks
One of the best breakdown/Tutorial that i have ever seen.
Nice work and great.