
Behind the Scenes: Tyrannosaurus rex Life Reconstruction
Introduction—Dinosaurs and Scientific Illustration in Blender
Dinosaurs. It’s been 177 years since they were first described by British biologist Sir Richard Owen, and despite the fact that all of them (except for modern-day birds) have been dead for over 66 million years, they have continued to capture the imagination. While the awe-inspiring nature of these extinct beasts has been sustained throughout history, the actual imagery depicting them has changed a lot. We’ve seen everything from lumbering mega lizards and lithe movie monsters able to chase down speeding Jeeps, to truly bizarre looking soft tissues and colourful skin displays. Understandably, people often ask “where are they getting all of this from?”, sometimes wondering if it’s all just made up. That’s where people like me come in.
My name is Matt. I’m a UK-based palaeontologist currently working towards a PhD in musculoskeletal biology at the University of Liverpool. While my career is based around research, I’m also an illustrator, self-taught to work in 3D mediums. Being a 3D artist has converged extremely conveniently with my scientific research—I frequently use Blender to create the 3D anatomical models integral to my work. While Blender is most commonly perceived as a tool to create 3D artwork and complex visual effects, it is also extremely useful as a scientific tool, aiding in the collection of data just as much as the final visualisation. For example, we can use armature rigged skeletal models to work out joint ranges of motion, or volumetric models to work out the mass properties of an animal.
However, sometimes the most effective way to visually communicate palaeontology is to use the tools at your disposal to show people what an extinct animal might have looked like when it was alive—but this isn’t always easy. One of the facts about being a palaeontological illustrator is that we have to inevitably accept that as time goes by, our work will become less accurate. As our understanding of the fossil record improves, our imagery of extinct animals changes to accommodate it. This is why old dinosaur art looks so different from modern dinosaur art, but it doesn’t make the old art less important. Classic depictions should be judged within the context they were created, and seen as stepping stones in an ever-changing field. With that in mind, I’m writing this today to present to you what is hopefully representative of the current stepping stone on our path to understanding a very famous dinosaur—demonstrated via Blender!
From the Bones Up
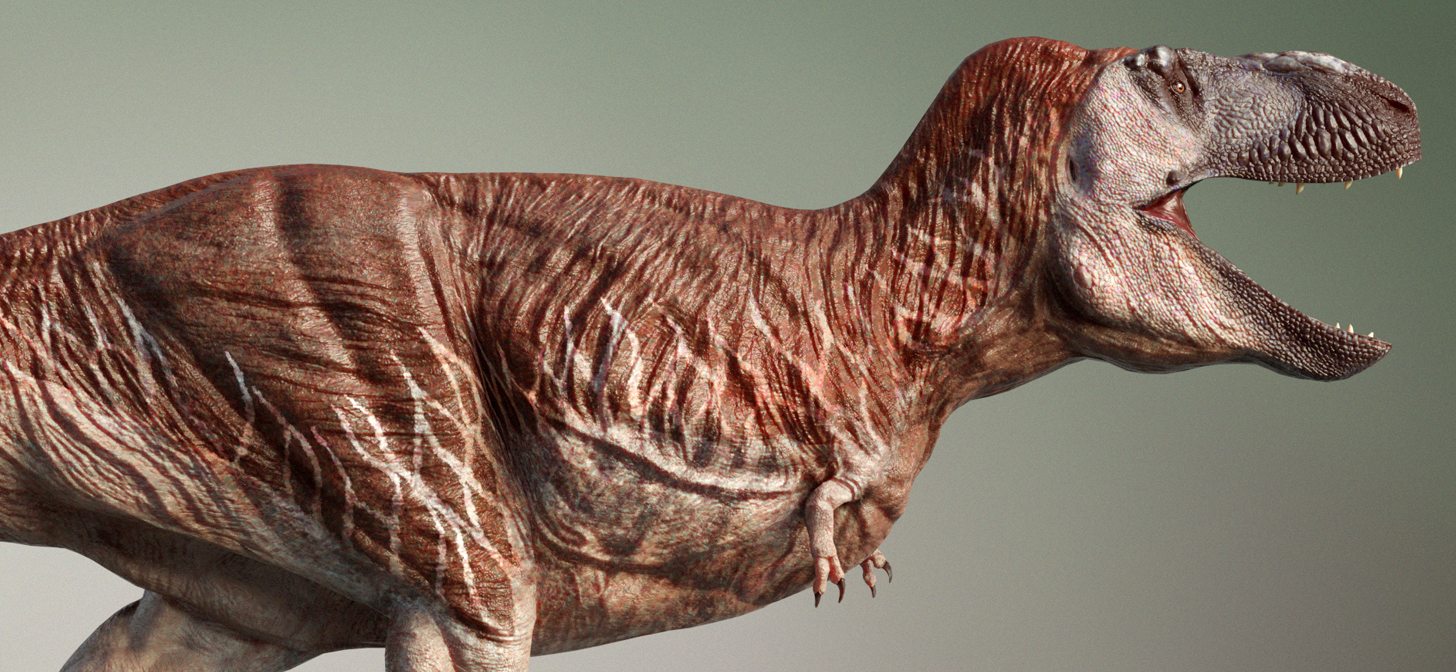
A few months ago, I set out on a mission to create the most realistic, life-like and scientifically accurate depiction that I possibly could of the most popular dinosaur—the mighty Tyrannosaurus rex. T. rex is part of a group of dinosaurs called tyrannosaurids, large-bodied carnivorous dinosaurs that inhabited North America and Asia during the Late Cretaceous period between 81 and 66 million years ago. T. rex itself was the biggest of this group, and the last to be alive before that fateful day in which a freak asteroid impact led to the extinction of all non-bird dinosaurs at the end of the Mesozoic era. It’s also one of the most completely known tyrannosaurids, with several very complete skeletons making it an ideal candidate for illustration.
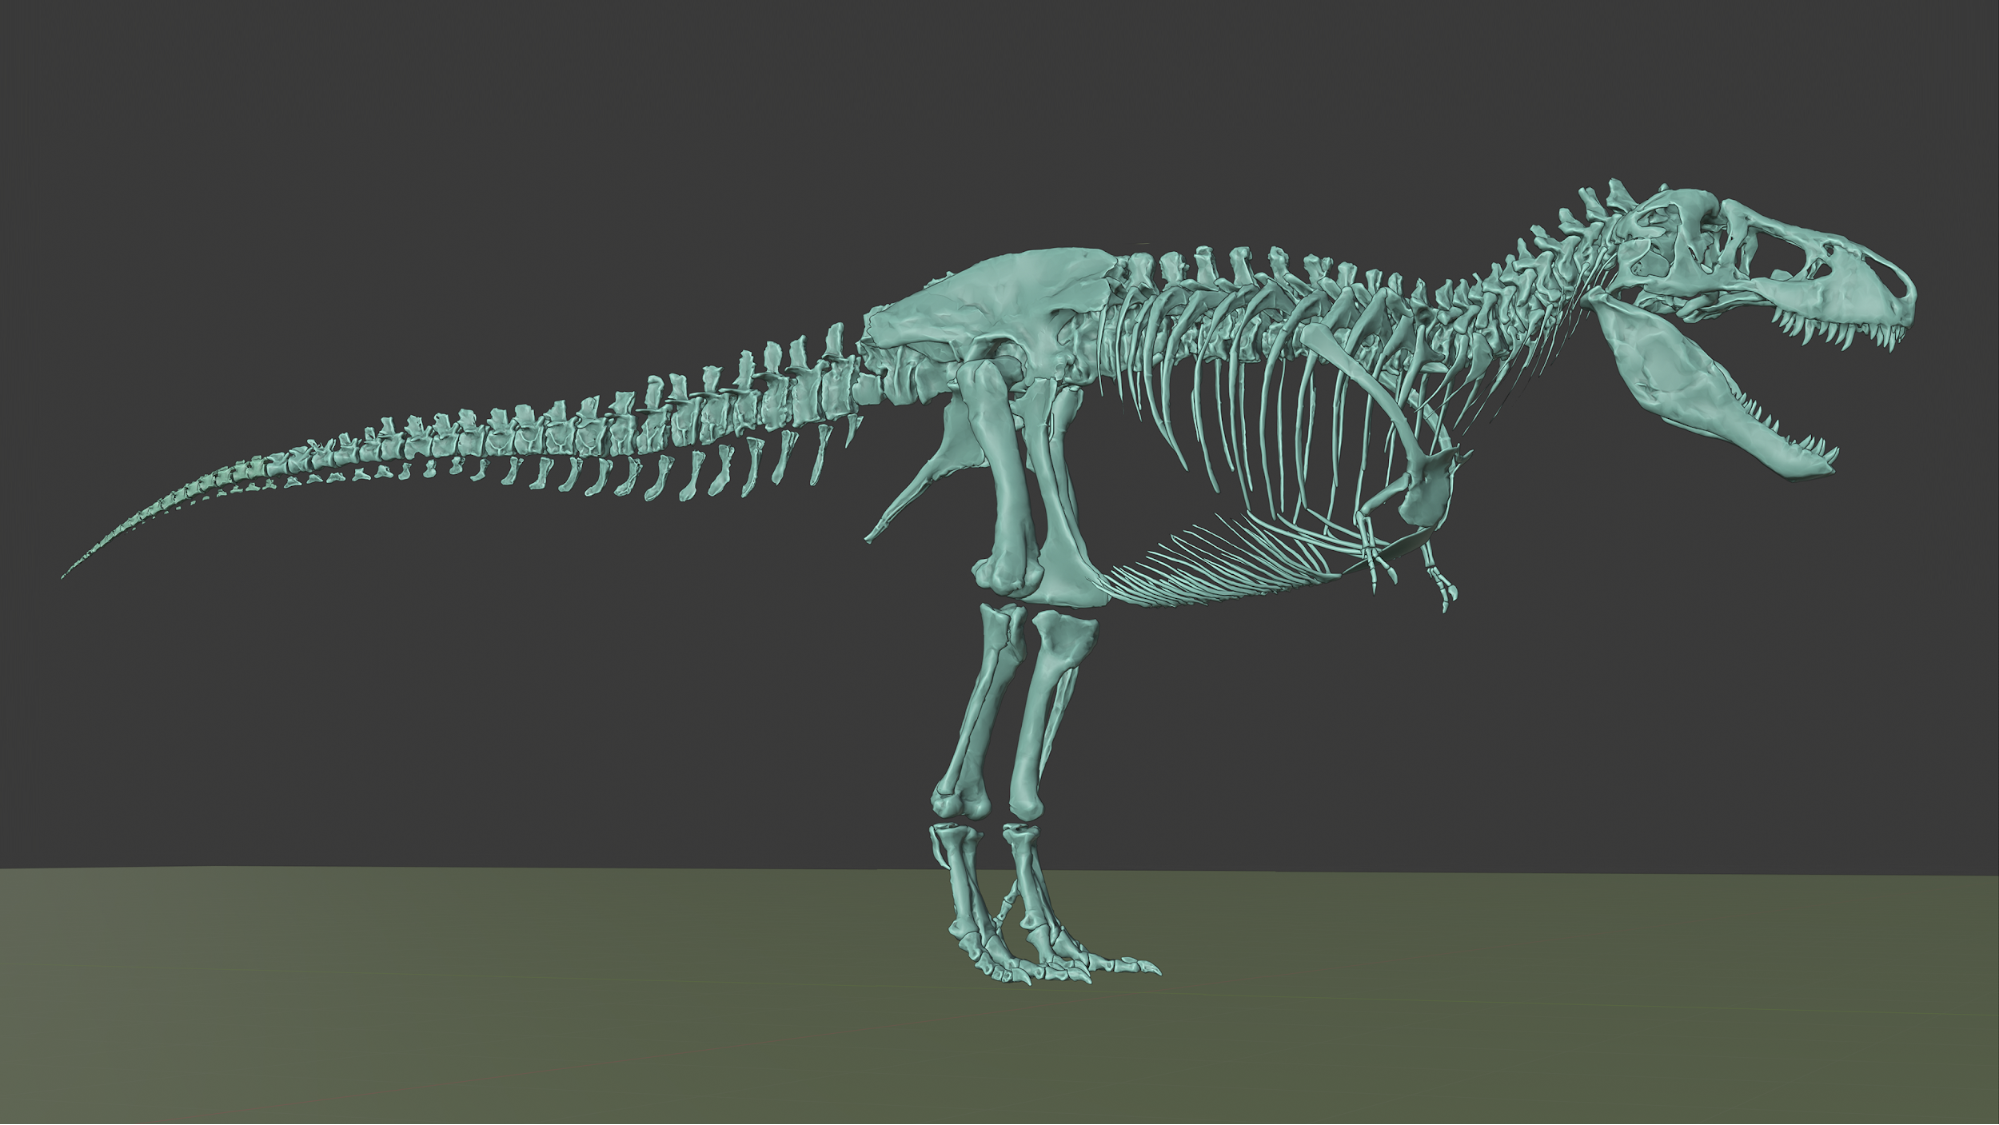
In June 2019, after years of hard work, the 3D digitisation team at the Smithsonian Institution (Washington, D.C.) posted a complete 3D scan of a mounted T. rex skeleton onto their website. You can read about it here. In the name of open science, they encouraged people to download the model and get creative. For me, this was a golden opportunity. Having an accurate skeleton as reference is instrumental to making an accurate life reconstruction of an extinct animal. The first step to completing my model was to take the Smithsonian’s scan, and re-articulate it into a neutral symmetrical pose:
Reconstructing the Muscles
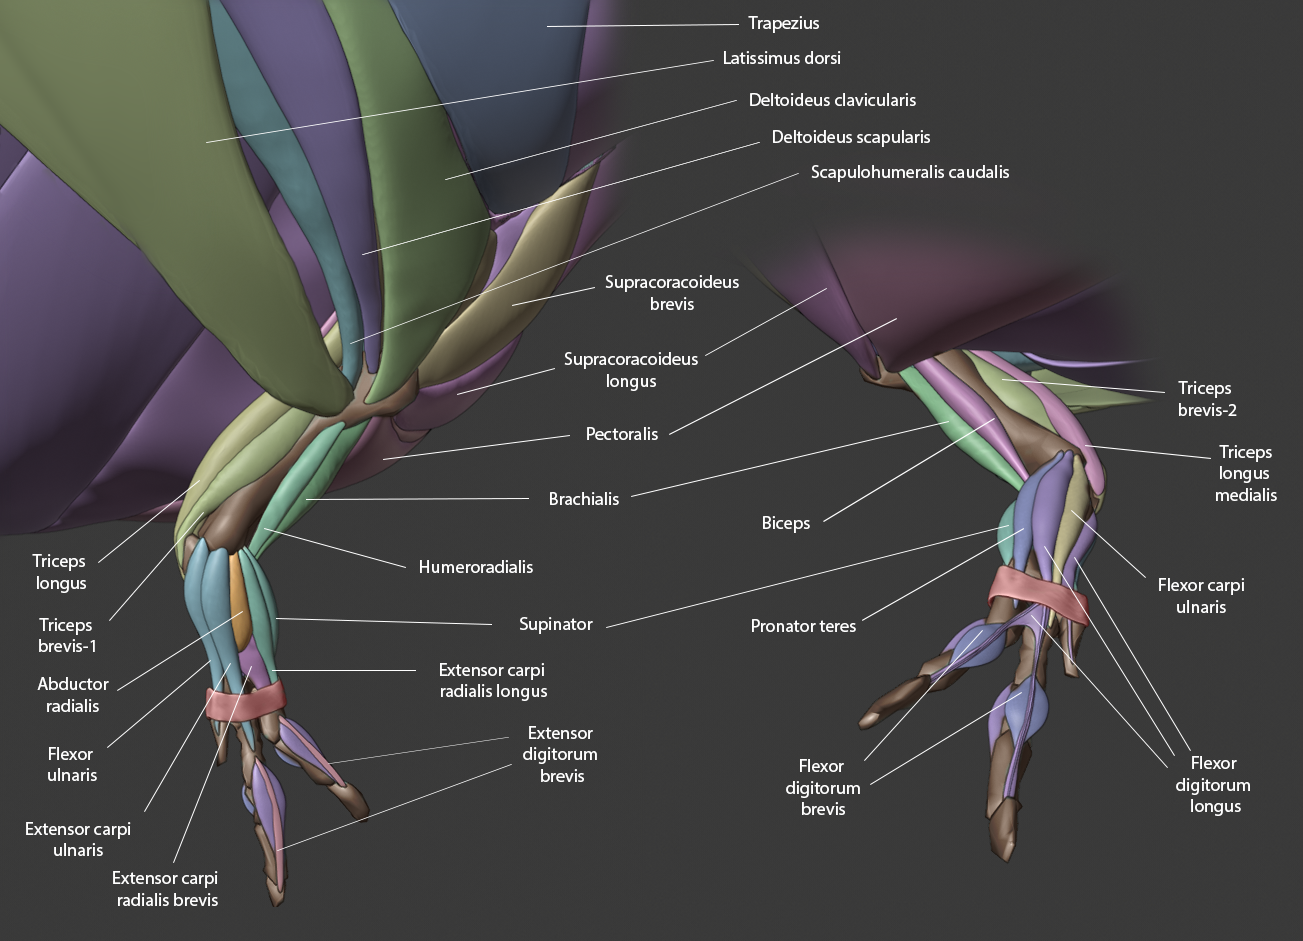
The next stage was to reconstruct the musculature to ensure that the final body shape was accurate. This is the trickiest part. Muscles don’t really preserve in ancient dinosaur fossils—but this doesn’t mean that we can’t reconstruct them. Skeletons don’t just float around in a bag of soft tissues—muscles are anchored to bones, and leave behind physical marks. We can then compare the layout of these physical marks upon the bones or “osteological correlates” to those seen in modern animals and work out which muscles should go where. This stage takes the most research and reading. The exhaustive list of published research I used for reference can be found here. Upon finalising where they should attach, each muscle was sculpted from a subdivided sphere.
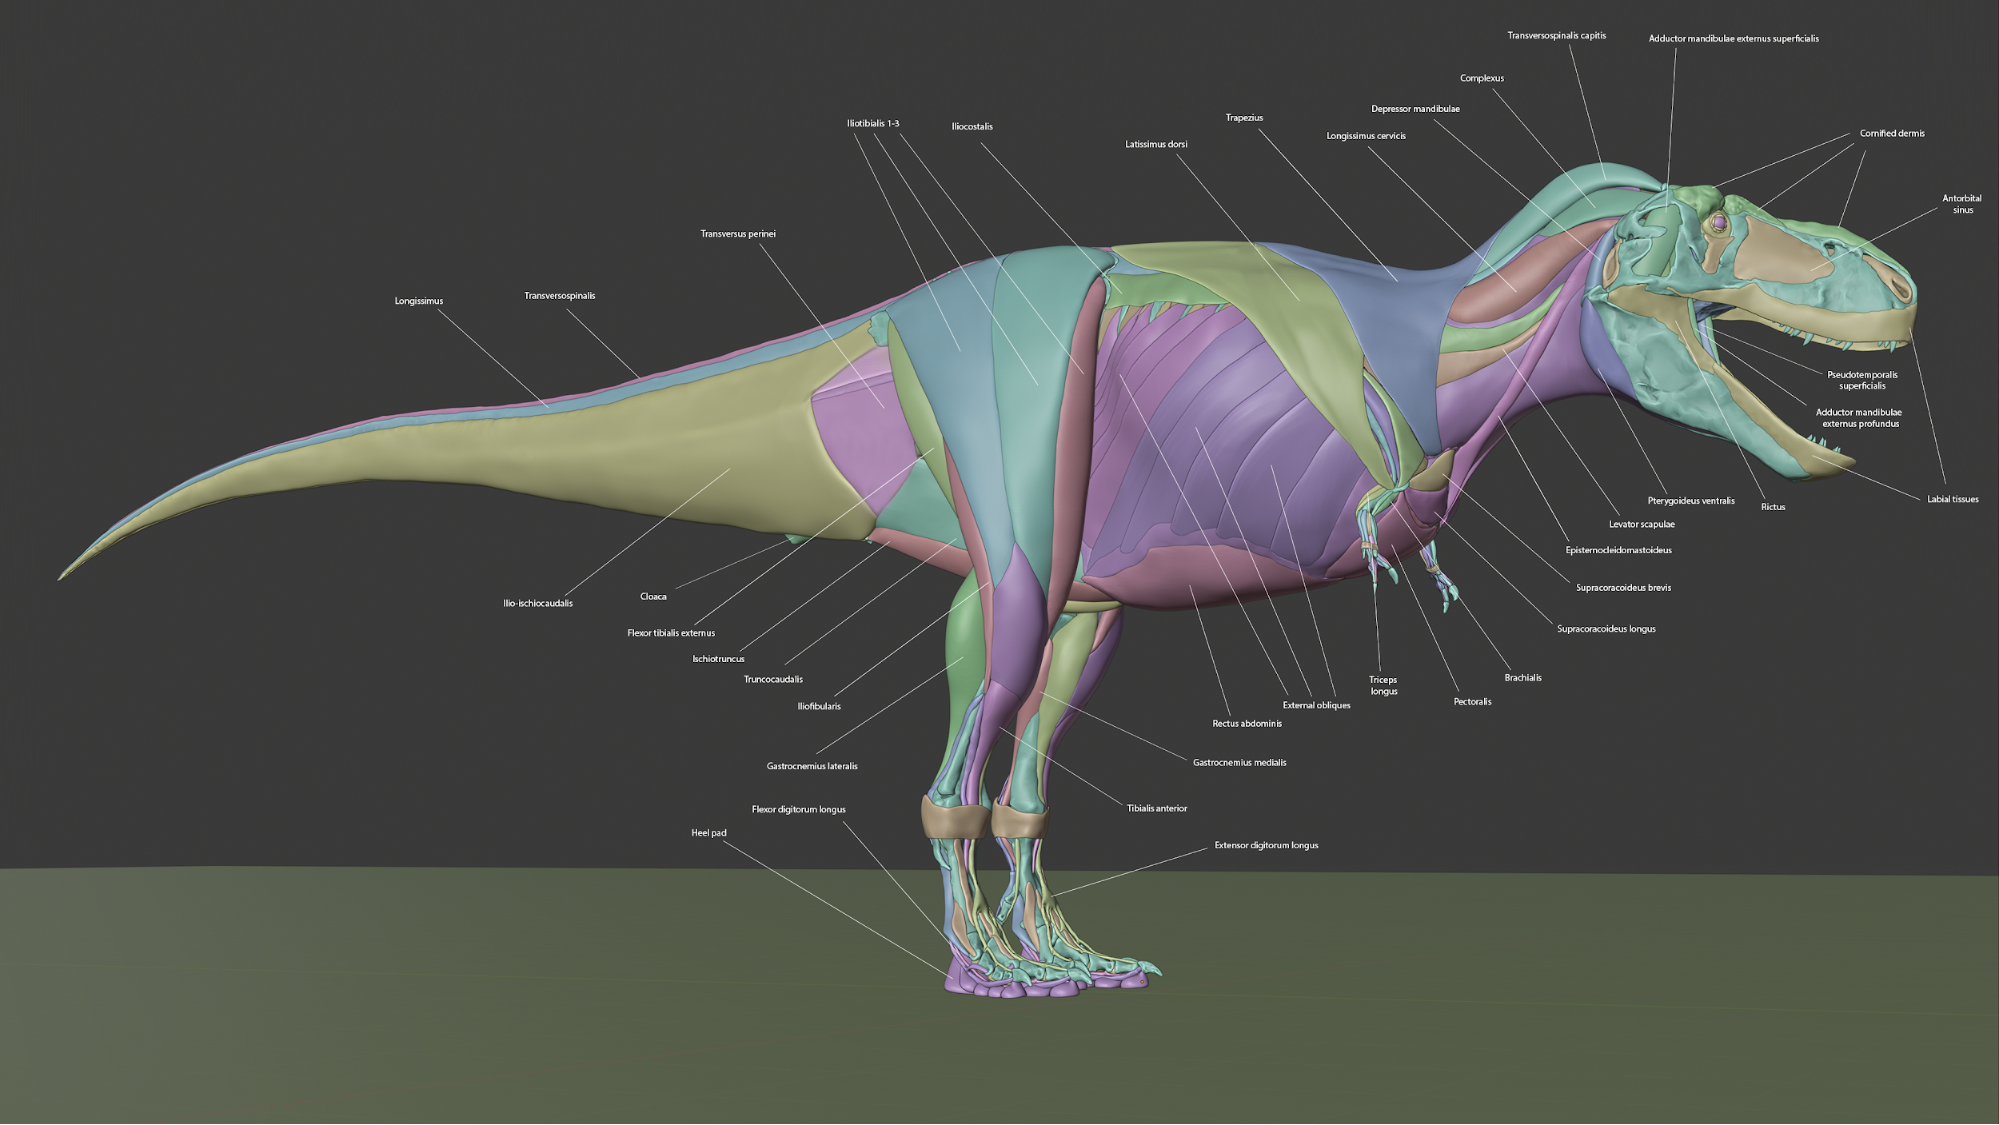
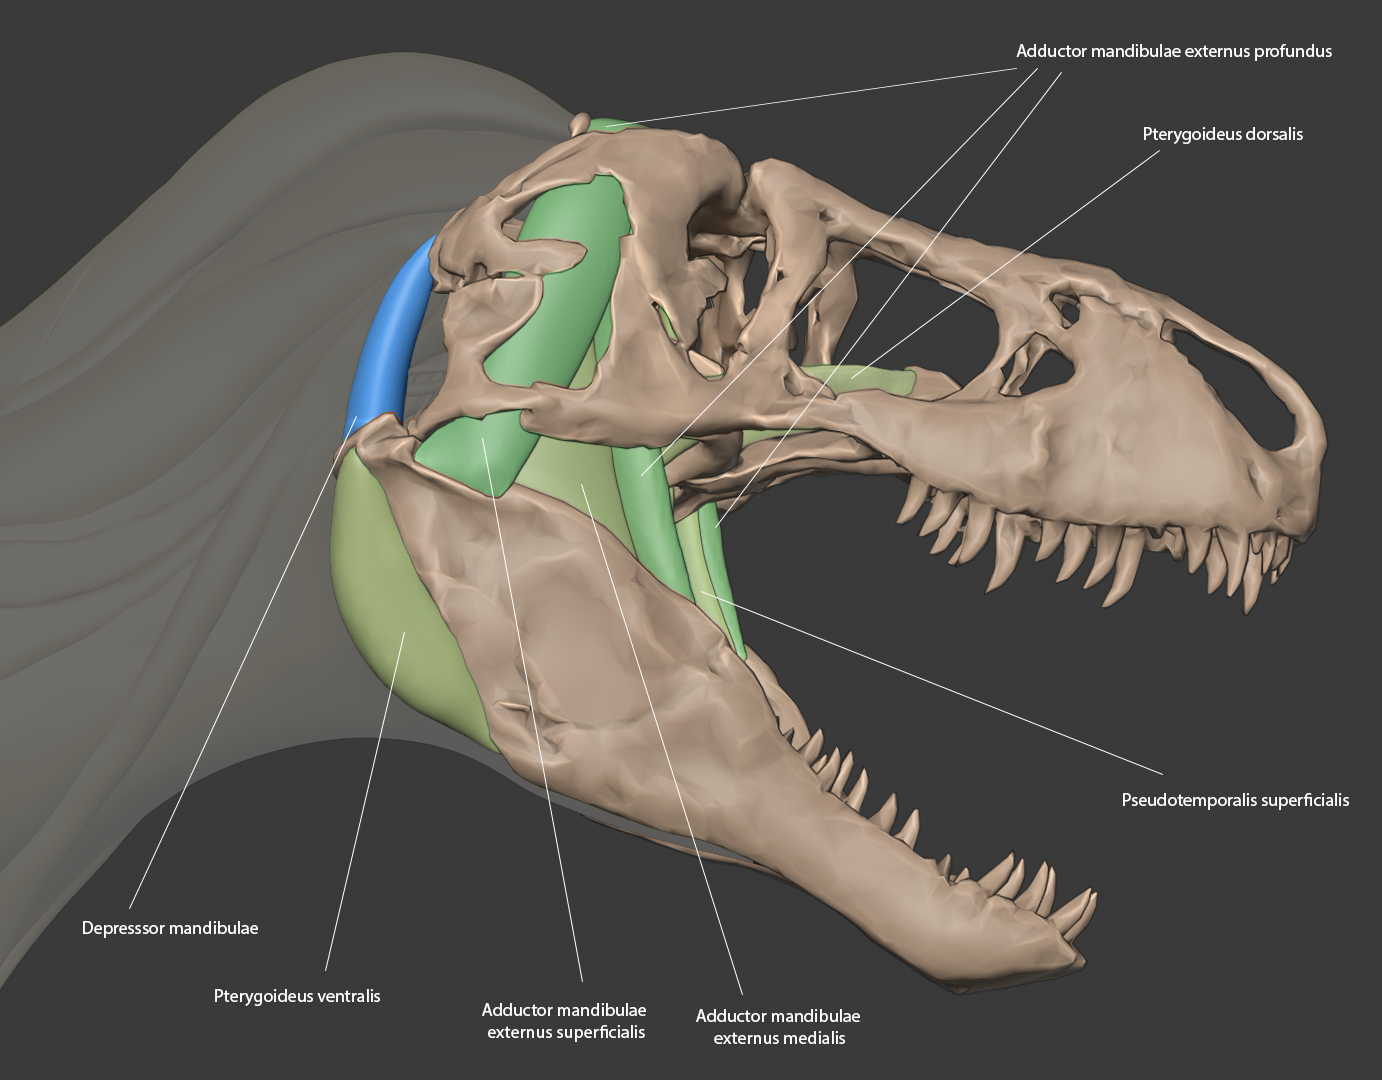
The musculature of T. rex is strange—parts are broadly similar to what we would expect to see in crocodiles and other modern reptiles, but other parts are extremely bird-like. It makes one wonder what T. rex drumsticks would have tasted like.
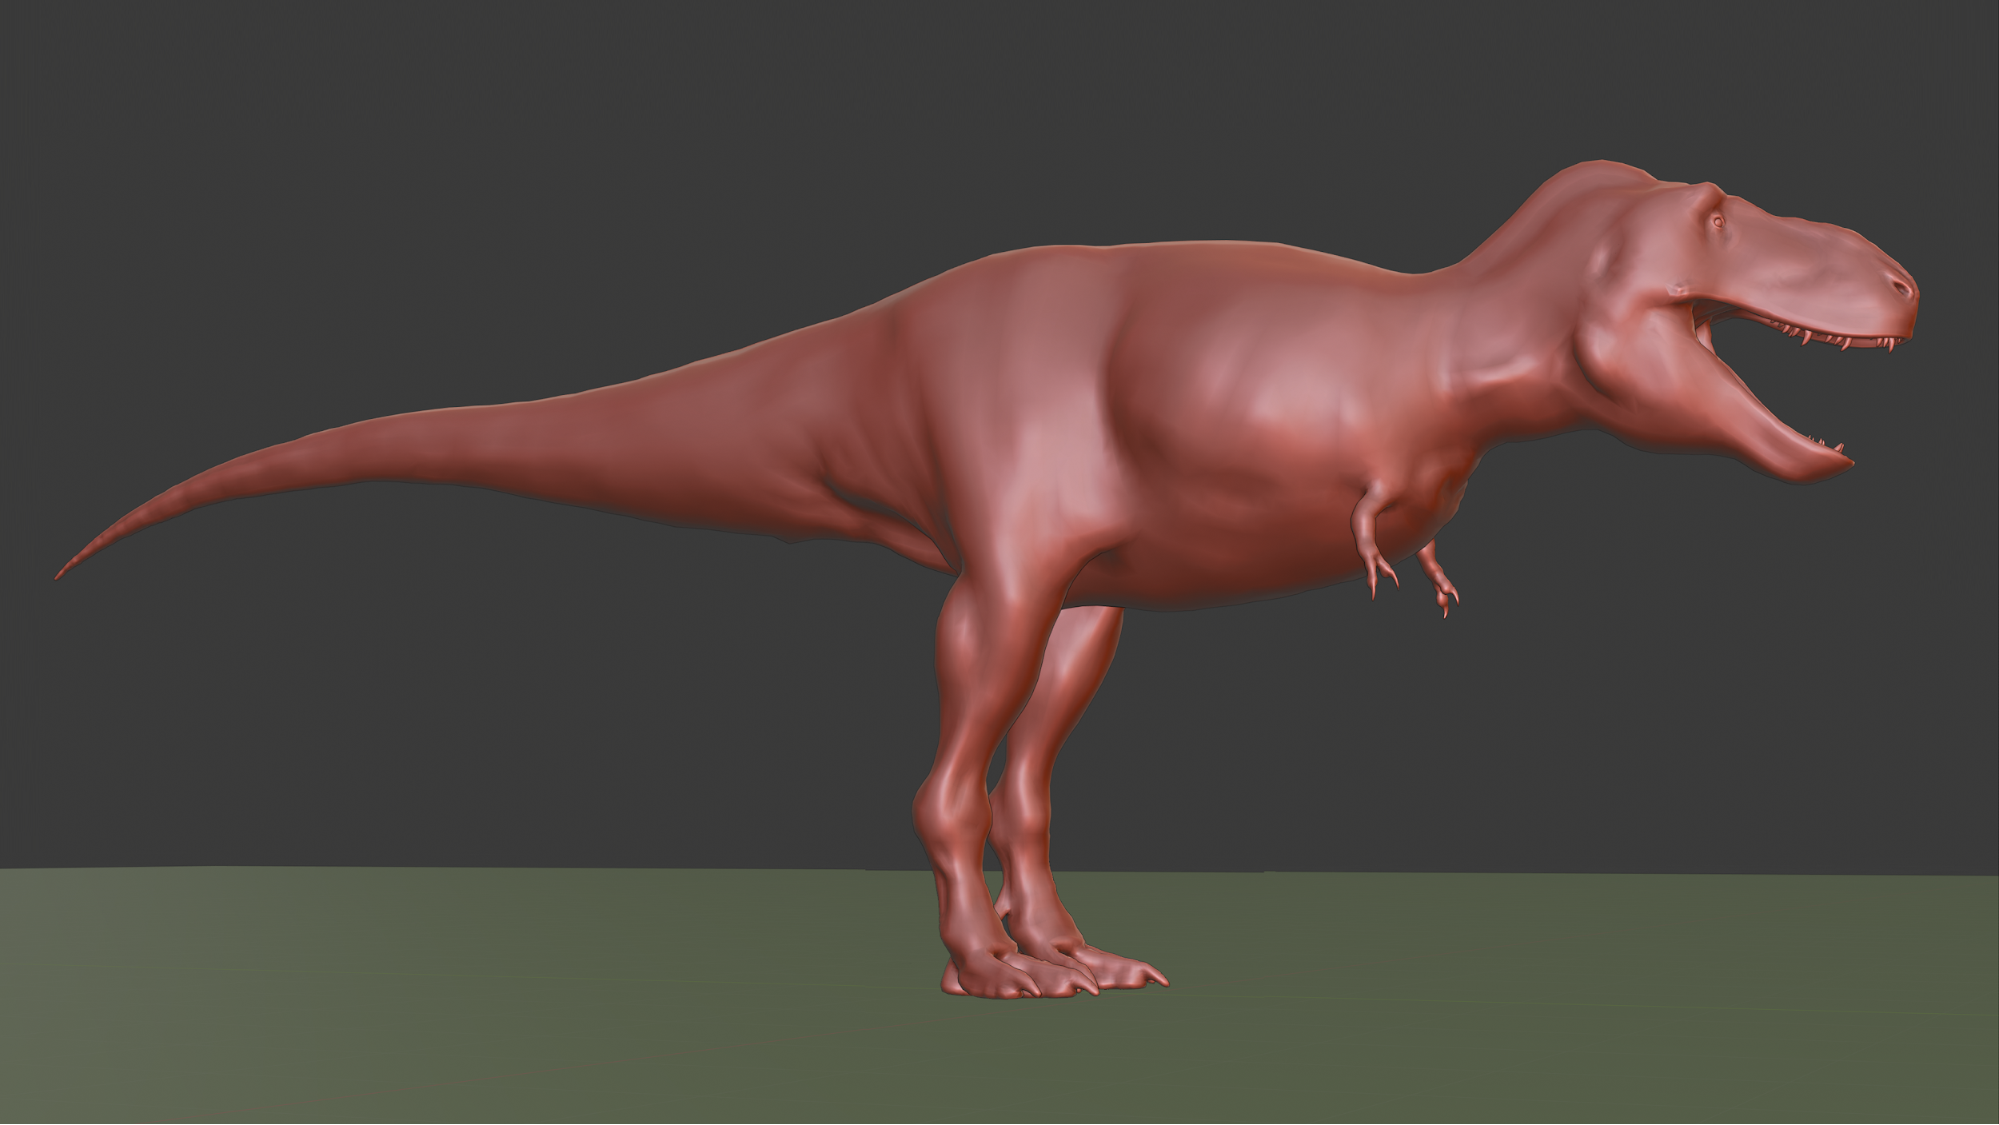
Skin and Surface Detailing
Once I was happy with the overall body shape as defined by the musculature, the next stage was to create a solid single mesh with no surface gaps, upon which skin detailing could be sculpted. Using a highly subdivided sphere and the shrinkwrap modifier worked pretty nicely here, although some manual resculpting was required. Before sculpting the skin details, a few things had to be reshaped. For example, the external claws of modern-day birds and reptiles are typically much larger than their bony core due to a thick keratin sheath. From fossil footprints of tyrannosaurids, we can tell that this external covering was at least large enough to have touched the ground. Additional large scale features also included patagia—flaps of soft tissue between various portions of the limbs and body. While these are technically speculative features, they are common in modern birds, and obscure some of the muscular definition at the limb boundaries.
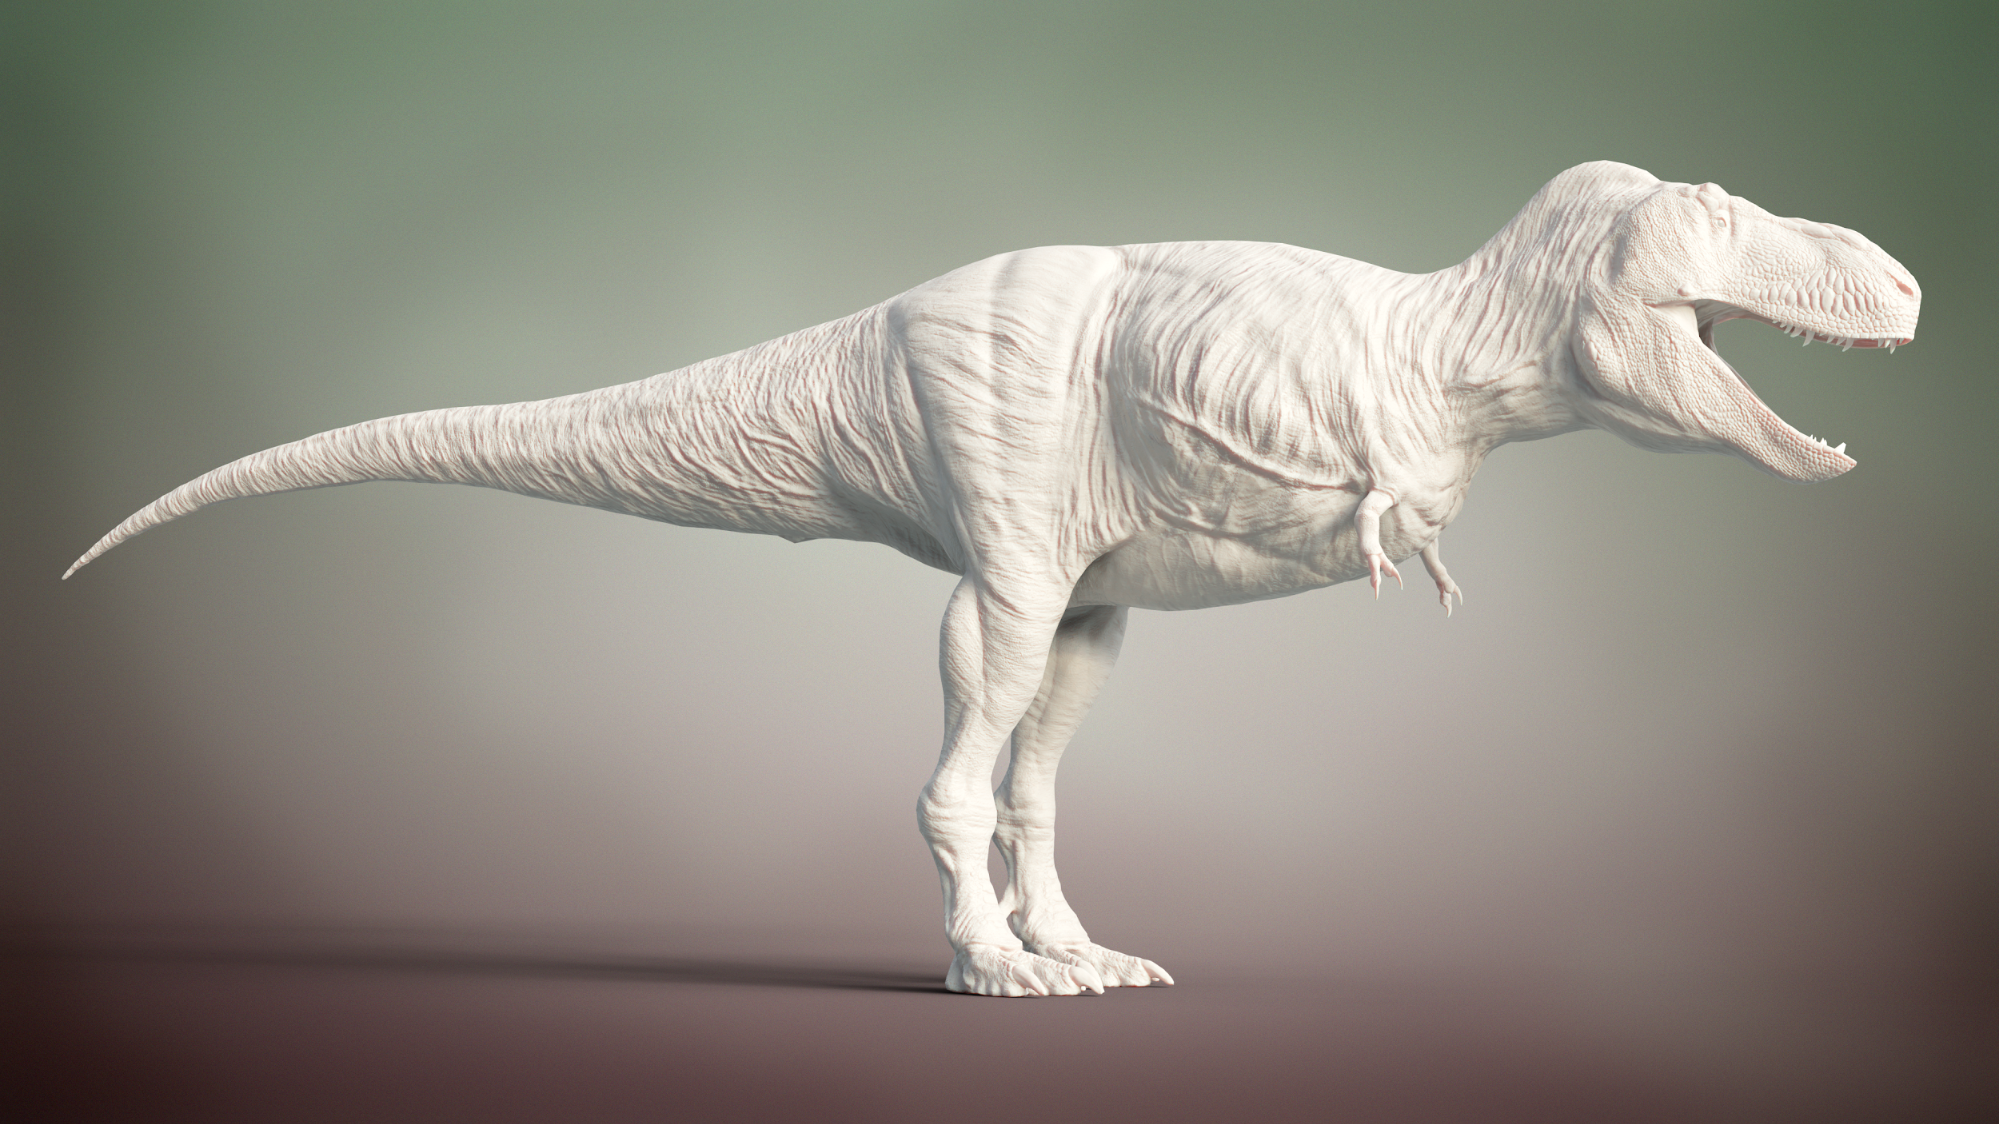
The next stage was to create a high-poly detailed sculpt. Of all the stages, this took the longest to complete. The skin details on T. rex are rather tiny, but the animal is almost 12 metres long—that’s a lot of sculpting. Large details such as skin folds and unique foot scales were sculpted directly using default brushes. The mosaic-like body scales were sculpted with custom brushes, though these can barely be seen at a distance due to being so small. The ornate scales upon the head were sculpted using a hand drawn alpha as a stencil. The distribution and shapes of the larger scales and structures are based on textures on the skull. In many modern animals, the growth of thick dermal structures actually leaves behind telltale markings on the underlying bones—markings that can also be seen upon fossil bones.
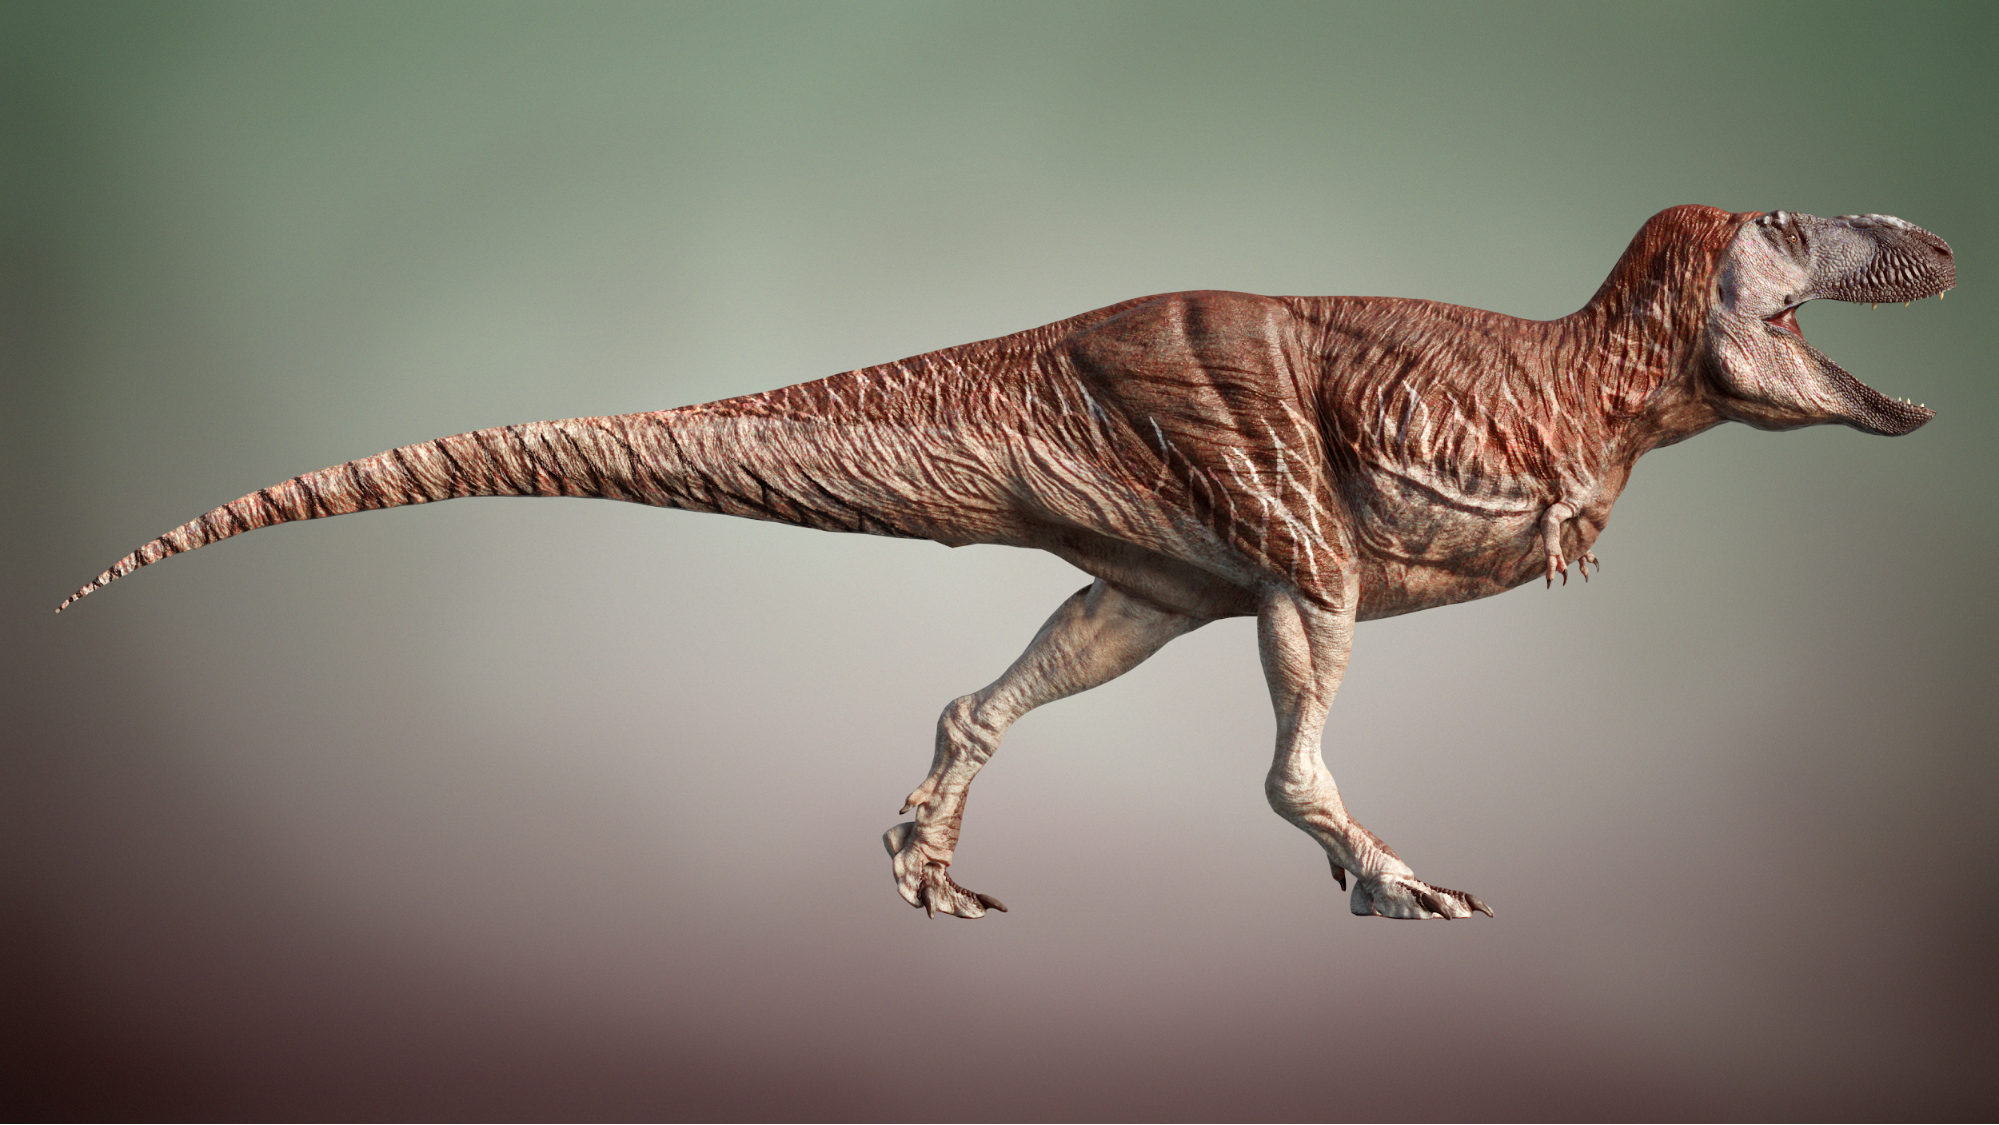
Some people may be surprised by the lack of feathers on this reconstruction. Whether or not T. rex was feathered is a contentious topic amongst researchers. As for the data we actually have, there are multiple described imprints of tyrannosaurid skin that definitely resemble scales. While these imprint fossils are small, they are widely distributed across the body—so, via reasonable extrapolation we can infer that most of the body was covered in something scale-like, at least in adults. The larger grouping Tyrannosauroidea ancestrally had extensive feather-like filamentous covering (e.g., Yutyrannus, Dilong), but it appears that this may have been secondarily lost in the more advanced “true” tyrannosaurids. It’s possible that some kind of filamentous covering was retained in some areas of the body (the dorsalmost surface of the torso currently yields no skin-related data in advanced tyrannosaurs), but we really can’t know for sure. This reconstruction should be seen as conservative, something of a minimalist interpretation of the data that could be built upon and changed without necessarily compromising plausibility.
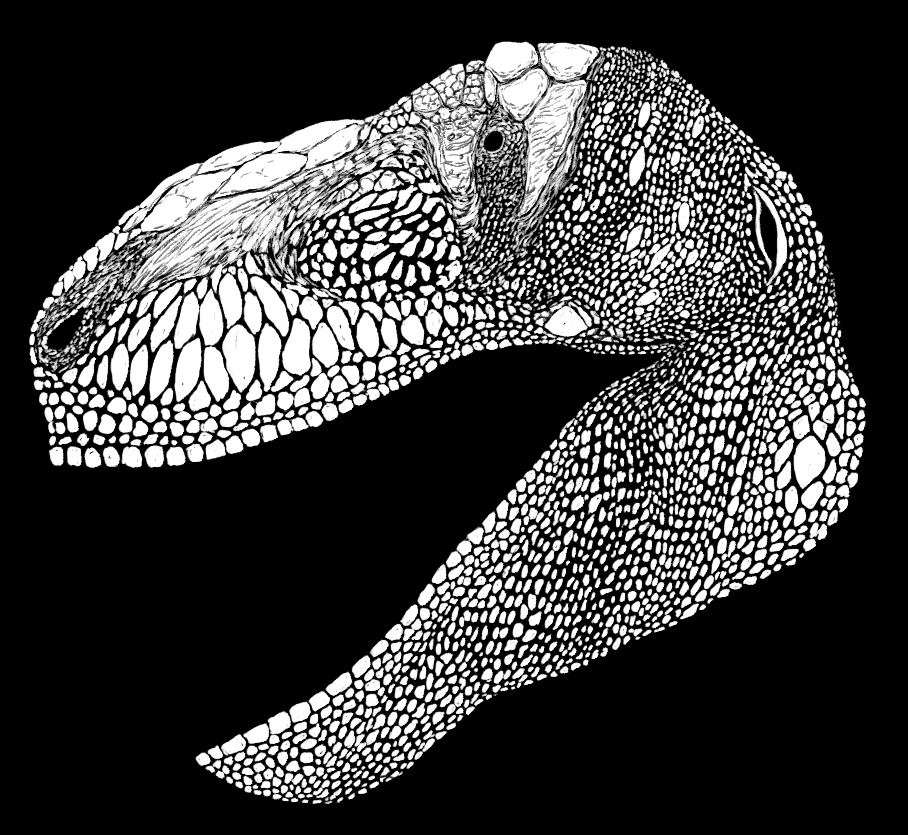
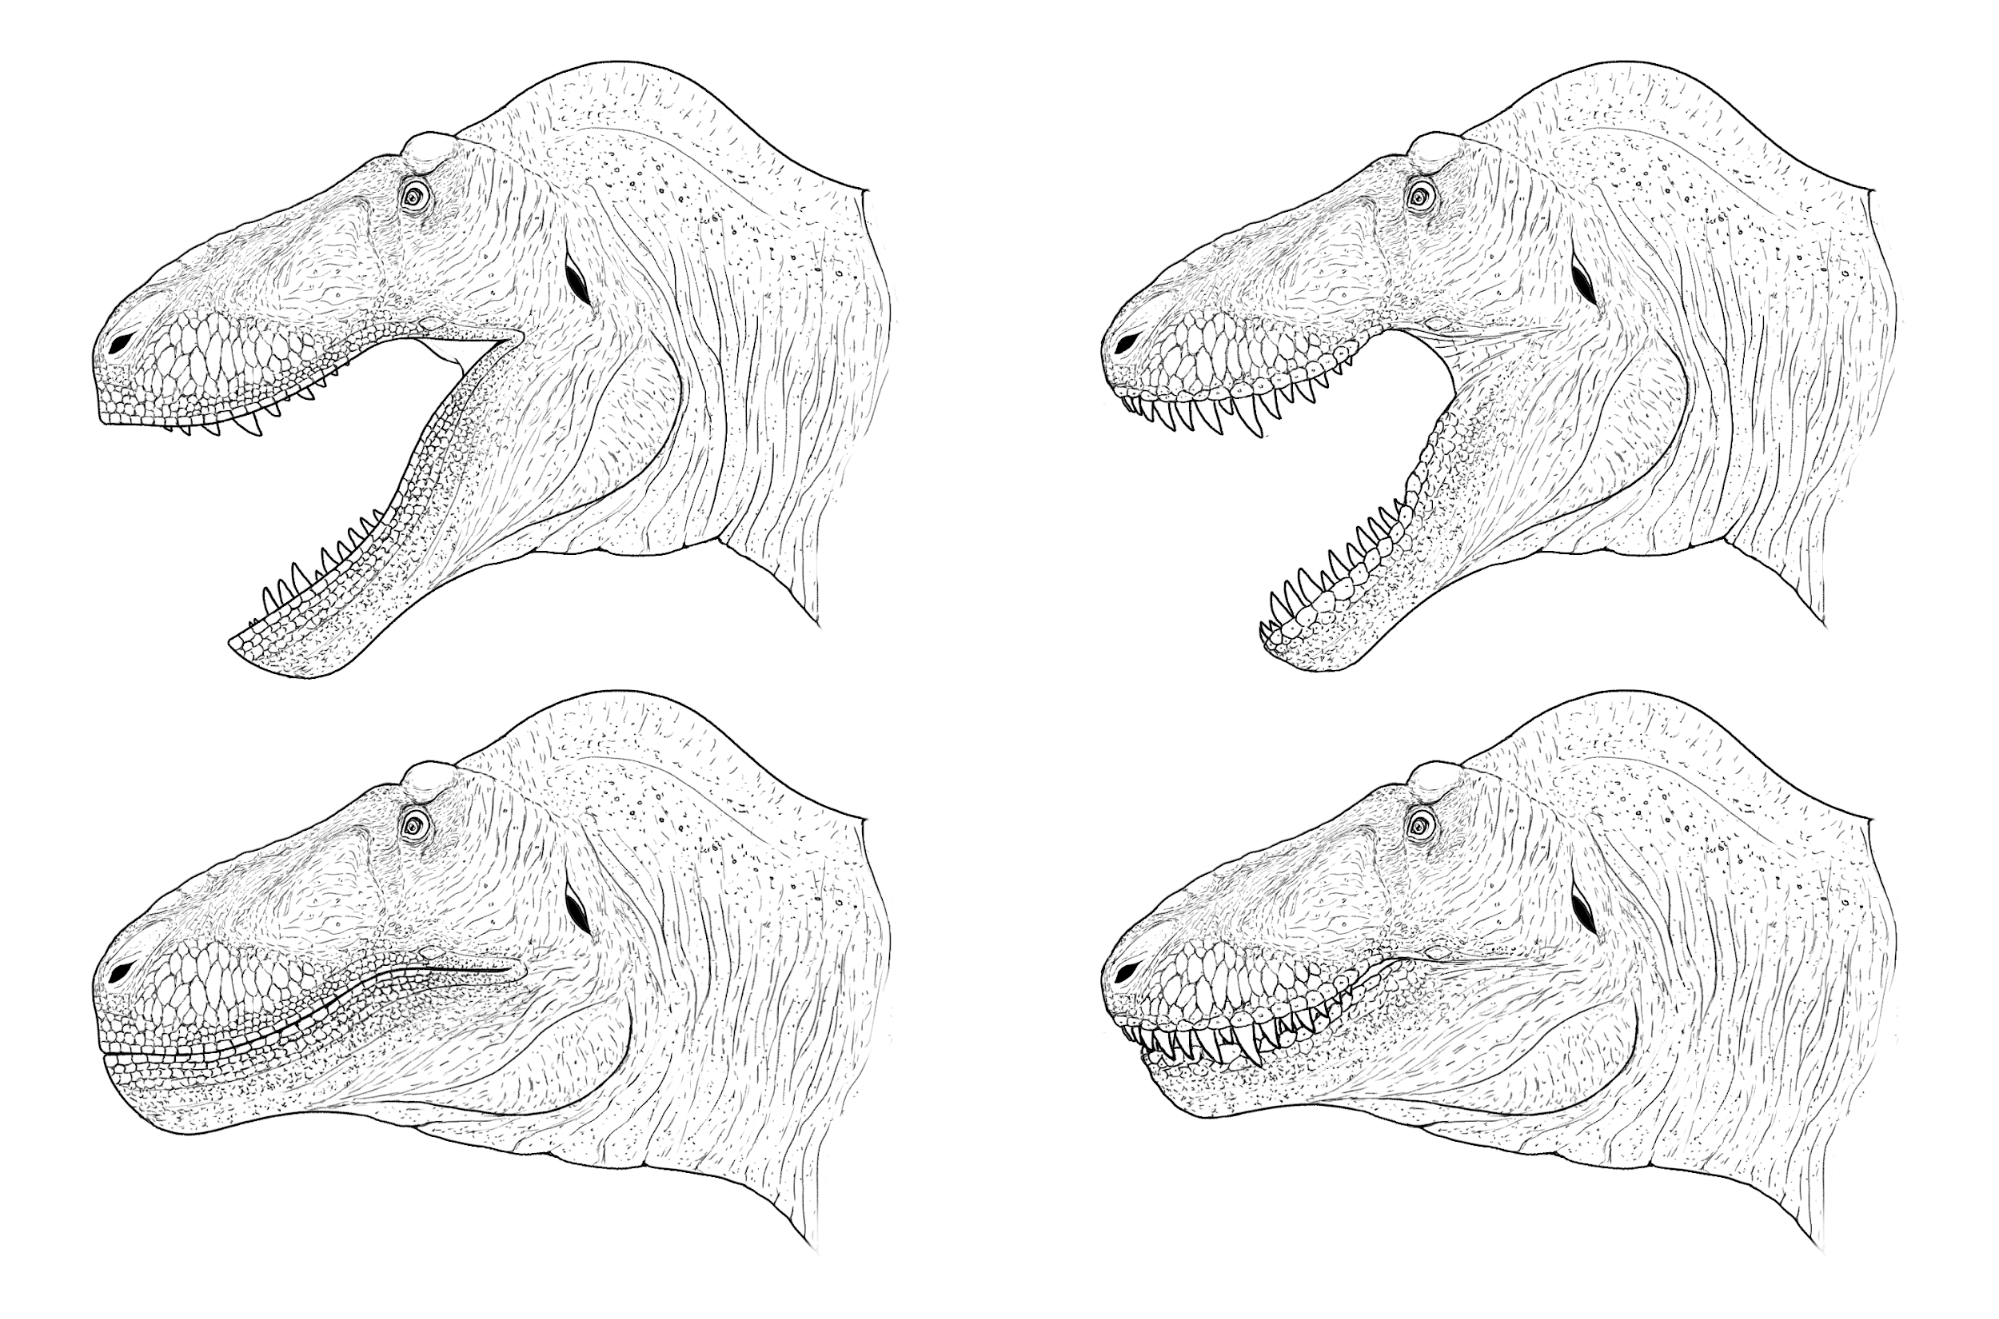
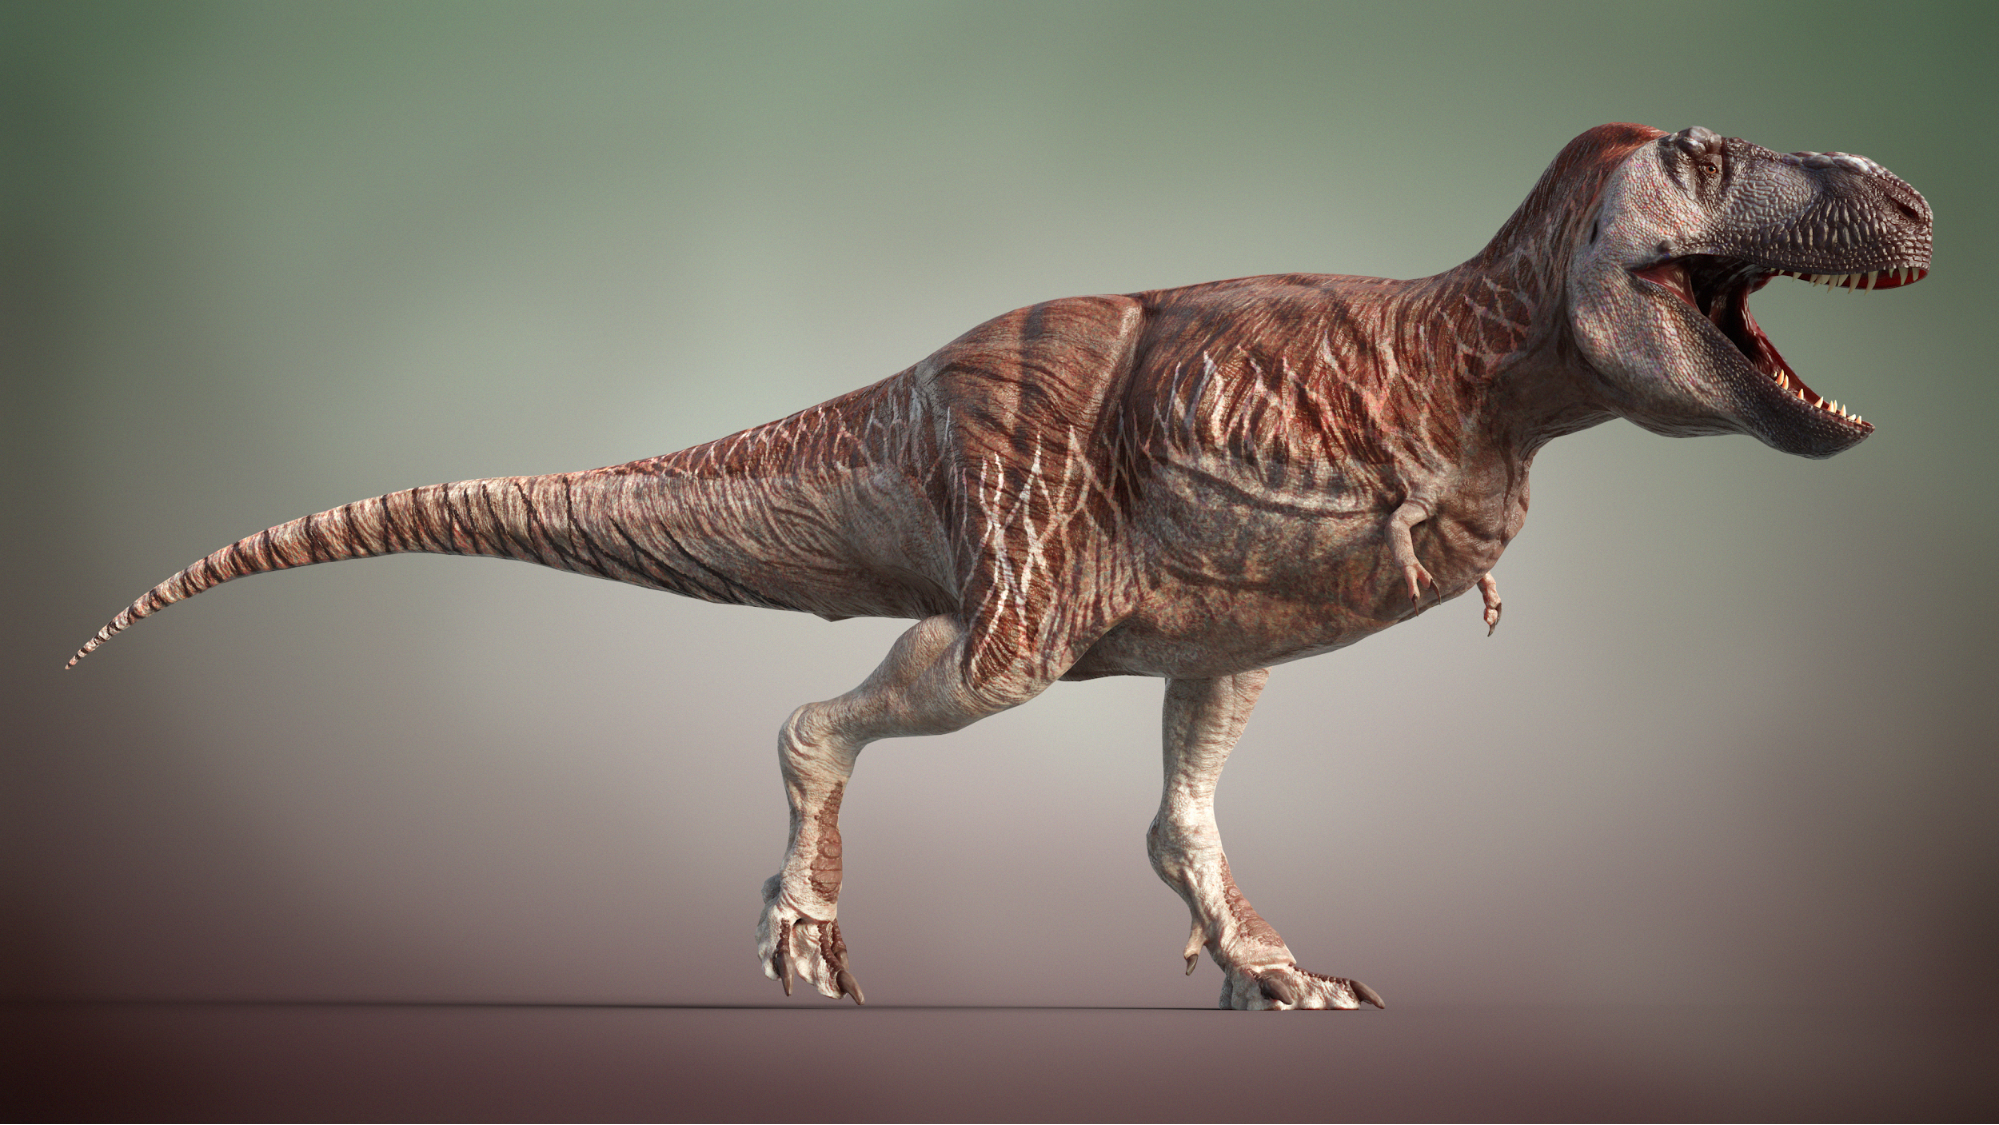
Another element that some viewers may also find odd is just how much of the teeth has been reconstructed as being obscured by “lippy” soft tissues. The illustration of “lips” (or lack thereof, leaving the tooth crowns exposed) in theropod dinosaurs is an extremely contentious topic that leaves researchers very divided. Ultimately, it all comes down to how we interpret the various textures and overall shapes of the bone at the oral margins—but this debate has far too many nuances to properly do justice to either side in this article. The main reconstruction presented here follows the interpretation of the vascular openings and smooth, sharp oral margins of the skull as indicating some kind of “lippy” covering. However, I don’t necessarily endorse this as the only valid model—reconstructions showing tyrannosaurids with scales closely clinging to the gums and leaving the tooth crowns fully exposed (which you can also see illustrated in the concept drawing below) are also backed by scientific precedence. I’m merely presenting one hypothesis.
Materials, Rigging, and Final Touches
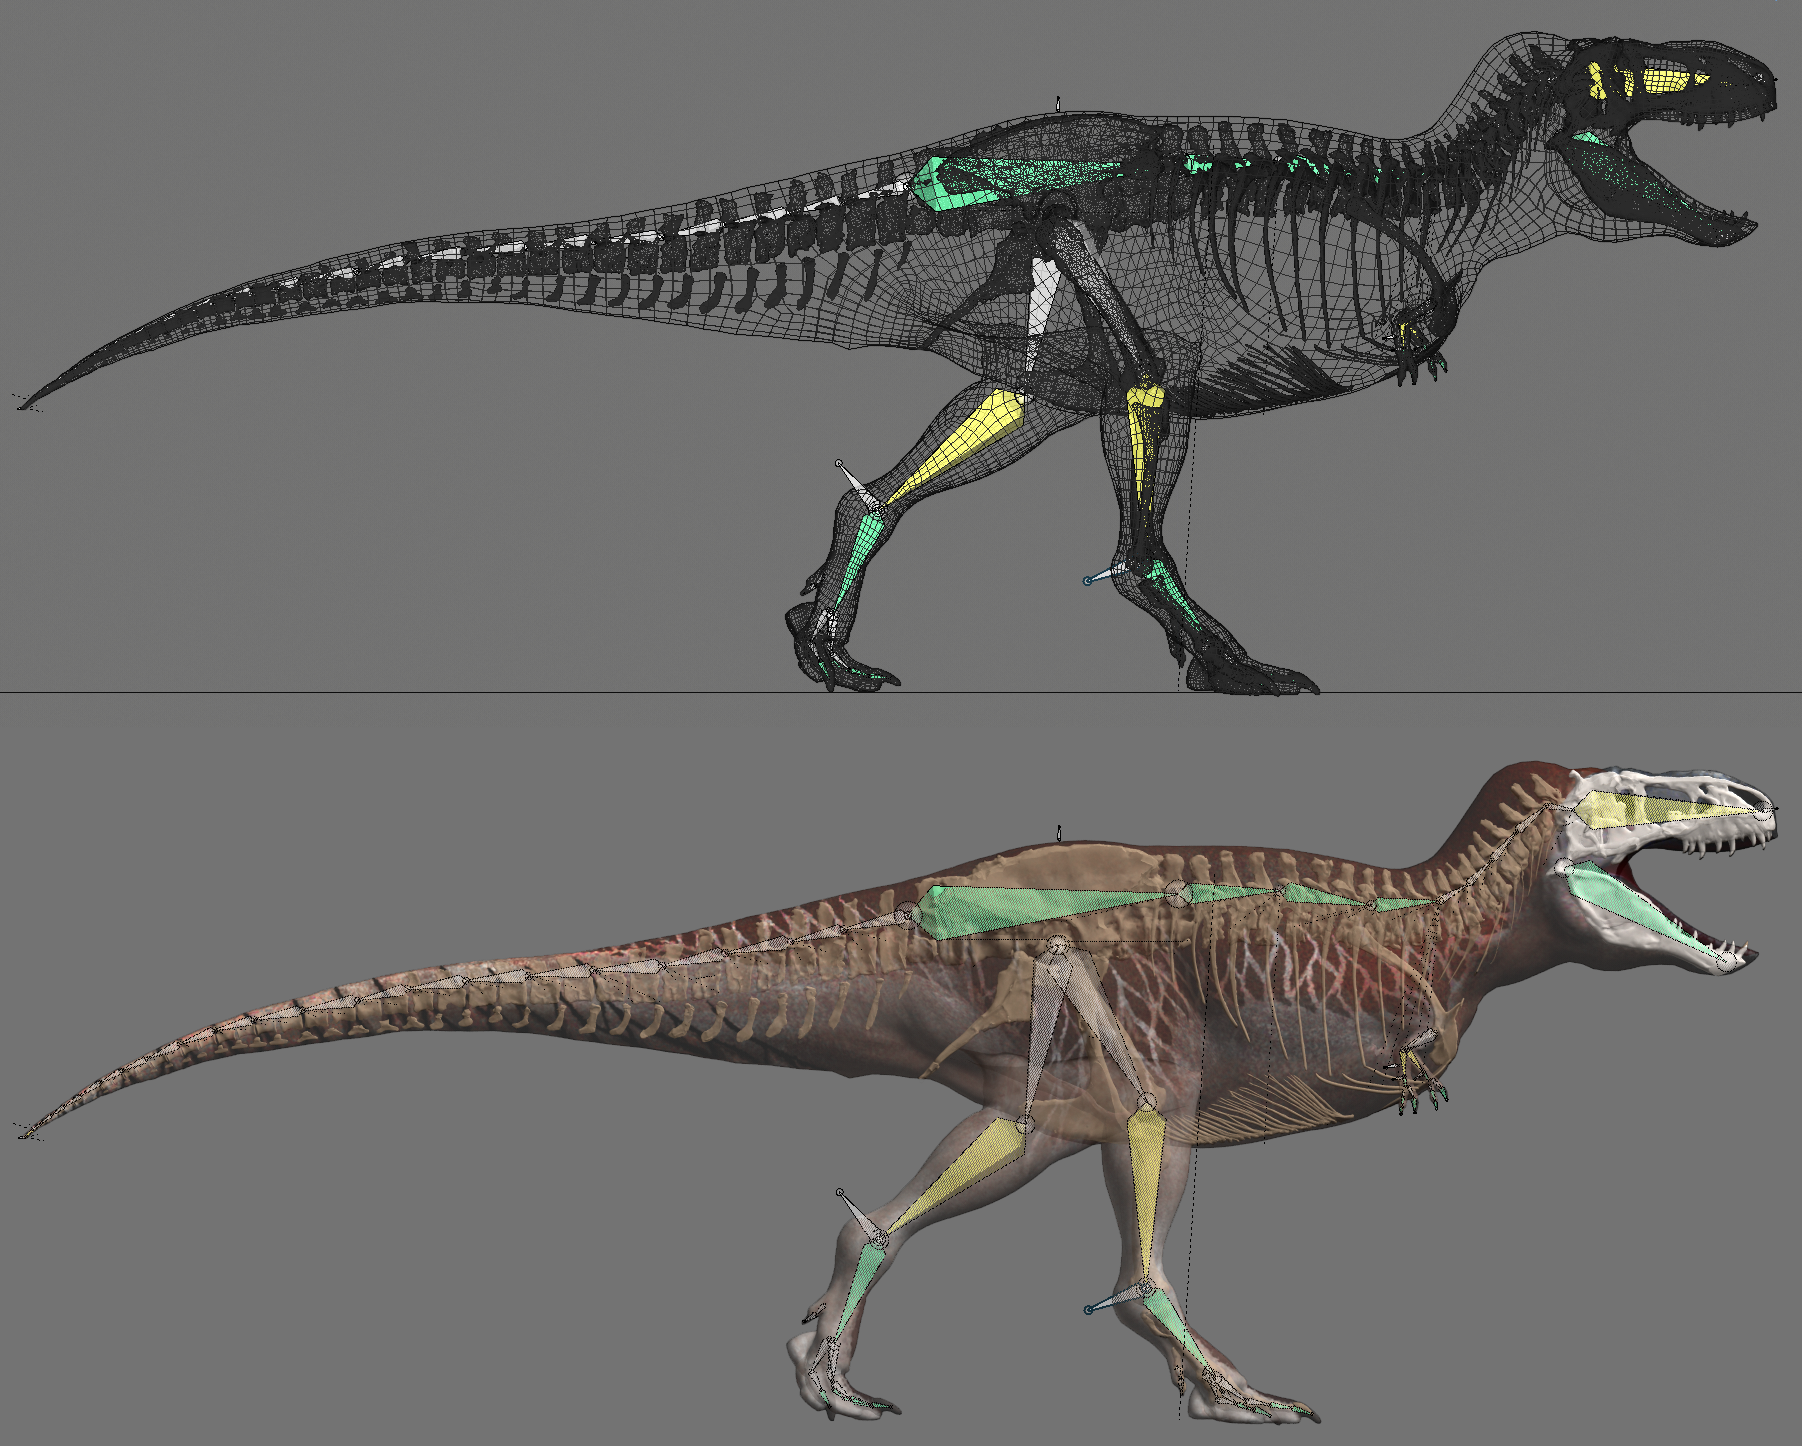
One of the most important stages of creating a model which can be efficiently posed and animated is retopology—creating a clean, low-poly representation of your model. Perhaps regrettably, I did the retopology entirely by hand, but there are extremely convenient add-ons such as RetopoFlow and DynRemesh/AutoFlow available on the Blender Market which make this way easier. Once I had an animation-friendly topology, I UV unwrapped the model. While Blender does have a built-in smart unwrap feature, I generally find that it is much cleaner to mark your UV seams by hand. This leads to larger user-defined UV islands, and makes external editing of texture maps much easier. After the low-poly model had been unwrapped, I baked the high-poly sculpted detail to a normal map. This allows detail retention but at a much lower processing cost, and having a lower poly count without having to sacrifice surface detail also makes weight painting during rigging much easier.
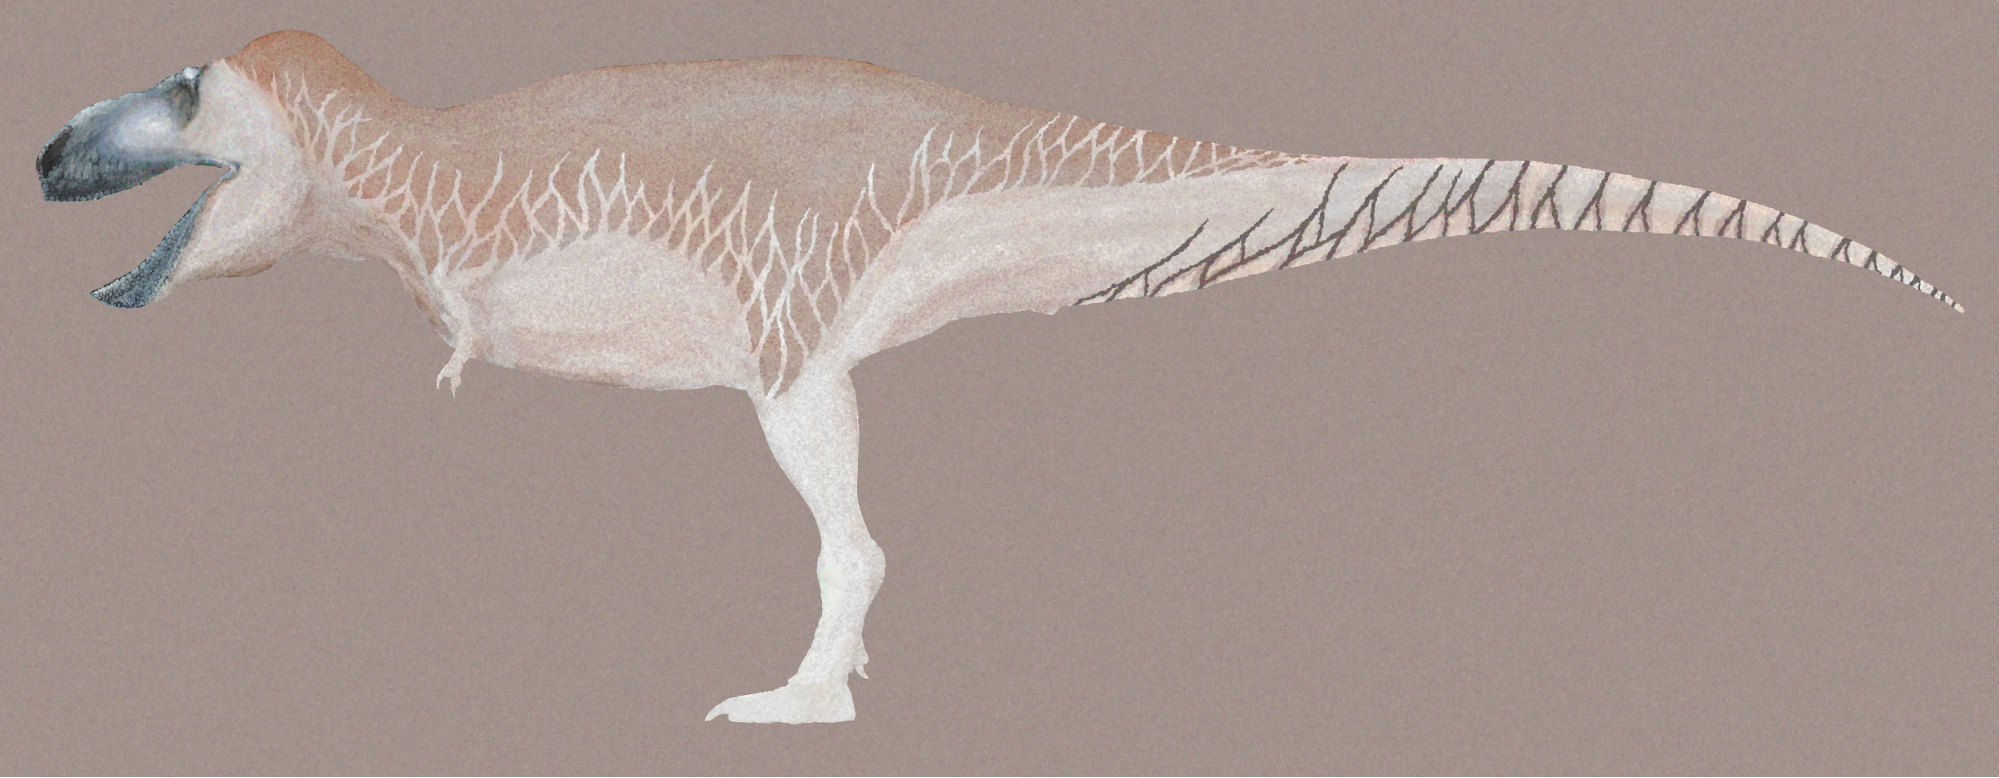
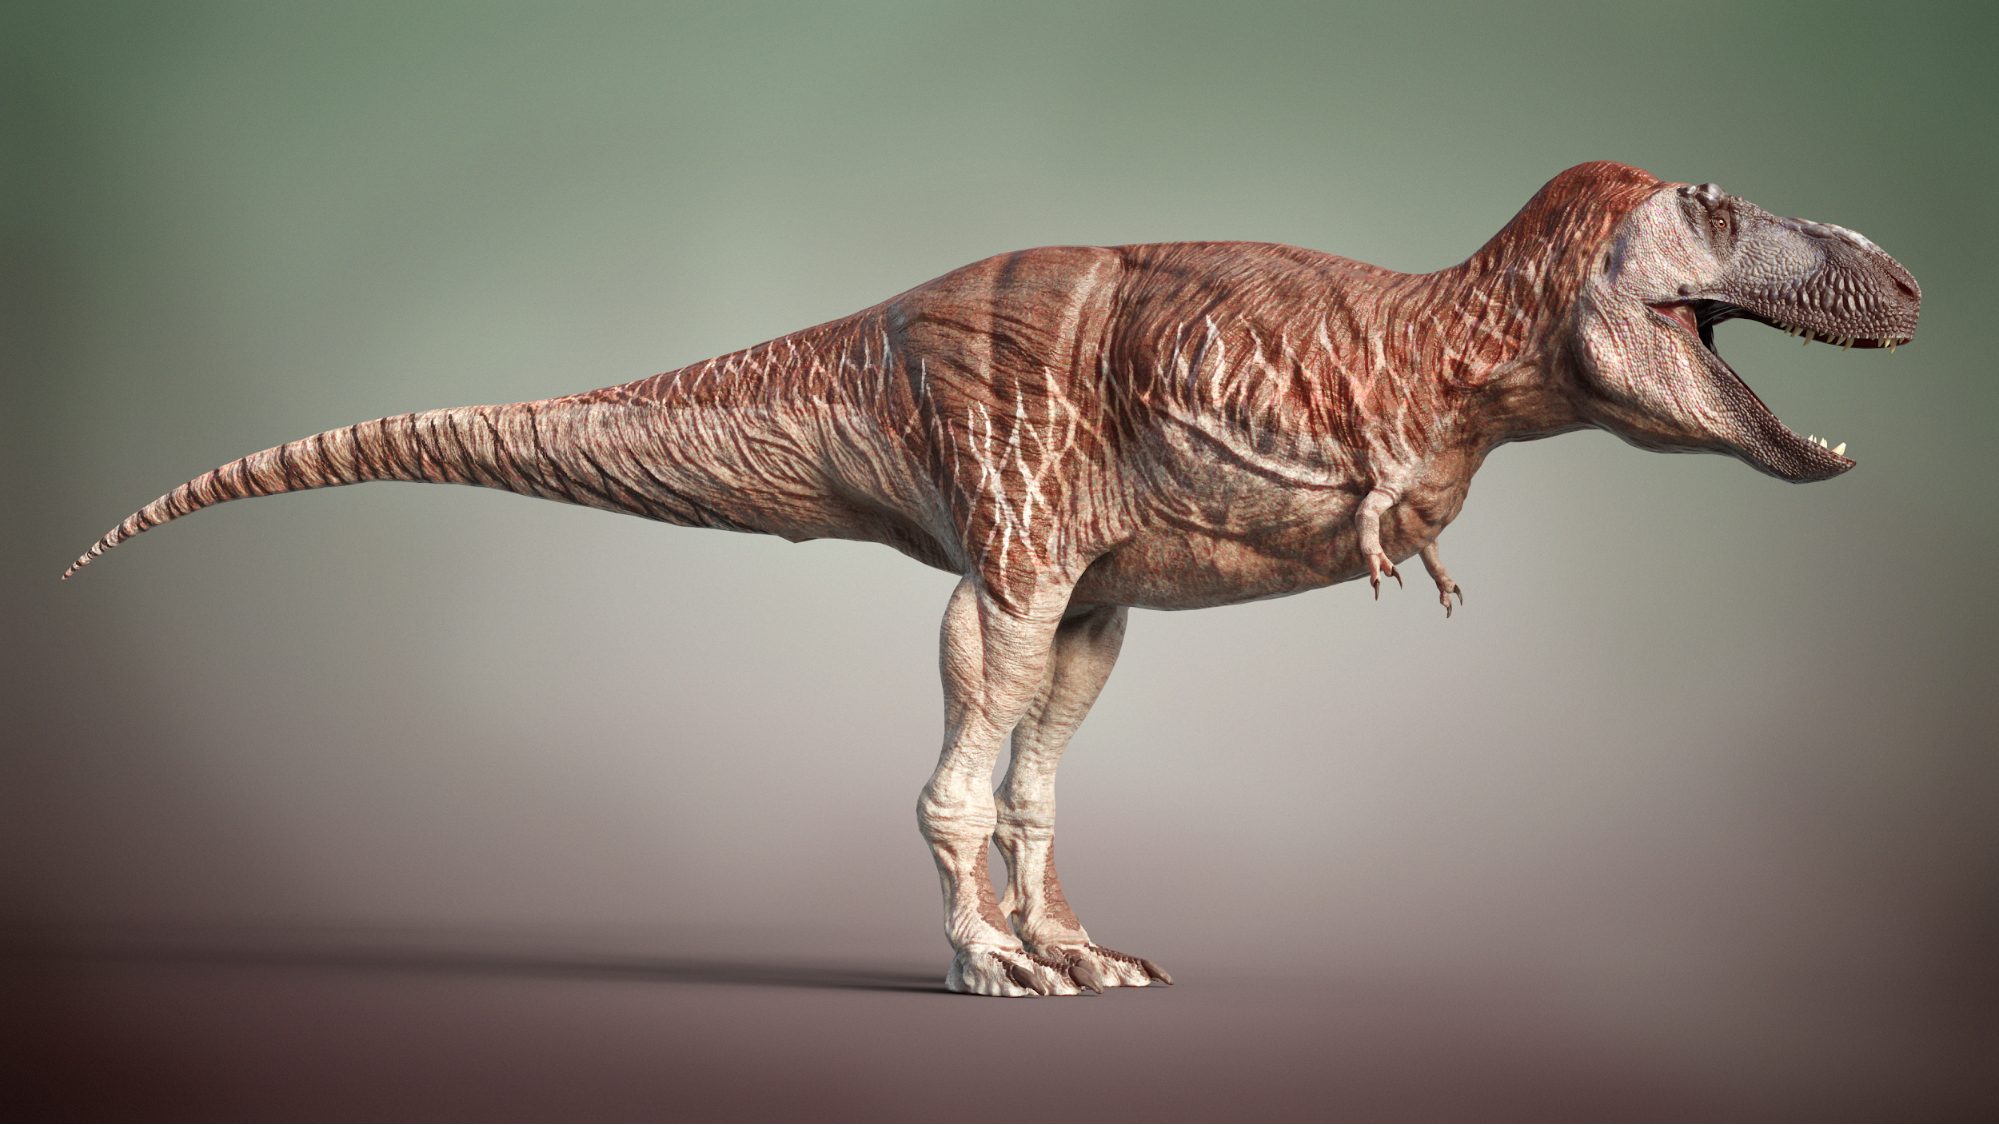
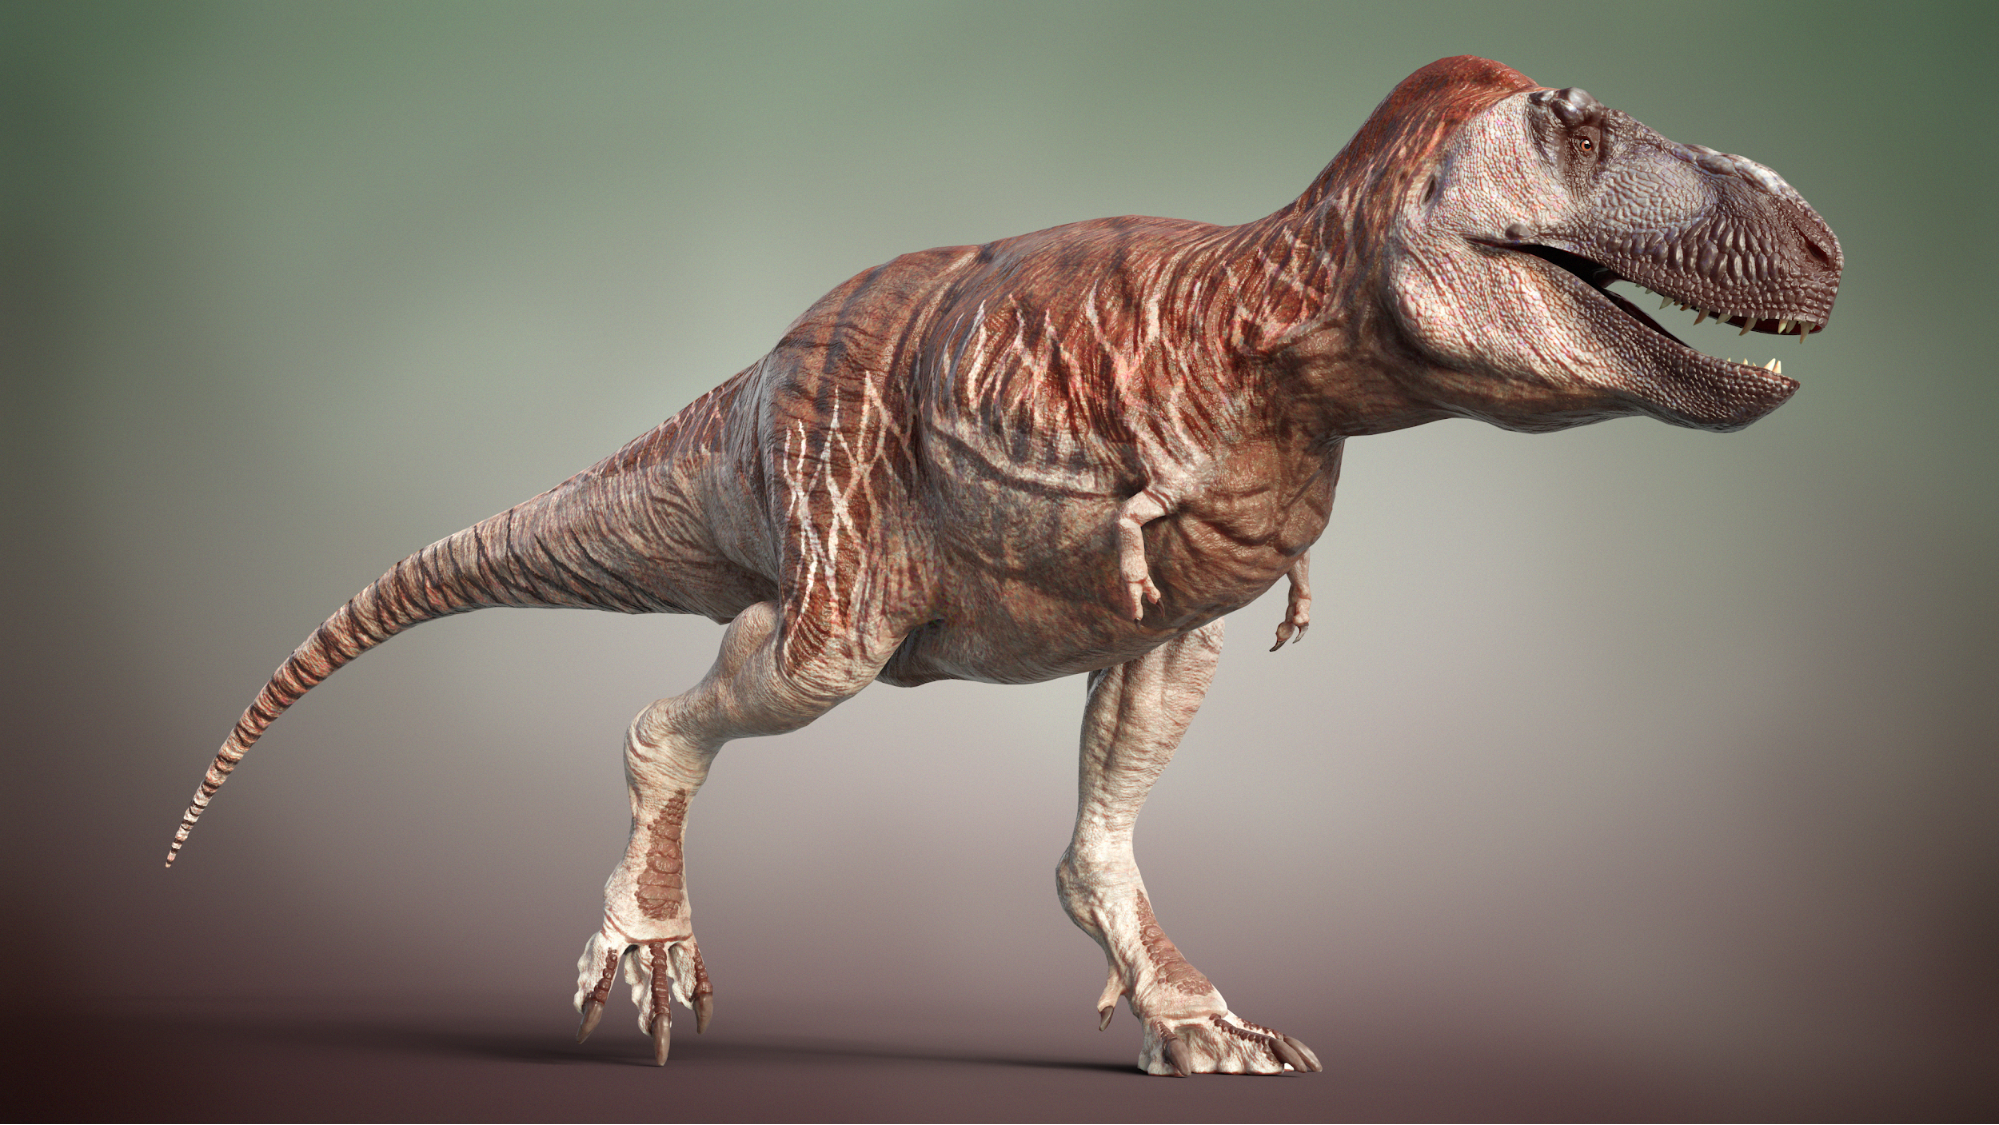
Before rigging the model, I designed a colour scheme. This is the most subjective part of palaeontological illustration. While there are a few exceptional fossils that allow us to infer colour from preserved skin chemistry, no such data exists for T. rex—the skin impressions we have are merely impressions in lithified mud. The design I ultimately chose was broadly inspired by modern birds and reptiles, but with no single specific influence. To create the colours, I took a render of the model in profile view and painted over it in Photoshop. This image was then used as a stencil in Blender’s texture painting module, where it was projected onto the unwrapped model. Additional colour details like the inside of the mouth and surface of the claws were painted directly onto the model in Blender. However, adding the colours didn’t finalise the look of the skin. Roughness and specular settings were adjusted in a way that allowed the large scales to be reflective without making the model look unnaturally glossy. To really add that final touch of realism, a subsurface scattering effect was added, in which light partially penetrated the model’s surface and spread throughout it. You can demonstrate this in real life by holding your hand close to a flashlight and noticing the red glow. Ultimately, this turns the model’s surface from looking like a stone statue to looking more like realistic skin.
One of the last things to do when building a character or creature is to rig it for posing and animation with an armature. Blender’s built-in armature tools are fantastic, allowing very easy armature construction and smooth symmetrical weight painting. Joint centres and rotational axes were determined by using the skeleton model as reference. The scanned bone models were parented to the armature to determine how far joints could move without bone-to-bone occlusion. Finally, basic IK controls were added to the limbs, tail and neck to facilitate quick natural posing, with additional constraints added to the torso to prevent unnatural bending.
The final stage before presenting a model is to light it. Generally, I find that HDRI setups lead to the most naturalistic and convincing looking renders, especially for things like animals and characters. HDRI Haven collects expansive galleries of HDR images representing many variations on outdoor and studio setups. I experimented with a few images found there before settling on lighting the final model in an open field environment with a clear afternoon sun. Generally a lot of node tinkering is required when changing between images, but given that the images are free and high quality, it’s worth it.
Final Renders

In the future, I’d like to expand on this model by adding simulated muscles to the limbs and cloth physics to the looser skin flaps, allowing for more realistic skin deformation during motion. But for now, I’m pretty satisfied. I hope that this has been an interesting read, and that it has helped illuminate how we create images of dinosaurs when we have little more than bones to go on.
About the Author
 Matt Dempsey, Biologist, geologist, artist, cinephile, video game fan, and comic book nerd. I’m a dinosaur palaeontologist studying for a PhD in musculoskeletal biology as part of the University of Liverpool’s Evolutionary Morphology and Biomechanics lab. I use various artistic tools to supplement my research and create anatomical reconstructions, as well as to create my own palaeontological artwork.


Wow!
Nice Project! Good Work!
Matt, this is FANTASTIC! Was just at the Houston Museum of Natural History and for the first time, noticed the muscle anchor points in the skull of one of their T. rex exhibits. I then checked their Triceratops and noticed the same anchor points, but in quite different locations — presumably defining completely different muscular needs.
Amazing work and and a very well-written article. Look forward to seeing more from you!
Incredibly fine work on both the model and the write up of your process. The amount of research that you did, the detail and the thought, all are inspiring. Thank you for sharing it with us!
Well done!!!
Get a producer, and turn this entire project into a DISCOVER-CHANNEL documentary.